In last week’s post I introduced the idea of turning a mundane wall hook into a piece of wall art. Wall hooks, coat hooks, robe hooks, back-of-door hooks—when you start noticing them—hooks show up in a surprising number of scenarios. This gives us a surprising number of opportunities to turn something functional into something beautiful and interesting.
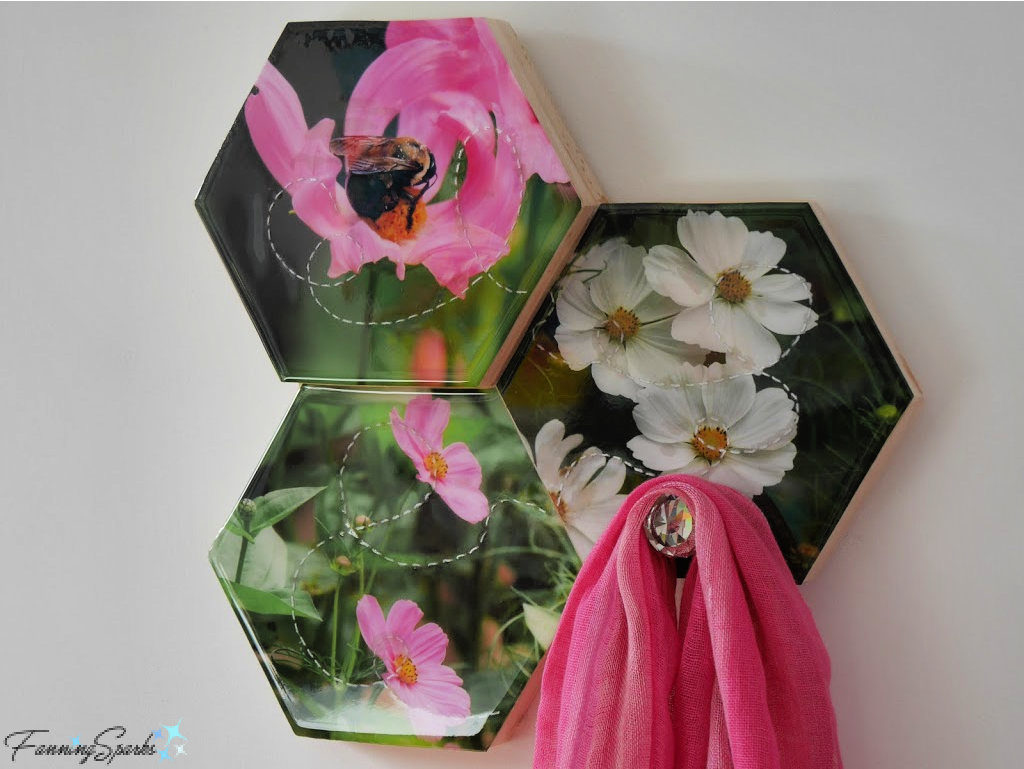
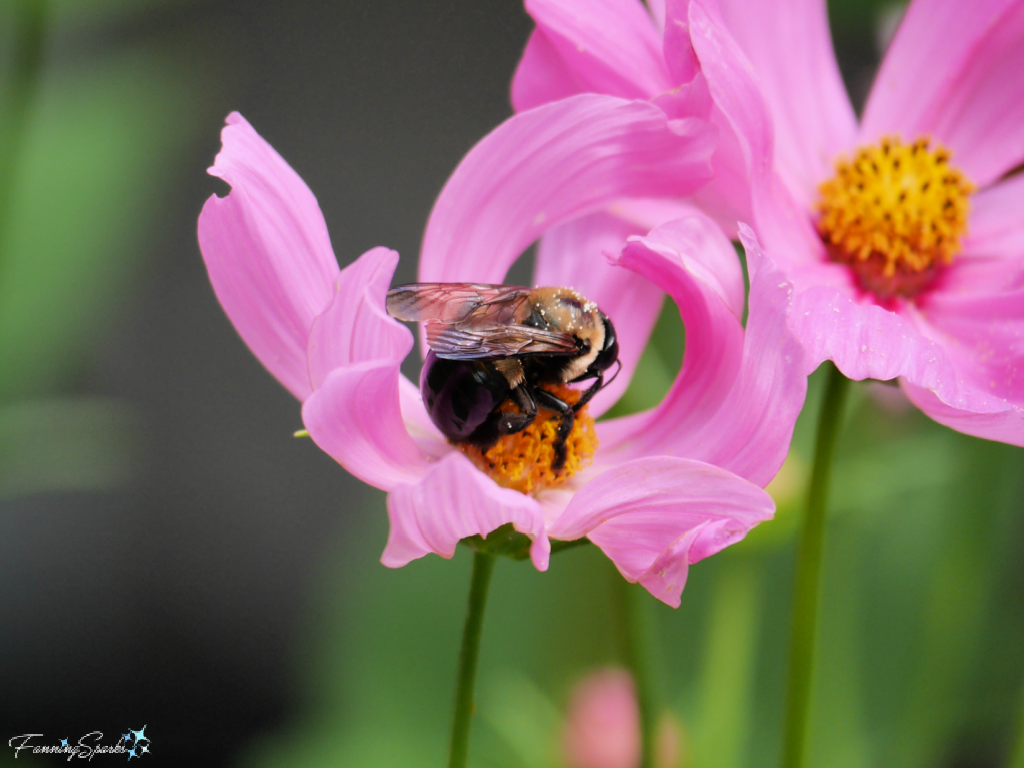
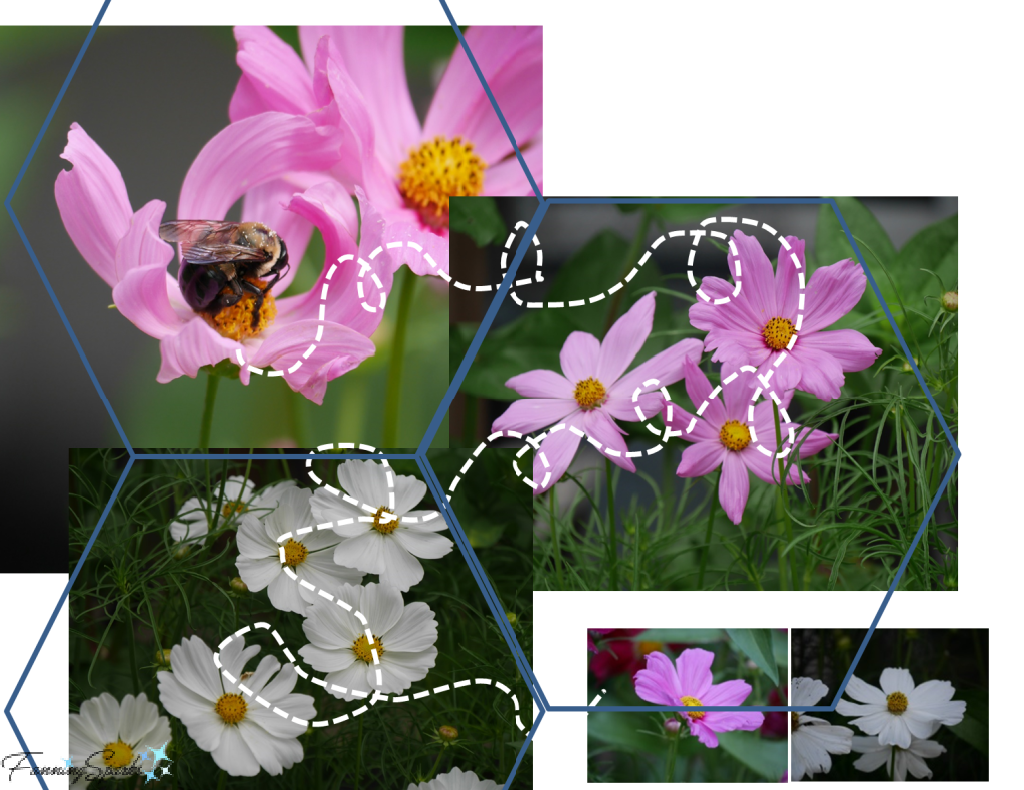
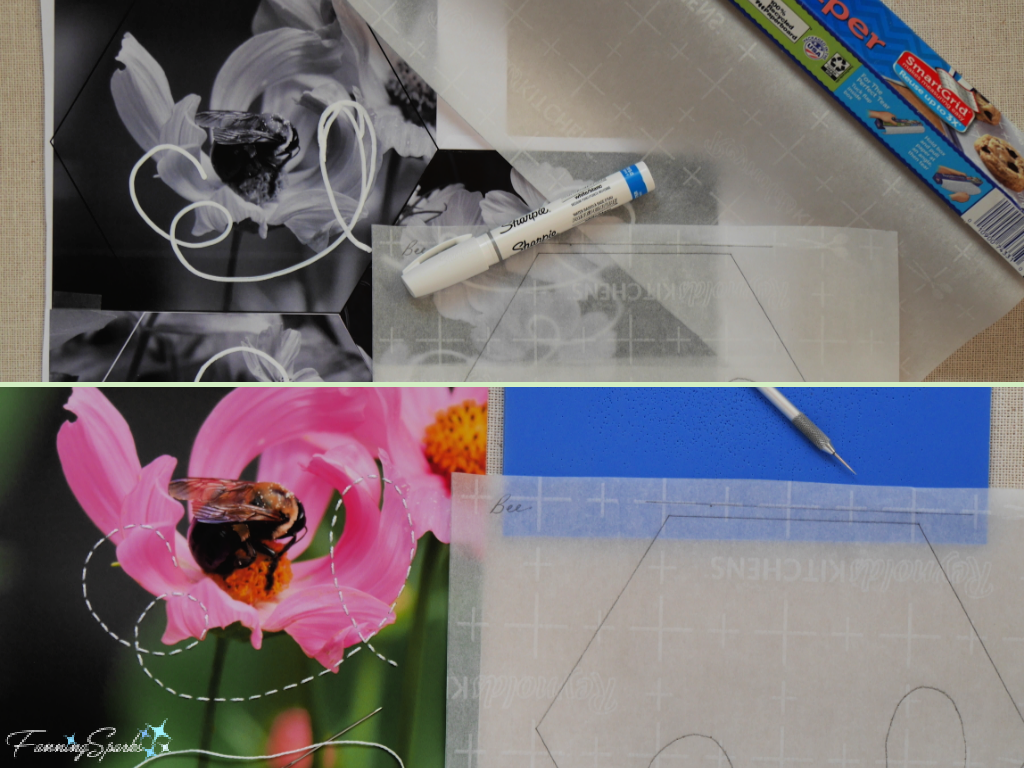
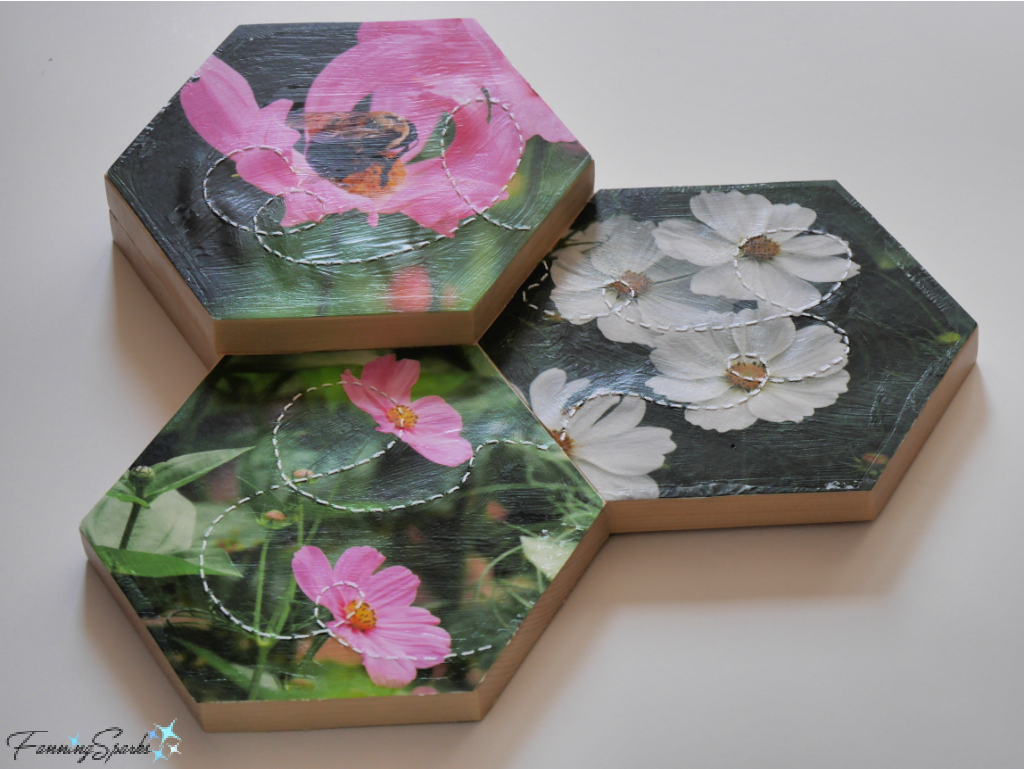
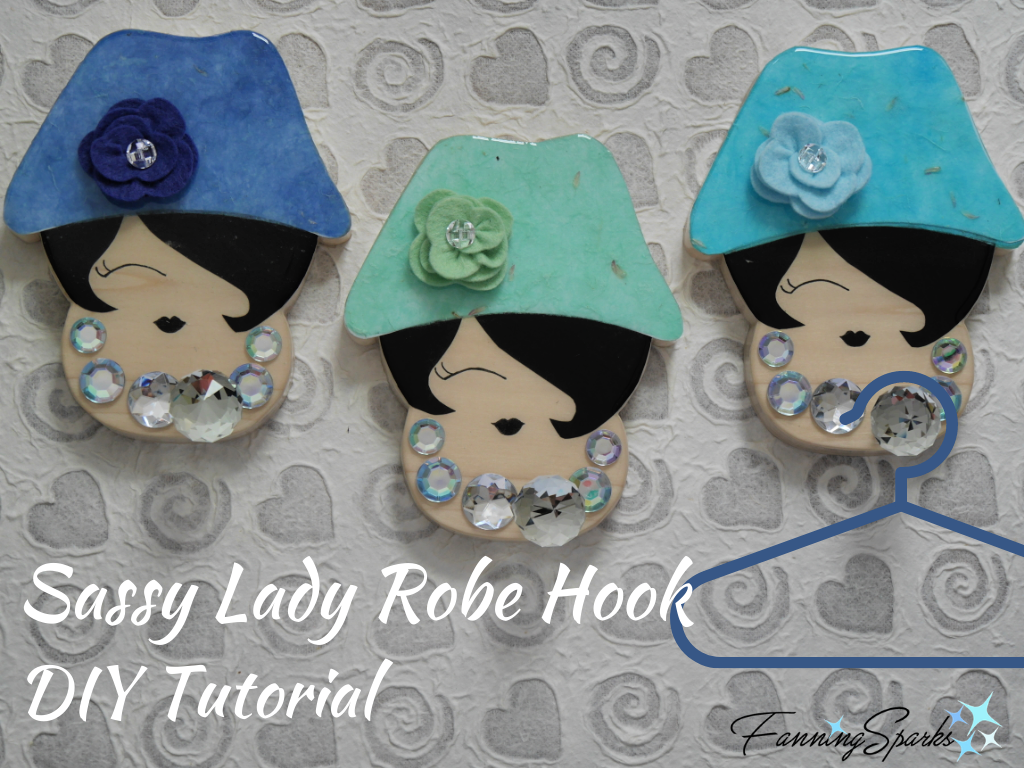
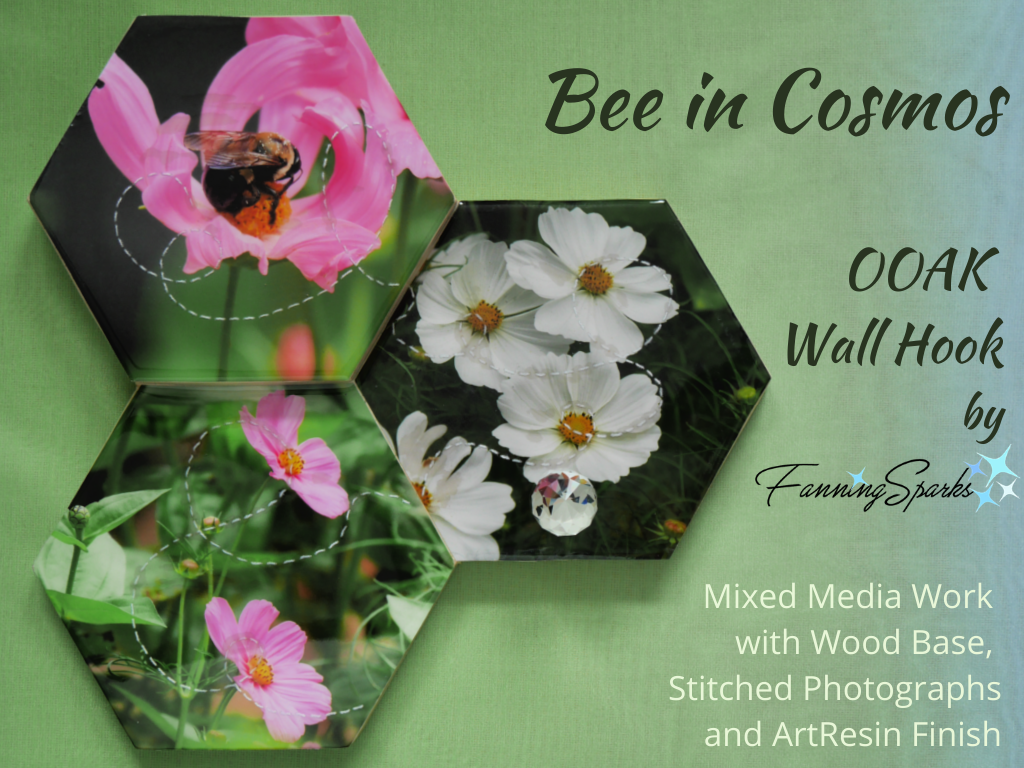
The Bee in Cosmos OOAK Wall Hook I shared in my last post now holds a hand towel in our Half Bathroom. This week, I’d like to share my Sassy Lady Robe Hooks.
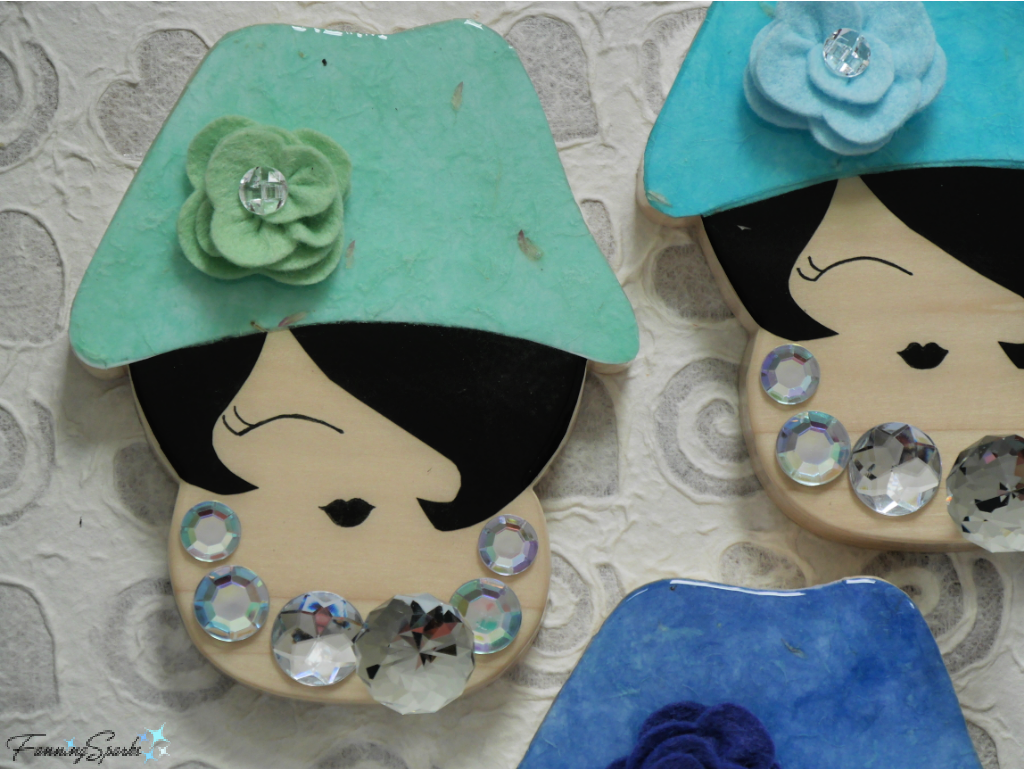 Three of these charismatic faces now inject a jolt of personality inside my clothes closet. They could, of course, be installed in any number of places and be used for a variety of purposes…in a bedroom to hold belts, bags, hats or jewelry…in a bathroom to hold robes or towels…or by the front door to hold bags, keys and face masks. Why not scan today’s DIY tutorial while you think about the perfect spot for your own Sassy Lady Robe Hook?
Sassy Lady Robe Hook DIY Tutorial
Today’s project is completely customizable. You could modify the hat type or the hair style. You could switch out the colors, finishes and embellishments. You could personalize it with a name or quote. This project is made of wood and paper finished with epoxy resin. It measures about 7½“ tall x 6” wide and is attached to a wall/door with 2 screws. Basic woodworking and paper crafting is involved.
Please Note: This tutorial, including the supplies listed and the instructions provided, account for only one Sassy Lady Robe Hook. I chose to make 3 concurrently so the photos will vary and may show multiples.
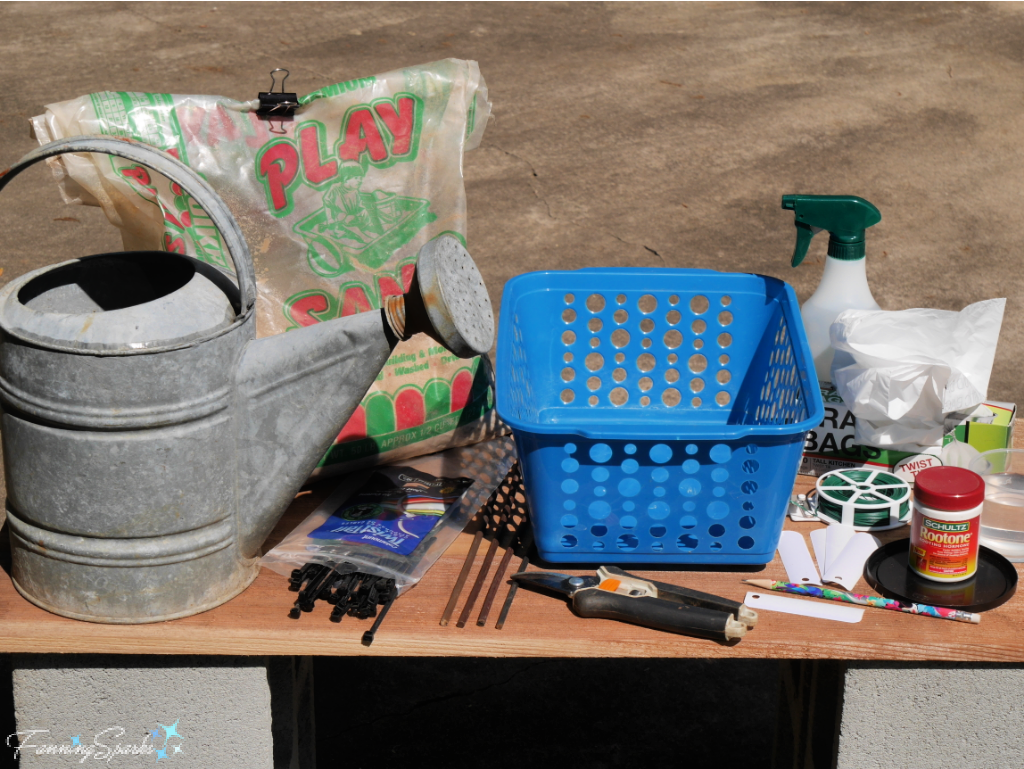
Supplies Needed
The following supplies are needed to make ONE Sassy Lady Robe Hook:
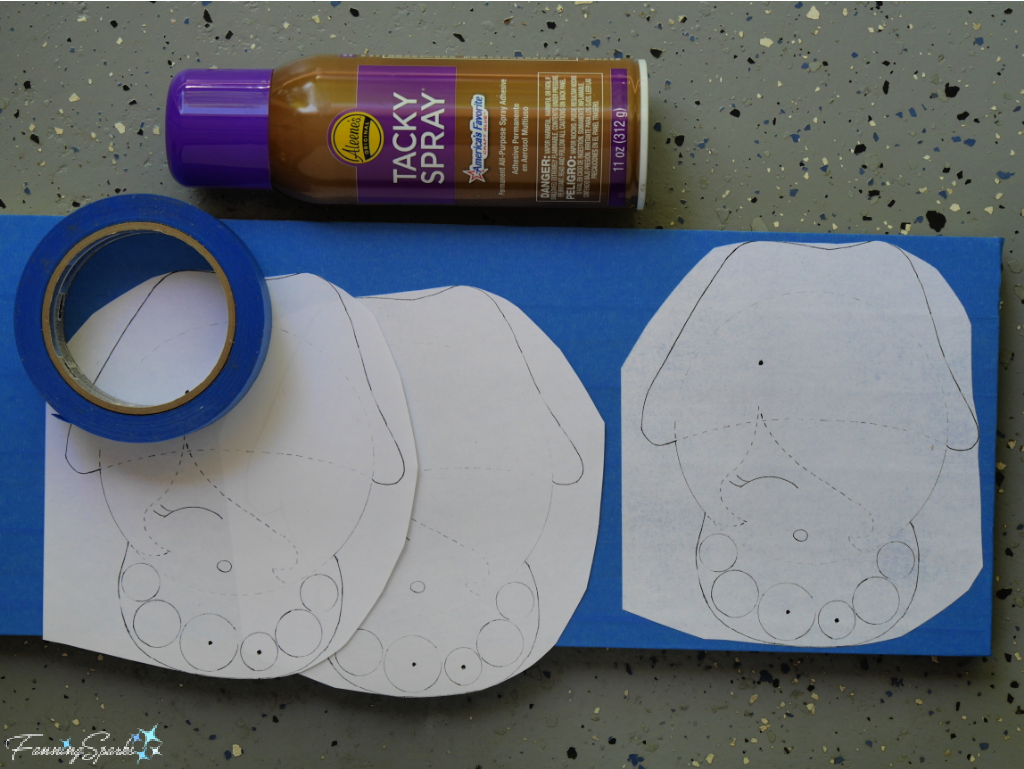
. Template: Download Sassy Lady Robe Hook – Complimentary Download to print the template.
. Paper: A few sheets of white paper for printing template.
. Wood Board: Piece of ¾“ pine or poplar slightly larger than 7½” x 6”.
. Painter’s Tape
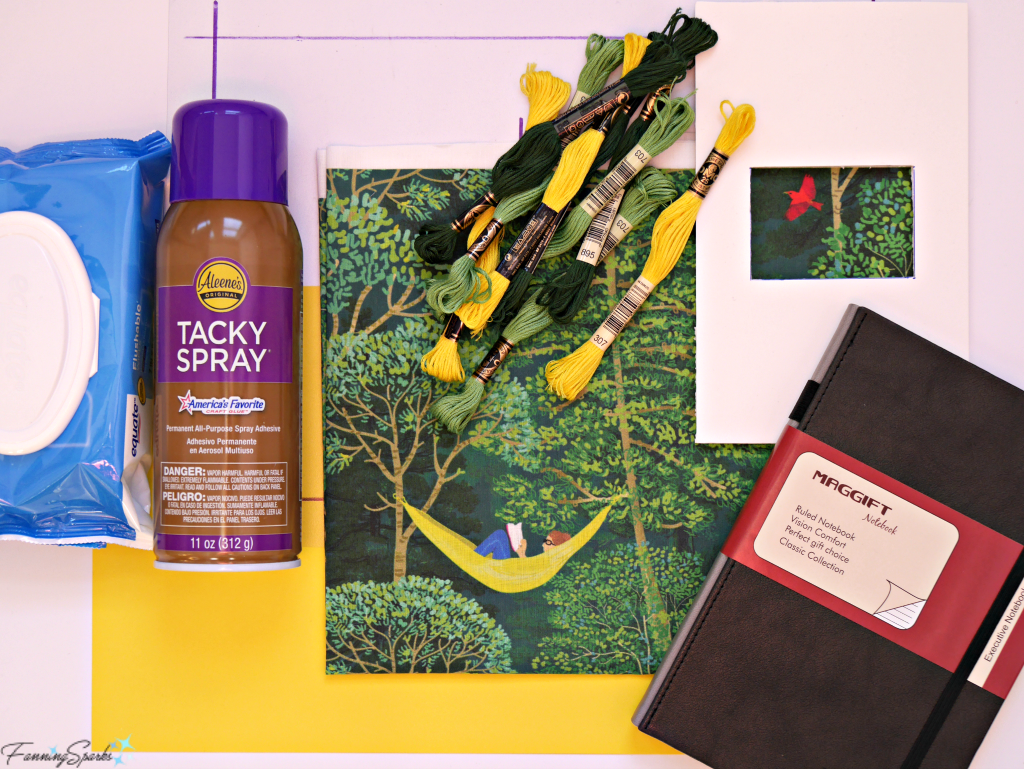
. Spray Adhesive: I used Aleene’s Tacky Spray.
. Sandpaper: Fine grit sandpaper.
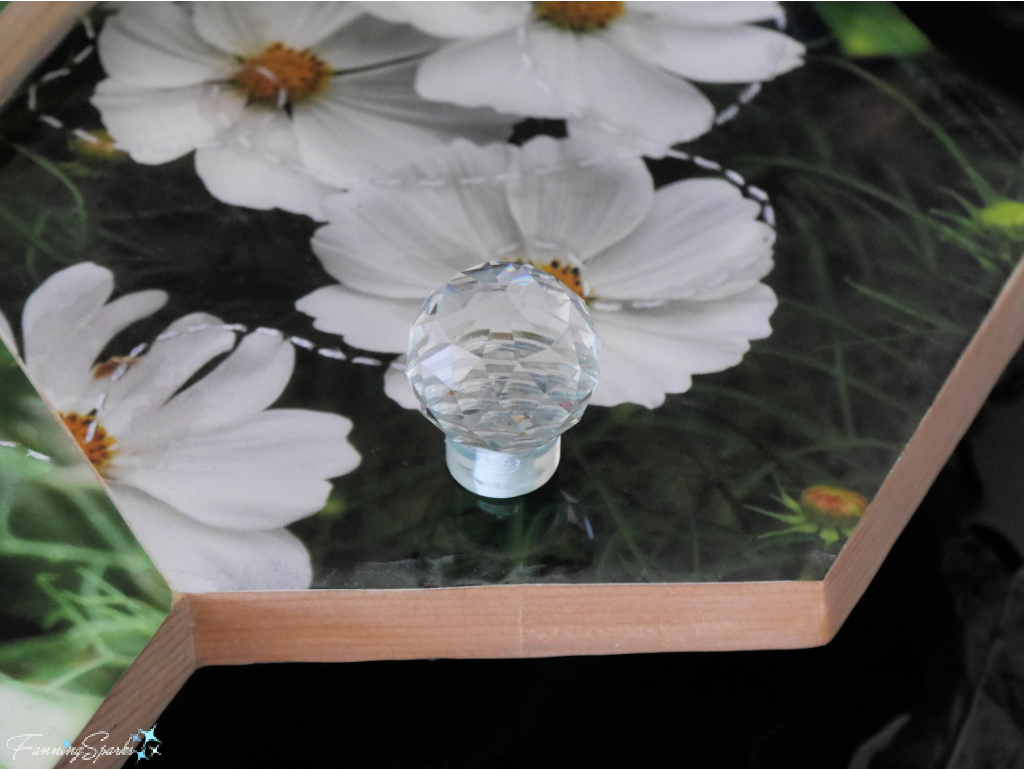
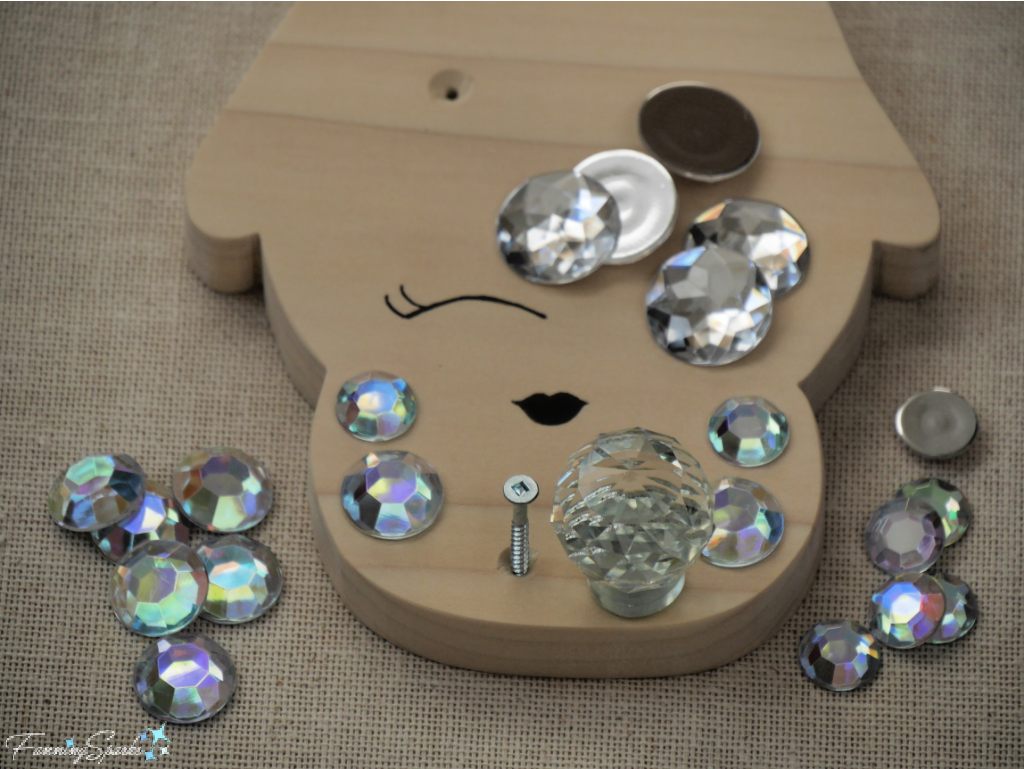
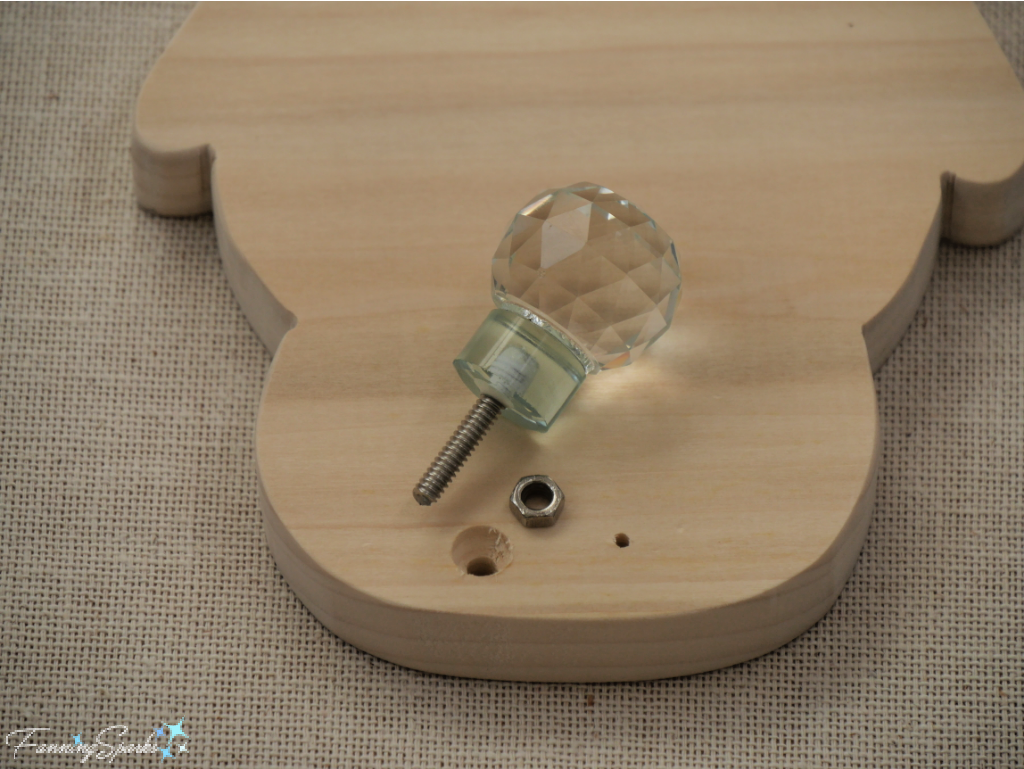
. Knob: A decorative knob or hook which can be made to look like part of the bead necklace and is suitable for the intended purpose. I chose a crystal sphere knob from Hobby Lobby. It is about 4” around and extends about 1½”.
. Paper: ONE piece of 3”x5” paper for the hair and ONE piece of 4”x6” paper for the hat. You may also need ONE piece of 4″x6″ white cardstock to line the hat. I used black cardstock for the hair and custom-dyed, handmade paper for the hat. See my previous post Experimenting with Fabric Dye to learn more about dyeing paper.
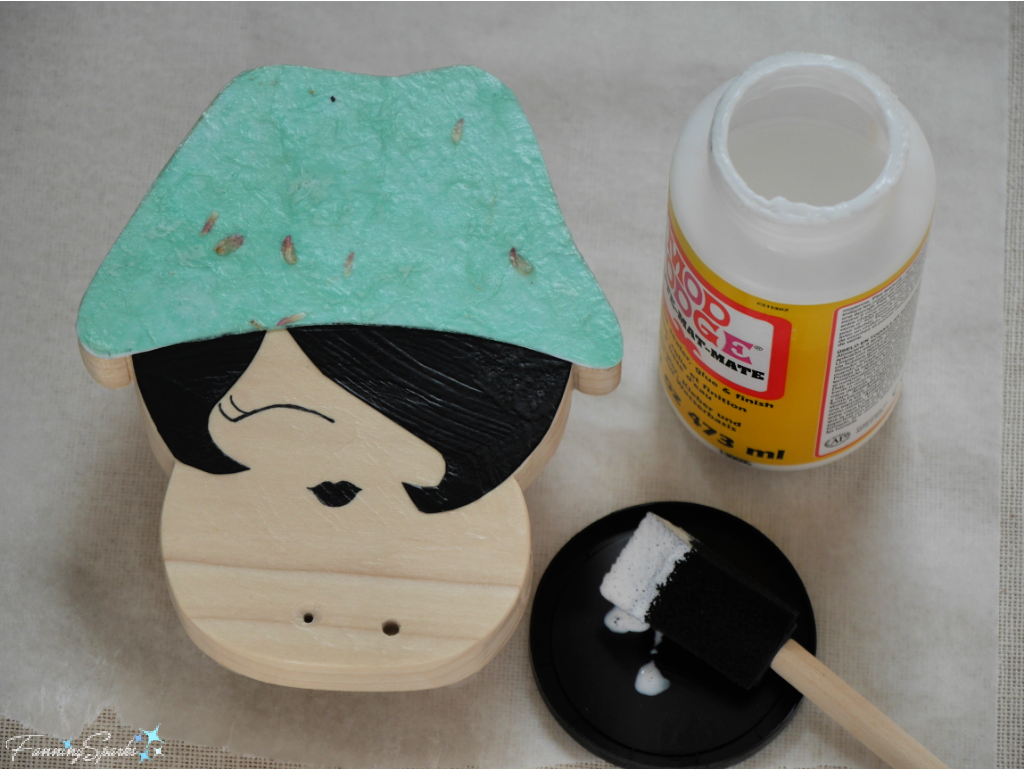
. Waterbase Sealer/Glue: I used Mod Podge Matte from PLAID.
. Wax Paper
. Acrylic Gemstones: TWO 16mm; TWO 20mm; and ONE 25mm. I found the Bead Design Co premium acrylic gemstones shown in the photo below in the jewelry-making section at Hobby Lobby.
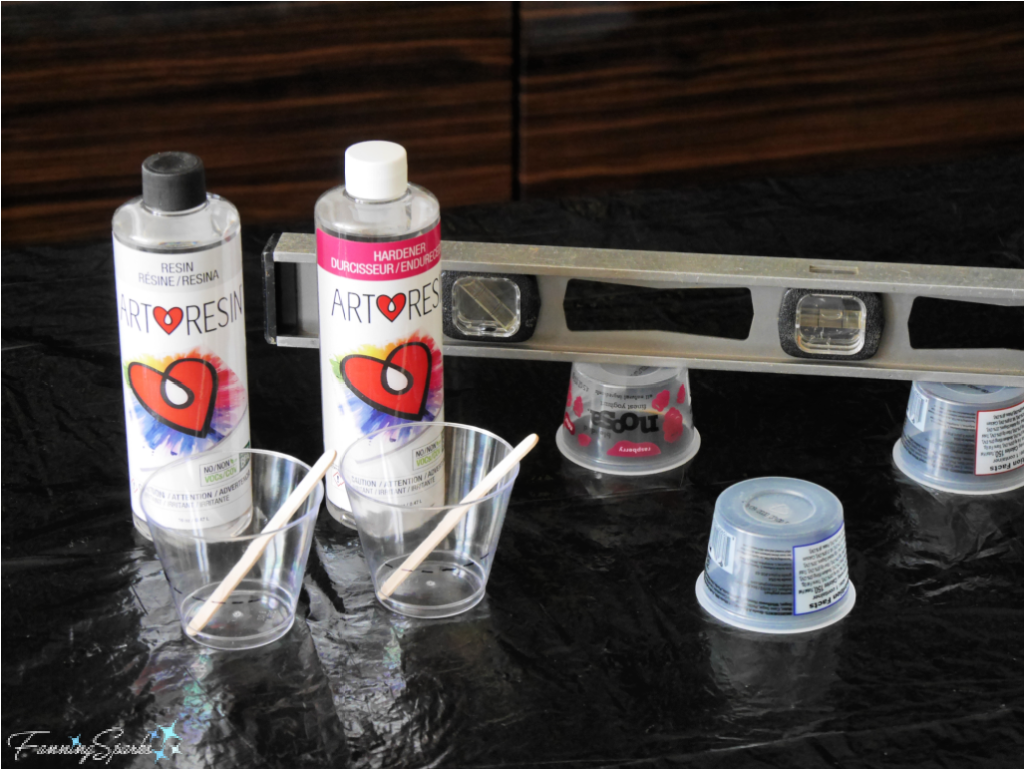
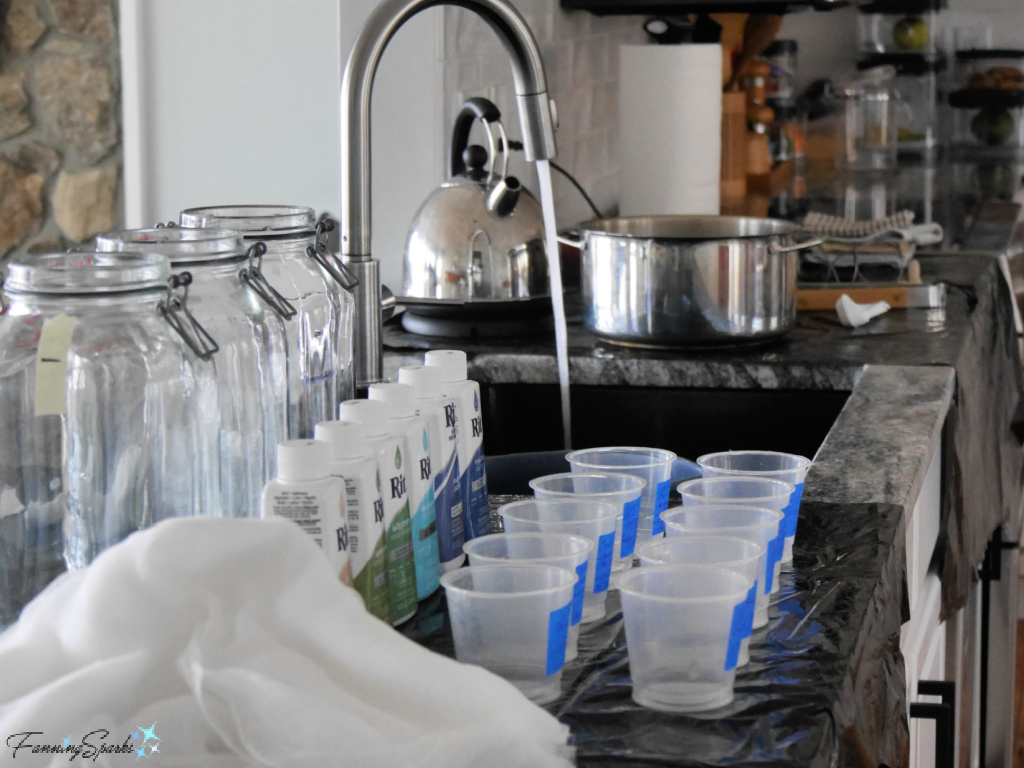
. ArtResin Epoxy Resin: 2 oz of ArtResin (ie 1 oz of resin and 1 oz of hardener).
. Nails: THREE 2-3″ nails to plug holes.
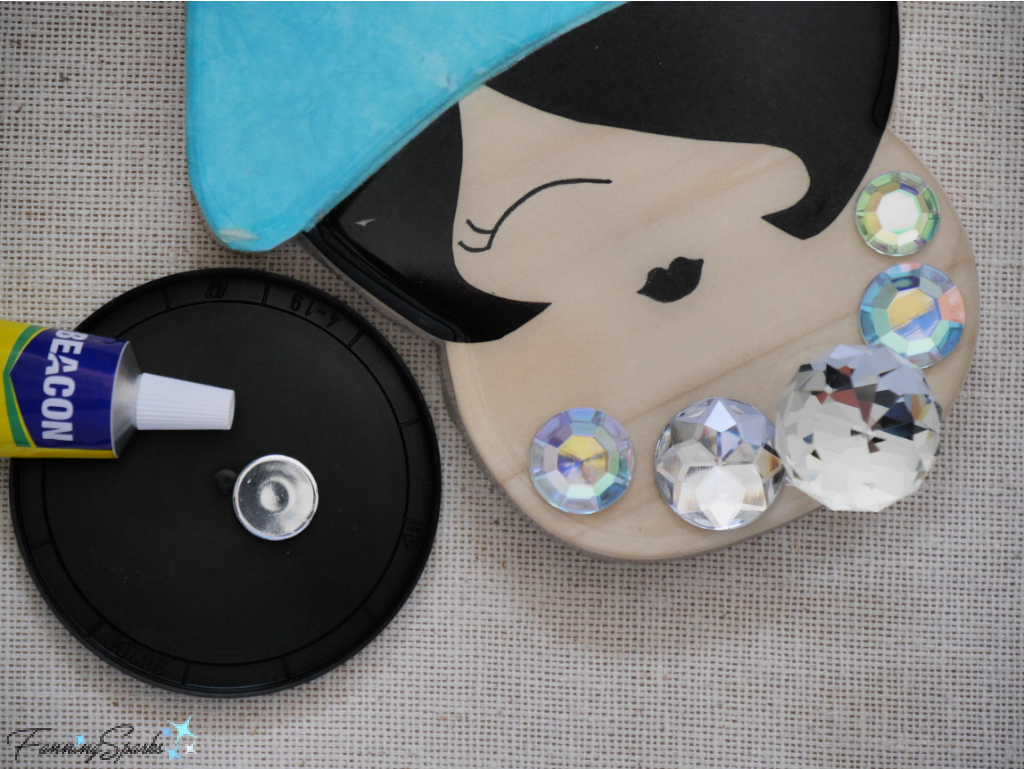
. Beacon Gem Tac Glue: Used to glue on the acrylic gemstones. This glue is specifically designed to attach crystals, rhinestones and glitter to various surfaces. It doesn’t interfere with the shiny backing of the gemstone and dries crystal clear. In contrast, when I tested E6000 Industrial Strength Adhesive on cured ArtResin little bubbles distorted the shiny backing of the gemstone.
. Felt and Button (Optional): 4” x 8” piece of felt and a shiny button to embellish the hat. See my previous post Teacup Pincushion – DIY Tutorial for the pattern and detailed instructions to make an Open Rose Form rolled spiral flower from felt.
. Screws and Anchors: TWO flathead screws and anchors suitable for attaching the piece to your wall or door. I used #6 1¼“ wood screws along with E-Z Ancor Hollow Door & Drywall Anchors.
Equipment and Tools Needed
. Printer: To print template.
. Scissors
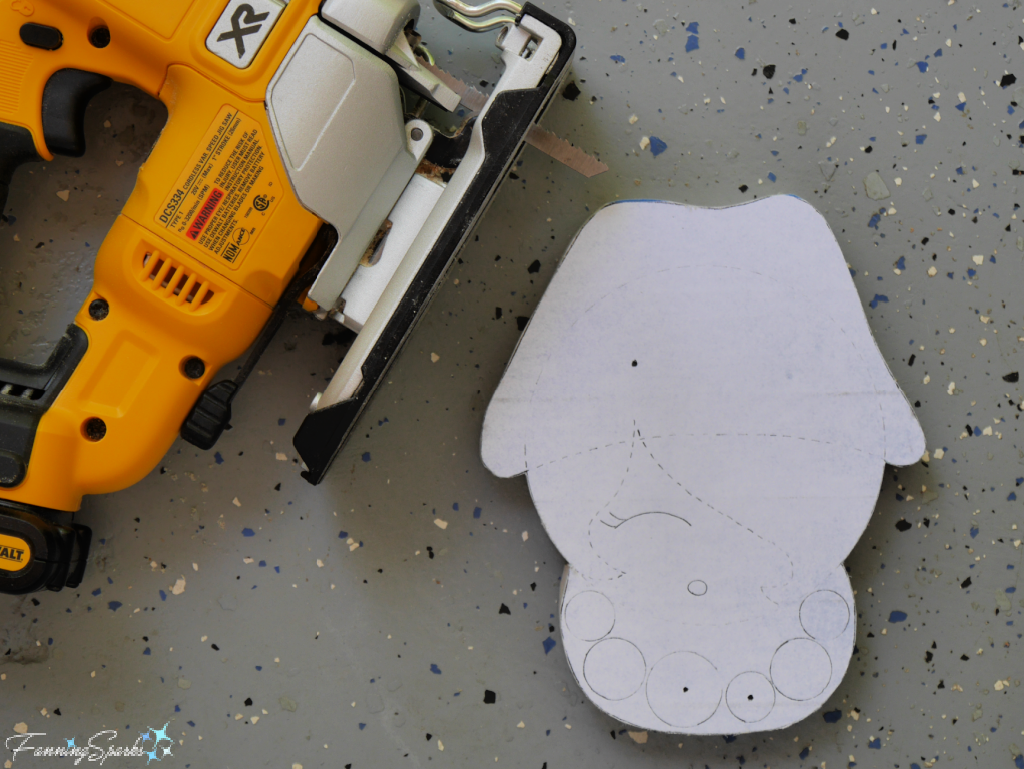
. Jigsaw
. Clamps
. Sharp-Pointed Tool or Nail: To indent the wood before drilling.
. Drill with TWO bits including 11/64” with countersink and 7/64”. You may need different sized bits to match the screws and decorative knob you selected. You may also need a 1/16″ bit and 5/64″ bit to drill the epoxy resin (as explained in Step 8).
. Pencil
. Bolt Cutters (or tool of your choice): To shorten the decorative knob screw.
. Tapered Round File: To sand the drilled holes. I used a diamond and titanium-coated steel file designed for jewelry-making.
. Ball Stylus Tool or Pencil: To trace design onto wood.
. Black Markers: It’s helpful to have both a fine and medium-tipped marker. I used Sakura Pigma Micron 03 and Brush markers.
. Brush: To apply the glue/sealer. I used a disposable foam brush.
. Short-Bladed Scissors: To trim tape along the wooden edges.
. Screwdriver(s)
The following equipment and tools will be needed in Step 8 Apply Finish Coat and are pulled from the instructions provided by ArtResin:
. Cover: To protect your piece from dust while it cures.
. Spreader:
. Plastic Drop Cloth: To protect your work table.
. Mixing Cups and Containers
. Artist’s Torch: To run a flame over your resin surface for a bubble-free, flawless finish. I used a BernzOmatic Butane Micro Torch purchased at Home Depot.
. Art Tape: To tape off the underside of your piece to collect drips. I used painter’s tape for this purpose.
. Disposable Gloves
. Stir Stick
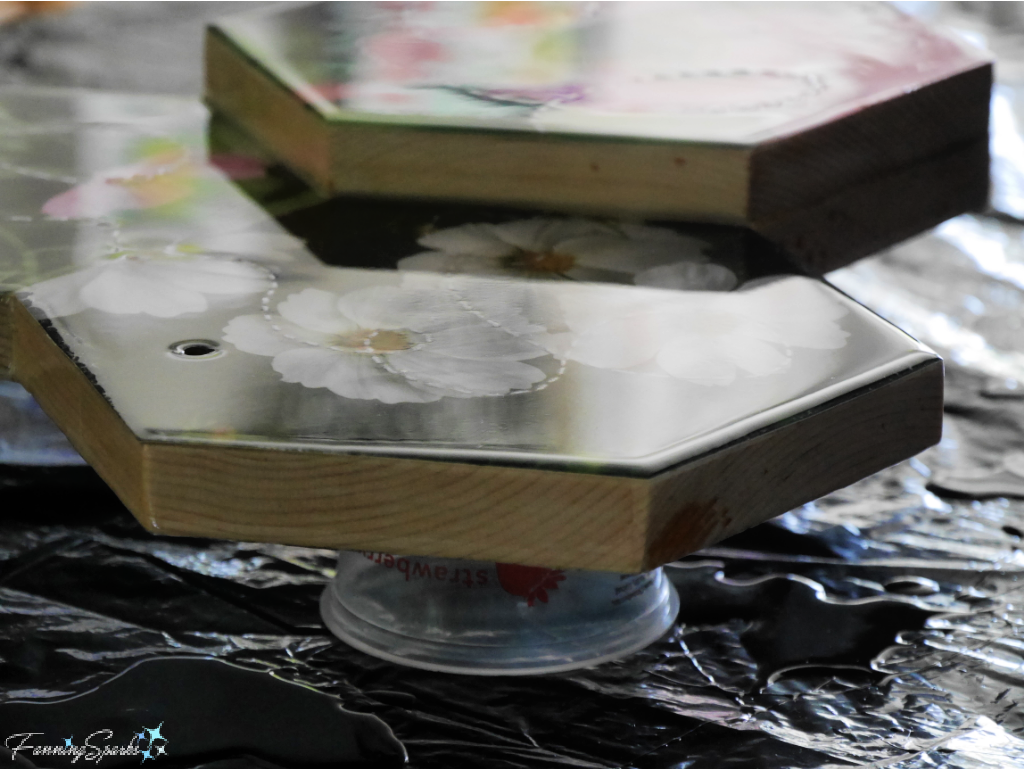
. Resin Stands: To prop your piece so it doesn’t get stuck to the table. I used overturned, plastic containers.
. Level: ArtResin is self-leveling so you will want to make sure your work is also level before you pour. www.artresin.com/level
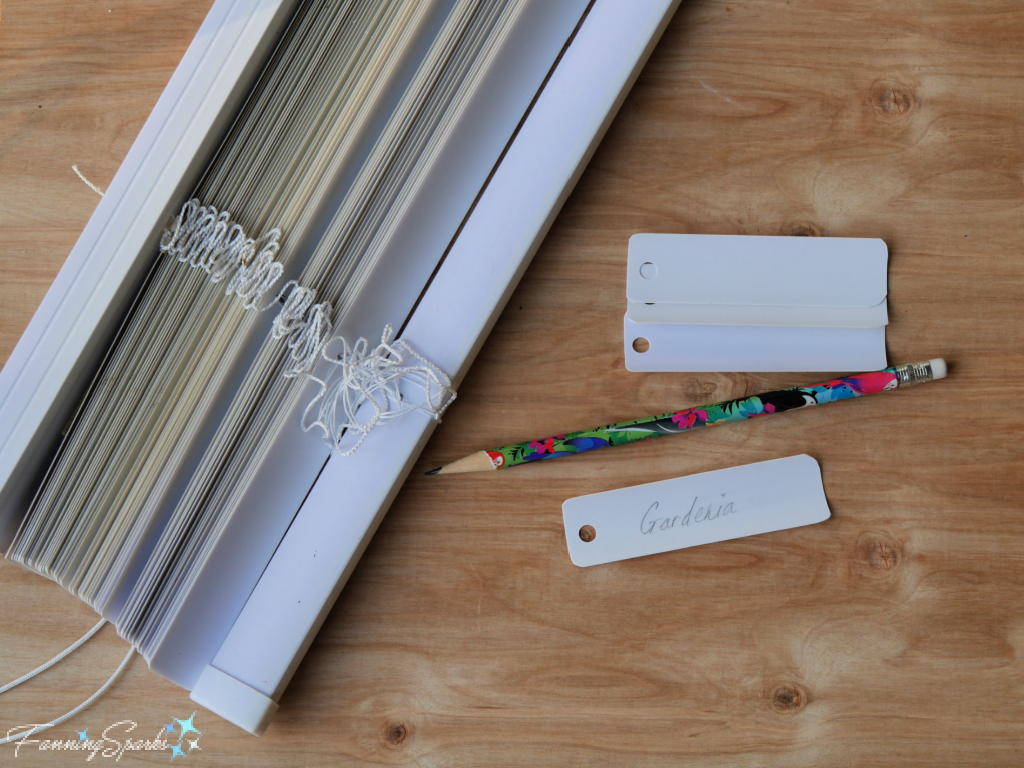
Step 1. Print Pattern Download the Sassy Lady Robe Hook – Complimentary Download and print the template. Take care to ensure the scale is accurate on your printed version. See specifics in the download document. Print TWO copies. Cut out one of the paper patterns leaving a border outside the cutting line. Set aside the second copy for Step 5.
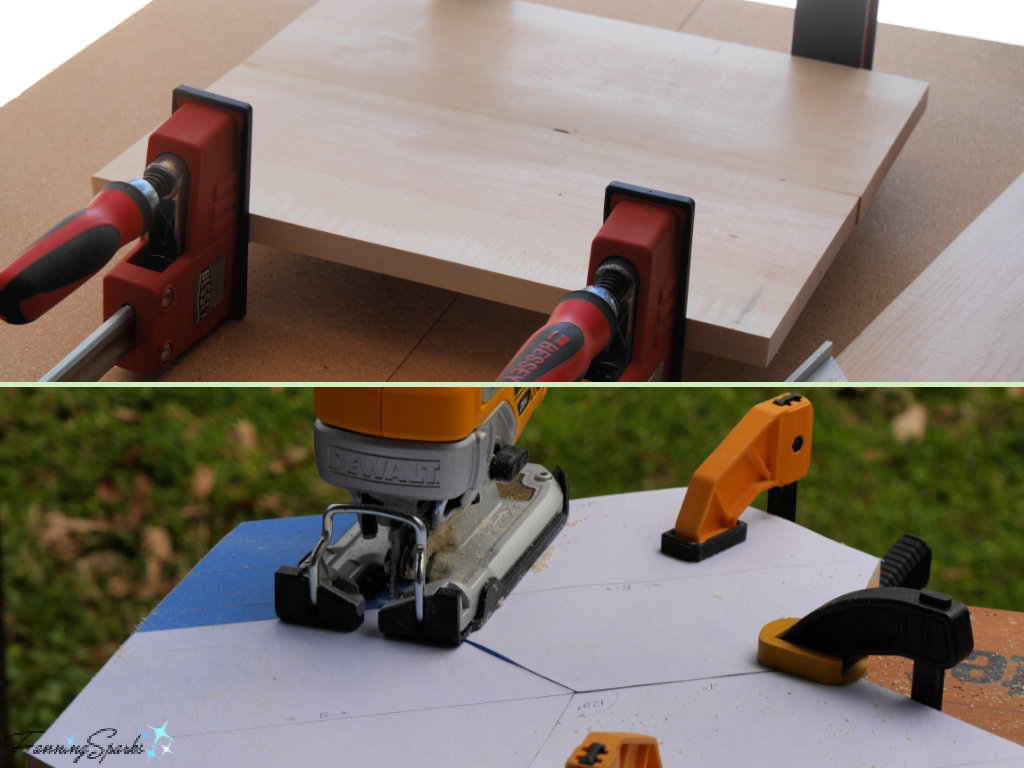
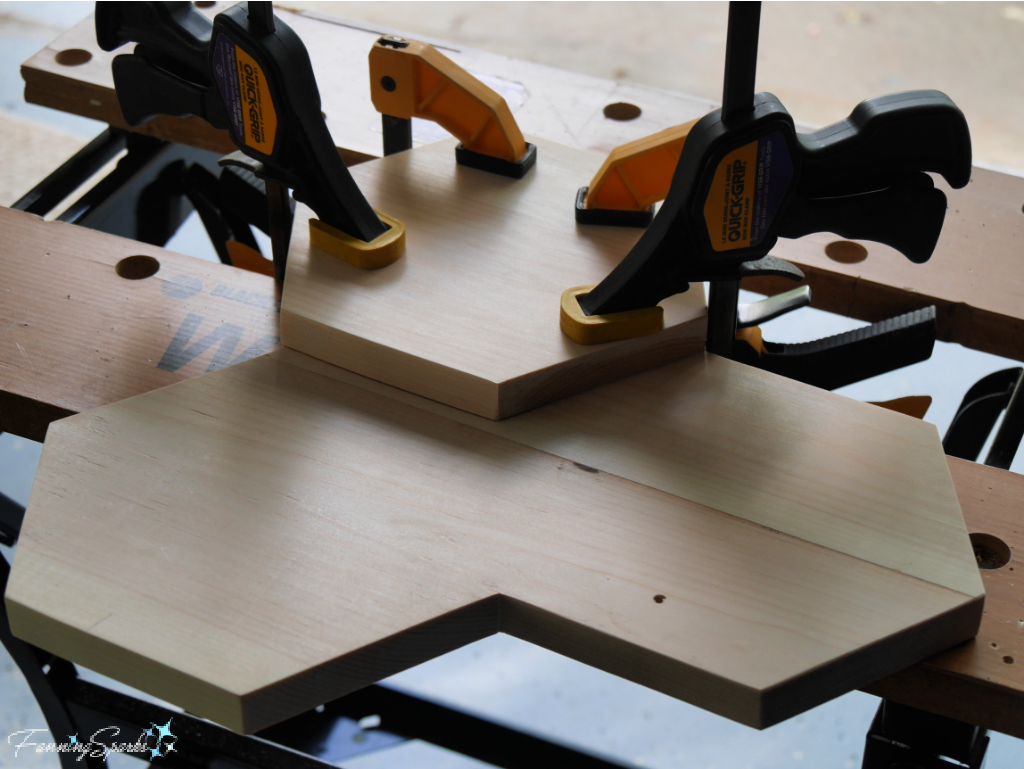
Step 2. Cut Wood Prepare a rectangle of wood at least 7 ½ “ tall x 6” wide. Cover surface of wood with painter’s tape. The tape makes it easier to remove the patterns from the wood. Spray the back of the paper pattern with adhesive. I used Aleene’s Tacky Spray. Position paper pattern, sticky side down, over the taped wood. Press into place.
Clamp the wood to a sturdy surface and use the jigsaw to cut out the shape.
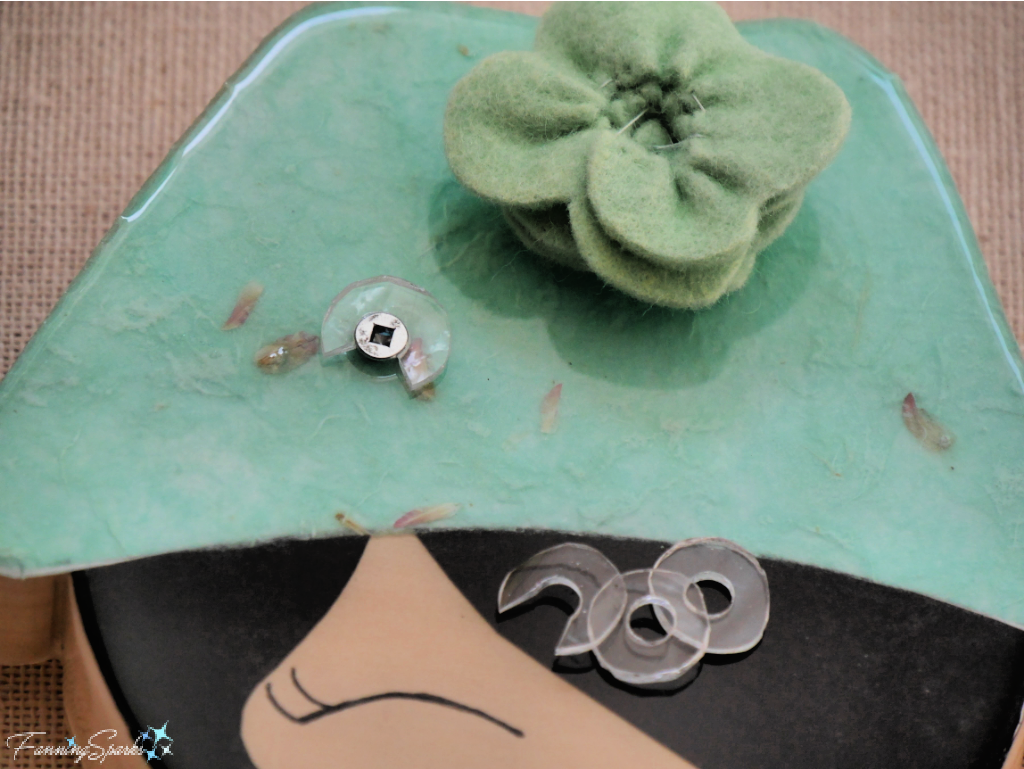
 Step 3. Drill Wood Head Mark the 3 spots—1 in the hat and 2 in the bead necklace—to be drilled by indenting them with a sharp-pointed tool. Remove the paper pattern and the painter’s tape. Use a pencil to label the back.
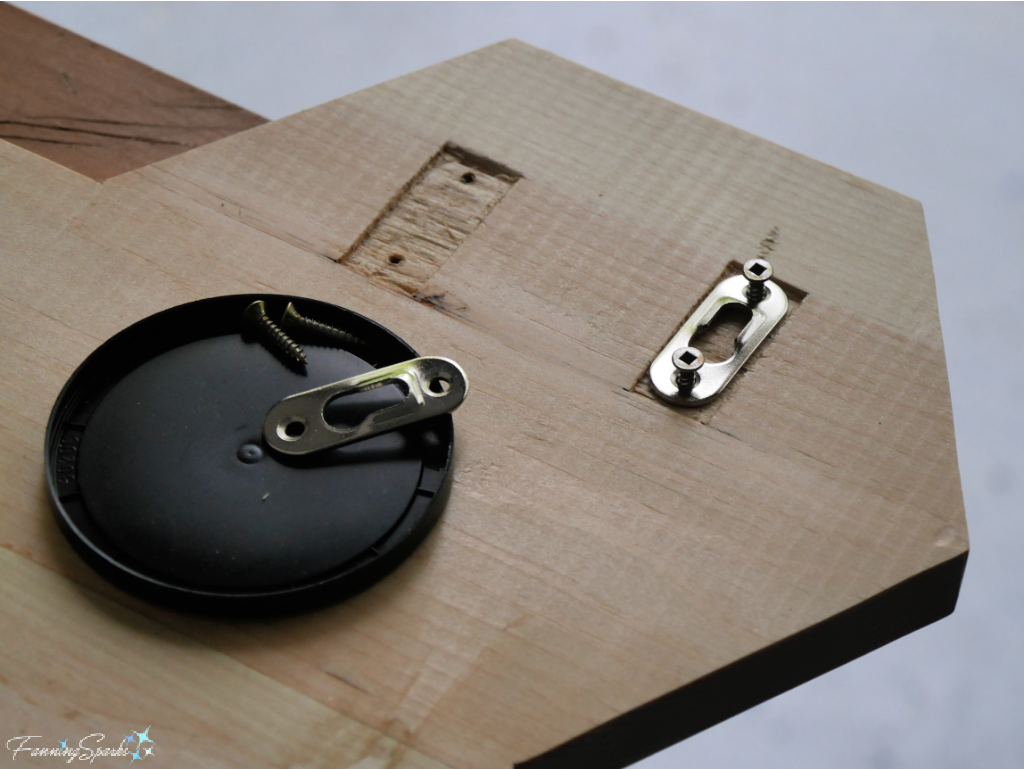
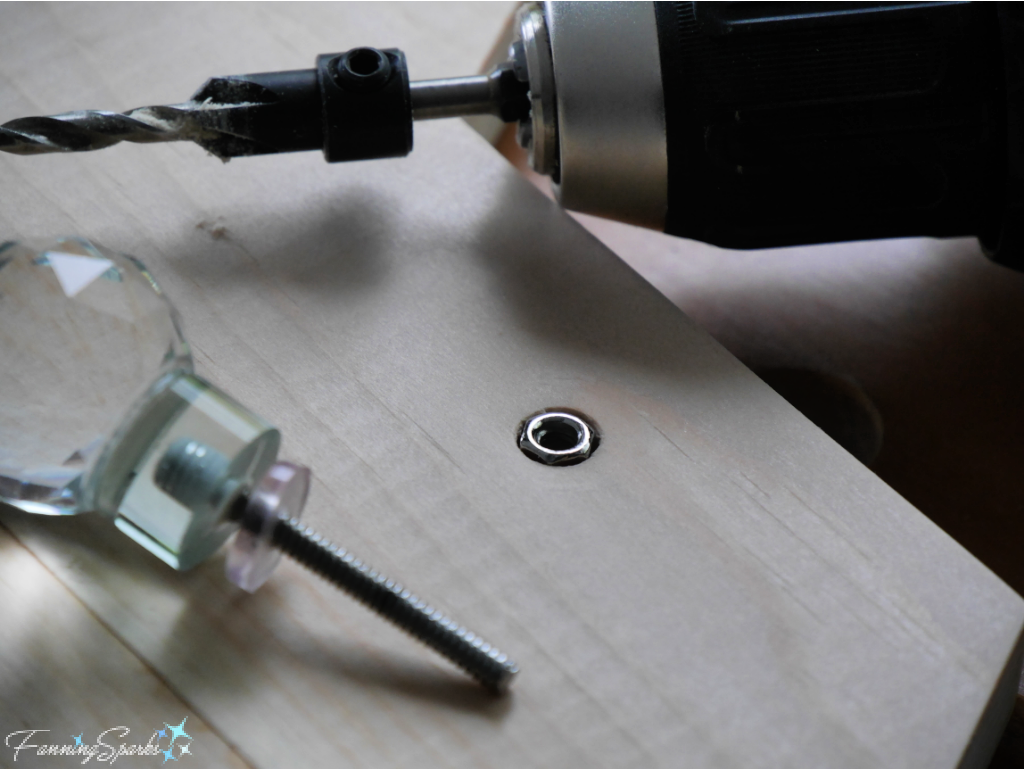
Prepare to drill the wood head by selecting the appropriate sized bits for the screws and decorative knob you’ve chosen. I used an 11/64” bit with countersink for the decorative knob and a 7/64” bit for the two screws. Clamp your wood head on top of a piece of scrap wood to prevent tear out on the bottom. Drill pilot holes in the hat and the left necklace bead for the screws. Drill a hole for the decorative knob in the right necklace bead. Turn the wood shape over to counterbore the hole for the decorative knob. This will allow the nut to sit flush against the back. You may also need to shorten the decorative knob’s screw. I used bolt cutters to shorten mine.
Step 4. Sand Wood Head Use fine grit sandpaper to smooth the front and side edges of the cut wood. Take extra care with the cross grain sections on the side edges since the epoxy resin can emphasize any roughness. Sand the edges of the drilled holes. A round tapered file is helpful for this step.
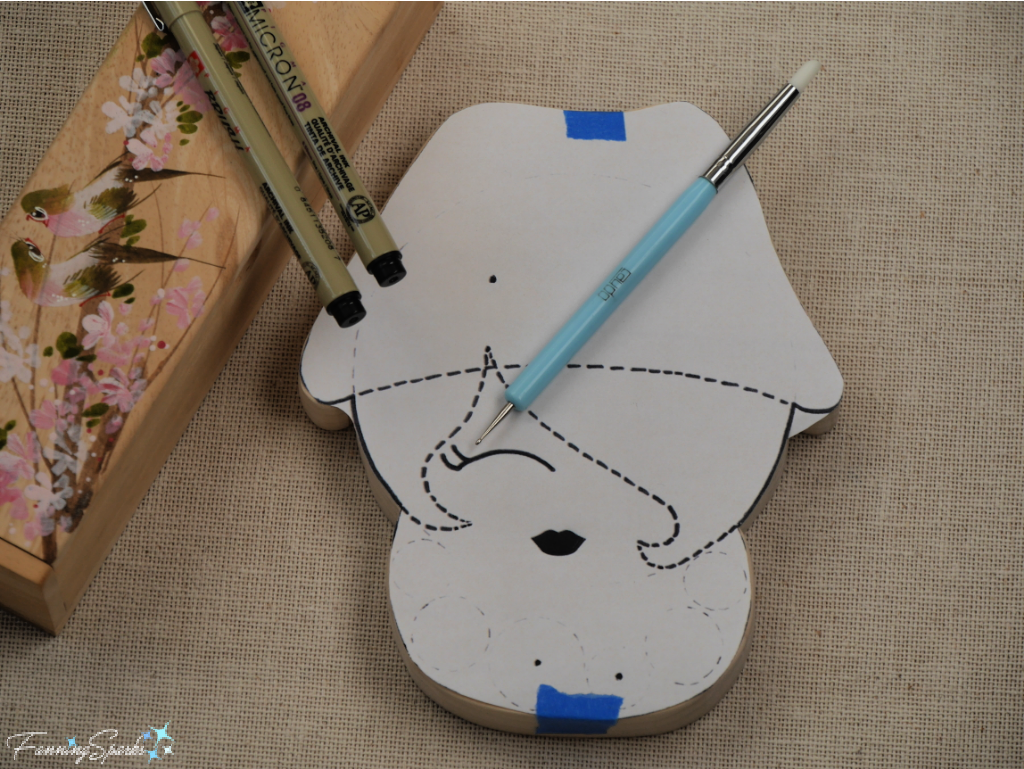
Step 5. Paint Face Using the paper pattern you set aside in Step 1, cut out the shape along the cutting line. Tape the paper pattern to the front of the wood head aligning edges. Use a ball stylus tool or dull pencil to trace over the lady’s eye and mouth indenting the wood beneath. Check that elements are visible before removing the pattern. Use a fine tip black marker to trace along the indentations. Use a medium tip black marker to fill in the lips. I used Sakura Pigma Micron 03 and Brush markers.
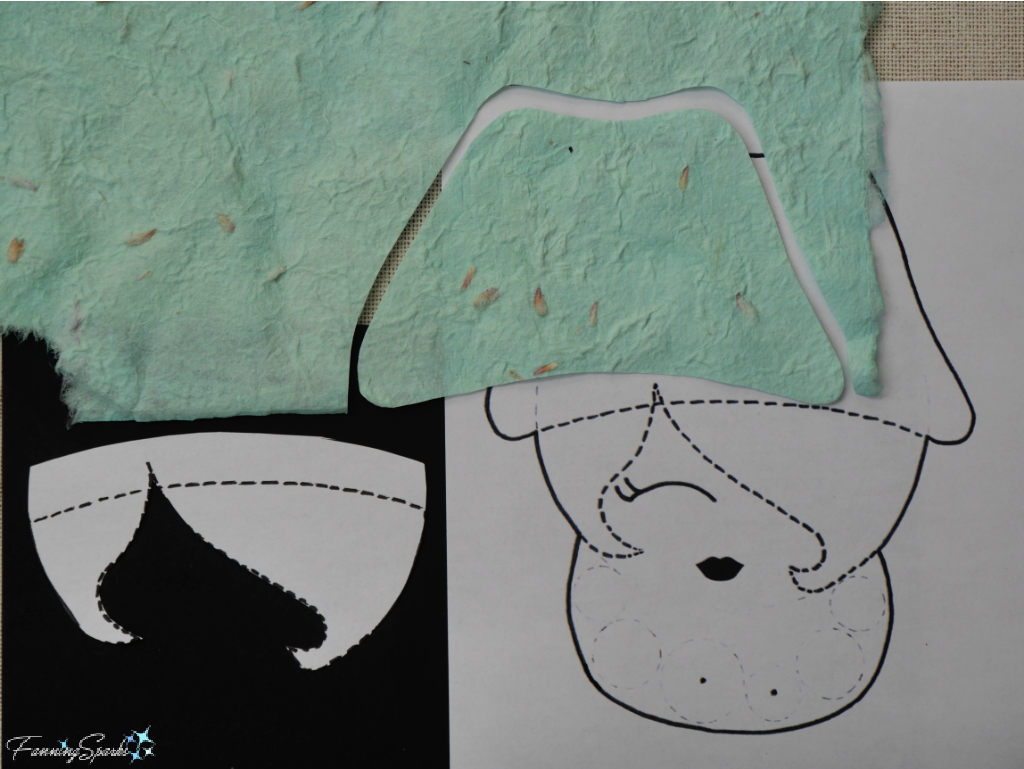
Step 6. Add Hair and Hat Cut out the hair and hat shapes from the paper pattern. Make a note along the top of the hair to add ⅜” along the hat brim—this will allow the hat to sit on top of the hair. Cut the hair from the paper of your choice using the hair pattern with the extra ⅜”. I used simple, black cardstock for the hair. Cut the hat from the paper of your choice using the hat pattern. I chose to use handmade paper for the hat.
Place the hair and the hat on the wood shape to ensure all edges align. Adjust if necessary. Glue the hair in place using Matte Mod Podge or glue of your choice. Monitor the paper to ensure it doesn’t warp or buckle. If it does, cover it with wax paper and weigh it down with something heavy.
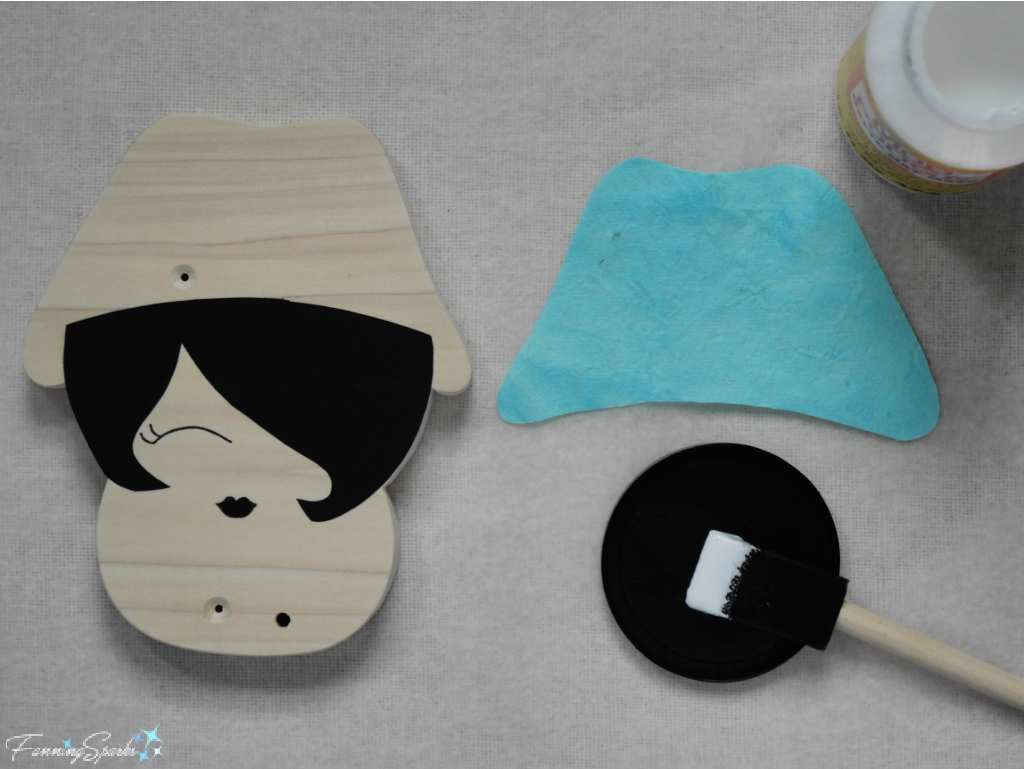
Glue the hat in place using Matte Mod Podge. Depending on the paper you’ve chosen, you may wish to first glue a layer of plain white cardstock underneath the hat. I used handmade paper which is quite thin and found that the black hair showed through. A layer of white cardstock followed by another layer of handmade paper solved the problem.
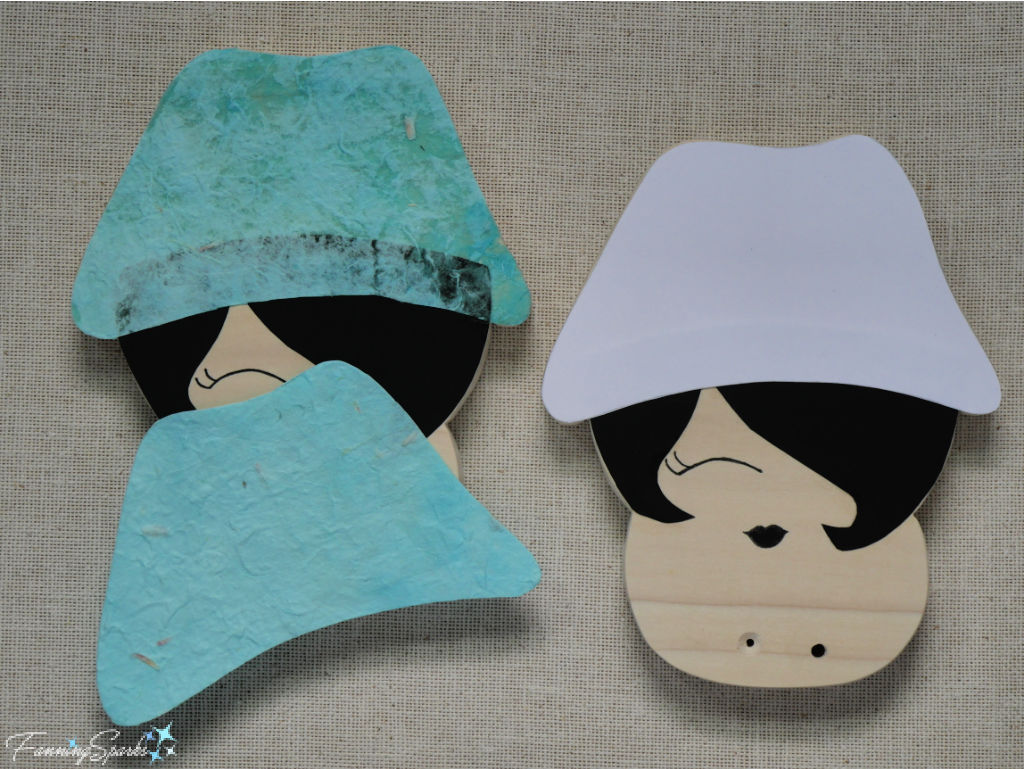
Use a sharp-pointed tool, nail or needle to pierce the paper and open the drilled hole in the hat.
Step 7. Seal Use Matte Mod Podge, or sealer of your choice, to seal all the surfaces and wooden edges. Don’t be concerned about brush strokes or unevenness at this point—these will be hidden by the final epoxy resin coat. Let your first coat dry and add a second coat to ensure a complete seal especially along the side edges. A good seal is needed to prevent the epoxy resin from seeping in and discoloring the paper or wood.
Step 8. Apply Finish Coat The process to prepare and apply an ArtResin epoxy resin finish coat is clearly documented by ArtResin. They provide lots of great guidance on how to use their epoxy resin product both in hard copy with their product and in a variety of formats online. They carefully walk you through the steps to 1 Prep, 2 Measure, 3 Mix, 4 Pour & Spread, 5 Finish, 6 Wait and 7 Clean Up. You’ll want to preview these instructions so you are prepared. For instance, Step 5 Finish involves using a butane- or propane-powered, handheld torch to eliminate air bubbles from the ArtResin surface. You’ll want to be familiar with its use prior to this step.
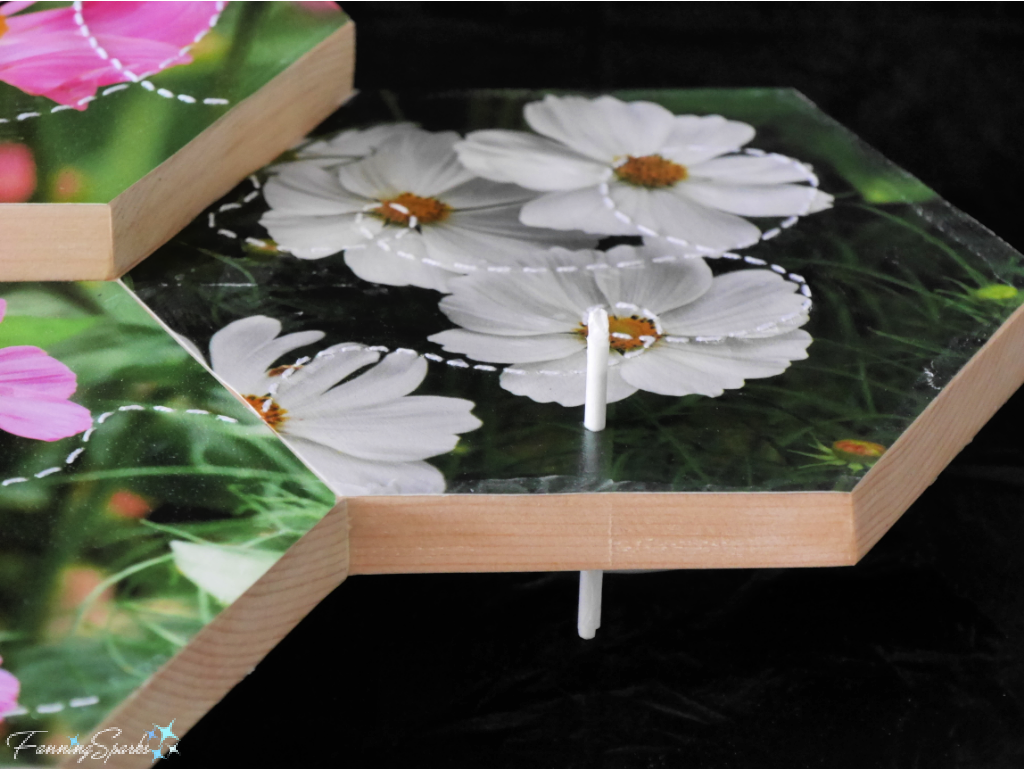
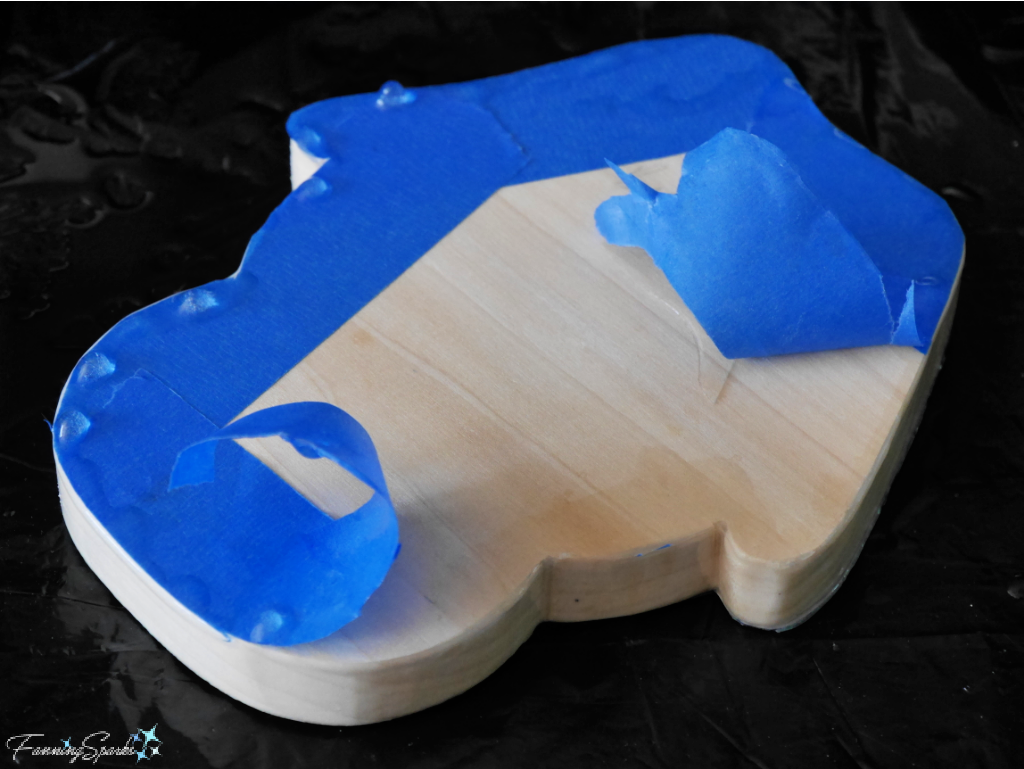
To prepare your Sassy Lady for the ArtResin coat, cover the bottom edges with painter’s tape. Use short-bladed scissors to trim the tape along the wooden edges. The tape will catch drips and provide a clean, even finish along the bottom edge.
Block the holes drilled for the screws and the decorative knob. By design, ArtResin epoxy resin adheres to nearly all surfaces so it’s important to plug the holes with a suitable material. I’ve learned that blocking the drilled holes with a small piece of wax paper rolled around a nail can work if the plug is removed before the epoxy resin sets.
Word of Caution: Take care to keep your torch away from the wax paper if you use one to remove air bubbles from your poured resin.
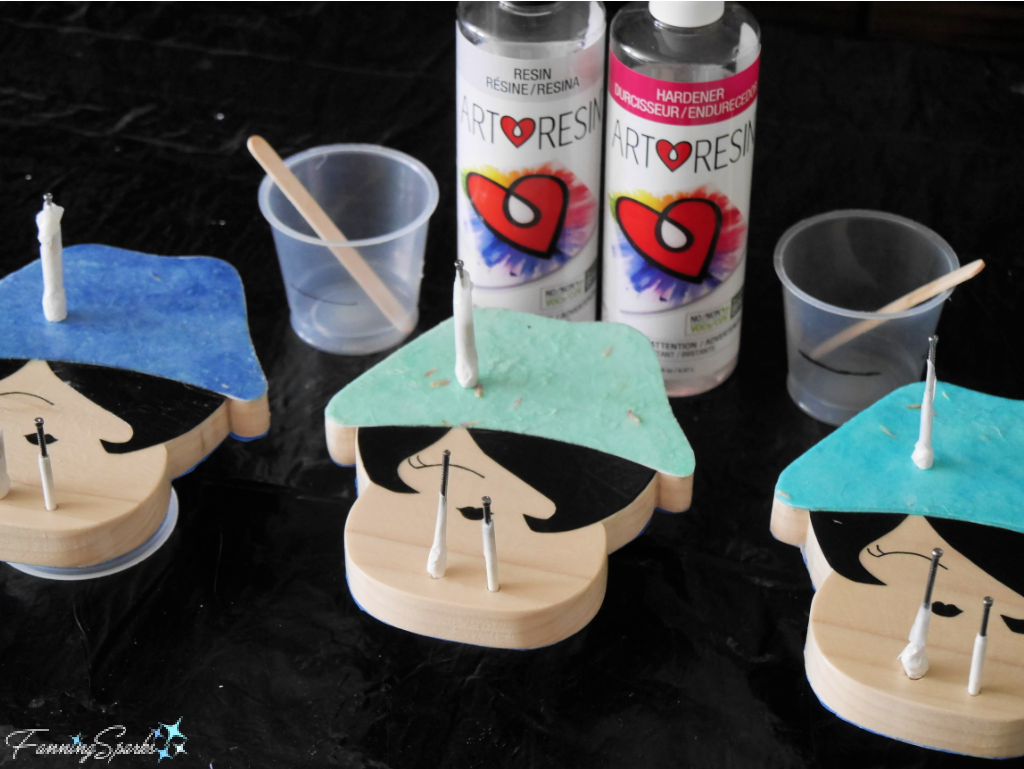
On my last project, I carefully removed the wax paper/nail plug about 2.5 hours after mixing the ArtResin and had great results. But with this project, 2.5 hours wasn’t enough time and the epoxy resin flowed into the holes when I removed the plugs. The trick is to remove the plugs after the epoxy resin has set enough to keep its shape. However, if you miscalculate as I did, the holes can be re-drilled later.
After waiting about 24 hours, remove the painter’s tape from the bottom of your piece. The ArtResin should be hard to the touch at this point although it won’t be fully cured until 72 hours have passed.
If necessary, re-drill the holes. The trick is to start with your smallest bit and gradually increase bit sizes to the desired size. For instance, I re-drilled my holes in three steps—1/16“, 5/64”, and 7/64”.
Step 9. Add Embellishments The embellishments can be added after the ArtResin is cured. Install the decorative knob in the right necklace bead. Using the pattern as a guide, carefully position the acrylic gemstones to simulate a bead necklace. Leave the left necklace bead with the drilled hole uncovered until the next step. Follow the manufacturer’s instructions to adhere the acrylic gemstones with Beacon Gem Tac Glue.
If you wish to embellish the hat with a felt flower like the one shown, check my previous post Teacup Pincushion – DIY Tutorial for the pattern and detailed instructions to make an Open Rose Form rolled spiral flower from felt. Set your completed felt flower aside for the next step.
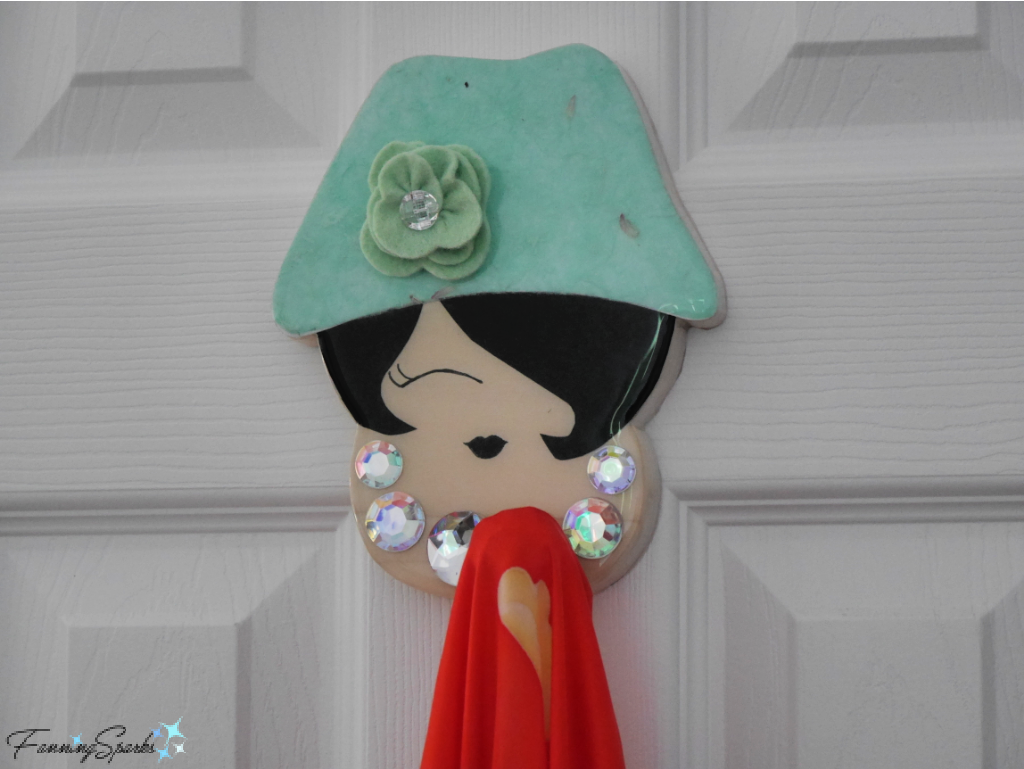
Step 10. Install Completed Robe Hook The final step is to install your Sassy Lady Robe Hook. Attach it with screws through the pre-drilled holes in the hat and bead necklace. Use anchors and screws appropriate for your situation. I used TWO #6 1¼“ wood screws along with E-Z Ancor Hollow Door & Drywall Anchors. Hide the screw heads with the final acrylic gemstone and the felt flower. I simply dabbed a bit of glue to their backs and stuck them in place.
However, if you’re concerned about eventually uninstalling the piece, you may choose to insert a “C-shaped” washer between the resined wood and the felt flower/acrylic gemstone. Then carefully glue the item to the washer and slip it over the screw head.
♦ TIP: A nifty way to create the “C-shaped” washer mentioned above is to make it from epoxy resin. Some of the ArtResin epoxy resin you poured onto your piece is likely to have dripped off and puddled on your plastic-covered work surface. After about 24 hours, peel off the “puddles” and cut them to the desired shape with ordinary scissors.
Voilà! Your new Sassy Lady Robe Hook is at your service!
More Info
You can download the project template here: Sassy Lady Robe Hook – Complimentary Download .
Please pin this image to share or save for future reference.
The felt flower used to embellish the Sassy Lady’s hat is described in a previous post. See Teacup Pincushion – DIY Tutorial for the pattern and detailed instructions to make an Open Rose Form rolled spiral flower from felt.
The handmade paper used for the Sassy Lady hats was custom-dyed. See Experimenting with Fabric Dye to learn more about dyeing various materials including paper.
There are three posts in this series about turning the mundane wall hook into interesting and beautiful wall art:
. Bee in Cosmos OOAK Wall Hook
. Sassy Lady Robe Hook – DIY Tutorial (this post)
. A Flutter of Butterflies in the Closet.
The first project, Bee in Cosmos OOAK Wall Hook, was my response to an ArtResin artistic challenge. I also used ArtResin in my Fern & Flower Press – DIY Tutorial and Thrifted Frame to Small Tray projects.
Visit the ArtResin website to learn more about or shop for ArtResin epoxy resin. Check out ArtResin’s Instagram account where they actively share and promote the work of artists using their products.
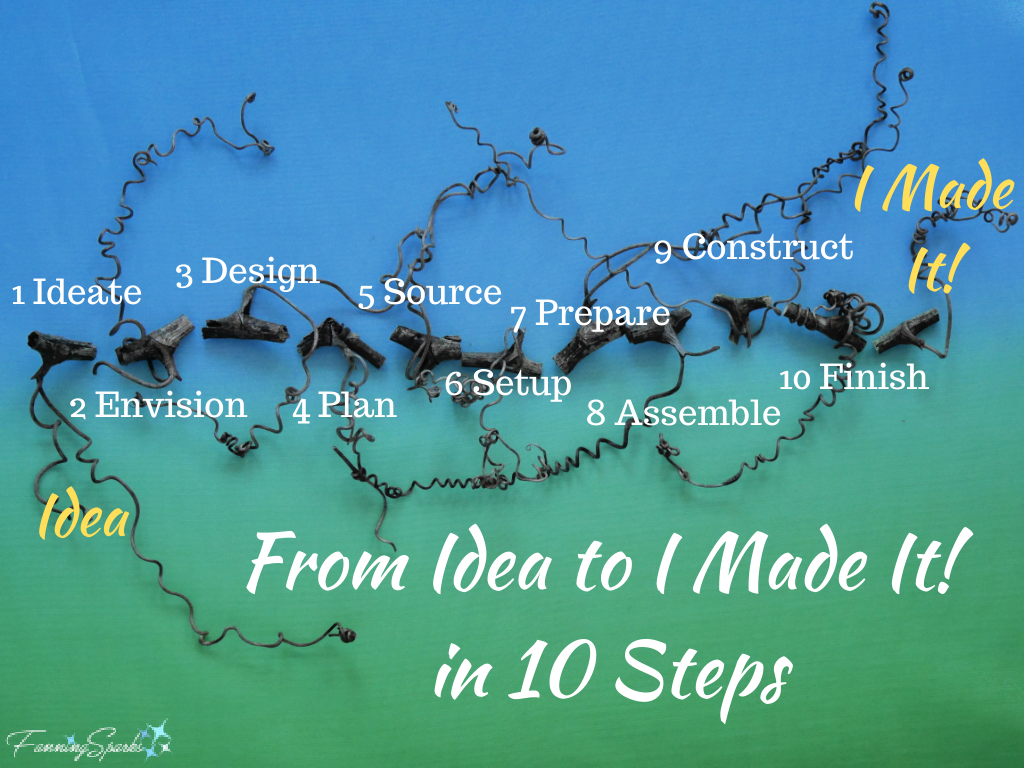
Today’s Takeaways
1. Consider the possibilities of recasting an everyday, functional item (like a wall hook) as a piece of wall art.
2. Simple materials and techniques can have beautiful and interesting results.
3. Turn the mundane into the extraordinary.