
Have you ever noticed those brightly colored, glass mosaic lampshades from the Middle East? The kind where dozens of small pieces of glass create interesting patterns and the light casts a rainbow of colors?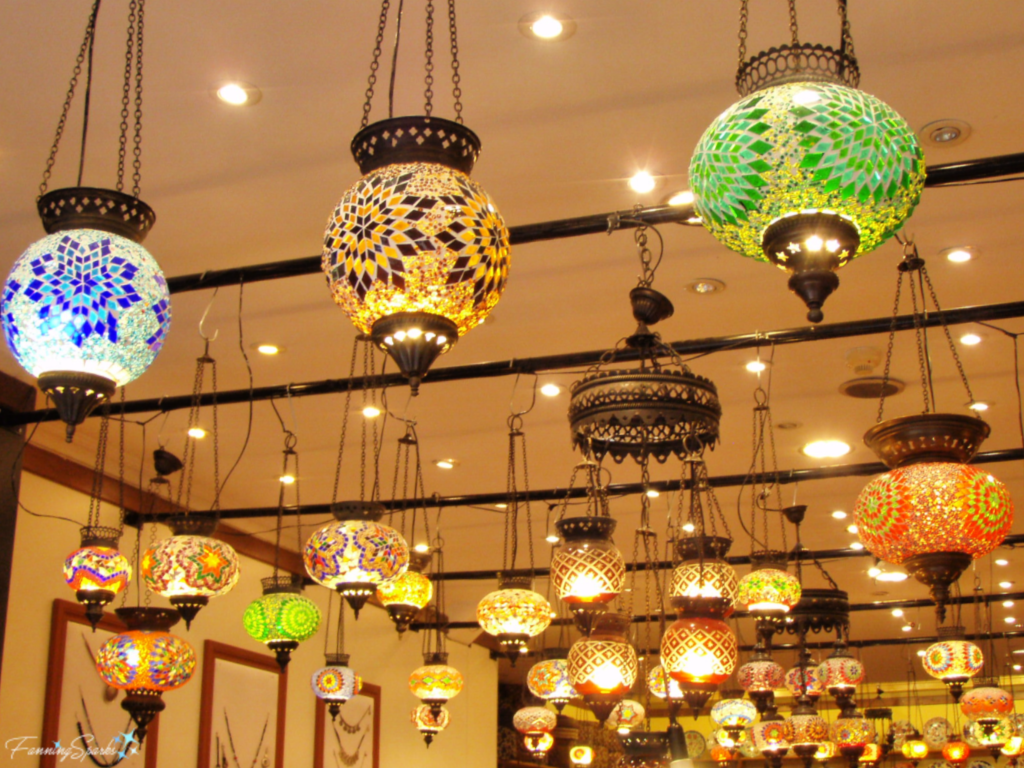
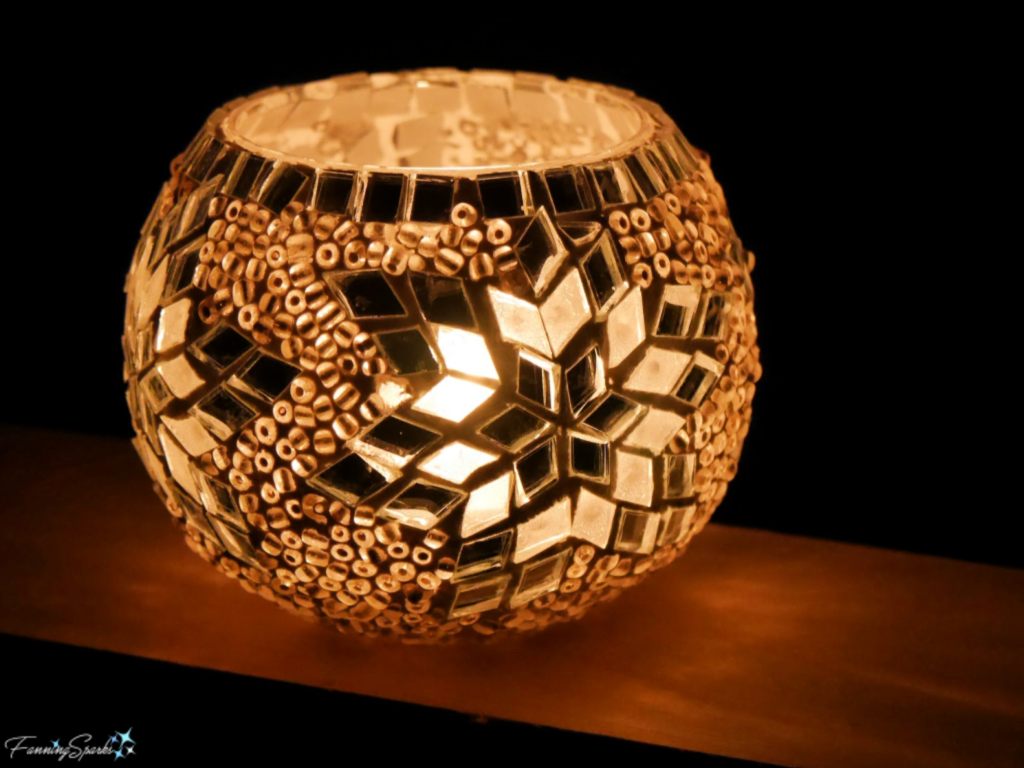
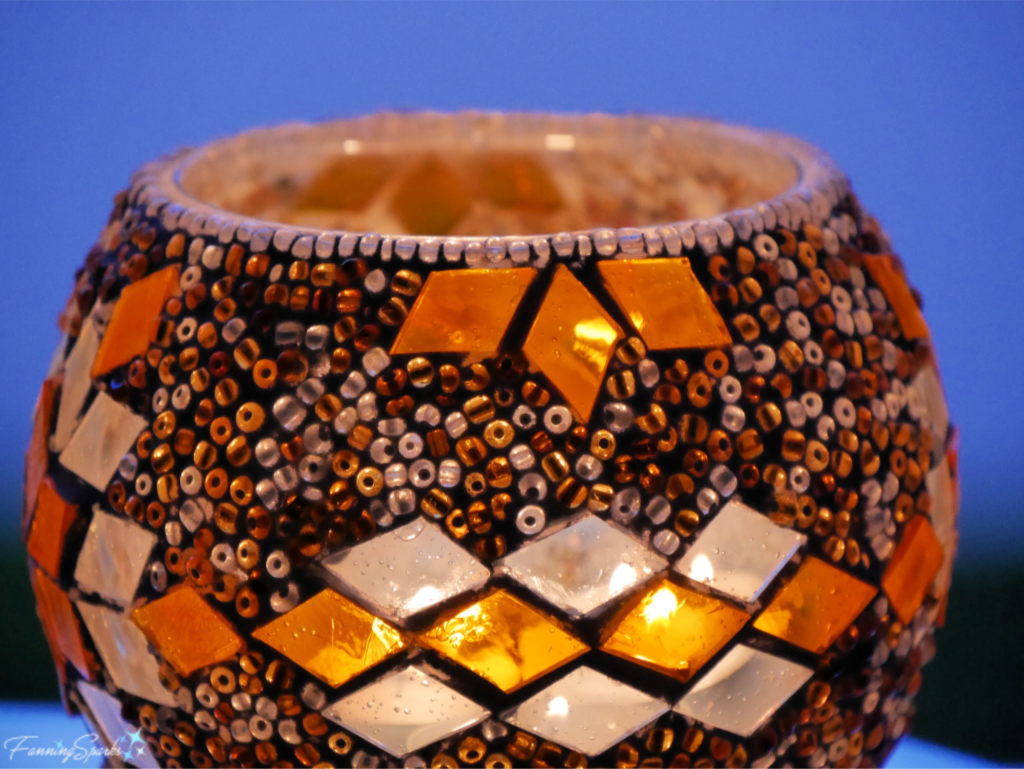
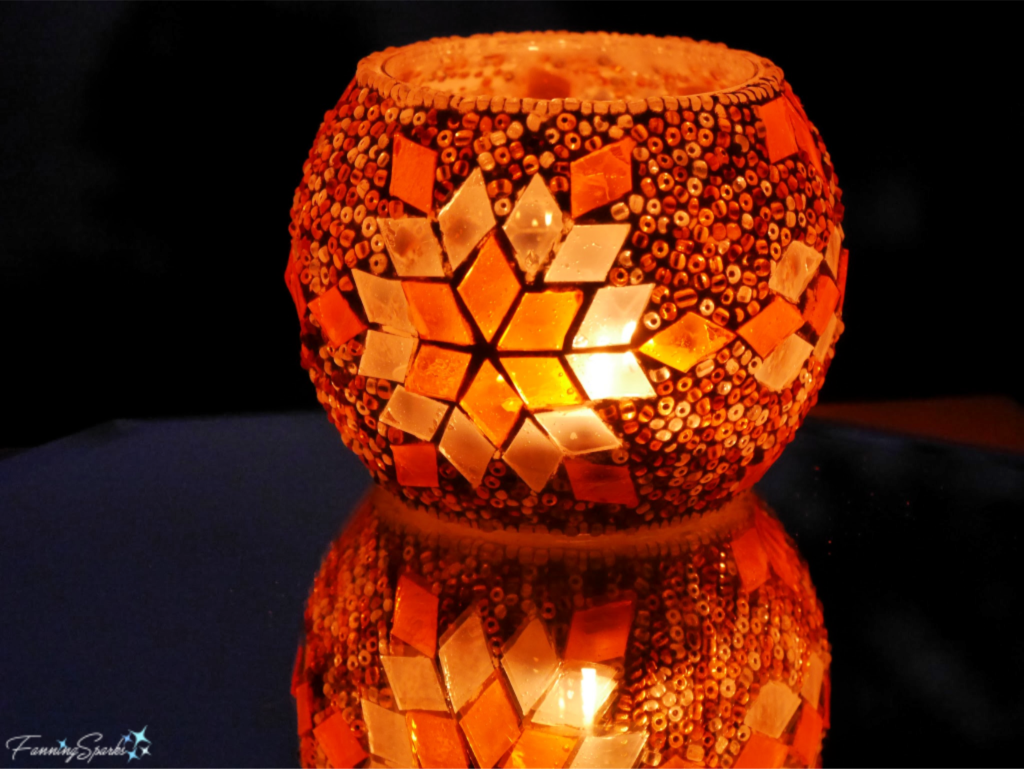
I purchased a few Turkish mosaic candle holders while visiting Istanbul. The candlelight really makes the design stand out.
Surprisingly, they are equally stunning in the sunshine.
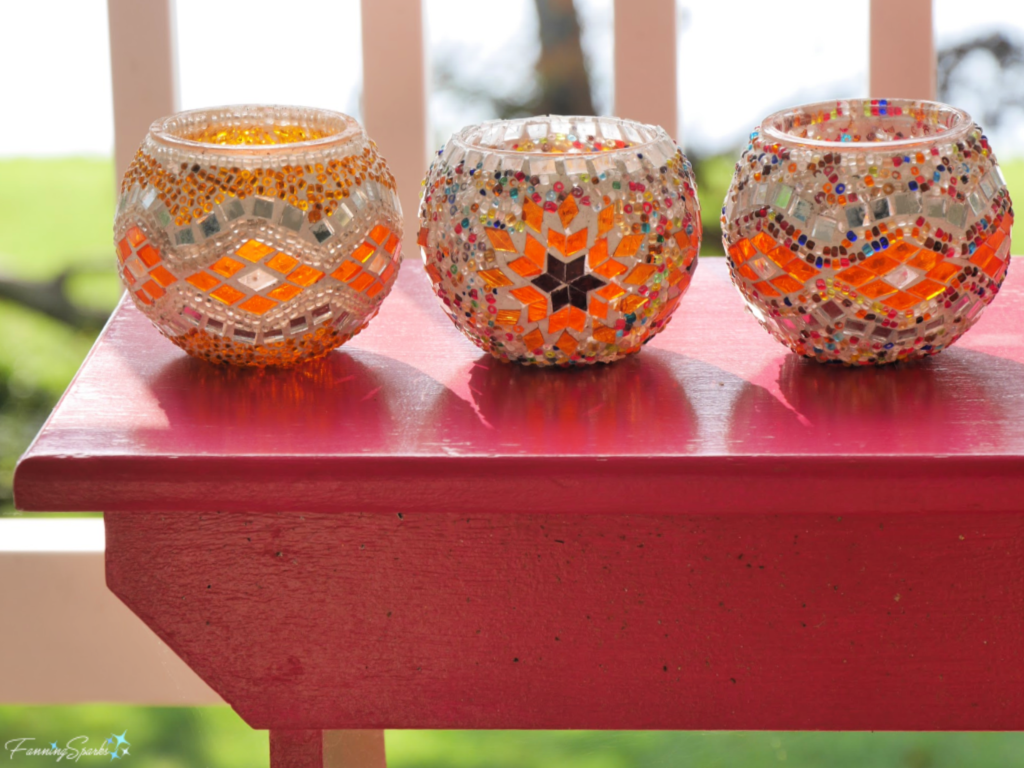
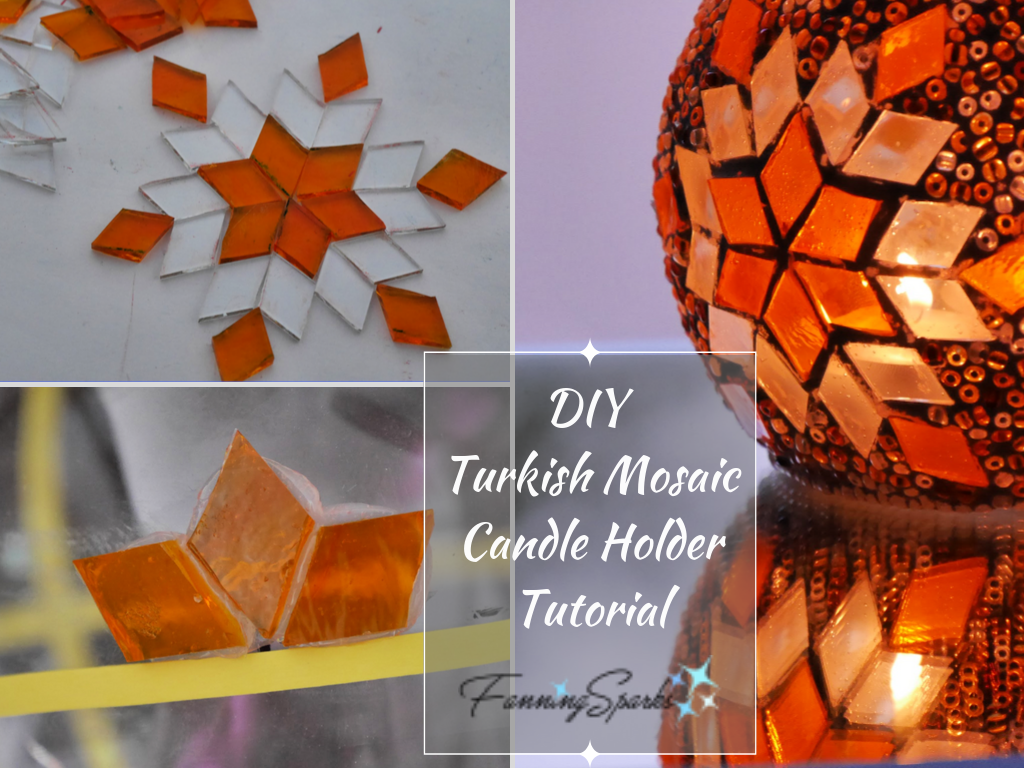
This was the perfect small project to attempt while I was in mosaic-making mode. My studio was already set up for glass cutting and mosaic making. I’ve been happily puzzling together little pieces of glass and tiles for a number of projects (see Pair of Mosaic Mirrors Completed). But you don’t need to be mosaic-crazy, or ever have made a mosaic, to make one of these beauties. My Istanbul souvenirs served as my inspiration and “go-by models”. Turns out, this is a very doable DIY project. At a high level, you cut some glass diamonds and glue them to a glass globe. Then finish off by grouting the surface. But let me get more specific and fill in all the fun details. Today’s post provides easy, step-by-step instructions to make your very own Turkish Mosaic Candle Holder.
Supplies Needed
The supplies needed for this project are not extensive—everything is spelled out below the photo.
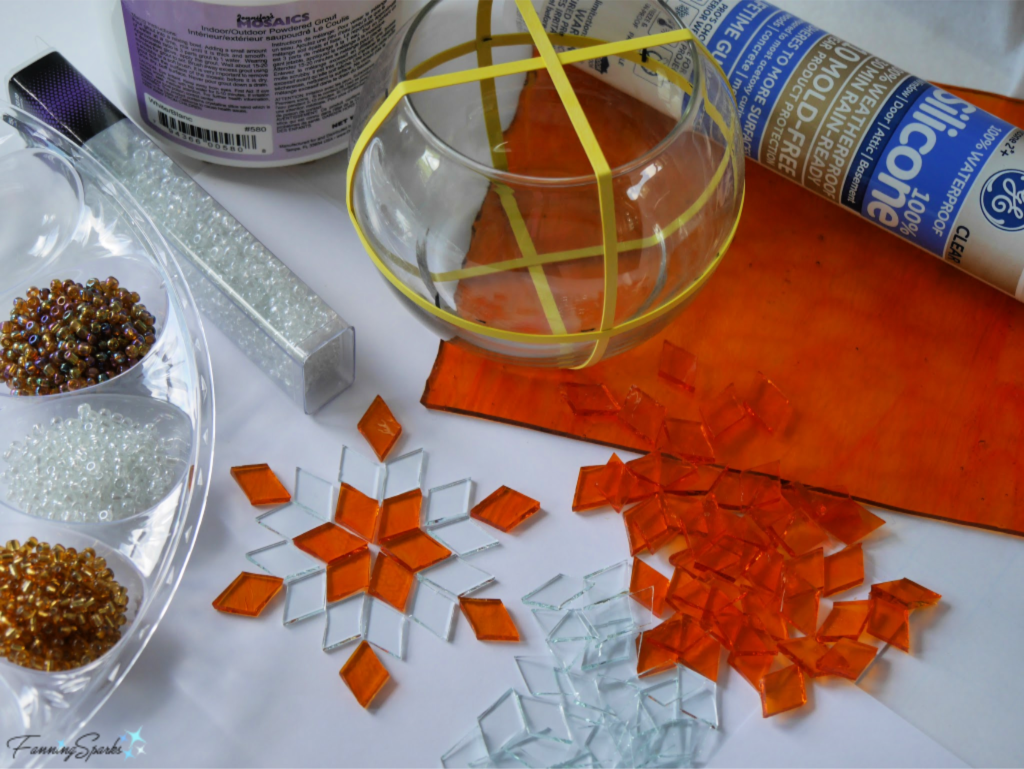
Glass Globe: A clear glass bowl measuring 3.9” x 4.9”. I used one made by Libbey Glass and purchased from the Dollar Tree in their candle section. There was a smaller size available as well. This glass globe cost only a dollar.
Colored Glass: A piece of stained glass measuring approximately 8 ½” x 2” should yield the 50 colored-glass diamonds required. I used a transparent, brilliant orange.
Clear Glass: A piece of glass measuring approximately 8 ½” x 1 ½” should yield the 42 clear-glass diamonds required. You re-purpose clear glass from a picture frame, window or the like, just ensure the clear glass is the same thickness as the colored glass (typically ⅛“).
Beads: Approximately 6 oz of 6/0 glass seed beads. I mixed together 3 colors, S/L Gold, Crystal Luster and Tortoise Rainbow from Bead Treasures.
Beading Thread: Approximately 5’ of beading or other heavy duty thread.
Paper: Several long, narrow strips of scrap paper.
Thin Cardboard: A thin strip of cardboard (such as a manila folder) approximately 1” x 9”.
Rubber Bands: 3 wide rubber bands.
Silicone: A tube of GE Silicone 2*+; Clear; 100% Silicone For Window, Door, Attic and Basement.
Grout: There are many types of grout available. I used Jennifer’s Mosaics Indoor/Outdoor Powdered Grout in white.
Grout Sealer: Sealer for grout and tiles. I used Custom Building Products brand from the local home improvement store.
Tools Needed
China Marker/ Wax Pencil/ Marker: To mark glass.
Glass Cutter: To score the glass.
Running Pliers: To run the glass scores and break the glass.
Beading Needle: To string the beads on the beading thread.
Scissors: To cut paper and thread.
Globe Holder: A round bowl, cup or container to hold the glass globe so it will be easier to position and maneuver. The globe holder should have an opening slightly smaller than the globe so the globe will sit on it snugly. The globe holder should be heavy enough so it doesn’t tip over.
Craft Stick: A wooden craft stick (aka popsicle stick) to spread silicone on the glass globe.
Plastic Lid: A plastic lid from a disposable food container (such as yogurt) to hold the silicone.
Caulk Gun: To dispense silicone from the tube.
Beading Bowl: To hold and catch loose beads when gluing them into place. Look for a bowl, tub or container about 3-5” larger than the glass globe.
Spoon: To scoop beads. Any plastic or other inexpensive spoon will work.
Knife: To trim and clean off excess silicone. An X-Acto or other small, utility knife will work.
Bowl: To mix grout. Disposable is best.
Stir Stick: To mix grout.
Cotton Rags: To remove excess grout. Old cotton t-shirts are ideal.
Bucket: To hold water when grouting.
Spatula: To spread and scrape grout. Any plastic spreader or spatula will work.
Safety Equipment including Safety Glasses, Gloves and Mask.
Instructions for Turkish Mosaic Candle Holder
Preparations
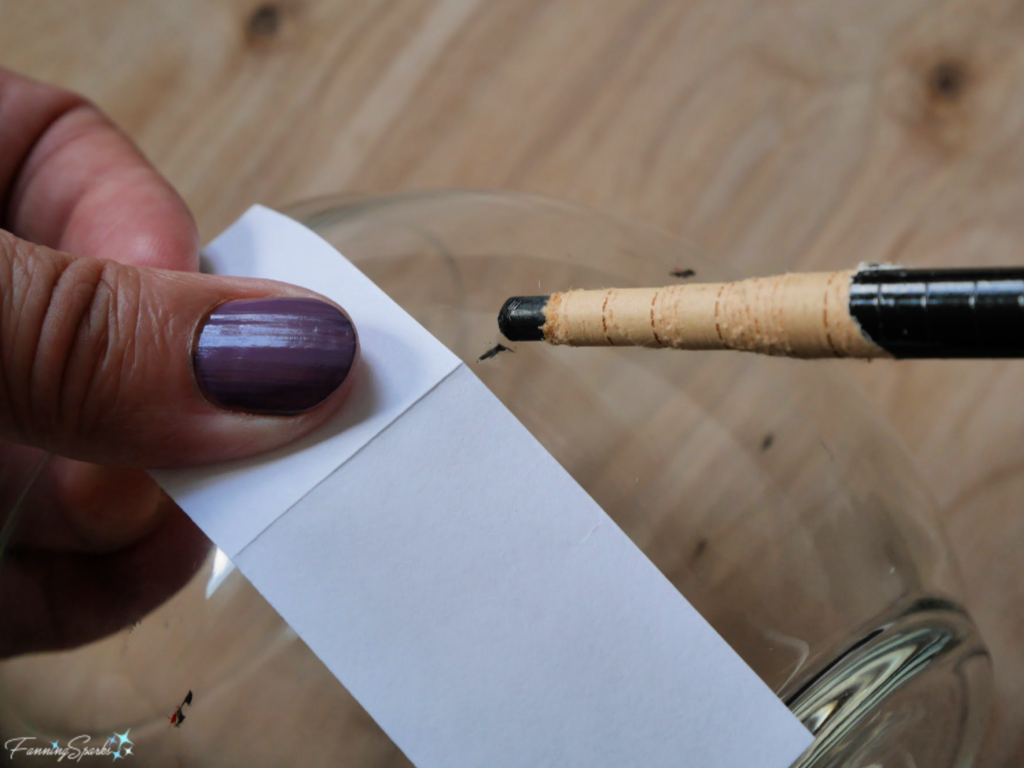
Step 1 Mark Horizontal Center Find horizontal center of the glass globe.
TIP: An easy way to find the center of the curved surface is to use a narrow strip of paper (approximately 1” x 6”). Align one end of the strip with the top edge of the globe. Smooth the paper over the surface of the globe to the bottom edge. Fold the paper in alignment with the bottom edge of the globe. Trim the paper at this fold. Fold resulting strip in half to find center. Use this folded score line to mark center on globe.
Use china marker to mark dashes along horizontal center on outside of globe. Trace same dashes on inside of globe. Remove dashes from outside of globe.
Step 2 Mark Vertical Quadrants Measure the circumference of the globe along the horizontal center using a strip of paper (approximately 1” x 20”) as noted in the tip above. Fold strip into halves and quarters. Use the folded score lines to mark the 4 quadrants across the horizontal center line.
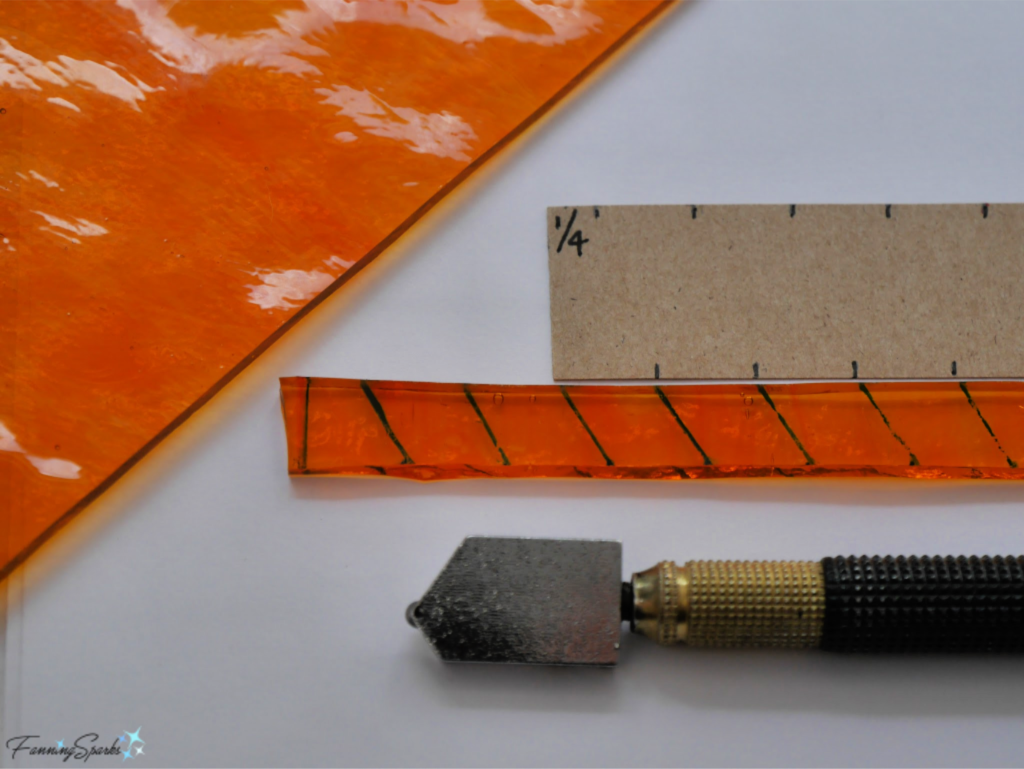
Step 3 Prepare Diamond Template Use a strip of thin cardboard (such as a manila folder) approximately 1” x 9”. Mark ½” increments along one long edge. On the other long edge, measure ¼” from end and mark. Mark ½” increments from the ¼” mark. See photo in Step 4. This provides a simple template for measuring and marking the glass.
Cut and Prepare Pieces
CAUTION: Please be careful! You’ll be working with glass. Edges are sharp. Shards may fly. Wear proper safety equipment including safety glasses and gloves.
TIP: If you’ve never cut glass or need a refresher, there are lots of great online videos and instructions available. I thought the video from Delphi Glass (see More Info below) was quite helpful. Please take the time to do some practice cuts and get comfortable with these techniques before proceeding.
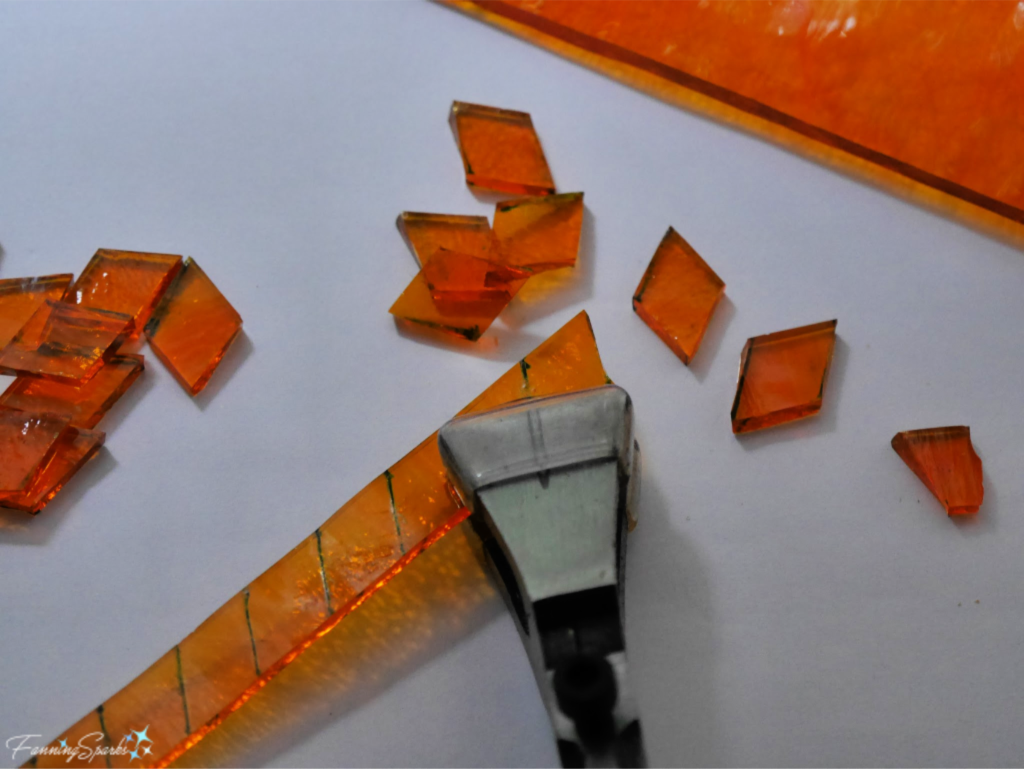
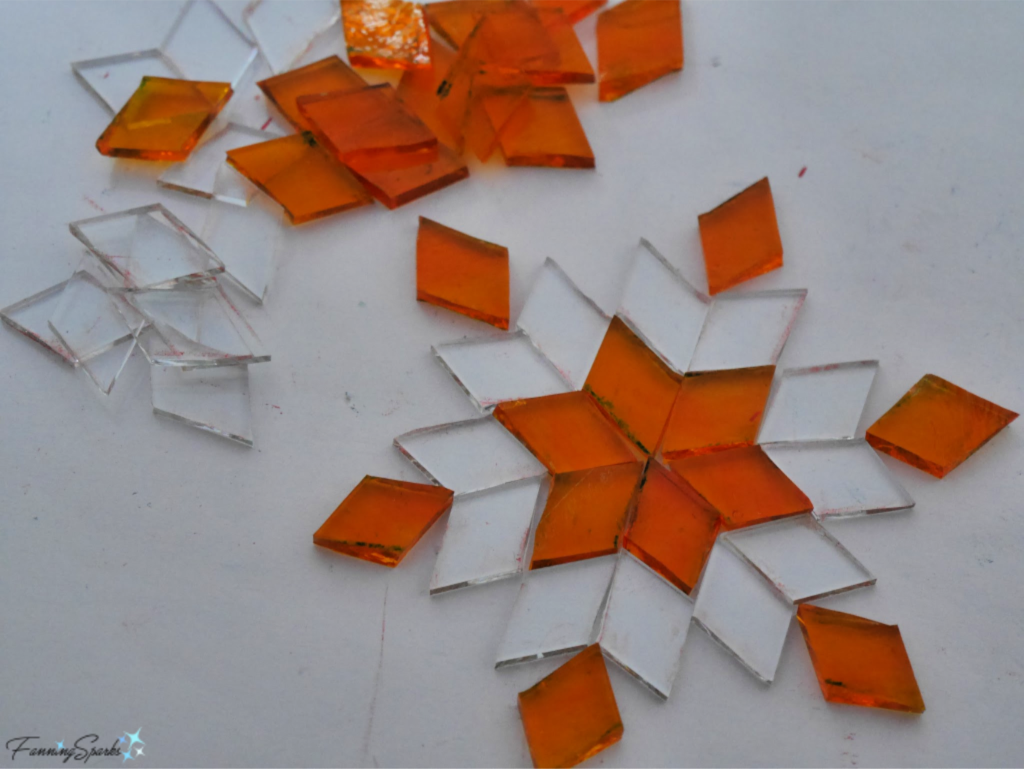
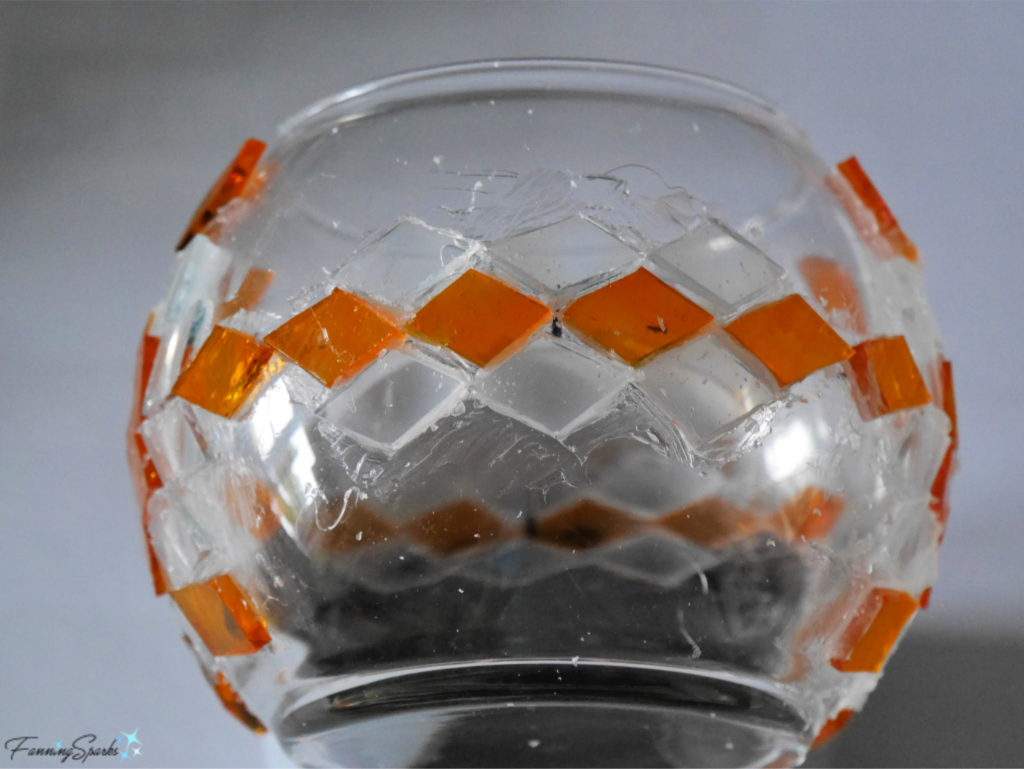
Step 4 Cut Glass Diamonds Cut approximately 34” of ½” strips of colored glass. You can see the transparent, brilliant orange glass I used in the photo below. Cut approximately 26” of ½” strips of clear glass. Using the diamond template (from Step 3), mark increments along the sides of the glass strips. Join the marks to create diamonds. It should look like this:
Cut the diamonds. You will need 50 colored glass diamonds and 42 clear glass diamonds. This includes a few extra to make fitting easier.
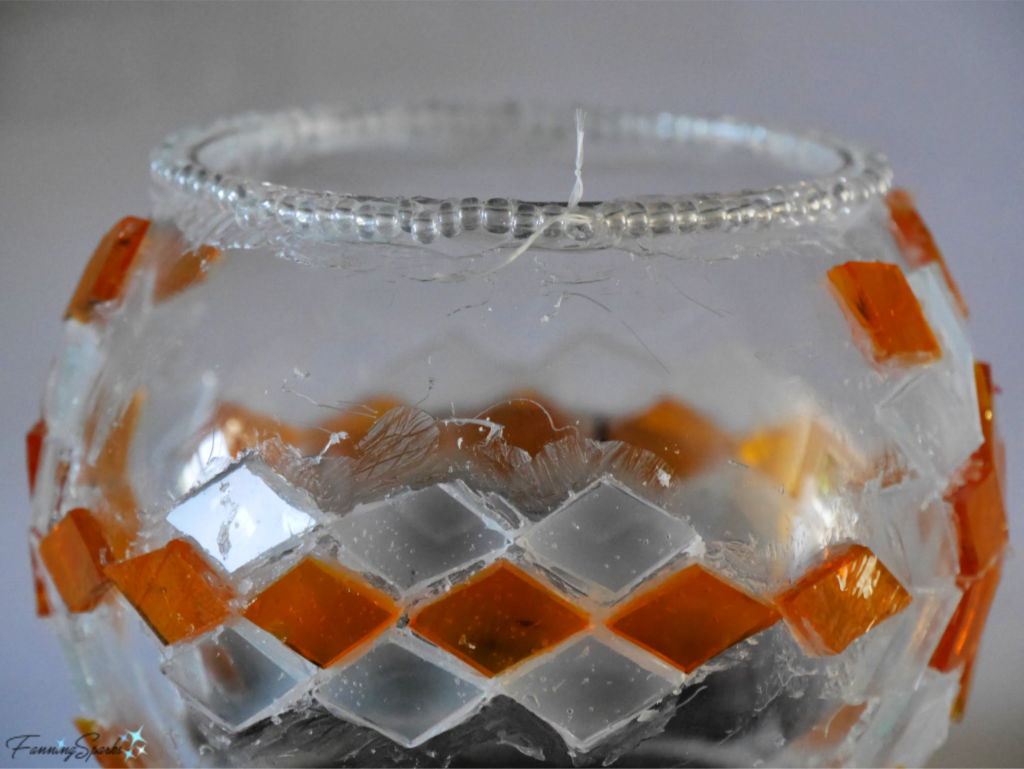
Step 5 String Beads A row of beads will be glued to the top and bottom of the glass globe to give the edges a nice, clean finish. Measure the top edge of the globe using a strip of paper as described in Step 1. Simply hold the paper along the top edge and crease the paper where it meets. Use the beading needle and beading thread to string a row of beads to the required length. Double check the length by holding the strung beads against the globe edge. Adjust, as needed. Carefully knot the end and tie off.
Repeat the same steps for the bottom edge of the globe.

Assembly
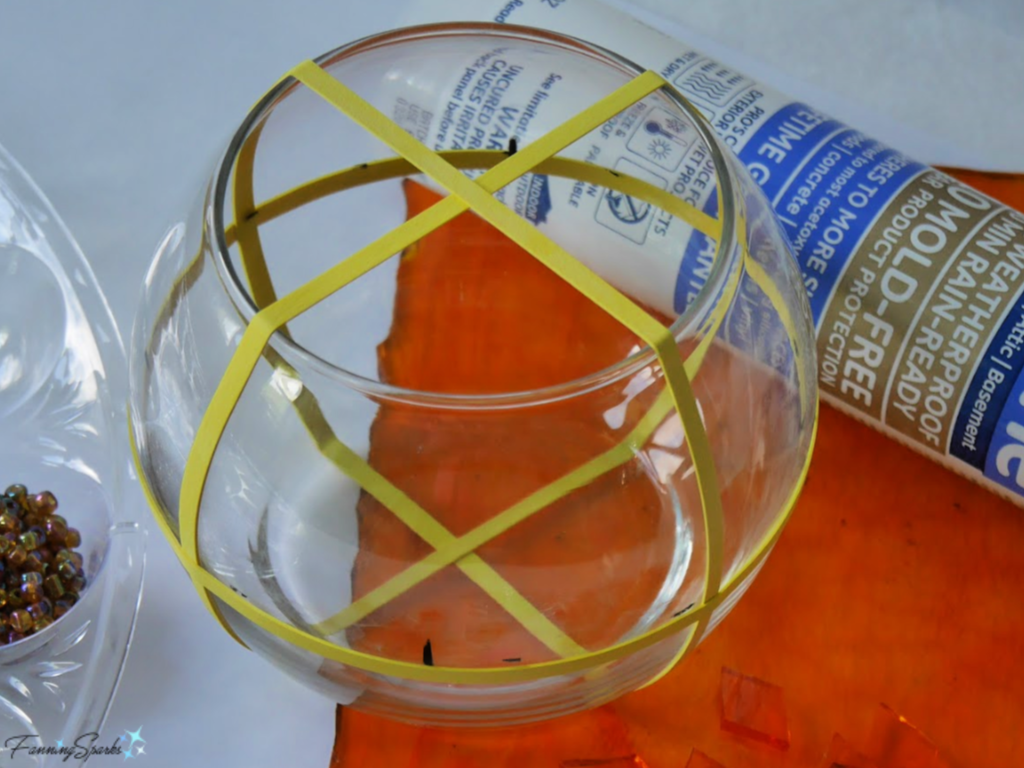
Step 6 Place Rubber Bands Slip rubber bands around the glass globe to serve as guidelines for gluing. Use 3 rubber bands‒2 will be placed vertically and 1 will be placed horizontally. Start with one of the vertical bands aligning it midway between two of the vertical quadrant markings (from Step 2). The idea is to leave the actual vertical markings free for gluing. Repeat with the second vertical band. The bands will cross at the center of the top and the bottom. Slip on the third rubber band horizontally aligning the band’s top edge with the horizontal markings (from Step 1). The globe should look like this.
Step 7 Lay Out Glass Pieces On a clear, flat working surface, lay out six colored glass diamonds in a star shape. Take care to find pieces that fit well together. Surround this first round, with a circle of clear glass diamonds matching and aligning edges. Finally, lay out colored glass diamonds at the six points of the star. The stars should look like this.
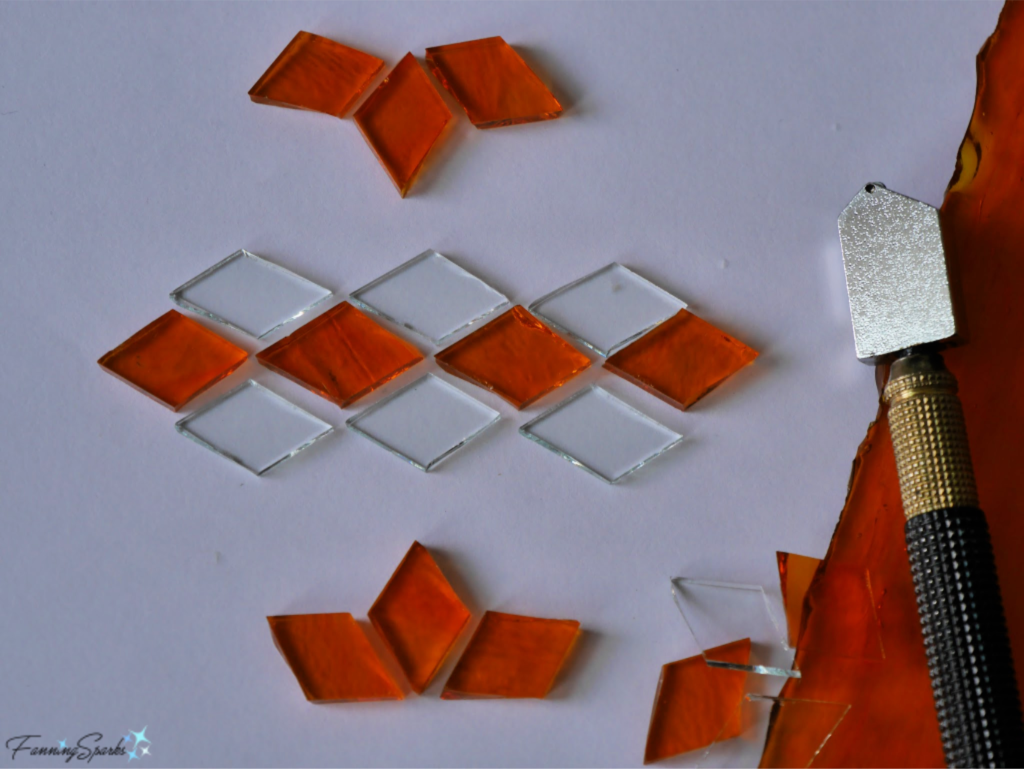
Lay out the side borders in a similar fashion. Start the side border with a row of 4 colored diamonds touching point to point. Add a row of 3 clear glass diamonds above and below.
Lay out 4 sets of 3 colored diamonds for the half stars.
Step 8 Adhere Star Centers Get ready to glue the glass pieces by setting up a work area. Set the glass globe in the globe holder so it’s slightly elevated and one side is facing up. You can see the plastic cup I used to hold the globe in the photo below. This wasn’t ideal, however, because it tipped over. I replaced the plastic cup with a round cardboard container. Have the craft stick and plastic lid ready. Open the silicone using the handy cutter and pick on the caulk gun.
TIP: Don’t forget to break the foil seal on the silicone tube BEFORE squeezing the caulk gun trigger. It creates a miserable mess if the bottom of the tube breaks and the silicone spreads all over the caulk gun. Ask me how I know!
Squeeze a small mound of silicone onto the plastic lid. Start with the top 3 colored diamonds in the center of one of the stars. The center point of the star will be positioned where the horizontal and vertical center lines cross. Use the wooden stick to pick up some silicone and cover the target spot for the first diamond. Try to apply a thin, even layer of silicone without bubbles or gaps. Put the first colored diamond into position. Use the edge of the rubber band for horizontal alignment. Repeat the process for the other 2 colored diamonds in the star center. Place only these 3 diamonds at this time.

Turn the globe around in the globe holder taking care not to disturb the glass diamonds already glued. The second star will be positioned opposite the first star. Repeat the process with the first 3 diamonds of the second star center.
Remove any excess silicone. I found scooping up extra silicone with a piece of scrap paper folded into a “V” was surprisingly effective. Allow the silicone to dry. According to the directions on the container, the sealant will be tack-free in 30 minutes but then it goes on to say “Do not touch or clean caulk for 24 hours.” The idea is to get these starting pieces solidly in place so they can form a foundation for the rest of the pieces. I played it safe and waited until the next day to proceed.
Step 9 Adhere Stars Remove the rubber bands. Use the same techniques as in Step 8 to adhere the rest of the glass diamonds for the 2 stars. Start at the center of the star, carefully positioning and gluing all the glass diamonds in place. As before, take care not to disturb the first star when turning and re-positioning the globe to work on the second star.
Step 10 Adhere Side Borders Starting at the center, align a colored diamond with the cross point of the horizontal and vertical center lines. Glue remaining 3 colored diamonds for the center row. Repeat on opposite side taking care not to disturb the diamonds already glued. Remove any excess silicone. Allow to dry.
Finish side borders by gluing clear glass diamonds in place. Remove any excess silicone. Allow to dry.
Step 11 Adhere Bead Edges Spread a line of silicone just below top edge of globe. Keep silicone thin enough so the beads will stick firmly to the glass without getting buried. Press beads into place aligning with top edge. Ensure a smooth connection point where the ends meet. Pull any loose ends of thread clear so they can be snipped after silicone dries.
Repeat for bottom edge. Remove any excess silicone. Allow to dry.
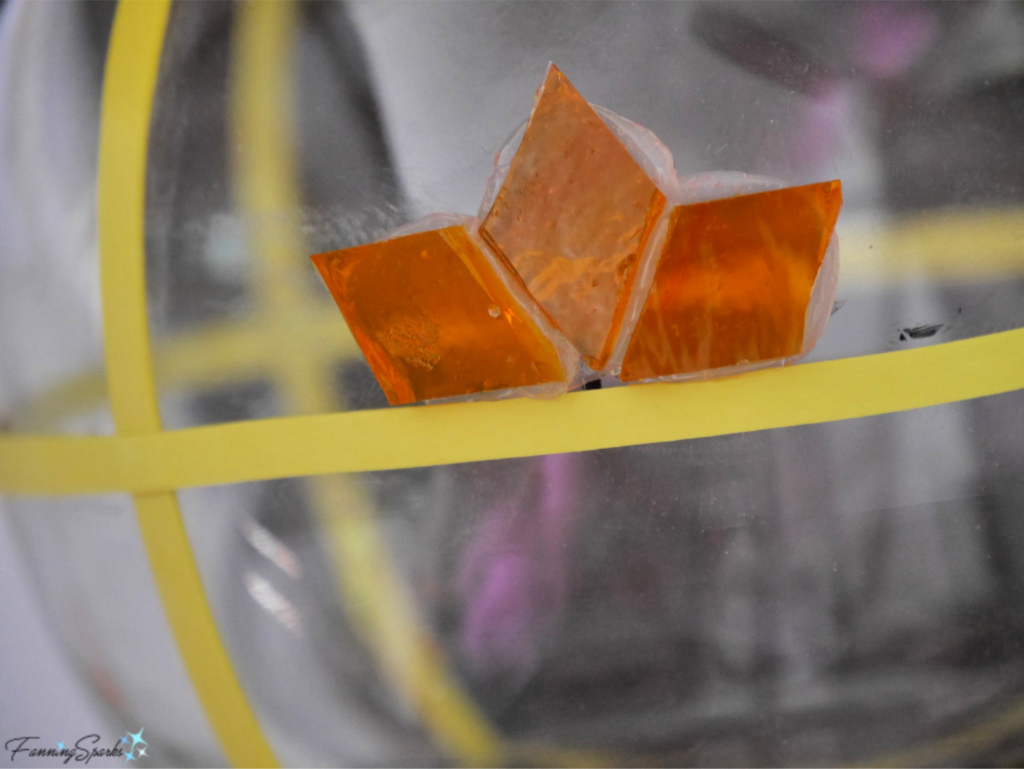
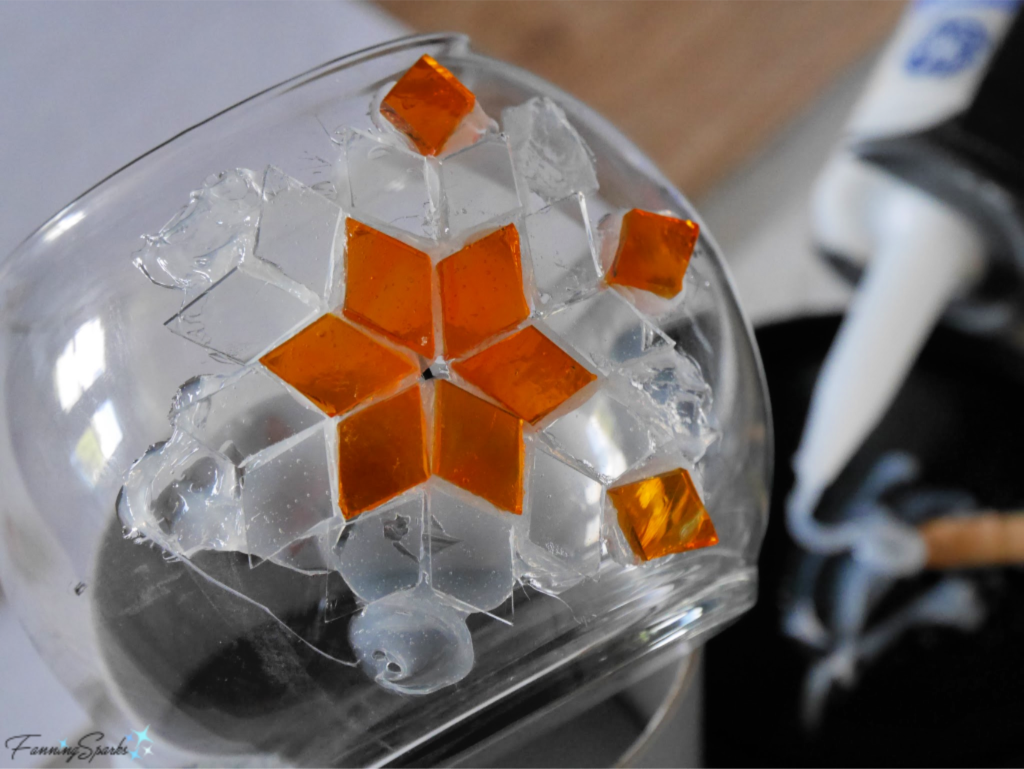
Step 12 Adhere Mini-Stars Use the same techniques as in Step 8 to adhere the small, 3-diamond stars on the sides. There are 4 mini-stars‒1 above and 1 below each side border. Start at the center of the star, carefully aligning the first colored diamond with the vertical quadrant marks. Glue the remaining 2 diamonds in place. Repeat for the second mini-star on this side. Turn the globe around taking care not to disturb the mini-stars already placed. Apply the final 2 mini-stars. I forgot to take a photo while gluing the mini-stars but here’s how the side will look when finished.
Step 13 Adhere Beads Filling in the remaining spaces with individual beads is the last step to cover the glass globe. It’s also the most fun! Pour the beads from their packaging into the beading bowl.
Working in sections, apply a thin layer of silicone to an open area on the globe. Hold the globe over the beading bowl. Use a spoon to scoop up some beads and let them fall on the silicone.
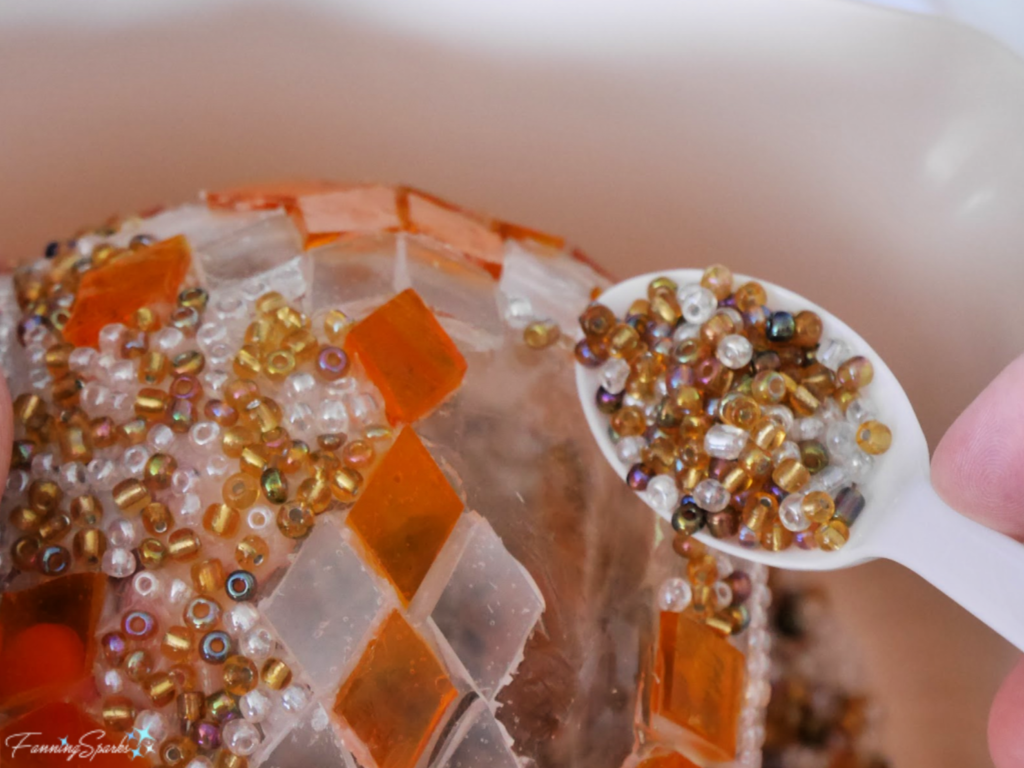
Settle beads into place by pressing lightly with hands. Repeat until all remaining sections are covered with beads.
Remove excess silicone. Allow to dry.
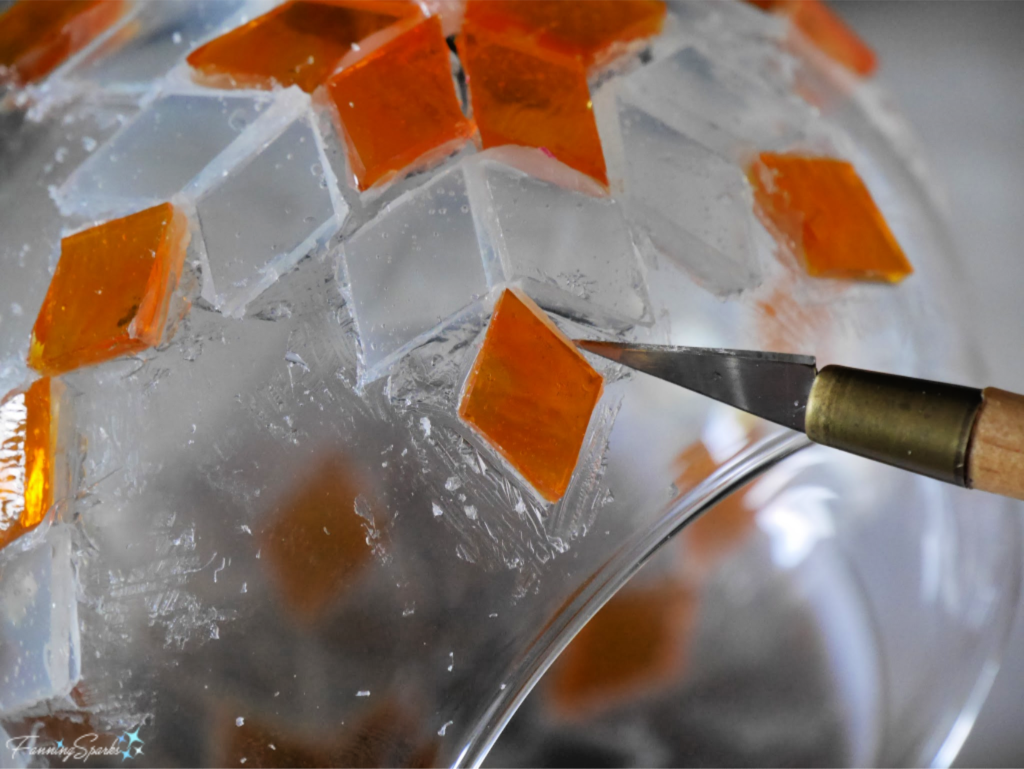
Step 14 Clean up Examine the beaded sections and fill any gaps by attaching individual beads with silicone. Use a small utility knife to carefully remove any excess silicone from the surface of the glass diamonds or beads. Use the knife to clear the joints between the glass diamonds to make way for grout. All glass diamonds and beads should be firmly attached. Adjust if needed. Snip off any thread ends on the bead edges.
Step 15 Grout
CAUTION: Be sure to wear proper protection when working with grout. Wear gloves. Wear a mask when mixing the dry grout. Also be sure to dispose of leftover grout correctly; never pour grout down a drain.
Mix dry grout with water according to manufacturer’s directions. Typically, the grout should be the consistency of thick oatmeal before applying. Have a supply of cotton rags, a bucket of water and a spatula or spreader ready.
Use the spatula to cover the entire globe with grout. Swipe the grout back and forth to force it into all the cracks.
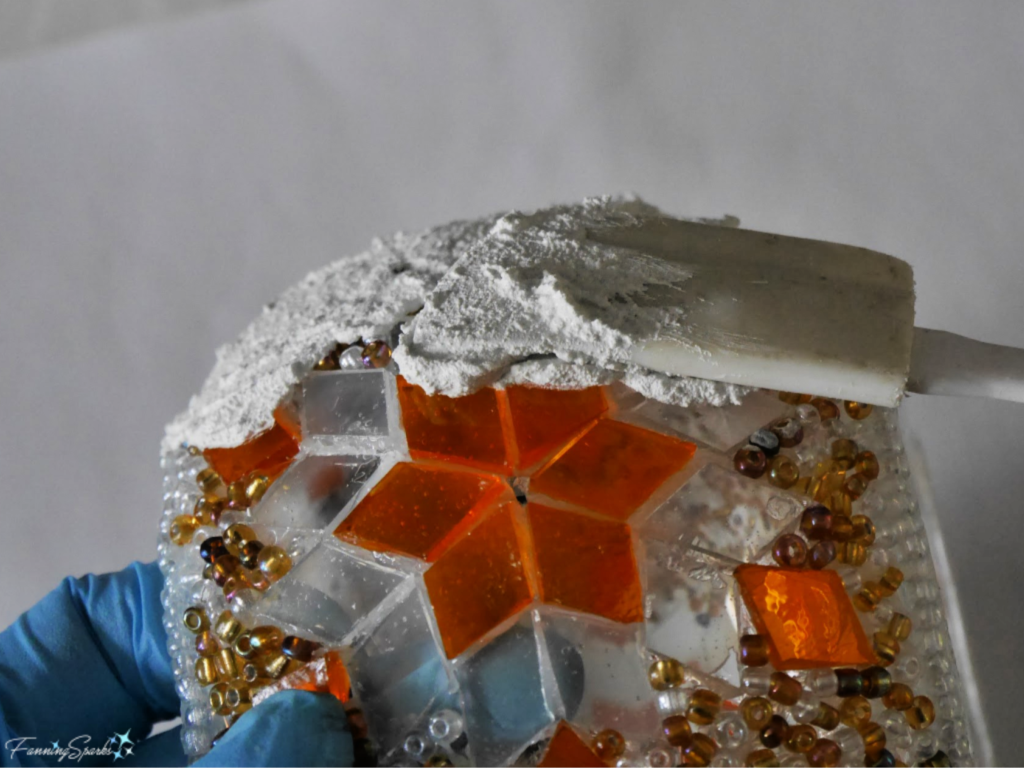
Following manufacturer’s directions, wait for the grout to set. This is typically 15-20 minutes. Remove excess grout with your hand and/or spatula. Use cotton rags to remove all grout from the surface of the glass diamonds and beads before it dries completely. It may be necessary to scrub with a slightly wet rag to remove grout from the bead surfaces. Take care not to make it too wet as the grout could wash away. Buff and shine the glass diamonds and beads with a dry cloth.
Following manufacturer’s directions, allow the grout to fully cure. This is typically a few days.
Step 16 Seal The final step is to seal the grout. Follow the manufacturer’s directions for the grout sealer you’ve selected. Allow the sealer to cure.
Step 17 Enjoy Your new Turkish mosaic candle holder is ready to use! Light a candle and enjoy!
More Info
I found this YouTube video from Delphi Glass, called How to Cut Glass – The Basics, very helpful. It’s a great place to start if you’ve never cut glass or need a refresher.
You may wish to pin for later reference.
Today’s Takeaways
1. A Turkish mosaic lamp or candle holder can add a colorful feature to your home.
2. This candle holder is a doable DIY project and a great way to try mosaics.
3. Consider making your own Turkish mosaic candle holder.


Comments are closed.