
As the world reels from the horrific situation in the United States, there is a tad of relief to be found in observing annual events such as Valentine’s Day. Traditionally, this day of hearts and flowers was focused on romantic relationships. But it has evolved to include all manner of love ― including love and appreciation for partners, friends, family, neighbours and self. Love, appreciation, kindness and caring ― these are all qualities we need more than ever.
One way to mark the day is to exchange small tokens of affection. Typically, these are thoughtful, little gifts with more sentimental than financial value. Valentine’s Day, or Galentine’s Day as some prefer, is a perfect opportunity to make and give handcrafted gifts. Making a one-of-a-kind gift for someone special signals caring and affection.
I’ve rounded up a handful of ideas from the FanningSparks blog to help inspire Valentine’s Day gift giving.
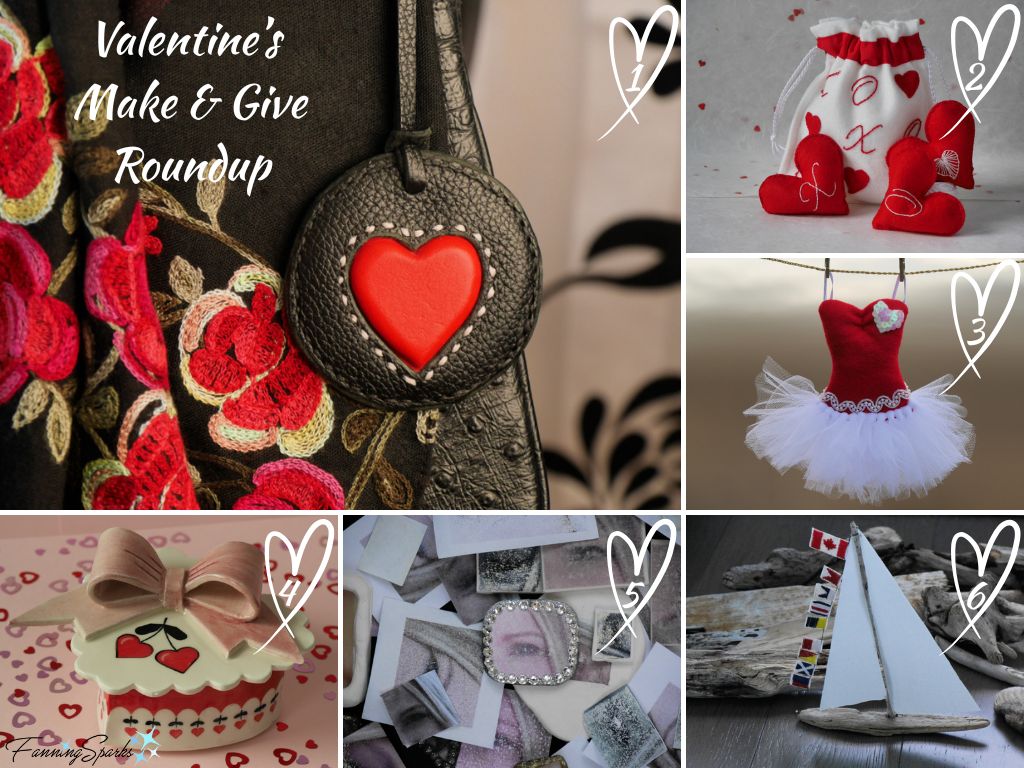
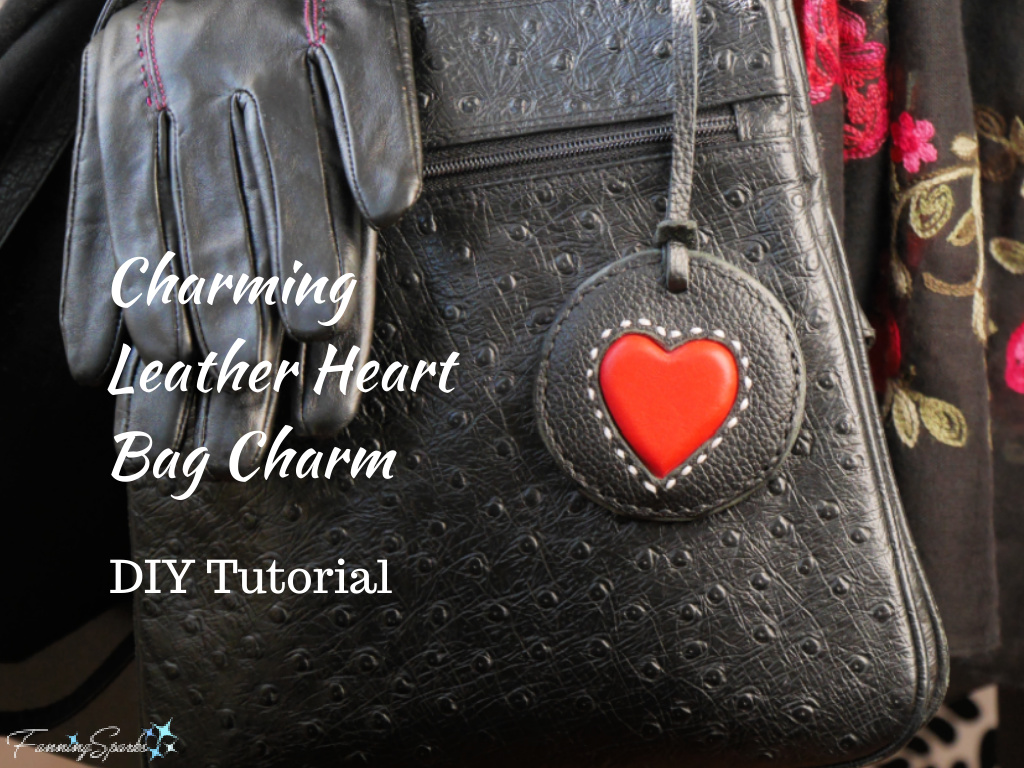
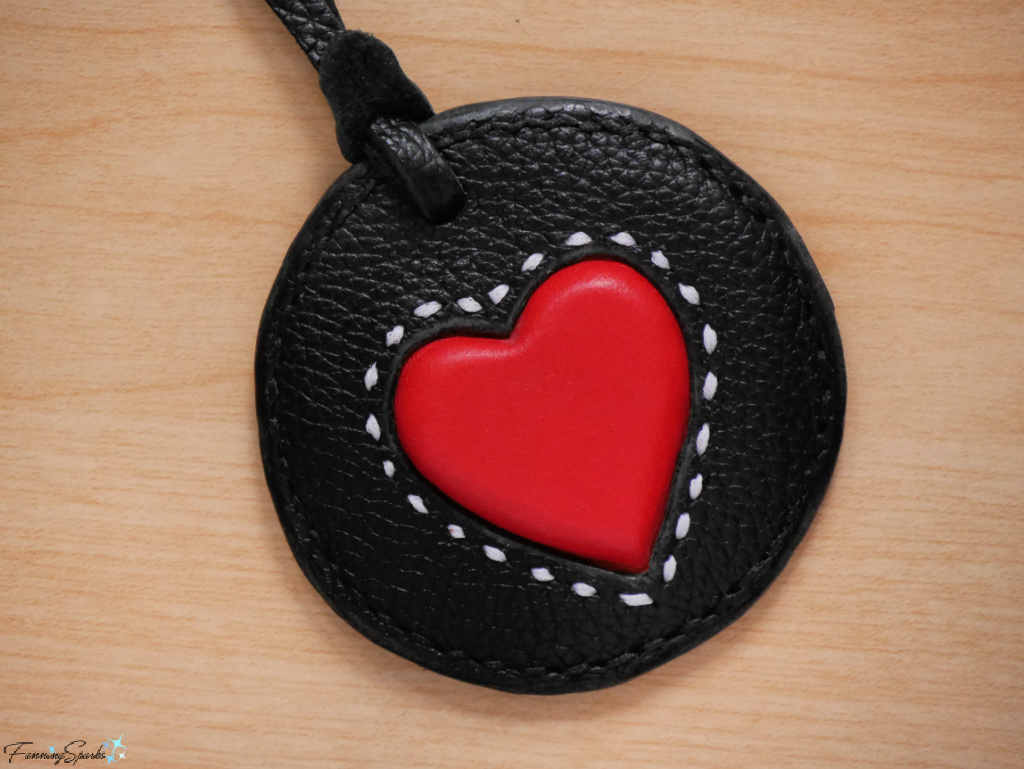
1. Charming Leather Heart Bag Charm
A bag charm, especially if it’s a one-of-a-kind handmade gift, can add a pop of personality and serve as a daily reminder of kind wishes. This charming leather bag accessory, featuring a pretty 3-dimensional heart, is made from black and red leather.
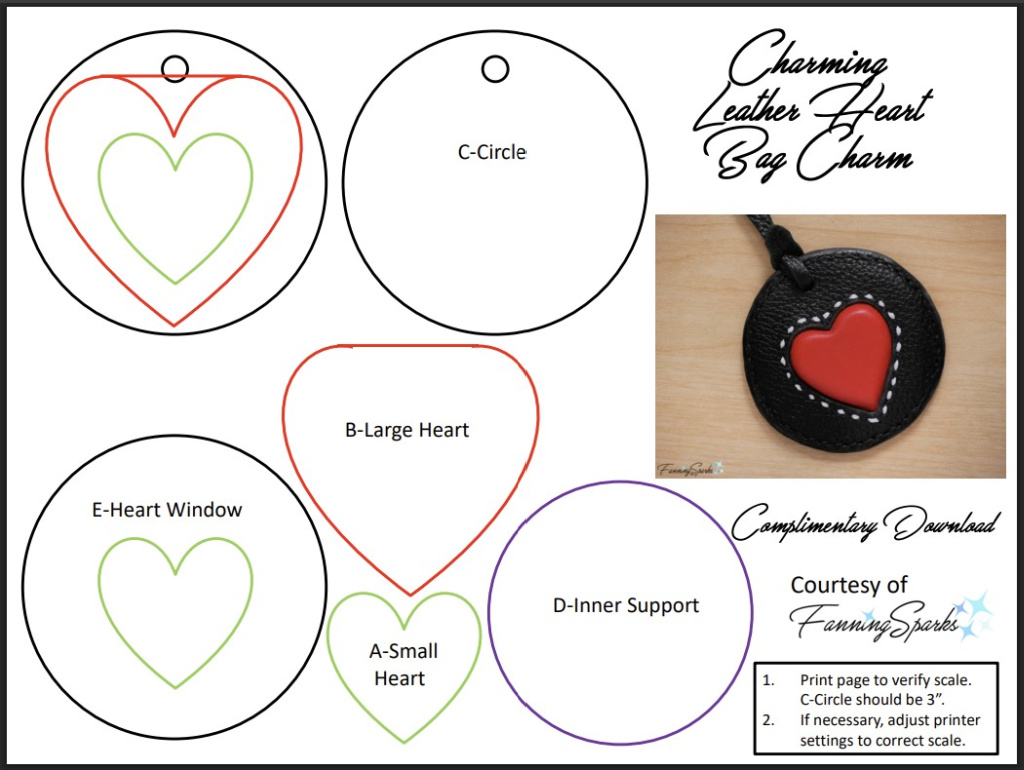
The original blog post, Charming Leather Heart Bag Charm – DIY Tutorial, contains templates for all the pieces needed for this project. Access the Charming Leather Heart Bag Charm – Complimentary Download for the project templates which look like this.
The DIY Tutorial includes detailed, step-by-step instructions but a condensed overview of the major steps follows. Please refer to Charming Leather Heart Bag Charm – DIY Tutorial for a more complete explanation of the process as well as a detailed list of the supplies, equipment and tools needed.
Charming Leather Heart Bag Charm – Project Steps
1. Use templates provided to cut a small inset heart and a heart-shaped window for molding the heart. Trim and carve to fit.
2. Use templates provided to cut a heart shape from red leather.
3. Wet the red leather heart in water. Drape over inset heart using bone folder to press into place. Cover with heart-shaped window to lock in form. Air dry.
4. Use templates provided to cut TWO circles from black leather and ONE inner support circle.
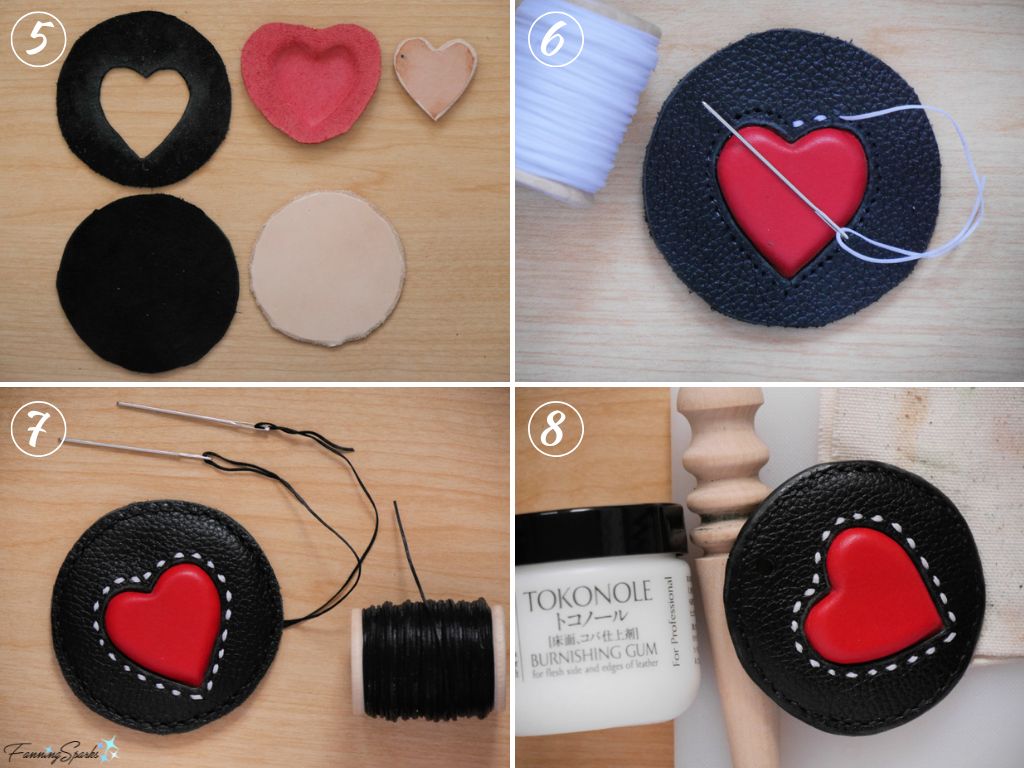
5. Cut heart-shaped window in one of the black leather circles. Test fit molded heart in window. Adjust as needed. Bevel and burnish inside edges of heart window. Assemble and glue.
6. Sew a line of running stitches around molded heart.
7. Glue the two black leather circles together. Trim edges. Sew a saddle stitch around the outside edges.
8. Bevel and burnish outside edges of the black leather circles to seal and polish. Punch hole and add strap.

2. Valentine’s Juggling Hearts
This unique gift ― a set of felt hearts designed for juggling complete with matching drawstring pouch ― is perfect for any fun-loving recipient. It’s an easy sewing project using felt with a little hand sewing, embroidery and machine stitching. Arguably, it’s easier to make the juggling hearts than to juggle them!

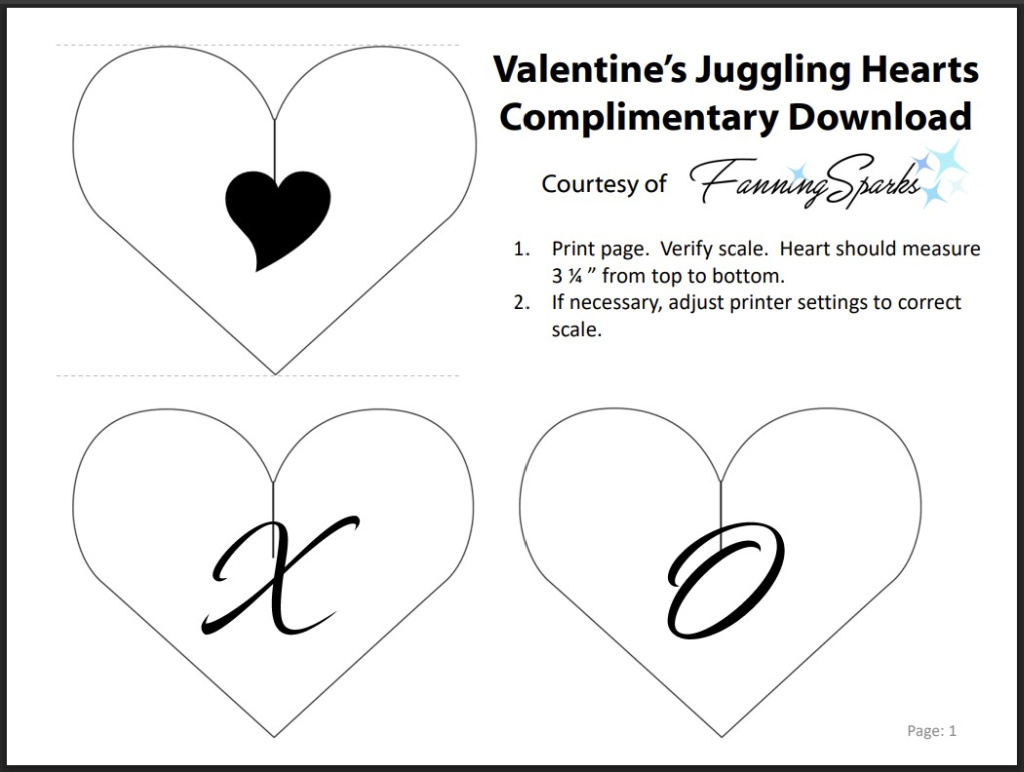
The original blog post, Valentine’s Juggling Hearts – DIY Tutorial, provides detailed step-by-step instructions and project templates. Access the Valentines Juggling Hearts – Complimentary Download for the project templates which look like this.
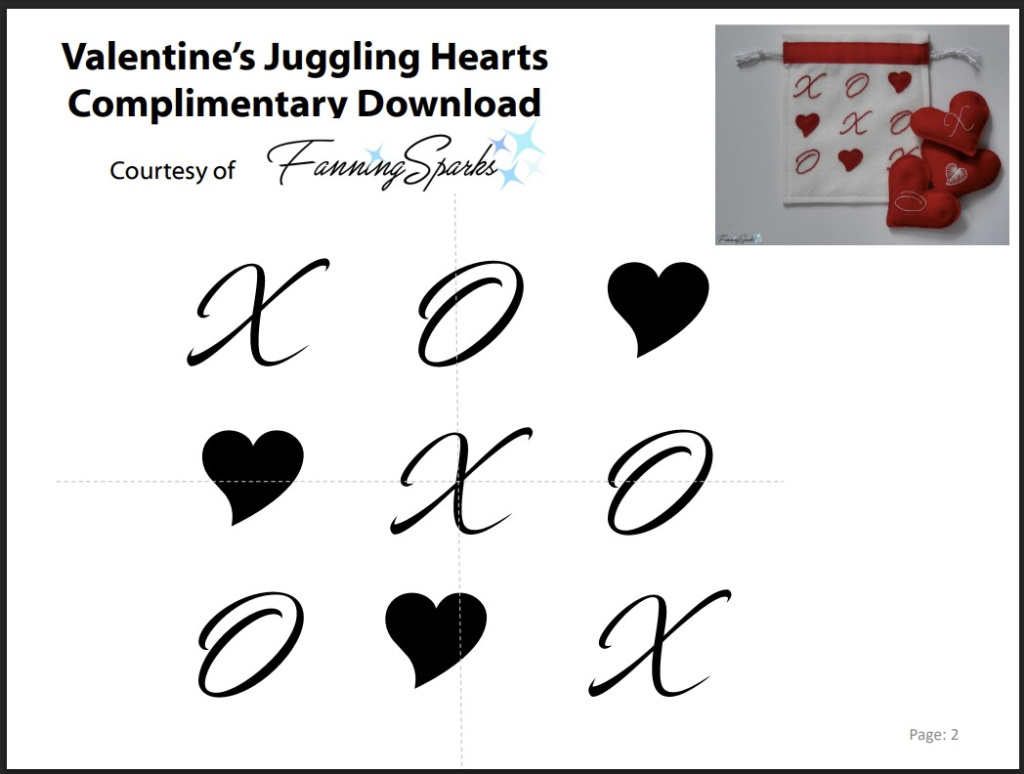
A condensed overview of the major steps in this project is shown below. Please refer to Valentine’s Juggling Hearts – DIY Tutorial for a more complete explanation of the process as well as a detailed list of the supplies, equipment and tools needed.
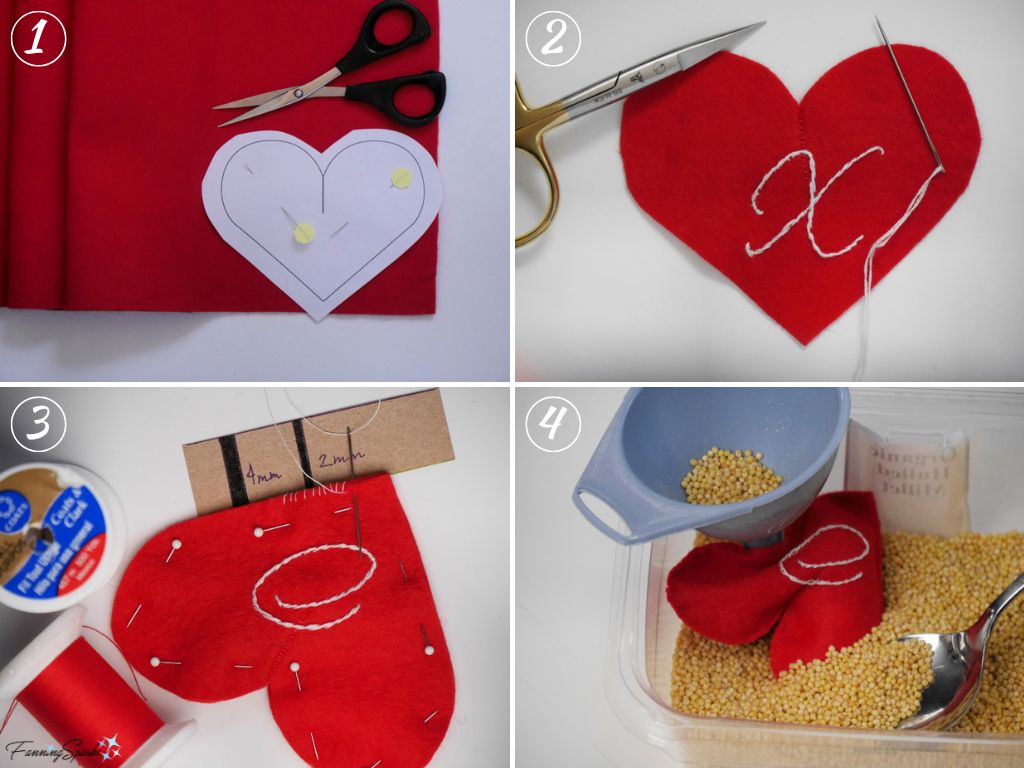
Valentine’s Juggling Hearts – Project Steps
1. Use template provided to cut SIX hearts from red felt.
2. Use designs provided to embroider three of the hearts.
3. Match an embroidered heart with an unadorned heart. Hand-sew around the outside edges with a blanket stitch leaving a small opening. Repeat with other hearts.
4. Fill with hulled millet. Hand-sew opening closed. Repeat with other hearts.
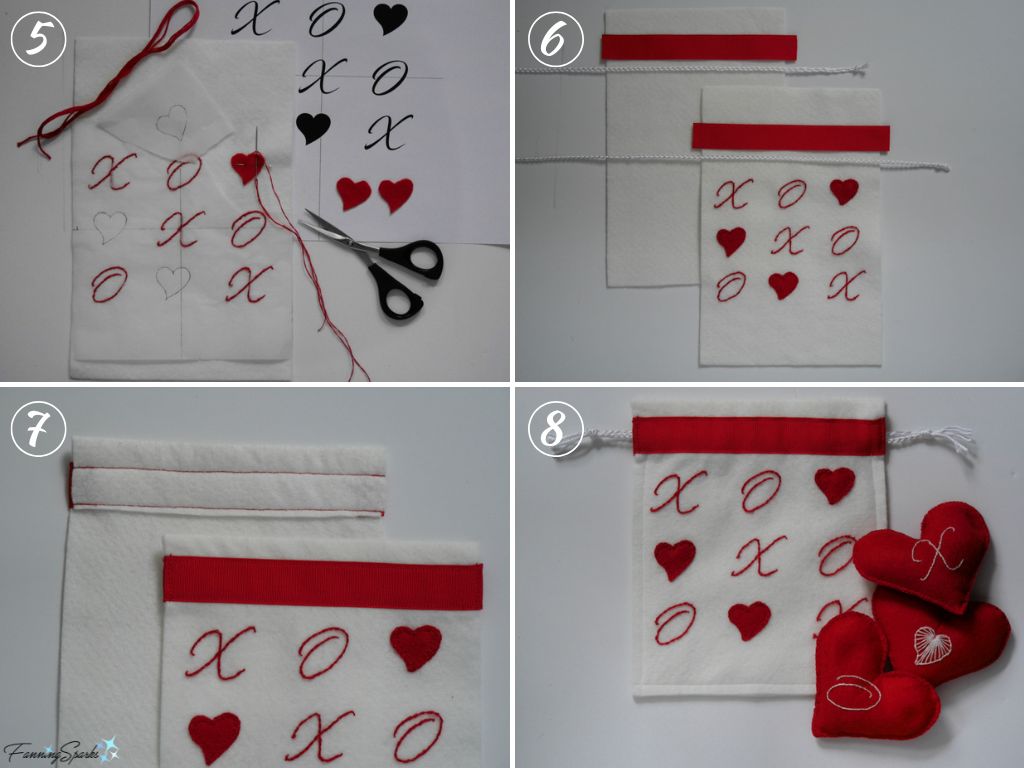
5. Cut pouch front from white felt. Use designs provided to embroider pouch front.
6. Cut remaining parts for pouch from white felt, red grosgrain ribbon and white cord.
7. Make casing along top edges of pouch parts by folding over felt and sewing on ribbon.
8. Sew front pouch to back pouch with ¼” seam along sides and bottom. Insert two lengths of cord for drawstring.
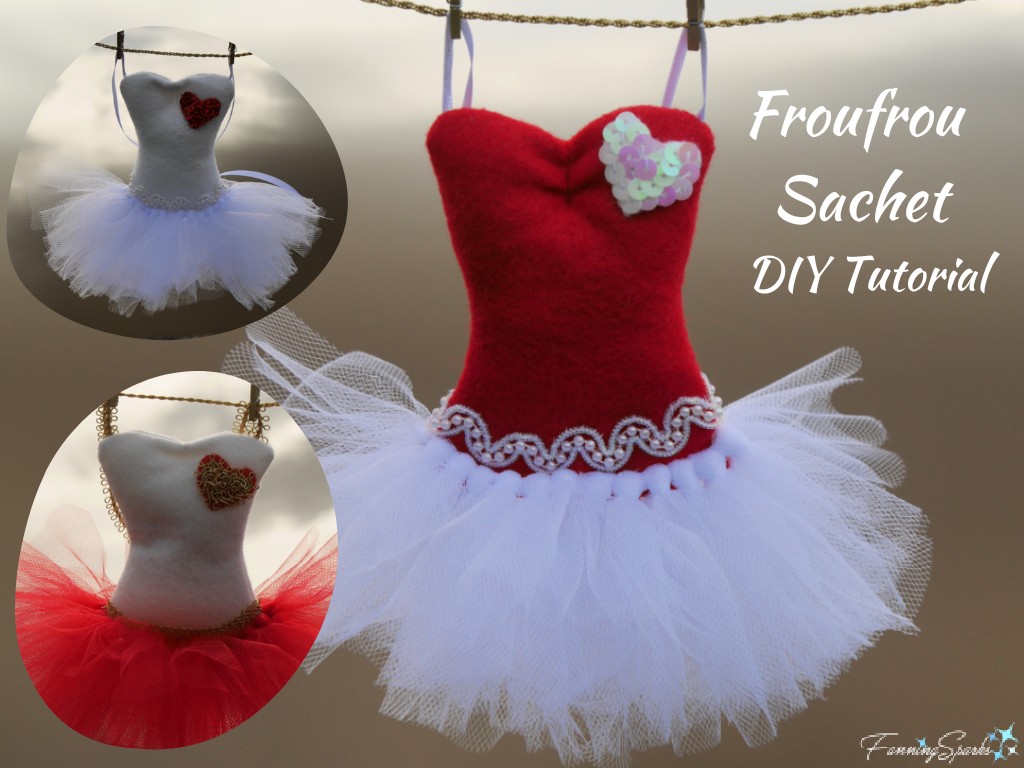
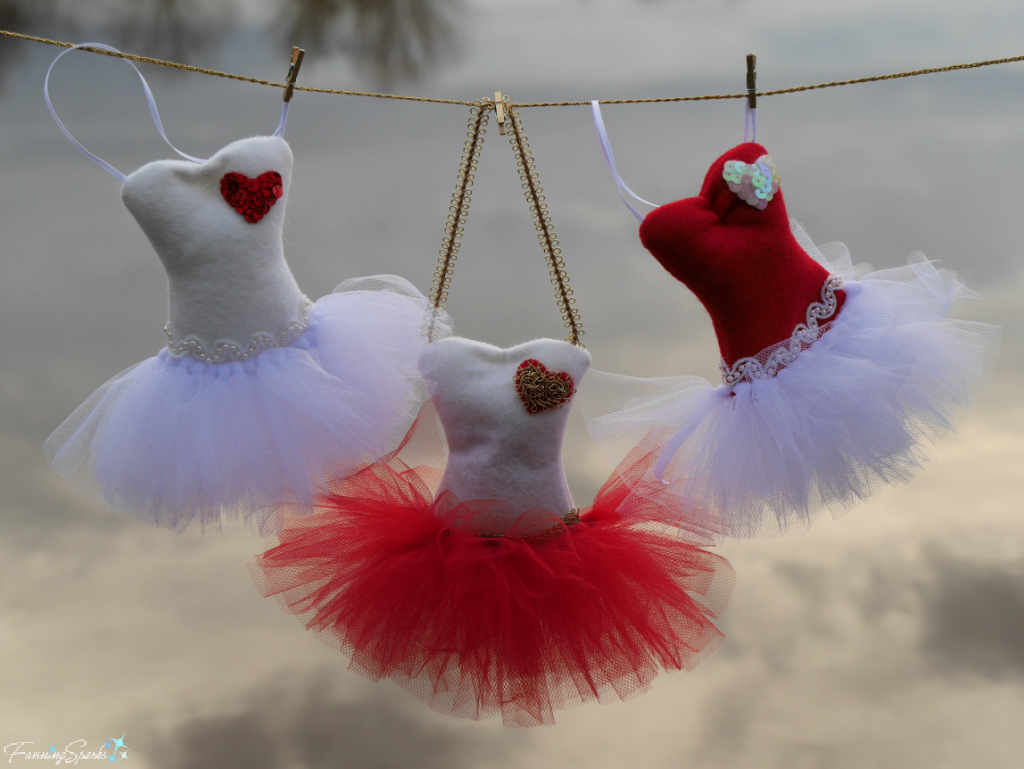
3. Froufrou Lavender Sachet
This next project is a lavender sachet designed to look like a frilly, little dress. It’s a fun mini-project which requires only a few, inexpensive supplies. The best part is the sachet can be personalized with different materials, colors and embellishments.
The original blog post, Maker Heart Challenge #3: Froufrou Sachet – DIY Tutorial, contains templates for all the pieces needed for this project. Access the Froufrou Sachet – Complimentary Download for the project templates which look like this.
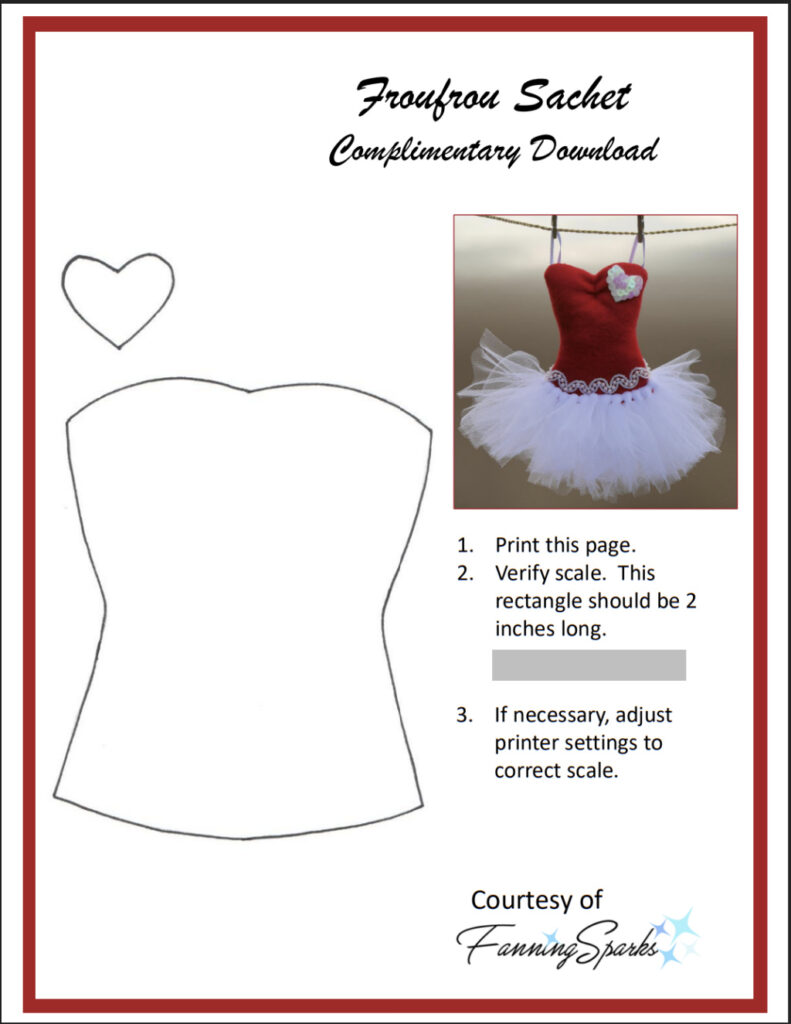
This froufrou, miniature-dress sachet can be made with basic crafting skills — some simple sewing is involved but it could be glued instead. A condensed overview of the major steps in this project is shown below. Please refer to Maker Heart Challenge #3: Froufrou Sachet – DIY Tutorial for a more complete explanation of the process as well as a detailed list of the supplies, equipment and tools needed.
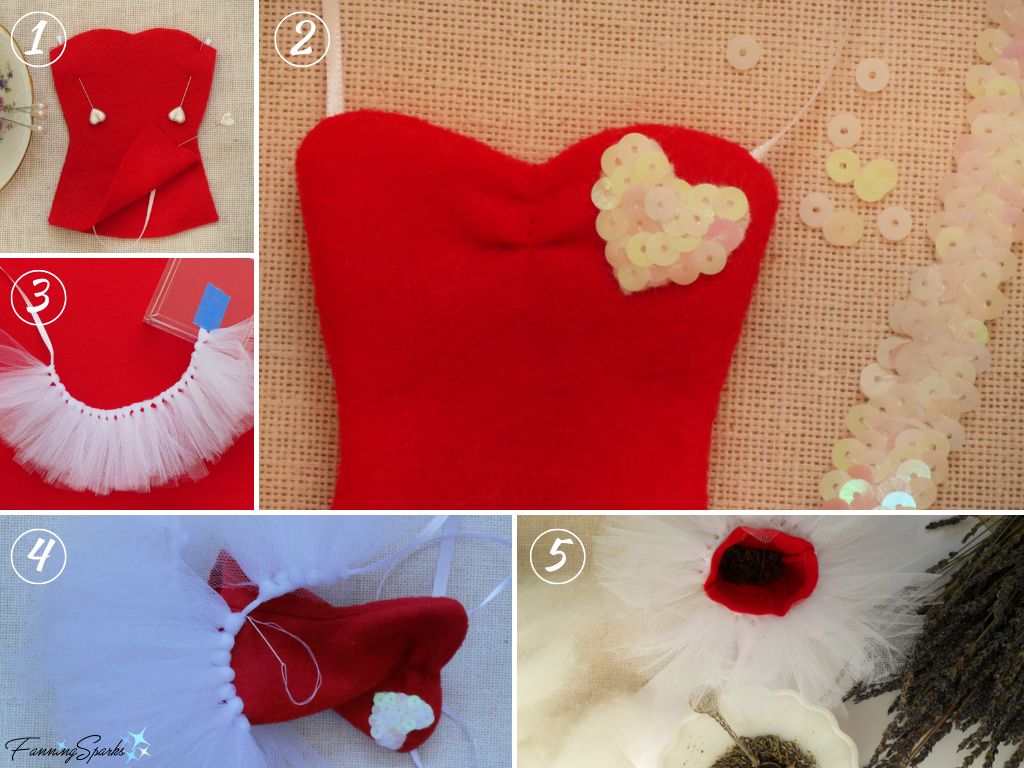
Froufrou Lavender Sachet – Project Steps
1. Use template provided to cut TWO bodice pieces from red felt. Align pieces and slip ribbon hanger between them. Sew around the outside edges leaving the bottom open. Turn right side out.
2. Make and hand-sew embellishments to the bodice.
3. Tie pieces of tulle ribbon onto narrow ribbon to make dress skirt.
4. Hand-sew tulle skirt to felt bodice. Embellish skirt waistline, if desired.
5. Fill the dress body with scented filling such as polyester batting with dried lavender. Hand-sew opening closed.
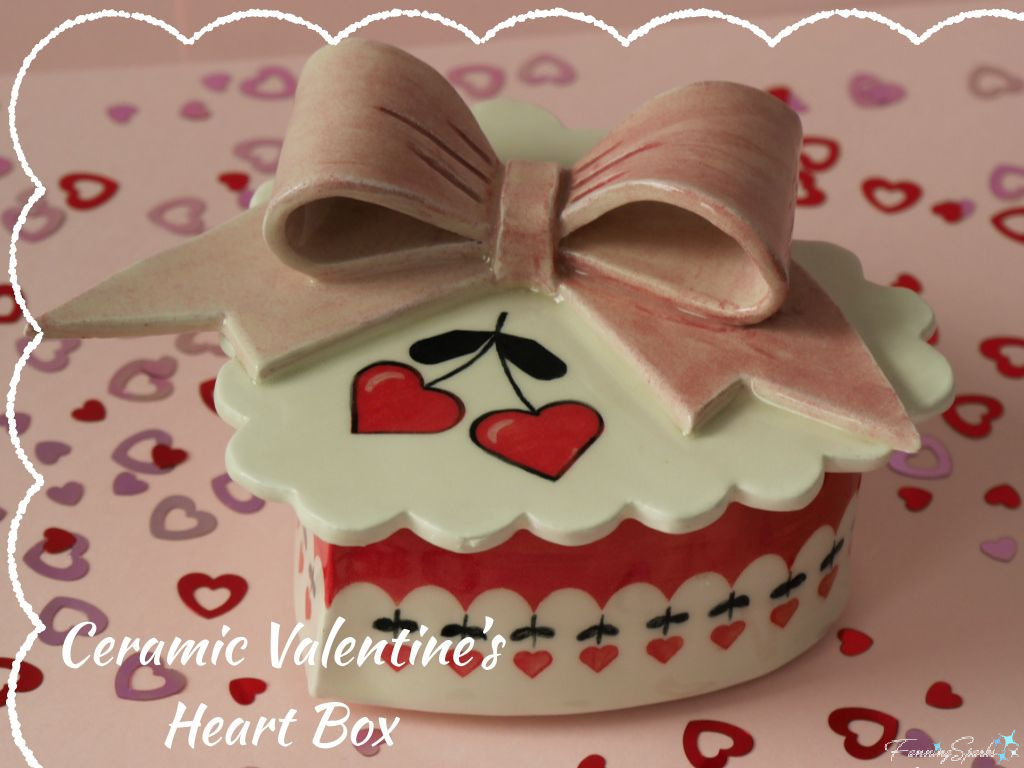
4. Ceramic Valentine’s Heart Box
This project plays off the fancy, heart-shaped boxes traditionally used to present Valentine’s Day chocolates. This small, lidded, ceramic box features a big, pink bow and heart-themed, painted details.
The original blog post, Maker Heart Challenge Bonus: Ceramic Valentine’s Heart Box, contains templates for all the pieces needed for this project. Access the Ceramic Valentines Heart Box – Complimentary Download for the project templates which look like this.
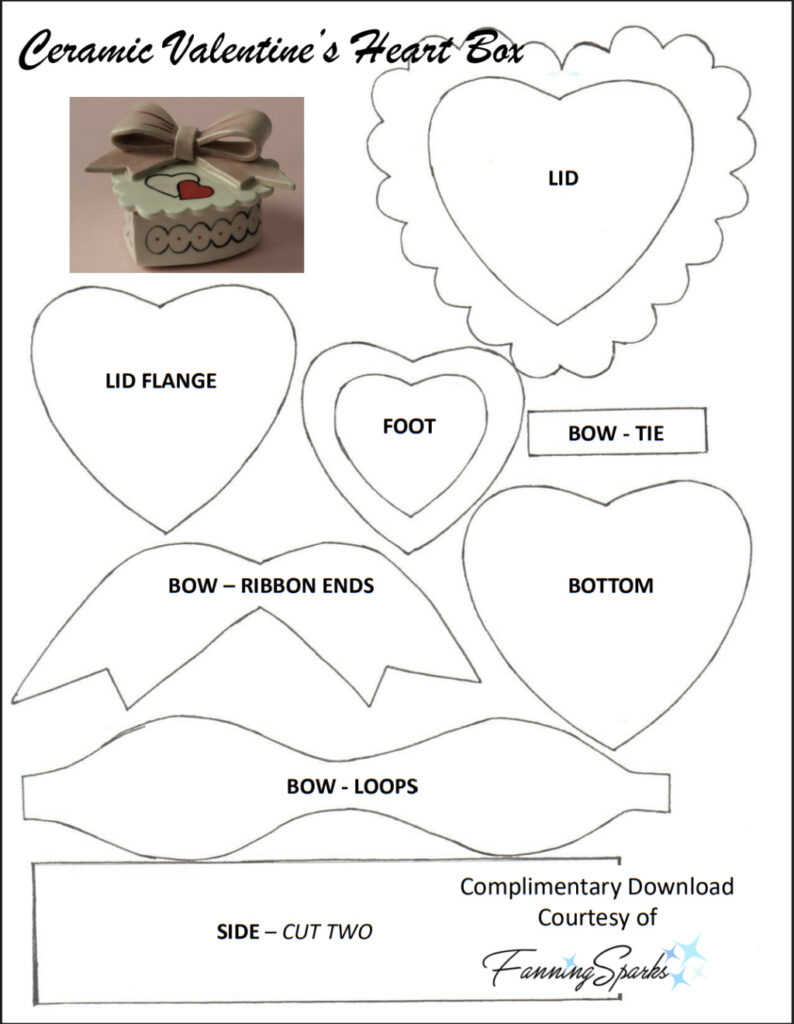
This decorative heart-shaped box is hand-built from clay and fired in a pottery kiln. A condensed overview of the project steps is shown below. Please refer to Maker Heart Challenge Bonus: Ceramic Valentine’s Heart Box for more detailed instructions.
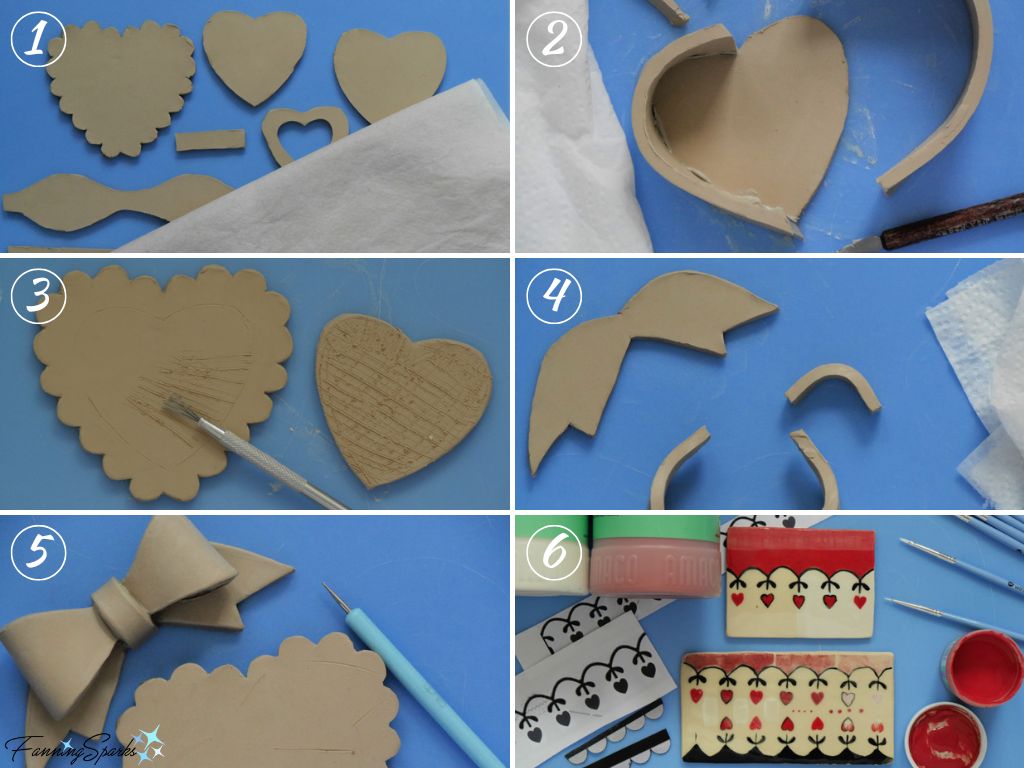
Ceramic Valentine’s Heart Box – Project Steps
1. Use templates provided to cut various parts from rolled clay.
2. Assemble body of box by attaching sides to bottom. Score, slip and seal seams.
3. Attach flange to bottom of lid and foot to bottom of box. Score, slip and seal seams.
4. Assemble bow by slowly shaping pieces ― ribbon ends, tie and loops ― into place. Score, slip and seal seams.
5. Position bow on box lid. Score, slip and seal seams. Allow pieces to dry.
6. Paint box, bow and details with underglazes. Bisque fire in kiln. Finish by covering with clear glaze and final firing.

5. Miniature Eye Portraits
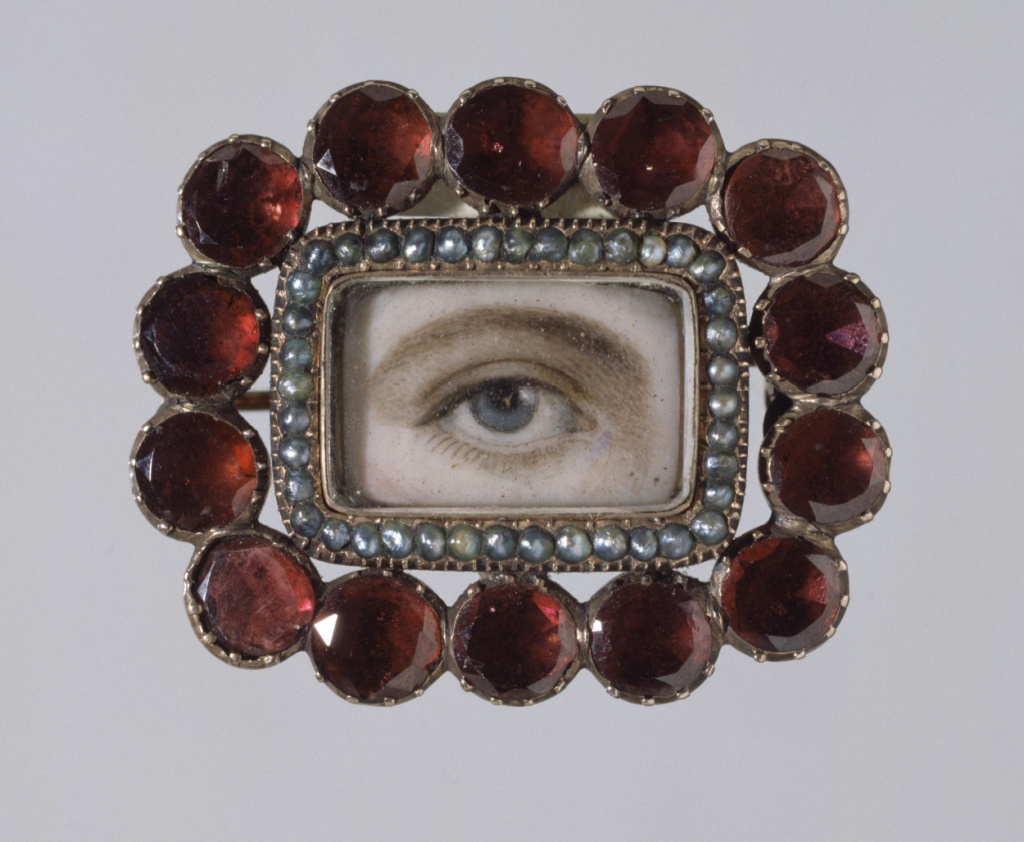
Eye miniatures, also known as “lover’s eyes”, were a thing about 200 years ago. These miniature portraits, usually painted with watercolor on ivory and incorporated into jewelry, focused solely on the eye. At first glance, eye miniatures might seem a little creepy but in light of the history behind them they become rather endearing. Here’s the scoop.
Eye miniatures, typically depicting the eye of a spouse, loved one or child, were worn as brooches, pendants, rings and other jewelry. The eye is clearly depicted on these miniature paintings but the subject’s identity isn’t immediately recognizable and may only be known to the recipient. This mysterious twist led to the term “lover’s eyes” and the practice of exchanging secret eye portraits as a token of love.
Here’s an example of an eye miniature set in a frame of pink stones from the Victoria & Albert Museum in London. As is often the case with eye miniatures, the painter and the subject are unknown.
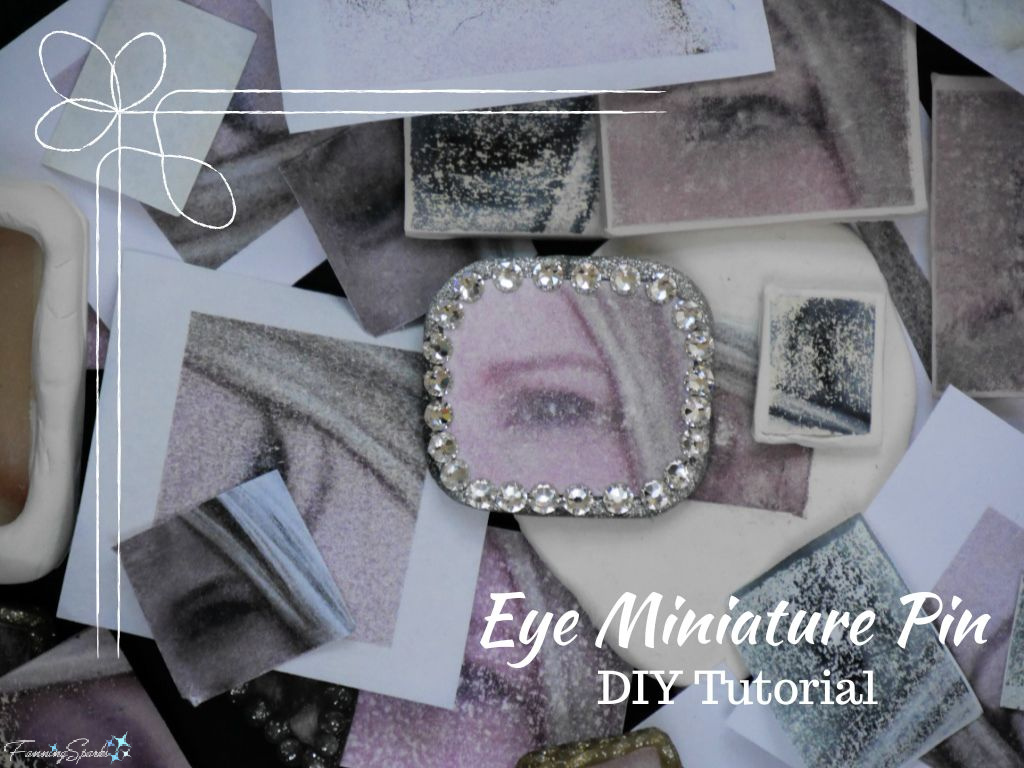
A few years ago, I tried making my own eye miniature. As it turns out, with a good photo and a little polymer clay, anyone can make one of these tokens of affection to exchange with loved ones.
The DIY Tutorial includes detailed, step-by-step instructions but a condensed overview of the major steps follows. Please refer to I Only Have Eyes For You with DIY Tutorial for a more complete explanation of the process as well as a detailed list of the supplies, equipment and tools needed.
Miniature Eye Portraits – Project Steps
1. Select a good quality photo of the eye. Crop and size as desired. Print on regular paper with a laser printer (not inkjet).
2. Roll out and smooth small square(s) of white polymer clay. Place eye print face down on surface and rub. Use hand sanitizer to transfer image.
3. Allow to dry. Trim to desired size and shape.
4. Create frame with desired color(s) of polymer clay. Embellish.
5. Bake in craft oven as per recommended temperature and time.
6. Attach tie tack or bar pin to back.

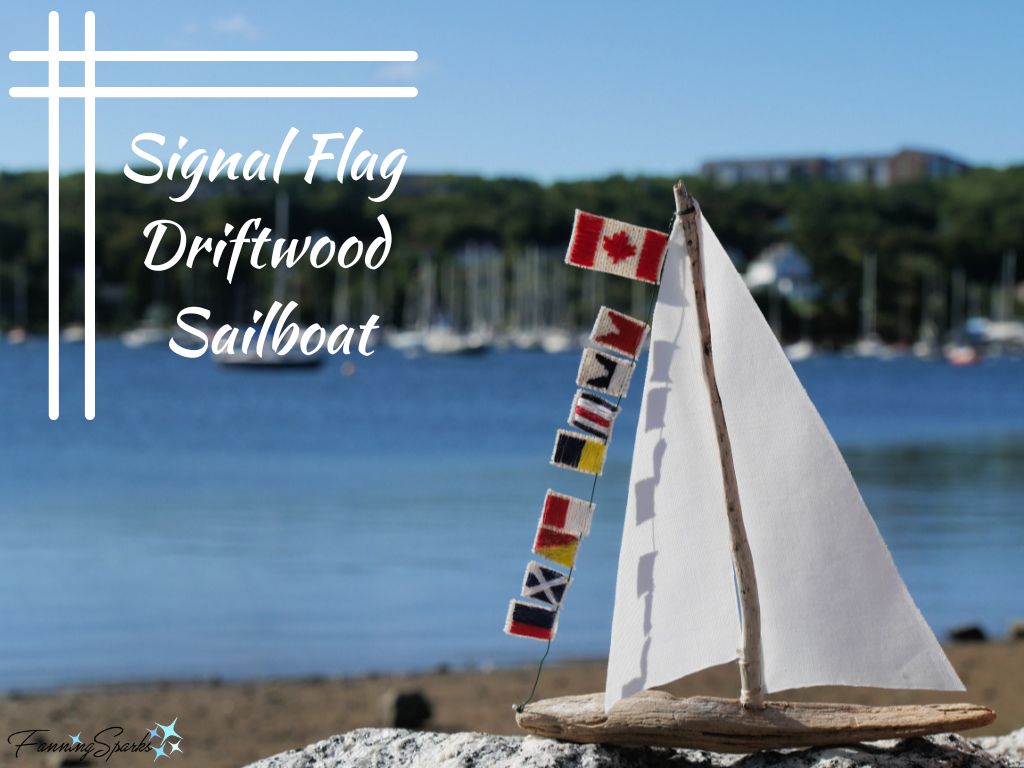
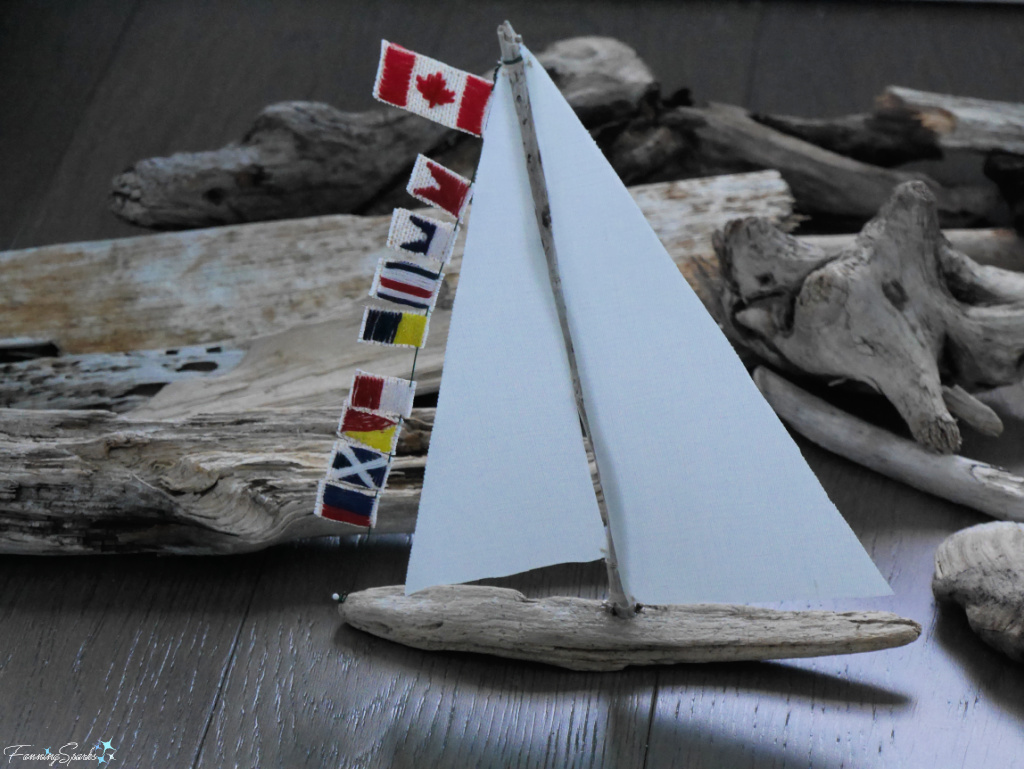
6. Signal Flag Driftwood Sailboat
This last suggestion ― a signal flag driftwood sailboat ― can easily be made with a personal message. On my version, the signal flags, flying under the flag of Canada, spell out the message “BACK HOME”. I made it to commemorate our return to Canada after living abroad.
It would be just as effective with a short Valentine’s message flying under a red heart. How about “LOVE YA”, “MY BESTIE”, “XO XO XO” or “MARRY ME”?
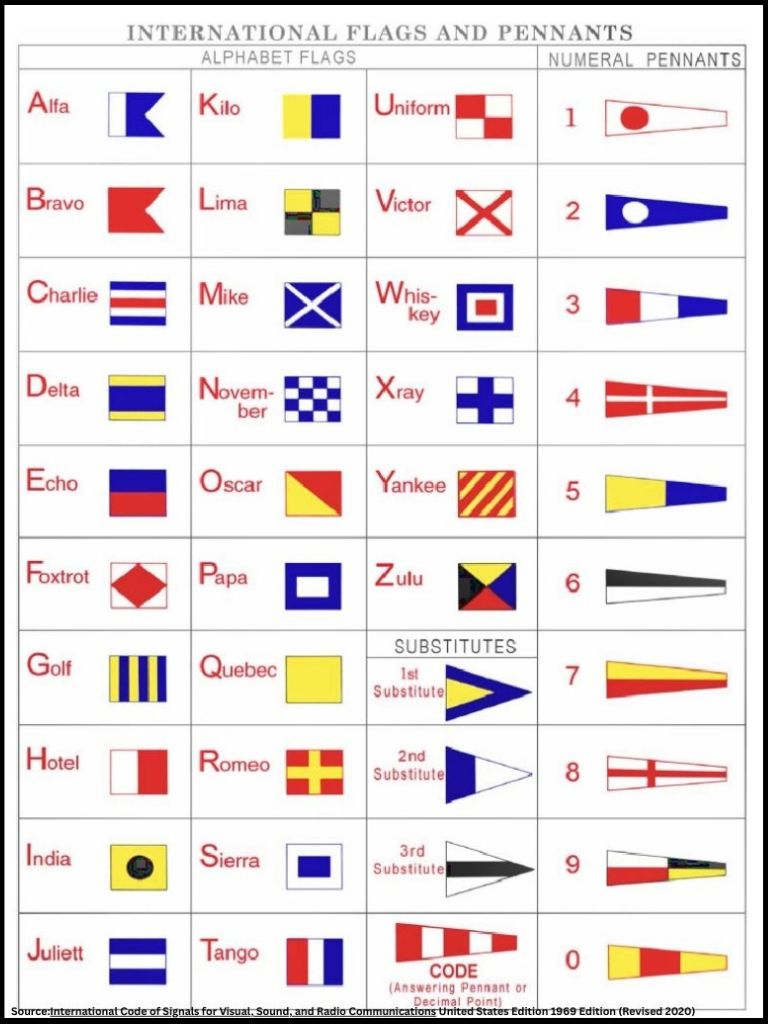
Shown below is the International Code of Signals for Visual, Sound, and Radio Communications which translates letters and numbers to signal flags.
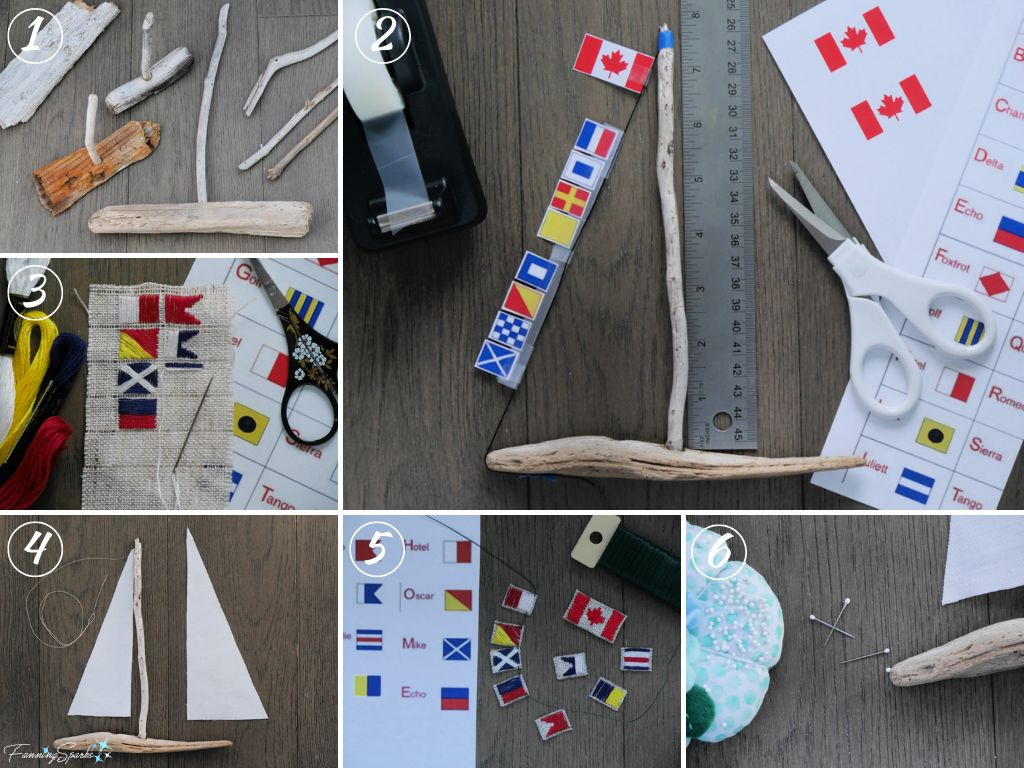
This message-carrying decorative sailboat is made from driftwood, fabric and ordinary supplies. Only basic crafting skills are needed. A condensed overview of the project steps is shown below. Please refer to Signal Flag Driftwood Sailboat for more detailed instructions.
Signal Flag Driftwood Sailboat – Project Steps
1. Select driftwood for the body and mast of the sailboat. Drill shallow hole in center of body. Test to ensure it is balanced and sits flat. Insert and glue mast in place.
2. Select signal flags to spell out desired message.
3. Embroider flags on small pieces of fabric. Alternatively, simply print on paper and cut to size.
4. Cut sails from white fabric. Attach to mast with thread. Glue as required.
5. String flags on fine wire ensuring they will “fly” correctly.
6. Attach wire to the sailboat with thread and/or glue. A shortened pin stuck into the driftwood can hold the bottom end.
This completes the Valentine’s Roundup Make & Give featuring FanningSparks’ projects. Hopefully, this selection of unique, one-of-a-kind, handmade projects inspires Valentine’s Day gift giving.
More Info
Previous blog posts mentioned in this blog post include:
. Charming Leather Heart Bag Charm – DIY Tutorial
. Valentine’s Juggling Hearts – DIY Tutorial
. Maker Heart Challenge Bonus: Ceramic Valentine’s Heart Box
. Maker Heart Challenge #3: Froufrou Sachet – DIY Tutorial
. I Only Have Eyes For You with DIY Tutorial
. Signal Flag Driftwood Sailboat.
Today’s Takeaways
1. Send a message of caring and affection to someone special with a handcrafted one-of-a-kind gift.
2. Handmade gifts can be personalized and tailored to the recipient.
3. Consider making and giving gifts this Valentine’s Day.


Comments are closed.