Thrift stores, estate sales, antique malls, flea markets… all call my name. It’s not that I buy a great deal. I don’t collect mountains of old dishes or hoard collector’s plates or stash old time silver. Well… there is that collection of milk glass that may be a little out of control… but that’s a story for another day.  One might wonder why it’s so appealing to just look at someone else’s discards. It’s the thrill of the hunt. It’s all about finding that one, perfect vintage piece. An item that brings back memories and is a pleasure to view. In my opinion, a well-placed vintage piece adds character and completes the story of our home.

The below vintage tin container is a case in point.

Vintage tin container, specifically designed to hold Dutch rusk, on display in my home. @FanningSparks

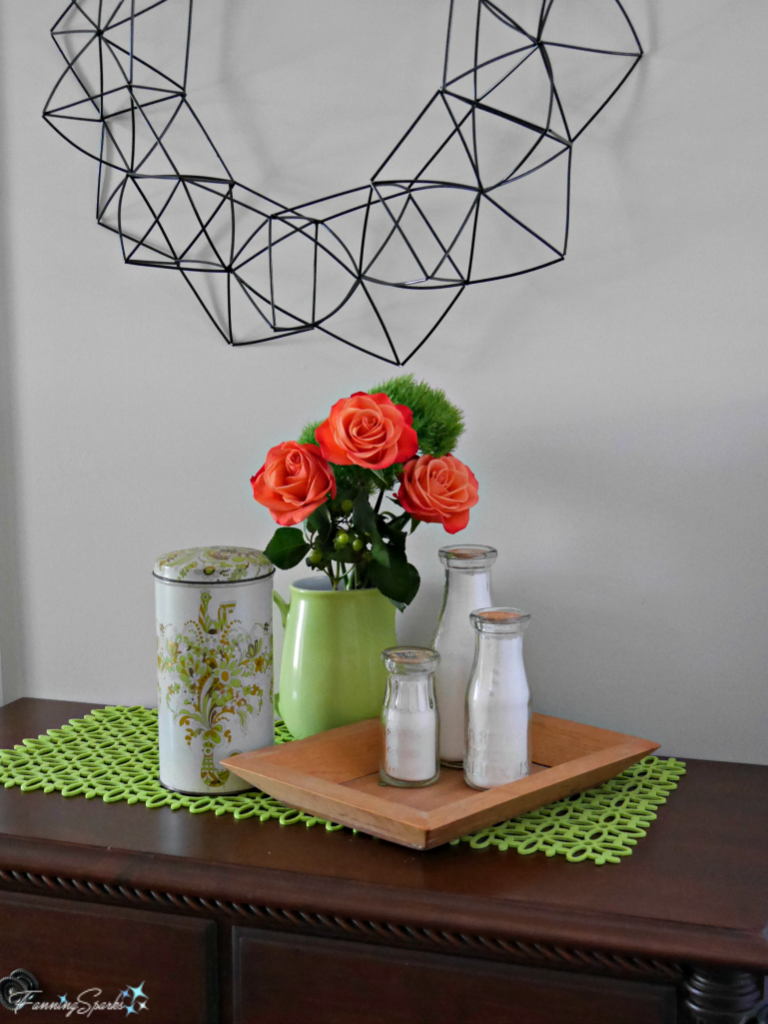
I love the design on this container.  It has a distinctive art deco style and the gold and green colors are pretty and unusual.  I found this container a few years ago in an antique/flea market in Belgium. I love its old world origins.  But the real story here is why this container is meaningful to me.

Vintage tin designed to hold Dutch Rusk. @FanningSparks

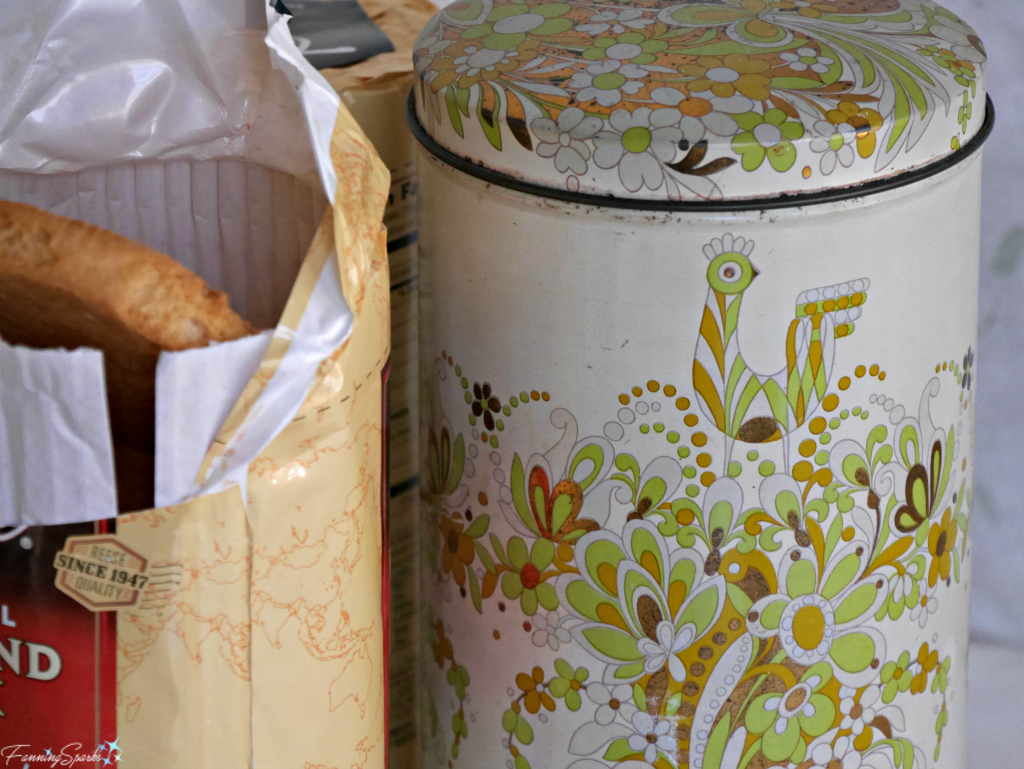
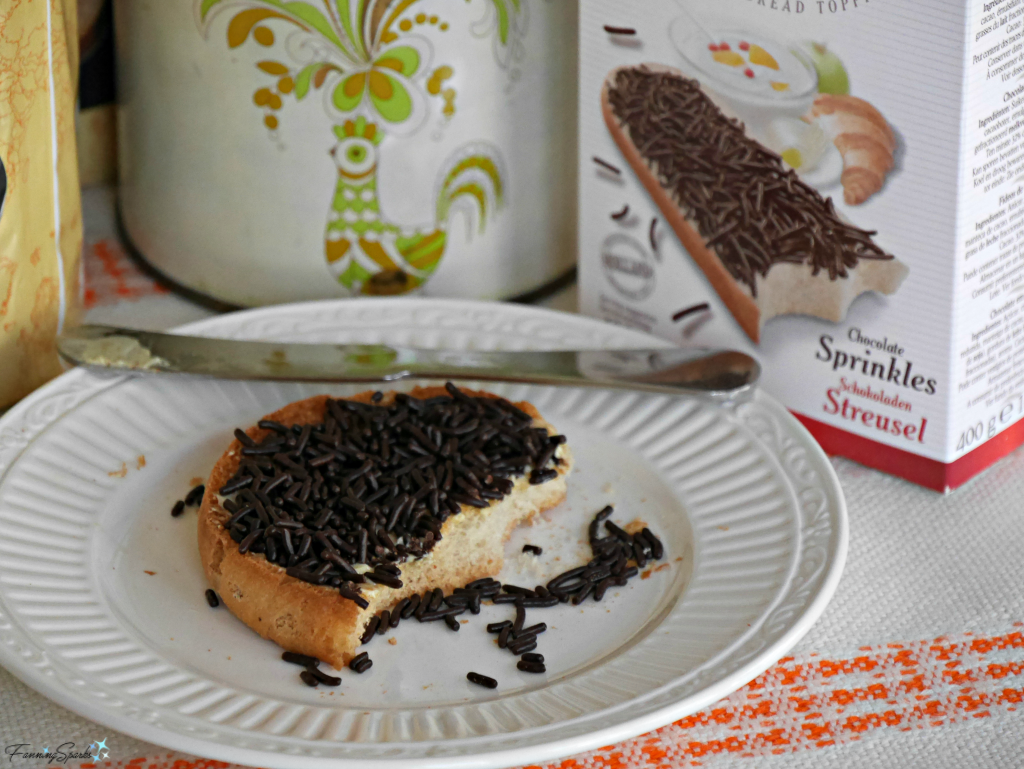
My mother and father were born in The Netherlands. They immigrated to Canada just after they were married in 1955. They brought many Dutch traditions, beliefs and practices with them including some favorite foods.  One of those foods was beschuitjes or rusk which is a twice-baked bread. As children, rusk were a rare treat enjoyed when family members visited from The Netherlands. One of the unique things about rusk is the way in which it’s packaged; a dozen rusk are neatly stacked into a little tower.  This brings me back to my beloved vintage tin. Notice how the vintage tin is the perfect fit for the package of rusk? When I look at that tin, I see special times with my family.

Lovely breakfast setting... beschuit , hagelslag and tea... with a Dutch flair. @FanningSparks

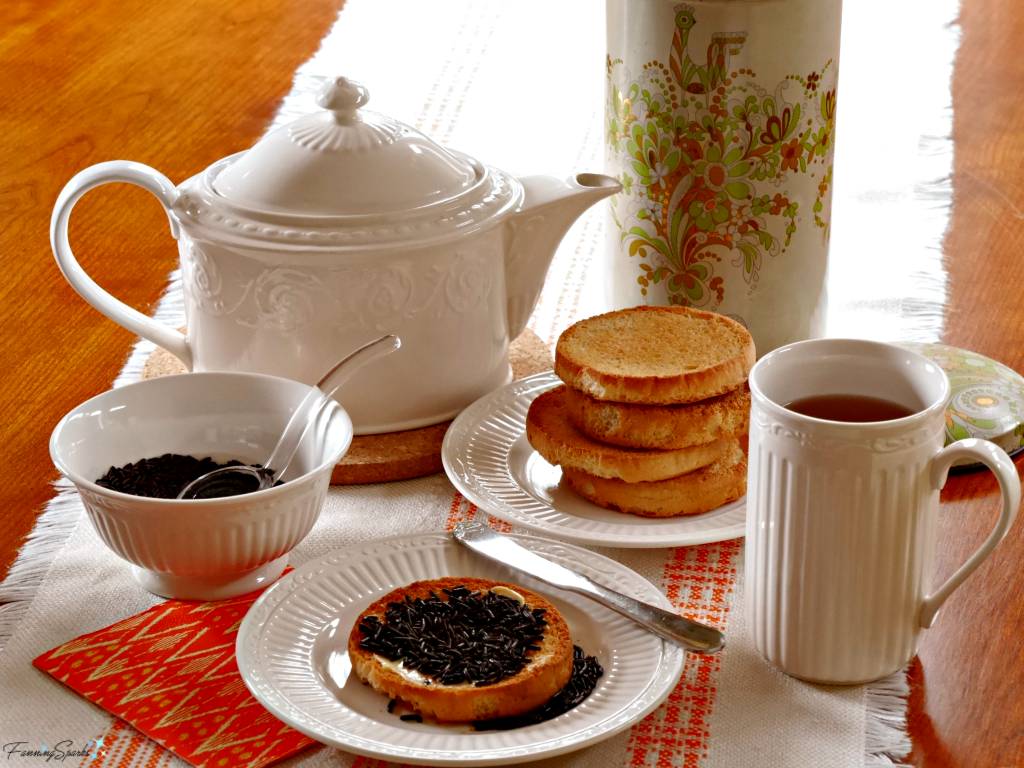
You may notice something else that’s rather unusual in the above photo.  The topping on the rusk looks like chocolate sprinkles.  Indeed it is!  The Dutch name for this sweet topping is hagelslag.  It’s not at all unusual to have hagelslag on a beschuit for breakfast in The Netherlands.

What a treat! Beschuit / rusk with hagelslag / chocolate sprinkles for breakfast. @FanningSparks

Interestingly, there’s a Dutch tradition to celebrate the birth of a child that involves rusk and sprinkles.  In this case, the sprinkles, called muisjes, are anise seed flavored and come in baby blue or baby pink.  Traditionally, visitors are served rusk with color-coordinated sprinkles … blue for a boy or pink for a girl… when they visit a family to celebrate the birth of a baby.  My immediate family did not follow this tradition but my Mom does remember getting these treats when babies were born to the Dutch royal family.  Are you familiar with this tradition?  Do you have similar memories?

Today’s Takeaways

I hope this post sparks some ideas for you too:
1. Keep your eyes open for meaningful vintage items at thrift stores, estate sales, antique malls and flea markets.
2. A well-placed vintage item can add richness and depth to your home’s décor.
3. Connecting with the past is integral to telling the story of our lives.
Peg - FanningSparks Author

One of the great things about writing a blog is it keeps me motivated to search out and investigate intriguing ideas.  One of the great things about being retired is it affords me the time to do just that.  For instance, recently I heard designer Ingrid Fetell Lee give a TED Talk titled “Where Joy Hides and How To Find It”.  Her ideas resonated with me and so I delved deeper into her “The Aesthetics of Joy” website and Instagram account.  Ingrid explores the relationship between our environment and our emotions and then applies these linkages to inspire her designs with joy.  We can define joy as a passing pleasure or a momentary feeling of great pleasure and happiness.

Through research Ingrid has identified a series of joyful things… things that bring joy universally… like cherry blossoms, rainbows, fireworks and bubbles.  Over time, she recognized patterns across these joyful items.  In her TED Talk she reveals that the patterns include “round things, pops of bright color, symmetrical shapes, sense of abundance or multiplicity, feeling of lightness or elevation.”  She makes a strong case for purposely incorporating these elements into our surroundings.  I admire and respect that her ideas are backed by scientific research.  Ingrid has written a book, called Joyful: The Surprising Power of Ordinary Things to Create Extraordinary Happiness. The book, which will become available in September 2018, can be preordered now.
Jan 8, 2019 Update: I loved the book Joyful.  See my followup post: My Top 3 Nonfiction Reads from 2018 for more info.

In the meantime, I’ve been following Ingrid’s Instagram account where folks are encouraged to tag their photos with “#JoySpotting”.  This got me thinking about my own photos.  Have I captured photos of joyful moments and objects?  Do these joyful moments and objects fit the patterns?  Which photos could I tag as #JoySpotting?  Today, I’d like to share the outcome of #JoySpotting in my own favorite photo archives.

I recall being drawn to the below art installation at Cornerstone Gardens in Sonoma California. This series of jaunty pinwheels was constantly in motion.  It was bright, colorful and mesmerizing.  Joyful? Check.

Joyful pinwheels spinning at Cornerstone Gardens in Sonoma California @FanningSparks

The below sculpture, titled “Swing Me Mama”,  is by Dominic Benhura and on display in the Singapore Botanic Gardens.  It’s a delightful work of art guaranteed to make you smile.  Joyful?  Check.

Swing Me Mama Sculpture in Singapore Botanic Gardens @FanningSparks

While on the theme of spinning and movement, I have quite a few shots of carousels and merry-go-rounds but they’re challenging to photograph.  I remember being drawn to the below beautifully carved and painted horses on the Carrousel de la Tour Eiffel in Paris.  The music was playing.  Children were enjoying the ride.  Joyful? Check.

Eiffel Tower Carousel horses in Paris France @FanningSparks

Cherry blossoms are a universally recognized joyful object.  Cherry blossoms are fleeting… you have to catch them at just the right moment to see their full beauty.  The cherry blossoms in the below photo, taken near Cologne Germany where I lived for several years, are at their peak.  Joyful?  Check.

Cherry trees in full bloom in Cologne Germany @FanningSparksCherry trees in full bloom in Cologne Germany @FanningSparks

There’s a connection between joy and things that don’t seem possible like floating and flying.   Below is a shot of a hang glider taken in Tenerife.  I’ve always loved this photo, partly because of the slow natural descent of the hang glider, but primarily because of the split-second timing that captured the hang glider directly above the church steeple.  Joyful?  Check

Hang glider slowly descends in Tenerife @FanningSparks

Roundness, and its connection to play, is one of the joyful patterns.  The below marbles are suspended in a frame and hung in a window.  I remember being drawn to this display because of the repeating shapes and how the marbles affected the light.  Joyful?  Check.

Marbles framed in front of window light @FanningSparks

I have numerous photos with pops of color but the below photo, showing a lone red tulip in a field of rich green grass, really stands out.  It’s the unexpected surprise of seeing this tulip out of context that drew me to this scene.  Joyful?  Check.

Lone red tulip in field of green grass @FanningSparks

Gift-giving is usually a source of joy.  I believe a beautifully wrapped gift enhances that joyful experience.  The below photo shows a carefully wrapped gift intended to make the recipient feel extra special.  Joyful?  Check.

Pretty gift wrapping with Way To Go note. @FanningSparks

I came across this art installation in Berlin Germany some time ago.  It was a wonderful surprise!    The image of all those paper boats floating on the water of the naturalistic pond has stayed with me.  Joyful?  Check.

Paper boats floating on naturalistic pond in Berlin Germany @FanningSparks

After going through this little exercise, I realize I’ve always been drawn to joyful objects as I travel and explore.  I’ve also incorporated some joyful patterns, like pops of bright color, into my home decor.  Here are a couple of examples from my current kitchen.

Bright cheery kitchen in my Villa Rica home @FanningSparks

Happy sunflower mosaic mirror in my Villa Rica home @FanningSparks

Similar bright colors were chosen for the chairs and table in my outdoor seating area.

Bright pops of color in my Villa Rica garden @FanningSparks

I love bright chartreuse green especially when its grounded with black and white.  Here are some examples from a condo where we used to live.

Pops of green in my Atlanta condo @FanningSparks

Pops of green in my Atlanta condo @FanningSparks

Given this new awareness of joyful objects and patterns, I’ll be looking for more ways to incorporate joy into my surroundings going forward.

More Info

You can learn more about Ingrid Fetell Lee, The Aesthetics of Joy, and her book Joyful: The Surprising Power of Ordinary Things to Create Extraordinary Happiness on her website.
Jan 8, 2019 Update: I loved the book Joyful.  See my followup post: My Top 3 Nonfiction Reads from 2018 for more info.

Today’s Takeaways

I hope you’ve enjoyed today’s post and that, you too, will be motivated to do some joy spotting.   Here are a few thoughts to get you started.

  1. Ordinary things have the ability to create joy universally.
  2. There are commonalities and patterns across joyful objects.
  3. Consider incorporating joyful objects and patterns into your own home and life.

Peg - FanningSparks Author

Today I’d like to delve into the cross stitch and how it’s being re-imagined in surprising new ways.  You may recall from my post on The Ultimate Maker’s Cabinet that I recently used extra-large cross stitches to add interest to my cabinet doors.  But I’m certainly not the first person to consider using the cross stitch in unconventional ways.  Here are some great examples that I found in my online exploration.

Spanish artist Raquel Rodrigo and her studio Arquicostura are known for amazing large scale outdoor installations of cross stitch.  On her website Raquel explains that she’s passionate about designing spaces and products that generate emotions.  Below are examples of her street art and street marketing.  They are created with cross stitches in colored thick string on wire mesh.  Imagine strolling along the street in Valencia Spain and coming across one of these awesome works.

Street art by Raquel Rodrigo/ Arquicostura in Valencia Spain Shared @FanningSparks
Photo via Arquicostura
Street art by Raquel Rodrigo/ Arquicostura in Valencia Spain Shared @FanningSparks
Photo via Arquicostura
Street Marketing by Raquel Rodrigo/ Arquicostura in Valencia Spain Shared @FanningSparks
Photo via Arquicostura
Street Marketing by Raquel Rodrigo/ Arquicostura in Valencia Spain Shared @FanningSparks
Photo via Arquicostura

Canadian designer, Laura Carwardine, created a spectacular feature wall in Patria Restaurant, a Spanish tapas restaurant in Toronto Canada.  The two-story wall showcases an intricate cross stitch design made with over 17,000 stitches of cotton jersey on copper-coated steel grid.  I’d love to see this in person someday… hmmm, maybe I could swing by the next time I travel to Nova Scotia to visit family.

Laura Carwardine/ Cargo Collective feature wall at Patria Restaurant in Toronto Canada Shared @FanningSparks
Photo via Cargo Collective
Laura Carwardine/ Cargo Collective feature wall at Patria Restaurant in Toronto Canada Shared @FanningSparks
Photo via Cargo Collective

Charlotte Lancelot Design Studio, from Belgium, worked in collaboration with Gan to present a collection of over-sized felt cross stitches.  The Canevas collection included rugs, poufs and cushions.  On her website, Charlotte explains how she’s re-interpreted the cross-stitch by updating the support and materials.  She notes that even in this transformed state the cross stitch maintains its essence and adds warmth to our homes and surroundings.  That’s the perfect explanation of re-imagining the traditional cross stitch.

Charlotte Lancelot Design Studio for Gan Canevas Collection Shared @FanningSparks
Photo via Charlotte Lancelot Design Studio
Charlotte Lancelot Design Studio for Gan Canevas Collection Shared @FanningSparks
Photo via Charlotte Lancelot Design Studio

German artist, Miss Cross Stitch, leverages cross stitch in public spaces to jazz up benches, chairs and other mundane public furniture.  She refers to this as street embroidery.   These unexpected treatments delight passersby in several European cities such as Berlin and Cologne Germany, Milan Italy, and Zurich Switzerland.  Here is an example of her street embroidery:

Miss Cross Stitch street embroidery from Berlin Germany Shared @FanningSparks
Photo via Miss Cross Stitch
Miss Cross Stitch street embroidery in Berlin Germany Shared @FanningSparks
Photo via Miss Cross Stitch

This Little Street blog, based in the US and authored by Audrey Smit, featured an unusual cross stitch project a few years ago.  It’s an interesting application of the traditional flower motif done in cross stitch on an nontraditional item.

Audrey Smit/ This Little Street cross stitched stool Shared @FanningSparks
Photo via This Little Street
Audrey Smit/ This Little Street cross stitched stool Shared @FanningSparks
Photo via This Little Street

But perhaps the most unexpected application of cross stitch comes from Lithuanian artist, Severija Inčirauskaitė-Kriaunevičienė, who cross stitches domestic metal objects such as pans, watering cans, spoons and even car doors.  Integrating traditional elements from her Lithuanian heritage, Severija creates beauty from the simplest of items.

Severija Inčirauskaitė-Kriaunevičienė cross stitch Shared @FanningSparks
Photo via Severija
Severija Inčirauskaitė-Kriaunevičienė cross stitch Shared @FanningSparks
Photo via Severija

In the company of such talented artists and designers, embellishing my Maker’s Cabinet with extra-large cross stitch isn’t so exceptional.  But, as you can see from the below photo, this treatment does push the limits on the materials and scale of traditional cross stitch.  I’m very pleased with how it turned out.

Maker's Cabinet showcasing cross stitch on fabric covered panels @FanningSparks

To fully appreciate to what extent these artists and designers have reimagined the traditional cross stitch, consider the below example of a conventional work of cross stitch.  The cross stitches are hand sewn on cotton fabric with embroidery floss in a classic rose pattern.

Cross stitched roses on vintage dresser scarf @FanningSparks

More Info

You can learn more about the talented artists and designers mentioned in this post on these sites:

In addition, I created a FanningSparks Pinterest board to showcase reimagined cross stitch works.

For the basics on cross stitch, The Cross Stitch Guild  and DMC, the world-renowned thread company, both offer outstanding reference sites.

Today’s Takeaways

  1. Studying the groundbreakers in an art/craft form that interests you can spark lots of ideas.
  2. Transforming traditional craftwork in contemporary ways leads to outstanding results.
  3. Challenge yourself to “transcend the ordinary”.

Peg - FanningSparks Author

Moving to a new home is top of mind for me these days.  We bought a new-to-us house on Lake Oconee in Georgia, USA about 2.5 hours away from where we currently live.  Making this move is both exciting and disruptive.

According to realtors and movers, more US households move in June than any other month of the year.  Chances are, someone in your circle of family and friends is moving into a new home in the next few weeks.  Chances are, you’ve gone through this experience yourself and know how stressful it can be.  Perhaps you’re wondering what you can do to help ease the moving process for family, friends or new neighbors.  Here’s a suggestion that might just be the answer.

The Open Me First move in package is filled with useful everyday items people need when moving.  I’ve put together and gifted dozens of these move in packages over the years.  The recipients have always been very appreciative.  On the other hand if you’re moving yourself, you may find some helpful suggestions of things to have on hand at your new home.

Open Me First gift box belly band. @FanningSparks

Deciding what to include in the move in package is easy.  Just think about your own experience of moving into a new home.

  • Wondering what to do with those new keys so you won’t lose them? Include a key ring.
  • Tempted to rip packing tape with your bare hands because all sharp objects are packed? Include utility knives.
  • Need to start a list of Things To Do? Include a pen and notebook.
  • Stumbling around unfamiliar hallways after dark? Include a night light.
  • Discover there’s no toilet paper at a crucial moment? Include a few rolls of toilet paper!

You can include band-aids, light bulbs, hand soap, cleaning essentials, and lots of other useful items.

You could invest a significant amount in this gift but I’ve found that’s not necessary.  The move in package I’m sharing with you today cost approximately $50.00 USD.  Keep in mind, you’re buying point-in-time supplies and tools.  I bought most of these items at the local dollar/ discount store.

Open Me First move in package full of items to ease moving into a new home. @FanningSparks

Even though you’re not buying high end products, it only takes a few minutes to dress up this gift and make it special.  I like to use a 16” square packing box for the container.  Adding a printed banner around the package (aka a gift box “belly band”) along with some colorful tulle ribbon really dresses it up.  For an added touch, I like to add a nice card and tie a couple of paper skeleton keys to the bow.  See More Info below for further details.

Open Me First package dressed up with tulle ribbon, paper keys and greeting card. @FanningSparks

In addition to being packed with thoughtful items and looking pretty, the Open Me First move in package relies on good timing for maximum effectiveness.  It’s best to have it waiting for the recipients when they first arrive at their new home.

Welcome Home Open Me First package awaits recipients on their new doorstep. @FanningSparks

It’s also useful to provide the recipients with a list of what’s inside the move in package.  This allows them to scan the list and get a general idea of what’s included.  I’ve created a simple printed list (see More Info below) that can easily be updated to reflect the actual contents you include.

Welcome Home Open Me First folder

Here’s a look at the list I typically include in an Open Me First move in package.

Welcome Home Open Me First folder list the contents enclosed. @FanningSparks

One final fun detail is the below Home Sweet Home sign.  I simply print this on the printer, trim it and insert into an inexpensive magnetic picture frame.

Simple Home Sweet Home sign for the new home. @FanningSparks

More Info

I’ve prepared a complimentary download for your convenience.  Click the link below to receive the following documents along with some simple instructions:

  1. Open Me First and Welcome Home belly band.
  2. Open Me First contents folder – list and cover.
  3. Home Sweet Home sign.
  4. Skeleton keys.

Open Me First Move In Package – Complimentary Download – Jun 2018

It’s not necessary to identify yourself to receive this download but it would be ideal if you would sign up for the FanningSparks list.  Thank you!

Today’s Takeaways

I hope today’s post triggers some ideas…

  1. Personalizing a gift to the recipient’s specific situation isn’t always easy but is very thoughtful.
  2. Gifts need not be expensive to be appreciated.
  3. Dressing up the package makes a gift special.

Peg - FanningSparks Author

As someone who loves to make, I’m always looking for places to display my treasures and store my projects and materials.  I also need a space to tack ideas and inspirational items.  I assume fellow makers and collectors face a similar challenge.  Today I’d like to share how I solved this problem with what I consider to be The Ultimate Maker’s Cabinet.

My Criteria

When I started thinking about a Maker’s Cabinet, I had several seemingly conflicting criteria in mind.  Let’s walk through my criteria and I’ll show you how I addressed each one.

1.The Maker’s Cabinet should be an attractive piece of furniture that will fit in anywhere in my home. It can’t require a studio or dedicated craft area.  It should be a separate piece of furniture that can be moved and should not be built in.

Maker's Cabinet showcasing extra-large cross stitch panel design on front doors. @FanningSparks

2. The Maker’s Cabinet should make a statement on its own. It should be special and stand out.

Maker's Cabinet showcasing extra-large cross-stitched front door panel. @FanningSparks

3. The Maker’s Cabinet should keep all my lovely maker collections and materials visible but allow me to hide them.

Maker's Cabinet opened to show inside storage shelves, trays and panels. @FanningSparks

4. The Maker’s Cabinet should provide quick and easy access to all my projects and materials but keep them neatly stored and organized.

Maker's Cabinet features fabric-covered panels on the inside doors along with custom configured shelving. @FanningSparks

5. The Maker’s Cabinet should provide lots of space to pin inspirational items, art and ideas. It should be easy to add, remove and change these items.  It needs the flexibility to keep them hidden or display them.

Maker's Cabinet features fabric-covered panels on the inside of the doors along with custom configured plastic tray shelves. @FanningSparks

6. The Maker’s Cabinet should be affordable. Re-purposing a piece of furniture is a possibility but having a furniture maker build a new custom cabinet is not.

Entertainment center found at Restore thrift store was re-purposed into Maker's Cabinet. @FanningSparks

My Process

The above photo shows the old entertainment center I re-purposed to create my Maker’s Cabinet.  I searched numerous thrift stores to find the perfect “blank slate”.  This entertainment center was definitely dated and has a very rustic style but it was solidly built, in good condition and the desired size.  And at only $50.00 USD, it was the perfect price!

TIP: Thrift stores, especially the Habitat for Humanity Restore thrift stores I frequent, are jammed with old entertainment centers these days.  It seems everyone is switching to wall mounted TVs so entertainment centers are being phased out.  Generally, these entertainment centers are good quality and (I assume due to the sheer number of them) priced very low.  This situation presents some fabulous opportunities to anyone interested in re-purposing and/or refining furniture.

Once I had this foundational piece I was able to start the transformation. Some of my changes were quite predictable.  I reconfigured the shelves into more, smaller shelves (as shown below).  I added a back to the top section and covered it with fun fabric.  I refinished the cabinet with a fresh coat of paint on the inside and the outside.  I fixed up the hardware by replacing the knobs and painting the hinges.

Maker's Cabinet showing newly configured bottom section. @FanningSparks

But several changes were less conventional.  Covering the outside of a cabinet with fitted fabric panels is certainly not something you see every day.  But this is my favorite thing about this cabinet and, in my opinion, this feature makes it stand out from the crowd.

The original cabinet had simple, wooden panel doors. I knew I wanted to rework them with something unique and special.  First I considered a fretwork overlay.  I even created an entire design with a mirror background that would have been lovely.  Then I started to think about stained glass and mosaics which could have been extraordinary.  But then it occurred to me that I was wasting all that space on the sides of the cabinet.  I started to wonder, why is it that cabinets and furniture never maximize their surface space?  That’s when the idea of being able to display things on the outside of the cabinet occurred to me.  I experimented with a few options and then settled on wooden frames made of mitered molding with fabric-covered panels inside them.

Maker's Cabinet closeup of mitered frame holding fabric-covered panels. @FanningSparks

This approach gives me ultimate flexibility.  I can leave the panels blank.  I can embellish a single panel as I did with the extra-large cross stitch.  I could display an entire collection by pinning it to the panels.  Or I could switch things up by putting different fabric on the panels.  These panels allow me to easily change the look of the cabinet at any time.  I was so taken by the fabric-covered panels on the outside of the cabinet, that I repeated the idea on the inside of the cabinet.  There are two panels on the top doors and a sliding panel.

Maker's Cabinet closeup of mitered frame holding fabric-covered panel on inside of doors. @FanningSparks

The sliding panel was actually a way to maximize space.  There were a few inches of unused space in front of the top shelves so I decided to squeeze in a sliding fabric-covered panel.  This was a fun addition because I learned how to build and install a mini barn door.  Many thanks to the folks at Shanty2Chic for the idea to use clothesline pulleys and for the detailed instructions.  More Info section below for link.  I did have to adjust the design to mount the horizontal bar inside the cabinet instead of on the outside where a door would normally be mounted.

Maker's Cabinet has sliding fabric-covered panel on custom-made barn door hardware. @FanningSparks

Another detail that makes this cabinet special is the series of plastic trays.  Originally I considered using a series of drawers but building drawers requires significant effort and purchasing custom-built drawers can be rather expensive.  I started looking for alternatives and discovered the IRIS Portable Project Cases which are plastic cases that measure about 12”L x 13”W by 3”H.  They’re the perfect solution.

Maker's Cabinet with plastic trays sitting on wood lath slats and fabric covered backing peeking through. @FanningSparks

I appreciate that I can slide the entire tray in and out; it’s easy to simply slip out a tray and take it to my work area.  I also appreciate that they’re a good size and can hold a considerable amount. Plus it was easy to build supports for the trays by simply installing two pieces of 1.5″ wood lath to hold each tray.  And to meet my objective of keeping things neat and orderly, I found labels that fit the plastic trays perfectly and printed appropriate titles for each tray.  See More Info for links.

Maker's Cabinet plastic trays provide easy access to craft supplies and projects. @FanningSparks

And, finally, who doesn’t love a good before and after comparison?

From thrift store find to Ultimate Maker's Cabinet. @FanningSparks

More Info

Several of the projects/ items pictured below in my Maker’s Cabinet have been mentioned in other FanningSparks blog posts.

Maker's Cabinet items tied to related FanningSparks blog posts. @FanningSparks

  1. The vintage tablecloth (bottom of stack) was the inspiration for This Stitch is Off and Running.
  2. Several of these gorgeous yarns were purchased during A Visit to Clara’s Loom.
  3. Alabama Chanin has its own dedicated shelf.  See A School for Makers for more information about this amazing designer and the Tshirt project I have underway.
  4. This embroidery sampler is the first one I ever made.  You can learn more about it on my About page.

You may also have noticed the DIY woven statement necklaces pinned to the right door.  See DIY Woven Statement Necklace Tutorial for step by step instructions on how to create one for yourself.

You can learn more about the Habitat for Humanity Restore thrift stores on their website.

Here’s a link to the excellent post on DIY Barn Door Hardware for $20 by Shanty2Chic.  Special thanks for this great resource!

Today’s Takeaways

  1. It is possible to keep your maker treasures and materials both hidden and displayed.
  2. Fabric-covered panels can be used to maximize the surface space of a cabinet for display purposes.
  3. Entertainment centers, which are readily available at thrift stores, can be transformed into one-of-a-kind Maker’s Cabinets.

Peg - FanningSparks Author

Every year, the small town of Madison, Georgia hosts a Spring Tour of Homes.  Madison proudly claims a lovely Historic District which is listed in the National Register of Historic Places.  As stated on the Madison website, “Madison’s preservation efforts reflect a nationwide movement to preserve a “sense of place” amid generic modern development.”  These efforts appear to be paying off as Madison was recently awarded the title of Best Small Town in Georgia 2018 by Southern Living.

There were 8 homes on the tour this year.  I was able to visit 5 and I took a ton of photos.  I had to force myself to narrow it down to my top 15 photos to get to a manageable number for this post.  This is pretty typical of most home and garden tours; you’re surrounded by so many new and interesting things that it’s impossible to digest everything you see.  I’ve learned to make the most of a house and garden tour by focusing on a few intriguing details at each location.  I don’t try to notice, record nor document everything about every location.  Instead I look for interesting items, pleasing arrangements and pretty vignettes.  You could think of them as snippets.  I learn as much as I can about each snippet before giving it further consideration.  Why did this item/arrangement/vignette  appeal to me?  What does it tell me about the owner/creator?  Is there a story here?  Is it something I would want to recreate/re-imagine in my own home?

Here are, FanningSparks 15 Favorite Fotos (aka snippets) of the Madison in May Spring Tour of Homes…

Madison in May - 15 Favorite Fotos Cover


Spotted at the Holly Hall property on Academy Street (circa 1851):

This charming roof originally covered the well house at this property. @FanningSparks
This charming roof originally covered the well house at this property.


Vintage eyeglasses casually placed on an old DVM Library book. @FanningSparks
Vintage eyeglasses casually placed on an old DVM Library book.


Authentic Singer sewing machine staged for action. @FanningSparks
Authentic Singer sewing machine staged for action.

Spotted in the Madison Historic District around Porter and Third Streets:

Curvaceous lines of a vintage truck peeking out of a shed. @FanningSparks
Curvaceous lines of a vintage truck peeking out of a shed.


Old school bicycle perfectly placed in front of this lovely Victorian style home. @FanningSparks
Old school bicycle perfectly placed in front of this lovely Victorian style home


Spotted at the Sylkenplum Cottage property on Plum Street (circa 1912):

Unexpected and amusing collection of springs. @FanningSparks
Unexpected and amusing collection of springs.


Spotted at the Rector House on Dixie Avenue (circa 1850; altered 1890 and later):

Showstopper countertops are made from local pecan wood. @FanningSparks
Showstopper countertops are made from local pecan wood.


Spotted at the Camp Boxwoods property on Athens Highway (circa 1978; significantly modified 2003):

Thoughtfully placed fountain is the perfect focal point in the pergola's line of sight. @FanningSparks
Thoughtfully placed fountain is the perfect focal point in the pergola’s line of sight.


Custom-made wood ceiling meticulously cut to taper in at the peak of the turret. @FanningSparks
Custom-made wood ceiling meticulously cut to taper in at the peak of the turret.


Simple colored glass bottles displayed with a few choice blooms echo the colored glass window panes. @FanningSparks
Simple colored glass bottles displayed with a few choice blooms echo the colored glass window panes.


Purple tones of the African violet emphasize the blue and white dishes. @FanningSparks
Purple tones of the African violet emphasize the blue and white dishes.


Pretty ball and dowel spandrel is highlighted by the greenery of the hanging ferns. @FanningSparks
Pretty ball and dowel spandrel is highlighted by the greenery of the hanging ferns.


Beautifully restored white vintage truck makes a statement without taking over. @FanningSparks
Beautifully restored white vintage truck makes a statement without taking over.

And now for something a little different.  You don’t often see farm animals on a house and garden tour!  Perhaps that’s why these are my two favorite shots.  Please note I will not be trying to recreate this snippet in my own home :-).

Highland cows are originally from Scotland and have a very distinctive look. @FanningSparks
Highland cows are originally from Scotland and have a very distinctive look.


This donkey strikes the perfect pose. @FanningSparks
This donkey strikes the perfect pose.

Truth be told, I love taking photos of farm animals and I’m always on the lookout for a photogenic cow!  Hmmm… wonder if it has something to do with the fact that I grew up on a dairy farm in the picturesque countryside of Nova Scotia Canada?

More Info

You can learn about the Madison in May event on their website.

You may also enjoy a look at Charleston’s Glorious Window Boxes which I posted after visiting Charleston’s Festival of Houses & Gardens earlier this year.

Today’s Takeaways

  1. House and garden tours are a great source of ideas.  Avoid being overwhelmed by looking for the details that contribute to the overall decor.
  2. Look for unusual collections, treasures and arrangements.  Why does it appeal to you?  What does it tell you about the owner/creator?   Is there a story here?
  3. Consider recreating/ re-imaging an idea in your own home.  How could you make it your own?  What details are most relevant to you?  Does it help tell your story?

Peg - FanningSparks Author