FanningSparks reached a special milestone this week.  The blog turned 1/2 year old.

It’s been 9 months since I retired from my IT career and decided to launch a DIY/lifestyle blog.  Www.FanningSparks.com was launched on March 20, 2018.  Many of you, my family, friends and former colleagues, have taken the time to visit the blog and engage through comments, likes, or subscriptions.  Thank you SO MUCH for your support!  It’s still early days in blogosphere terms and FanningSparks is slowly, but surely, building a following.  I’m often asked how the blog is progressing so I decided to celebrate this milestone by sharing a few behind-the-scenes highlights with you.

FanningSparks Blog Content Categories

The FanningSparks social presence is primarily a website blog with multiple supporting channels.  I publish a new post, with original story and photos, every Tuesday here at www.FanningSparks.com.   FanningSparks is about making and decorating from inspiration to creation to sharing.  Inspiration comes from everywhere but I have settled into 3 primary sources:  Traditional arts and crafts (aka Making by Others), Nature and Travel.  Here’s the lay of the land: 4 content categories including Travel, Decorate, Nature and Make.
FanningSparks Category Index Pages. @FanningSparks


I’ve published 30 posts with original stories and photos.  Photography is a big part of FanningSparks and nearly all the photos I share are my own work.  I’ve loved photography since I was a teenager and I’ve amassed a sizable inventory of photos over the years.  The blog gives me a reason to get creative with my camera and it provides a venue to share my best work.  The blog has served up approximately 3,100 unique page views since launch with approximately 250 unique readers visiting every month.

Let’s look at some example posts to give you a taste of what you can expect to find on the blog.

Nature   Two of my favorite posts about Nature are:
Color Palette by Mother Nature
Soft shades of the autumn fern in spring. @FanningSparks

Patterns by Mother Nature
Distinctive Zebra Checks Us Out. Sighted during African Safari. @FanningSparks

Travel   Two posts about travel include:
Majestic Lovable Elephants

Young male elephants sparring in the water @FanningSparks

First Light at Peggy’s Cove
Peggys Point Lighthouse during magic hour before sunrise. @FanningSparks

Make   The majority of my posts fall into the Make category.  The subject could be arts and crafts made by others, such as…
A School for Makers

Alabama Chanin School of Making - Magdalena Corset DIY Kit @FanningSparks

… or it could be traditional arts and crafts that have inspired me, such as…
Re-imagining the Cross Stitch
Cross stitched roses on vintage dresser scarf @FanningSparks

… or it could be things I’ve made myself, such as…
DIY Woven Statement Necklace Tutorial

DIY Woven Statement Necklace tutorial @FanningSparks

The Ultimate Maker’s Cabinet
The ultimate Maker's Cabinet with lots of display and storage space. @FanningSparks

DIY Pyramid Trellis Tutorial

DIY Pyramid Trellis Tutorial by FanningSparks. @FanningSparks

Decorate   Recent posts about home décor include:
A Before Tour of Our New Casual Lake House
Enjoying sunrise from the dock. @FanningSparks

Glide It On and 14 More Painting Tips

Glide It On and 14 more tips for painting walls and cabinets. @FanningSparks

FanningSparks Social Media Channels

The FanningSparks Instagram account has proven to be a great way to announce posts and share photos with a broader audience.

Instagram has brought in the most new followers and provided some great exposure.  I was thrilled when my recent post on Joy Spotting was featured in author and TED speaker Ingrid Fetell Lee’s Insta story.

Joy Spotting Post Shout Out. @FanningSparks


Pinterest, the visual search engine beloved by the DIY community, is another critical channel.   FanningSparks has 9 boards with over 650 original and curated pins.  According to the mysterious Pinterest algorithms, an average of 7.5K viewers/month see FanningSparks’ pins.

FanningSparks on Pinterest. @FanningSparks

The FanningSparks Facebook page has become a great way to share original content with relevant organizations, small businesses, and like-minded Facebook groups.  I’ve been pleasantly surprised by the amount of activity in Facebook.

Two other channels, email notification signups via the blog and the Bloglovin blog reading service have small, loyal followings.


Creating and publishing FanningSparks has been a great experience.  I’m learning something new every day.  But the best part of all has been connecting with kindred spirits whether its meeting an artisan, a shop owner or a fellow workshop participant.  Occasionally I’ll hear from a reader directly.  One of my favorite reactions was this one: “You gave me an idea.  I too have a cabinet I can convert.  OMG I’m so excited now.  Have a wonderful organized day.”.

I’ll wrap up by re-sharing my original launch invitation and inviting you to join in.

Formal invitation to join the fun at the FanningSparks blog launch

Cheers,

Peg - FanningSparks Author

The small Acadian village of Cocagne is nestled along the Northumberland Strait in New Brunswick, Canada. It’s an area of natural abundance; a “land of plenty”, which is what Cocagne means in French. It’s a beautiful part of the world. Inspired by this natural beauty Marcia Poirier, the artisan behind Wildabout Wampum, creates spectacular jewelry from quahog shells. Quahogs are edible clams that live on the eastern coast of North America. Admittedly, when I think of the unremarkable clam I do not immediately think of spectacular jewelry. At least, I didn’t before learning about Wildabout Wampum.

I recently had the pleasure of visiting Marcia’s home-based studio and meeting her in person. Marcia is friendly and welcoming. She’s full of energy and passionate about her art. She personally took us on tour of her studio and boutique. I love the story of how Marcia got started making these unusual treasures. As she tells it, Marcia and a friend were walking along the beach when she spotted a quahog shell with an unusual marking. Marcia picked it up and pointed out a heart shape in the purple layers of the shell. She tossed the shell and they went on with her walk. A few days later, Marcia’s friend surprised her by giving her a carving kit along with the very same quahog shell she had tossed away. Marcia went on to carve out that heart and then wore it as a pendant.
Original Heart Carved From Quahog Shell at Wildabout Wampum. @FanningSparks

Friends admired Marcia’s quahog heart pendant and asked her to make one for them. Marcia has been making hearts, and other beautiful jewelry, ever since. Isn’t that a great story?

Marcia eagerly shared her knowledge about quahogs explaining how the purple and white layers of the quahog shell are annual growth bands. The age of a quahog can be determined by counting the layers in the shell much like counting the rings in a tree.  The vibrancy of the purple layers is affected by various environmental conditions including the level of iron found on the ocean floor. Marcia has learned which areas produce the most intensely colored quahogs and exclusively sources her shells from those locations.

After selecting and preparing a quahog shell, Marcia transfers a design onto the shell. She selects and positions the design to maximize the natural layering of the shell. The design is carefully carved by hand using tiny power tools. The piece is then sanded by hand to a smooth, shiny finish.
Shell Hand Carved in Quahog Shell at Wildabout Wampum. @FanningSparks

After watching the artisans at work in the studio a visit to the Wildabout Wampum boutique is mandatory.
Wildabout Wampum Boutique in Cocagne, New Brunswick, Canada. @FanningSparks

The shop is well-stocked with a wide selection of pendants, earrings, bracelets and other items. This stunning whale tail pendant is a popular design.
Fish Tail Pendant Carved from Quahog Shell at Wildabout Wampum. @FanningSparks

Of course, I couldn’t leave Wildabout Wampum without selecting my very own one-of-a-kind memento. Isn’t it lovely?

Heart Pendant Carved from Quahog Shell I Purchased at Wildabout Wampum. @FanningSparks

Marcia’s success in turning quahog shells into beautiful jewelry is a remarkable story. But it doesn’t explain the name of her studio. Why “Wildabout Wampum”? After she started making her jewelry, Marcia learned that Native Americans, the Wampanoag Indians in the area now known as northeastern USA, carved beads from the purple sections of the quahog shell. These beads where used for trade and ceremonial purposes. The Natives used the beads as currency for trading. They also wove the beads into patterns to form “belts” for ceremonial purposes. The patterns indicated tribal history, inter-tribal treaties and even sanctified wedding vows. Today, wampum (like those shown below) still have a special significance to Native Americans.
Mystery solved! Wildabout Wampum doesn’t actually sell wampum but the name is a clear nod to this honorable heritage.
Strands of Wampum Beads Carved from Quahog Shells at Wildabout Wampum. @FanningSparks

While I love wearing my Wildabout Wampum heart pendant on a chain, I couldn’t help but wonder how it would look on a woven statement necklace. I found yarn in nice complementary colors and then followed the step-by-step instructions from my post DIY Woven Statement Necklace Tutorial. I made a few refinements such as leveraging a blank metal jewelry connector for the top bar and using decorative yarn for the top row of fringe. The woven necklace provides the perfect backdrop for the gorgeous quahog shell heart. Now, I have two ways to wear my Wildabout Wampum heart.

FanningSparks DIY Woven Statement Necklace Showcasing Wildabout Wampum Heart Pendant. @FanningSparks

I’m always intrigued by how traditional arts and crafts can be re-imagined in contemporary ways. I seek out examples of how materials and/or techniques have been changed to bring new life to an old practice or product. This is a perfect example.  Thanks to Marcia Poirier, the original art of carving wampum has evolved into hand-crafting beautiful quahog shell jewelry.

More Info

Learn more about Wildabout Wampum on their website.  Be sure to check out Marcia’s video “The Art & Design of Marcia Poirier” and the galleries of her collection.

The Tourism New Brunswick website has additional information on Cocagne, New Brunswick, Canada.

Here’s the link to my post on the DIY Woven Statement Necklace Tutorial.  It really is an ideal DIY project.  It’s fairly easy, it’s inexpensive, no special tools are needed, and it’s fast. But the best thing about this project is its versatility.  You can change the colors, embellishment, size or design to make your own one-of-a-kind work of art!

Today’s Takeaways

  1. Keep your eyes open for unexpected sources of inspiration.
  2. Consider ways to transform the ordinary.
  3. Seek out opportunities to learn about the artisans and craftspeople in your community.

Pin for Later

You may want to pin this post to your Pinterest board for later reference.  Please pin this image.

FanningSparks DIY Woven Statement Necklace with Wildabout Wampum Heart Pin. @FanningSparks

Peg - FanningSparks Author

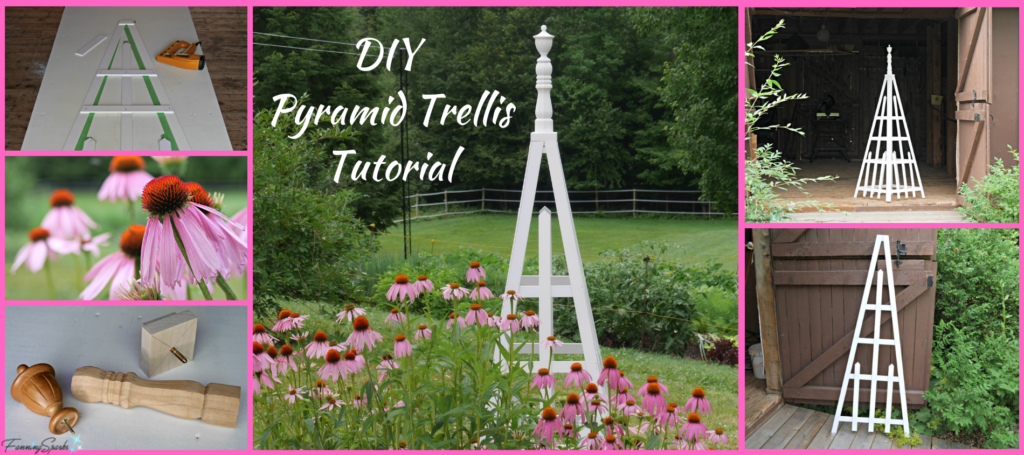
A pyramid trellis, or tuteur, is the perfect way to add height to a garden space.  Unlike a traditional trellis which requires a wall or other support, the pyramid trellis can be placed anywhere.  A pyramid trellis can play a starring role with interesting design, materials and colors.  Or it can play a supporting role and hold up climbing vines and flowers.  Either way, a pyramid trellis can add character and interest to the garden.

DIY Pyramid Trellis Painted Green and Shown with Wild Indigo. @FanningSparks

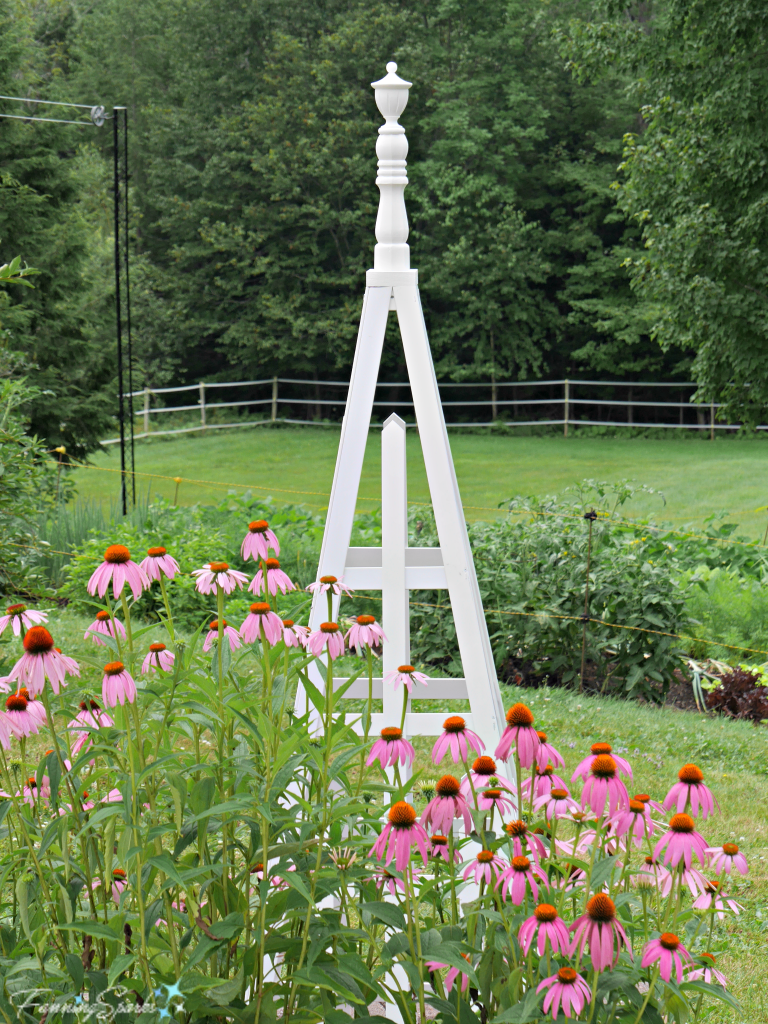
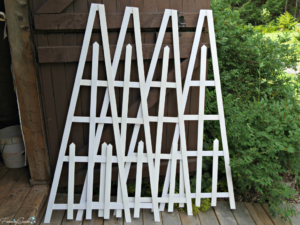
A pyramid trellis is an easy project you can do yourself.  Choosing a design that doesn’t require complex multi-angle cuts is the key to simplifying this project.  It’s also a great opportunity to make something that’s unique and one-of-a-kind.  Vary the materials, the dimensions and the colors to make it your own.  I’ve made 4 pyramid trellises, 3 for myself and 1 as a gift.  Today, I’m going to show you how to make your very own pyramid trellis.  This is a substantial structure; it is nearly 6’ high and nearly 2’ square at the base.  I created this step-by-step tutorial while making the below pyramid trellis as a surprise for my beloved sister.

DIY Pyramid Trellis Painted White Shown with Purple Coneflowers. @FanningSparks

Materials/Supplies Needed

Lath Strips: 12 – strips of 7/32” x 1 ½” x 8’ long PVC Lattice Molding
The first three pyramid trellises I made were constructed from 6’ wood lath strips.  I was able to buy these at my local Home Depot in Georgia.  However I made the fourth pyramid trellis while visiting my sister in Nova Scotia and was only able to find wood lath strips in 4 foot lengths.  I substituted 8’ PVC Lattice Molding for the wood lath.  The PVC was considerably more expensive than the wood but comes prefinished and is very easy to work with.  I’ll be showing the PVC version in this tutorial.

Finial: a decorative top about 1  foot high and no more than 3″ square at the base.
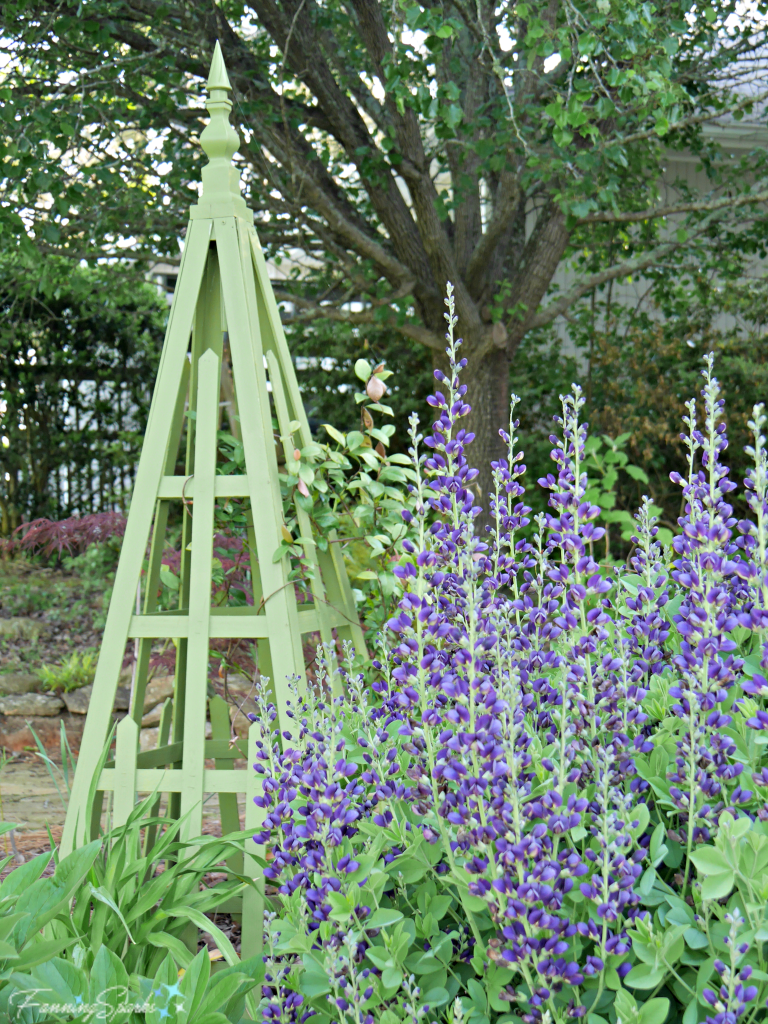
This is the fun part!   Use your imagination to finish off the top of your pyramid trellis.  I found the perfect resin finials at Hobby Lobby when I made my first three pyramid trellises (shown on green trellis in above photo).  But they were no longer available and I had to get creative for this most recent version.  I used a furniture leg of turned wood topped with a curtain rod finial.  More details in the below tutorial.

Screws: 32 – size #4 ¾” flat wood screws
Screws: 4 – size #8 1 ½” flat wood screws
Screw Hooks: 4 – 1 ⅞”   The screw hooks are big enough to slip over a piece of rebar which can be used to anchor your trellis.
Staples: 1  ⅜” long preferably rust resistant
Wood:  1 – 1″ x 4″ x 8″ long pine or other softwood
Tape: Masking or painter’s tape
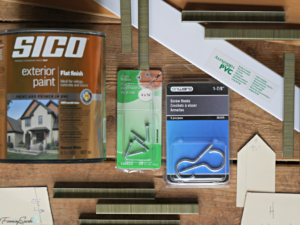
Paint: Exterior paint in your desired color.  Since I left this trellis pyramid white, I only needed to paint the finial and the anchors and to cover up the staples and screws.
Sandpaper:
Templates: Download the DIY Pyramid Trellis – Complimentary Download – Sept 2018 .  See More Info below for an outline of the contents.

Supplies and Materials for DIY Pyramid Trellis. @FanningSparks

Tools / Working Space Needed

Jigsaw with an appropriate blade for cutting PVC or wood lath.  Alternatively, use whatever saw you have available and are comfortable using.
Drill with appropriate bits for the screws and screw hooks.
Staple Gun:   An electric staple gun is ideal but a manual staple gun would also work.
Paint Brush and any other painting supplies needed.
Clamp
Tape Measure
Pencil
Work Surface:  58” by 25”
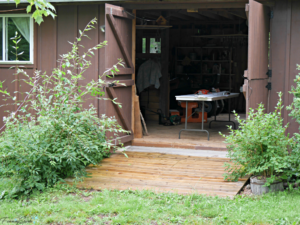
Barn: You may also want to borrow your sister’s cool barn to work in but obviously that’s optional.

An Empty Barn is the Ideal Working Area. @FanningSparks

Assembly

At a high level, the construction process is quite straightforward.  Cut 40 pieces of wood lath to the specified lengths.  Lay the parts on a large flat surface to staple together into 4 identical sides.  Stand up the 4 sides into a square and connect.  Cut and attach the parts for the finial and the anchors.  Here are the detailed step-by-step instructions.

Step #1 Cut Lath Strips

There are several guides included in the DIY Pyramid Trellis Download file to assist you with this step.  Print the Templates for Angled Cuts and the Templates for parts H, I, J, K on heavy paper.  Ensure they printed to the intended size and cut out.  If the template pieces are not the intended size, you may need to adjust your printer settings (see instructions on the cover page in the download file).
Review the Cut Plan and Part List.  The Part List shows the specifics of each part to be cut including the length, quantity and angled cut instructions.  Note the “How to Cut Ends” column.  Some ends are straight, others are cut at a 10°angle and others are cut into a picket shape with 45° angles.  The ends may be parallel or non-parallel.  The angles of the Legs (Part A) must be parallel.  The angles of the Crosspieces (Parts B-E and H) must be non-parallel.  See the Angled Cuts Guidance for diagrams of parallel and non-parallel cuts.  Take care to cut all ends as indicated.
The Cut List shows which parts to cut from each 8’ length.  It is color-coded to match the Part List.

Mark each piece with the part letter.

Sand all cuts.  You should have 40 parts at this stage.

Cut Parts for DIY Pyramid Trellis. @FanningSparks

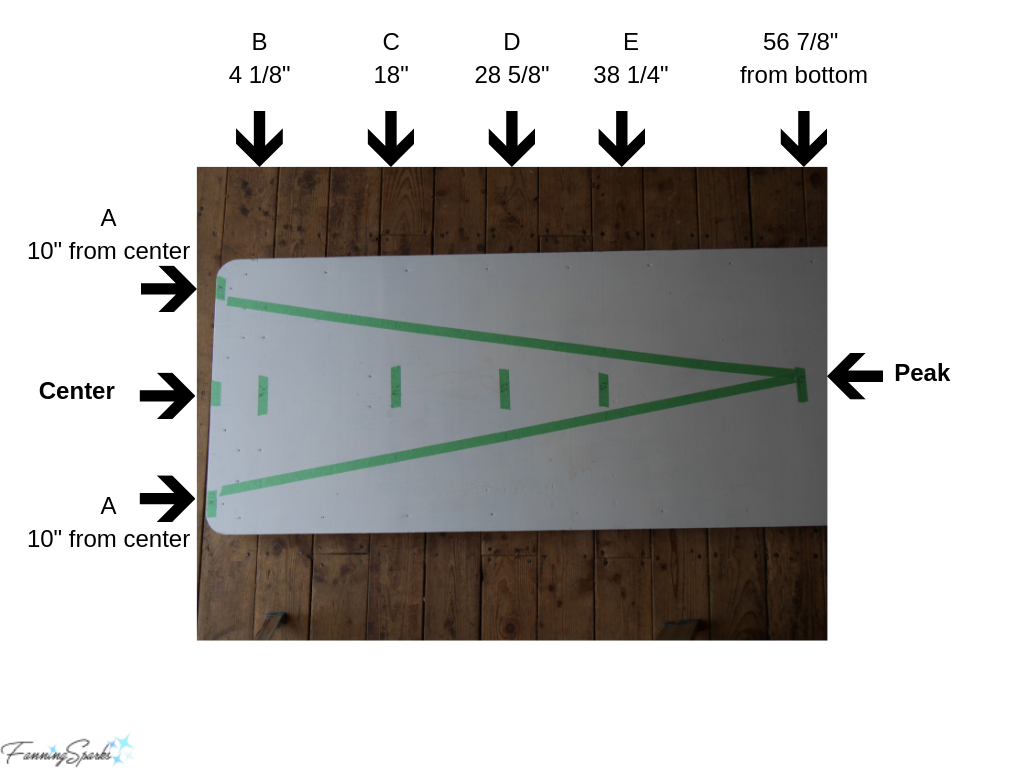
Step #2 Prepare Work Surface

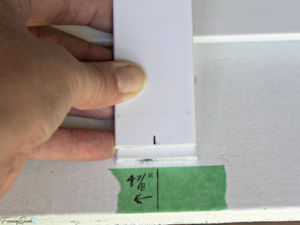
Select a large, flat work surface at least 58” by 25”.  Use masking or painter’s tape to mark a triangle on the surface as follows.   Choose one 25” edge to be the bottom of the triangle.  Mark the center of this edge.  Measure and mark 10” to the left and right of center.  Label these as A.  Measure and mark 56 ⅞” up from the center of the bottom edge.  This will be the peak of your triangle.  Next mark the 4 crosspieces.  Measure up from the bottom edge and mark as follows:
At 4 ⅛” from bottom, mark B.
At 18” from bottom, mark C.
At 28 ⅝” from bottom, mark D.
At 38 ¼” from bottom, mark E.

Run pieces of tape from each side of the bottom of the triangle (marked A) to the peak.  It’s not necessary to have these lined up perfectly since the lath strips will be straight.  Place a mark at each of the above points along both sides of the triangle.  Your work surface should look like this:

Marking the Work Surface for the DIY Pyramid Trellis. @FanningSparks

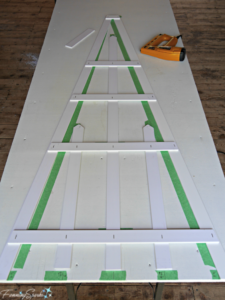
Step #3 Assemble Pyramid Sides 

Align the lath strips with the markings on your work surface.  Note you’ll be placing the front side of your lath strips down on the work surface and working on the back sides. Start with the legs which are the outside angles of your triangle.  Place one Part A along the right side. At the bottom of the triangle, align the inside edge of Part A at the 10” mark and ensure the angles match.  At the top peak of the triangle, align the inside edge of Part A with the inside edge sitting on the center mark.  You may wish to tape the part to your work surface to keep it in place.  Repeat this same procedure with another Part A on the left side of the triangle.

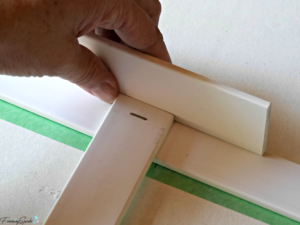
Attach the top crosspiece Part H.  The short edge should align with the top of the two Part As.  The sides of crosspiece H should be indented by the thickness of your lath.  Use a scrap piece of lath to check this alignment as shown below (note the photo doesn’t show Part H).  Staple Part H in place.

Indenting the Edge During Assembly of DIY Pyramid Trellis. @FanningSparks

Attach the bottom crosspiece Part B aligning the top edge with your 38 ¼” mark.  The sides of Part B should be indented in the same way as Part H.  Staple in place.

Attach the remaining 3 crosspieces – Parts C, D and E – in this same manner.

To attach the pickets, remove the partially assembled pyramid side from the work surface.  At the bottom of your triangle, measure 4 ⅞” from the center line to the right.  Taking care to align with the bottom edge of your work surface, place a piece of tape at the 4 ⅞” spot, mark and label G.  Repeat this step to the left of center.

Place the pickets on your work surface.  Align the long center picket – Part F – with the center marks keeping the bottom end one-tape-width up from the bottom edge.  In the finished pyramid trellis only the legs – Parts A – touch the ground.  As shown below, align the center of one of the short pickets – Part G – with the 4 ⅞” G mark keeping the bottom end one-tape-width up from the bottom edge.

Centering the Picket During Assembly of DIY Pyramid Trellis. @FanningSparks

The picket should be parallel to the long center picket (part F).  Repeat this step with the other short picket – Part G.  Place the partially assembled pyramid side back on the work surface with the front side facing down (the same way as it was constructed).  In this way, all staples enter from the back and will not show on the front of the pyramid trellis.   Ensure the pickets remained in position.  Staple all 3 pickets in place.

At this point, your pyramid side should look like this on the work surface…

One Side of DIY Pyramid Trellis Assembled. @FanningSparks

…and like this when standing:

First Assembled Side of DIY Pyramid Trellis. @FanningSparks

Assemble the other 3 pyramid sides following step 3.

Step #4 Paint Pyramid Sides

Clean up the parts by removing labels and erasing marks.  If your wood isn’t finished, this is the time to paint.  It’s much easier to paint the pyramid sides before they’re fastened together.  At this point, you should have 4 finished sides like this:

Four Sides of DIY Pyramid Trellis Assembled. @FanningSparks

#5 Assemble Pyramid

The next step is to attach the 4 sides into a pyramid.  Use tape to temporarily hold the sides together while you’re working.

Taping the Sides to Stabilize During DIY Pyramid Trellis Construction. @FanningSparks

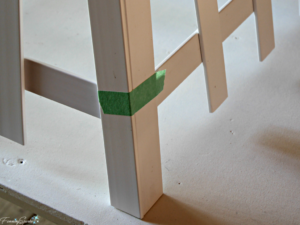
The trick is to alternate the sides so they overlap… one end is over and the other end is under.  See the Pyramid Assembly Detailed Diagram in the DIY Pyramid Trellis Download file for details.  Use small wood screws (#4 ¾” long) to fasten at every crosspiece and leg juncture.  Be sure to drill pilot holes first.  Optionally, you may wish to staple the sides together before screwing them.

Your pyramid should be quite firm at this point but the next two steps will strengthen it substantially.

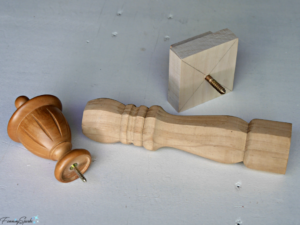
Step #6 Finish the Top

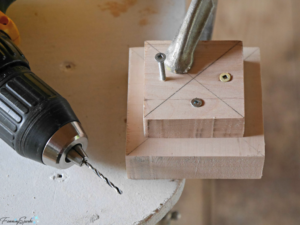
Use templates I and J from the DIY Pyramid Trellis Download file.  The small square (Part J) should fit snuggly inside the top of your pyramid.  The large square (Part I) should sit on top of the pyramid and align with the sides.  Make any necessary adjustments to the templates. Use the templates to cut two squares from the 1″ x 4″ x 8″ wood.

Mark the center of the two squares.  Center the small square on the large square and attach with #8 1 ½” wood screws as shown below.

Attaching Top 2 Squares for DIY Pyramid Trellis. @FanningSparks

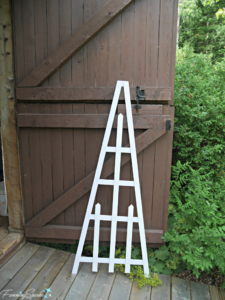
The next step is to add your finial.  As noted in the Materials/Supplies Needed list above, this is where you get to be creative and put your personal mark on your pyramid trellis!  The actual parts you use for the finial will dictate how to attach it.  With my first pyramid trellises, I drilled a hole in the top squares and inserted a dowel to hold the finial.  On the pyramid trellis in this tutorial, I used wood screws to attach the curtain finial to the turned furniture leg and then screwed that into the top squares.

Parts for Finial on DIY Pyramid Trellis. @FanningSparks

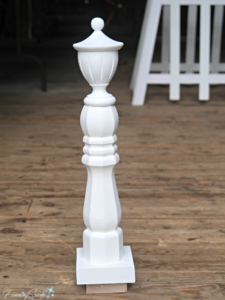
It looked much better after assembly and a little paint:

Finished Finial for DIY Pyramid Trellis. @FanningSparks

Insert the top squares (and your finial) into the top of the pyramid, pre-drill and screw in place through the top crosspiece.

Step #7 Add Anchors

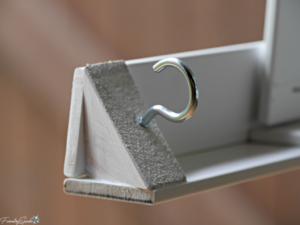
This is the final step.  To be honest, my first pyramid trellises don’t have anchors.  I learned the hard way, wind will blow over these pyramid trellises if they’re not tied down.  Adding anchors to the bottom of the legs makes it easier to ground them.  The idea is to insert small triangular supports with screw hooks in the bottom of each corner where the legs come together.  After placing your pyramid trellis in the garden, slip pieces of rebar through the screw hooks and drive the rebar into the ground.

Use template K from the DIY Pyramid Trellis Download file to cut 4 triangles from the 1″ x 4″ x 8″ wood.  Paint if needed.  The anchor pieces will look like this.

Anchor Parts for DIY Pyramid Trellis. @FanningSparks

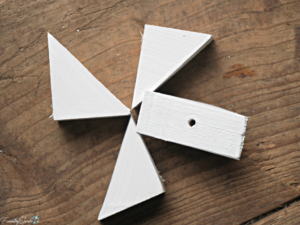
Insert a screw hook into the long edge of each triangle.  Be sure to pre-drill so the wood doesn’t split.  Then slip the anchor piece into the bottom corner where the legs come together, pre-drill and screw in place.

Anchor Part with Screw Hook on DIY Pyramid Trellis. @FanningSparks

That’s it! Your pyramid trellis is done!  But the fun’s not over yet; now you get to decide where to put it!  Or in this case, my sister gets to decide.

DIY Pyramid Trellis Completed. @FanningSparks

More Info

Be sure to download the DIY Pyramid Trellis – Complimentary Download – Sept 2018 for the guides mentioned in the above instructions.  The following are included:
1. Angled Cuts Guidance
2. Templates for Angled Cuts
3. Templates for Parts H, I, J, K
4. Cut Plan and Part List
5. Pyramid Assembly Detailed Diagram (for Step #5)

Special thanks to the folks at This Old House for the post How to Build a Pyramid Trellis which inspired the version I shared today.

Today’s Takeaways

  1. A pyramid trellis can add character and interest to the garden.
  2. A pyramid trellis is an achievable project to do yourself.
  3. This pyramid trellis can be customized.  Change the color, size, design and finial to make it your own.

Peg - FanningSparks Author

When it comes to decorating my home, one of the steps I enjoy the most is selecting textiles.  There are numerous surfaces that allow me to incorporate color, pattern and texture with fabric and other textiles.  Some examples are upholstery, pillows, seat covers, bedding, blankets, quilts, shades, curtains, tablecloths, runners, towels, rugs and mats.  The best part is the countless options from which to choose.  Whether I shop for ready-made or create my own, this is the perfect opportunity to add personality to our home.

In my previous post, Color Palette by Mother Nature, I shared the idea of looking to nature for color inspiration.  Today, I’d like to take a similar approach with patterns.  We’ll look at several different types of patterns including animal prints, stripes, floral, foliage, geometric and abstracts… all courtesy of Mother Nature.  A pattern is defined as a discernible regularity where elements repeat in a predictable manner.  In the world of interior design and decorating, pattern is used to foster cohesiveness and add interest.  Typically, patterns work closely with color and shape to add continuity to a living space.

Let’s begin with the popular pattern category of animal prints.  I’ll share a few of my all-time favorite photos taken while on safari in South Africa to illustrate these splendid patterns.  This beautiful leopard had the perfect lookout perch.  There’s much to say about this photo (see More Info below) but we’ll just admire those gorgeous leopard spots for today.

Beautiful Leopard on the Lookout. Sighted during African Safari. @FanningSparks

Watching the elegant giraffe lean over to drink is an unforgettable experience.  The giraffe’s spots are another outstanding example of an animal pattern.

Elegant Giraffe Drinking. Sighted during African Safari. @FanningSparks

Stripes are a classic pattern.  The zebra’s distinctive black and white stripes are the perfect illustration.

Distinctive Zebra Checks Us Out. Sighted during African Safari. @FanningSparks

While not nearly as dramatic, this birch bark is another example of the beauty of stripes.

Interesting Birch Bark Patterns. @FanningSparks

Florals are beloved patterns in surface design.  These purple coneflowers repeat to create a lovely floral pattern.

Grouping of Purple Coneflowers. @FanningSparks

Here a single bearded iris bloom showcases a subtle mix of branching patterns.

Bearded Iris called Autumn Tryst. @FanningSparks

Foliage inspires another category of patterns.  Ferns and succulents, in particular, are very much in vogue.  Here a graceful fern casts intriguing shadows on the moss covered ground.

Ferns Cast Shadows on Moss. @FanningSparks

In this close-up, the veins of a hosta leaf illustrate a pleasing branching pattern.

Veins in Hosta Leaf. @FanningSparks

Here’s another example of a foliage pattern.  The distinctive branching pattern, repetition of the curly edging and the bumpy leaf structure all combine to transform the lowly cabbage into a thing of beauty.

Beautiful Patterns in Cabbage. @FanningHead

Often the repetition of a simple shape forms a pattern.  These shapes can be geometric or organic.  Here the simple oblong shape of a catkin repeats to form a handsome geometric pattern.

Early Spring Catkins Create Lovely Pattern. @FanningSparks

The disk florets in the center of this sunflower create an intricate geometric pattern.  The repetition of the flower petals (more correctly the ray florets) provide another lovely pattern.  I love how that one little wayward petal disrupts the pattern and shakes things up!

Closeup of Soft Yellow Sunflower. @FanningSparks

The triangular scales on this pine cone form a familiar geometric pattern.

Closeup Showing Geometric Pattern of Pine Cone. @FannngSparks

The delicate spiral shape of this fern frond provides another example of a repeating pattern.

Spiral Frond of the Christmas Fern. @FanningSparks

The raindrops on this Lady’s Mantle leaf form an interesting, circular pattern.

Raindrops on Lady's Mantle Leaf. @FanningSparks

The final pattern category I’d like to include is abstracts.  By definition, abstract is non-representational and does not depict a person, place, or thing in the natural world.  So it would be difficult to draw upon Mother Nature for examples.  But given that we’re simply looking at types of patterns for interior design, I’ll use a looser definition and take the liberty to include these two examples.  The below photo is polished granite with the look of movement.  This is actually our new kitchen countertop in Viscount White.

Granite with Movement on Kitchen Countertop. @FanningSparks

Our final photo is another example of an abstract pattern.  It’s actually clouds at sunset but resembles a watercolor.

Cloudy Sky At Sunset. @FanningSparks

More Info

Color and pattern work together to add life to a room.  See the post, Color Palette by Mother Nature, for more information about inspiring color palettes.
Jan 22, 2019 Update: Check out Texture by Mother Nature for even more decorating inspiration from nature.
May 19, 2020 Update: Form by Mother Nature is the latest post in this series.

In addition to color and pattern, there are 5 more interior design elements.  They are space, line, forms, light and texture.  The Interior Design Academy explains the 7 elements of design must work in harmony to create an aesthetically pleasing interior.

To see more photos and learn about my African safari, see my post on Majestic Lovable Elephants.

I learned an interesting fact about patterns in nature while researching this post.  Scientists have found that the endless variations seen in nature can actually be traced back to a few simple themes and rules. For instance, the familiar form of Queen Anne’s Lace, is referred to as a branching pattern with an explosion shape.   This pattern illustrates how nature has found the most efficient way to reach all points in a large area while moving the shortest distance.  The dense array of florets in the Queen Anne’s Lace flower head attracts the most insects possible.

Side View of Queen Anne's Lace. @FanningSparks

Today’s Takeaways

  1. Consider broadening your scope and looking at all options before narrowing down to a selection.
  2. Consult Mother Nature for pattern inspiration. Take time to observe the variety of patterns in nature.
  3. Use pattern in your surroundings to foster cohesiveness and add interest.

Peg - FanningSparks Author

There’s something magical about the time between first light and sunrise.  The sky shifts from darkness to light as the world slowly wakes up.  Light is soft and diffused.  Skies turn pink and gold.  The pace is measured and unfolds slowly.  It’s peaceful and calm.  Everything is quiet and still in anticipation.

In the world of film and video production, this time period is called the “magic hour” because of the way the natural light is diffused.  Since the sun hasn’t yet risen, there are no shadows and subjects can be beautifully lit with soft light.  Magic hour is followed by the “golden hour” which occurs directly after the sun rises.  During golden hour the light is rich and warm and the world has a soft glow.  Golden hour is a favorite time for photographers shooting in natural light.  The sequence is reversed in the evening when the sun sets.  To be 100% accurate about it, neither period is exactly an hour long since the timing varies from location to location and season to season.

When traveling around the world, I often make an effort to view my surroundings during the early morning hours.  The below photo, one of my favorites, was taken before sunrise at the Notre-Damede la Garde in Marseille France.  I’ll never forget walking up the hill to the basilica in the bitter cold darkness of a January morning.  But the panoramic view of the city and port as the early morning sky slowly lit up were worth every bit of discomfort.  It was glorious!

Cross at Notre-Dame de la Garde in Marseille France during first light. @FanningSparks

More recently, I had the pleasure of watching the world shift from darkness to light at Peggy’s Cove in Nova Scotia, Canada.  Our visit took place in August so the weather was perfect but it did require a mighty early start.  We set out at 4:30 am to catch first light (special thanks to my sister, nieces and nephew for sharing the adventure!).
Peggy’s Cove, being on the coastline, is often foggy but it was beautifully clear that morning.   We found the perfect vantage point and settled in for Mother Nature’s performance.  She did not disappoint!  It was another glorious show!

Magic Hour at Peggy's Cove. @FanningSparks

Peggy’s Cove is known for its rugged beauty.  The quaint fishing village is surrounded by huge granite boulders facing the Atlantic Ocean.

Huge granite boulders surrounding Peggy's Cove viewed at first light. @FanningSparks

The classic red-and-white lighthouse, officially called Peggy’s Point Lighthouse, is an iconic Canadian image.  It’s a popular destination and the site is often crowded with visitors.  Avoiding those crowds is another advantage of visiting Peggy’s Cove in the early morning.  In fact, we had this beautiful place to ourselves.
You can see the difference between the magic hour and golden hour lighting in the two photos below.  The first photo was taken with first light during the magic hour. The second photo was taken after sunrise during the golden hour.

Magic hour, before sunrise, at Peggy's Cove. @FanningSparks

Golden hour, after sunrise, at Peggy's Cove. @FanningSparks

It appears building cairns, especially inuksuit, has become very popular at Peggy’s Cove.  An inukshuk, traditionally made by Inuit people, is a man-made structure of rough stones stacked in the form of a human figure.  An inukshuk is commonly thought to communicate “Now the people will know we were here”.

Peggy's Point Lighthouse and an inukshuk during golden hour. @FanningSparks

Inukshuk during magic hour at Peggy's Cove. @FanningSparks

Inukshuk on the granite boulders of Peggy's Cove during magic hour. @FanningSparks

Cairn at Peggy's Cove during golden hour. @FanningSparks

More Info

Peggy’s Cove is renowned for its rugged beauty and is a popular destination.  As a native Nova Scotian, I’ve visited the area many times and can honestly say it never disappoints.  If you ever have a chance to visit Nova Scotia, I highly recommend you stop by Peggy’s Cove.  For more info see the Peggy’s Cove Coastal Region website.

Magic Hour, an app by elfinda apps, calculates the time of sunrise and sunset and the adjacent magic/golden hour by location and date.  As you can see in the below screenshot from the Magic Hour About page, magic/golden hour is typically when the sun is between 6 degrees below the horizon to 6 degrees above.

How We Find Magic Hour - Magic Hour App About page screenshot.   @FanningSparks


Today’s Takeaways

  1. Consider visiting popular destinations during the early morning hours.
  2. Make time to experience Mother Nature’s performance between first light and sunrise.  Research the best times for your location and season.
  3. Consider taking photos during the magic or golden hour for beautiful diffused light.

Peg - FanningSparks Author