“Decorative fixtures can play a big part in making the kitchen a welcoming place. They are the architectural jewelry that helps set the tone. Decorative lighting adds the visual sparkle to a space.” says lighting designer Randall Whitehead. He goes on to explain that decorative lighting is only one of the four types of lighting to be considered. The others are task lighting, ambient lighting and accent lighting. Task lighting is intended to light a work area for the day-to-day activities performed in the room. Ambient lighting gently fills the room with light and sets the mood. Accent lighting is intended to emphasize specific objects. The trick is to layer in various light sources to address all four purposes. Whitehead notes a single light fixture can serve more than one function such as providing both ambient and decorative lighting. Honestly, I can’t claim to have taken all of this into account when I selected new light fixtures for our kitchen. But I am very pleased with the lighting and it has made a much bigger impact than I expected.
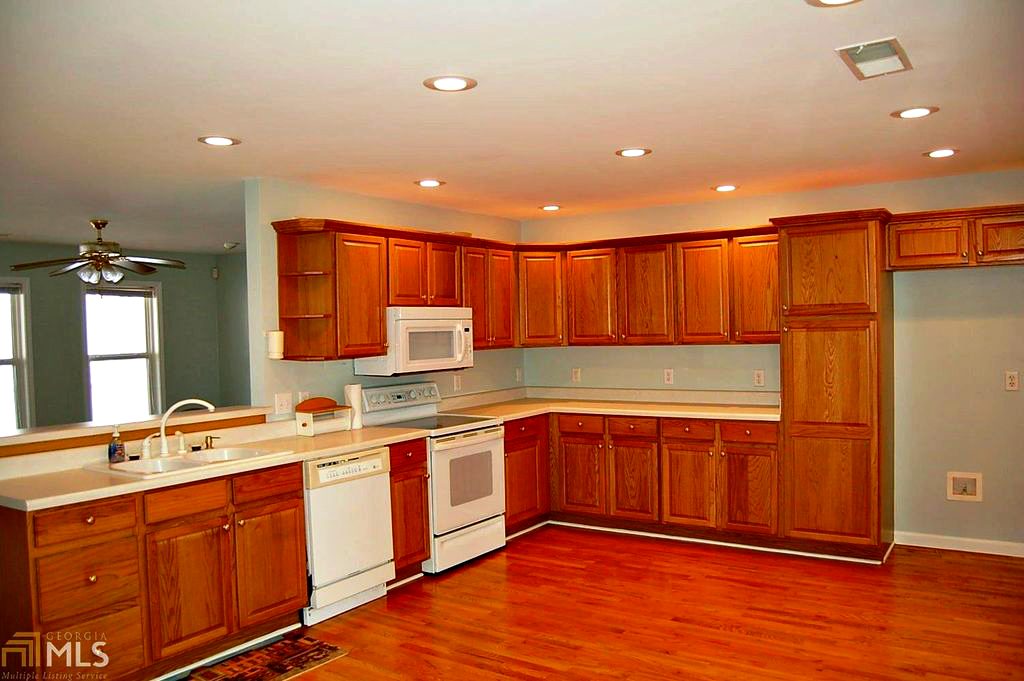
But enough theory—time to look at a real life example. To fully appreciate the improvement our new light fixtures have made, let’s go back to the beginning. Here’s a photo of our kitchen from the original real estate listing.
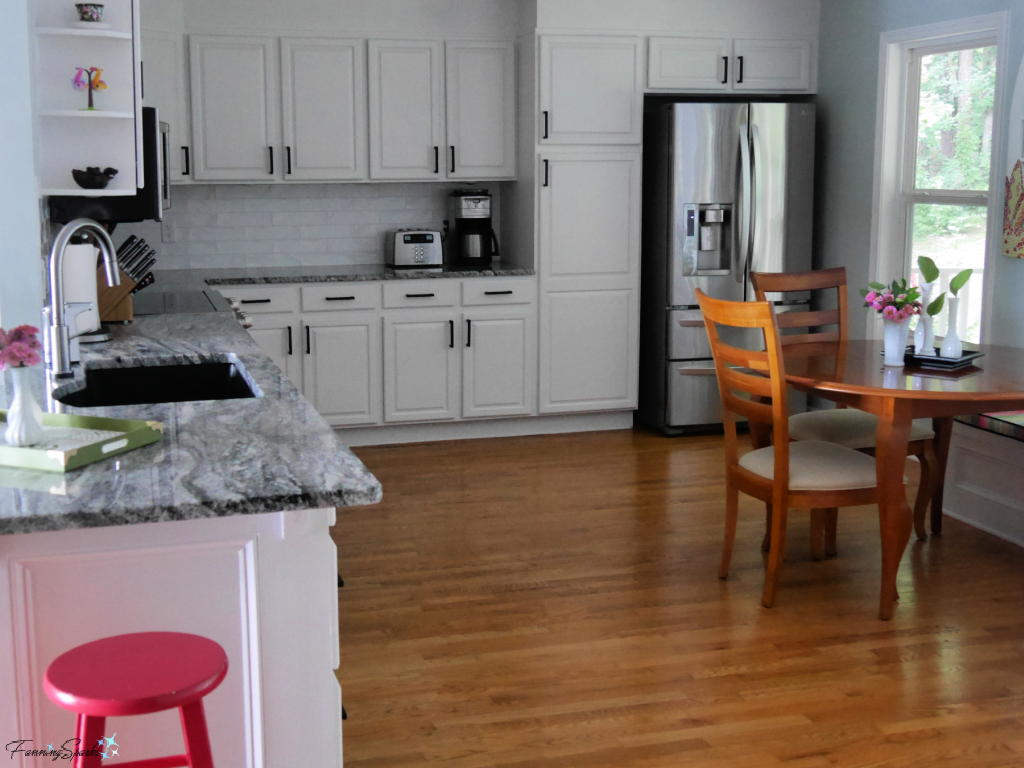
 The kitchen underwent a significant transformation when we first moved in. We maintained the original layout but made a number of improvements. We kept the original cabinets, extended them to the ceiling, painted them white and replaced the hardware. We reconfigured the countertops and had them replaced with granite. We had new tile backsplash installed. We replaced the appliances, the sink and the faucet. Here’s how the kitchen looked after the renovations.
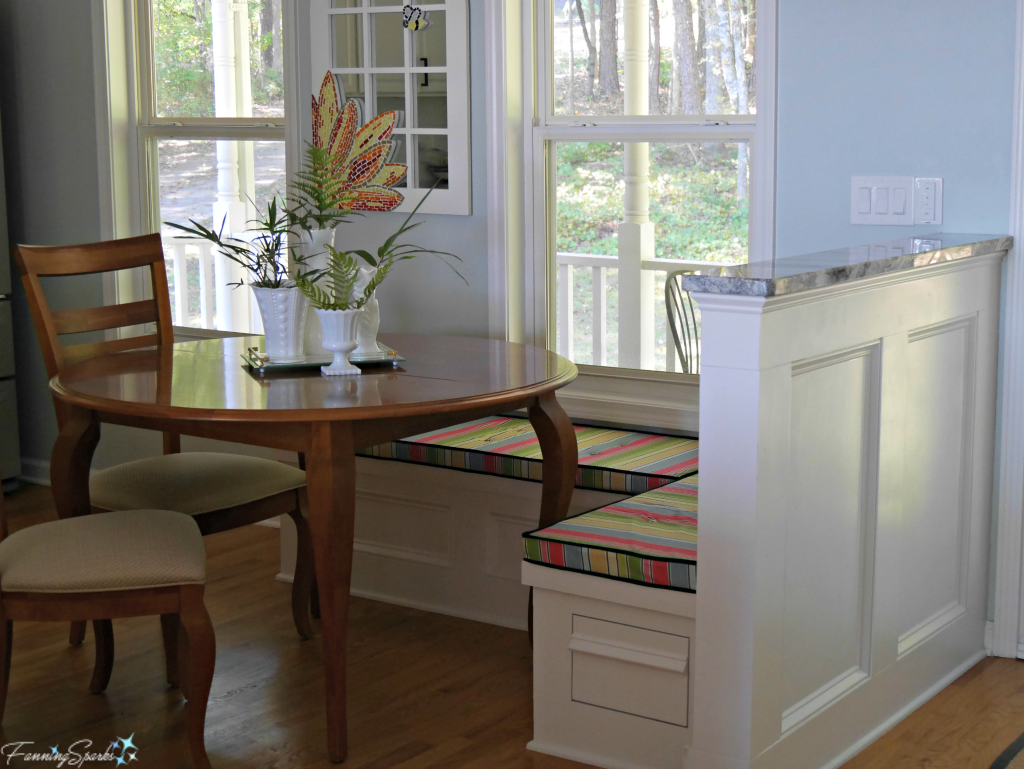
 We also had a new pony wall and banquette constructed to separate the front entry and create an eat-in area. I shared the details of this change in the post Our Pony Wall and Banquette Combo.
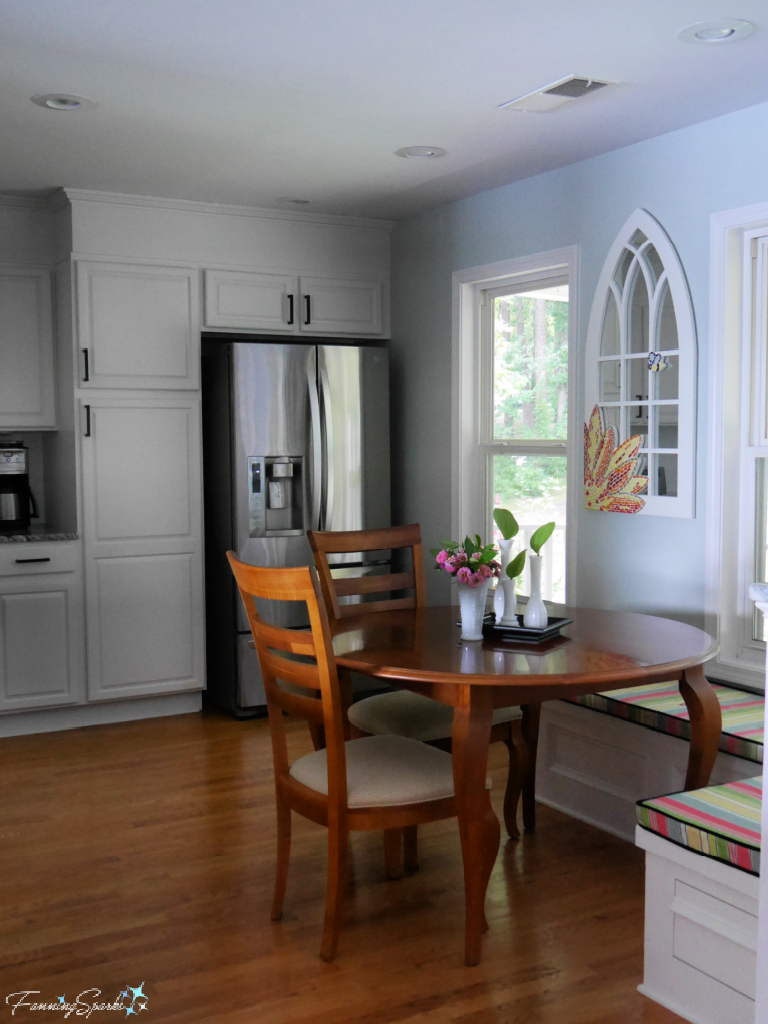
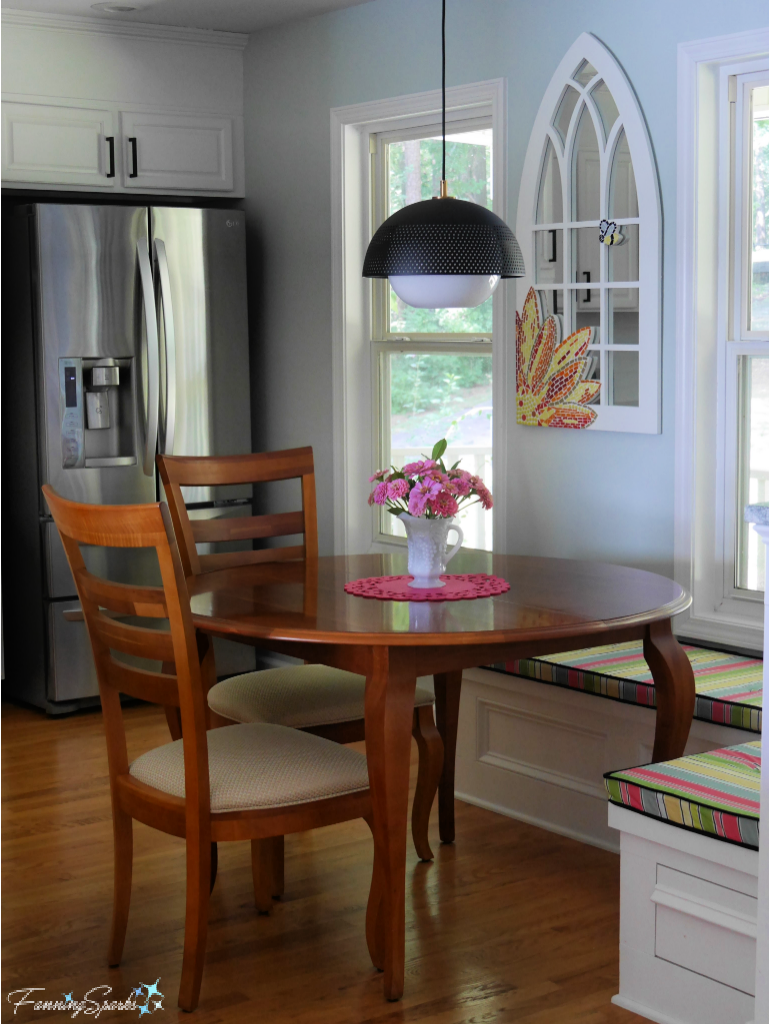
 One thing we didn’t change was the lighting. We simply ran out of steam and decided to delay new light fixtures. A series of recessed can lights were the only source of lighting in this area. They provided acceptable task lighting but did nothing for ambient, accent or decorative lighting.
A recent decision to switch out a light fixture in our half bathroom presented the opportunity to make some changes to the kitchen lighting as well. We had to engage an electrician anyway so it made sense to bundle the work.
My search for new light fixtures started on the LampsPlus website. We’ve purchased from them several times in the past and had good luck with their products and service. Please note this is not a sponsored post; I’m merely sharing my experience. Here’s a screenshot of the LampsPlus Kitchen Pendants section.
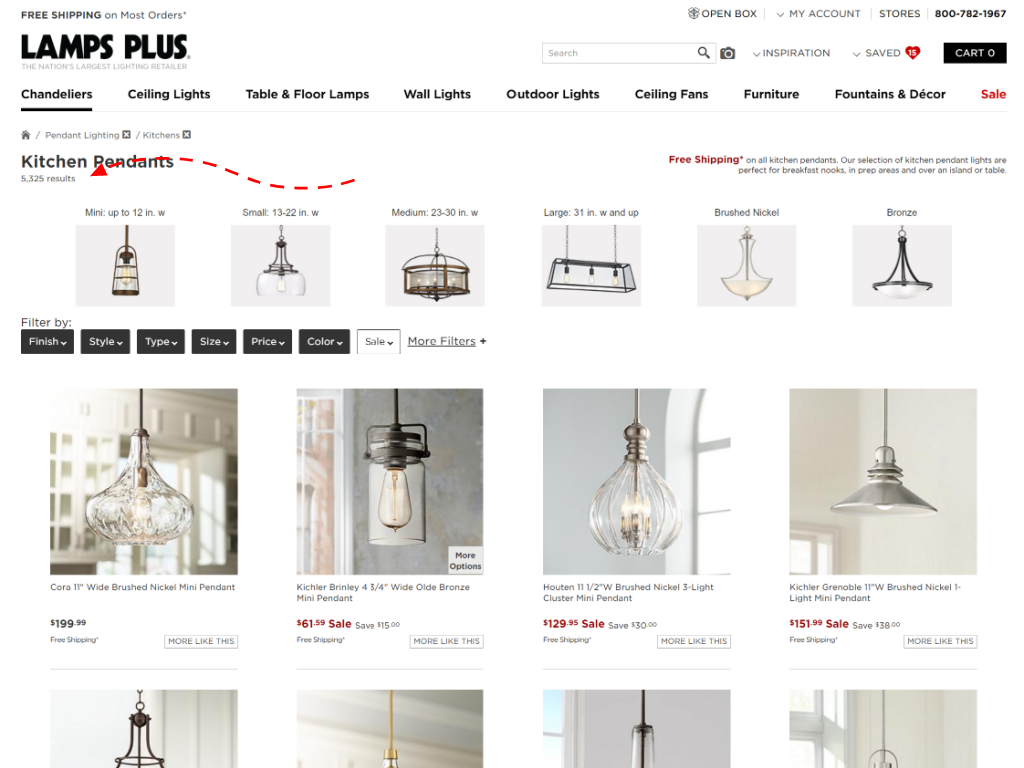 Selecting light fixtures online can be challenging. The first step is to narrow down the choices. The above screenshot shows 5,325 results for kitchen pendants… over 5,000 options! The search filters allowed me to narrow down the options by Finish, Style, Size, Price, and so on. The Save Option allowed me to “heart” the fixtures I liked and add them to a wishlist. These are, of course, fairly standard features for an online shopping site. But the shopping aid that is noteworthy and made my search much more manageable is the View In Your Room feature.
The Room Viewer feature is surprisingly robust. Simply upload a photo of the room and then layer in the light fixture(s) to see how it looks. The lights can be resized and moved around. I found this went a long way to helping me visualize the light fixtures in our space.
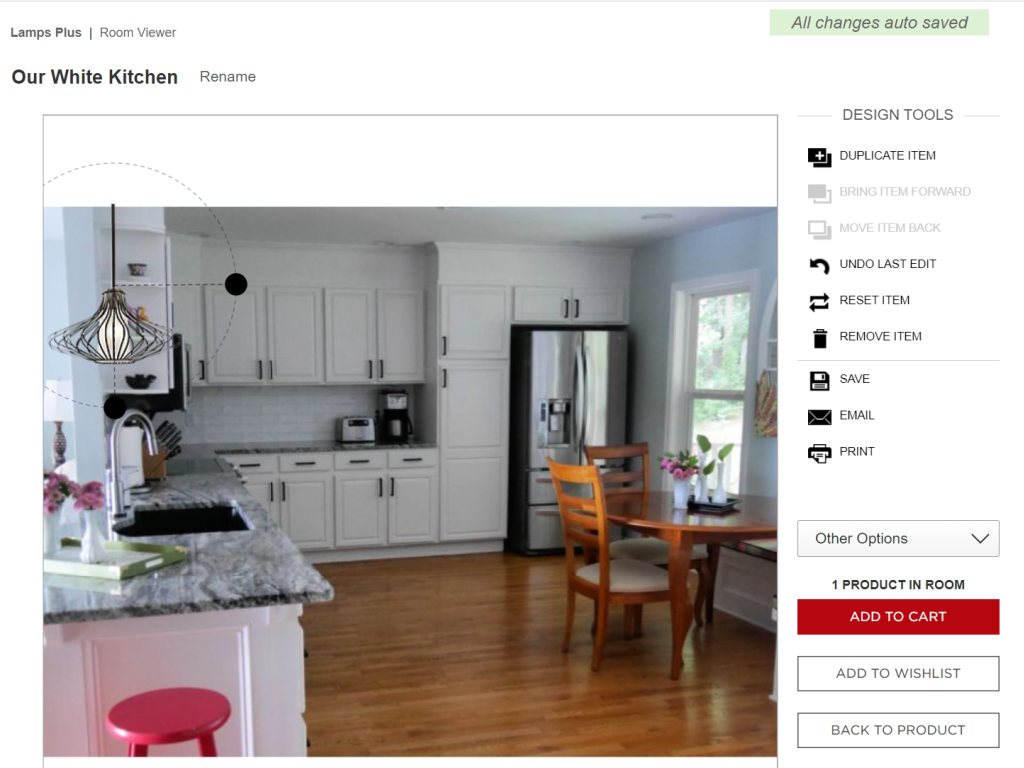 One thing to keep in mind when using the LampsPlus Room Viewer feature is scale. You can easily resize the fixture to make it look good in the Room Viewer photo but, obviously, the actual fixture is a specific size. It’s difficult to determine how big or small the light fixture will be in the actual space. That’s when I switched my selection process from online to hands-on.
I found household objects in the size and shape of the light fixtures I liked. For instance a large round tray was a good stand-in for the pendant light shown above. By holding the imaginary light fixture in place, I was able to evaluate its size in the actual space.
We decided to install 3 new light fixtures in the kitchen area: a pendant over the counter, a pendant over the dining table and a close-to-ceiling light in the entry area. After narrowing down my options, I checked to see if they were available in LampPlus Open Box where they list like-new fully inspected returns at heavy discounts. I scored several Open Box finds!
After much deliberation, the selections were made and the orders placed. Our electrician (Thank you Andrew!) did an amazing job of installing all the new light fixtures including revamping the existing light switches. But the best part is that he was able to run new wiring for the pendants without having to cut into the drywall. Yay! No drywall dust to cleanup! No drywall to repair! No ceilings or walls to repaint!
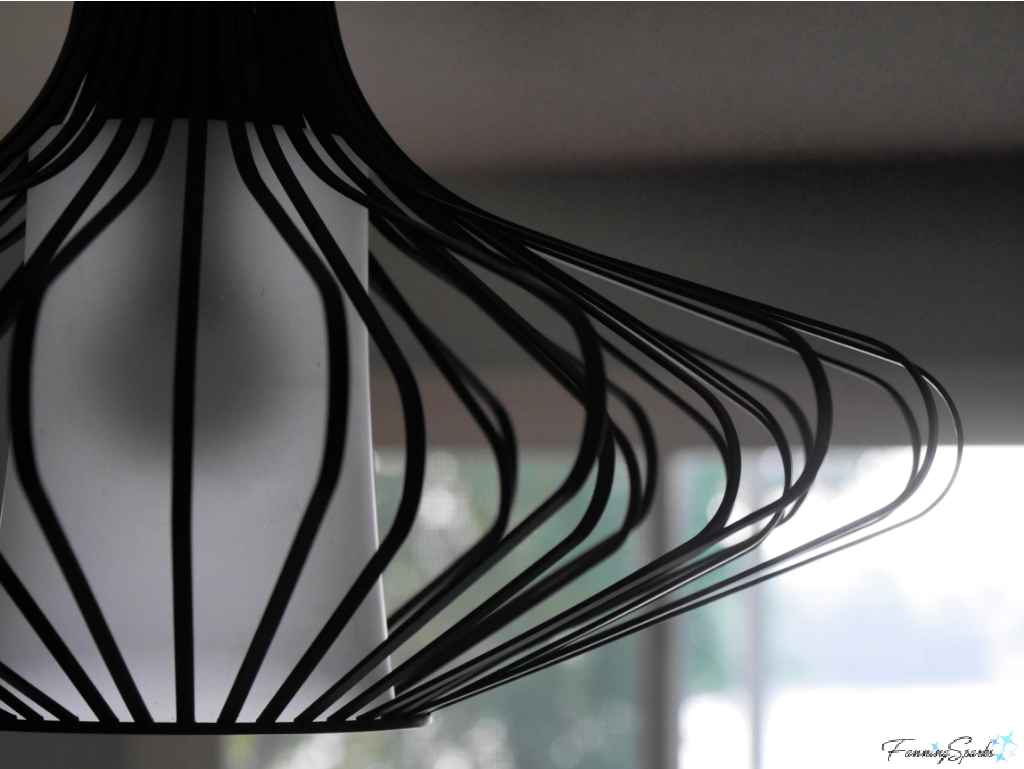
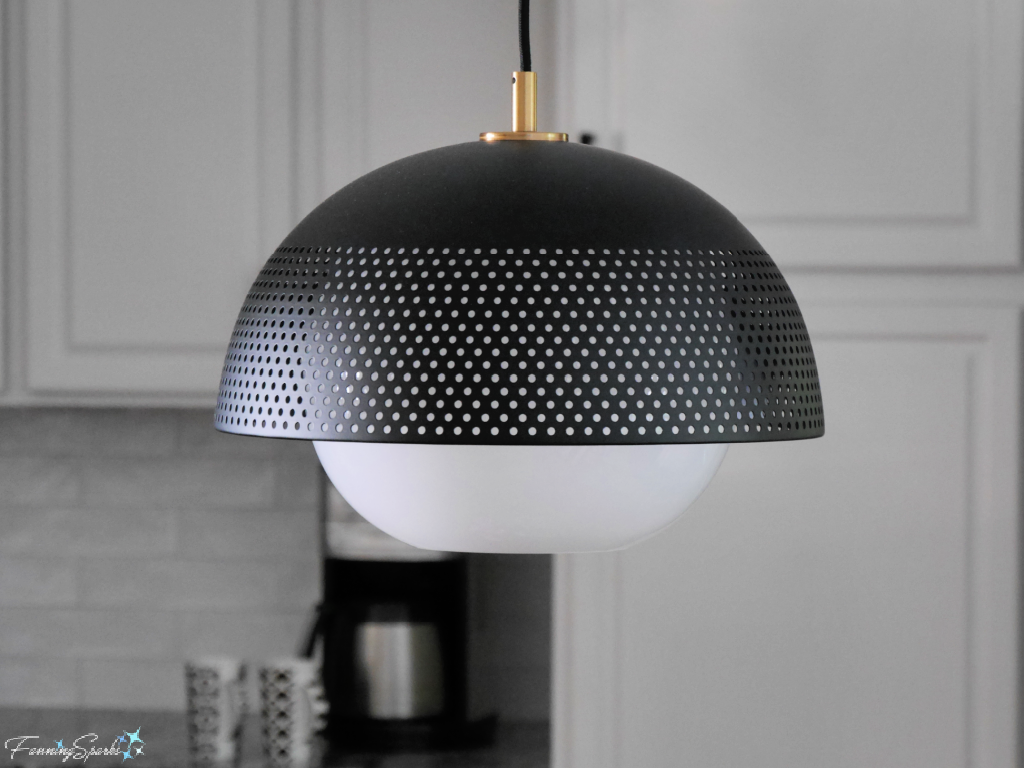
Now for the results! Here’s the new pendant above the counter. I love how it looks.
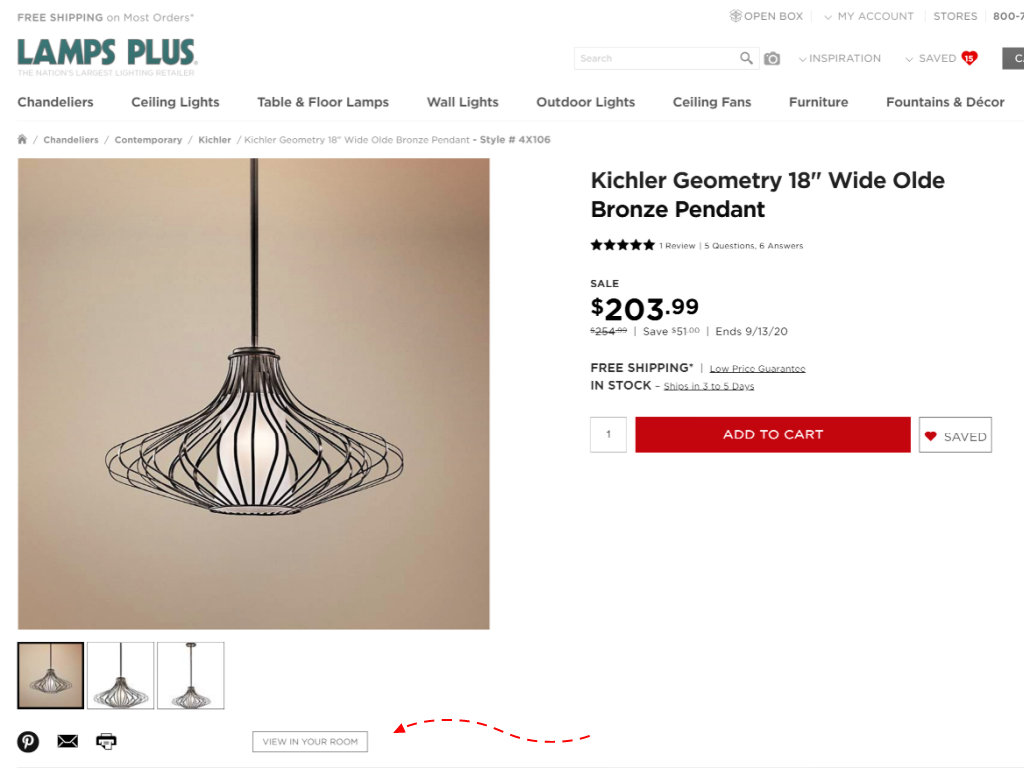
 In my opinion, it adds great visual interest without taking over the space. The generously-sized, open black metal frame creates a light, sculptural effect. This pendant light is the Kichler Geometry 18” wide in old bronze.
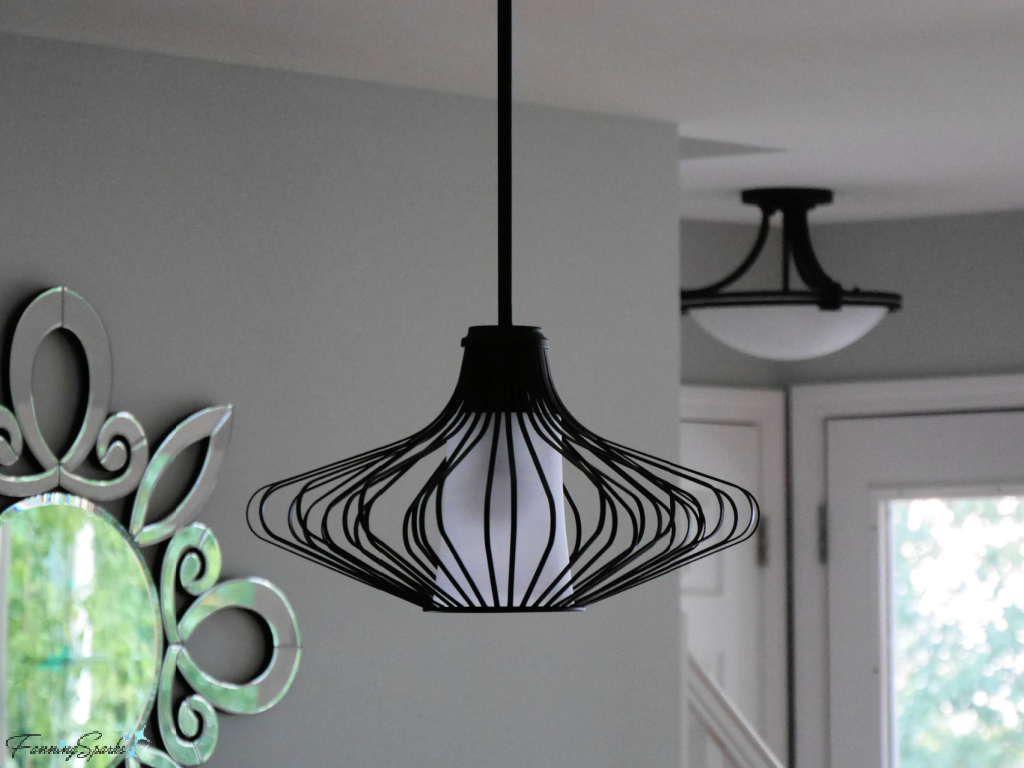
 We kept things cohesive by choosing light fixtures in a combination of black metal and white glass but mixed it up with different forms, sizes and details. Here’s the new pendant light over the dining table.
This pendant light is the Maxim Perf 14 ¼” wide in black and satin nickel.
 Having selected a new close-to-ceiling fixture for the front entryway, we decided to install the same fixture in the other entryway. This photo shows that fixture along with the pendant over the counter. The close-to-ceiling fixture is the Possini Euro Deco 16” wide in bronze.
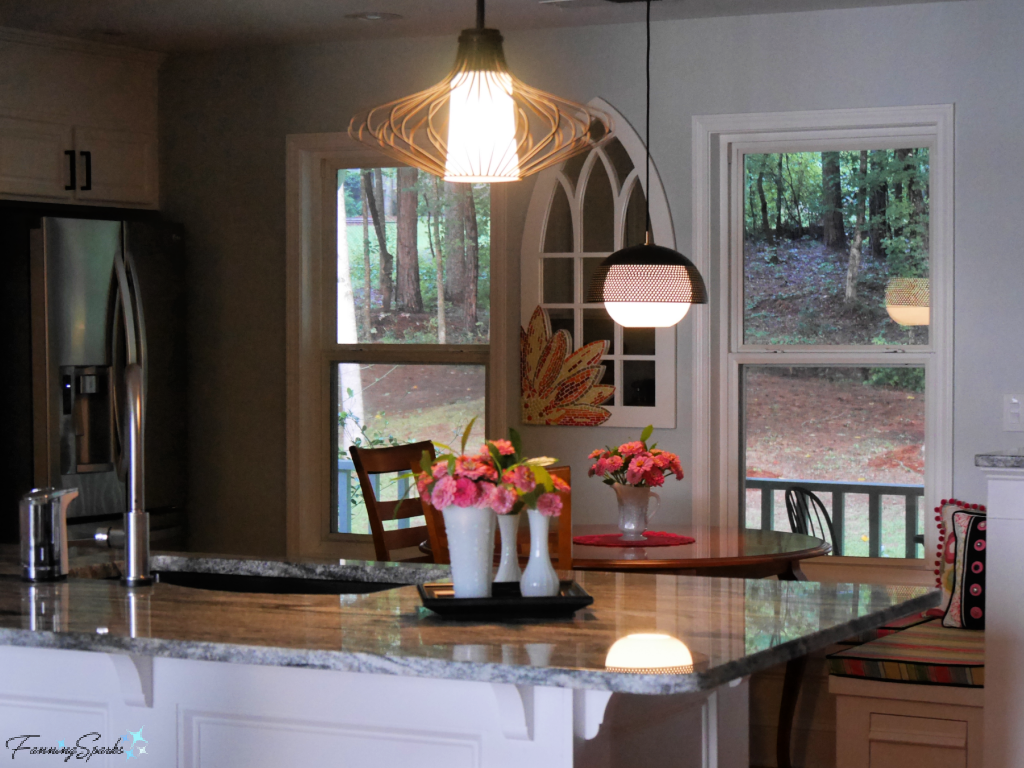
 Of course, lights have to be turned on to get the full effect. We had dimmer switches installed on the pendant lights which allows them to serve as task lighting when set to high and ambient lighting when set to low. Here are the over counter and dining table pendant lights.
 In this next photo, the over counter pendant light fixture and the entryway close-to-ceiling fixture are shown.
 It’s always fun to see a side-by-side comparison–here’s the counter area before and after the new pendant light fixture. I think Randall Whitehead was right…decorative lighting does indeed add “visual sparkle to a space.”
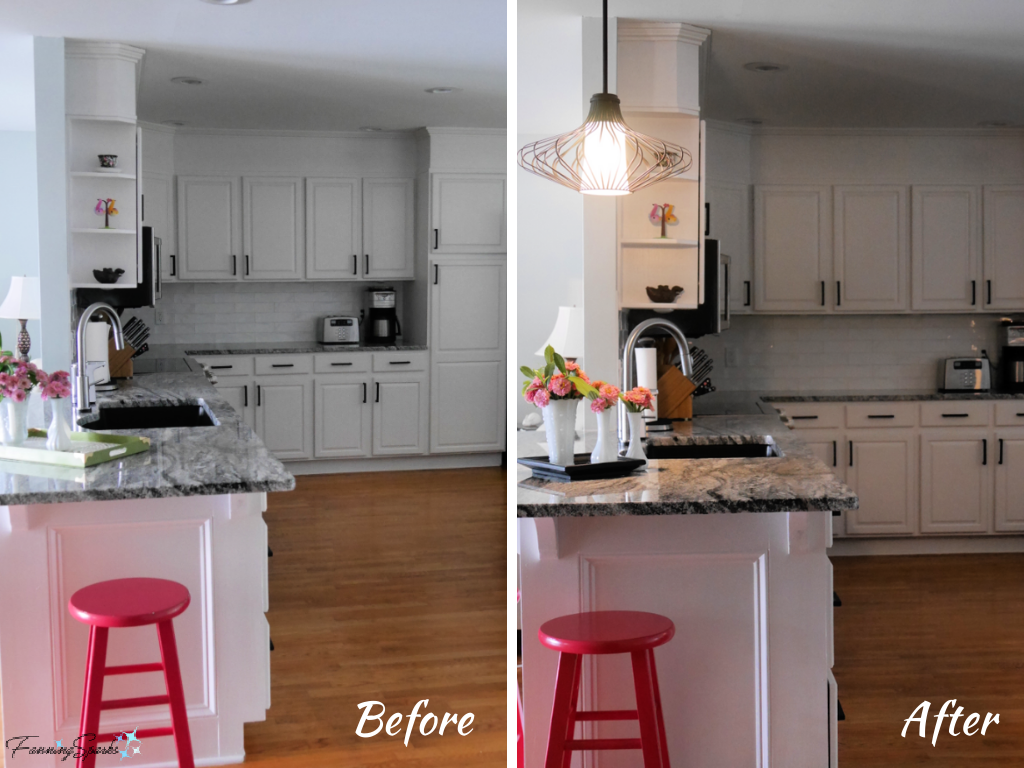
More Info
You may be interested in previous posts about our home including A Before Tour of Our New Casual Lake House and Our Pony Wall and Banquette Combo.
You can find the light fixtures we selected on the LampsPlus website. (please note this is not a sponsored post; I’m merely sharing my experience):
. Maxim Perf 14 ¼ “ Wide Black and Satin Nickel Pendant Light
. Kichler Geometry 18” Wide Olde Bronze Pendant
. Possini Euro Deco 16” Wide Bronze Ceiling Light
For more insights on lighting design, check out Randall Whitehead’s website including his article Light Layering – The Secret Sauce to Good Design.
Many thanks to Andrew of MWJ Electric Company in Morgan County, Georgia.
Today’s Takeaways
1. There are 4 types of lighting including task, ambient, accent and decorative.
2. Consider layering the different types of lighting in a single room.
3. Lighting fixtures can serve as architectural jewelry for the home.


 Whether you’re a diehard chicken fan or simply curious (like me), the barnyard at Hundred Acre Farm in Madison, Georgia is a great place to visit. This quaint farm setting is home to about 200 chickens plus ducks, turkeys, peacocks, horses, goats, dogs, a donkey and probably others I didn’t even see. The chickens are raised “free range” with the ability to roam from the chicken roost to the green pastures. In fact, you’ll want to drive slowly along the farm’s main driveway to avoid chickens crossing the road to get to the other side (Sorry… I just couldn’t resist referencing that age-old riddle!).
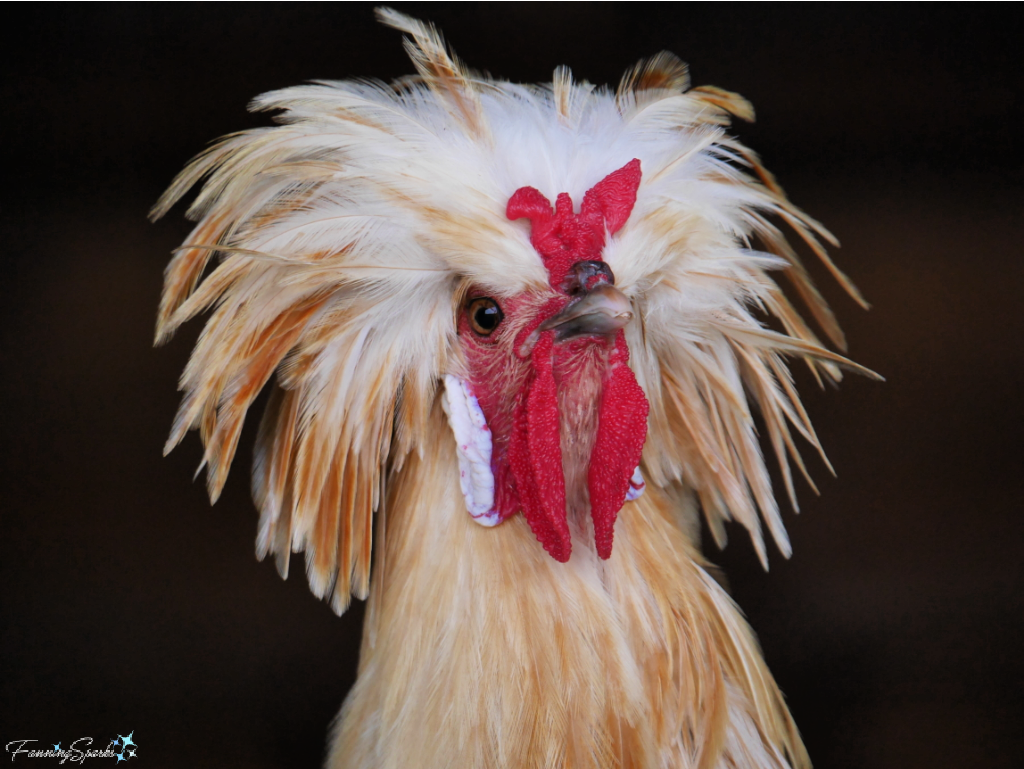
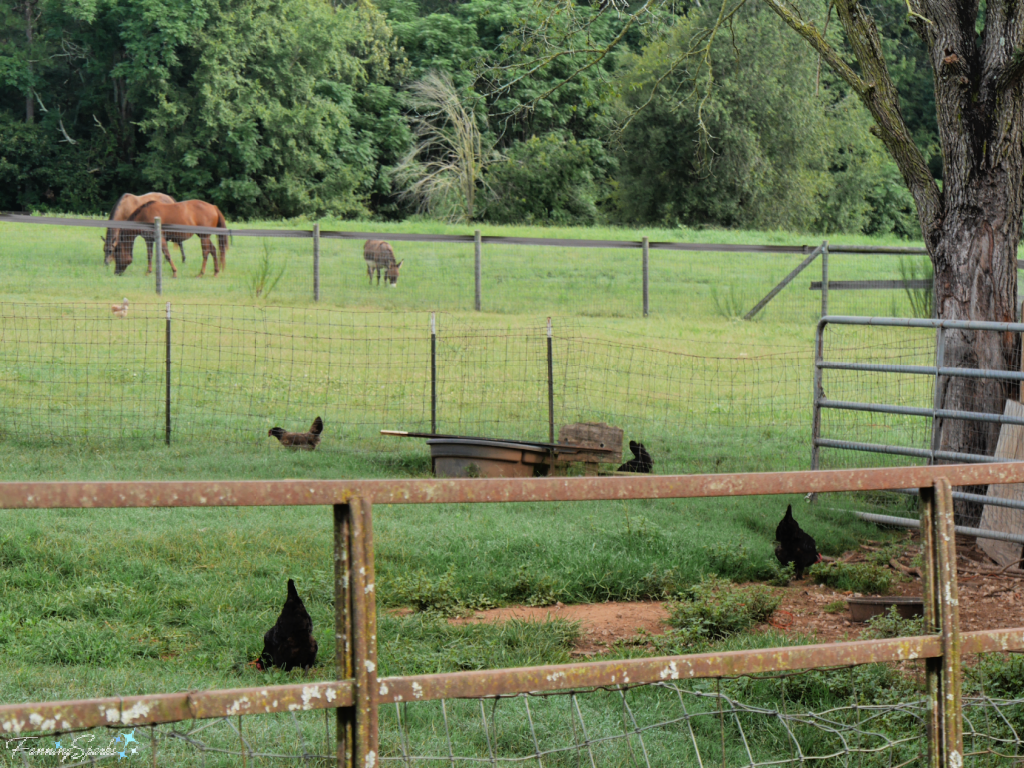 One of the most interesting aspects of the flock at Hundred Acre Farm is the variety of chickens. I’m no chicken expert but according to the folks at the Farmhouse Inn (Thank you Kristen and Crystal!) there are actually about 8 different breeds. I’d like to share some examples in today’s post.
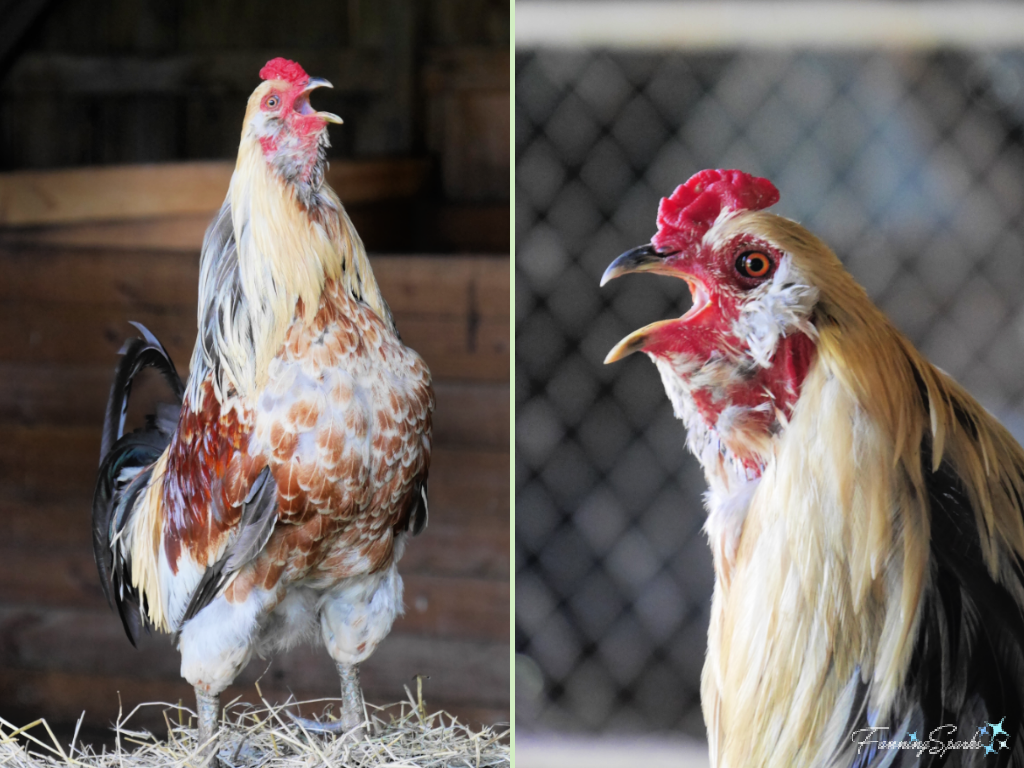
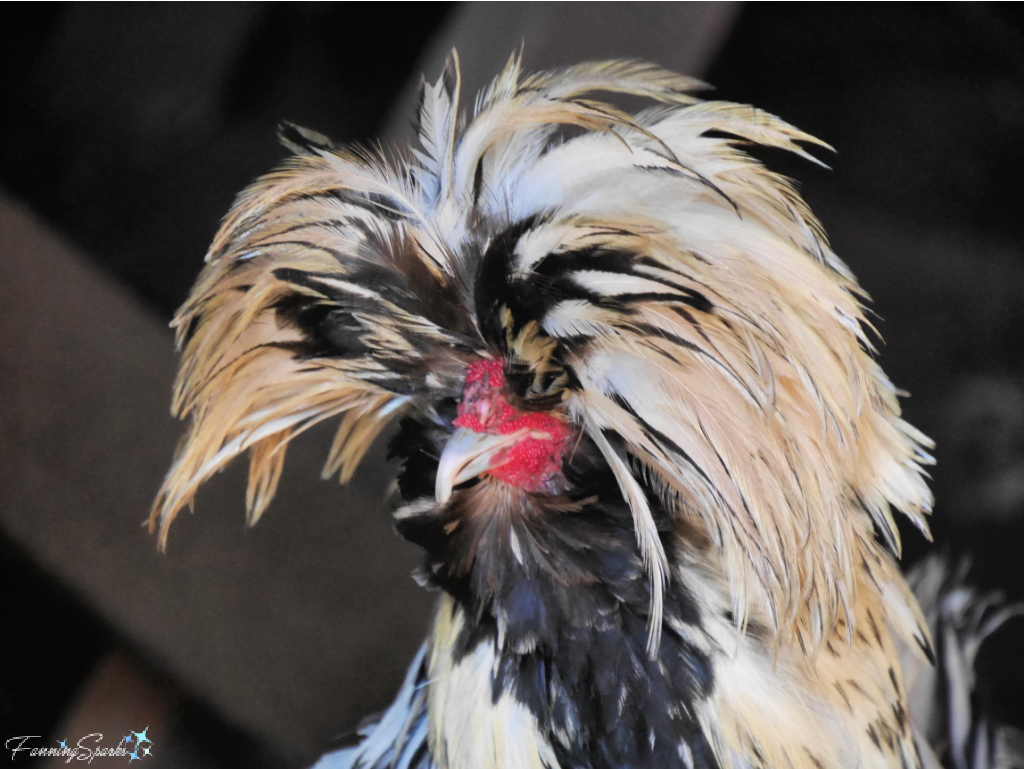
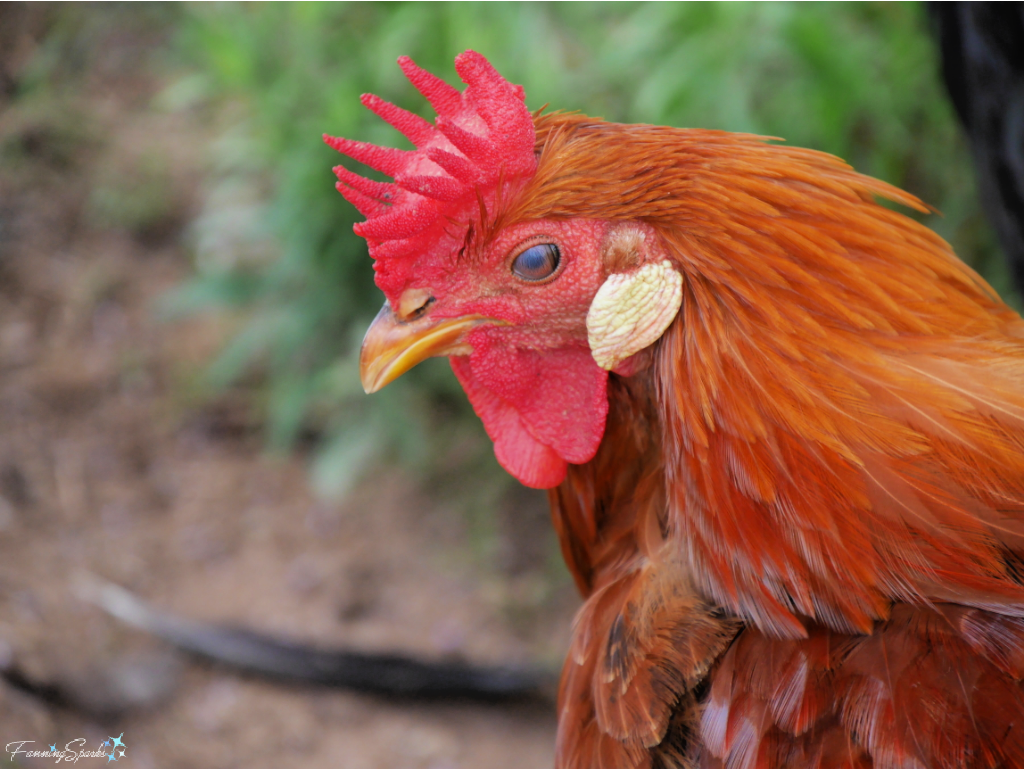 Of course, it takes some effort to look this good! Here’s the rooster preening himself. Preening is a form of grooming that helps release new feathers from their sheaths, remove debris and pests, and distribute oil over the feathers.
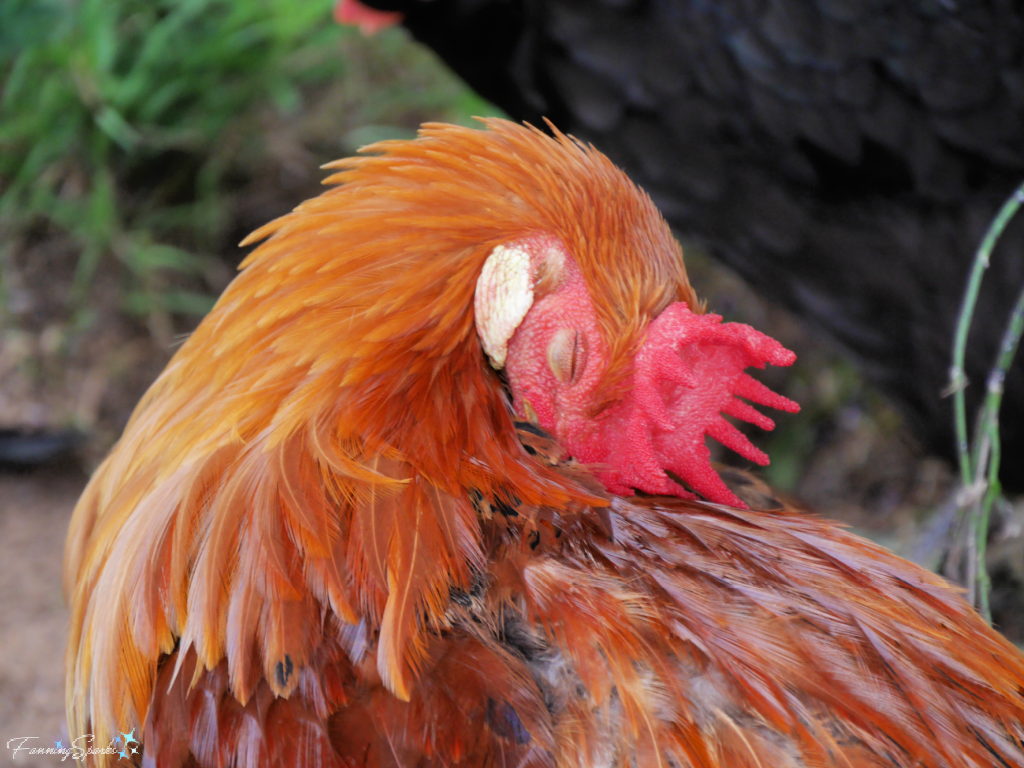 But the Rhode Island Red isn’t the only handsome gentleman in this barnyard. The Brahma chicken, in Light, Dark or Buff colored varieties, is noteworthy for its large size. It is “often described as “The King of Chickens,” says the Backyard Poultry website. Here’s a beautiful Buff Brahma rooster proudly strutting his stuff.
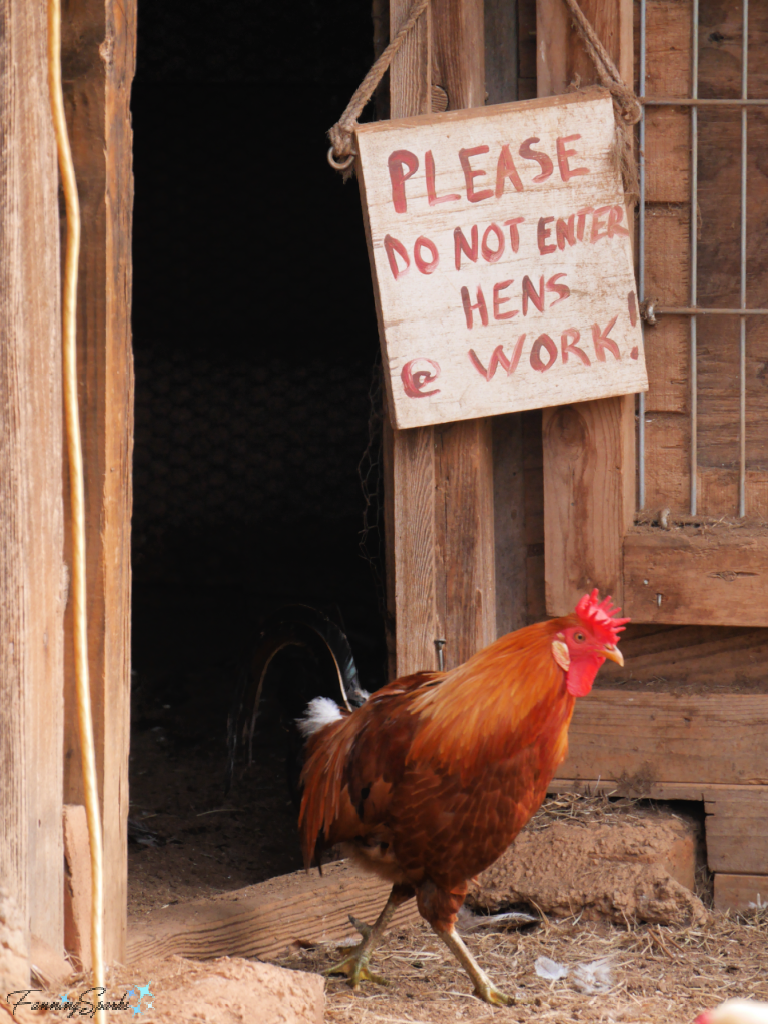
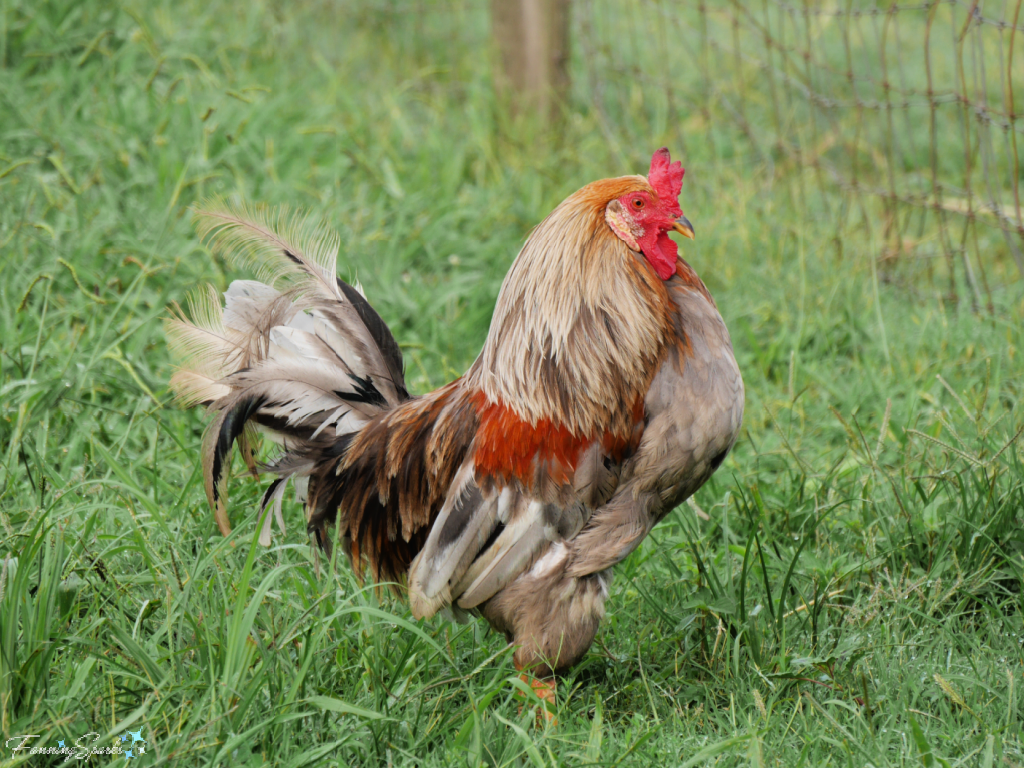 Thanks to the Backyard Poultry website, I’ve learned that roosters serve a few purposes. The most obvious is breeding. “One good reason to have a rooster is that you want chicks! Hens don’t need a rooster in the flock to lay eggs, but they do need a rooster in the flock to lay fertile eggs.” Roosters can also serve to protect the flock, be raised as livestock for meat, or, rather surprisingly, become family pets.
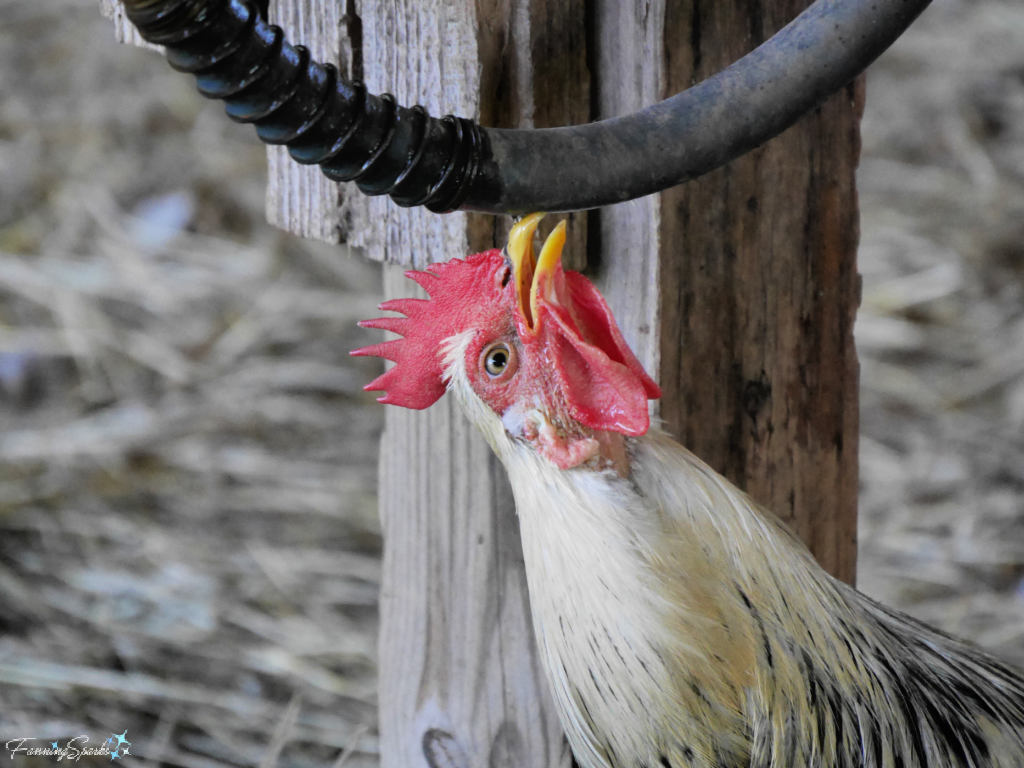

 Other female duties include raising the young. This DeKalb Amberlinks mother hen was watching over her chicks in the barn. Hens, are said to, guard their chicks fiercely.
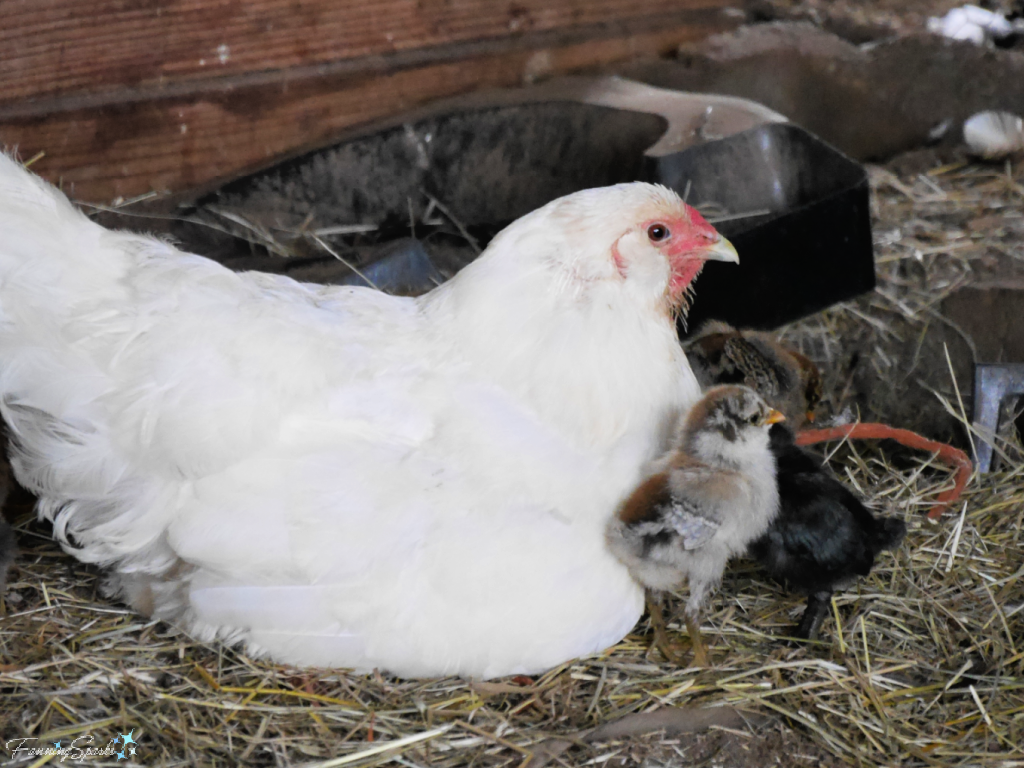 Eventually, Mom led the kids out of the barn…
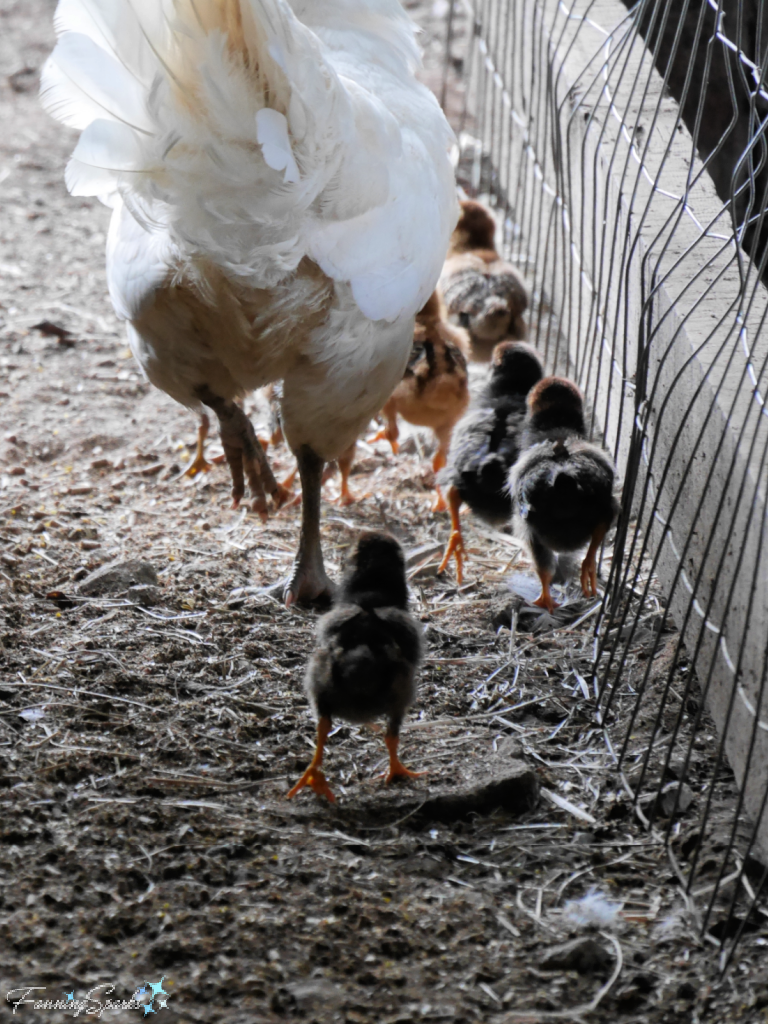 ……and out to the field. Unlike some birds, mother hens don’t feed their chicks directly. Instead they lead them to food and water and call them towards edible items.
 While the chickens are busy earning their keep, there are other barnyard residents who merely have to look good like this handsome peacock…
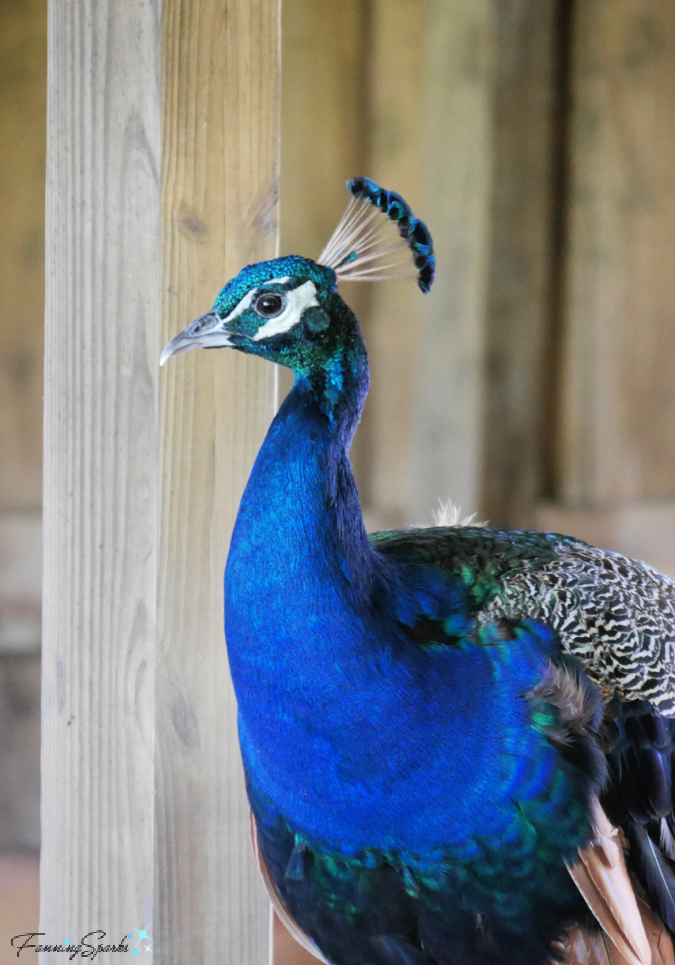
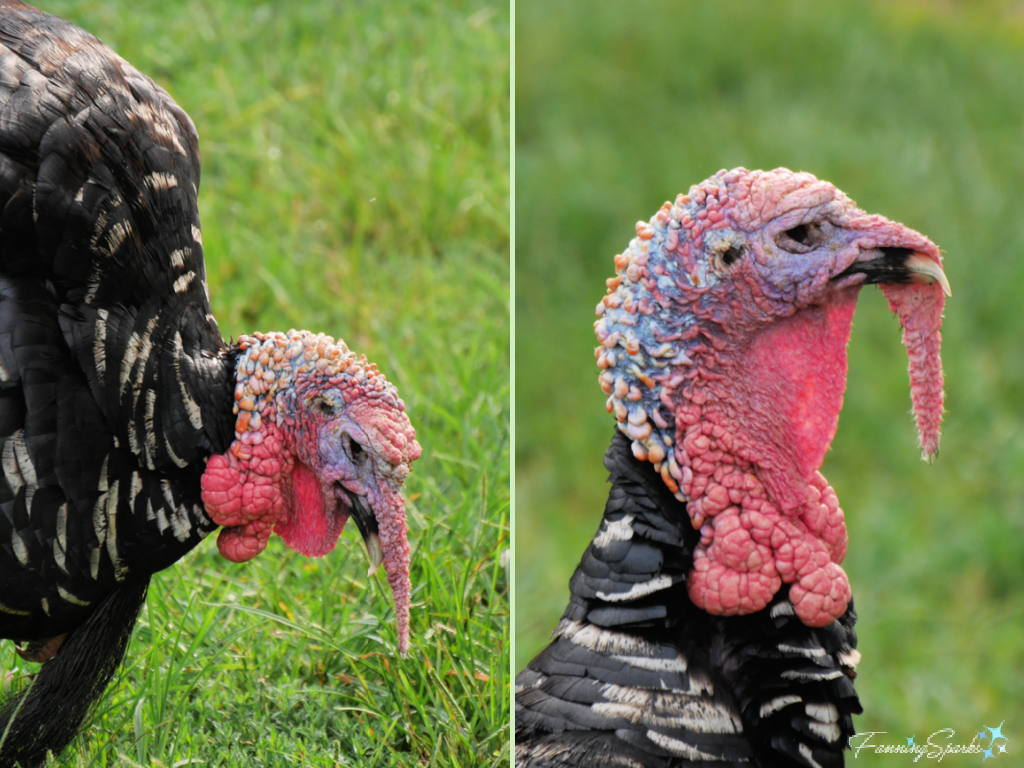 Luckily, a female turkey sees it differently and finds those fleshy outgrowths on the turkey’s head and throat, called caruncles, rather attractive. At least that’s what I read into this description from Wikipedia “In anatomical terms, the snood is an erectile, fleshy protuberance on the forehead of turkeys. Most of the time when the turkey is in a relaxed state, the snood is pale and 2–3 cm long. However, when the male begins strutting (the courtship display), the snood engorges with blood, becomes redder and elongates several centimetres, hanging well below the beak…”

 The Town lattice design, mentioned on the historical marker, comes into view as you walk into the bridge. A network of closely spaced diagonal elements forms the “lattice”.
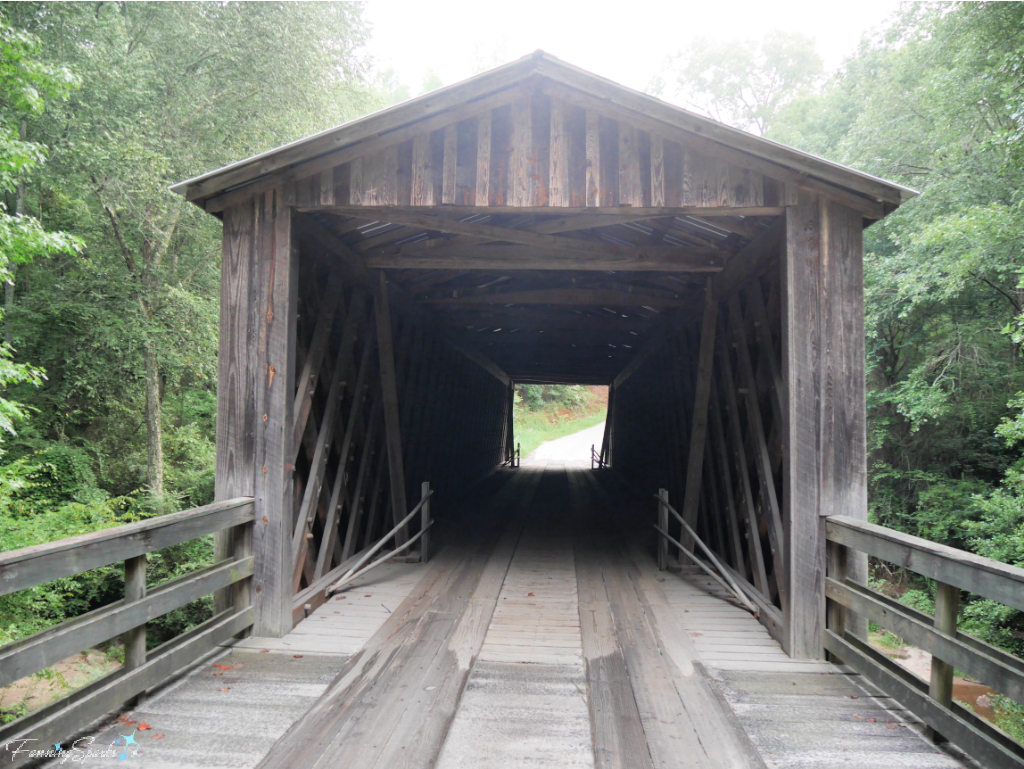 The lattice is clearly visible in the below photo. Interestingly, there is a series of sequential numbers “16, 19, 18, 21, 20, 23, 22, 25, 24…” marked on the diagonal planks. The Georgia Department of Transportation provides this explanation “The wooden members of the bridge were often cut off-site, including boring of the holes for trunnels, and assembled in place. Builders used a numbering system to allow easy onsite assembly of the bridge pieces in a “pre-fab” fashion; the numbers are still visible on lattice members in many bridges.”
 Here’s a closer look at the trunnels, also called wooden pegs or tree-nails, used to connect the lattice planks.
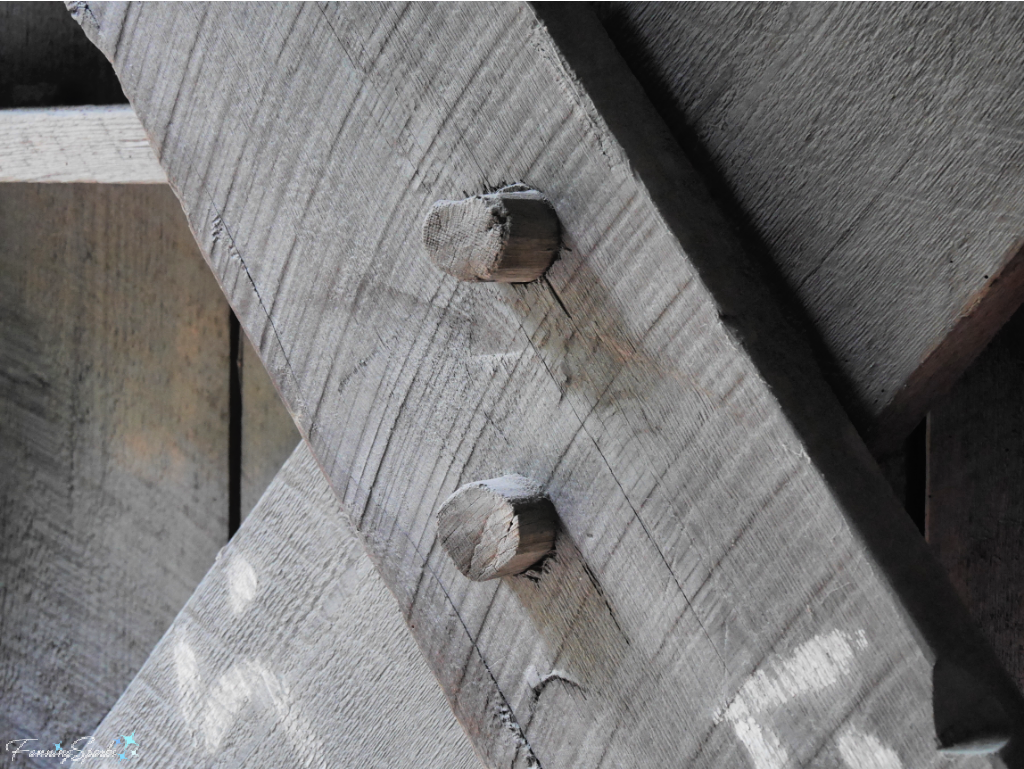 According to Wikipedia, the wooden lattice bridge design was patented in 1820 by architect Ithiel Town. “The design was of great importance because it could be built quickly by relatively unskilled workers from readily available material. The design also avoided the need for the heavy piers needed for stone arches. The design was widely known throughout the world and made Town wealthy.”
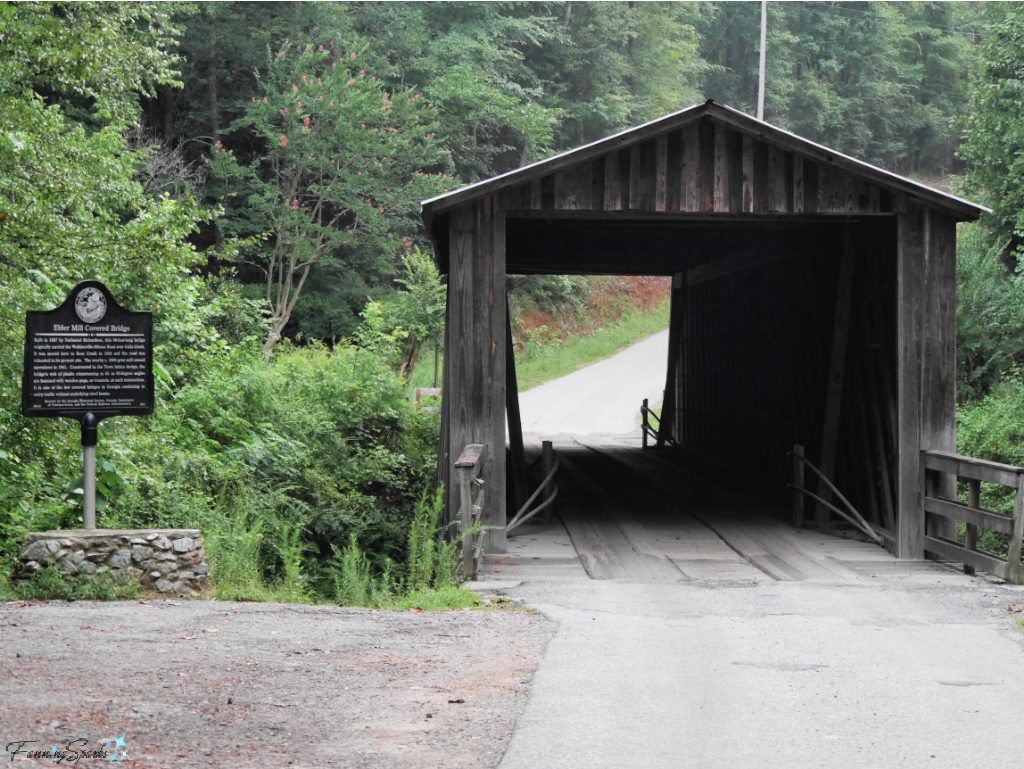
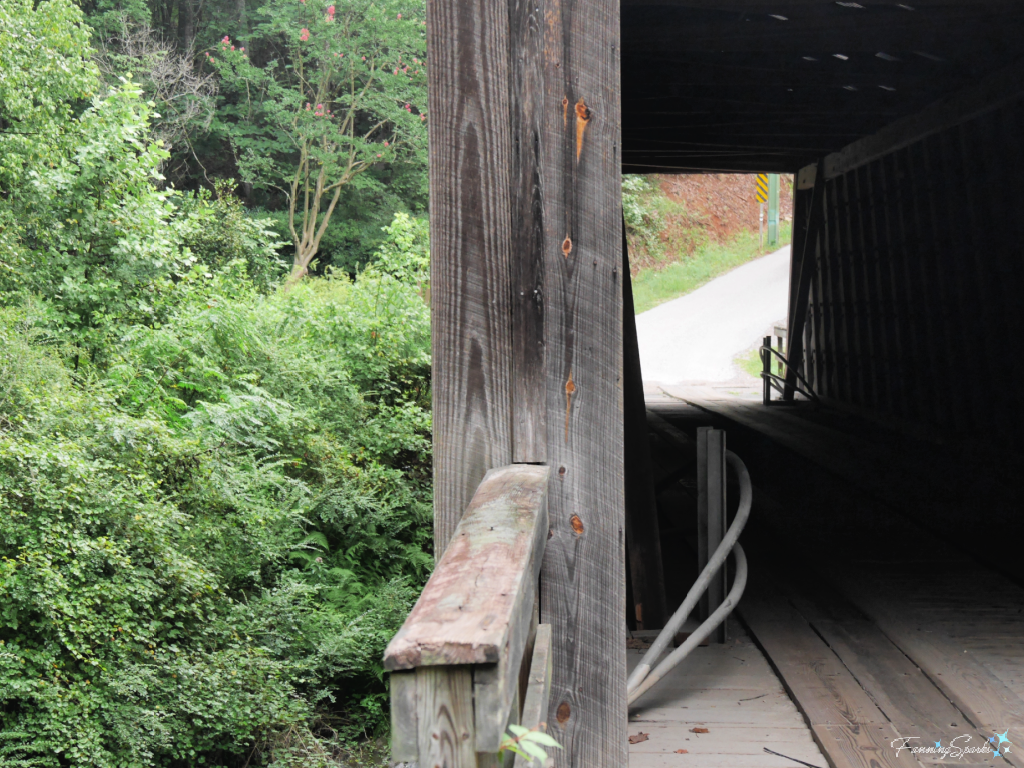
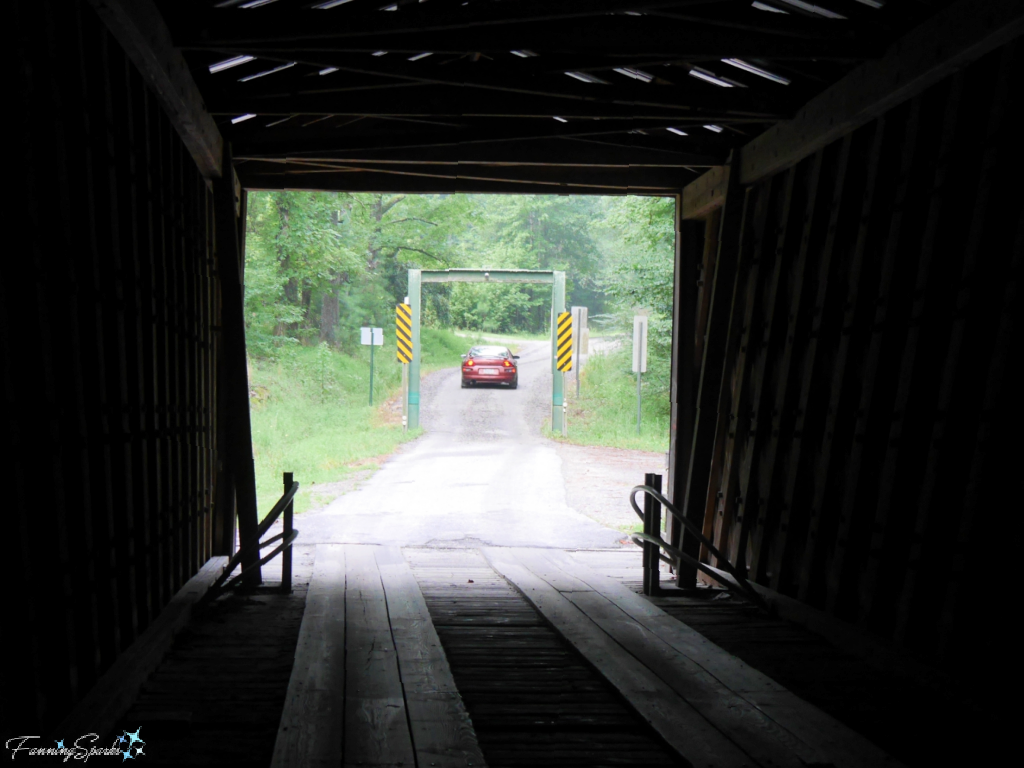 Some covered bridges have openings, or windows, along the sides but the Elder Mill Covered Bridge is completely closed in. Wooden siding, as shown in the below photo, covers the sides of the bridge.
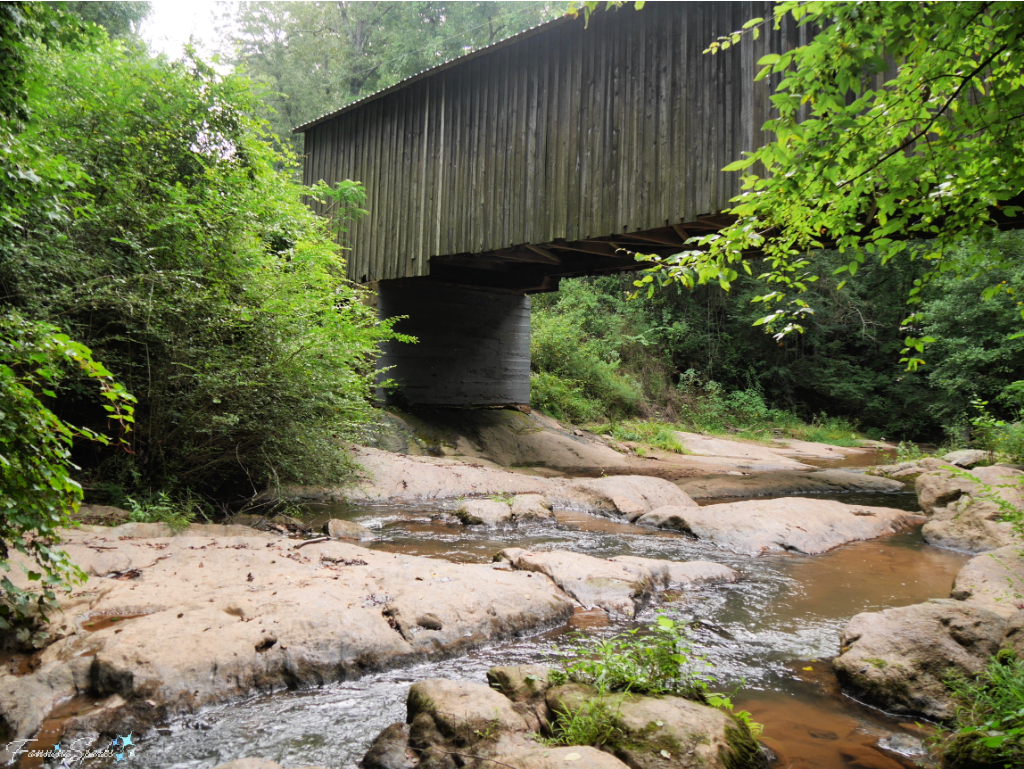 A short path takes the visitor down to Rose Creek. There are large, smooth rocks and a gently flowing, shallow stream. It’s a pleasant area for wading and exploring. The area is somewhat restricted, however, as it is surrounded by private property. No Trespassing and Private Property signs provide clear instruction.


 I tried drying and pressing some Rose of Sharon flowers in my new
  It’s best to cut the Rose of Sharon flowers when they are partially open and to remove the stamens before putting them in the flower press. Check out my previous post
  Cosmos and hydrangea also have thin, delicate flower petals which dry beautifully. The flowers pictured below took about 2 weeks to dry.

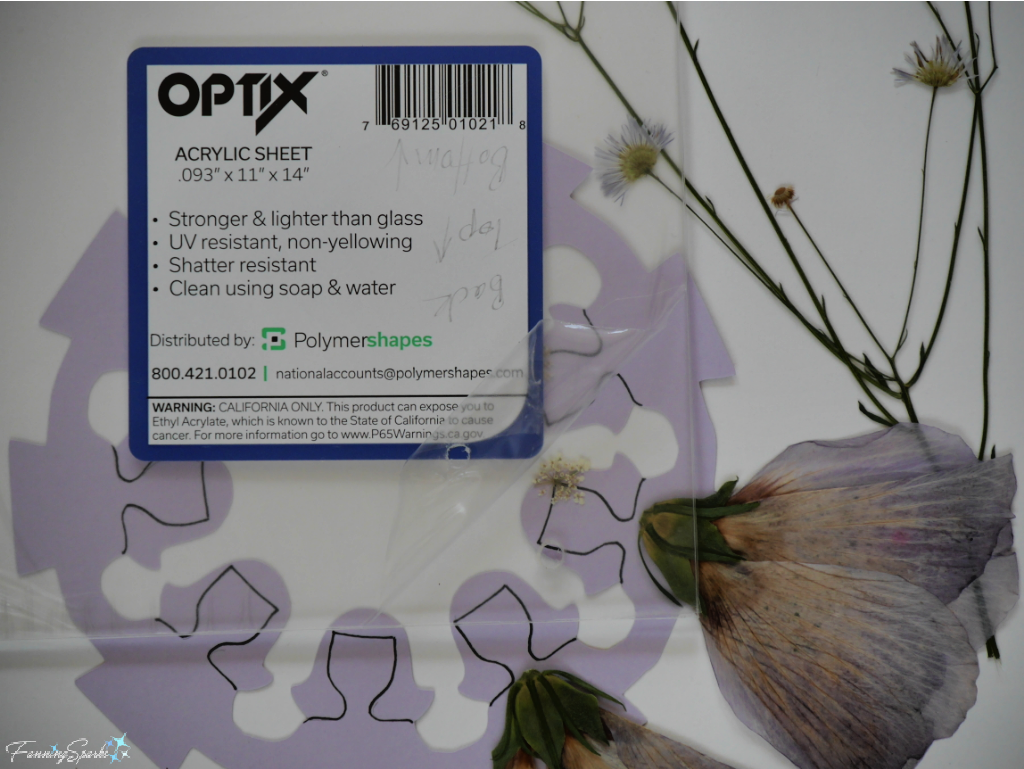
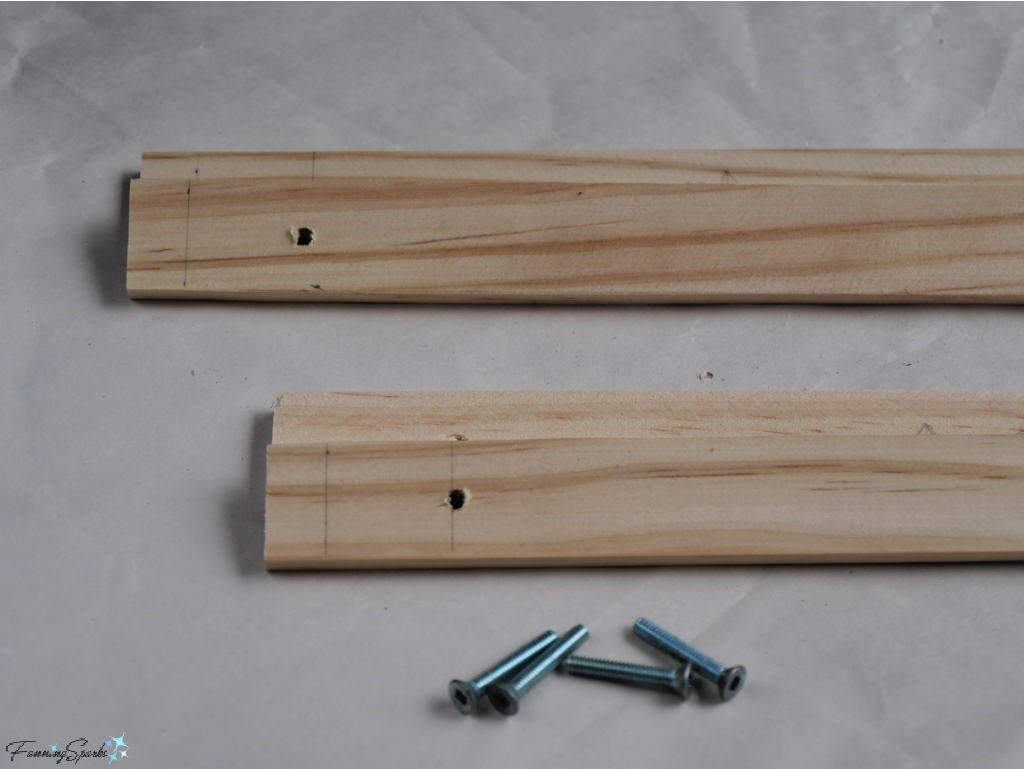 The trick to drilling acrylic, as I learned online, is to drill slowly and work in gradual increments. Starting with a 1/16″ bit and gradually working my way up to a 11/64″ bit resulted in neat and clean holes. Note the holes in the acrylic are slightly bigger than the holes in the wood so the screws can slip through without resistance.
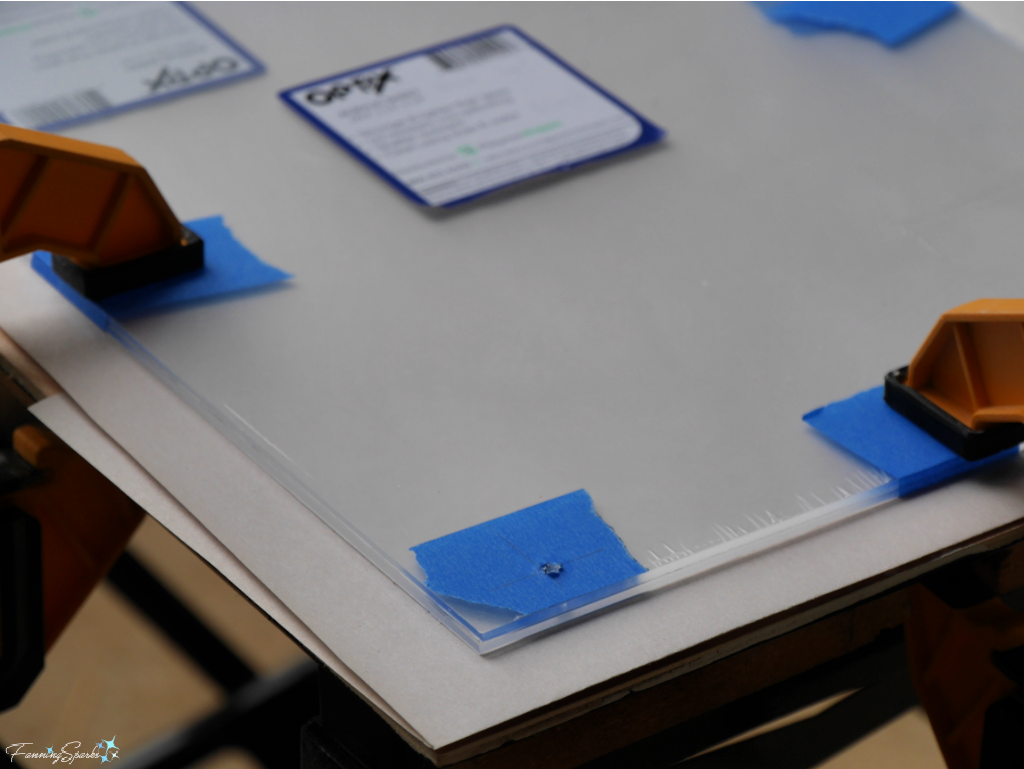 To finish the wooden bars, I sanded them smooth and then stained them with some General Finishes Gel Stain left over from another project. This product produces great results but does require a few steps and a little patience.
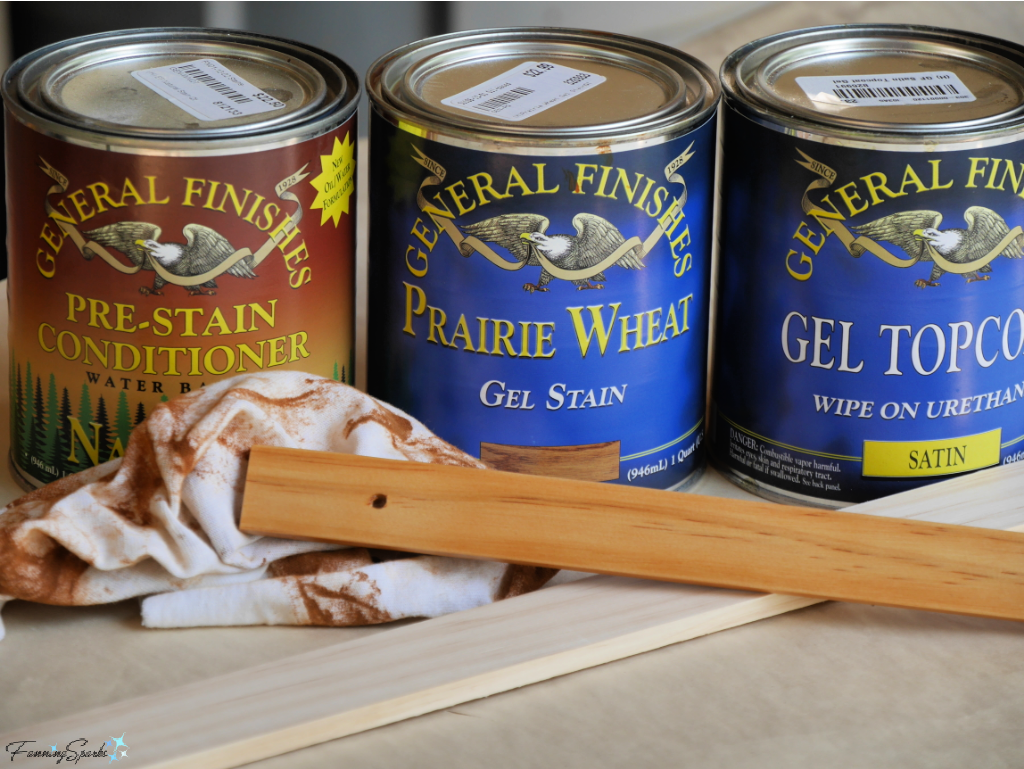
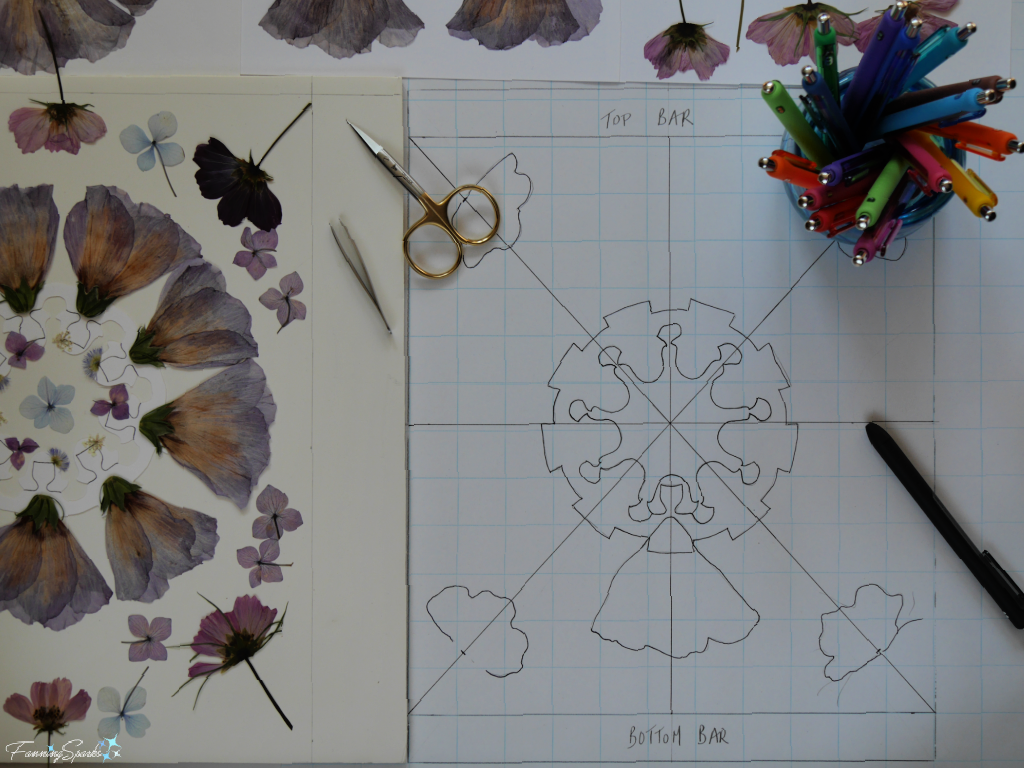 The next step was to glue the cut paper dolls and the dried flowers to the back sheet of acrylic. Using a small paintbrush, I carefully covered the back of each element with Matte Mod Podge. Tweezers were helpful for lifting and placing the tiny delicate pieces. After drying the piece overnight, I used wet cotton swabs to remove smudges and smears.
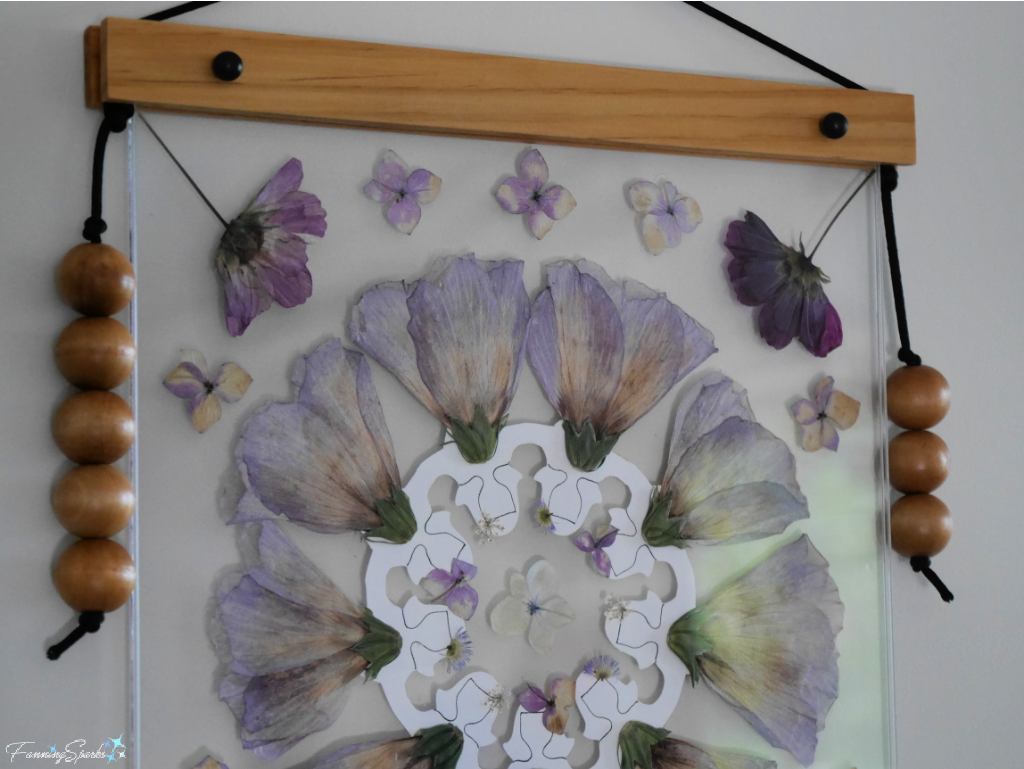 Here’s the completed piece. Now the lovely Rose of Sharon flowers can live on as pretty Pressed Flower Girls!
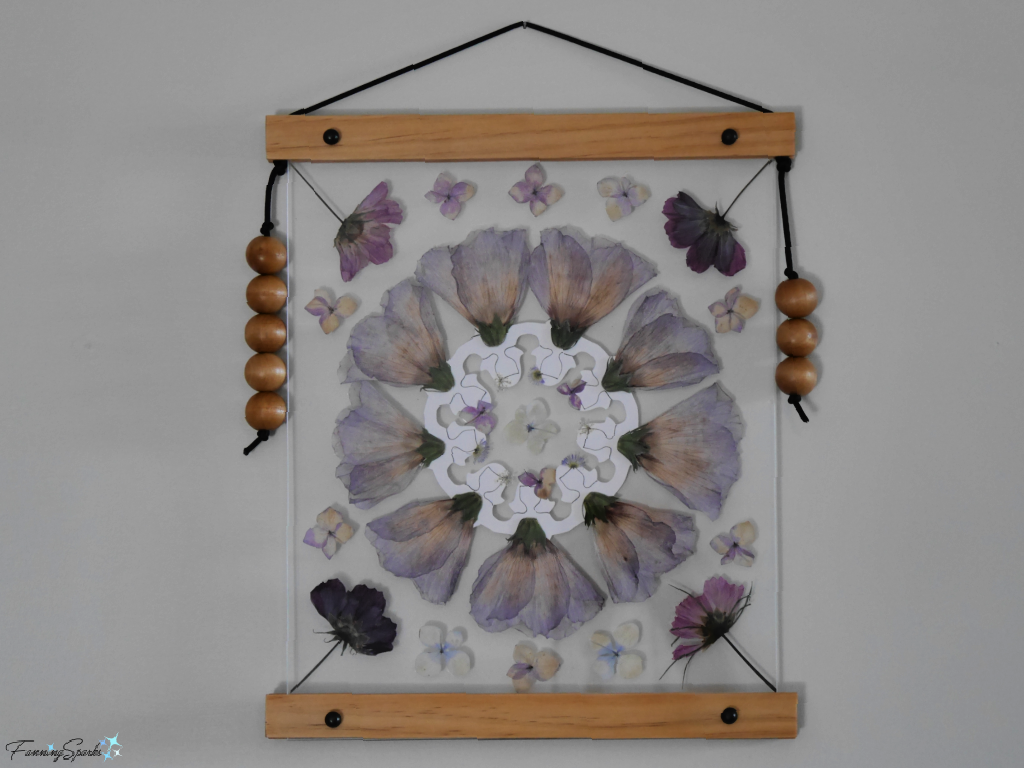


 The park was overflowing with summer flowers. Here’s another magnificent Eastern Tiger Swallowtail perched on a vibrant zinnia.
 Speaking of zinnias, I shared my love for these flowers in a previous post called
 Here’s another species—it’s the striking Gulf Fritillary (Agraulis vanilla) with its orange-patterned wings.
 Here’s another shot of the Gulf Fritillary. It’s moved on to the ever popular purple coneflower.