
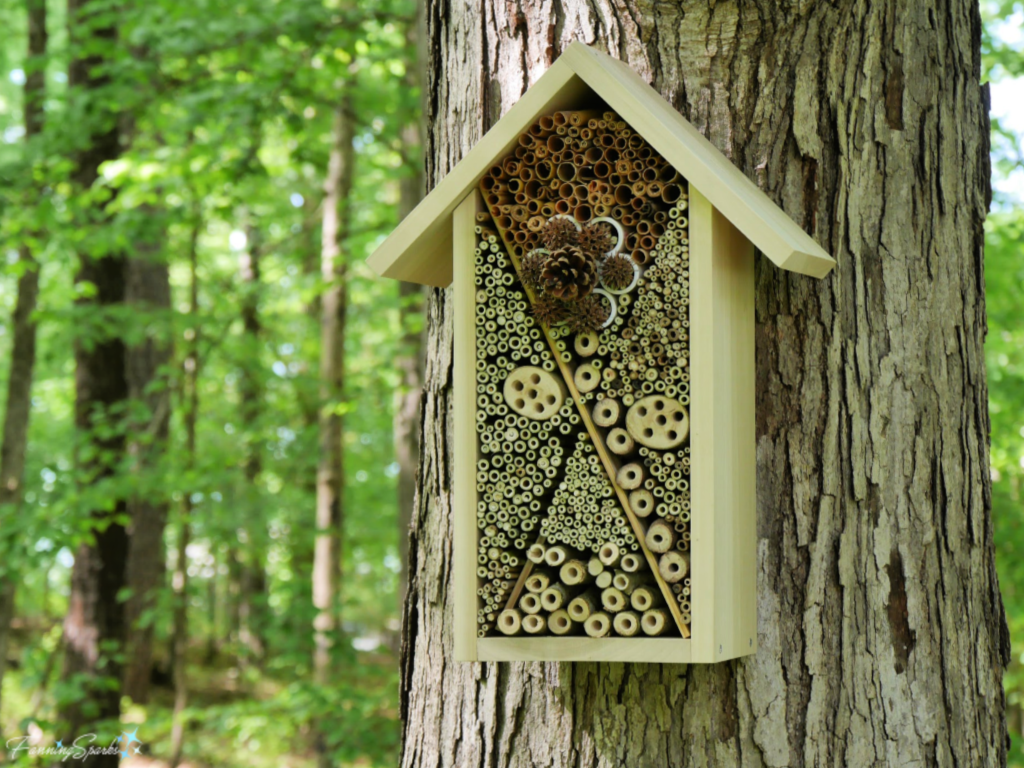
As promised in my previous post about Insect Hotels for Bees and Other Pollinators, I’d like to share my version of an insect hotel in today’s post. I’ve dubbed it the “AirBee-n-Bee House”. It’s targeted to tunnel-nesting native bees such as Mason Bees and Leaf-Cutting Bees. Our AirBee-n-Bee House has been open for business for about a week but we haven’t received any reservations yet! So I can’t report on its effectiveness but I can report that it looks really cool in our front yard.
 This post provides easy, step-by-step instructions to make your own AirBee-n-Bee House. There are two components to this project: a wood frame in the shape of a house and nesting materials that fill the frame. We’ll start by building the wooden House Frame.
Supplies Needed for House Frame
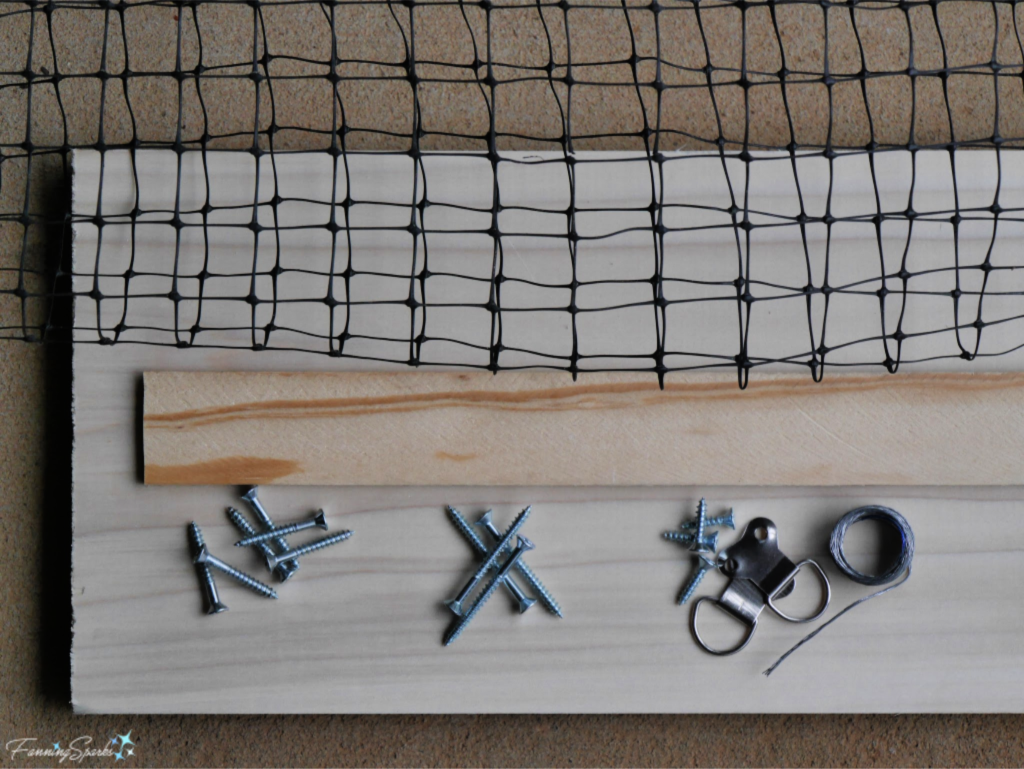
The following supplies are needed to make the wooden House Frame. Note: You will also need nesting materials which are described below in Step 8.
. Wood Boards: 5 ft of 1” x 8” (actual size is ¾” x 7 ¼ ”). I used poplar.
. Wood Slats: 6 ft of ¼” x 1½ ” This product are sometimes called lattice molding.
. Screws:
… 6 x Size #8 1¼” length wood screws
… 4 x Size #8 1¾” length wood screws
… 4 x Size #8 ¾” length wood screws or appropriate size screws to attach your hangers.
. Hangers with Wire: Choose sturdy hangers as the finished bee house is quite heavy.
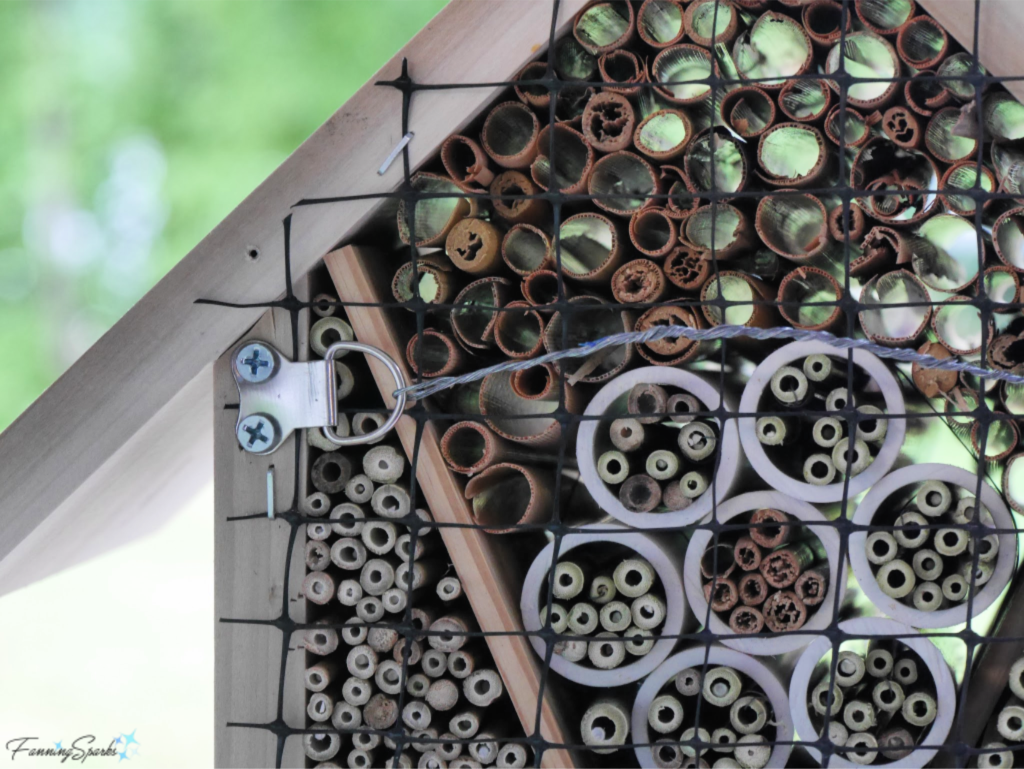
. Netting: Approximately 10” x 20” of plastic netting. This will be attached to the back of the structure to help keep the nesting materials in place. Any type of netting or exterior-grade open weave fabric should work.
. Painter’s Tape (not shown)
 Tools Needed
. Jigsaw (or whatever type of saw you prefer to cut wood)
. Drill with 2 drill bits:
… 7/64” bit with countersink for pre-drilling Size #8 screws
… 5/16” bit for drilling tunnel holes
. Screwdriver
. Tape Measure
. Ruler: Yardstick or other straight edge
. Pencil
. Angle Finder: To measure angles and set jigsaw blade accordingly. I really like the digital Angle-Rule, a 2-in-1 ruler and angle finder, from GemRed.
. Sharp Point: This will be used to indent the wood prior to drilling. A nail or screwdriver tip will work fine.
. Work Surface with Clamps
. Stapler
. Scissors
. Pruners
Measurements
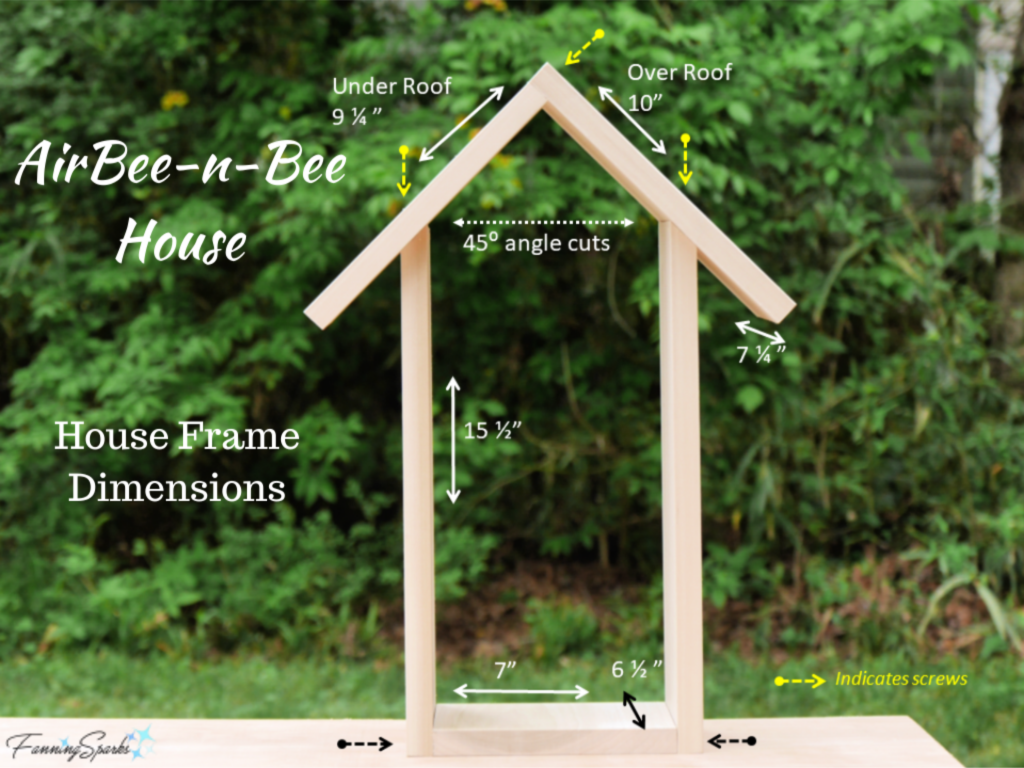
The design and dimensions of the House Frame are shown below.
Instructions
Step 1 Cut Wood Parts Cut the 1” x 8” board into the following:
. Over Roof 7 ¼” x 10”
. Under Roof 7 ¼” x 9 ¼”
. 2 x Sides 6 ½” x 15 ½”
. Bottom 6 ½” x 7”
Cut top edges of the Sides at 45⁰angle.
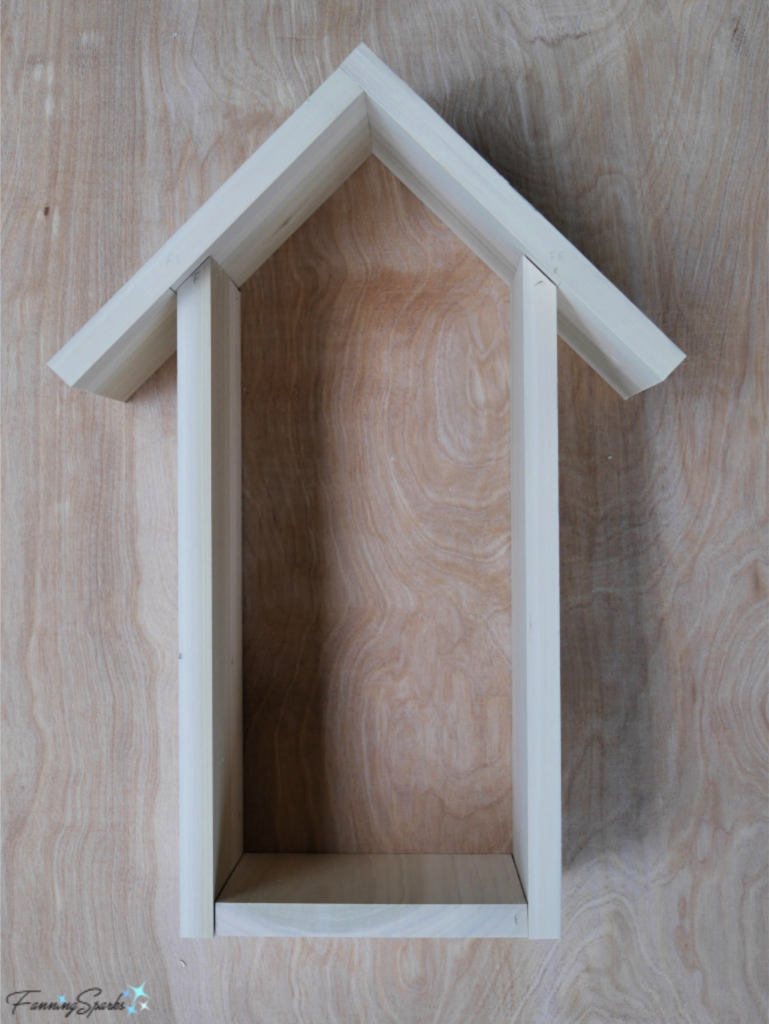
Step 2 Test Fit Assemble the pieces to get familiar with how they fit together and to ensure they fit correctly. Make any necessary adjustments. Use a pencil to lightly mark front and top of each piece.
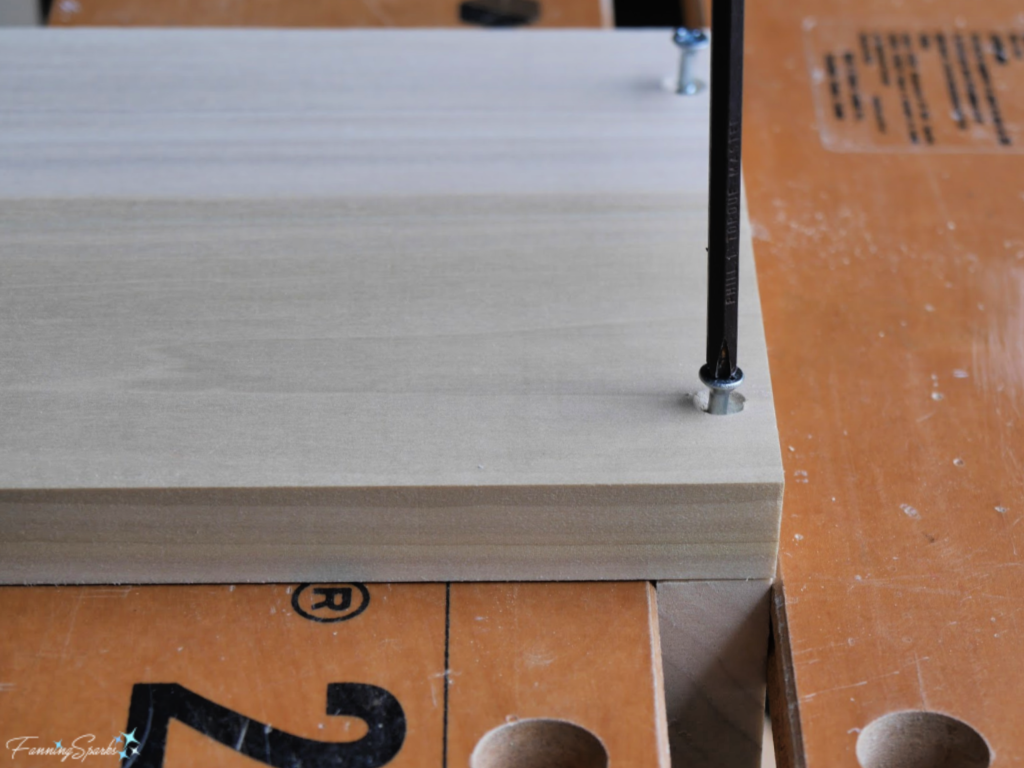
Step 3 Attach Side to Bottom On the bottom outside edge of the Side, measure up 3/8” and mark for 2 screws. Use a sharp point to make an indentation on the marks. This will make it easier to position the drill bit.
As shown below, clamp Bottom along 6½ ” edge to hold it steady and level. Hold Side on top of Bottom, squaring corner and aligning bottom edges. Drill pilot holes at marks with countersink bit. Attach with size #8 1¼” length screws. This will result in an L-shaped piece.
 Step 4 Attach Other Side to Bottom Repeat Step 3 to attach other Side to Bottom. This will result in a U-shaped piece.
Step 5 Assemble Roof Use the same approach as outlined in Step 3, to attach the Over Roof to the Under Roof. The roof angle will be 90⁰.
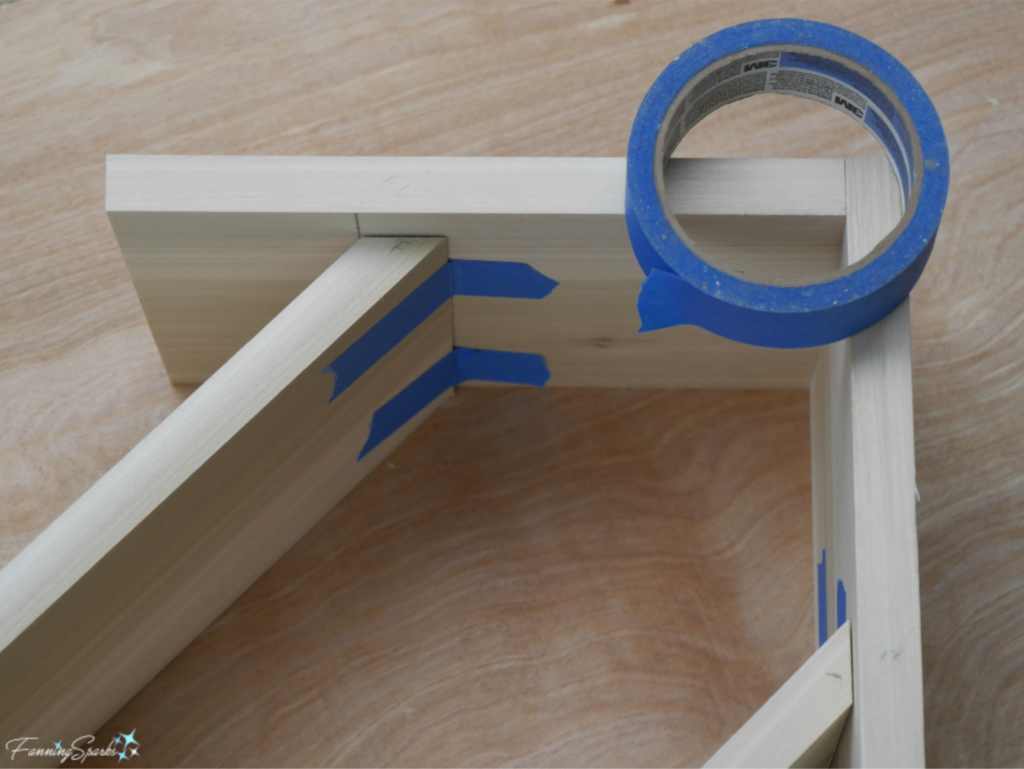
Step 6 Attach Roof to Box Use a pencil to lightly mark placement lines on both sides of both Roof parts. On the inside lower edge, measure up 3⅛” from the bottom and mark a line. On the outside lower edge, measure up 4 ¼” from the bottom and mark a line. Place the Roof on the box aligning the Sides with the inside placement lines. The resulting angle where the Roof and Sides connect should be 45⁰. Adjust if necessary.
Mark and indent for screws along the outside placement line on both Roof pieces. Note there is a ¾” overhang on the front edge of the Roof but not on the back. Screws should be placed about 2 ½“ from the front edge to allow for the overhang. Looking ahead this is where the screws will be placed.

Re-align the top of the Sides with the inside placement line. Align back edges. Use tape to hold pieces in place. Drill pilot holes and screw together using size #8 1¾ ” screws.
 Step 7 Insert Cross Pieces Use four pieces of wood slat to create 2 X’s inside the House Frame. Cut a piece of wood slat to 16 ¼”. Slide into frame to ensure a snug fit. Adjust if necessary. Repeat with 3 more pieces. These pieces fit snugly but are not attached. They will serve to hold the nesting materials in place.
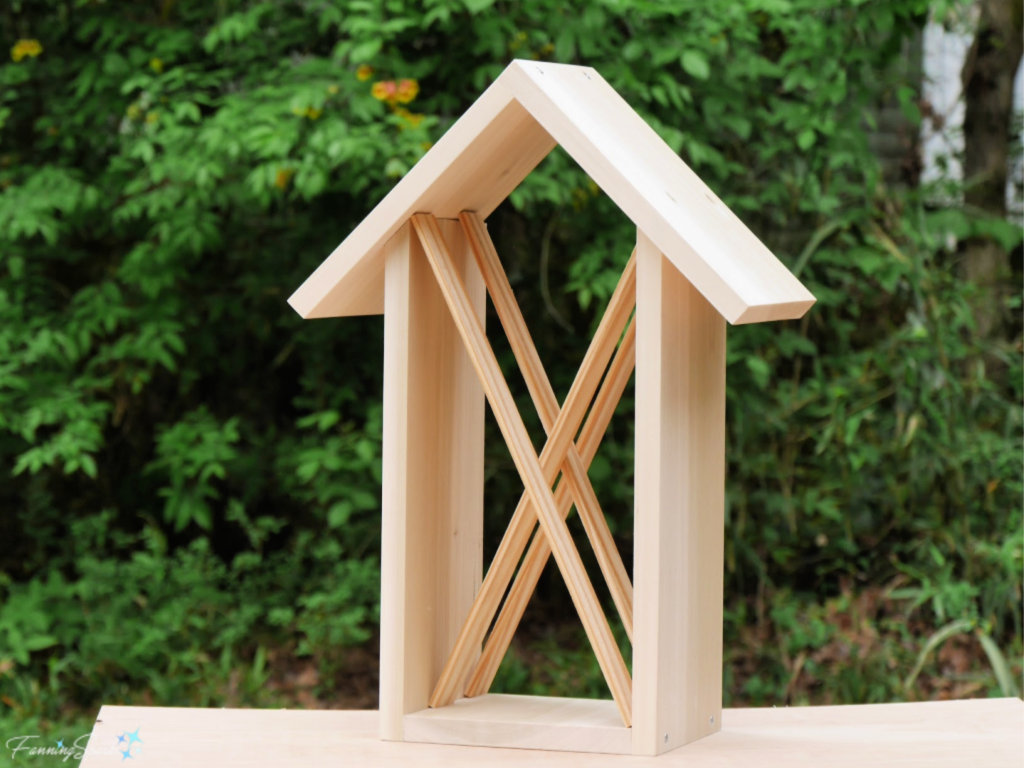
The House Frame is complete and now the fun begins! It’s time to put in the nesting materials. Position the materials in any way you like. You can create a variety of patterns and designs. See my “Insect Hotels – FanningSparks Favs” board on Pinterest for more ideas.
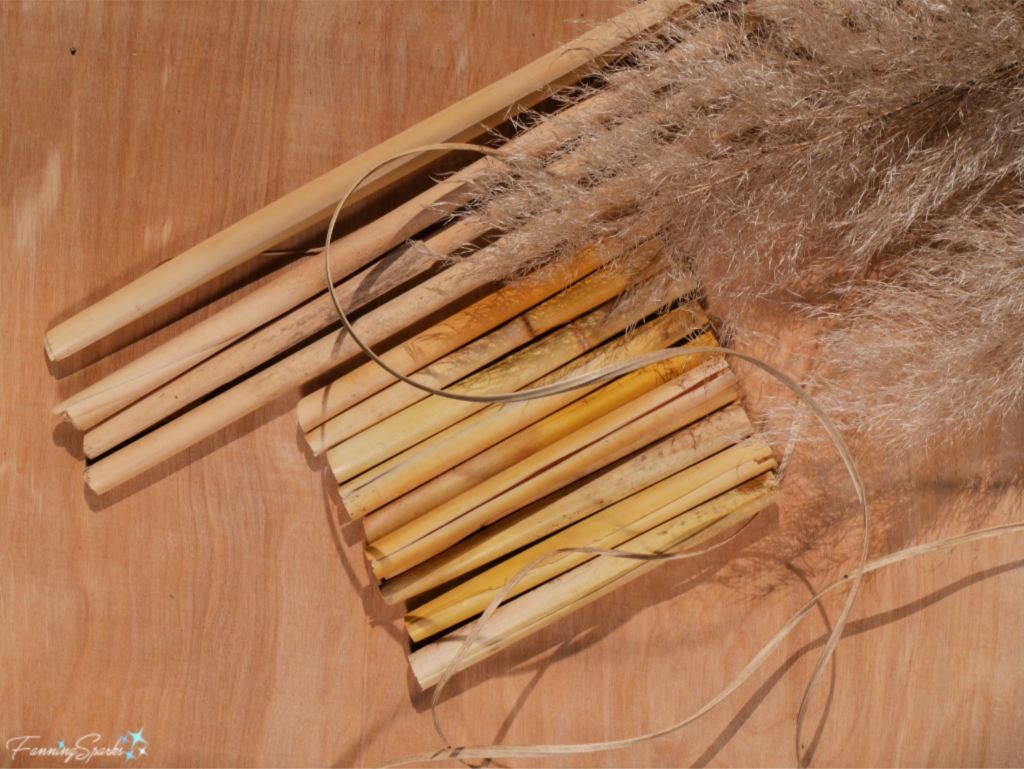
Step 8 Gather and Prepare Nesting Materials Tunnel-nesting bees prefer hollow tubes with a 5/16” diameter hole. Cut the tubes to 6 ½ “ length to fit inside this House Frame. Most reference sources recommend using natural materials for these tubes. I foraged most of my materials from our yard and surrounding woods but you can also use paper (parchment or butcher paper is recommended) to roll tubes. Simply roll the paper around a pencil and use tape to keep it rolled.
Some reference sources recommend keeping the nesting area small. If it is too large, there is a risk of attracting an unnatural number of bees thus inviting pests and predators. To mitigate this risk, I deliberately filled some sections of my wooden House Frame with small bamboo rods (see notes about Filler below).
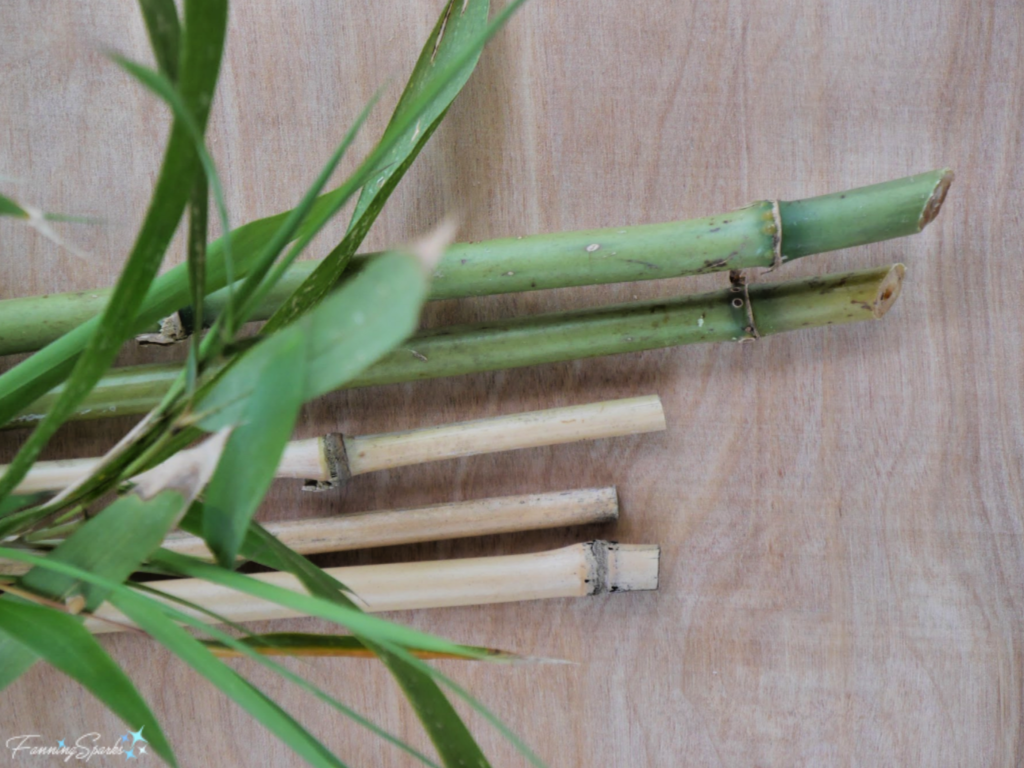
Hollow Reeds: Dried pampas grass stems provide natural tubes. I used pruners to cut the reeds to 6 ½” and then peeled the layers apart to create the tubes. Of course, the resulting tubes aren’t perfectly uniform but most are the desired size.
 Drilled Tree Branches: Gather small fallen or pruned tree branches and cut to 6 ½” lengths. Drill 5/16” holes into the ends.
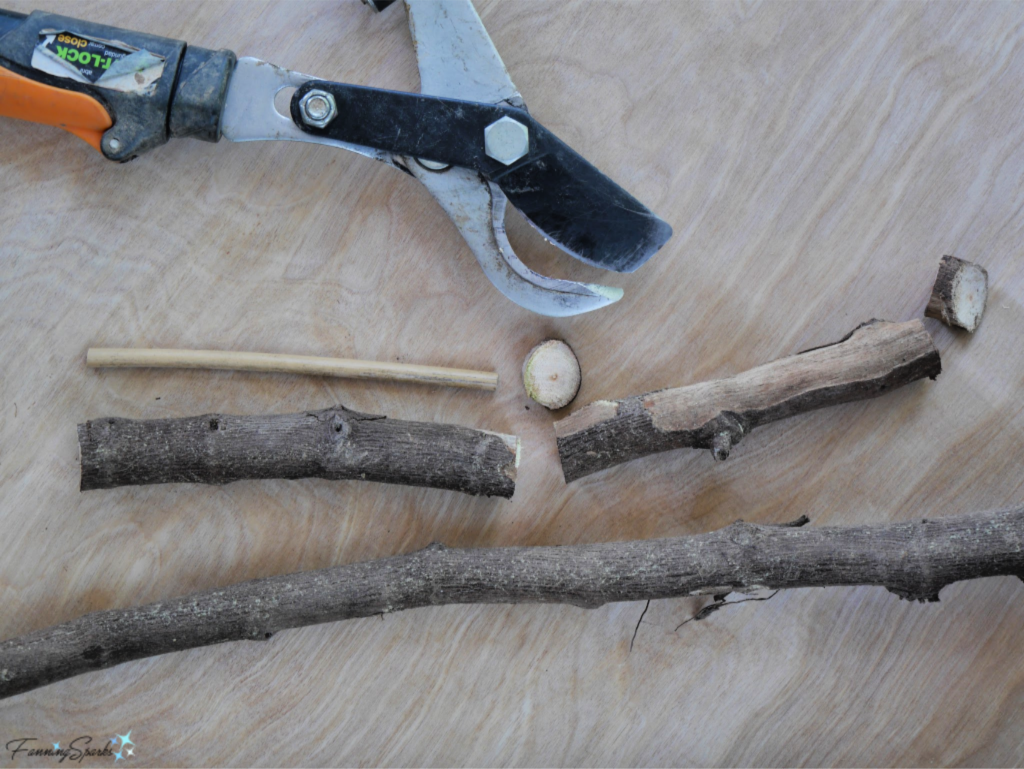 Filler: I cut bamboo from our yard and trimmed it into 6 ½” lengths to use as filler. A few of the tubes might be big enough for the bees to nest inside but most will serve as filler and create natural cavities and hollows.
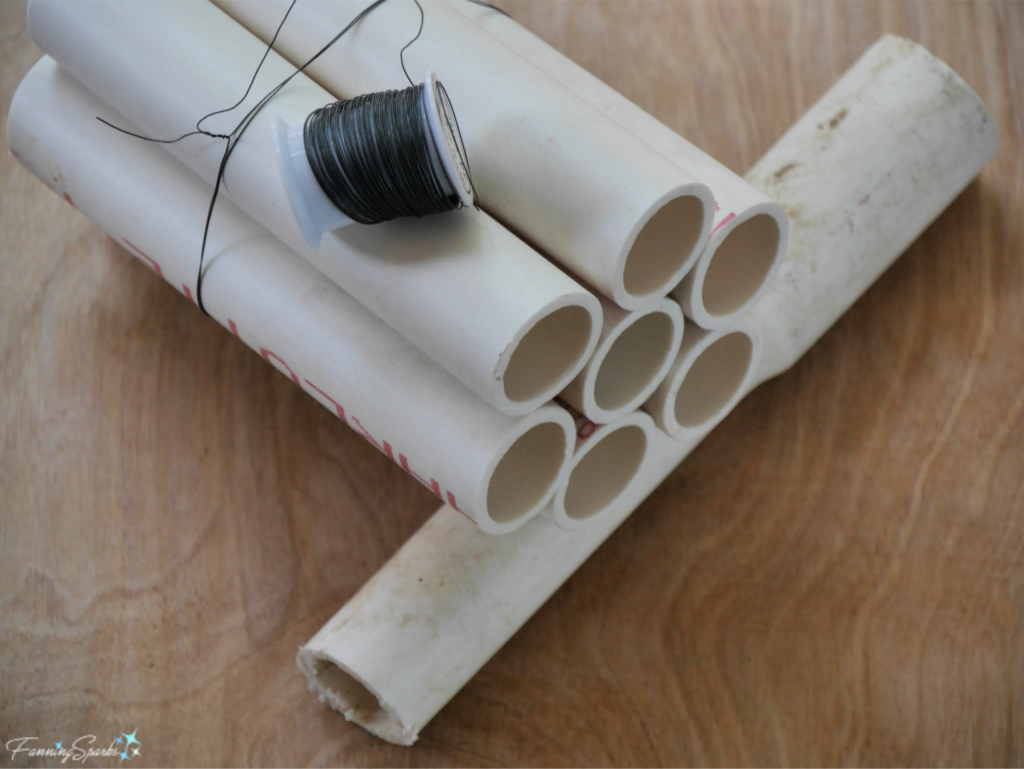
 Decorative Elements (optional): We have a substantial stack of scrap PVC pipe, so I used some to create a decorative flower shape. It is merely cosmetic and definitely optional. I cut 7 pieces of 1” PVC pipe to 6 ½” lengths and wrapped a strand of thin wire around the bundle to hold it together.
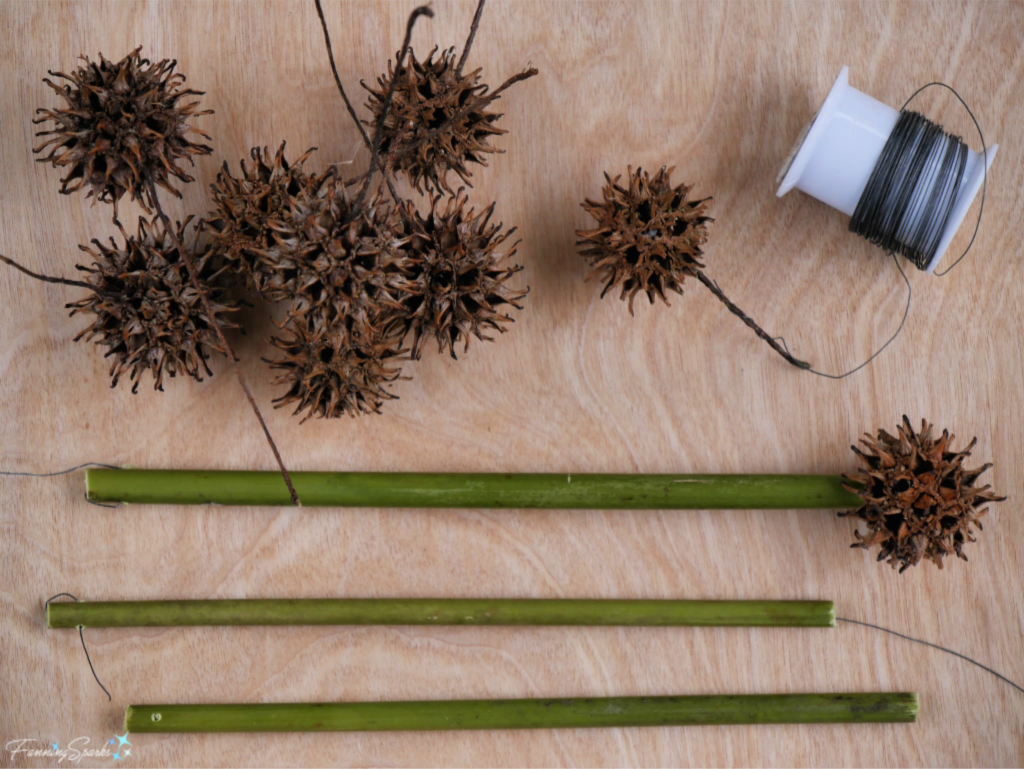
 There are thousands of pesky sweetgum fruits (ie the spiny seed pods pictured below) and pine cones lying around our property so it’s nice to finally find a use for a few of them. I used them as decorative elements. It’s easier to position and secure the sweetgum fruit if it is attached to a stick. Drill a small hole into the end of a 6 ½” piece of bamboo. Then thread a piece of thin wire through the bamboo, attach it to the stem of a sweetgum fruit on one end and anchor it through the drilled holes on the other end. Pine cones can be wired in a similar way.
 Step 9 Place Nesting Materials in House Frame Fill the House Frame with the nesting materials. Simply lay hollow reeds, bamboo stems and drilled tree branches around the Cross Pieces. Ensure the final placement is snug and tight so pieces will stay in place. As noted above, you can position the materials in any way you like to create patterns and designs.
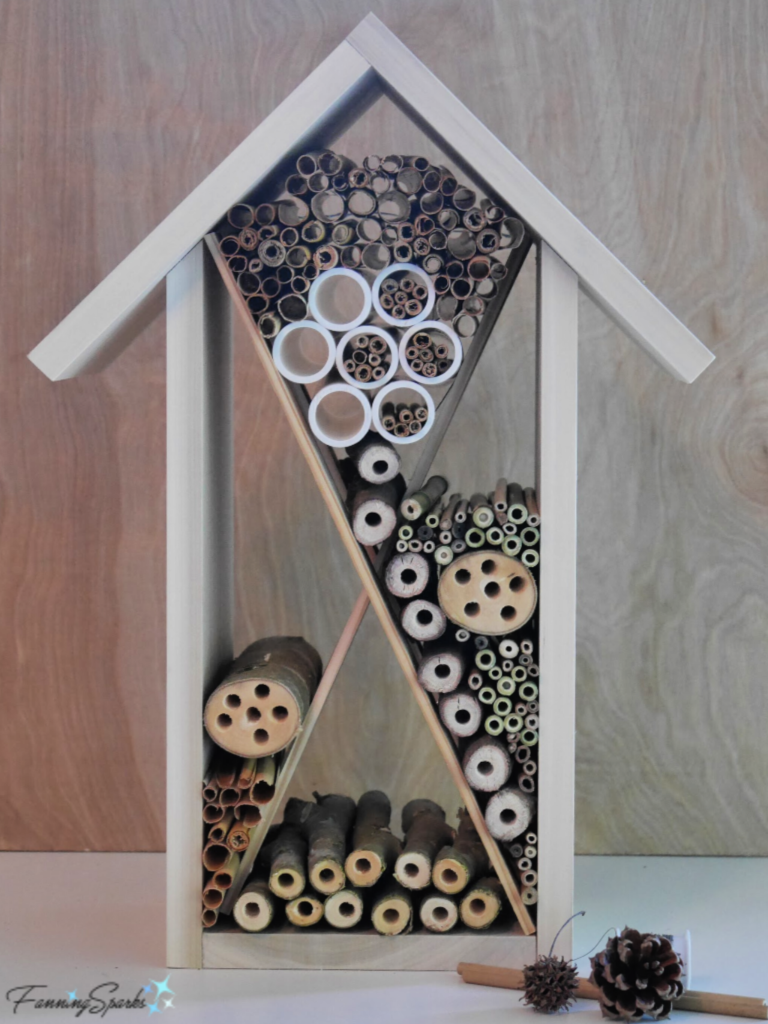
My idea was to create a simple flower motif with PVC pipe representing the flower petals and tree branches representing the flower stem and leaves. Sweetgum fruits and a pine cone dress up the flower bloom.

Step 10 Finishing Up Remove any visible pencil marks. The final step is to attach the netting and hangers. Staple the piece of netting to the back of the House Frame. This is intended to help keep the nesting materials in place while still allowing access and air flow. Trim off the excess netting with scissors. Attach the hangers at the top of the Sides using size #8 ¾” length wood screws (or appropriate size for your hangers). Attach hanging wire.
 I deliberately didn’t paint or finish the wood to avoid exposing the bees to harsh materials. Plus I prefer to let it weather naturally. When it comes time to clean the bee house—it’s recommended to do so annually—you can replace the old tubes and reeds with fresh ones. The Xerces Society provides clear instructions on proper nest maintenance (see More Info below).
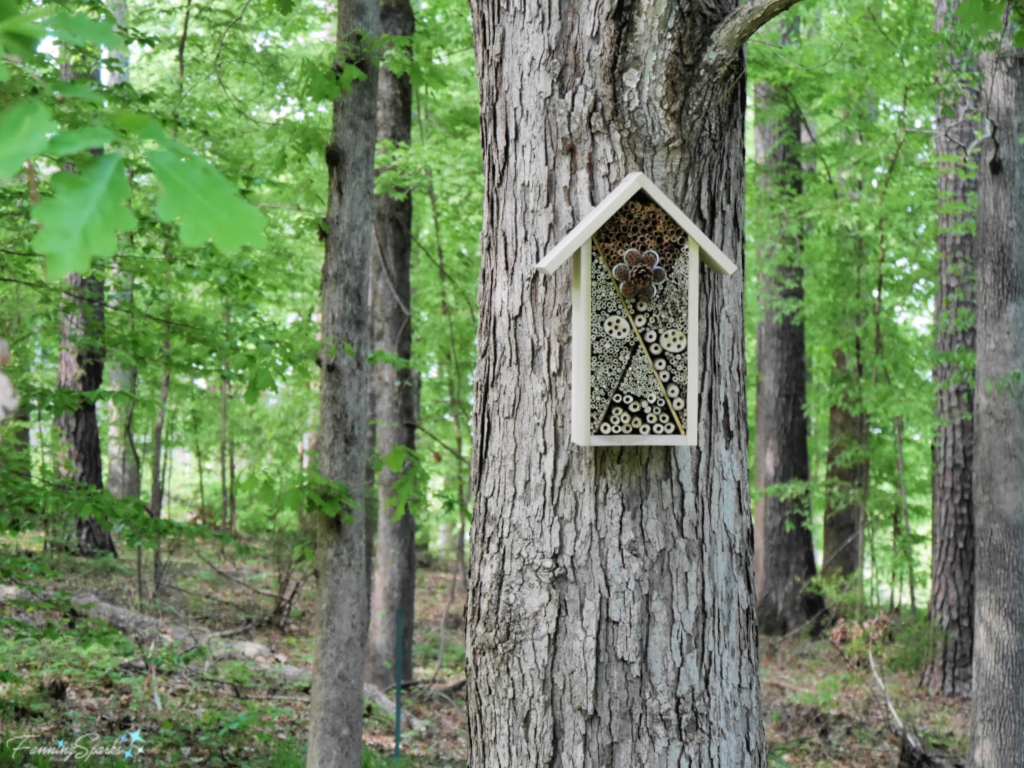
Your AirBee-n-Bee House is ready to install. It should be securely attached to a tree or wall. Here’s our new AirBee-n-Bee House eagerly awaiting our first guests!
More Info
You may want to check out my previous post, Insect Hotels for Bees and Other Pollinators, to learn about the important role pollinators play in the human food supply. It also includes information about the various species of bees and their preferred habitats.
The Xerces Society for Invertebrate Conservation provides a comprehensive fact sheet on Tunnel Nests for Native Bees which includes clear instructions on proper nest maintenance.
As noted above, I created a Pinterest board of Insect Hotels to share examples I’ve found.
Please pin this image to share or for future reference.
Today’s Takeaways
1. The featured AirBee-n-Bee House is a fun and easy woodworking project.
2. Many factors must be considered in creating a safe bee house.
3. Proper care and maintenance are required to maintain a safe bee house.

Comments are closed.