Learning about the seven elements of design is an ongoing process.  Lately I’ve been thinking about form.  Just as I have with the other elements I studied previously—color, pattern and texture—I’m looking to Mother Nature for inspiration.  The remaining three elements, by the way, are space, line and light.
Form is a 3-dimensional object in space.  Form has volume defined through characteristics of length, width, and height.  Shape, on the other hand, is flat and has only 2 dimensions.  Form is commonly divided into two categories: geometric and organic.  Geometric forms are precise and mathematical.  They are easy to name and include common items such as spheres, cubes, pyramids, cones and cylinders.  It’s helpful to compare these forms to their two-dimensional counterparts.  For instance, a 3-dimensional sphere comes from a 2-dimensional circle.  A cube comes from a square.  A pyramid or cone comes from a triangle.  Our built environments are packed with geometric forms.  In the below photo, Porto Portugal is a beautiful collage of geometric forms.
Porto Portugal Viewed from Cathedral   @FanningSparksOrganic forms are rounded, irregular, free-flowing and curvy.  They are most evident in nature.  They often make patterns but rarely with mathematical precision.  When I set out to photograph examples of natural forms I quickly became overwhelmed.  There is an endless variety and every subject has multiple forms.  I decided to narrow my focus to the plant world and pick out familiar forms.
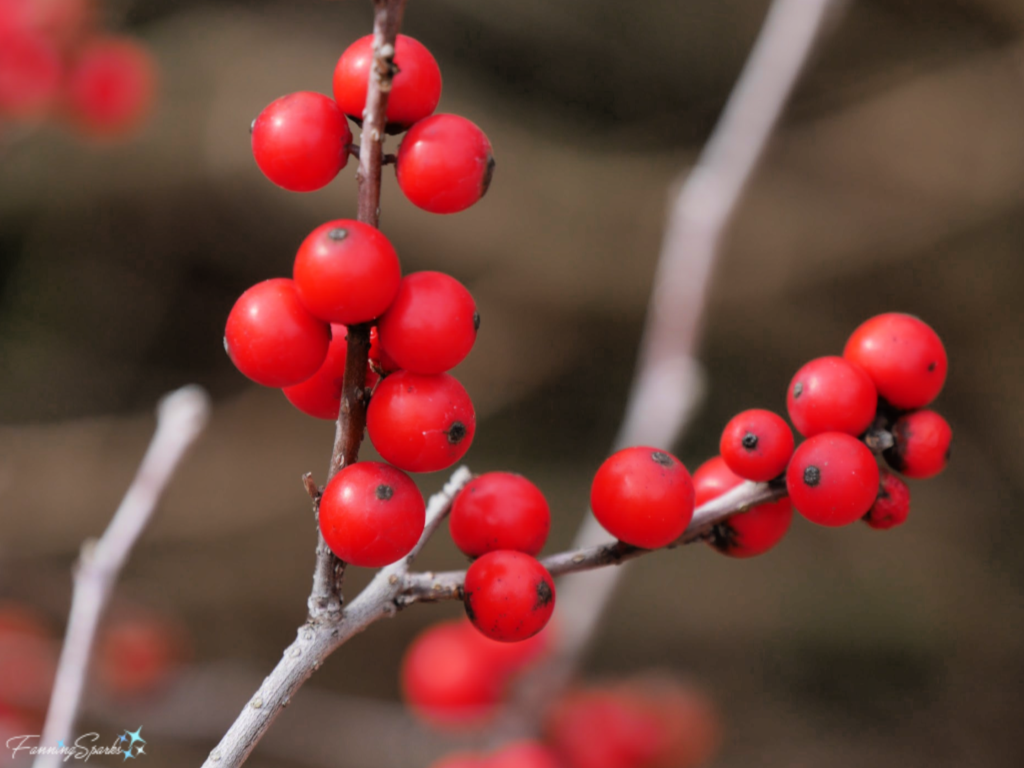
Spheres and balls are common forms in nature.  The below photo of ripe berries on a Winterberry Holly (Ilex verticillata) provides a great example.
Berries on Winterberry Holly   @FanningSparks
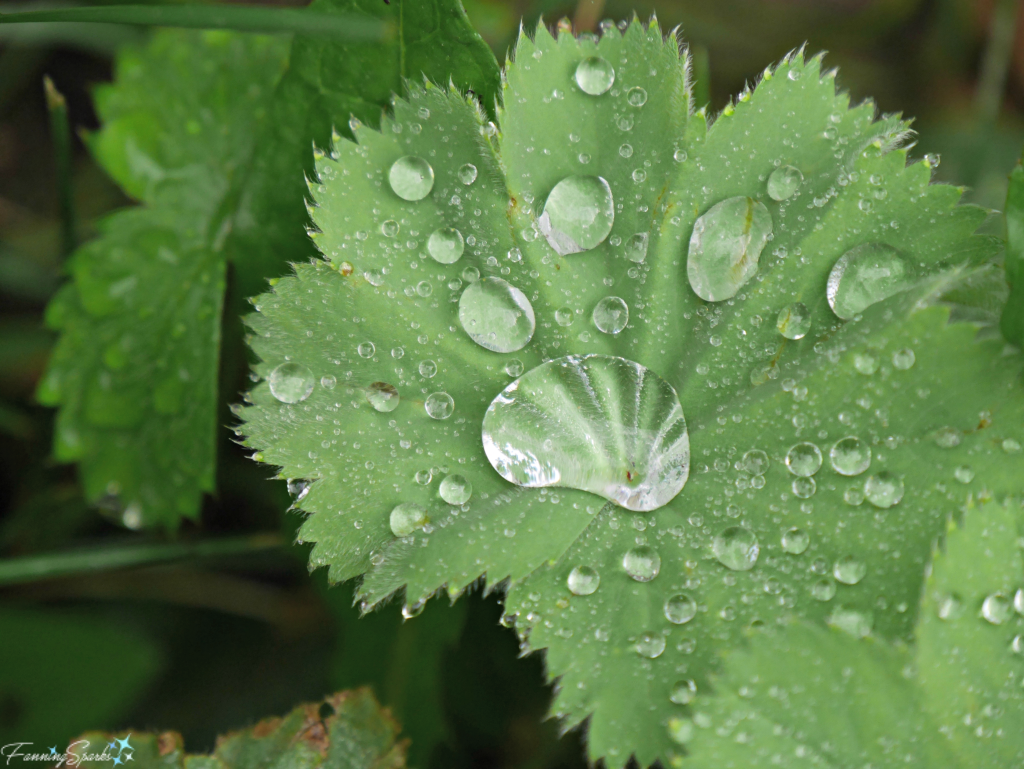
Several of the raindrops on this Lady’s Mantle (Alchemilla mollis) leaf appear to be symmetrical spheres.  But it’s the irregular, organic form of the largest drop that catches the eye.
Raindrops on Lady's Mantle Leaf. @FanningSparks
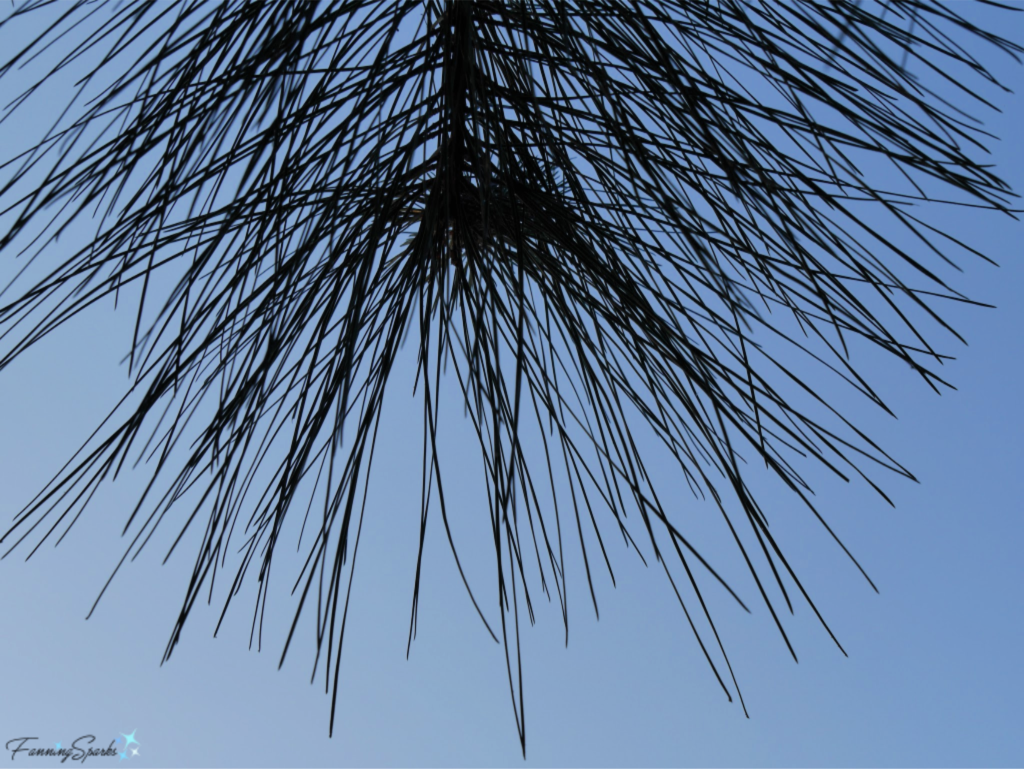
Straight-edged cylindrical forms such as tubes, shafts and spears are also common in nature.  These pine needles provide an example.
Pine Needles Against a Blue Sky   @FanningSparks
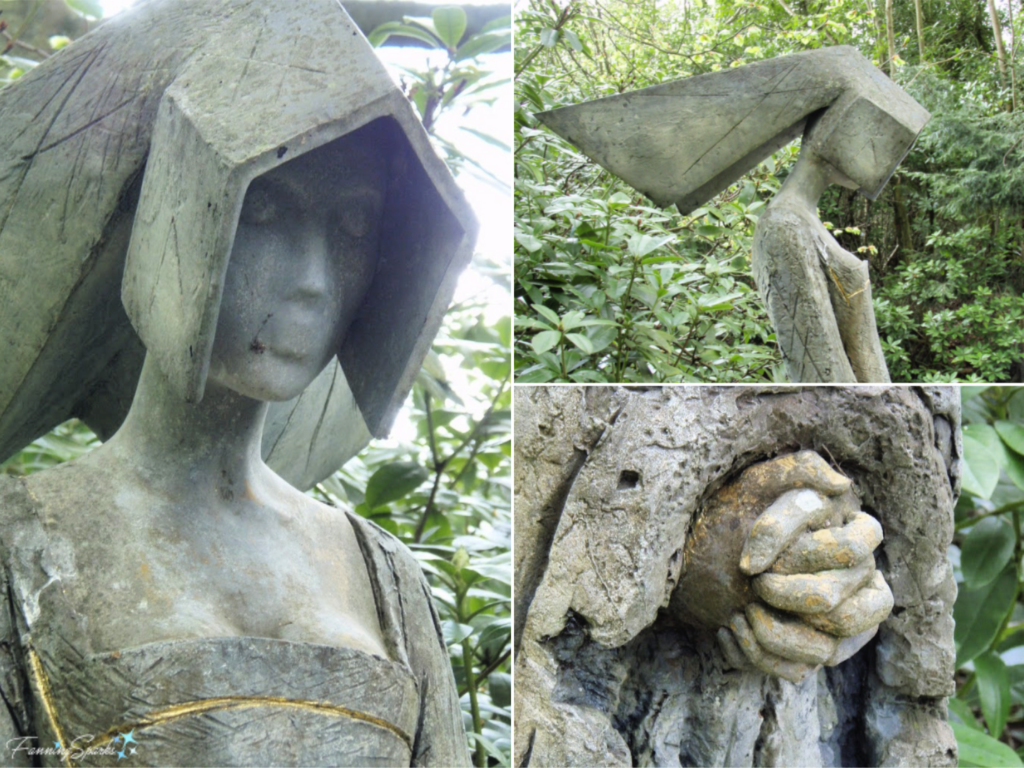
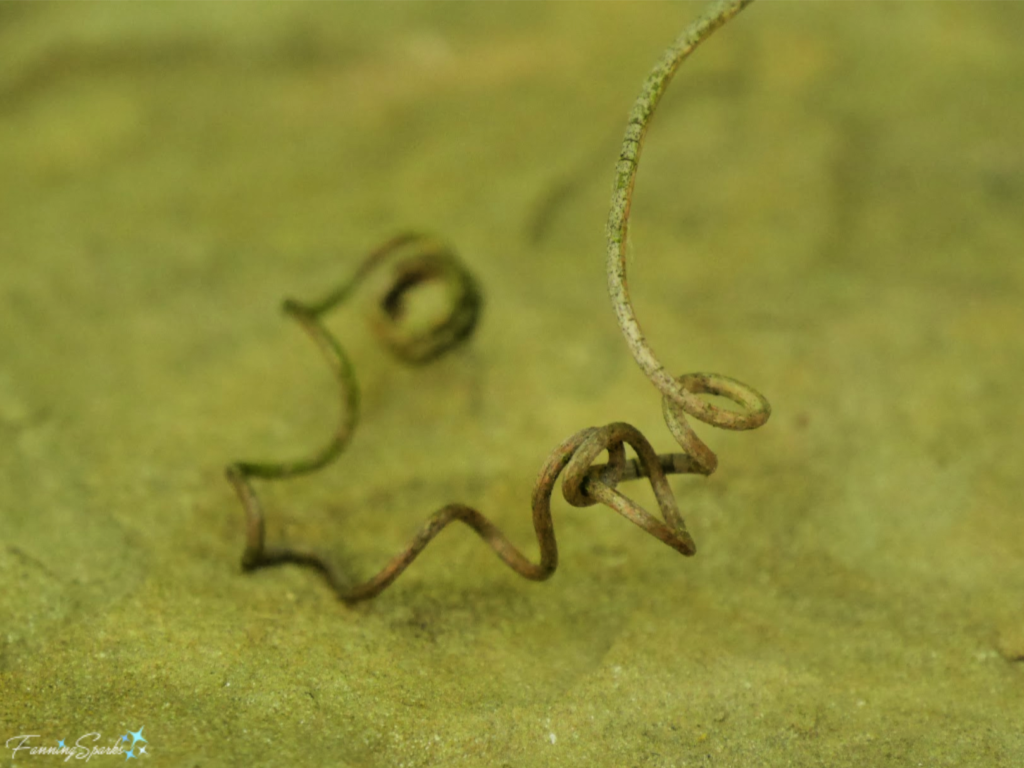
In contrast, this fragment of a climbing vine provides a great example of a free-flowing, curvy organic form.
Twisting Vine   @FanningSparks
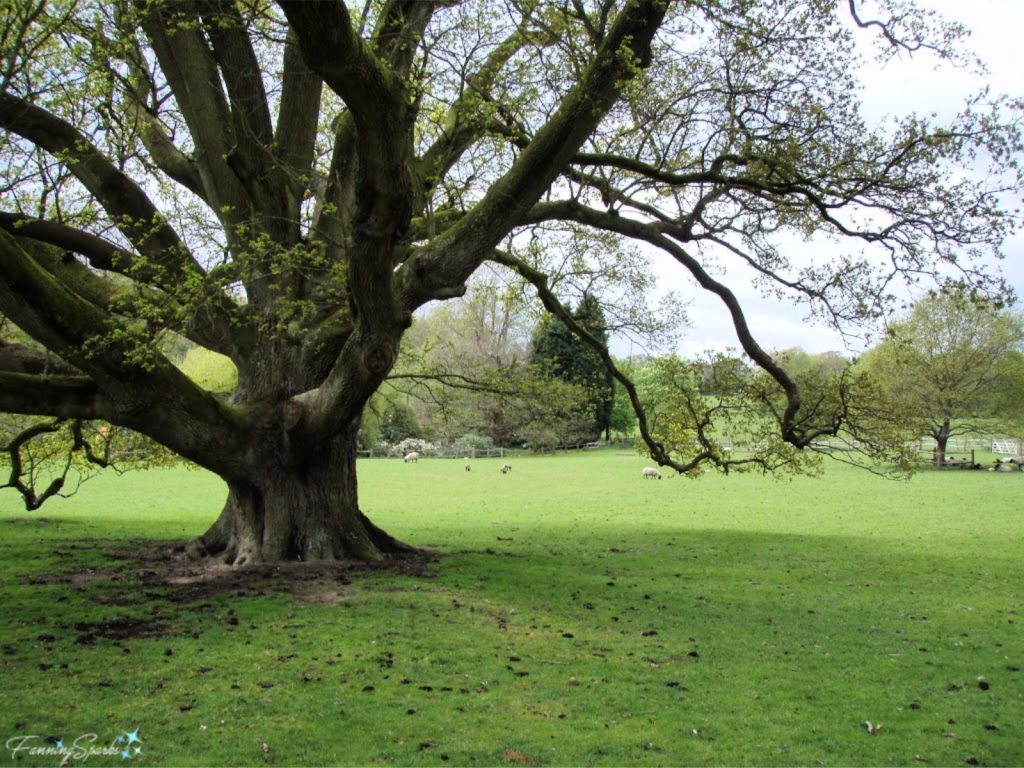
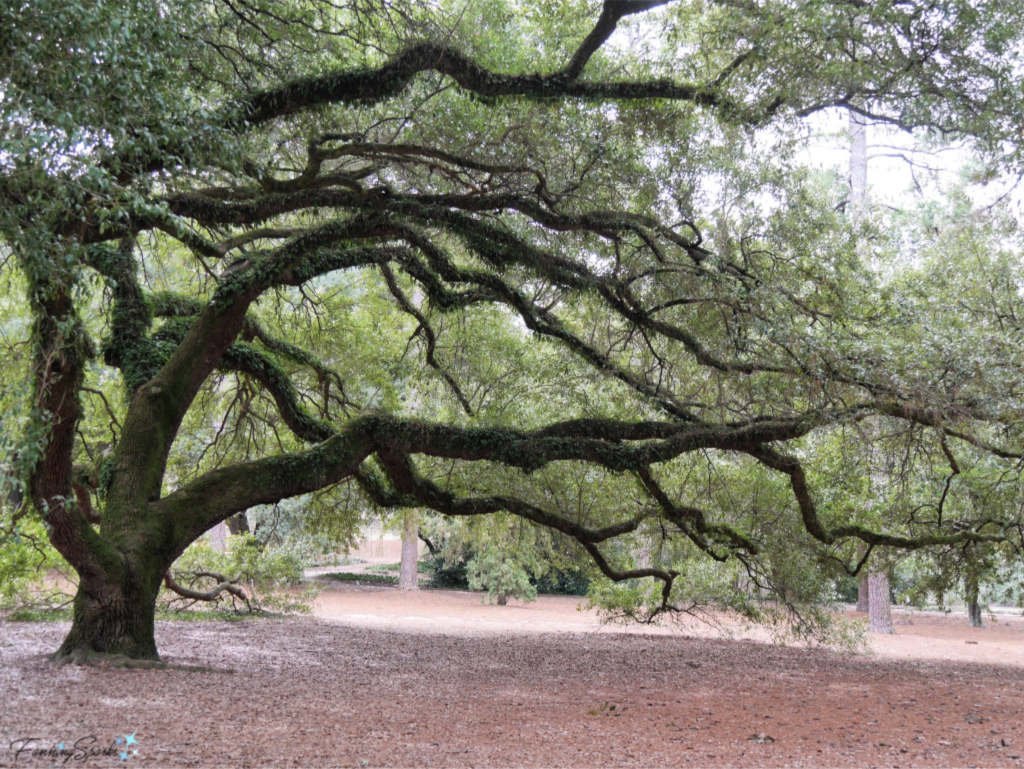
A similar free-flowing form is illustrated by the fractal branching of this gorgeous Southern Live Oak (Quercus virginiana).
Southern Live Oak   @FanningSparks
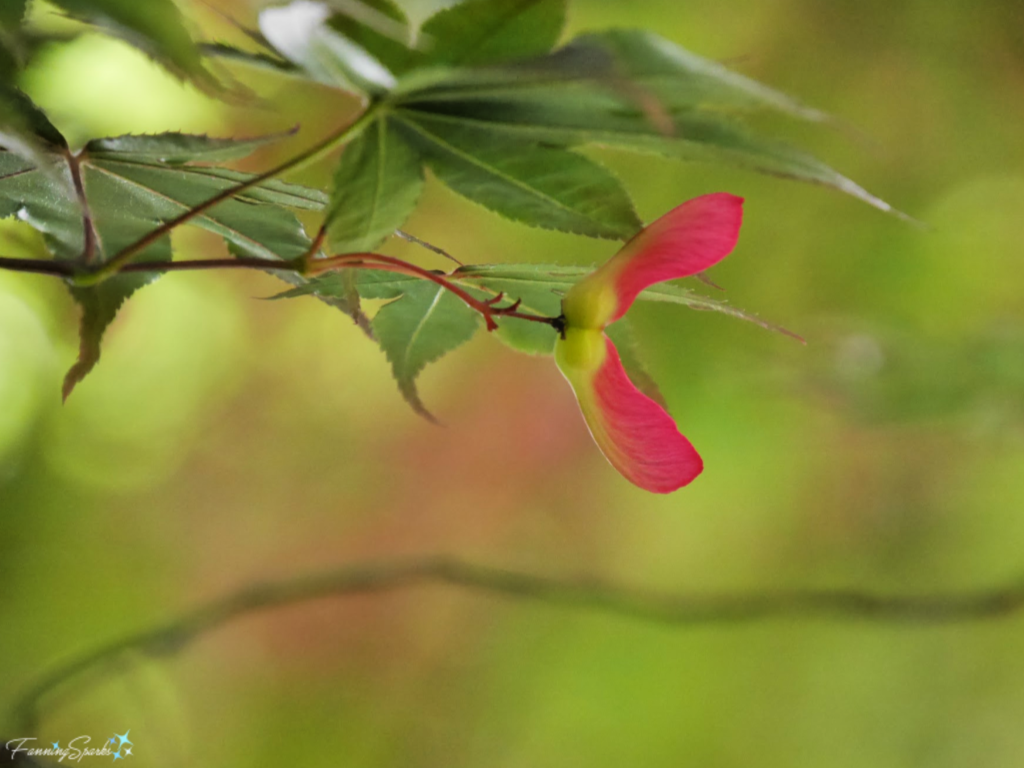
Japanese Maples are known for their beautiful foliage.  This shot showcases the palm-shaped form and the brilliant red color of fallen autumn leaves.   Autumn Leaves from Japanese Maple   @FanningSparks
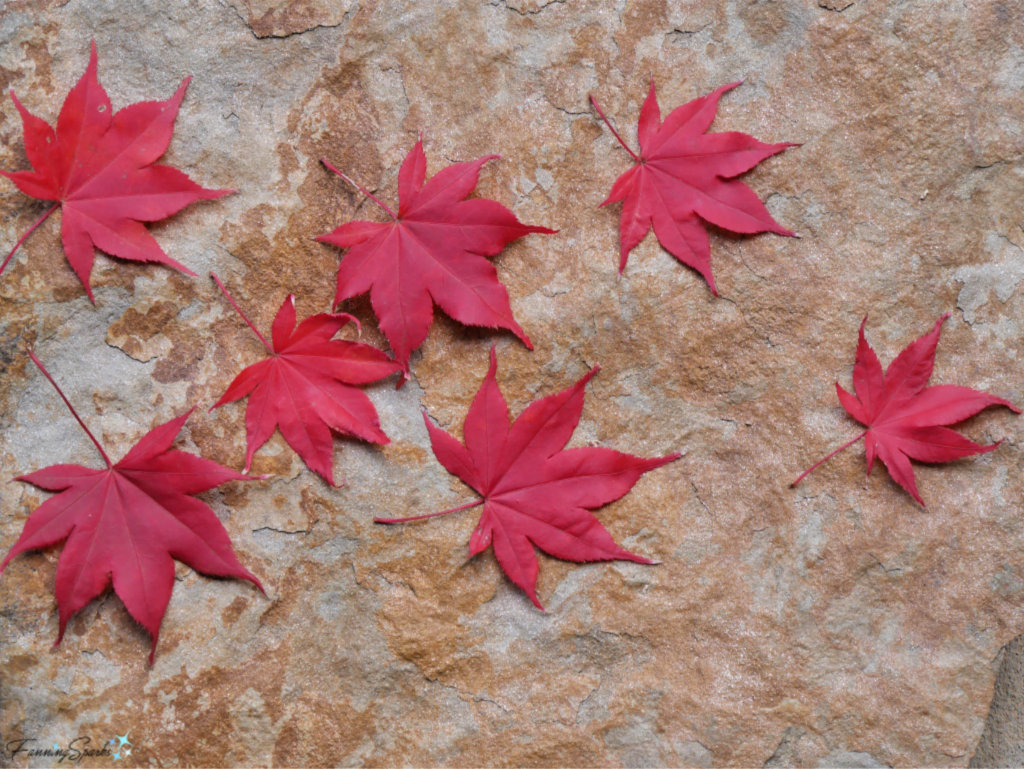
In the spring, the Japanese Maple tree bears these uniquely-formed winged seeds called samaras or keys.
Winged Seed of Japanese Maple   @FanningSparks
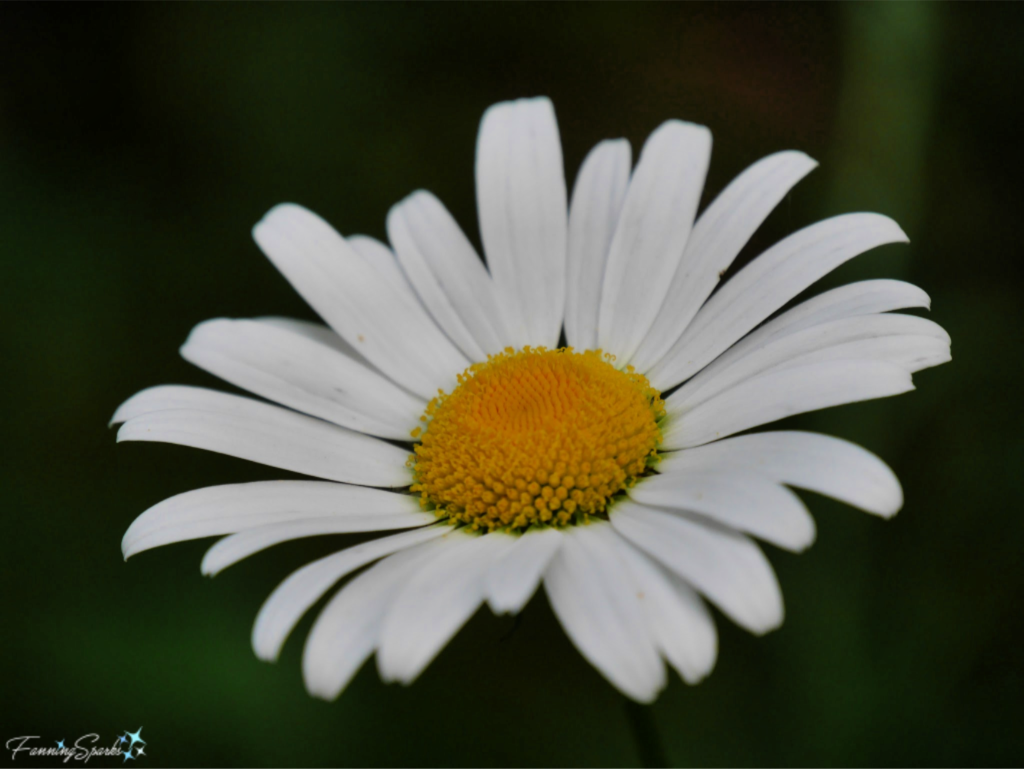
Flowers present a multitude of forms.  This one, simple wild daisy offers numerous examples.  But to keep it simple, I’ll call out only the elongated teardrop form of the petals and the rounded mound of the flower disc.
Simple Wild Daisy Bloom @FanningSparks
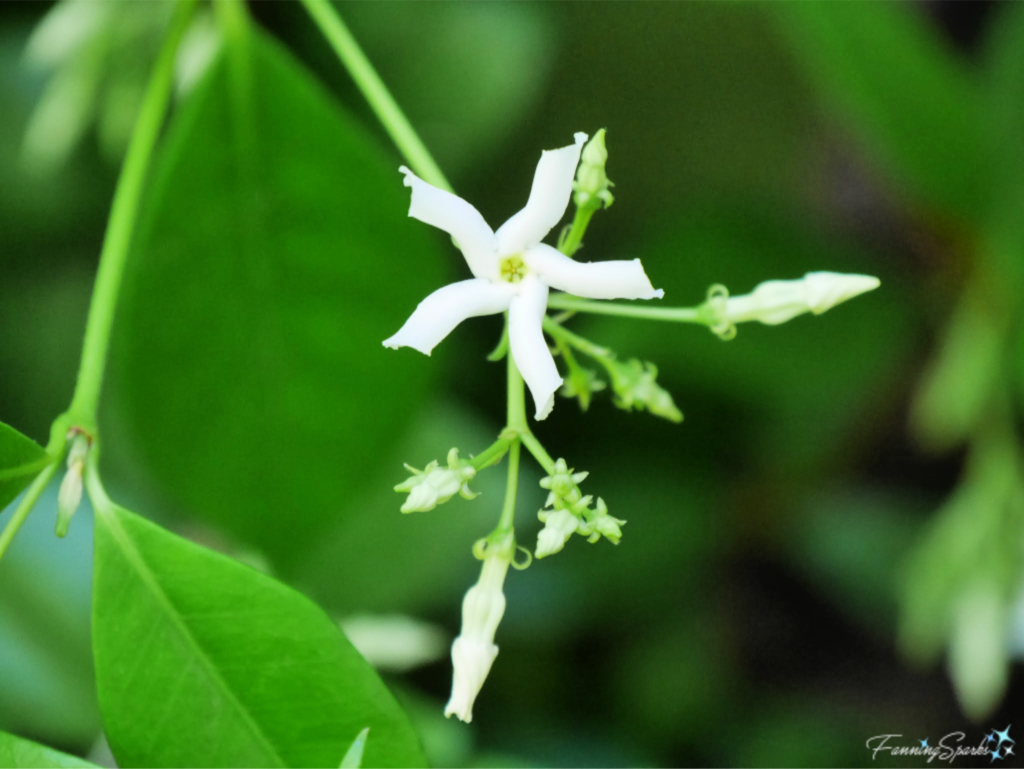
The form of this bloom makes it easy to see why the Confederate Jasmine (Trachelospermum jasminoides) is also called the Star Jasmine.
Confederate Jasmine Bloom   @FanningSparks
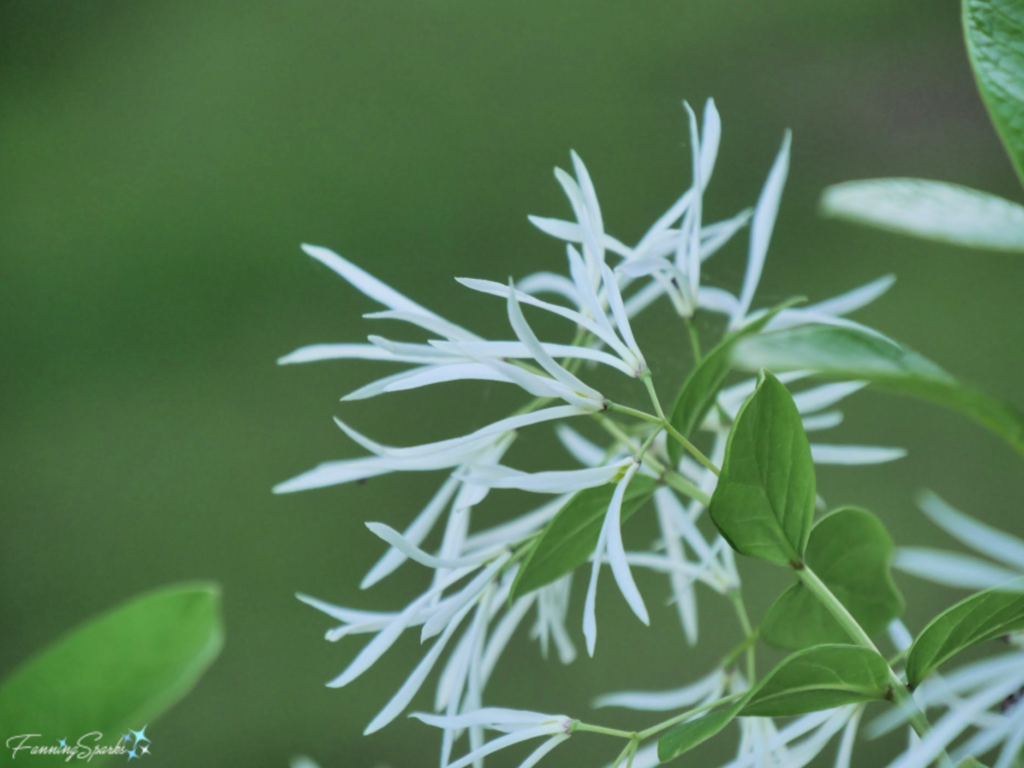
The blossom on the Fringe tree (Chionanthus virginicus) illustrates another natural form.
Fringe Tree in Bloom (Chionanthus virginicus)   @FanningSparks
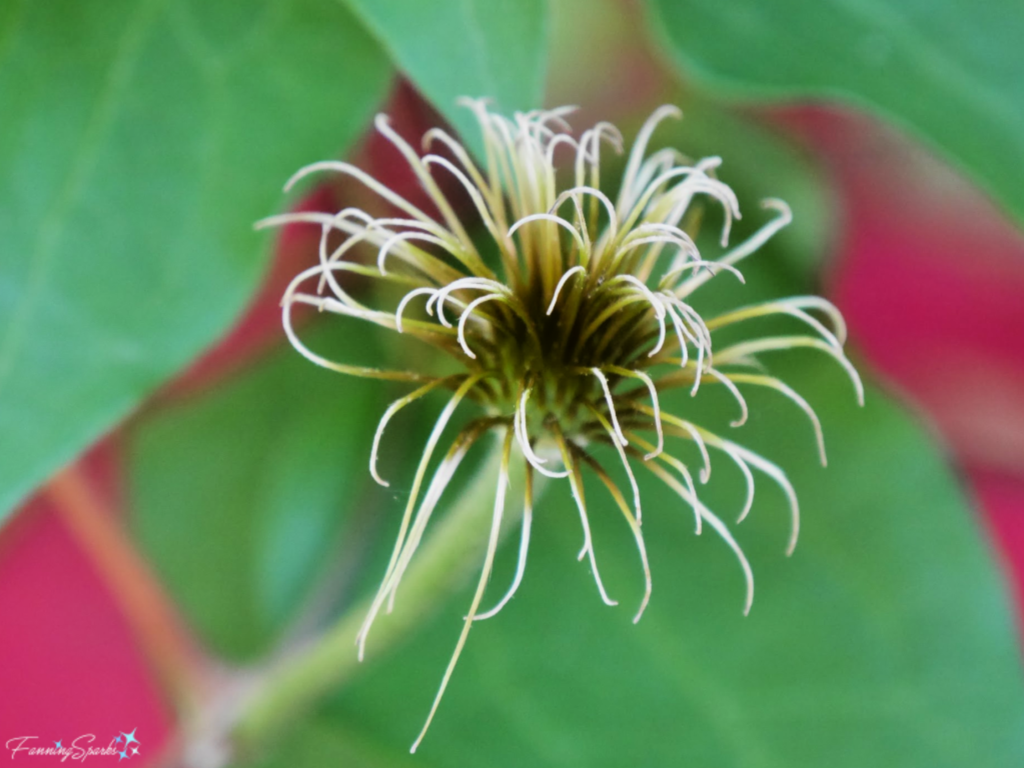
The Clematis “Ramona Blue” bloom drops its petals leaving behind this interesting, pompom-like form.
Clematis Ramona Blue Flower Center   @FanningSparksStudying nature’s forms is not a new idea.  The work of German biologist Ernst Haeckel is particularly noteworthy.  Back in 1904, he published Kunstformen der Natur (Art Forms in Nature).  The book, a collection of 100 prints of various organisms, is “considered the most beautiful visualization of nature ever made by a scientist”.  While Haeckel’s purpose was scientific research and documentation, his work has been tremendously influential on many of the 20th Century artistic movements especially the Art Nouveau movement.  Here’s an example from Haeckel’s Art Forms of Nature illustrating Siphonophorae and Discomedusae which are classes of marine organisms commonly known as jellyfish.
Art Forms in Nature by Ernst Haeckel - Plate 17 and 8 - Jellyfish   |  From Archive.Org
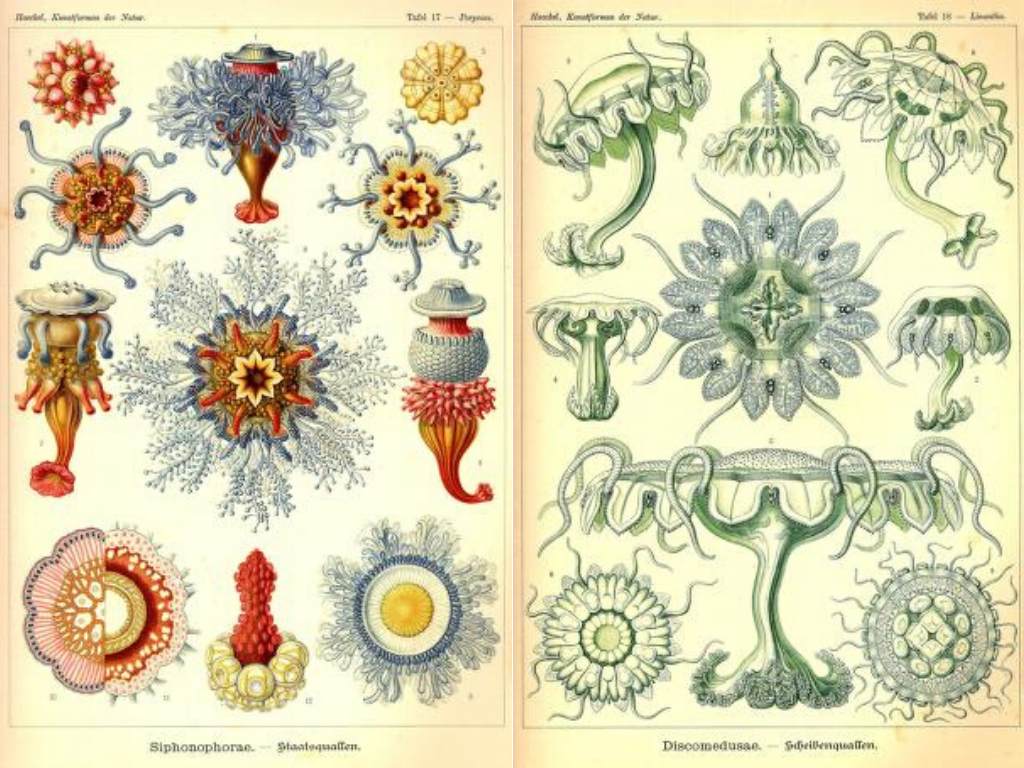
This book, in all its astonishing beauty, is available in the public domain with no copyright restrictions (see More Info below).
But I digress; the purpose of this deep-dive into form is not to explore the world of biology but rather to consider the role of form in design and decorating.  It’s tempting to stick with geometric forms—they are familiar, readily-available, practical and functional.  But when comparing the two worlds—a geometric, built world and an organic, natural world—the former seems harsh and limiting while the latter is soothing and infinite.  Thus, the challenge becomes finding ways to incorporate organic elements into our geometric environments.  Thankfully, there are others who have addressed this same challenge.  The artists and proponents of the Art Nouveau movement certainly did.  How did they accomplish this?  What organic forms did they use?  And how?  Are there insights which can be applied to our current-day homes?   Now, that’s a subject for another day!

More Info

There are seven elements of design including color, pattern, texture, form, space, line and light.  The Interior Design Academy explains these elements must work in harmony to create an aesthetically pleasing interior.
. See the post, Color Palette by Mother Nature, for inspiring color palettes.
. See the post, Patterns by Mother Nature, for inspiration about patterns.
. See the post, Texture by Mother Nature, for examples of texture from the natural world.  The follow up post, Decorating with Texture, draws from this natural inspiration to add texture in our homes and surroundings.
As mentioned above, Ernst Haeckel’s book, Art Forms in Nature, is available for free with no copyright restrictions.  You can find it here on Archive.Org.

Today’s Takeaways

1. Consider form, as one of the seven elements of design, when decorating your home and surroundings.
2. Forms can be geometric or organic.
3. Get inspiration from the endless variety of forms in the natural world.
Peg - FanningSparks Author

In last week’s post, I shared a DIY tutorial for a simple wall shelf.  The wooden, two-shelf unit fits perfectly above the toilet in our Half Bathroom.  I mentioned I had a project do-over and a few missteps but didn’t elaborate.  This week, I come clean on that do-over and share a helpful decorating lesson I learned along the way.
You may recall from last week’s post that I was inspired by a simple wall shelf I’d spotted at an Airbnb.
Wall Shelf Inspiration Front View @FanningSparks
In fact, the first shelf I built looked almost identical to the Airbnb version.  That’s the one I had to do-over.  I’m really happy with the second version but the first one was a disappointment.  Here’s what happened.
Some time ago I made a mosaic mirror for our Half Bathroom.  The mirror, which I shared in the post My Mandala-Inspired Oval Design, looks so nice over the pedestal sink.  It makes me smile every time I see it.
Mandala-Inspired Oval Mosaic Mirror in Half Bathroom. @FanningSparks
Not much has happened in this small room since then.  We still need to upgrade the faucet and replace the towel ring and other hardware.  The walls are still bare.  It’s rather disappointing to have this lovely mirror reflect a boring, blank wall.  Eventually, sparks ignited and I got inspired to replicate the wall shelf from the Airbnb for the wall above the toilet.  I took some time to figure out size and placement.  I readily admit I got more excited about styling and decorating the shelf than the shelf itself.  I was visualizing framed photos, handmade clay pieces and dried flower bouquets.  I rushed off to build a wall shelf tailored to these plans.
Simple Wall Shelf Version 1 Completed   @FanningSparks
Then the big day came to hang my new wall shelf.  But something was off!  The shelf didn’t look quite right—it fit the space just fine and it was exactly as designed—but it was lackluster.  I couldn’t put my finger on what was wrong but I never hung the shelf.
Time went on.  The wall shelf just sat there. The answer came to me when I was reading a home decorating blog post about hanging art on a wall (see More Info below).  The author, Diane Henkler, explained How to Hang Art on a Wall the Way an Interior Designer Does [by] Relating Shape to Wall Space. … When you hang something on a wall … the single item or the grouping of objects should be arranged in the same shape and orientation as the wall space you are trying to fill.”
In other words, your wall decor should mirror the shape of your wall.  A square wall space should have square-shaped wall art.  It could be a single item such as a painting or a weaving or it could be a grouping of items such as a gallery of photos.  The overall shape of the wall art should be square, in proportion to the wall space, although the pieces don’t actually have to be square.  A round mirror, for instance, could work well in a square wall space.  Or if the wall space is rectangular, the wall décor should be rectangular.  The orientation of the rectangular space should also be taken into consideration.  Wall décor on a vertical rectangle of wall space should be hung in portrait orientation.  Wall décor on a horizontal rectangle of wall space should be in landscape orientation.  And so on.
Ah Ha!  That was the problem with my bathroom wall shelf: the wall space is an obvious vertical rectangle but my wall shelf was an obvious horizontal rectangle.  It was back to the drawing board!  This time I forced myself to pay more attention to the wall shelf itself.  I carefully designed it to mirror the vertical rectangle of the wall space.  I added a second shelf.  Then I filled in the top of the frame to emphasize the vertical rectangle. I made a paper template to better visualize the results.
Paper Template for Simple Wall Shelf   @FanningSparks
With this reassurance, I set off to build version 2 of the wall shelf.  Things came together quickly as I’d already figured out the construction process.   All the details were captured in last week’s DIY Tutorial.   Here’s another look at the new wall shelf.  Much better!
My Fully Styled Simple Wall Shelf @FanningSparks
I staged the below side by side comparison to help me see the difference.  It’s amazing how shifting to the same vertical orientation as the wall space improves the arrangement.  I may have taken the long way to get here but this is a decorating lesson I won’t forget!
Decorating Tip: Repeat Wall Shape and Orientation with Wall Decor   @FanningSparks
The best part of all is seeing the finished wall shelf with my treasured items reflected in my beautiful mosaic mirror.  Oh so pretty!
Mosaic Mirror with Shelf Reflection   @FanningSparks

More Info

In My Own Style, by blogger Diane Henkler, is where I found the post Hang Art on a Wall the Way a Designer Does.  I’ve been following Diane’s blog for years.  She shares lots of great budget-minded decorating ideas.  Thank you, Diane!
You can learn more about the mosaic mirror I created for the Half Bathroom in the post My Mandala-Inspired Oval Design.  I also created mosaic mirrors for our Master Bathroom which you can see in the post Pair of Mosaic Mirrors Completed.
There’s a full tutorial with step-by-step instructions to make this Simple Wall Shelf in this post.
Simple Wall Shelf DIY Tutorial @FanningSparks

Today’s Takeaways

1. Don’t underestimate the value of trial and error.
2. There are a multitude of resources available to guide you in decorating your home and surroundings.
3. Consider making your own one-of-a-kind home decor items tailored specifically to your space.
Peg - FanningSparks Author

It all started with a modest wall shelf I spotted at an Airbnb.  It caught my eye for its simple functionality and straightforward design.  I took several photos thinking that I might want to make it someday.  Then I left the idea to simmer.
Wall Shelf Inspiration Side View   @FanningSparks
Fast forward a few months and I’ve been on a roll in the workshop.  I decided to design and build a version of that simple wall shelf for our Half Bathroom.  I had a do-over and a few missteps but I’m really pleased with the final results.  Shown below is my simple wall shelf styled with a few treasured things including the recycled glass beads I bought in South Africa, a black petal-shaped bowl I made in my Hand Building Pottery Class, my favorite blown glass mermaid and an antique glass bottle used as a reed diffuser.
My Fully Styled Simple Wall Shelf @FanningSparks
At only 18” wide x 19” high, this simple wall shelf doesn’t require a lot of space.  All it needs is a few carefully styled items to add personality and punch.  Today’s post includes detailed step-by-step instructions so you can make your own Simple Wall Shelf.
Supplies Needed
The following supplies are needed for this simple wall shelf:
. Wood Boards: 7 ft of ½” x 3½”.   I used poplar.
. Screws:
… 4 x Size #8 1” length wood screws
… 4 x Size #8 2½” length wood screws
. Wire Nails: 4 x Size #17 ¾“ length
. Knobs: 3 small knobs or hooks with a base of about ½” to 1” diameter and a height of about 1” to 2”.  I tried simple wooden knobs repurposed from an Ikea dresser but settled on clear glass knobs.  You can use any type of knob or hook you like.  Some examples are shown in Step 7.
. Wood Glue
. Wood Filler
. Paint (or preferred finish)
Supplies Needed for Simple Wall Shelf   @FanningSparks
Tools Needed
. Jigsaw (or whatever type of saw you prefer to cut wood)
. Drill with 7/64” countersink bit for Size #8 screws
. Screwdriver
. Hammer
. Nail Punch
. Tape Measure
. Pencil
. Sharp Point: This will be used to indent the wood prior to drilling.  A nail or screwdriver tip will work fine.
. Work Surface with Clamps
. Clamps
. Square
TIP: A speed square (aka rafter square) is great for small woodworking projects like this wall shelf.  The overhang edge makes it easy to align an edge and ensure an accurate perpendicular line.  Plus the handy 7” size is much easier to maneuver than the typical 24″ framing square.  The speed square can be used for several other tasks (which admittedly I haven’t even tried) such as measuring angles with the built-in protractor, marking center lines with the built-in pencil notches and measuring rafter angles with the reference markings.
Project Tip: Use a Speed Square   @FanningSparks
Instructions
Step 1  Cut Wood Parts.
  Cut the ½” x 3½” board into the following:
. 2 x Shelf 3½“ x 18”
. 2 x Shelf Lip ¾” x 18”
. 2 x Vertical Brace  1¾“ x 19”
. 2 x Horizontal Bar 1¾“ x 9”
Parts for Simple Wall Shelf   @FanningSparks
Step 2 Cut Notches.  Notches in the back of the Shelves are used to attach them to the Vertical Braces.  Measuring from the left end, along the back edge of the shelf, mark at: 2¾“, 4½“, 13½“, 15¼“.  Finish marking the notches by connecting the 2¾” and 4½” markings at ½“ from the outside edge .  Do the same between the 13½“ and 15¼” markings.  The result should be two 1¾” x ½“ notches positioned 2¾“ from the ends.  Repeat on the second shelf.
Marking Notches for Shelf   @FanningSparks
TIP: Before starting to cut out the notches with your jigsaw, drill holes in the inside corners.  This makes it easier to stop cutting at the right spot.  Then use a jigsaw to cut out the notches taking several passes to remove the wood.
Project Tip: Drill Corners and Multiple Cuts   @FanningSparks
Step 3 Test Fit.  Mark lines for shelf placement on the Vertical Braces.  Measure down 5“ from the top edge and mark a line for the placement of top edge of the top shelf.  Measure up 5½“ from the bottom edge and mark a line for the placement of the top edge of the bottom shelf.  Assemble the pieces to get familiar with how they fit together and to ensure they fit correctly.  Make any necessary adjustments.  Pay particular attention to the fit of the notched shelves.  Use a pencil to lightly mark front and top of each piece.
Test Fit Simple Wall Shelf   @FanningSparks
Step 4 Drill Parts.  Measure and mark the bottom Horizontal Bar for the 3 knobs.  Measuring from the left end along the center of the board (at ⅞“), mark with pencil at: 1⅜“, 4½“, 7⅝”.  Take note of how your selected knobs are designed to attach.  For instance, are threaded bolts attached to the knobs or do you need to screw them on from the back?  Prepare the holes accordingly.
Measure and mark both Vertical Braces for all screw holes as follows:
. To attach top Shelf: 5¼” from top edge and centered at ⅞“; countersink from back
. To attach bottom Shelf: 5¼” from bottom edge and centered at ⅞“; countersink from back
. To attach unit to wall: 4½” from top edge and centered at ⅞“; countersink from front
. To attach top Horizontal Bar: on the narrow outside edge, ⅞“ from top and centered at ¼“;  countersink from outside
. To attach bottom Horizontal Bar: on narrow outside edge, ⅞“ from bottom and centered at ¼“; countersink from outside
Indent at marks with the sharp point.  Drill pilot holes with countersink at marks.
Marking to Drill Vertical Brace  @FanningSparks
TIP: It can be tricky to drill the last set of holes in the Vertical Brace because the deep holes are drilled into the narrow face.  I found it much easier to keep the drill level and plumb using a simple right angle corner jig I cut from scrap wood.  Remove the jig to finish drilling the hole.
Project Tip: Make Jig to Drill Deep on Narrow Face   @FanningSparks
Step 5 Attach Shelf Lips.  Attach a Shelf Lip to the front edge of each Shelf.  Align the bottoms and sides; the front of the Lip sits ¼” above the Shelf.  Glue and clamp the Lip in place.  For good measure, use a couple of wire nails to secure in place.  Use nail punch to recess the wire nails.
Attaching Shelf Lip   @FanningSparks
Step 6 Assemble Parts. Assemble the Vertical Braces and Horizontal Bars into a rectangle. Ensure the countersunk holes on the outside edges of the Vertical Braces are facing out, the countersunk holes for attaching shelves are at the back and the countersunk holes in the Horizontal Bar for the knobs are at the back.  Ensure edges are aligned.  Use speed square to ensure corners are square.  Glue and screw in place with 2½” screws.  Clamp until dry.
Attach the Shelves to the Vertical Braces.  Use the placement lines made in Step 3 aligning top edges of shelves with lines.  Ensure back edges are aligned.  Pay particular attention to the shelves using the speed square to ensure they are level and square.  Glue and screw in place with 1” screws.  Clamp until dry.
Assembling Simple Wall Shelf   @FanningSparks
Step 7 Attach Knobs. As noted in the Supplies Needed section, you can use any type of knob or hook you like.  I tried a few options including the simple wooden knob (shown in center) and an embellished version (shown on left).  In the end, I chose the simple glass knobs (shown on right) because they don’t compete for attention with the items I displayed on the shelves.  Attach your selected knobs to the bottom Horizontal Bar.
Options for Knobs on Simple Wall Shelf   @FanningSparks
Step 8 Finish and Paint.  Finish the wall shelf by filling the nail holes and any gaps around the notches.  Sand smooth.  Prime and paint.
Step 9 Hang Shelf Unit.  Hang the wall shelf through the drilled holes on the Vertical Braces.
Step 10 Style and Enjoy.  Have fun styling your shelves!

More Info

Please share or pin this image for future reference.
Simple Wall Shelf DIY Tutorial   @FanningSparks
Looking for more beginner woodworking projects?  How about one of these?
. The Ultimate Maker’s Cabinet
. Pyramid Trellis
. Bluebird-Approved Birdhouse
. Air Bee-n-Bee House

Today’s Takeaways

1. Whether travelling physically or virtually, take note of functional and decorative items that catch your eye.
2. Give ideas time to evolve and crystallize.
3.  Consider transforming a blank wall into a miniature gallery using a simple wall shelf styled with a few treasured items.Peg - FanningSparks Author

As promised in my previous post about Insect Hotels for Bees and Other Pollinators, I’d like to share my version of an insect hotel in today’s post.  I’ve dubbed it the “AirBee-n-Bee House”.  It’s targeted to tunnel-nesting native bees such as Mason Bees and Leaf-Cutting Bees.  Our AirBee-n-Bee House has been open for business for about a week but we haven’t received any reservations yet!  So I can’t report on its effectiveness but I can report that it looks really cool in our front yard.
Our AirBee-n-Bee House Open for Business  @FanningSparks
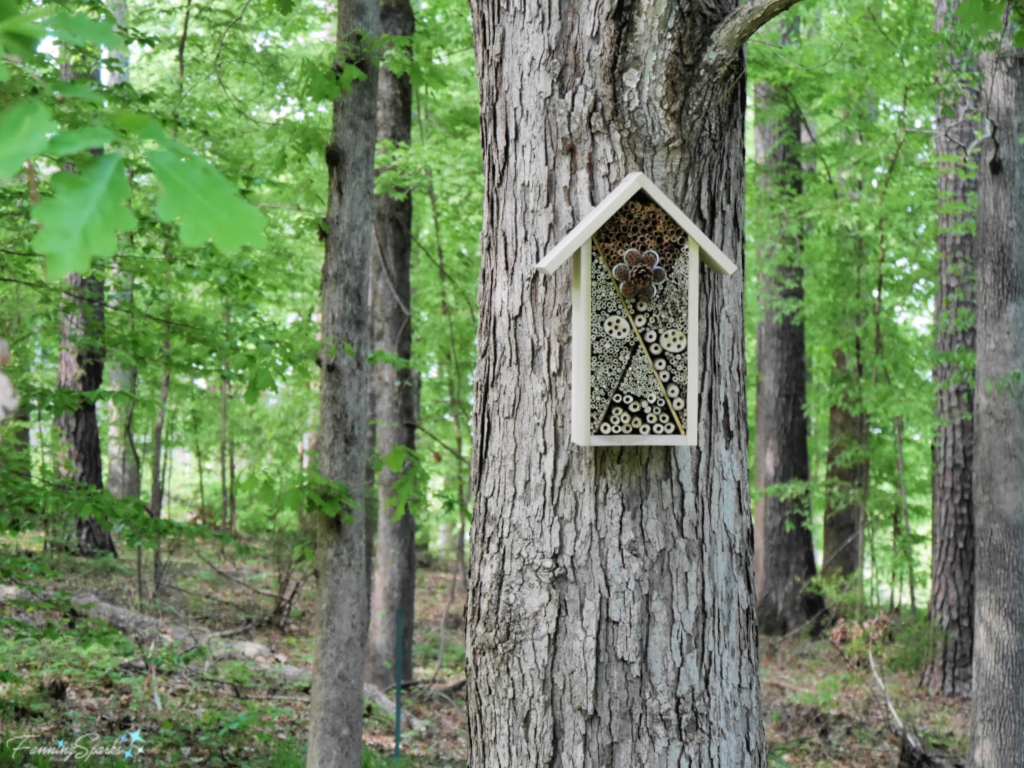
This post provides easy, step-by-step instructions to make your own AirBee-n-Bee House.  There are two components to this project: a wood frame in the shape of a house and nesting materials that fill the frame.  We’ll start by building the wooden House Frame.
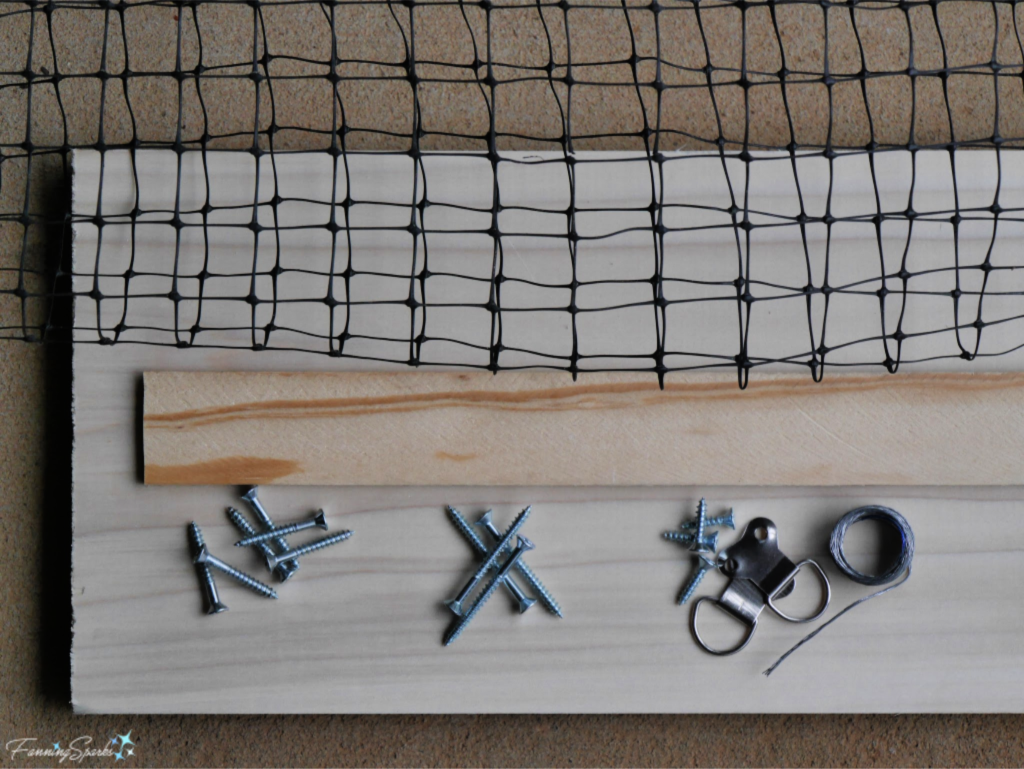
Supplies Needed for House Frame
The following supplies are needed to make the wooden House Frame.  Note: You will also need nesting materials which are described below in Step 8.
. Wood Boards: 5 ft of 1” x 8” (actual size is ¾” x 7 ¼ ”).   I used poplar.
. Wood Slats: 6 ft of ¼” x 1½  ”  This product are sometimes called lattice molding.
. Screws:
… 6 x Size #8 1¼” length wood screws
… 4 x Size #8 1¾” length wood screws
… 4 x Size #8  ¾” length wood screws or appropriate size screws to attach your hangers.
. Hangers with Wire:  Choose sturdy hangers as the finished bee house is quite heavy.
. Netting: Approximately 10” x 20” of plastic netting.  This will be attached to the back of the structure to help keep the nesting materials in place.  Any type of netting or exterior-grade open weave fabric should work.
. Painter’s Tape (not shown)
Supplies Needed for AirBee-n-Bee House @FanningSparksTools Needed
. Jigsaw (or whatever type of saw you prefer to cut wood)
. Drill  with 2 drill bits:
… 7/64” bit with countersink for pre-drilling Size #8 screws
… 5/16” bit for drilling tunnel holes
. Screwdriver
. Tape Measure
. Ruler: Yardstick or other straight edge
. Pencil
. Angle Finder: To measure angles and set jigsaw blade accordingly.  I really like the digital Angle-Rule, a 2-in-1 ruler and angle finder, from GemRed.
. Sharp Point: This will be used to indent the wood prior to drilling.  A nail or screwdriver tip will work fine.
. Work Surface with Clamps
. Stapler
. Scissors
. Pruners
Measurements
The design and dimensions of the House Frame are shown below.
Measurements for AirBee-n-Bee House @FanningSparks
Instructions
Step 1  Cut Wood Parts   
Cut the 1” x 8” board into the following:
. Over Roof 7 ¼” x 10”
. Under Roof 7 ¼” x 9 ¼”
. 2 x Sides 6 ½” x 15 ½”
. Bottom 6 ½” x 7”
Cut top edges of the Sides at 45⁰angle.
Step 2 Test Fit   Assemble the pieces to get familiar with how they fit together and to ensure they fit correctly.  Make any necessary adjustments.  Use a pencil to lightly mark front and top of each piece.
Test Fitting the AirBee-n-Bee House @FanningSparks
Step 3 Attach Side to Bottom   On the bottom outside edge of the Side, measure up 3/8” and mark for 2 screws.  Use a sharp point to make an indentation on the marks.  This will make it easier to position the drill bit.
As shown below, clamp Bottom along 6½ ” edge to hold it steady and level.  Hold Side on top of Bottom, squaring corner and aligning bottom edges.  Drill pilot holes at marks with countersink bit.  Attach with size #8 1¼” length screws.  This will result in an L-shaped piece.
Attaching the Sides for the AirBee-n-Bee House @FanningSparks
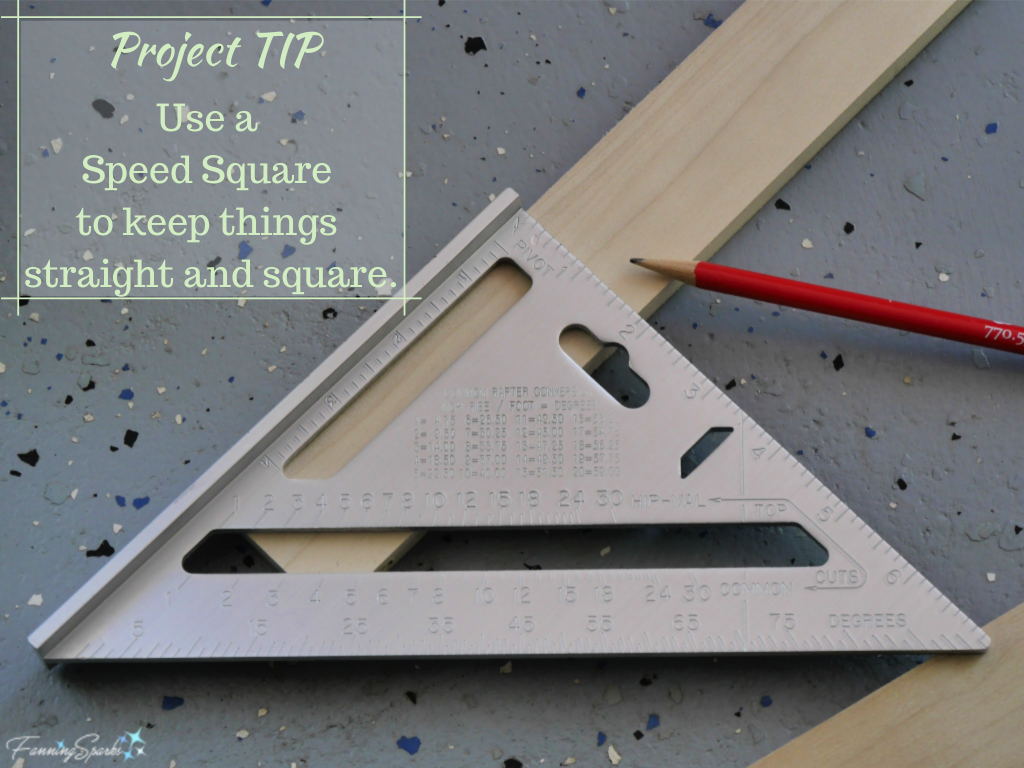
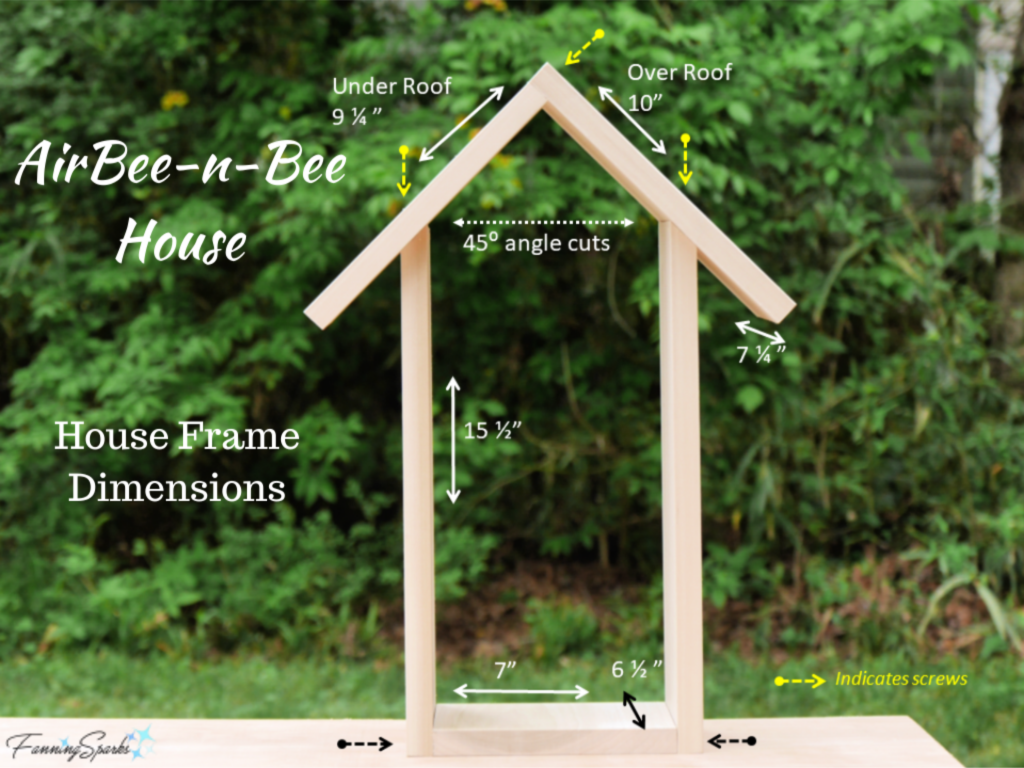
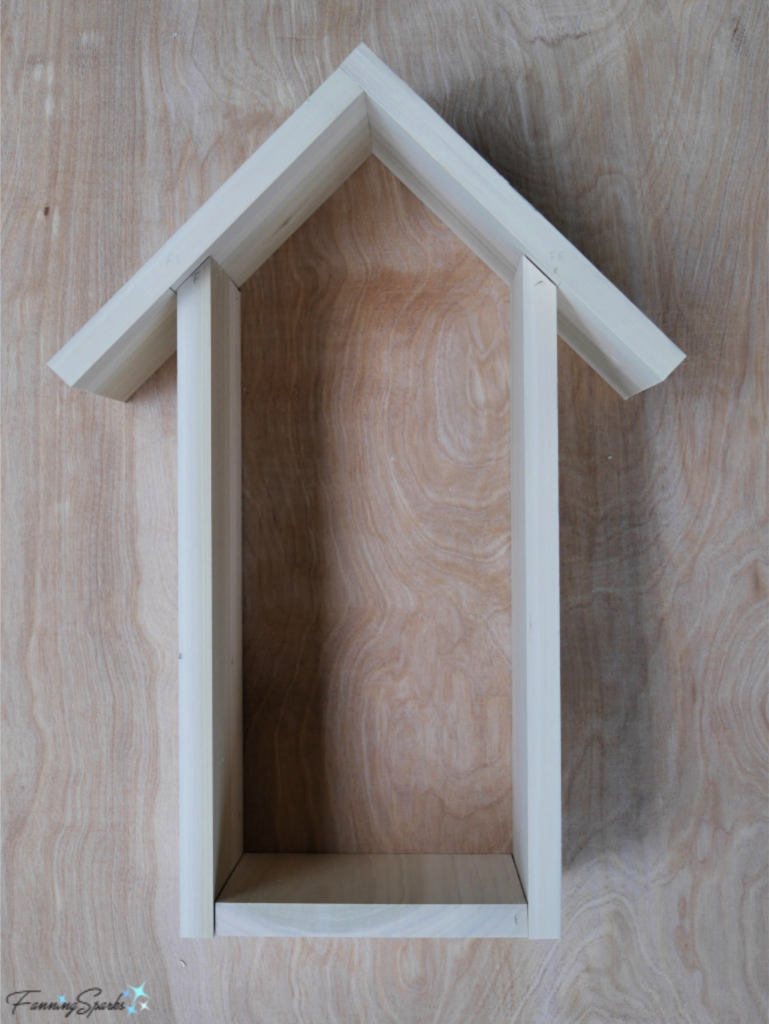
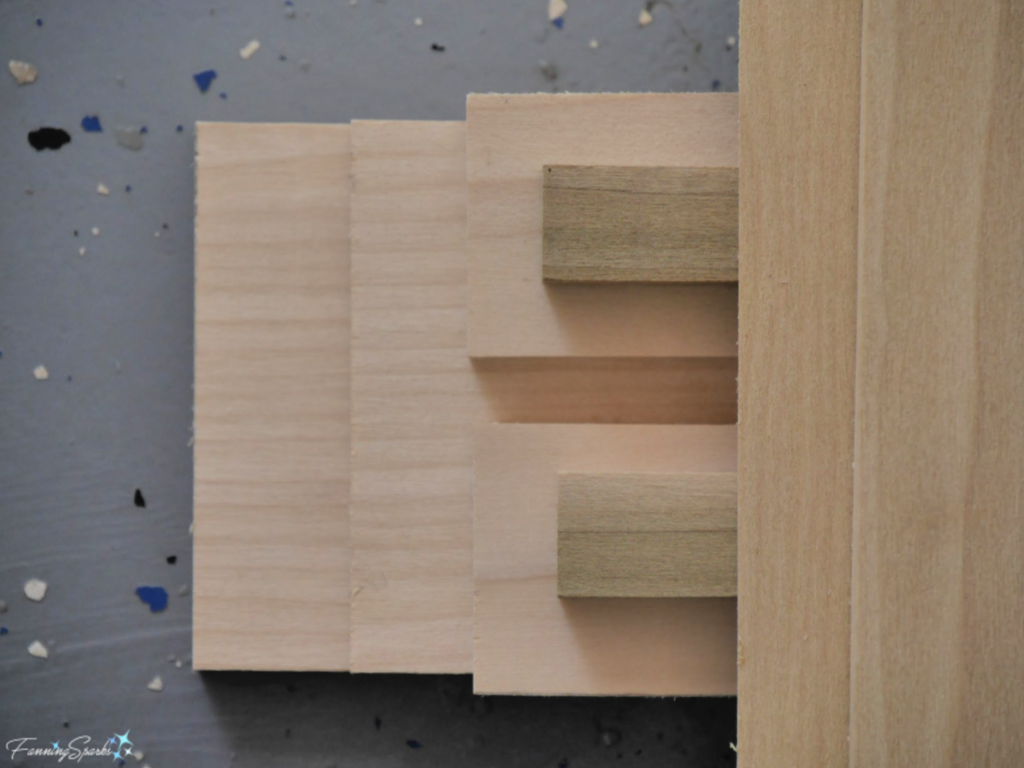
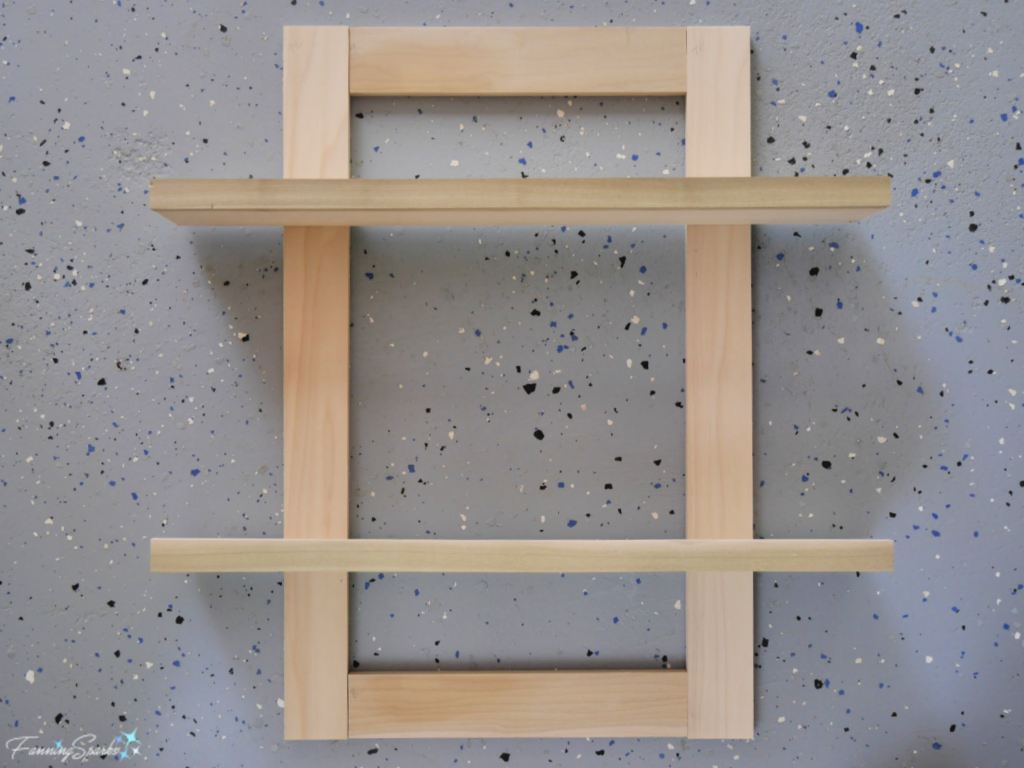
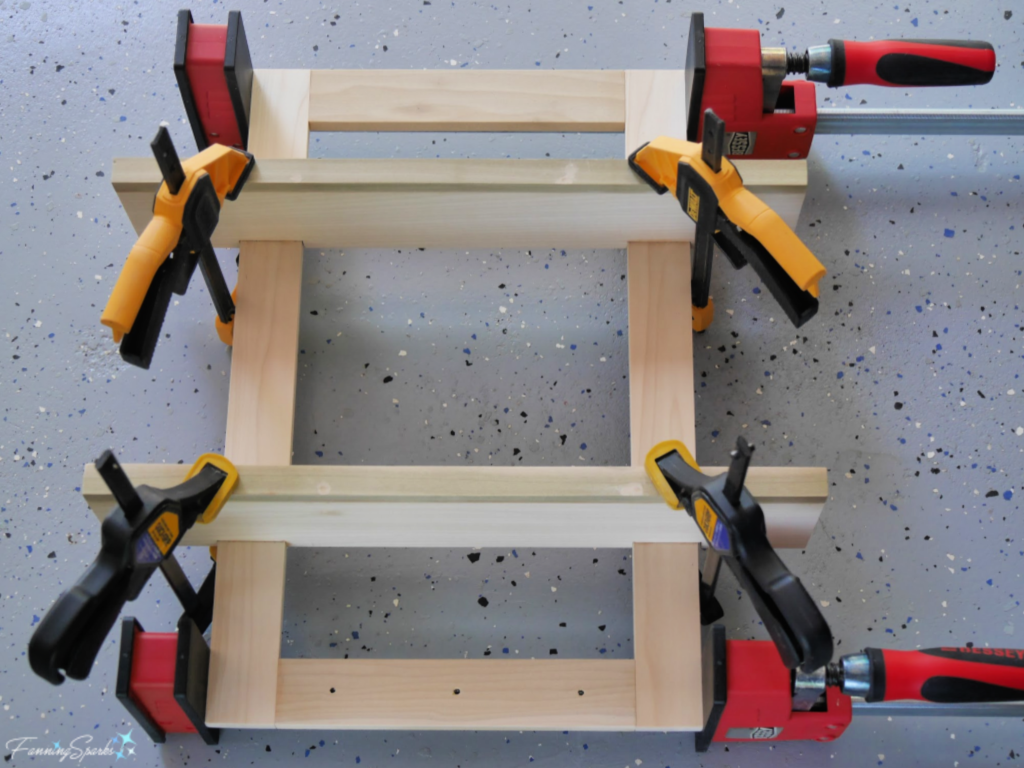
Step 4 Attach Other Side to Bottom   Repeat Step 3 to attach other Side to Bottom.  This will result in a U-shaped piece.
Step 5 Assemble Roof   Use the same approach as outlined in Step 3, to attach the Over Roof to the Under Roof.  The roof angle will be 90⁰.
Step 6 Attach Roof to Box   Use a pencil to lightly mark placement lines on both sides of both Roof parts.  On the inside lower edge, measure up 3⅛” from the bottom and mark a line.  On the outside lower edge, measure up 4 ¼” from the bottom and mark a line.  Place the Roof on the box aligning the Sides with the inside placement lines.  The resulting angle where the Roof and Sides connect should be 45⁰.  Adjust if necessary.
Mark and indent for screws along the outside placement line on both Roof pieces.  Note there is a ¾” overhang on the front edge of the Roof but not on the back.  Screws should be placed about 2 ½“ from the front edge to allow for the overhang.  Looking ahead this is where the screws will be placed.
Screw Placement on Roof of AirBee-n-Bee House @FanningSparks
Re-align the top of the Sides with the inside placement line.  Align back edges.  Use tape to hold pieces in place.  Drill pilot holes and screw together using size #8 1¾ ” screws.
Prepping to Attach the Roof on the AirBee-n-Bee House @FanningSparks
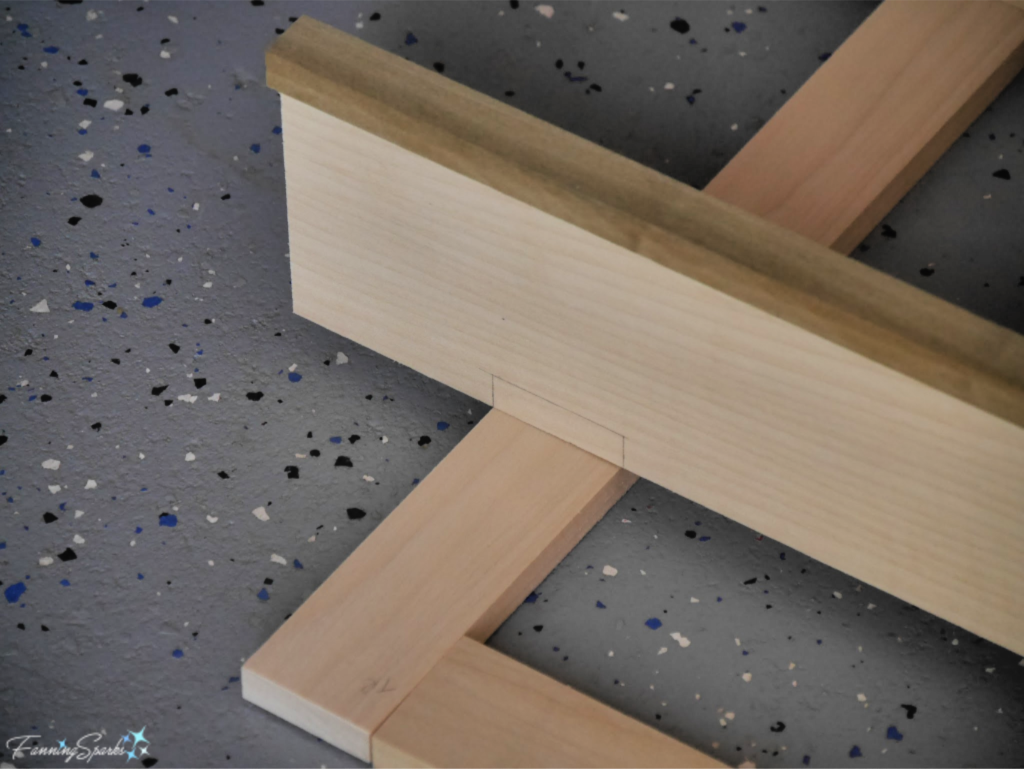
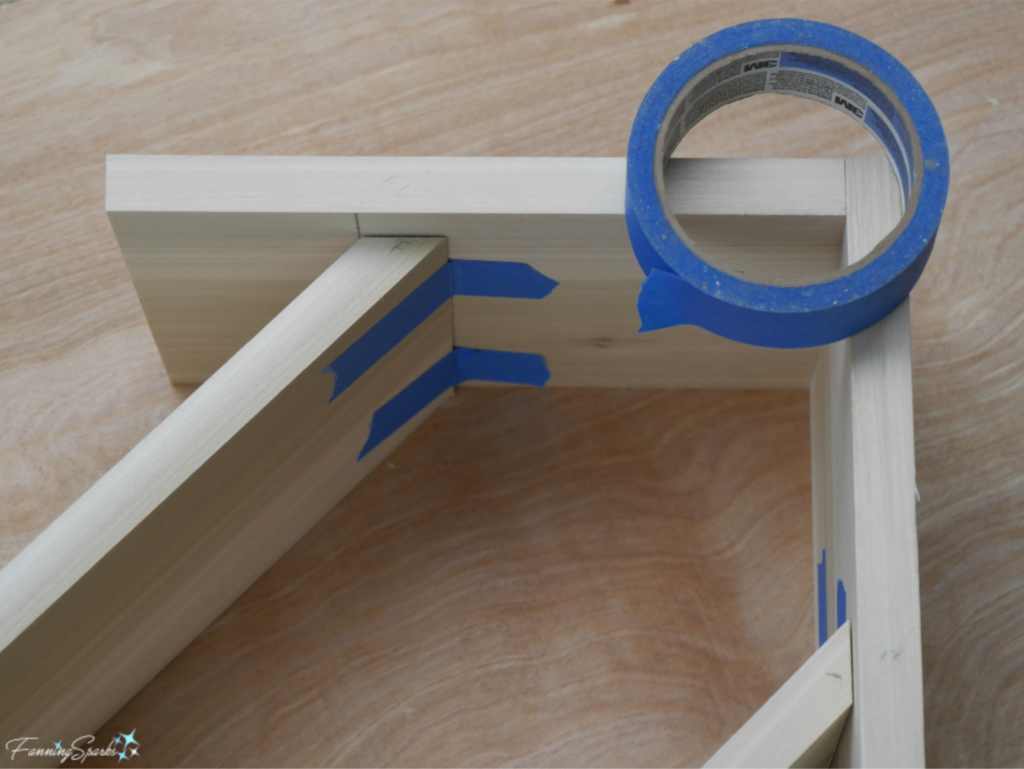
Step 7 Insert Cross Pieces   Use four pieces of wood slat to create 2 X’s inside the House Frame.  Cut a piece of wood slat to 16 ¼”.  Slide into frame to ensure a snug fit.  Adjust if necessary.  Repeat with 3 more pieces.  These pieces fit snugly but are not attached. They will serve to hold the nesting materials in place. 
Fully Assembled House Frame for AirBee-n-Bee House @FanningSparks

The House Frame is complete and now the fun begins!  It’s time to put in the nesting materials.  Position the materials in any way you like.  You can create a variety of patterns and designs.  See my “Insect Hotels – FanningSparks Favs” board on Pinterest for more ideas.

Step 8 Gather and Prepare Nesting Materials   Tunnel-nesting bees prefer hollow tubes with a 5/16” diameter hole.  Cut the tubes to 6 ½ “ length to fit inside this House Frame.  Most reference sources recommend using natural materials for these tubes.  I foraged most of my materials from our yard and surrounding woods but you can also use paper (parchment or butcher paper is recommended) to roll tubes.  Simply roll the paper around a pencil and use tape to keep it rolled.
Some reference sources recommend keeping the nesting area small.  If it is too large, there is a risk of attracting an unnatural number of bees thus inviting pests and predators.  To mitigate this risk, I deliberately filled some sections of my wooden House Frame with small bamboo rods (see notes about Filler below).
Hollow Reeds: Dried pampas grass stems provide natural tubes.  I used pruners to cut the reeds to 6 ½” and then peeled the layers apart to create the tubes.  Of course, the resulting tubes aren’t perfectly uniform but most are the desired size.
Pampas Grass Reeds for AirBee-n-Bee House @FanningSparks
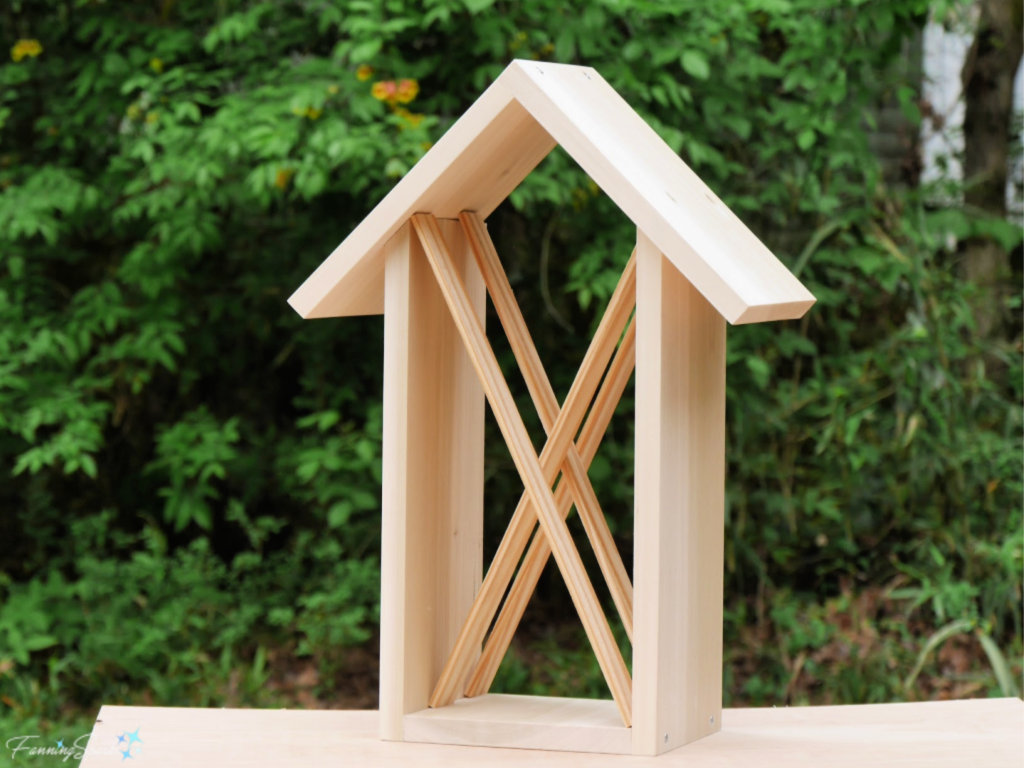
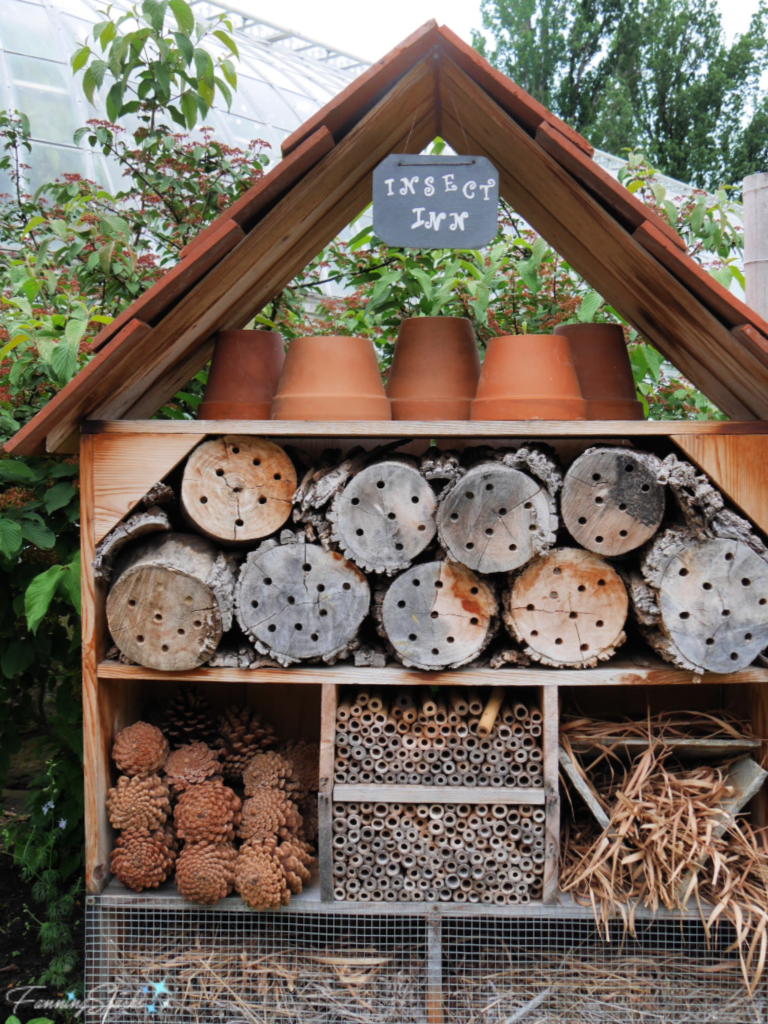
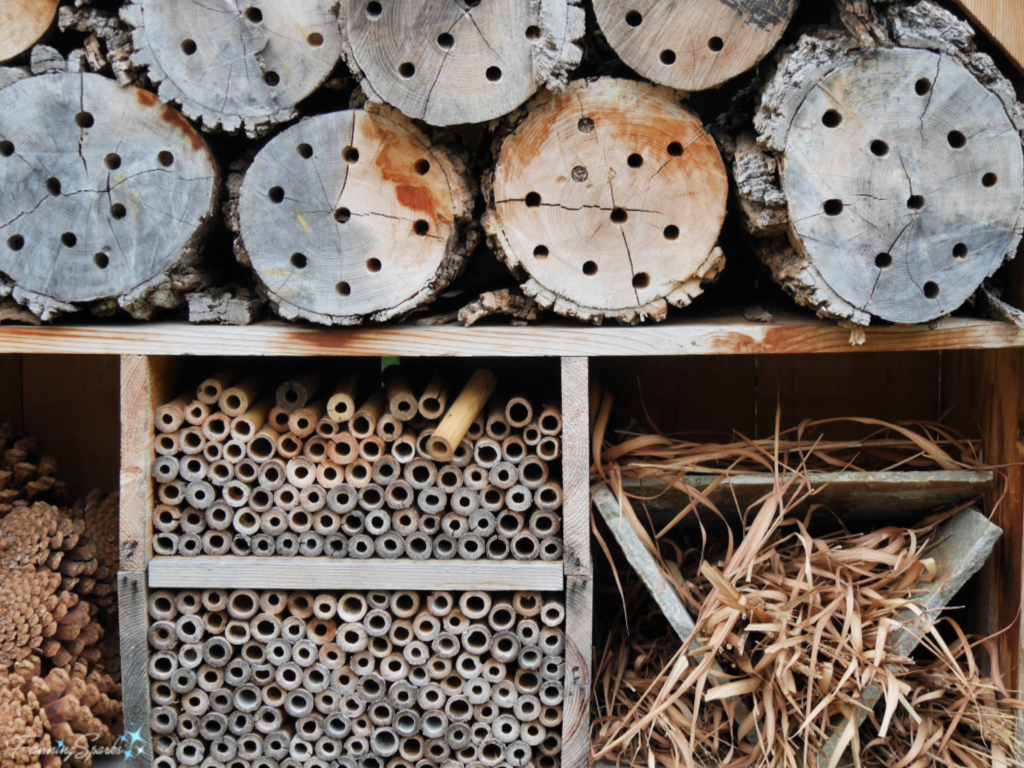
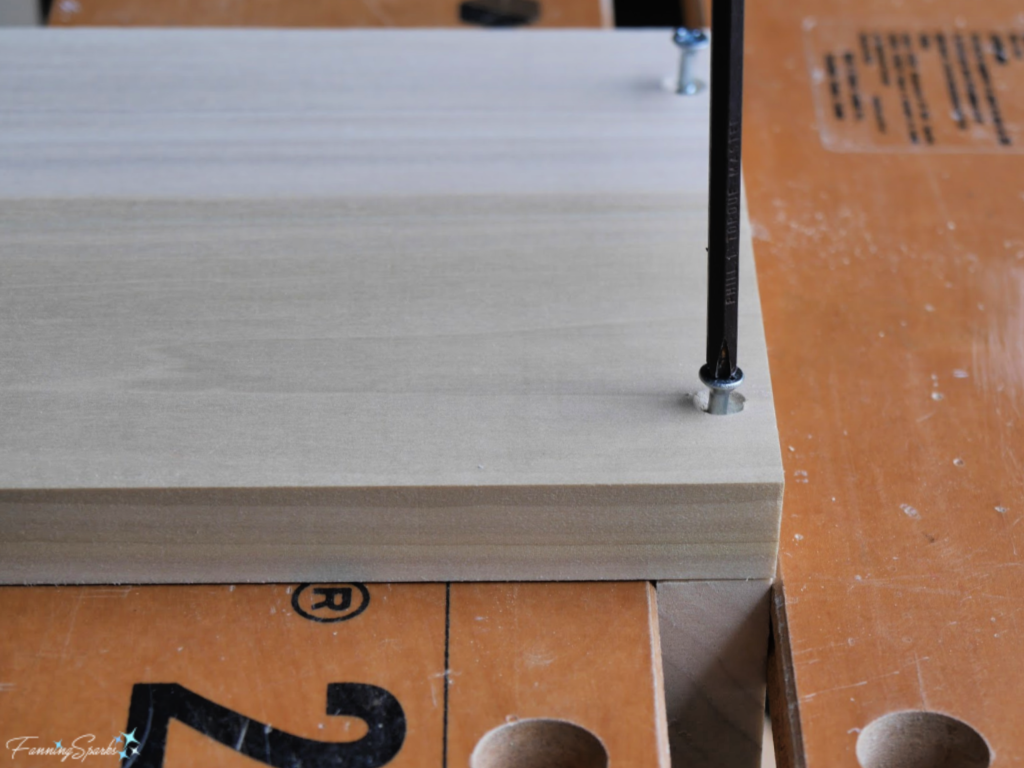
Drilled Tree Branches: Gather small fallen or pruned tree branches and cut to 6 ½” lengths.   Drill 5/16” holes into the ends.
Wood Branches for AirBee-n-Bee House @FanningSparks
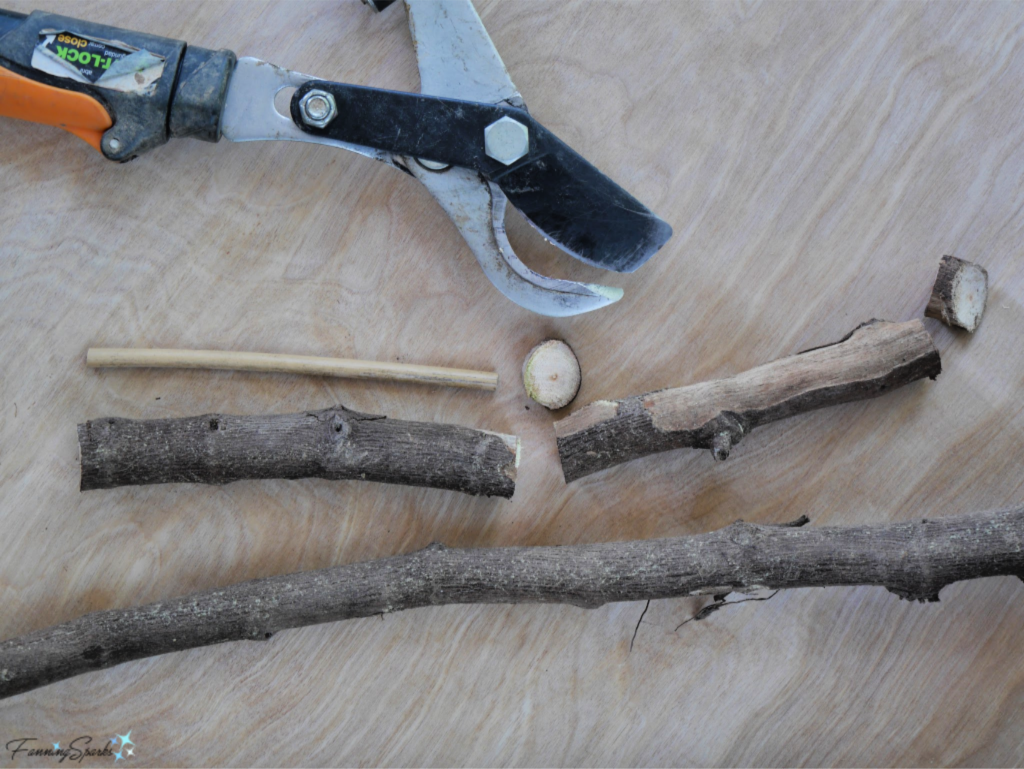
Filler:  I cut bamboo from our yard and trimmed it into 6 ½” lengths to use as filler.  A few of the tubes might be big enough for the bees to nest inside but most will serve as filler and create natural cavities and hollows.
Bamboo Stems for AirBee-n-Bee House @FanningSparks
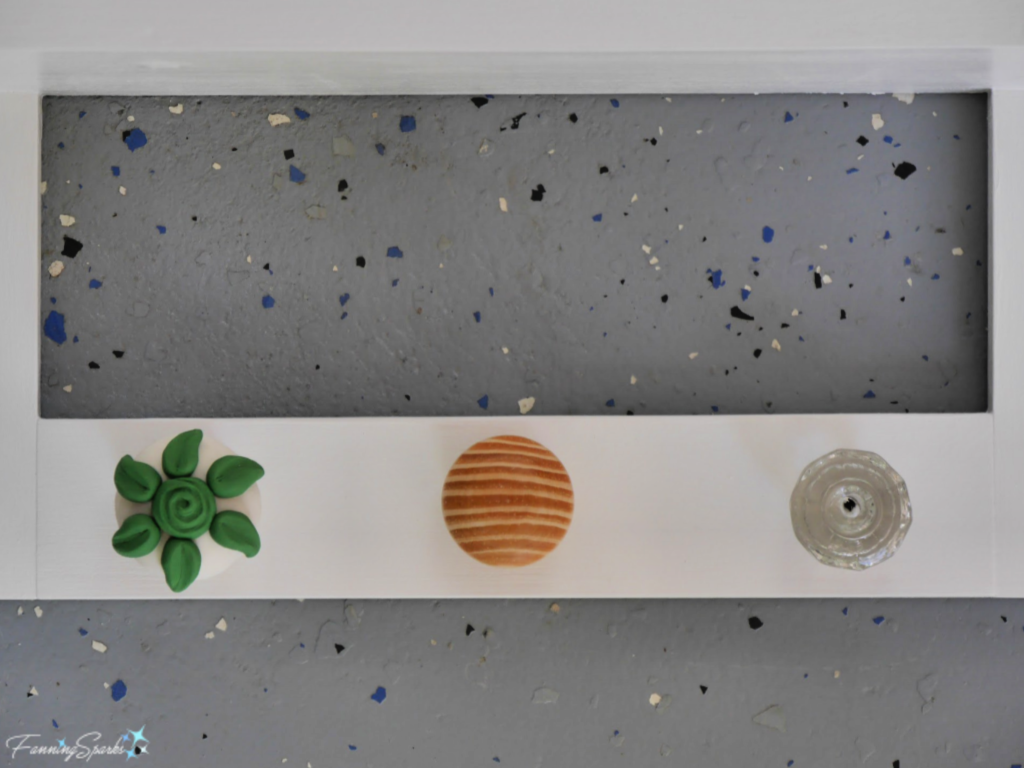
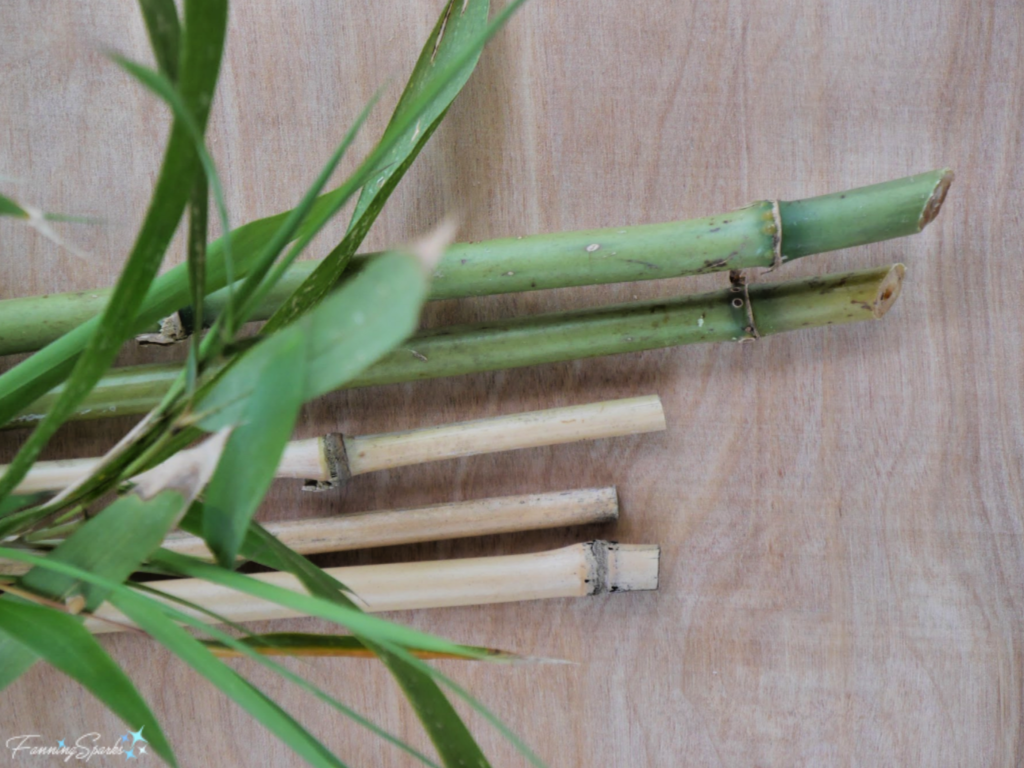
Decorative Elements (optional):  We have a substantial stack of scrap PVC pipe, so I used some to create a decorative flower shape.  It is merely cosmetic and definitely optional.  I cut 7 pieces of 1” PVC pipe to 6 ½” lengths and wrapped a strand of thin wire around the bundle to hold it together.
Decorative Element Made with PVC Pipe for AirBee-n-Bee House @FanningSparks
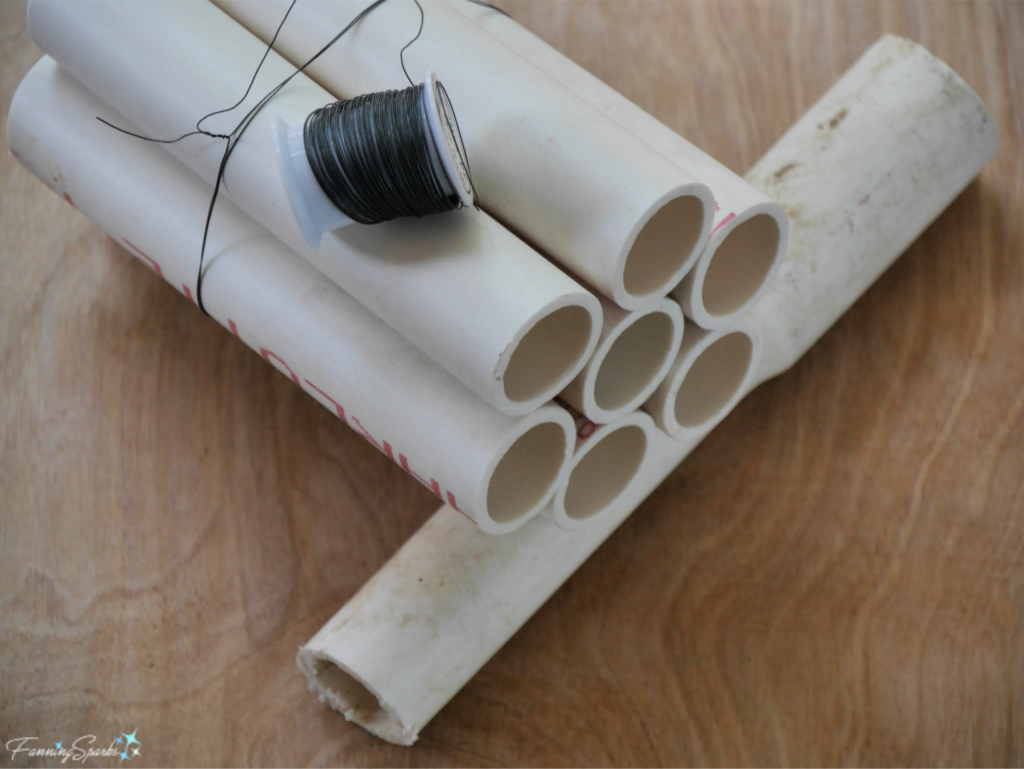
There are thousands of pesky sweetgum fruits (ie the spiny seed pods pictured below) and pine cones lying around our property so it’s nice to finally find a use for a few of them.  I used them as decorative elements.  It’s easier to position and secure the sweetgum fruit if it is attached to a stick.  Drill a small hole into the end of a 6 ½” piece of bamboo.  Then thread a piece of thin wire through the bamboo, attach it to the stem of a sweetgum fruit on one end and anchor it through the drilled holes on the other end.  Pine cones can be wired in a similar way.
Wiring Sweetgum Fruits as Decorative Elements for AirBee-n-Bee House @FanningSparks
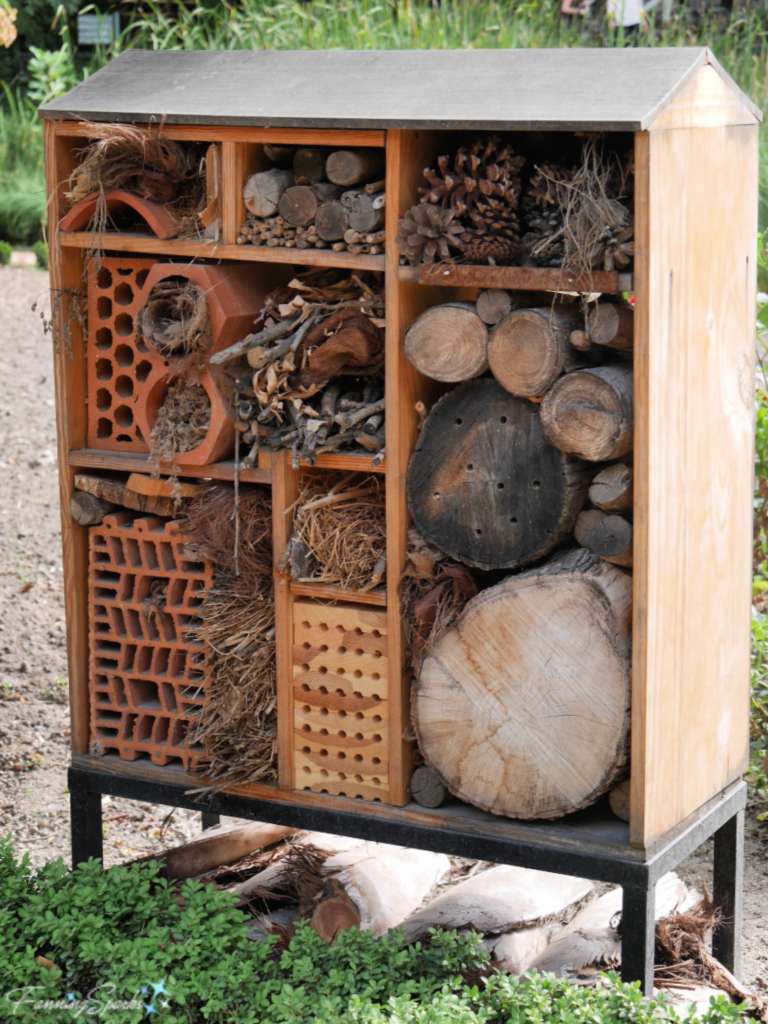
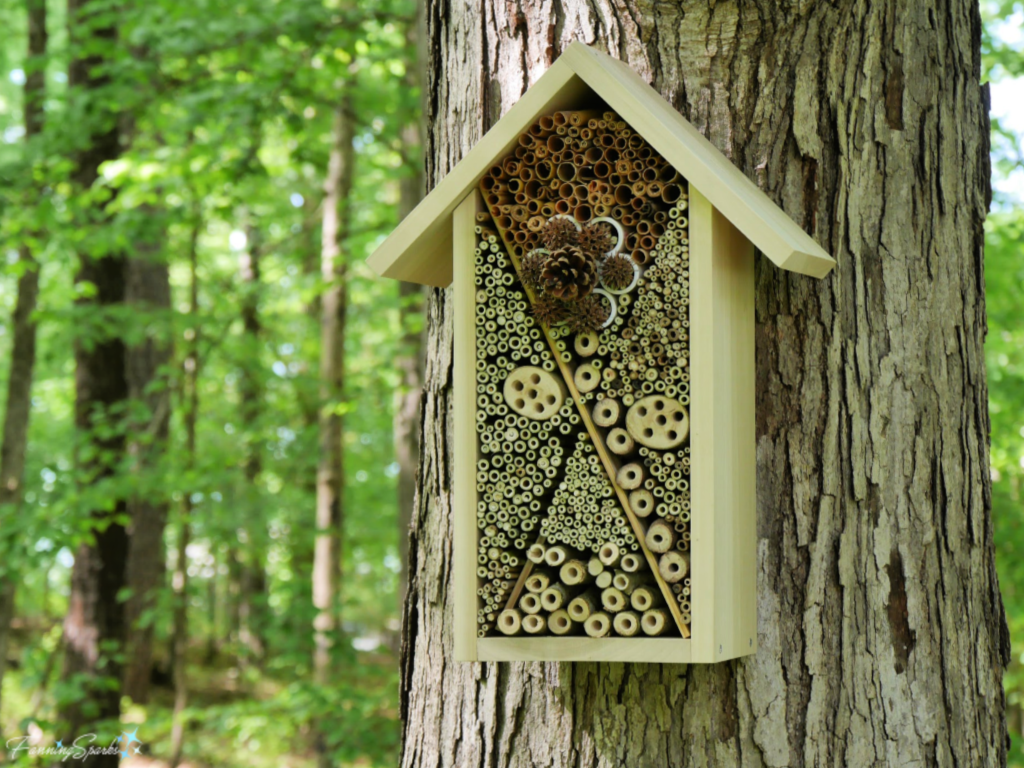
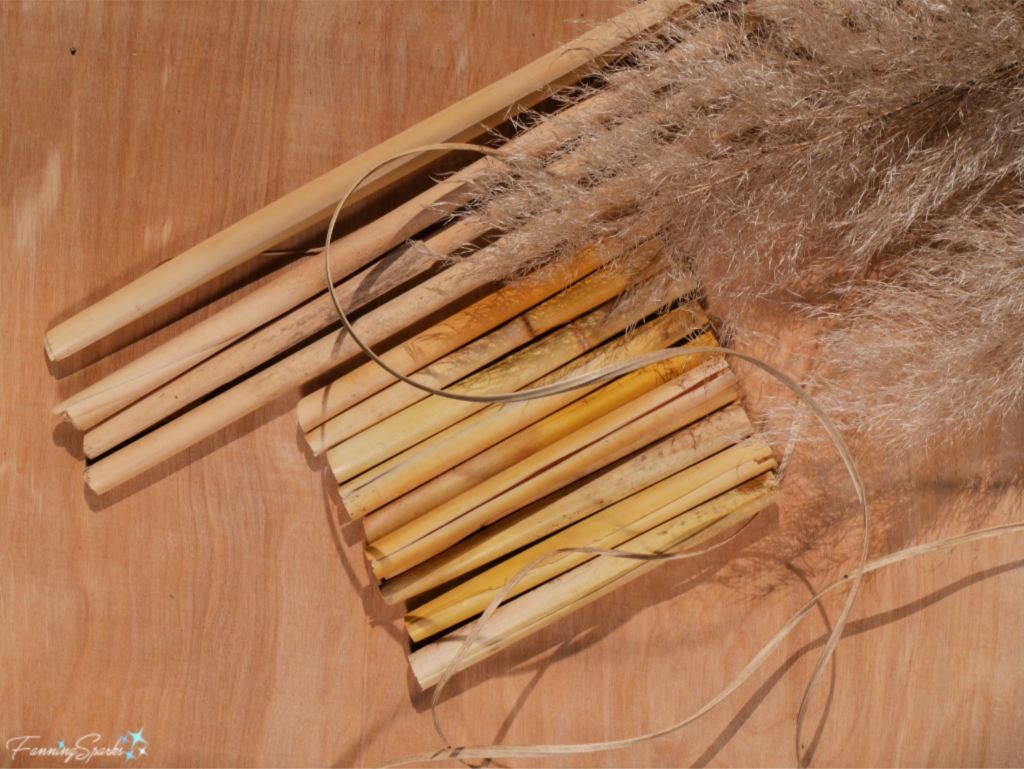
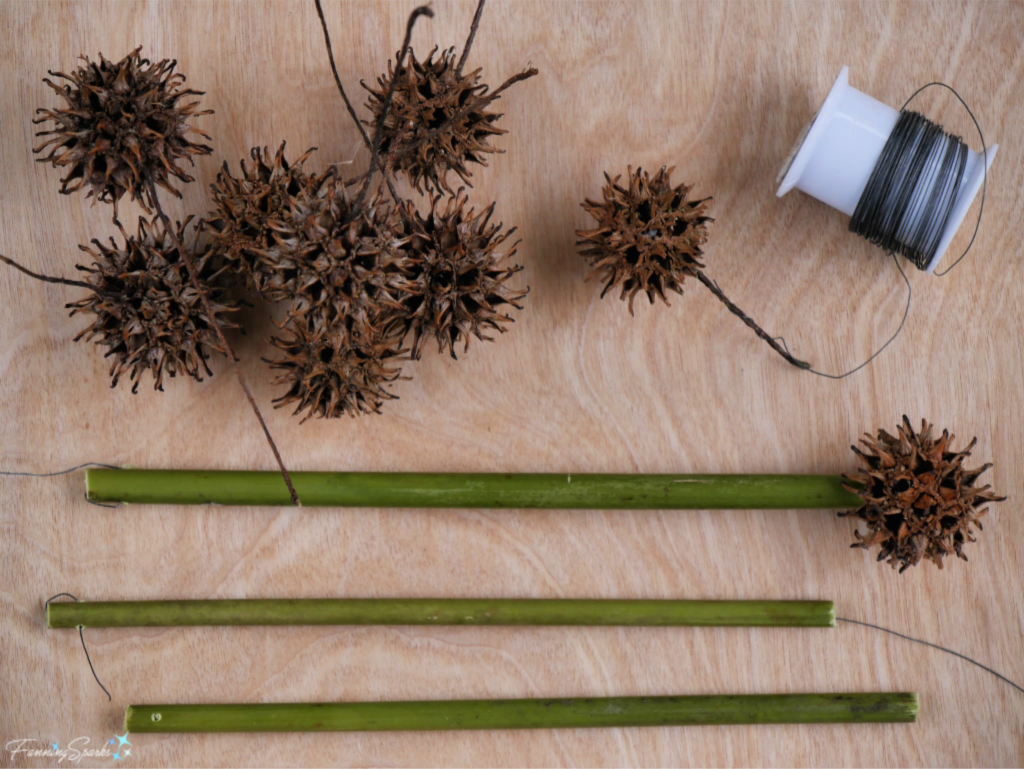
Step 9 Place Nesting Materials in House Frame   Fill the House Frame with the nesting materials.  Simply lay hollow reeds, bamboo stems and drilled tree branches around the Cross Pieces.  Ensure the final placement is snug and tight so pieces will stay in place.  As noted above, you can position the materials in any way you like to create patterns and designs.
Inserting Nesting Materials in the AirBee-n-Bee House @FanningSparks
My idea was to create a simple flower motif with PVC pipe representing the flower petals and tree branches representing the flower stem and leaves.  Sweetgum fruits and a pine cone dress up the flower bloom.
Flower Design in AirBee-n-Bee House @FanningSparks
Step 10 Finishing Up   Remove any visible pencil marks.  The final step is to attach the netting and hangers.  Staple the piece of netting to the back of the House Frame.  This is intended to help keep the nesting materials in place while still allowing access and air flow.  Trim off the excess netting with scissors.  Attach the hangers at the top of the Sides using size #8  ¾” length wood screws (or appropriate size for your hangers).  Attach hanging wire.
Finishing the Back of the AirBee-n-Bee House @FanningSparks
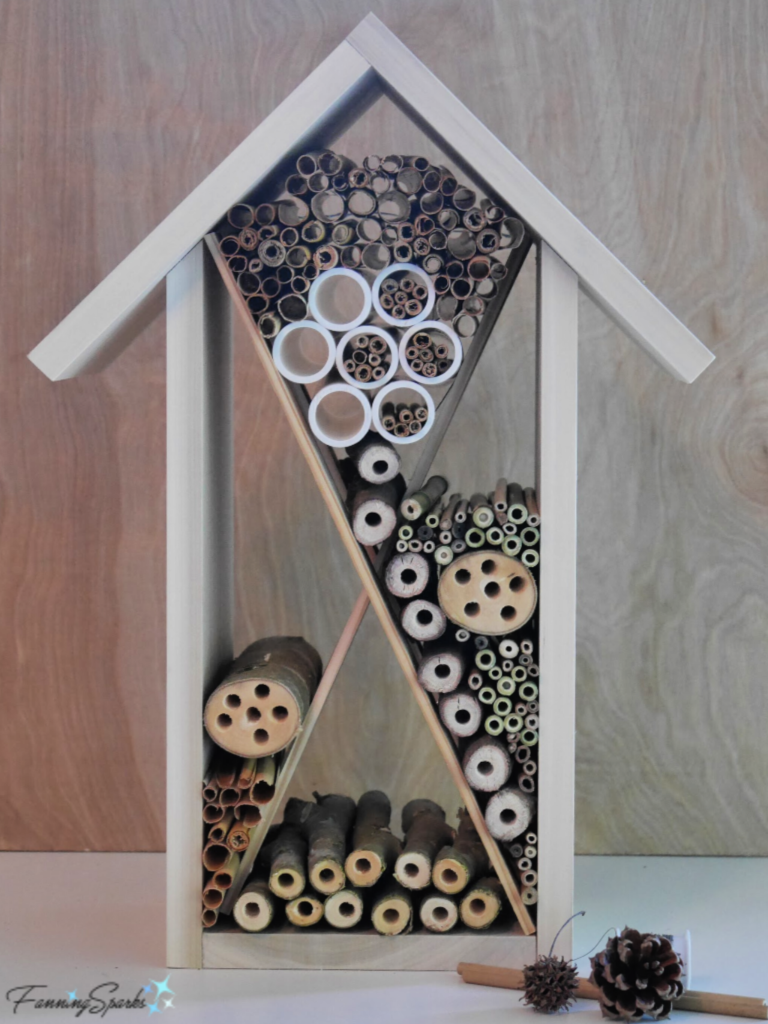
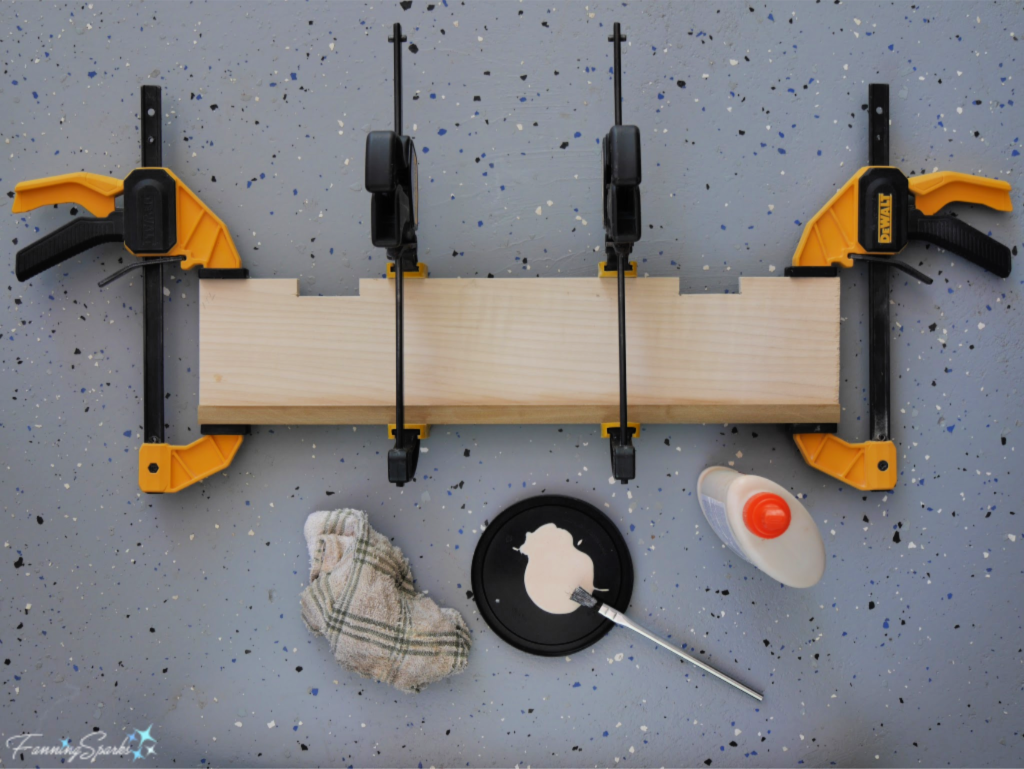
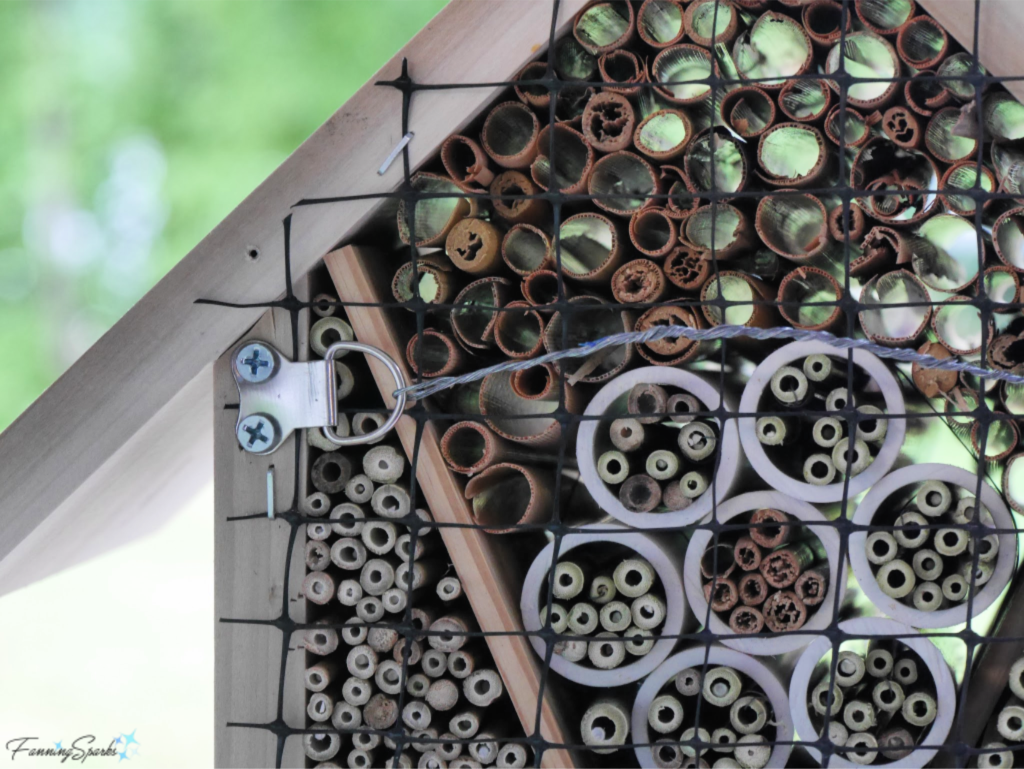
I deliberately didn’t paint or finish the wood to avoid exposing the bees to harsh materials.  Plus I prefer to let it weather naturally.  When it comes time to clean the bee house—it’s recommended to do so annually—you can replace the old tubes and reeds with fresh ones.  The Xerces Society provides clear instructions on proper nest maintenance (see More Info below).
Your AirBee-n-Bee House is ready to install.  It should be securely attached to a tree or wall.  Here’s our new AirBee-n-Bee House eagerly awaiting our first guests!
Our AirBee-n-Bee House Open for Business @FanningSparks

More Info

You may want to check out my previous post, Insect Hotels for Bees and Other Pollinators, to learn about the important role pollinators play in the human food supply.  It also includes information about the various species of bees and their preferred habitats.
The Xerces Society for Invertebrate Conservation provides a comprehensive fact sheet on Tunnel Nests for Native Bees which includes clear instructions on proper nest maintenance.
As noted above, I created a Pinterest board of Insect Hotels to share examples I’ve found.
Please pin this image to share or for future reference.AirBee-n-Bee House DIY Tutorial @FanningSparks

Today’s Takeaways

1. The featured AirBee-n-Bee House is a fun and easy woodworking project.
2. Many factors must be considered in creating a safe bee house.
3. Proper care and maintenance are required to maintain a safe bee house.
Peg - FanningSparks Author

Over the last year, I’ve noticed large insect hotels popping up in botanical gardens and public parks.  These structures are designed to host pollinators and other beneficial insects.  The ones I’ve seen are quite elaborate—comprised of multiple compartments with a variety of materials.   The first insect hotel I saw was located at the Phipps Conservatory and Botanical Gardens in Pittsburgh.  It was cleverly labelled the “Insect Inn”. The accompanying signage explained the benefits: “Bug hotels are created using natural materials for the purpose of attracting beneficial insects.  Different insects will use this structure for shelter, mating and hibernation.  These insects are important for garden health, helping to pollinate many plants while also eating pests.”
Insect Inn at Phipps Conservatory and Botanical Gardens   @FanningSparks
The drilled wood, for instance is targeted for “Solitary bees, like Mason and Carpenter bees, [who] use holes in wood to keep their young safe.  They dig in and then partition small compartments in the wood.  Here they lay eggs.  Their young rest here until they are mature enough to fly and fend for themselves.”
Details of Insect Inn at Phipps Conservatory and Botanical Gardens   @FanningSparks
The second insect hotel I saw was at the Retiro Park in Madrid.  It has a similar purpose “The “Insect Hotel” is a structure designed to favor the nesting of pollinating insects as well as their winter survival.”
Insect Hotel at Retiro Park in Madrid  @FanningSparks
Early this spring, I had the opportunity to attend a presentation, at the State Botanical Garden of Georgia, titled It’s All About Bees by Fred Smith of New Urban Bees.  (Thank you, Fred, for a great presentation!)  Fred promotes the presence of bees and pollinators in an urban setting.  He explained there are numerous varieties of bees.  Fred divided garden bees into 3 categories—honeybees, bumble bees and solitary bees—and explained the nesting requirements for each.  He demonstrated how to make solitary bee nesting boxes and explained how he’s experimenting with bumble bee nests.  He also introduced the idea of small honeybee hives as a realistic alternative for urban settings.  His passion for bees was contagious and I soon found myself delving further into the world of bees.
Eastern Carpenter Bee on Phlox   @FanningSparks
One of the websites Fred recommends is the UGA (University of Georgia) Bee Extension Service (see More Info below).  UGA has a graduate-level Honey Bee Program within its College of Agricultural & Environmental Sciences.  The program focuses on bee biology, bee management and crop pollination. I learned about the importance of bees and other insects in pollination of plants that are important to humans.
They pollinate:
.  1/3 of the food you eat.
.  approximately 1,000 plants grown for food, beverages, fibers, spices and medicines.
.  75% of all flowering plants.
Most of the fruits and vegetables you find in the grocery store would no longer be available if honey bees and other pollinators were to go extinct.”
Western Honey Bee on Poppy   @FanningSparks
Just as Fred shared with us during his presentation, the UGA website explains there are other pollinating bees besides the honeybee including bumble bees, soil-nesting bees (eg Southeastern blueberry bees), other tunnel-nesting bees (eg  bees in the genus Osmia ) and carpenter bees.
Eastern Carpenter Bee on Salvia   @FanningSparks
Another website recommended by Fred is Bees of Georgia by the Georgia Gwinnet College (see More Info below).   This website strives to make it easy to identify bees and provides clear information for farmers and the general public.  I learned there are over 17,000 species of bees in the world with nearly 3,500 bee species in North America alone.  I learned appearances differ by size, color, pattern, presence of hair, and presence of pollen baskets while behaviors differ by type of flight, plants associated with and nesting habit.
This got me wondering… could I spot these differences to determine a bee species and be more specific about the bees shown in this post?  Here’s a side by side comparison of three of my favorite bee photos.  Until now, I simply thought the bee on the camellia (top) was a honeybee and the others (bottom) were bumble bees.
Comparing Bees   @FanningSparks
I couldn’t figure it out from the Bees of Georgia website so I turned to the iNaturalist community for help.  iNaturalist is a browser-based nature identification application with a network of specialists and enthusiasts helping to identify wildlife.  It’s a great way to contribute to “citizen science data for science and conservation“.  iNaturalist also has a cool mobile app called Seek which leverages modern technology for more immediate identification.  (I raved about this app in a previous post Seek to Identify Wildlife with this Fun App).  Within a few hours, the experts weighed in and solved the mystery.
Bees Identified by iNaturalist Community   @FanningSparks
Here’s a screenshot from iNaturalist showing one of my “observations”.  I simply uploaded the photo, recorded when and where it was taken, and tagged it as “Bees”.
My iNaturalist Observation   @FanningSparks
One might wonder why all this matters.  The Bees of Georgia website makes it crystal clear: “Reliance on a single insect species, the honeybee, for the pollination of over 1/3 of the human food supply can be dangerous. Indeed, this is especially true considering that honeybee populations are in decline … The best pollination alternative to honeybees is the native bees already present in the local environment.”  The UGA website provides this guidance, “In general, bees need nest sites and enough food (from blooming plants) to produce offspring. These facts are the foundation of any bee conservation program.”
Common Eastern Bumble Bee on Azalea   @FanningSparks
To make it real, I decided to design and build my own insect hotel.  I chose to focus on tunnel-nesting native bees using the information I learned from Fred and the UGA website.  It’s been a fun project.  you can find all the details, including a full tutorial with step-by-step instructions, in the AirBee-n-Bee House DIY Tutorial post.
AirBee-n-Bee House DIY Tutorial @FanningSparks

More Info

Check out the websites for the Phipps Conservatory and Botanical Gardens in Pittsburgh and Retiro Park in Madrid for information about these great gardens.
New Urban Bees is Fred Smith’s website. The University of Georgia, College of Agricultural & Environmental Sciences’  Honey Bee Program website and the Bees of Georgia website are packed with information.
Check out my previous post Seek to Identify Wildlife with this Fun App.  To learn more, access the iNaturalist website or find the “Seek by iNaturalist” app on Google Play or the App Store.

Today’s Takeaways

1.  Bees and other pollinators play a critical role in the human food supply.
2. iNaturalist is a great resource for identification of wildlife.
3. Consider providing nest sites and blooming plants for bees and other pollinators.
Peg - FanningSparks Author

This is the third post in a series on virtual travel.  This week, we’ll be visiting an English country garden in Southeast England.
Countryside in Ticehurst England   @FanningSparks
Pashley Manor Gardens are located in Ticehurst in East Sussex.  It’s a beautiful country manor, dating back to 1550, in a charming Tudor style.
Pashley Manor in Ticehurst England  @FanningSparks
The setting and house are lovely and the gardens are spectacular.  There are 11 acres of beautiful flower borders, handsome hardscaping and gorgeous vistas.  The garden is designed around “garden rooms” which break up the space into separate areas and encourage visitors to move from one area to another.  At Pashley Manor, each garden room is planted in a different color theme.   Here’s a look at a white and silver garden room.
White Garden Room at Pashley Manor Gardens in Ticehurst England  @FanningSparks
The below garden room showcases yellow, gold and white.
Yellow Garden Room at Pashley Manor Gardens in Ticehurst England  @FanningSparks
Here’s a closer look at this section of the garden.  Notice the perfect match between the colors of the tulip and the surrounding foliage.  This is a great illustration of a garden design technique called “color echoes”.  Gardeners select plants in different tints of the same color to create harmony through repetition.
Color Echo with Yellow Tulips  @FanningSparks
Here’s another example of a color echo—pink shows up in the edges of the main tulips, in the small flowers (I believe they’re forget-me-nots) and the secondary tulips.
Color Echo with Pink Tulips  @FanningSparks
Here’s an interesting plant pairing—the vibrant orange tulips shine beside the burgundy heuchera.
Orange Tulip with Burgundy Coral Bells   @FanningSparks
This is a broader view of the same flower border.  The statue off in the distance provides the perfect focal point.  Garden designers use focal points to draw and direct the visitor.  It provides the eye with a place to rest—to pause and take in the entire view.
Distant Focal Point at Pashley Manor Gardens  @FanningSparks
The artwork, “Mr Bennett’s Daughter”, is by eminent Sussex sculptor Philip Jackson.
Mr Bennett's Daughter by Philip Jackson  @FanningSparks
There’s another Philip Jackson sculpture in the gardens which has an intriguing story.
Anne Boleyn by Philip Jackson  @FanningSparks
This piece is of Anne Boleyn and was specifically commissioned by the owners of Pashley Manor.  History buffs may be interested to learn that Pashley Manor has a historical connection to the Boleyn family.  From their website: “The original house at Pashley was on the moated island and was probably a hunting lodge.  This house was owned at the outset of the Wars of the Roses by Sir Geoffrey Boleyn, Lord Mayor of London in 1457 and great-grandfather of Anne Boleyn.  His son, Sir William, and then William’s eldest son, Sir Thomas, who held court at Pashley in 1518, and eventually Sir Thomas’ brother, Sir James Boleyn – uncles to Anne Boleyn, each owned Pashley in turn.”  Anne Boleyn (1501 or 1507 – 19 May 1536) was the second wife of King Henry VIII of England and was queen consort from 1533 until 1536.  She was the mother of Queen Elizabeth I of England.  This Anne Boleyn sculpture is the focal point on a small island overlooking a pond.
Anne Boleyn by Philip Jackson  @FanningSparks
The gardens are designed with the visitor’s comfort in mind.  There are quiet places to rest…
Garden Bench at Pashley Manor Gardens  @FanningSparks
…with pretty views to enjoy.
Pink Tulips with Sculpture of Girl  @FanningSparks
There’s a charming café at the back of the manor.
Café at Pashley Manor  @FanningSparks
It was the perfect place to duck out of the rain (“It is England, after all!”), grab a bite to eat and enjoy the fragrance of the wisteria.
Wisteria Along Brick Steps  @FanningSparks

More Info

You can learn more about these delightful gardens on the Pashley Manor Gardens website.  Check out South East England’s official tourism website for more information about this charming area.
More of Philip Jackson’s splendid sculptures can be viewed on his website.
There are 3 posts in this series about virtual travel:
. A Virtual Visit to Lisse about the flower fields of Lisse in the Netherlands
. Virtual Hanami Around Aizu about the cherry blossoms in Japan
. A Virtual Stroll in Ticehurst (this post).
You may also enjoy the following posts:
The Allure of the Waterlily includes a visit to the village of Giverny France
. Charleston’s Glorious Window Boxes showcases spring in this beloved city of the US Southeast
Spring Into a Garden Tour features the springtime gardens of Athens Georgia
Camellia Road Trip shares a recent road trip throughout the US Southeast to visit 5 outstanding camellia gardens.

Today’s Takeaways

Consider incorporating some of the garden design techniques viewed at Pashley Manor Gardens into your own garden:
1. Garden rooms
2. Focal points
3. Color echoes.
Peg - FanningSparks Author