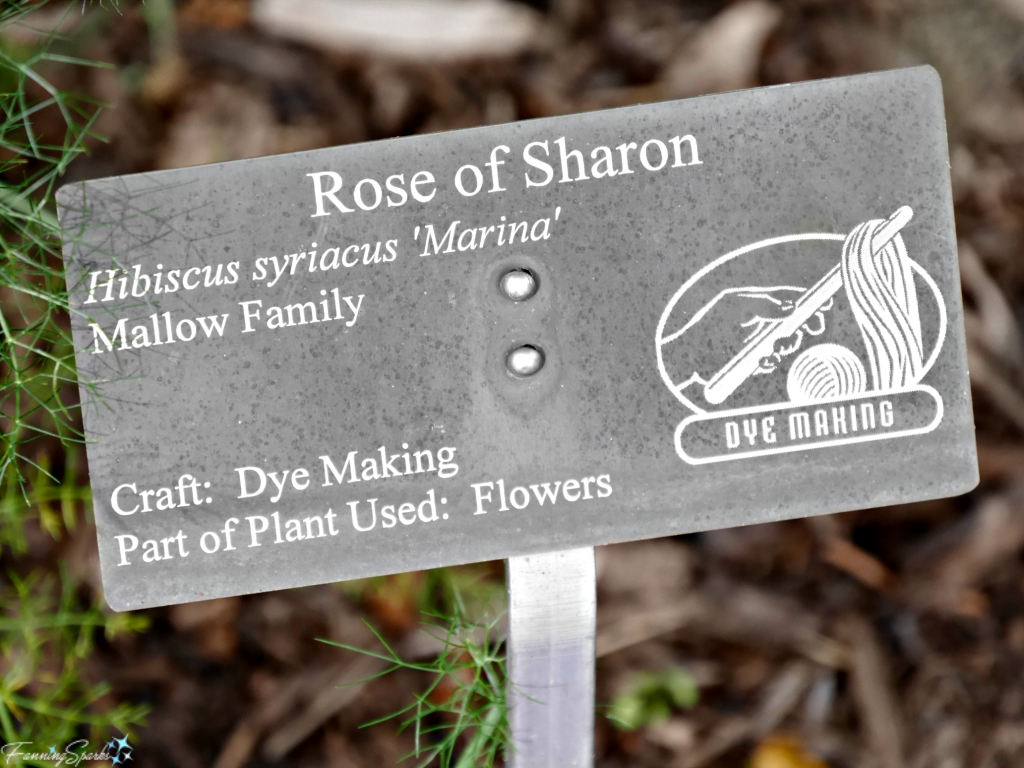
The Heritage Garden at the North Carolina Arboretum in Asheville features plants associated with Southern Appalachian crafts such as natural dyes, hand papermaking, broom making, basket making and botanical remedies. An informational board showcases naturally dyed yarns in a surprising array of colors and identifies which plants were used to create the dyes. Small signs (like this one for the Rose of Sharon) identify specific plants and their usage throughout the garden. I became intrigued by the idea of natural dyeing after seeing this exhibit.
Fast forward to a year later, I had the opportunity to attend a Natural Dyes workshop at the Robert C. Williams Museum of Papermaking in Atlanta. The workshop was led by Doug Baulos and Jacob Phillips. It was an information-packed, fun-filled day of making.
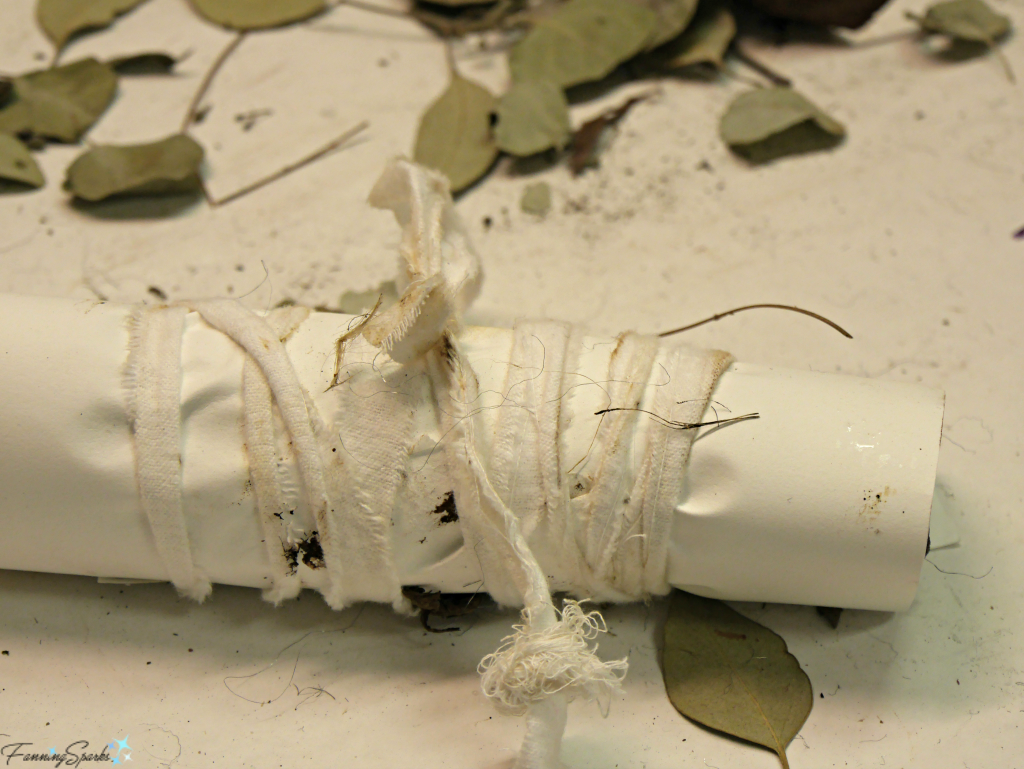
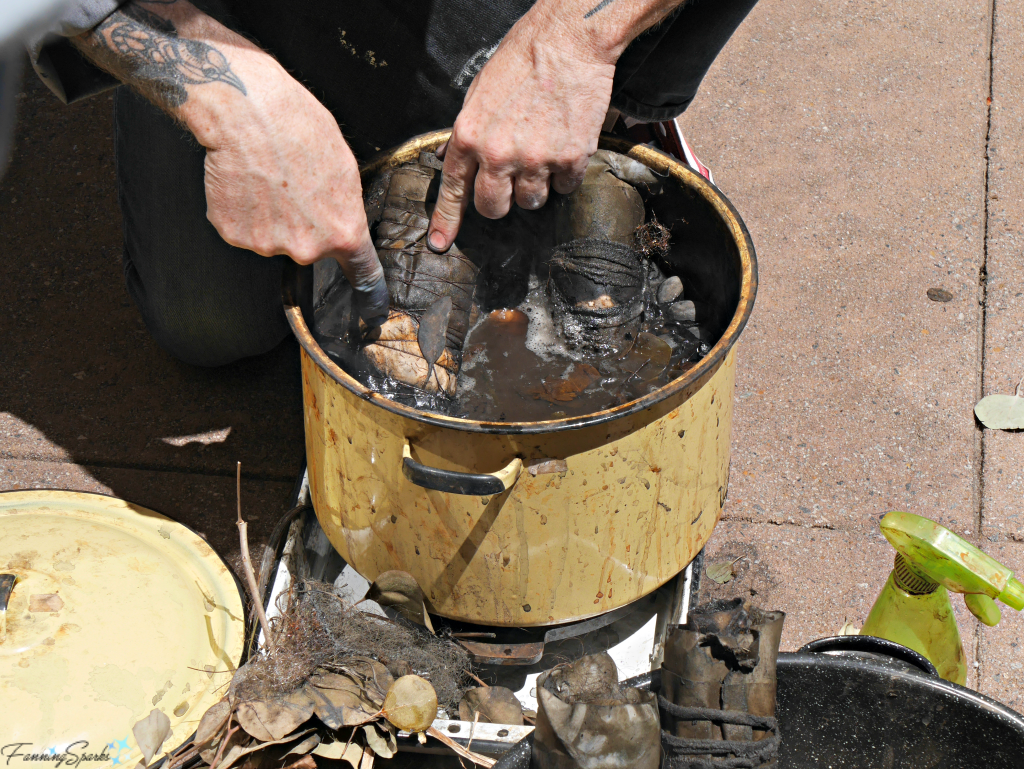
First we made an eco-print placing eucalyptus leaves, red cabbage and steel wool on a vinegar-spritzed sheet of paper. The paper was tightly rolled, tied with fabric strips, and then cooked and steamed for several hours in a concoction of coffee, tea, vinegar and other liquids. The results were a wonderful surprise!
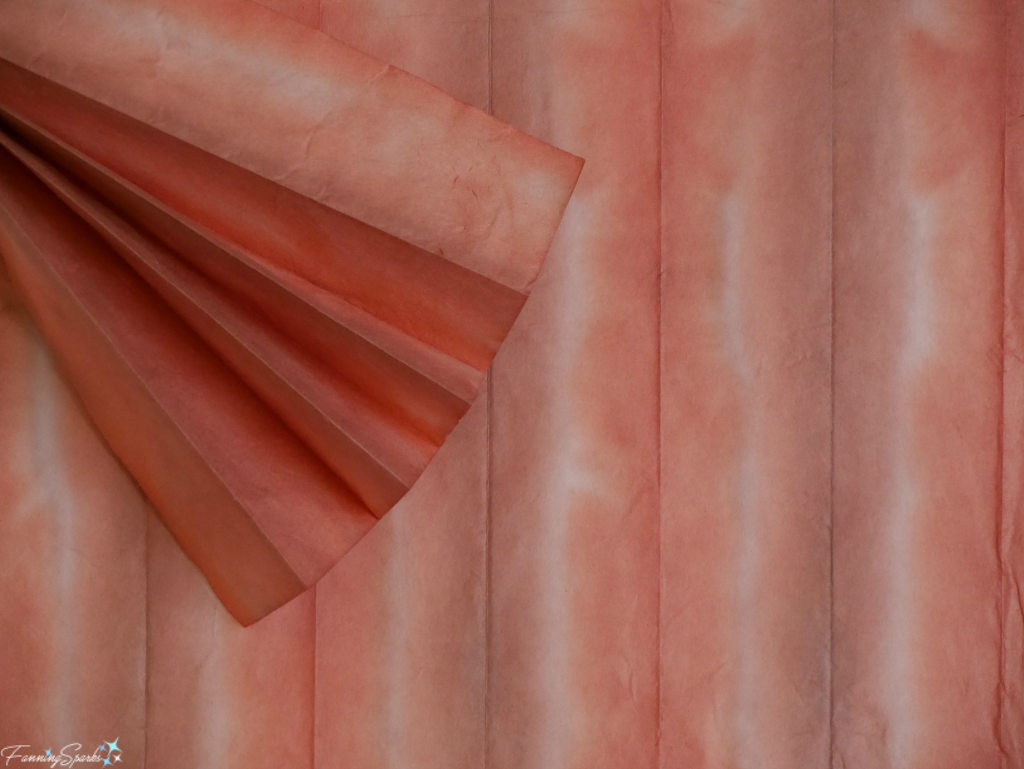
In our second project, we learned about Suminagashi which is the ancient art of Japanese marbling. We used natural dyes made from cutch, pokeweed, hopi and lily/buckthorn/iron. The best part was playing with the floating dyes to achieve a striking design. Next, we moved on to the Venetian Fold. Using rice paper, we learned how to complete a Venetian fold. We dipped our folded paper into 3 different dyes (buckthorn (alembic), alkanet and madder) to achieve a lovely ombre effect.
All of this was great fun but the last topic, Itajime, was the most popular. Itajime is a Shibori technique where you fold to create negative spaces in the dyed fabric. We learned about vat dyeing and the proper way to develop and handle an indigo dye vat. Then we all had great fun folding papers and fabrics in a variety of innovative ways. We used clamps, wooden blocks, string and rubber bands to hold the folds in place and create interesting patterns. Then we dipped our little bundles into the indigo vat to let the dye take over. After carefully unfolding our dyed items they were hung to dry. Here you can see some of the amazing work created by my talented classmates.
The whole process was magical! It’s little wonder natural dyeing has become so popular. Ironically the age-old practice of using dye derived from plants and animals was phased out in the mid-1800s when synthetic dyes were introduced. Yet, as we see with so many traditional arts and crafts, interest in natural dyeing has surged and it’s back in vogue.
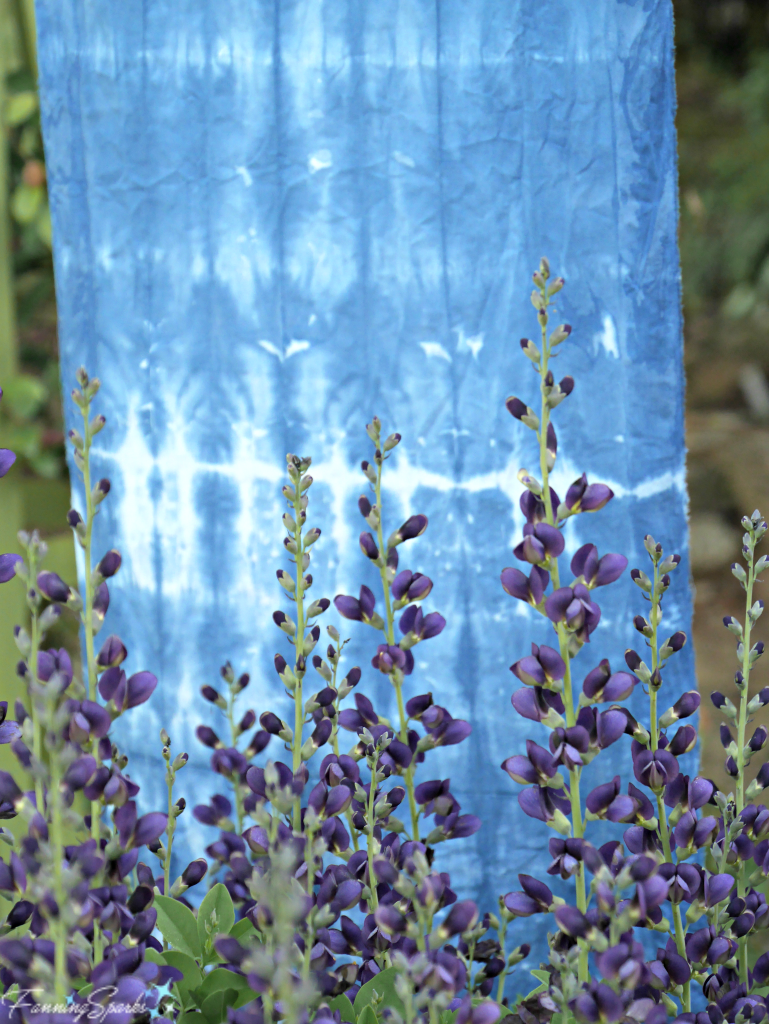
I’ve always loved the beautiful deep purple-blue flowers of the Baptisia australis (aka Blue False Indigo) but I never realized I could use it to dye fabrics and papers naturally. Here are a couple of shots of my itajime projects staged in front of the Baptisia australis when it was in full bloom in my flower garden. Isn’t it cool to see the indigo-dyed paper and fabric with an actual indigo plant?
Warning: Using natural dyes does require an informed and mindful approach. Poisonous plants can easily be mistaken for the intended varieties. Harmful materials can be used incorrectly. Research and safety are critical! It’s also important to be mindful of your sources. In the southern US, for instance, the demand for natural dye making has increased the illegal harvesting of plants from protected areas and is causing environmental concerns due to over-collection. Let’s not contribute to this problem.
More Info
You can learn more about the Heritage Garden at the North Carolina Arboretum on their website under Plan a Visit > Garden Exhibits.
Both of the Natural Dyes workshop instructors, Doug Baulos and Jacob Phillips, are active on Instagram. Be sure to check them out.
Michel Garcia, from Lauris France, is considered to have played a pivotal role in building an understanding of natural dye history and teaching sustainable adaptations for current practice. He established Le Jardin Conservatoire des Plantes Tinctoriales (Botanical Garden of Dye Plants) as a horticultural resource for chemists, natural dye researchers, and botanists.
A School for Makers? There actually is such a place and I’ve wanted to attend it for some time. But it’s not the kind of school where you carefully load your backpack with new pencils and notebooks for the first day of school. It’s not the kind of school where you attend a series of classes to listen to teachers lecture about math, languages and sciences. It’s not the kind of school where you take copious notes and study into the wee hours before the next big test. The School of Making™ by Alabama Chanin is an experience where you learn by doing, surrounded by like-minded makers and tons of living examples. You learn new techniques, you try things, you get the hang of it … and you M.A.K.E! At this school, you learn how to make garments in the style of the award-winning Alabama Chanin brand. The garments are comfortable and flowing and beautifully embellished by hand.
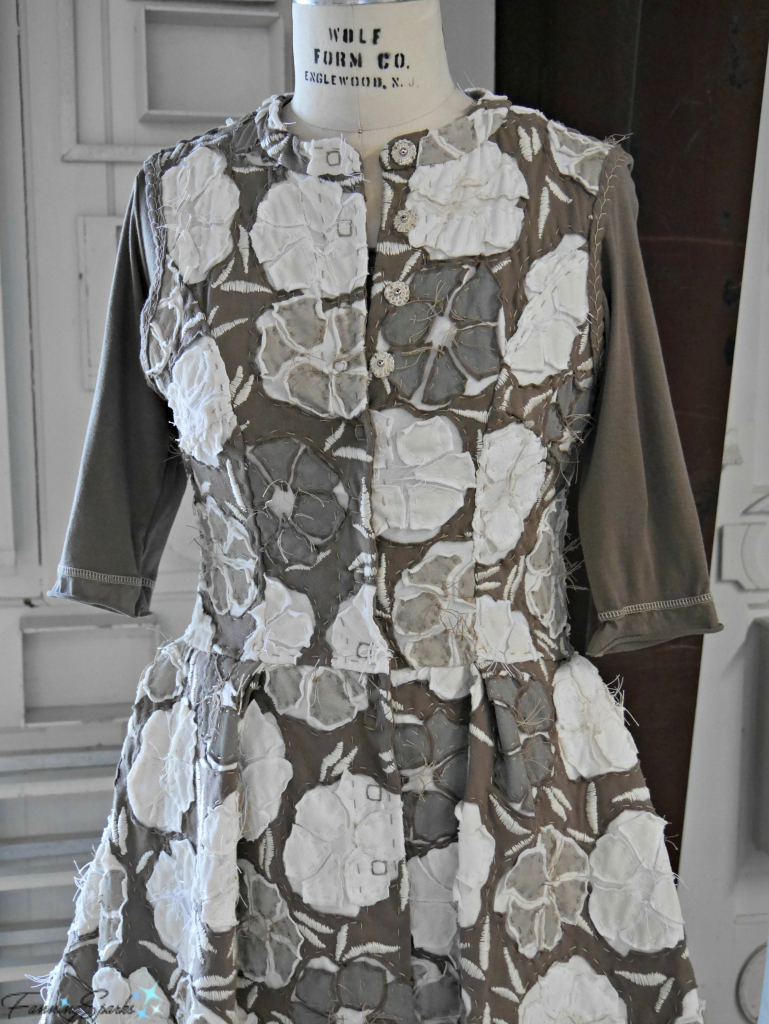
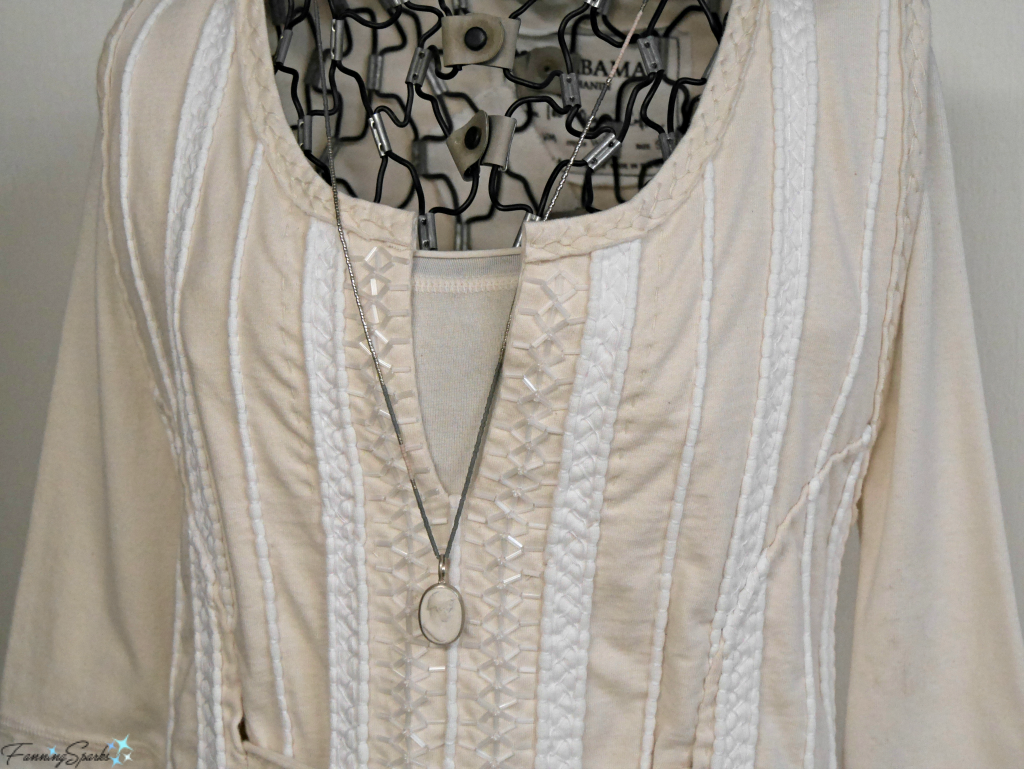
Here’s a peek into the Alabama Chanin Factory Store in Florence Alabama.
This gorgeousness is the Alabama Chanin Dogwood Tunic.
Equally lovely is the Alabama Chanin Georgia Smock.
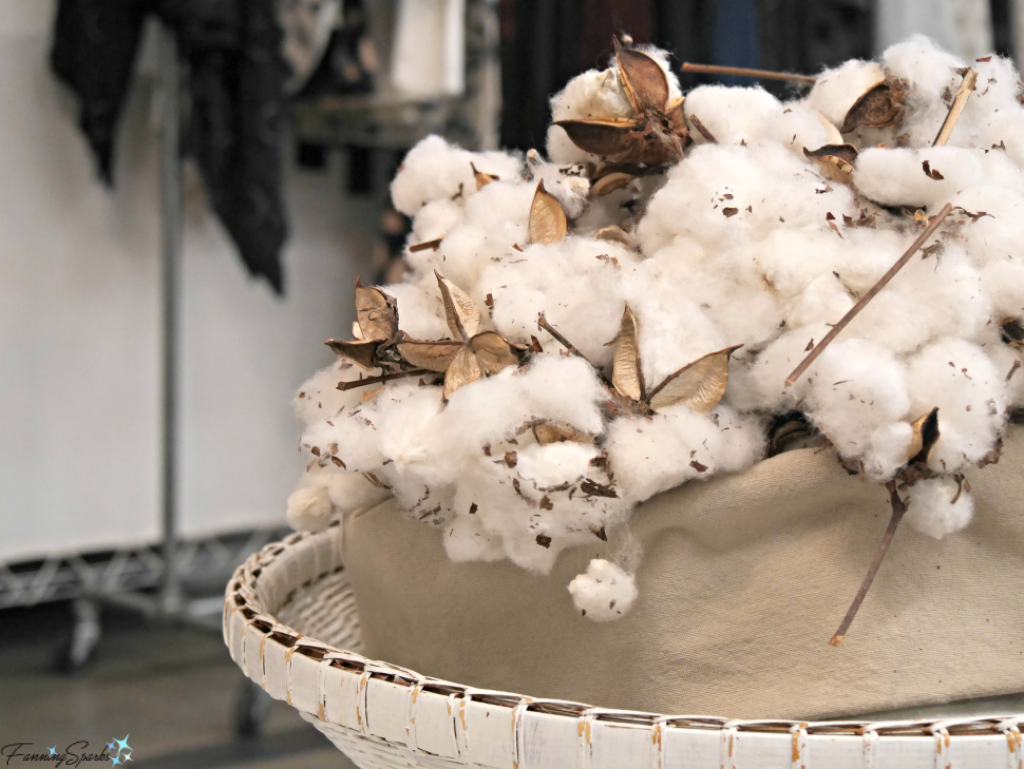
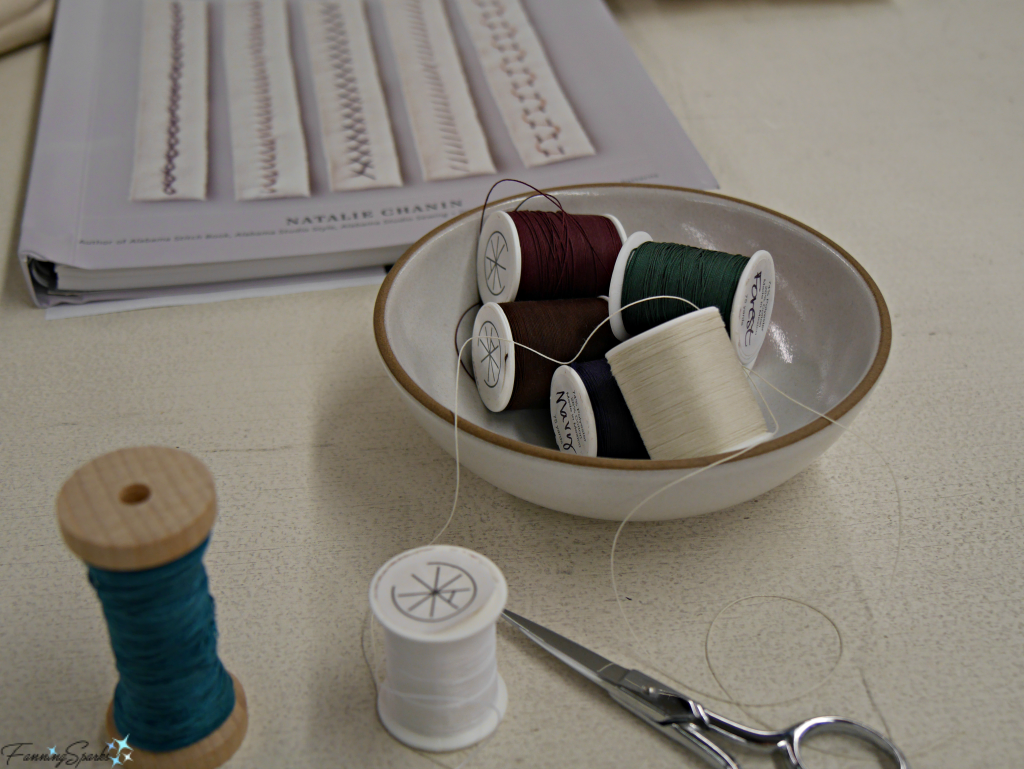
The story of how The School of Making came into being is fascinating and surprising. Natalie Chanin is the talented designer behind the Alabama Chanin brand of fashion and home goods. They are known for working in 100% organic cotton jersey fabric.
You may wonder why someone who makes her livelihood from designing, producing and selling beautiful garments would readily teach others how to make those same garments. Isn’t the fashion industry about keeping secrets and preventing others from copying your ideas? Aren’t “knock offs” a bad thing? Apparently not at Alabama Chanin! In fact, their mission clearly states their devotion to openly share and educate others.
I had the pleasure of hearing Natalie answer these questions in person. She readily admits her pieces are expensive and that not everyone can afford them. But early on when someone accused Alabama Chanin of being an elitist company because of it, she resolved to show others how her garments were made. That’s when she wrote the Alabama Stitch Book. Others warned she was putting the nail in her own coffin by giving away her designs and techniques. But reactions to the book were the opposite; people said “this is kind of hard… now we see why it’s worth so much”.
So Natalie’s gutsy move paid off! I am thrilled that it turned out in her favor… and in ours! An entire community of makers eagerly embraced her designs and techniques. Over time, this evolved into The School of Making where Alabama Chanin fosters creativity and Natalie gives serious thought to cultural sustainability through keeping traditional crafts alive.
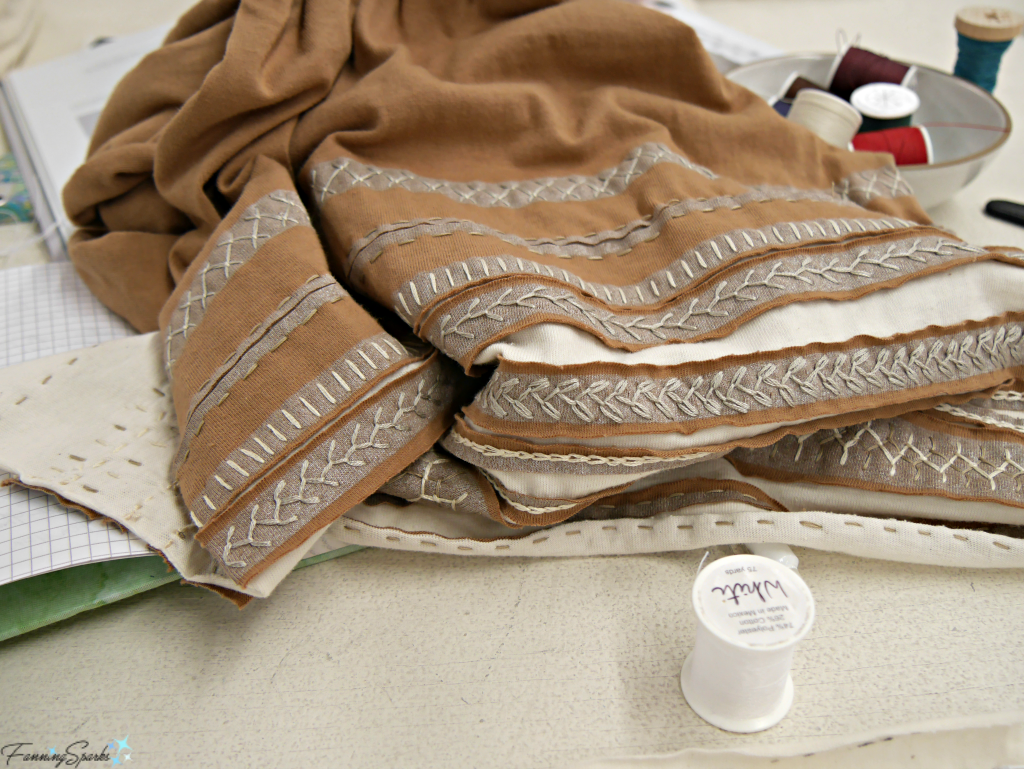
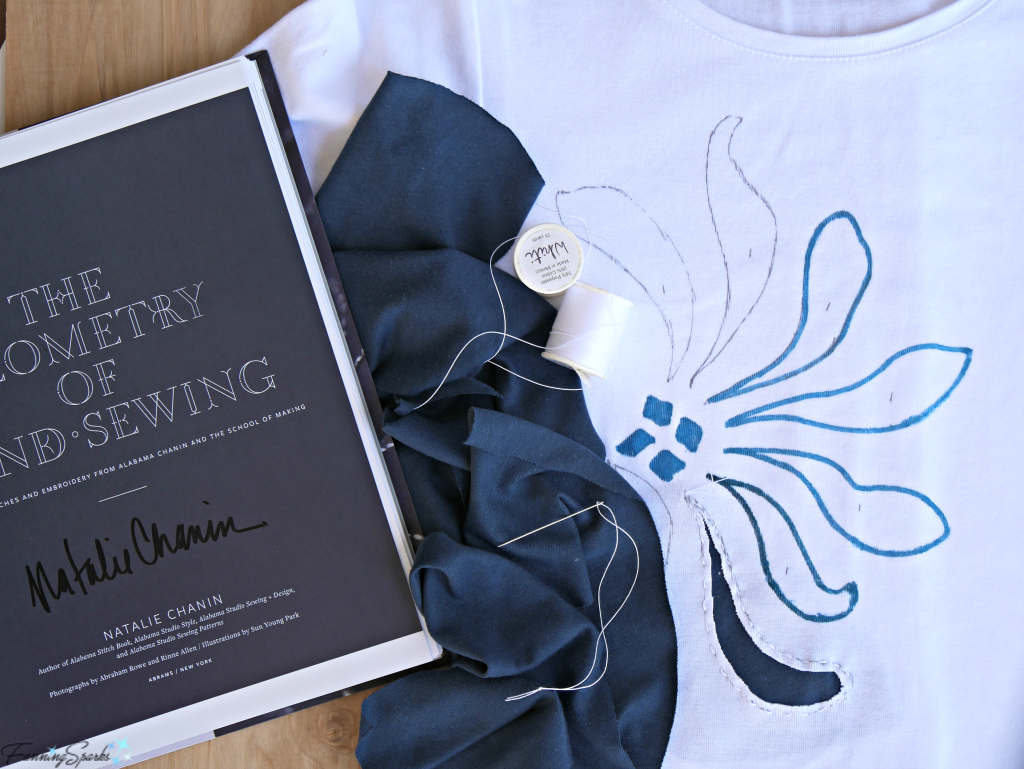
So what did I learn in school? The session I attended was a compressed workshop so we only had time to learn the basics and start a Tshirt project. Here’s a peek at my “school desk”.
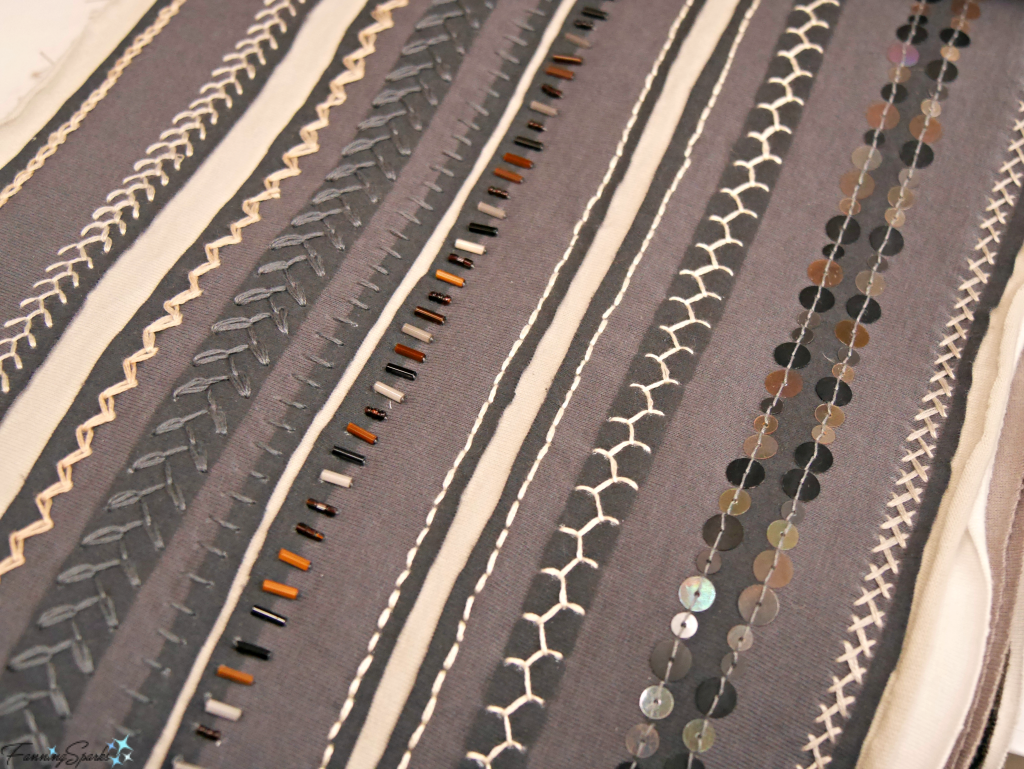
We were able to examine spectacular samples and stitch books.
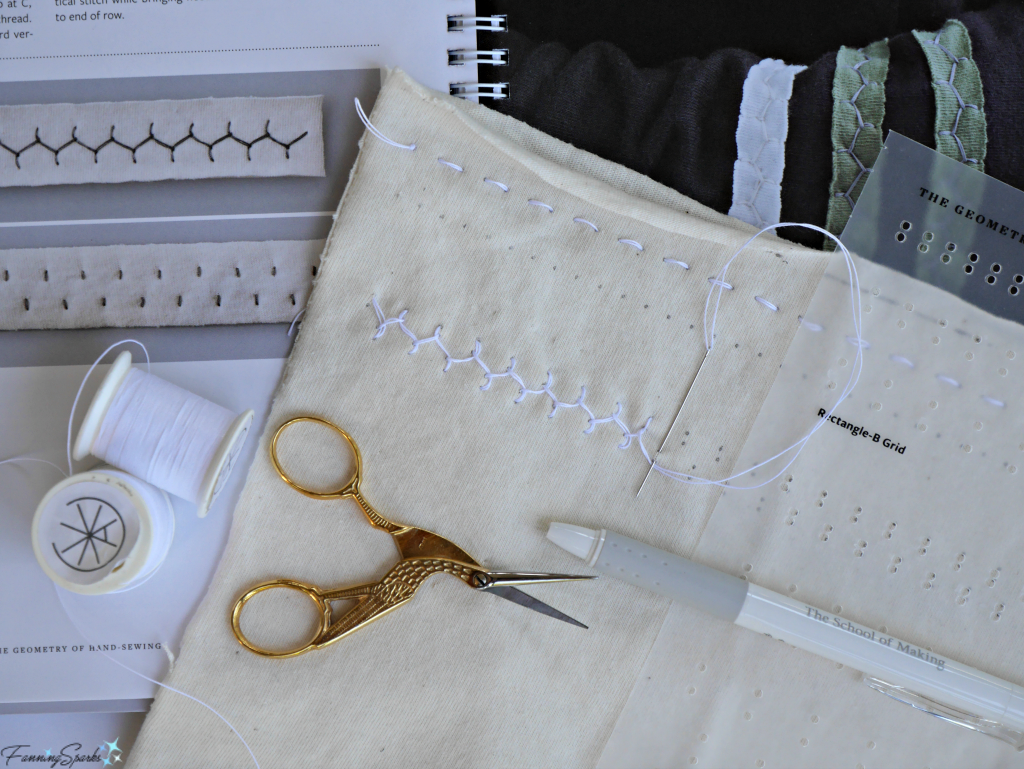
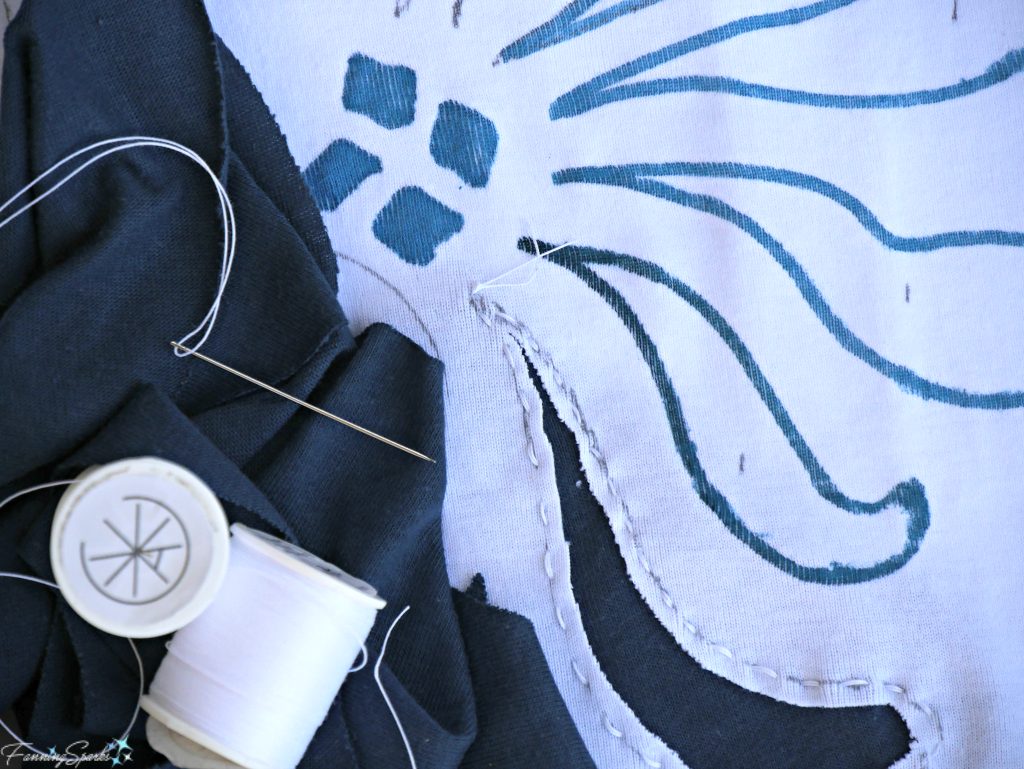
Here’s my attempt at the Cretan stitch leveraging the ingenious template from The Geometry of Hand-Sewing. You may recall me mentioning this book in my post called This Stitch is Off and Running. The stitching templates are made of firm plastic which you can easily tear out of the book. You simply lay the template on your fabric and use a FriXion marking pen to mark dots on your fabric. After you’ve finished making your perfectly spaced stitches, you use the heat of an iron to make the dots disappear. Genius! See More Info section below for a link to the book.
This is the Tshirt I started. We used stencils and markers to add the design. Then used reverse applique with fabric scraps to embellish it. As you can see, my Tshirt has a long way to go!
Thankfully, I have The School of Making Stitchalong Facebook group to keep me motivated. It’s an online support group of over 1000 classmates and like-minded makers. Folks share their projects, celebrate accomplishments and seek advice. I imagine this type of interaction being similar to the old-timey quilting bees where members of the community came together to sew and support each other.
Now I’d best get back to that project… I have homework to do!
More Info
You can find lots of information about Alabama Chanin on their website. Be sure to check out the gorgeous Collection and The School of Making. There are several DIY Sewing Kits and other resources to get you started.
Today’s Takeaways
I’d like to leave you with these thoughts; perhaps they’ll spark an idea.
Few award-winning designers are as willing to share as Natalie Chanin so it’s important to show appreciation and support her brand.
A DIY Kit, complete with materials and instructions, is a great way to try a new craft.
Take advantage of online support groups to keep learning and stay motivated.
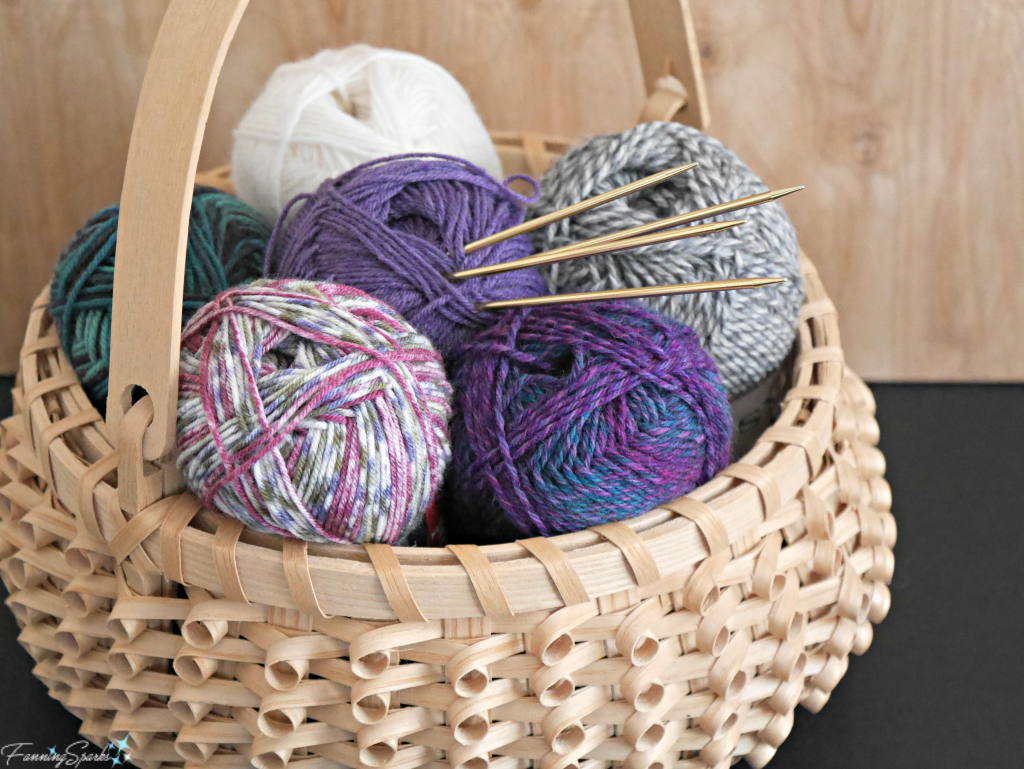
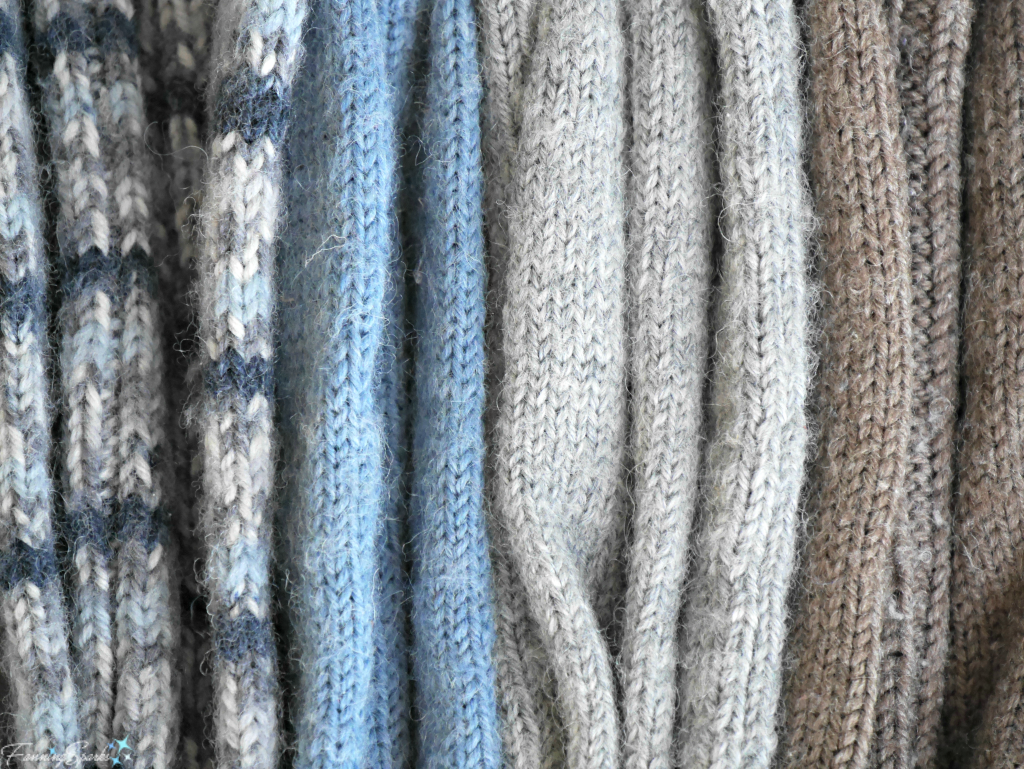
My mother knits. A lot. She’s knit lots of different articles and patterns throughout her knitting “career” but these days she specializes in socks. Socks are straightforward and practical just like she is. She can knit a pair of socks like nobody’s business. It’s marvelous to watch… just stay clear of those knitting needles because they’re flying!
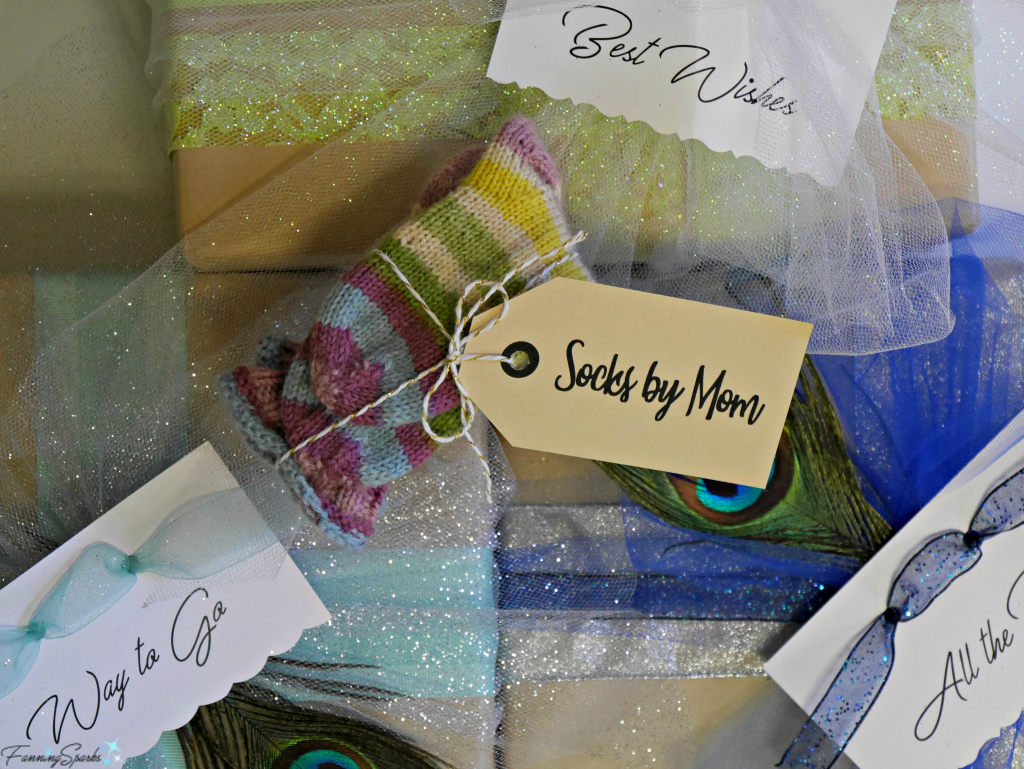
My mother gives socks. A lot. She gives socks to celebrate a birthday, she gives socks to say thank you, she gives socks to welcome you to the family. Those lucky enough to receive “Oma Socks”, as they’re affectionately called in our family, know that every stitch was made with care and love.
My mother has gifted so many hand-knit socks over the years that she really can’t keep track of who she’s given them to. Rumor has it, for instance, that my older brother has an entire dresser drawer full of her socks. I have not actually seen it myself so I can’t say one way or the other. But I will say, we never turn down her hand knit socks. They are prized by all.
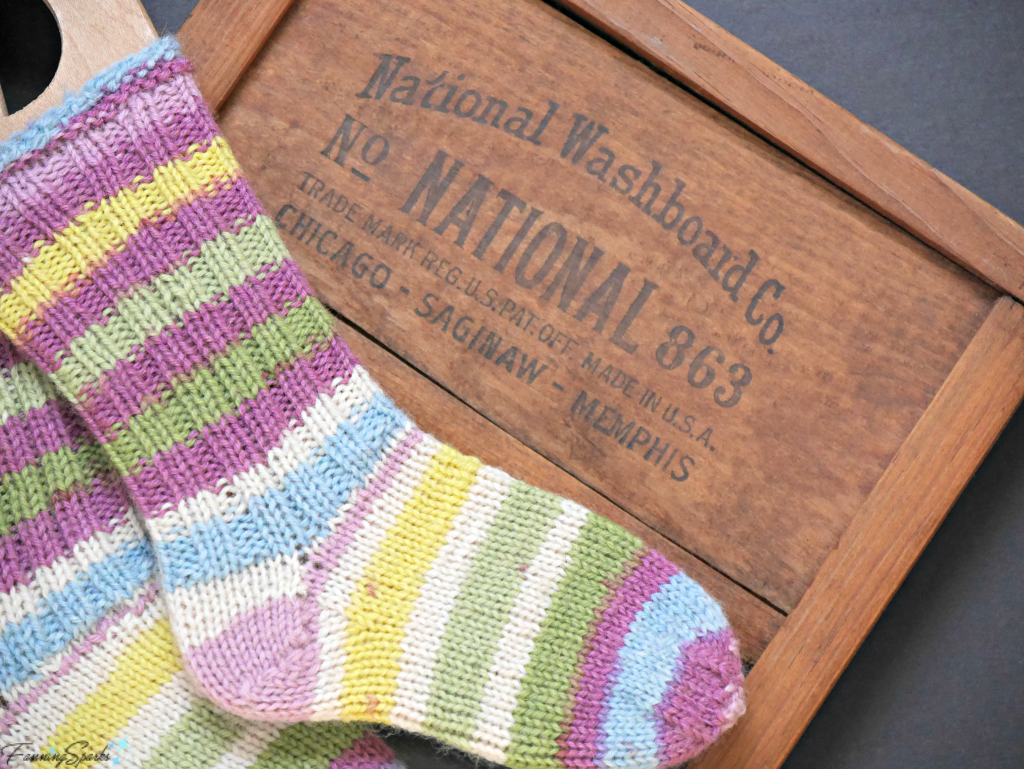
So when I asked my Mom if she’d knit me a pair of socks so I could hang them on the wall, I wasn’t sure how she’d react. After all, socks have a purpose and it’s to keep your feet warm… socks are not meant to decorate your home. But she came through and agreed to knit a pair of socks to my specifications. My plan is to showcase these socks in my laundry area. I bought vintage sock stretchers to display them so the socks had to be a certain size. And I wanted the socks to match the color scheme in my home.
Back in the day, sock stretchers were used to keep woolen socks from shrinking after they were washed. A 1907 ad from the Daily True American states “inserted in the stockings during the washing, they prevent shrinking and, because of the large holes in the stretchers, permit of rapid drying”. But as new and improved yarns were introduced, sock stretchers were no longer needed. A 1949 ad from DuPont states “DuPont nylon will keep their shape, looks, and smartness for a long, long time. Throw away your sock stretchers too because under normal washing conditions these new Bear Brand honeys won’t shrink, won’t stretch, they’ll always fit.”
I think claiming socks will keep their “smartness” is hilarious. Shape and looks, yes. But smartness? So back to the socks my Mom knit for me. I don’t know about their smartness but I think they’re perfect. I can’t wait to get them on display.
Today’s Takeaways
Perhaps these thoughts will spark an idea:
Displaying handmade items, especially if they’re made by someone special, adds depth and meaning to your home.
Try using everyday household items in unexpected ways.
Thoughtfully placed vintage items can bring fun and interest into your home decor.
Re-imagining the lowly running stitch in new ways.
One of my favorite things about “making” is the challenge of studying a traditional art or craft and coming up with ways to do it differently. Could I change the technique? What would happen if I switched one of the traditional materials? Or used an entirely different set of materials? How would this look if it were a different scale (eg bigger, smaller, wider, narrower)? The possibilities are endless. The running stitch (also called the straight stitch) is a great case in point.
The below photo shows an example of the lowly running stitch (stitches in green). If you’ve had a chance to read my About page, you might recognize this as the embroidery sampler I made as a child. The running stitch is the simplest sewing stitch… merely a line of over and under stitches. Just the fact that it is included in this child’s sampler, puts the running stitch in the realm of the “basics”. This stitch is, admittedly, a little lackluster… there’s nothing fancy about a running stitch. Or so it seems.
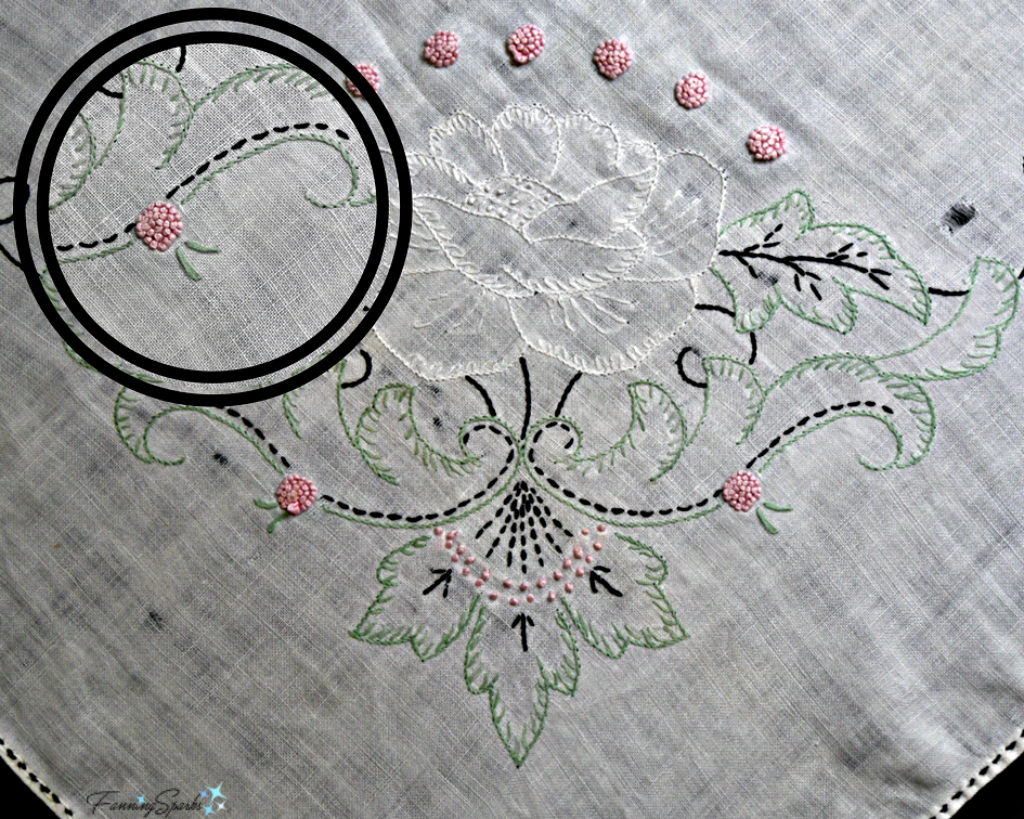
The running stitch is traditionally used to embroider or embellish fabric. Below is a great example of the running stitch used in the traditional way. This vintage tablecloth is embroidered with a lovely design. The materials are embroidery floss on a plain cotton fabric. Notice how the simple running stitch (in black) sets off the more elaborate stitches in the floral design.
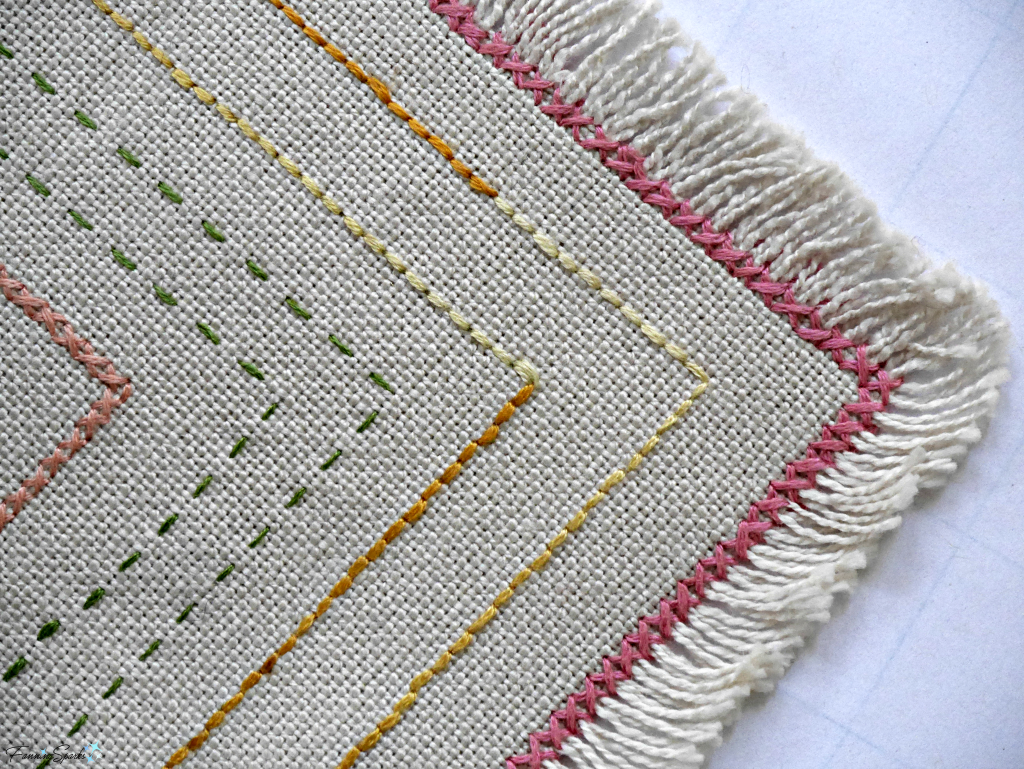
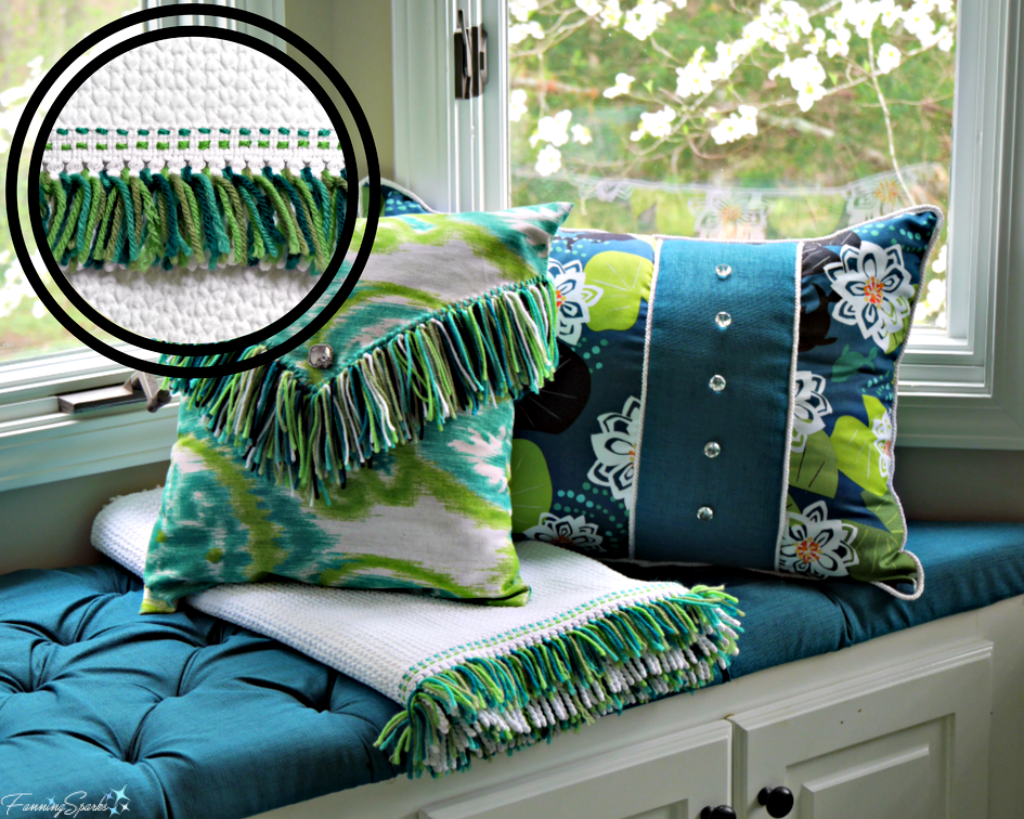
In this next example, I used a series of running stitches to jazz up a cotton blanket. The materials have been altered from the traditional embroidery floss and cotton fabric to yarn and a textured cotton blanket. I used 2 colors of yarn to match the colors in my bedroom décor. Then I simply stitched along the edge of the blanket. Lucky for me, there is a row of trim along that edge which has a very obvious grain line. It was easy to create a neat, uniform row of stitches. I finished it off by adding some colored yarns to the fringe.
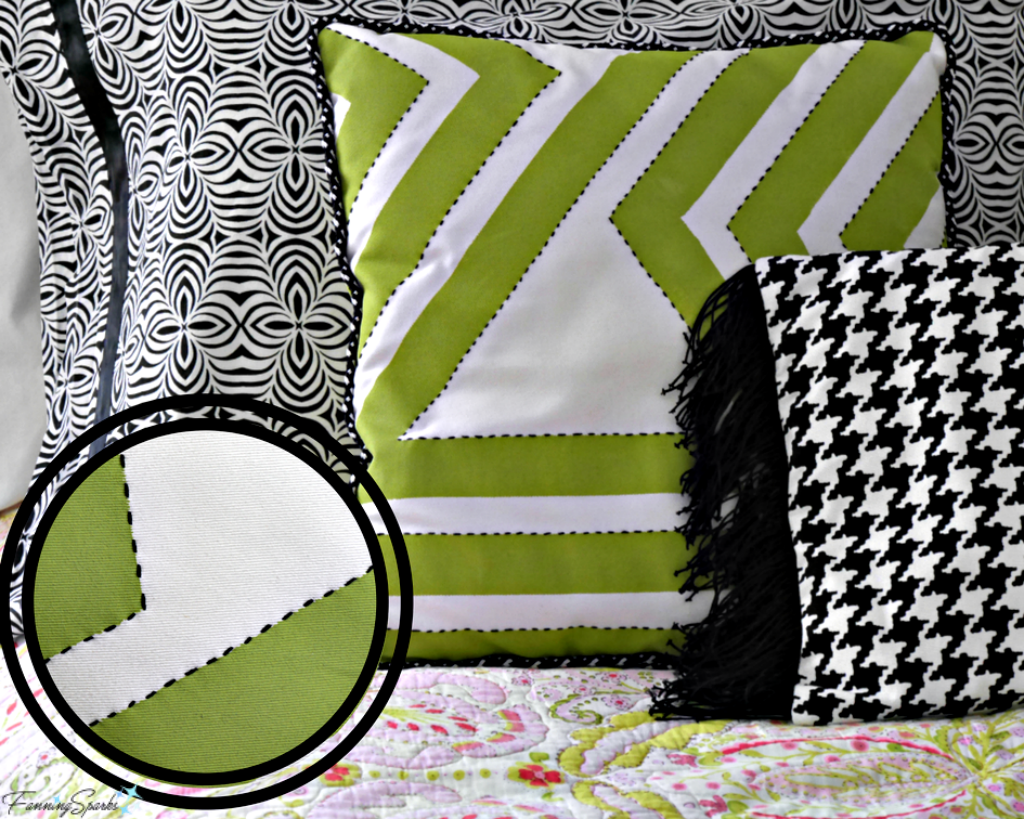
Here’s yet another example of the running stitch in a slightly different application. The below pillow was painted and then highlighted with a running stitch. I created the design and used painters tape to mark the design on the fabric. Then I mixed textile medium into paint and applied the design to the pillow cover. I used black embroidery floss to sew a simple running stitch along some of the painted stripe edges. I think this delicate black running stitch adds interest and provides the perfect finishing touch. As you can see in this example, the traditional methods and materials have been altered by incorporating painted fabric.
Here’s another example I’d like to share. It is, in fact, a work in progress so I can’t yet show the final product. I’ve been playing with “stitched paper” whereby you stitch paper, or in my case photos, with thread. This is a more obvious alteration of the traditional materials… instead of stitching on cotton fabric, I am stitching on paper. Once again, the lowly running stitch is used in a fresh and non-traditional way.
The running stitch is also integral to an embroidery technique called reverse applique. Here’s an example of reverse applique that I made to showcase the FanningSparks color scheme. In this example, the running stitch plays a supporting role. It is used to sew the different fabrics together but it is the layering and cutting of the fabrics which bring the design to life.
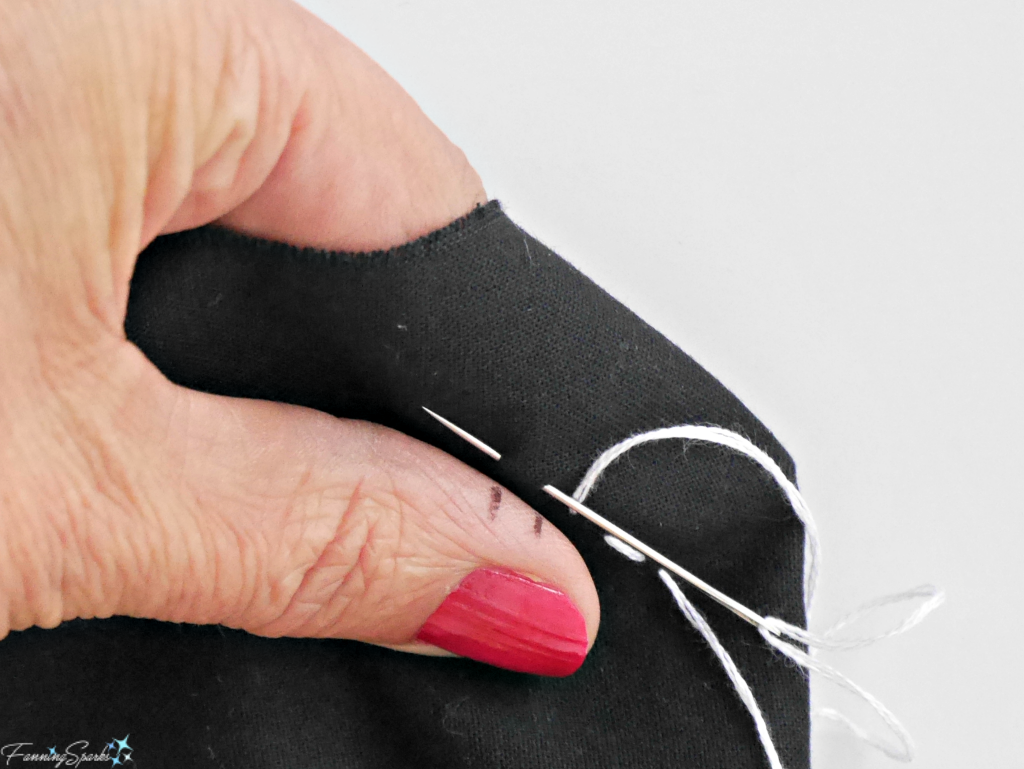
You may have noticed that the running stitch is typically very uniform. Sometimes, you can rely on the actual fabric grain to guide you like I did with the blanket above. Other times you have to monitor the stitch length yourself. Here’s a great trick I learned for keeping your stitches nice and even. You simply mark your thumb or finger with the stitch length using a ball point pen. You’ll want to play around with this a little to determine the best place to make your marks. I found marking my thumb was the best because that’s where I hold the fabric as I bring the needle in and out of the fabric.
More Info
I recently learned about a great book called “The Geometry of Hand-Sewing”. It is written by Natalie Chanin, the award-winning designer behind Alabama Chanin. This book includes detailed instructions for 100+ stitches with lots of diagrams and photos. But the best part is the pull-out templates or stitching cards. You simply use a FriXion marking pen to mark dots on your fabric so you can make perfectly spaced stitches. The pen marks disappear with the heat of an iron. Genius!
Today’s Takeaways
Here are a few thoughts that may spark an idea:
Vintage textiles provide great insight on traditional needlework arts.
Re-imagine traditional needlework art by altering the various aspects of the materials, techniques, scale, application and design.
Take time to experiment and just see what happens.
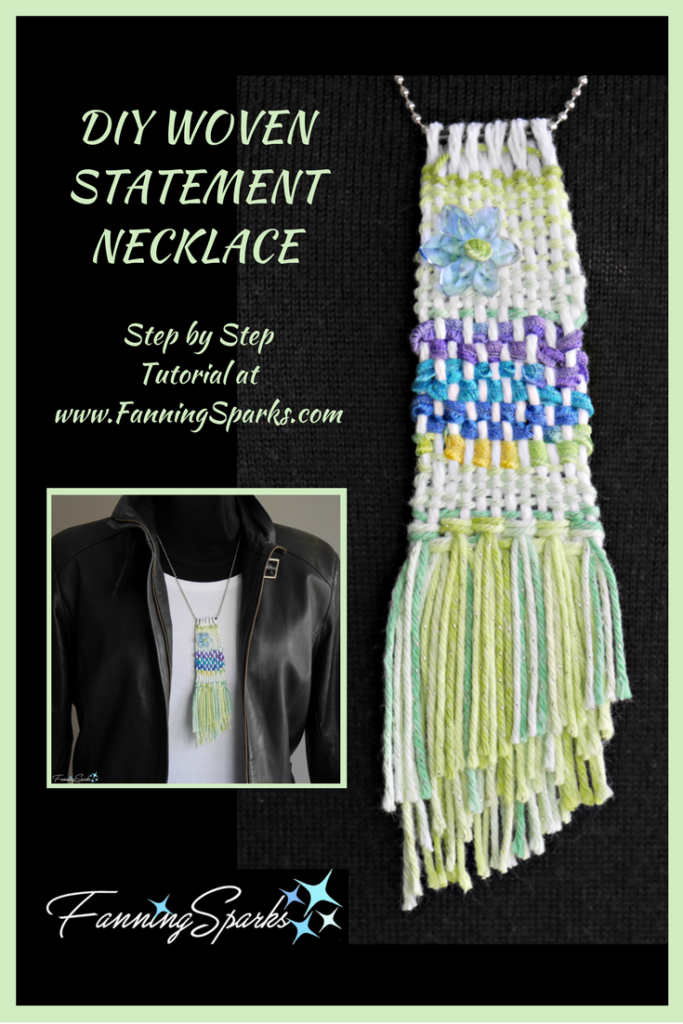
I’m excited to share my first step-by-step tutorial today. We’re going to make a DIY Woven Statement Necklace. I consider it to be an ideal DIY project. It’s fairly easy, it’s inexpensive, no special tools are needed, and it’s fast. But the best thing about this project is its versatility. Obviously, you can change the colors and embellishment. You can also change the size; make it longer, shorter, wider or narrower. You can change the mix and amount of plain weaving and fringe. So you can put your own personal spin on it and make your own one-of-a-kind work of art!
I’ve created a Pinterest board section of woven statement necklaces. Be sure to check it out for inspiration. You may also choose to visit a fiber shop for some tactile inspiration… there’s nothing like appreciating beautiful yarns in person. See the More Info section towards the bottom of this post for a tip on finding great fiber shops near you.
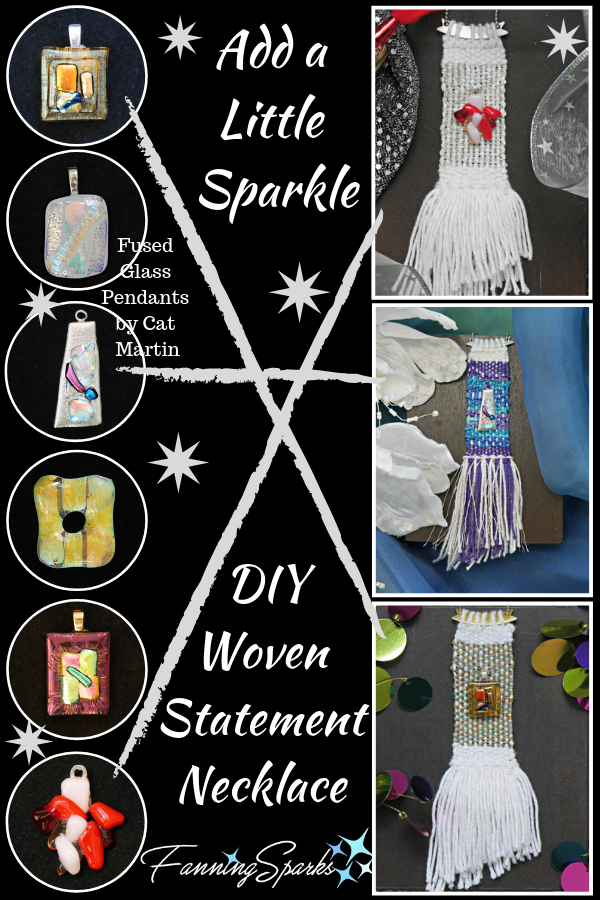
Dec 18 2018 Update: Inspired by fused glass pendants made by Cat Martin, I decided to Add a Little Sparkle for a holiday version of this DIY Woven Statement Necklace. Check out the post to see instructions for this and two more variations.
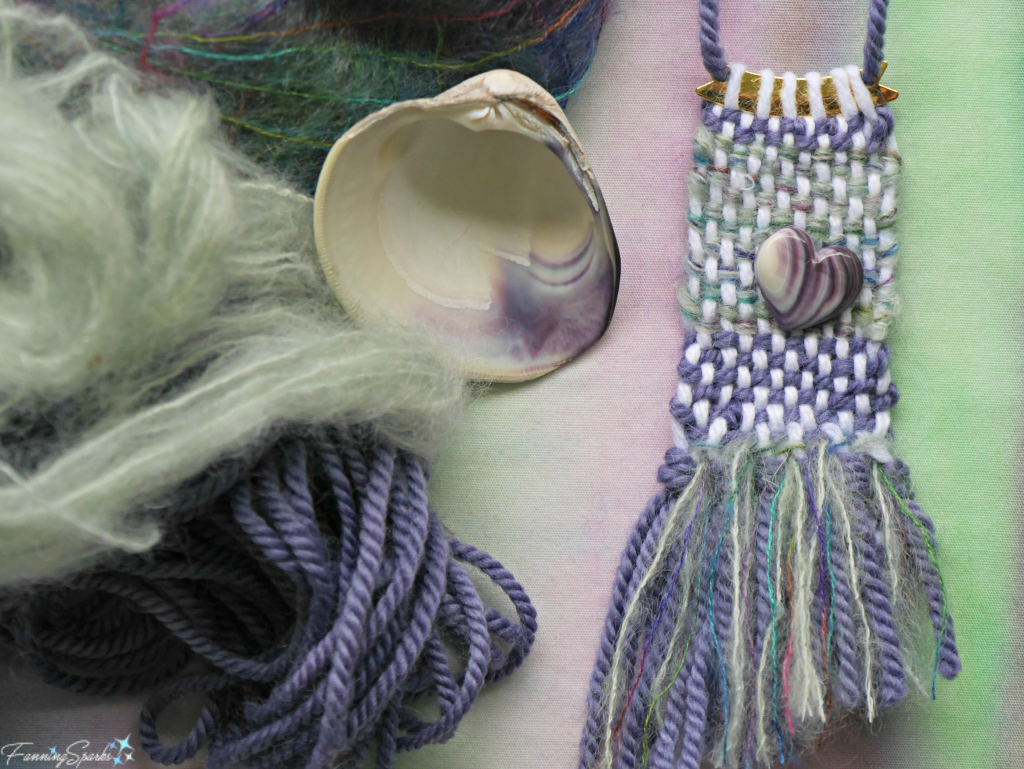
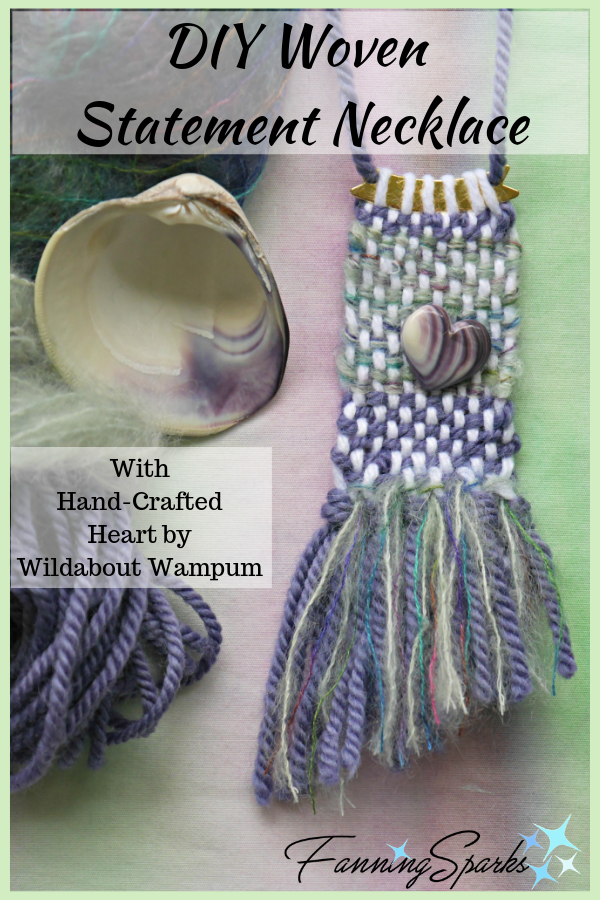
Sept 18 2018 Update: After visiting the Wildabout Wampum studio and boutique in Cocagne, New Brunswick, Canada, I created a second version of this DIY Woven Statement Necklace featuring a hand-crafted quahog shell heart pendant. I did make a few refinements in this version as noted at the end of this post. See my post Artisan Transforms Quahog Shells for the full story.
I hope inspiration has struck and you’re ready to get started. First, we’ll build a small loom. Second, we’ll use that loom to weave the statement necklace. Please feel free to post any questions or clarifications in the comments at the end of this post.
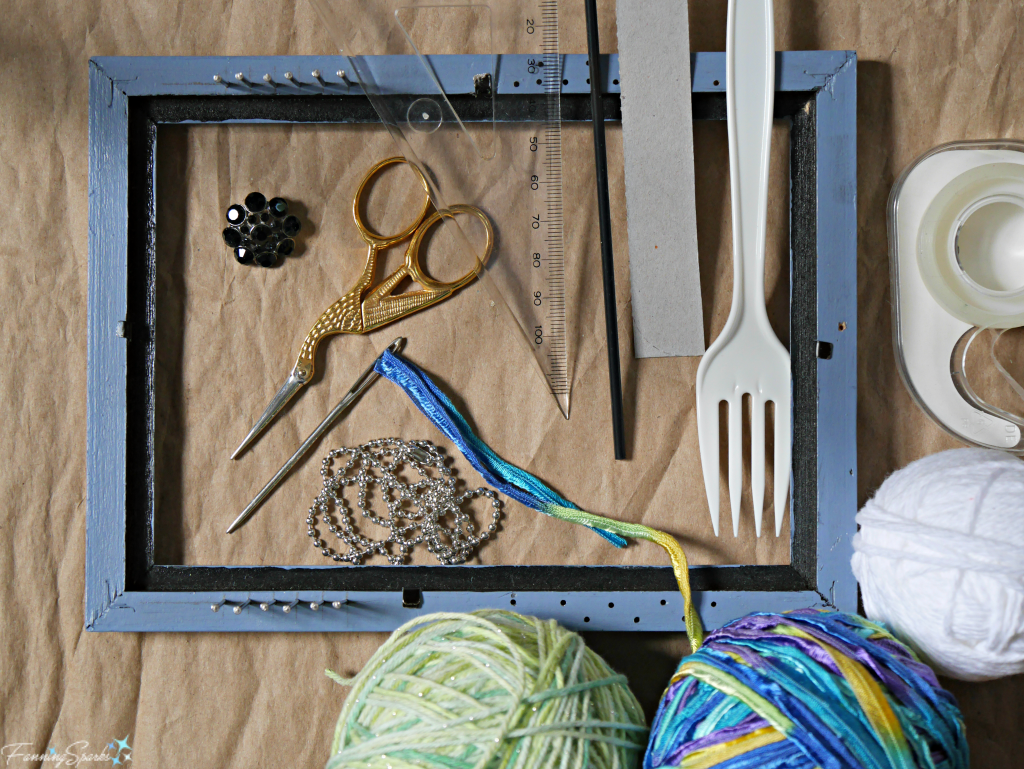
Supplies and tools
Loom – 6″ x 8″ wooden frame, 12 x 1” finish nails, ruler, pencil and hammer (alternatively you could use a 4″ x 6″ frame)
Yarn – 3 kinds of yarn (details below)
Cardboard header – Cut strip of thin cardboard (from manila folder or mailing envelope) 3” long by ¾” wide.
Tapestry needle
Plastic fork
Tape
Cocktail straw
Plastic triangle with 45⁰ angle (or similar template in paper or cardboard)
Scissors
Ball link chain in silver color – 24” (alternatively you could use a link chain or cord)
Embellishment (suggestions at step 25)
Supplies and tools needed.
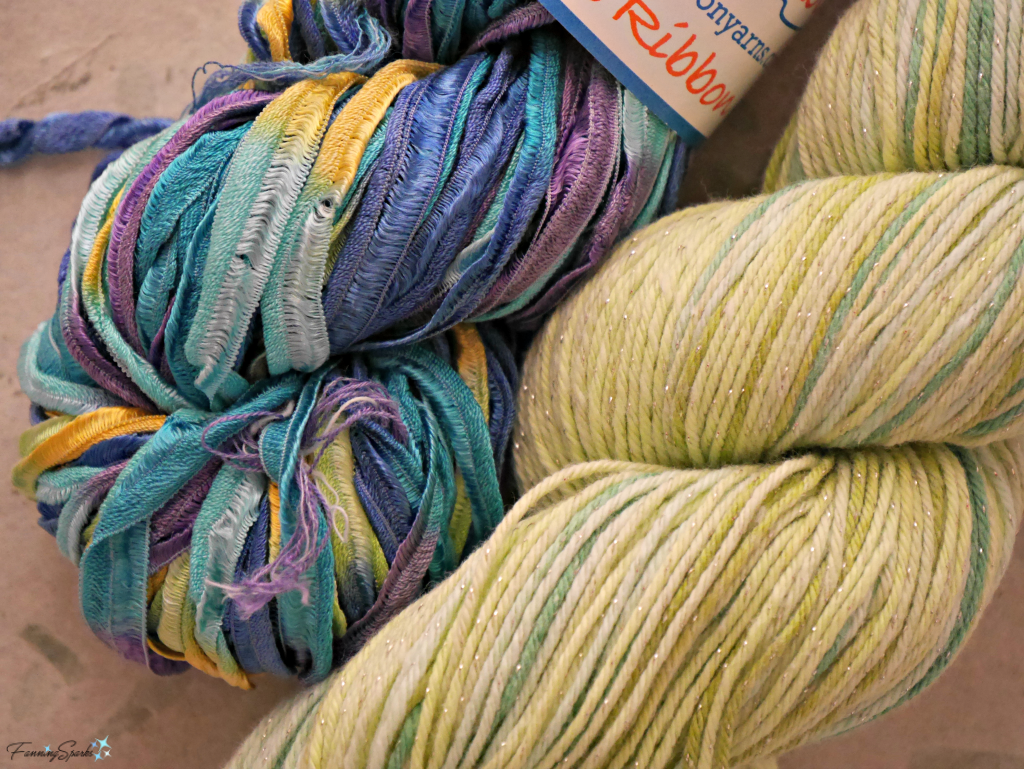
If you had a chance to read my post about A Visit to Clara’s Loom, you may recognize this yarn. I purchased it during my visit with this project in mind.
Yarns purchased at Clara’s Loom.
We’ll use 3 types of yarn:
Cotton yarn to be used for the warp (vertical) threads. I used Lily Sugar’n Cream 100% cotton yarn in white.
Primary yarn to be used for most of the weaving and the fringe. I used Cascade Yarns Sunseeker Multi in a variegated green (Color 121).
Decorative yarn to be used for accent weaving. I used Mango Moon silk ribbon variegated ribbon yarn in shades of blue, purple, green and yellow (color 4304 Saturn).
Build the loom
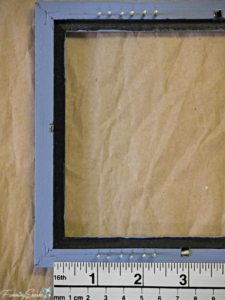
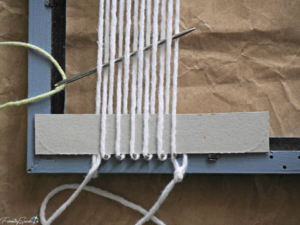
Step 1. We’ll use the frame horizontally so our warp threads will be 6” long. On the 8” edge of the frame, measure and mark a line 1/8” from the inside edge of the frame. Then along this line, mark 1” in from the left inside edge of the frame and mark every 1/4 “ for 6 nails. Repeat on the opposite 8” edge.
Step 2. Tap in 1” finish nails at each mark. Note we’re only using a portion of the frame; we will not be weaving across the entire width.
Nails set into frame to create loom.
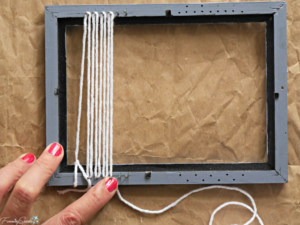
Warp the loom
For clarity, let’s orient ourselves to the frame so we’re on the same page. You’ll want to place it as shown with one of the long 8” edges with the nails directly in front of you. The instructions will refer to this as the BOTTOM of the frame. The opposite 8” side with nails will, of course, be the TOP of the frame. LEFT and RIGHT are obviously the two short 6” edges. The warp thread will run from the BOTTOM to the TOP. We will weave from the BOTTOM of the loom to the TOP and from LEFT to RIGHT.
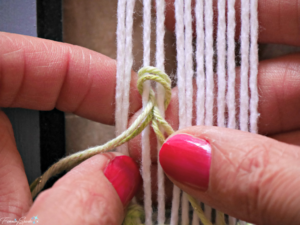
Step 3. Warp the loom using the cotton yarn. Begin at BOTTOM LEFT of the loom. Cut a piece of cotton yarn about 80” long. Tie one end of the cotton yarn around the frame and make a firm knot. Alternatively, you could tie it to the first nail. Run cotton yarn from BOTTOM to TOP and over the first nail on the TOP LEFT. Bring the cotton yarn back down to BOTTOM, down and around first BOTTOM LEFT nail, and back up to the next TOP nail. Use your fingers to keep tension firm; you want some ease without being too loose and you want some firmness without being too tight.
Warping the loom with cotton yarn.
Step 4. Continue until all nails have been wrapped. Knot yarn at BOTTOM RIGHT of loom. Or alternatively, tie the end to the last nail.
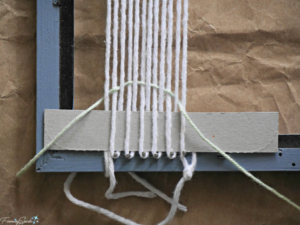
Step 5. Take the piece of cardboard and weave it through the warp threads alternating over and under. Slide the cardboard down to BOTTOM of the loom so it is snug. This cardboard header will help keep your yarn tight and will give us some room to maneuver later.
Create plain weave heading
Step 6. Use the primary yarn. Cut about 30” and thread into tapestry needle. Start at the BOTTOM LEFT of the frame. Work the first row from LEFT to RIGHT. Leave about a 3” tail on the LEFT. Weave the primary yarn through the warp threads by going over and under. Be sure to work in the opposite path to the cardboard header meaning where the cardboard is over, your primary yarn should be under and so on.
Cardboard header in place. Using the tapestry needle to weave the yarn.
Step 7. Pull yarn through leaving it loose and shaped into an arch.
First row of plain weaving arced.
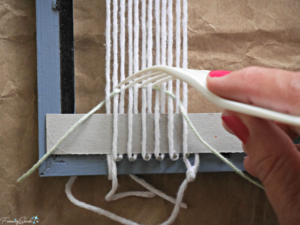
Step 8. Use the plastic fork to gently slide the yarn snug against the cardboard. It’s important to leave this arc of slackness and then use the fork to remove that slack. This helps you keep the sides straight and square. If you skip the arcing step and merely pull the yarn across, the tension will likely be off and the sides will pull into a V shape.
Using plastic fork to settle yarn into place.
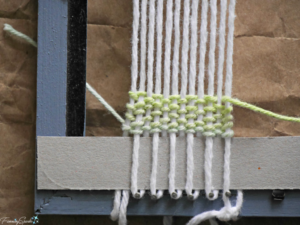
Step 9. Weave a second row working from RIGHT to LEFT and alternating the over and under path with the previous row. Repeat this same process for a total of 9 rows. Trim yarn leaving about a 3” tail. Just tuck your tails to the back and keep them clear of your weaving; we will clean them up later.
Heading of plain weaving completed.
Create fringe
Step 10. Create 3 rows of fringe with rya knots. Cut 34 x 20” lengths of primary yarn. Each rya knot is made around two warp threads. We’ll work LEFT to RIGHT and make 3 rows of fringe. Double up one length of the fringe yarn by folding it in half. Find the center of the doubled yarn (should be around 5”) and hold it over the first two warp threads at the LEFT. Pull the LEFT yarn to the back around under the first warp thread, moving from the outside to the inside. Then pull it up through between the 2 warp threads to the front. Do the same with the RIGHT yarn.
Tying the rya knot for the fringe.
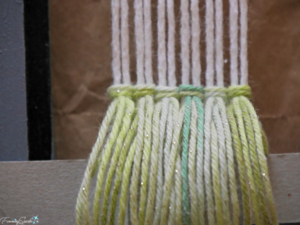
Step 11. Pull the fringe yarn tight by sliding the rya knot up towards the TOP. Then slide the rya knot down snug to the previous row of weaving. Continue across the row working with 2 warp threads at a time. You will have 6 rya knots. Don’t worry if the ends of your fringe aren’t even, we will trim it at a later step.
Rya knots form first row of fringe.
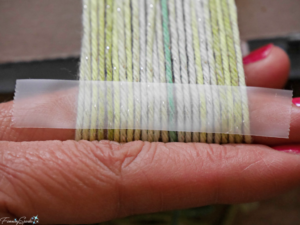
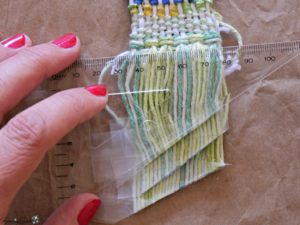
Step 12. I found it helpful to tape the fringe at this point. This keeps the yarns orderly for later trimming. Simply smooth out the fringe one strand at a time, laying it flat over your finger, pull and place all the yarns so they are flat and straight. Put a piece of tape across to hold them in place. Flip over the yarns and add a matching piece of tape on the backside.
Taping the fringe for easier trimming later.
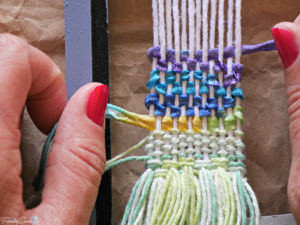
Step 13. For the second row of fringe, work from LEFT to RIGHT again beginning with the second warp thread from the LEFT. You need to skip that first warp thread to offset the rya knots between rows. You will have 5 rya knots in the second row. Complete the third, final row of rya knots in exactly the same way as you did the first row of fringe.
Weave section of plain weaving
Step 14. Cut about 20” of primary yarn. Weave 6 rows of plain weaving following the same procedure you did in steps 6 to 9.
Second section of plain weaving.
Weave section of decorative yarn
Step 15. Cut about 25” of decorative yarn. Weave 7 rows of plain weaving with the decorative yarn following the same procedure you did in steps 6 to 9. Take care to keep the ribbon yarn flat and neat as you weave.
Plain weaving with decorative yarn.
Weave final section of plain weaving
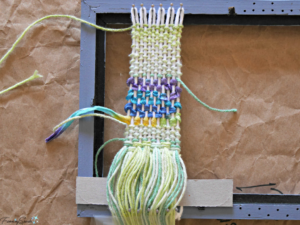
Step 16. This is the final section of weaving. Cut about 40” of primary yarn. Use the primary yarn to weave 17 rows of plain weaving following the same procedure you did in steps 6 to 9.
All weaving completed!
TIP: Keep an eye on your weaving to ensure your rows are alternating correctly. If you discover a mistake, simply pull out the mistake and redo.
Ooops, missed a thread.
Remove weaving from loom
Step 17. Flip all fringe yarns up so the BOTTOM of the loom is accessible.
Prepare to remove weaving from loom.
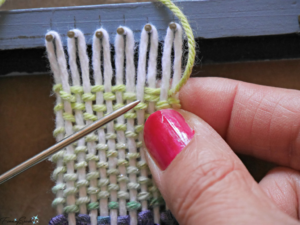
Step 18. Slide out the cardboard header. Working one BOTTOM loop at a time, cut the loop at the nail and tie the two ends together snugly against weaving. Alternatively, you could tie a knot in the loop without cutting it.
Tying off bottom loops.
Step 19. After you’ve removed and tied all 6 loops, untie the original beginning and ending warp thread knots. Trim to about 3”. Use the tapestry needle to weave these tails into the back of the weaving.
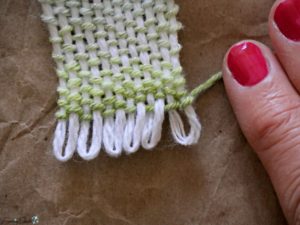
Step 20. Slip the TOP loops off the nails taking care to keep the loose tail at the top under control. As an optional step, you may choose to tie knots in these loops at this point.
Top loops removed from loom.
Step 21. Sew all loose tails into the back of the weaving using the tapestry needle. Simply merge the tails into your weaving taking care to keep them hidden from the front.
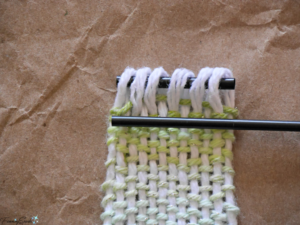
Step 22. Cut a piece of cocktail straw about 1” long. Weave it through the TOP loops. You may wish to make a couple of snips in the ends of the straw. These will help keep the straw from sliding on the ball chain.
Cut cocktail straw to serve as carrier.
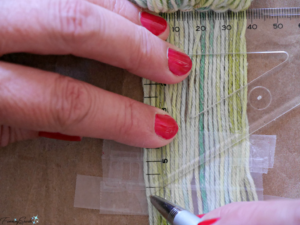
Trim fringe
Step 23. Next we will trim the fringe. Work with one row of fringe at a time; starting with the first, bottom row of fringe. Use the 45⁰ angle on the plastic triangle to guide your cuts. You may wish to add some tape so you can actually mark the cutting line with a pen. The first bottom row of fringe will be about 2.5” inches long at its longest point on the left edge.
Marking fringe for a clean angled cut.
Step 24. Cut fringe with scissors. Repeat this procedure for the second, middle row of fringe. Marking and cutting it about 1/2” shorter than the first row. Do the same for the third, top row of fringe. Remove all tape.
Fringe rows trimmed at angle.
Finishing Touches
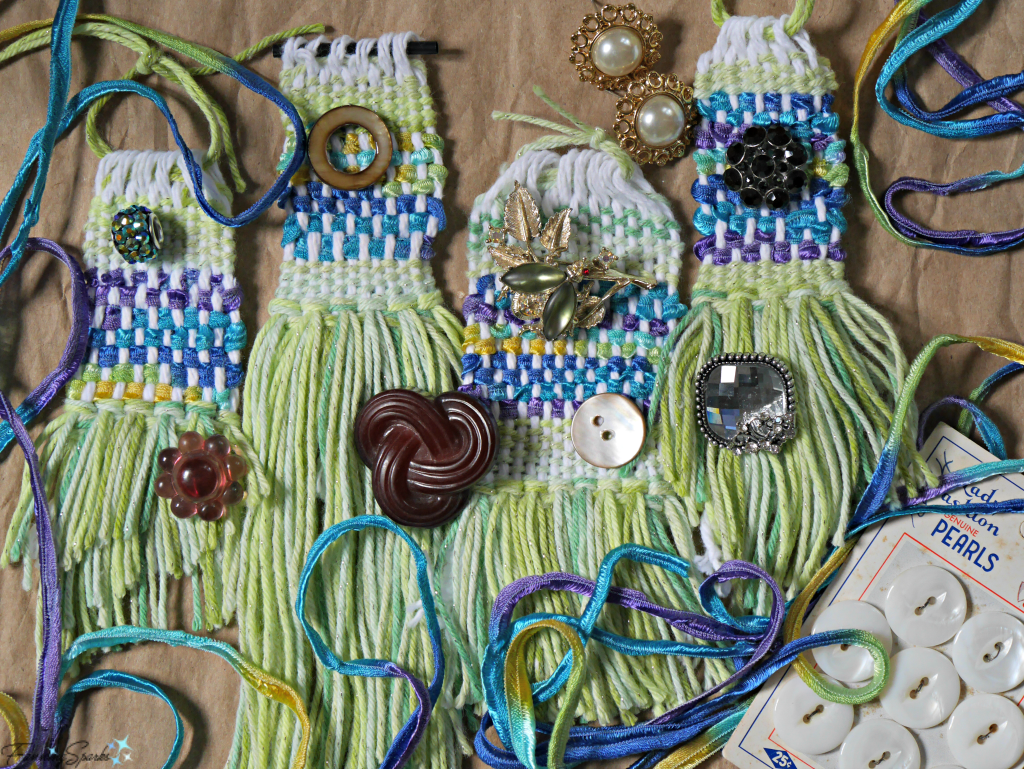
Step 25. You may wish to embellish your statement necklace. There are lots of options including vintage buttons, interesting beads, jewelry charms, novelty buttons, vintage pins/brooches and vintage earrings. I chose to use a little blue flower vintage button. Simply use a piece of yarn to sew the accent to your weaving.
Embellishment suggestions.
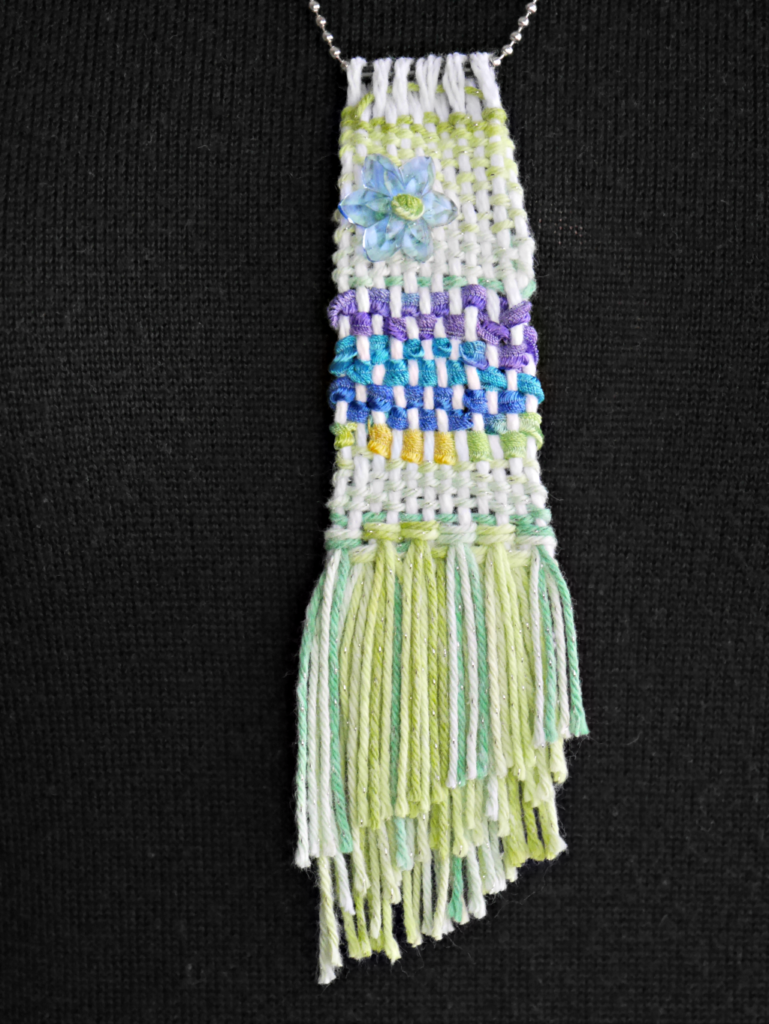
Step 26. Insert the ball chain into the cocktail straw through the top loops. You’re done! Find the perfect outfit to showcase your work of art and get ready for the compliments!
Your DIY woven statement necklace is done!
Sept 18 2018 Update: After visiting the Wildabout Wampum studio and boutique in Cocagne, New Brunswick, Canada, I created a second version of this DIY Woven Statement Necklace featuring a hand-crafted quahog shell heart pendant. I did make a few refinements in this version including:
Used decorative yarn instead of primary yarn for the second row of fringe (step 13)
Due to the light weight of the decorative yarn, increased the number of rows of plain weaving from 7 rows to 12 (step 15)
Reduced the number of rows of plain weaving in the final section from 17 rows to only 2 (step 16)
Used a blank metal jewelry connector instead of a cocktail straw for the top bar (step 22)
There are also some examples on Clara’s Loom Facebook page. Facebook is also a good way to reach Clara’s Loom if you wish to purchase yarn or would prefer to buy one of her beautiful finished necklaces.
As noted in my previous post, NeedleTravel is a great online resource for locating noteworthy fiber and fabric shops in the USA. The Find Shops Near My Location feature in their NeedleTravel app is easy to use and super convenient.
When I was first learning to weave I relied heavily on YouTube videos. “Weaving for Beginners” a 5-part series by Annabel Wrigley / Creativebug is one of my favorites. Her explanations are clear and her directions are easy to follow. The instruction is delivered at a good pace. Her designs are fun and innovative. You may want to reference these videos if you get stuck on any of the steps in this tutorial. Or you may decide to take on more weaving projects.
Dec 18 2018 Update: Check out the post, Add a Little Sparkle, for 3 holiday versions of the DIY Woven Statement Necklace complete with instructions.
Today’s Takeaways
Patience and persistence are important when trying a new craft. It took me 5 attempts to create this final version of the necklace.
Have fun with this statement necklace. There are countless variations that you can make by switching the colors, the yarns, the design, etc.
Making something beautiful with your own hands is very gratifying.
Pin for Later
You may want to pin this post to your Pinterest board for later reference. Please pin this image.
Early last year I had the amazing good fortune to go on an African safari. It was spectacular! The lodging, the people, the location, the thrill… all of it was outstanding. But it was the wildlife that made it unforgettable. With nothing but air between you and the animals, you are able to observe, study and admire these beautiful wild animals at length. It’s only fair to warn you, though, that one safari is never quite enough… you’ll yearn to see and experience more and more.
While I made a conscious effort to observe carefully before looking through the viewfinder, I did take a lot of photos. Some of my favorites are of the elephants which I’d like to share with you today. Below is one of the first elephants we sighted. We observed it gently walking down the track before it stopped to eat.
I’m certainly not the first person to have fallen for these majestic, lovable creatures. In preparation for my trip to South Africa, I discovered Brian Connell’s Tales from the African Bush series. His first book, Msomi and Me, shares his story of building an African safari lodge. It was the perfect pre-read for my safari! But his second book, Elephants are People Too, is most relevant to today’s post. He opens the book by declaring elephants to be the most amazing animals on the planet. Then he goes on to share his fascinating experiences in the African bush, many of which involve elephants.
As I narrowed down the photos to include in this post, I became curious about some of the elephant behaviors I’d captured. For instance, why is this young elephant holding its trunk like that? This led me to a wonderful resource called the ElephantVoices Gestures Database. It refers to this gesture as “sniffing towards” whereby the elephant “is using its trunk to sniff towards an individual, object or scent of interest”. I guess that object of interest was us!
Shortly after we sighted the little one, Mama Elephant came along and sheparded it to safety.
In the below photo, which is one of my all-time favorites, Mama and little one leave us behind (pun intended :-)).
We were fortunate to witness two young male elephants sparring. According to the Elephant Gestures database, “elephants, especially young males, test one another’s strength by placing their trunks on one another’s heads and pushing their opponent down and back. Sparring can range from gentle and sensuous pushing, trunk-twining … in a playful or greeting context, to more boisterous shoving, to very rough and aggressive pushing, tusking and even ramming.” The below series of photos illustrate several of these gestures.
In the below photo, you can see the male elephant has spread it ears. According to the Elephant Gestures database, elephants “face an opponent or predator head on with ears fully spread (at 90 degrees from body) presumably for the purpose of appearing larger. Elephants may also spread their ears when they are excited, surprised or alarmed.”
I hope you’ve enjoyed this glimpse of these amazing animals. Observing them going about their daily routines in their natural setting leaves a lasting impression. It’s little wonder, people want to keep that memory alive with elephant-themed items in their every day lives. That is certainly true for me.
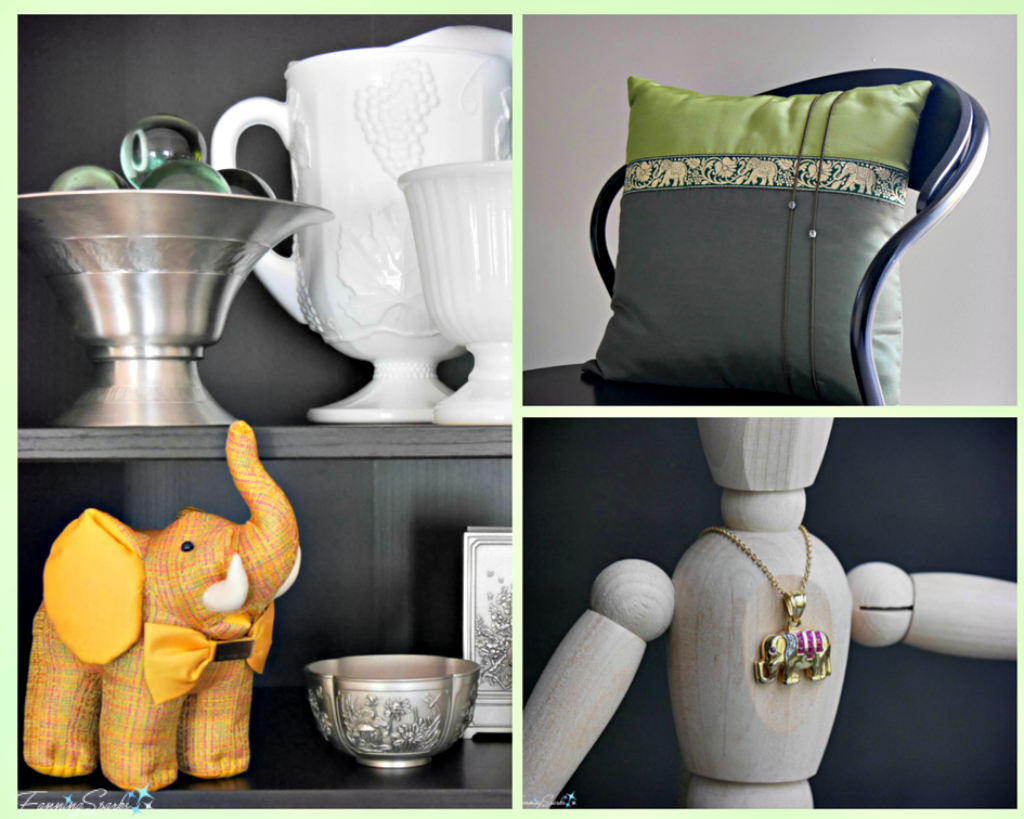
Below are some of the elephants that has infiltrated my home. These items were actually purchased in Thailand after I saw my first elephants but they have become even more meaningful after seeing these majestic, lovable animals in South Africa.
More Info
These photos were taken within the Timbavati Private Nature Reserve in South Africa. Game drives were conducted by Kambuku Lodges where we stayed.
The ElephantVoices Gestures Database, more accurately the “Poole, J.H. and Granli, P.K. 2009. Elephant Gestures Database”, is a wealth of information and loaded with fun facts.
Sept 2018 Update: See the post, Patterns by Mother Nature, for additional photos from this African safari.
Today’s Takeaways
1. If you ever have a chance to go on an African safari, do it!
2. You can enrich your travel experience by reading about your destination before you visit. Guide books and travel sites are great but fact-based storytelling provides deeper understanding.
3. Animals that strike a chord with you become part of your story. Think about how you may want to tell that story with carefully placed items in your home.