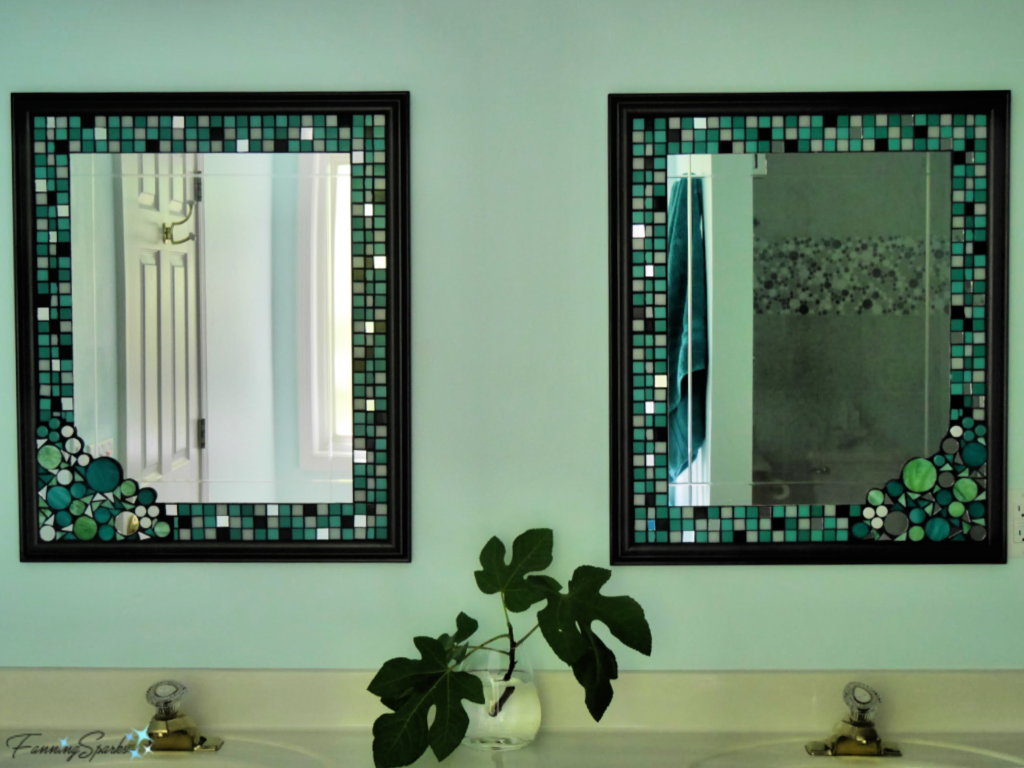
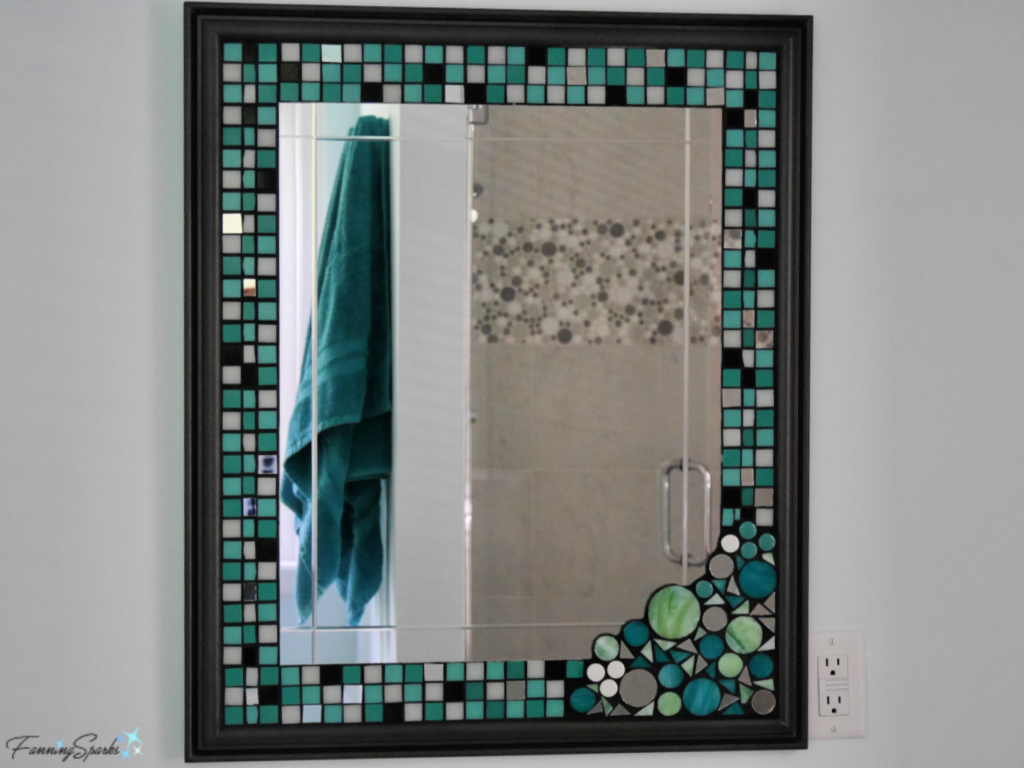
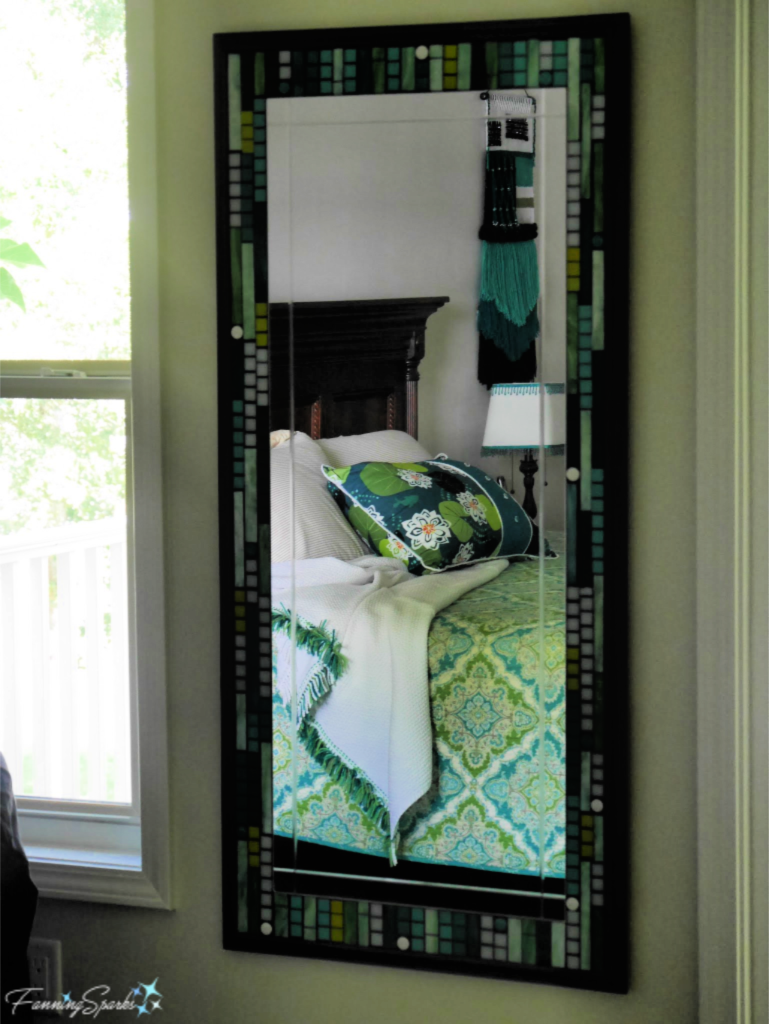
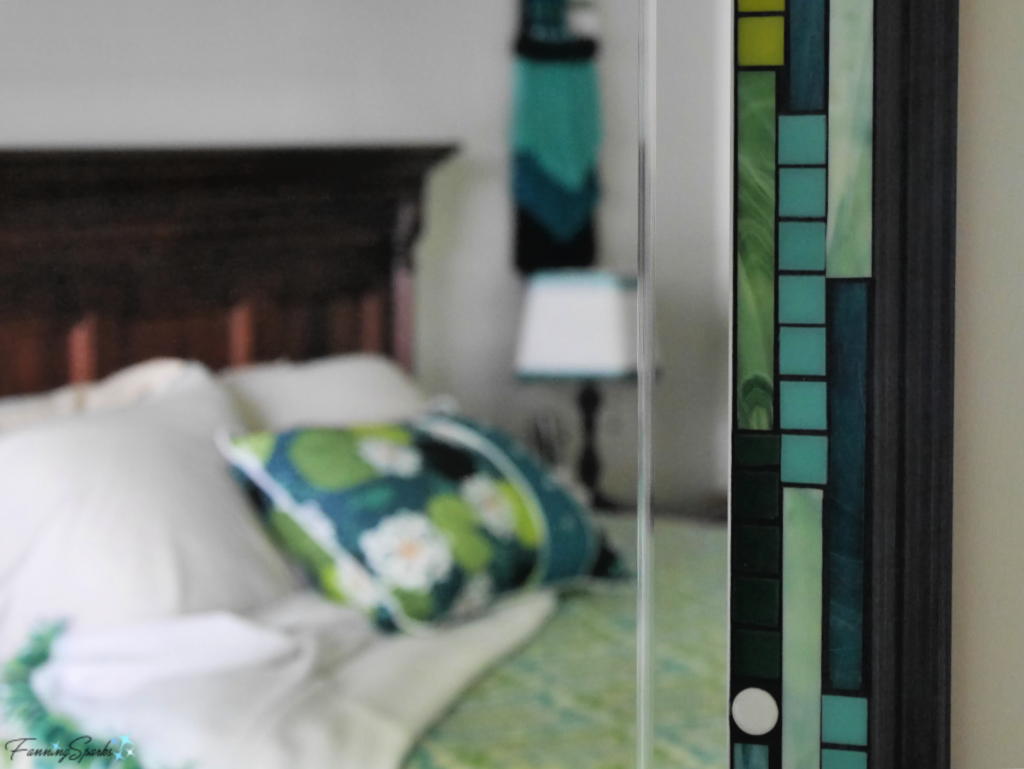
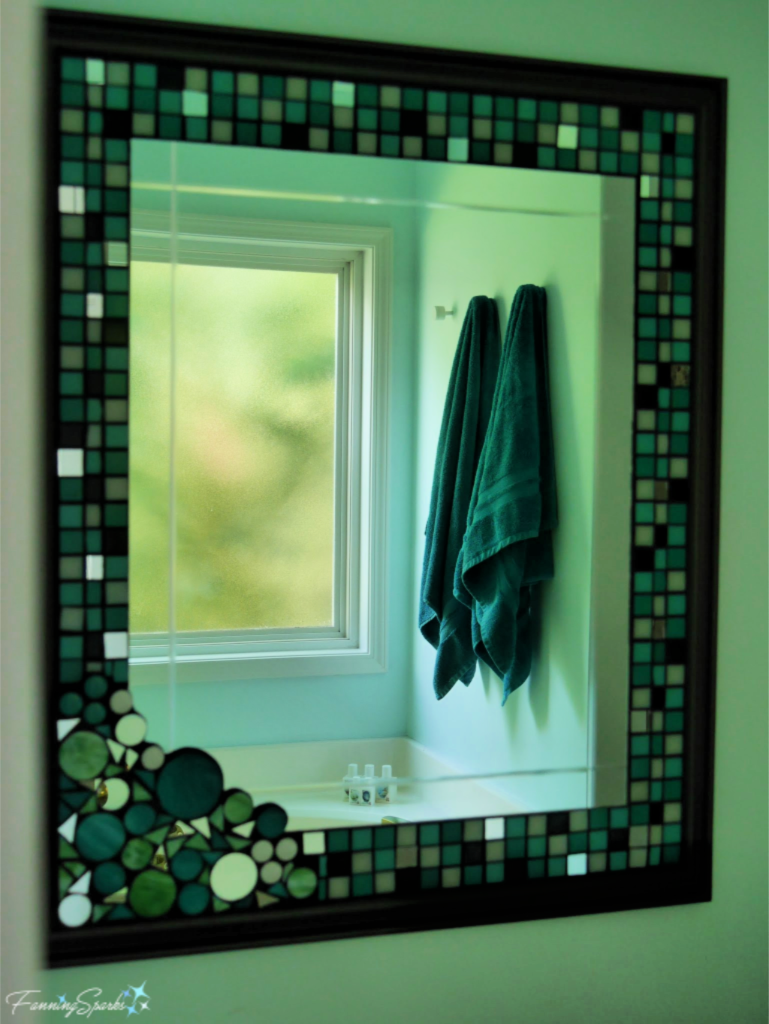
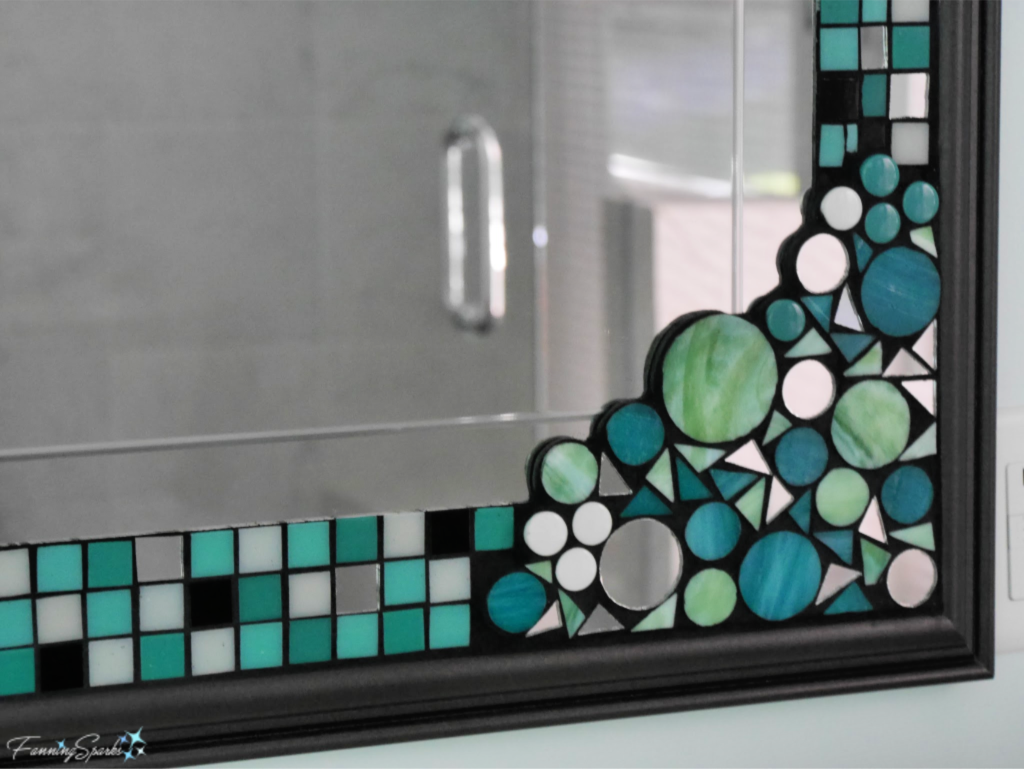
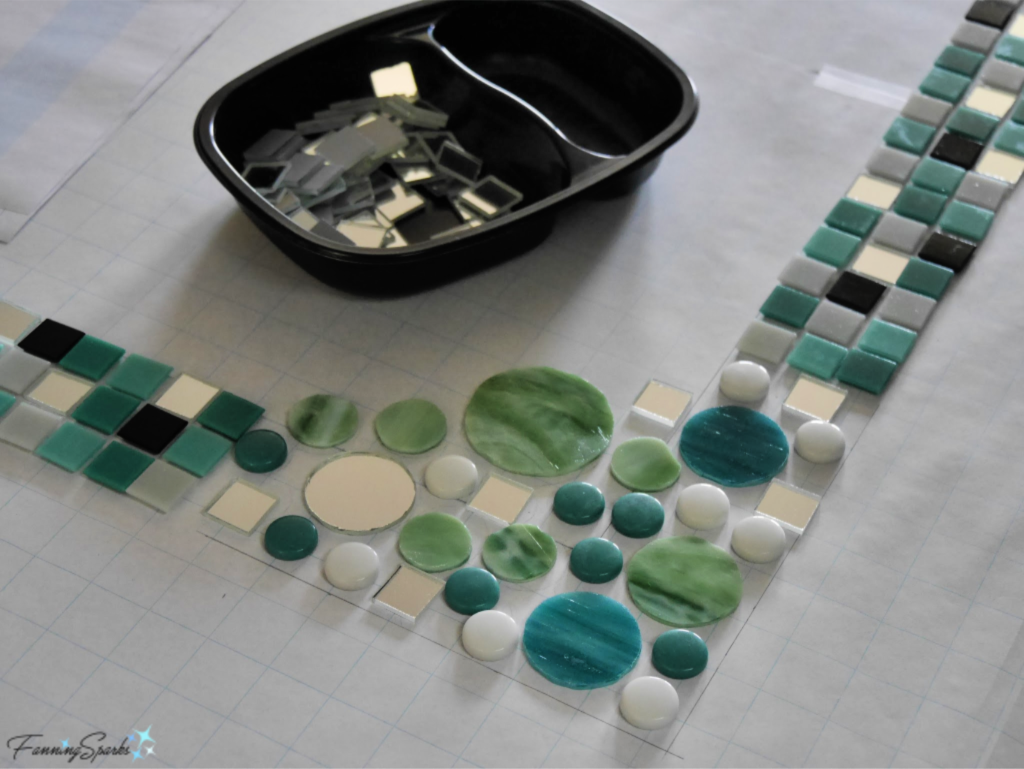
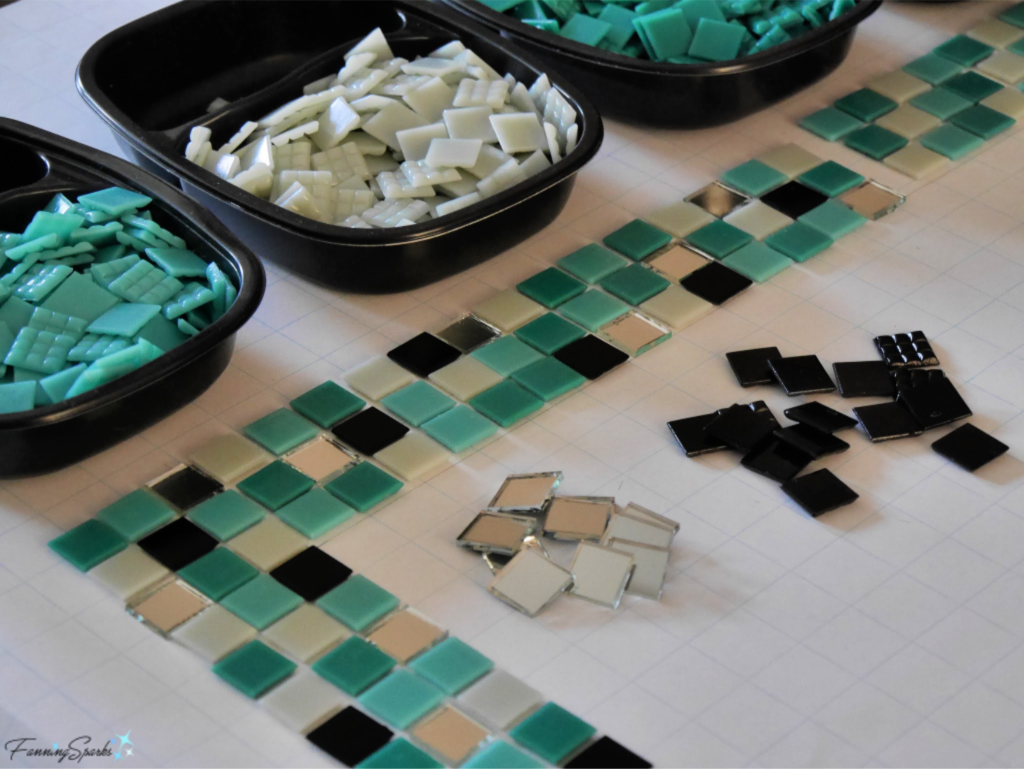
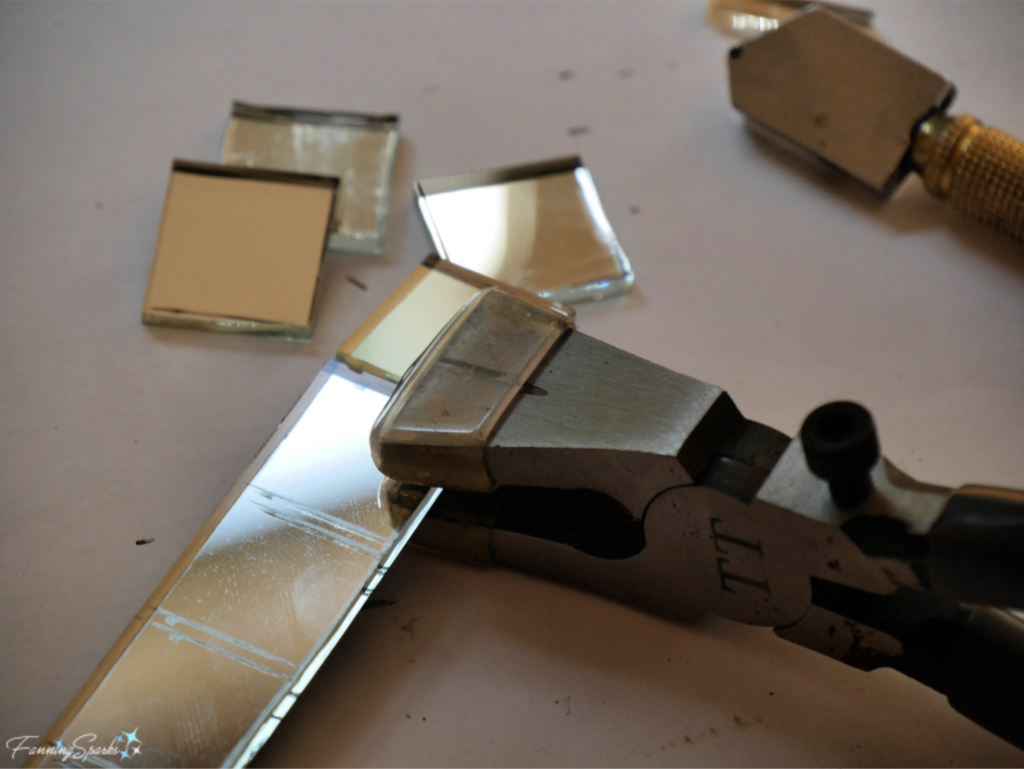
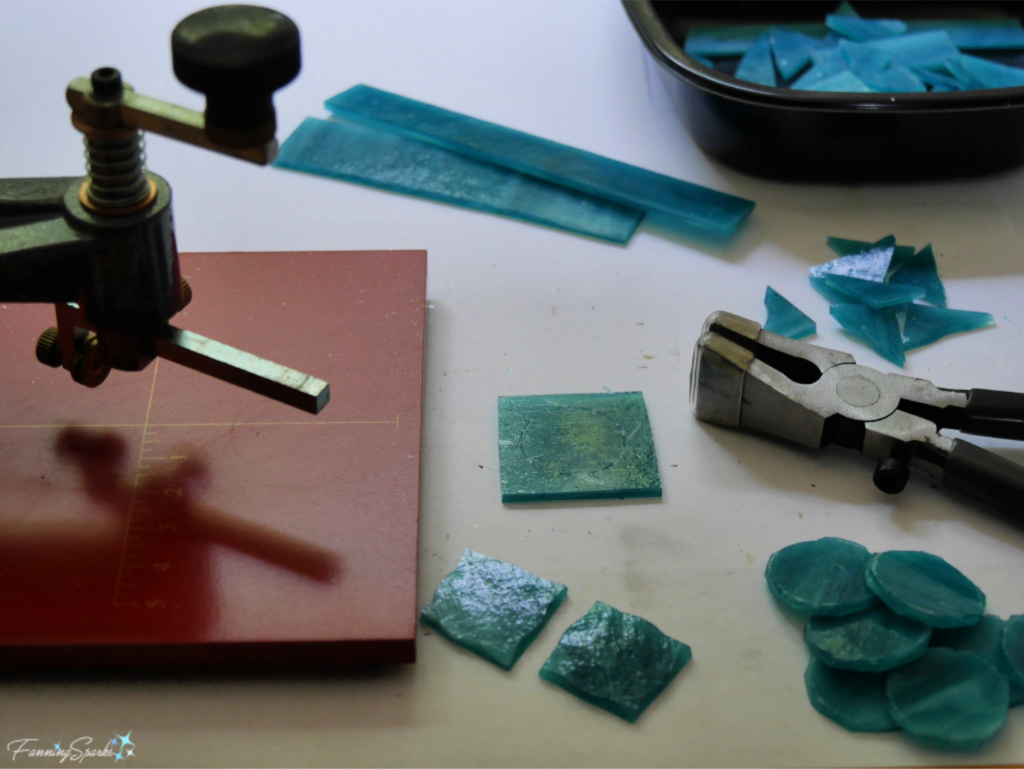
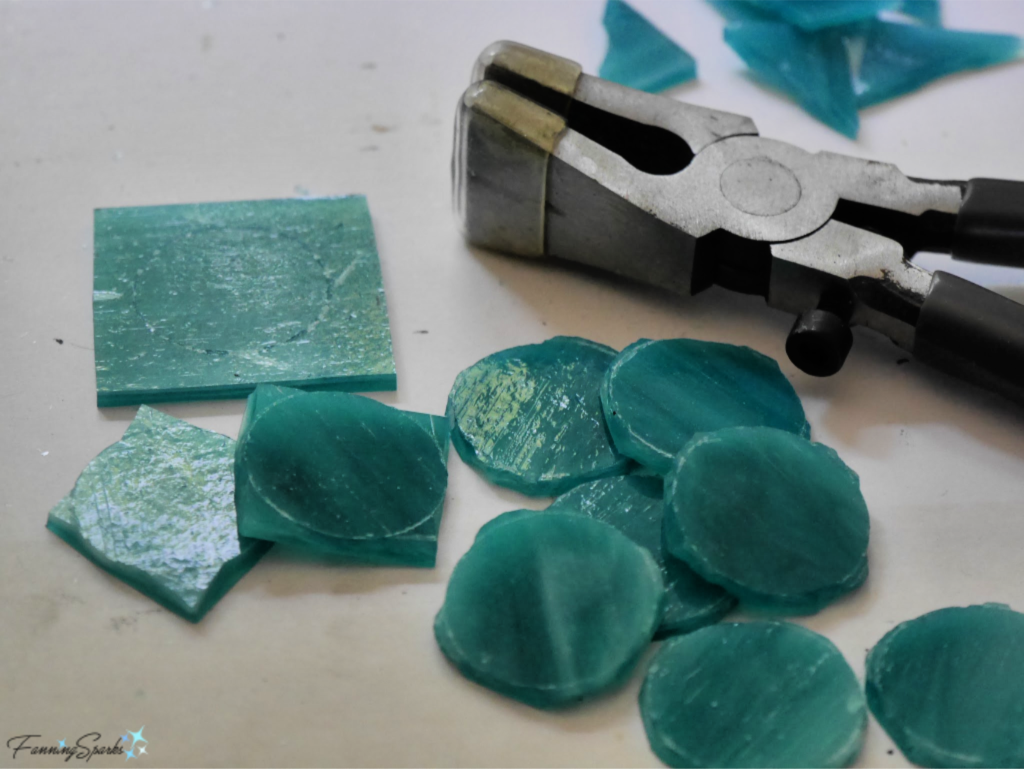
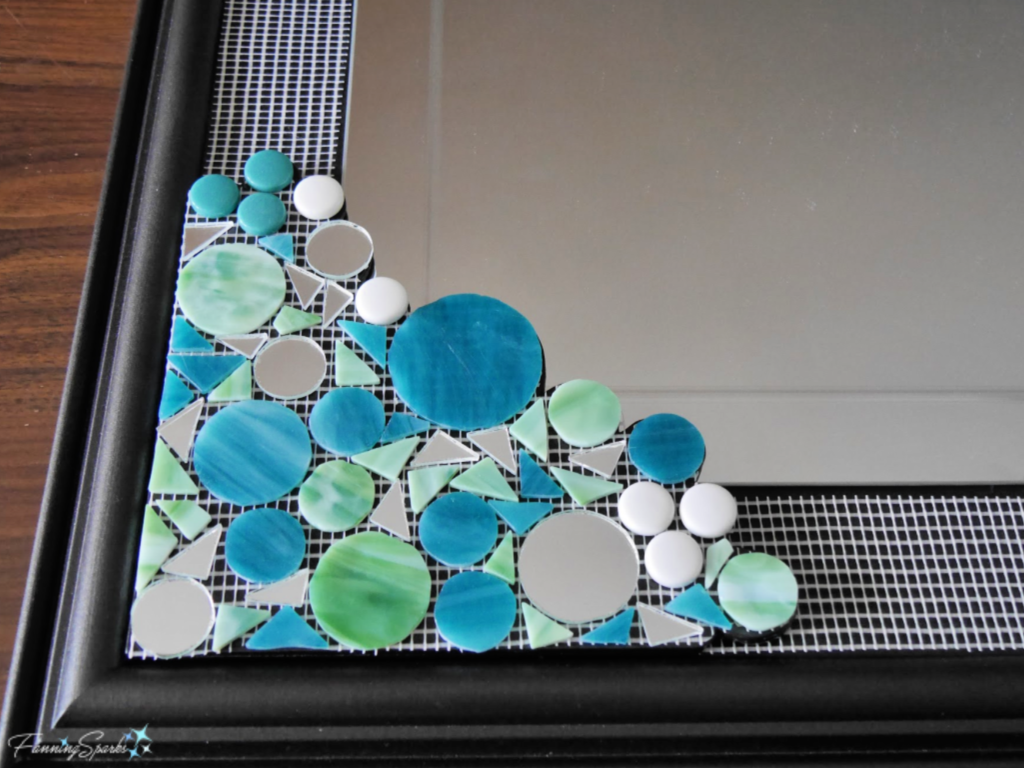
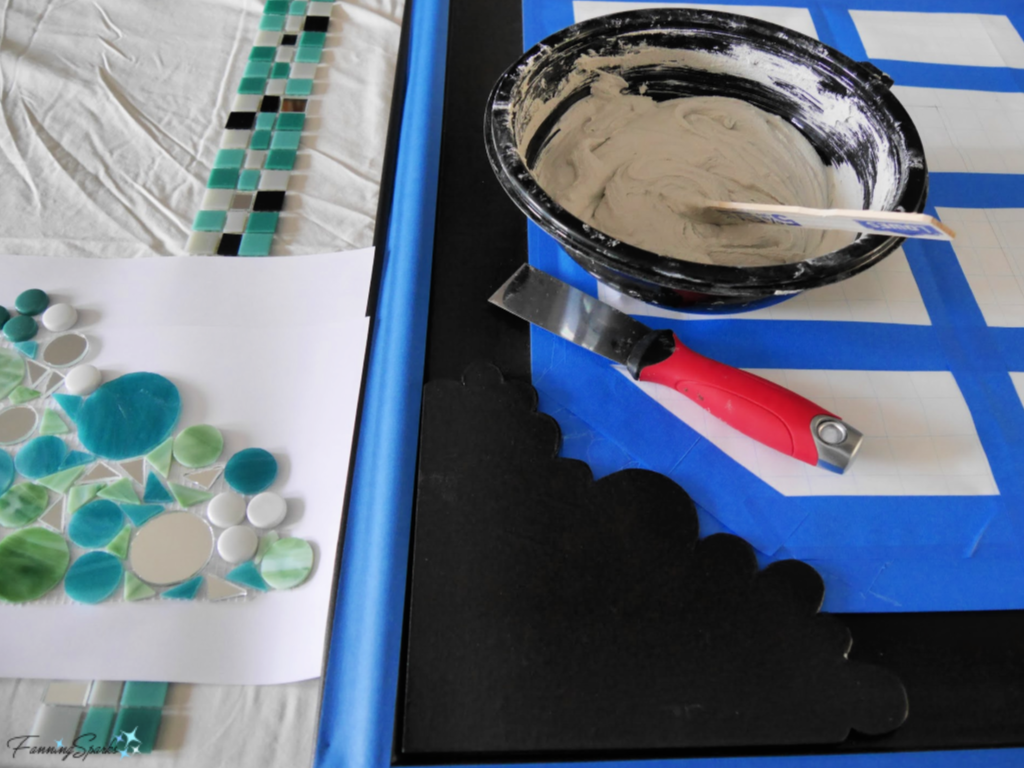
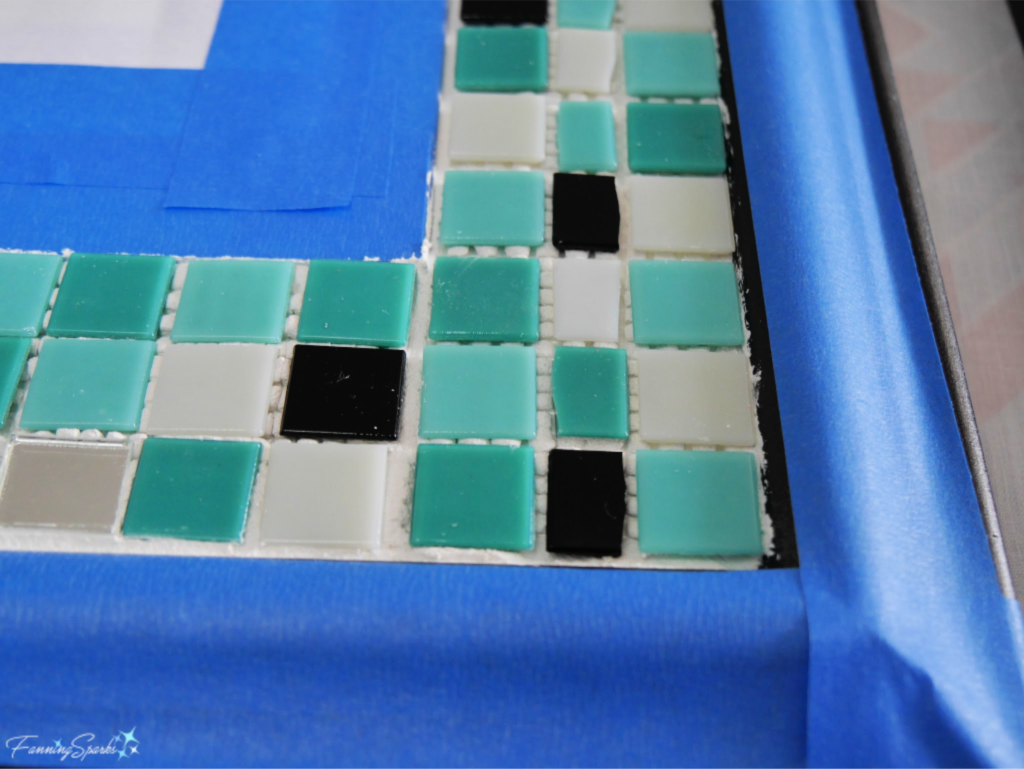
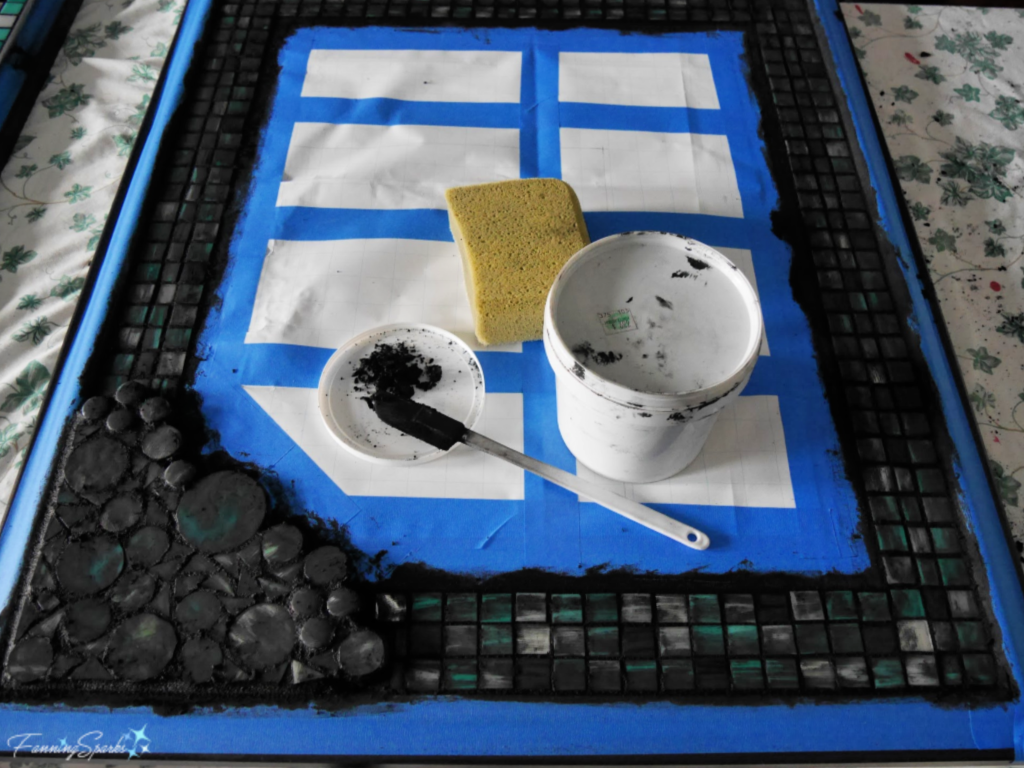
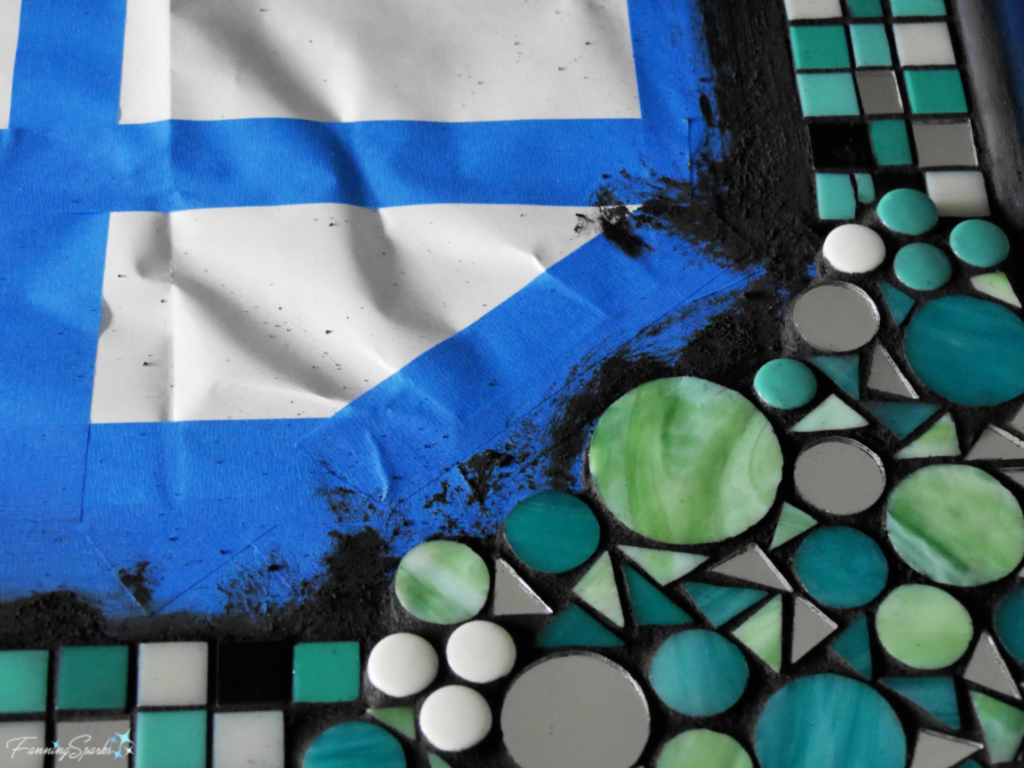
A mosaic is an assemblage of small pieces of colored glass, stone, or other materials. The mosaic mirror frames I made for my own master bathroom, for instance, were an assembly of glass with rectangular tiles set into a grid-patterned border and an irregular accent of circles and triangles.  See my post Pair of Mosaic Mirrors Completed.
Custom Made Mosaic Mirrors for Master Bathroom by FanningSparks. @FanningSparks

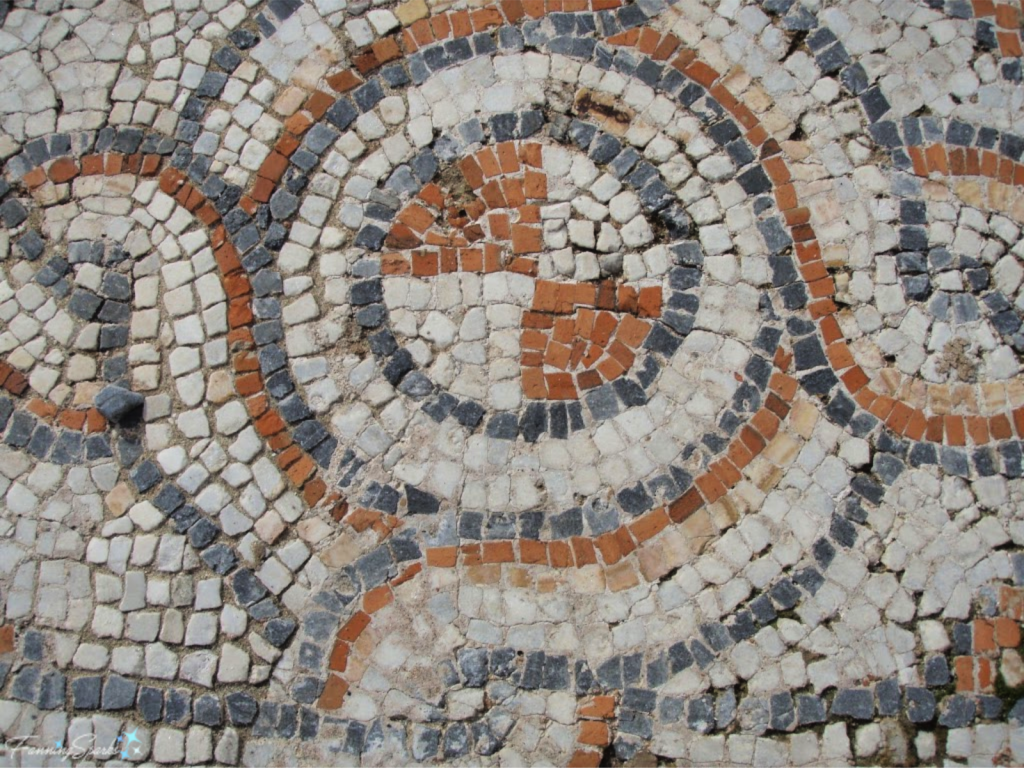
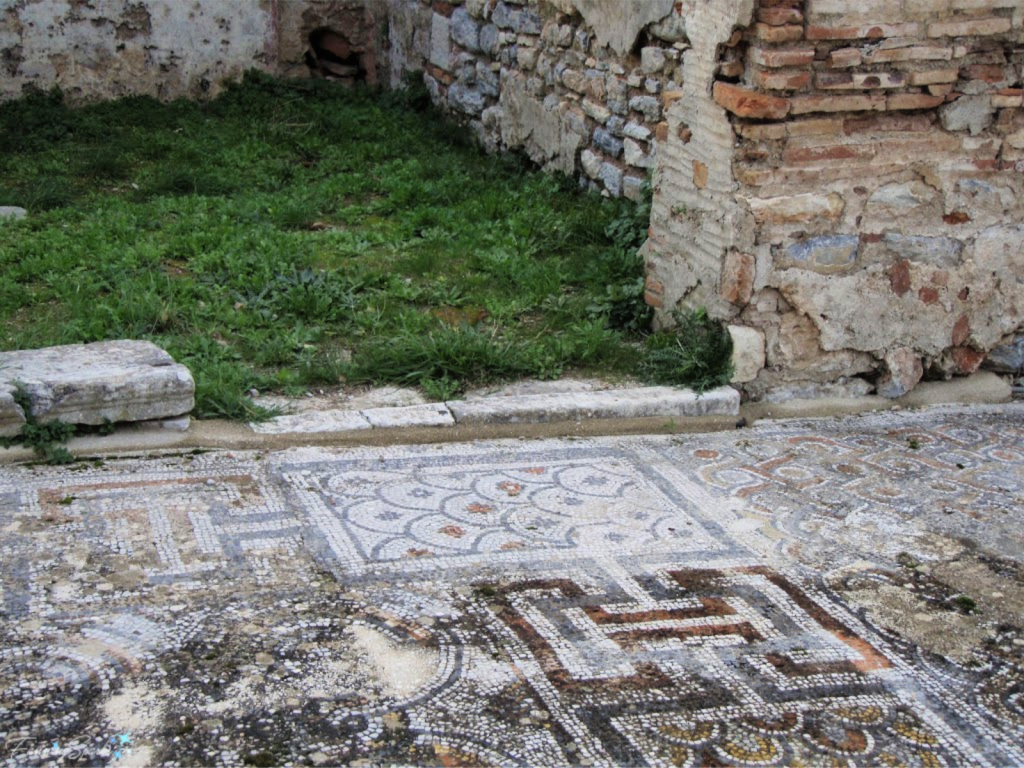
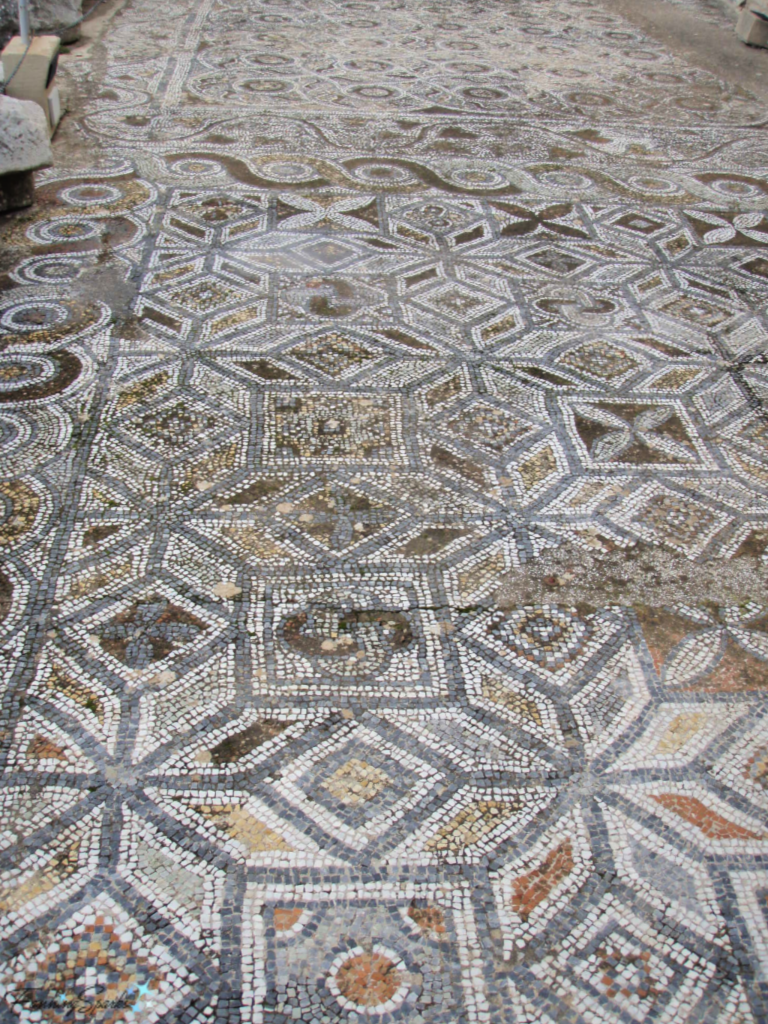
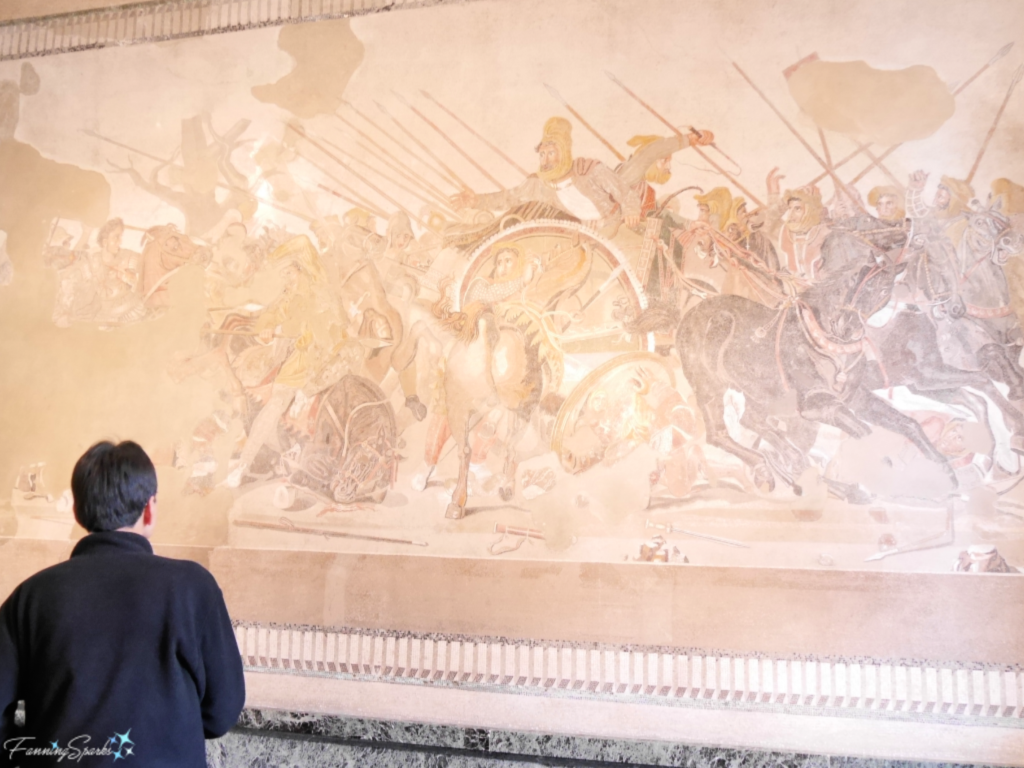
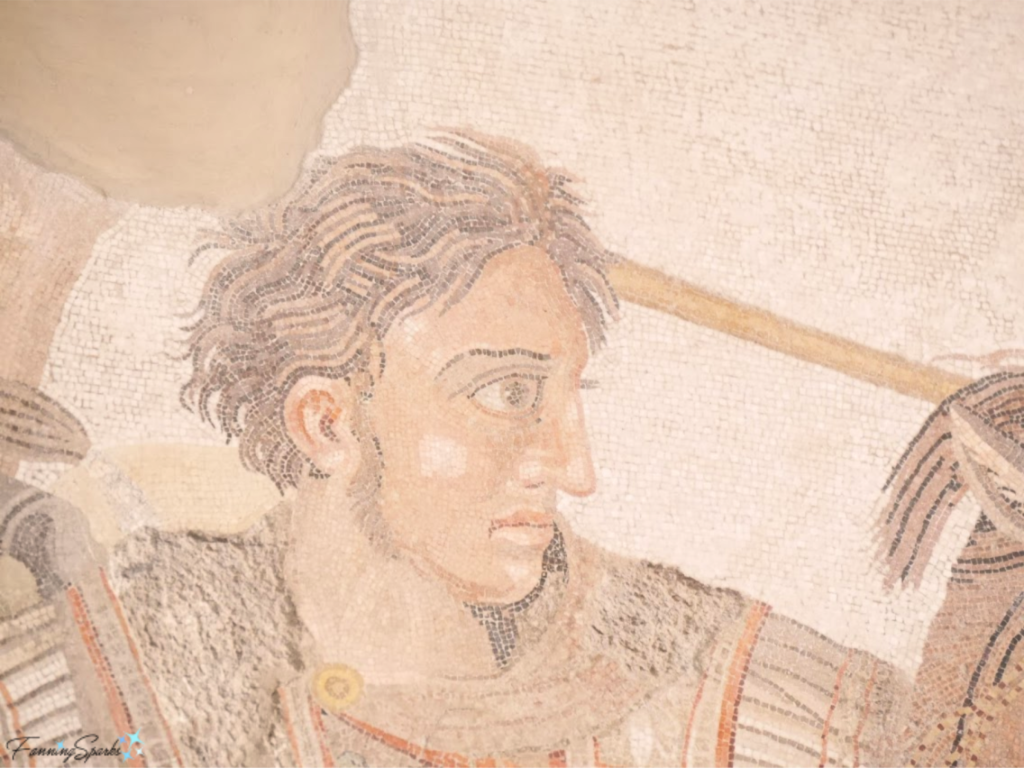
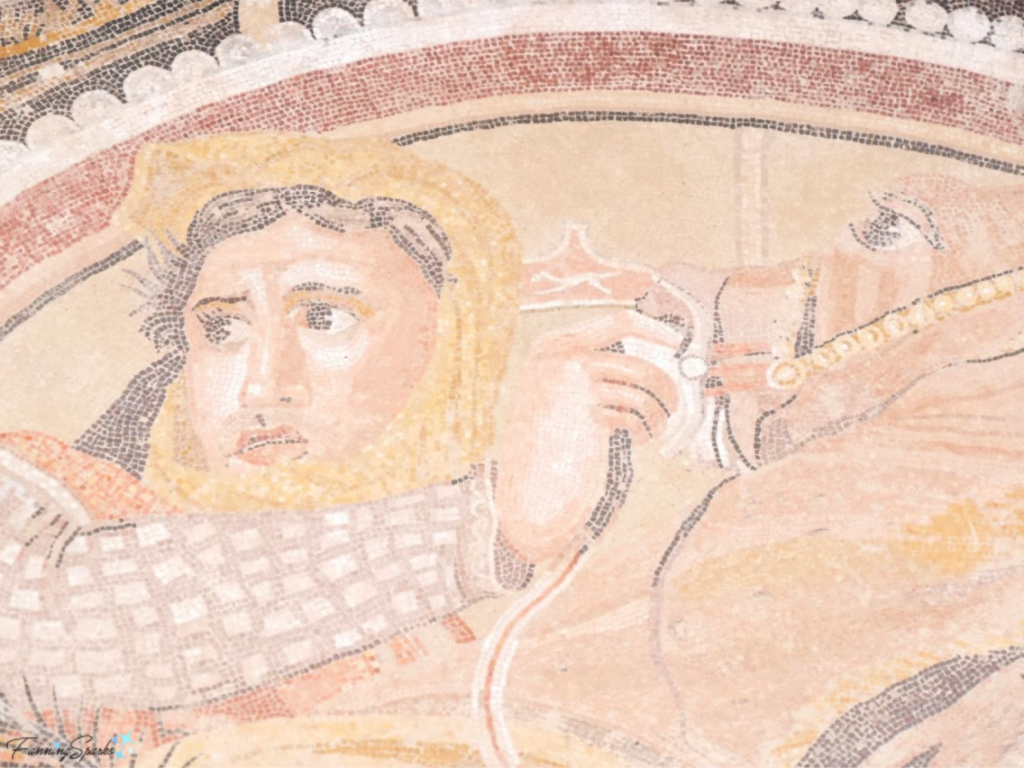
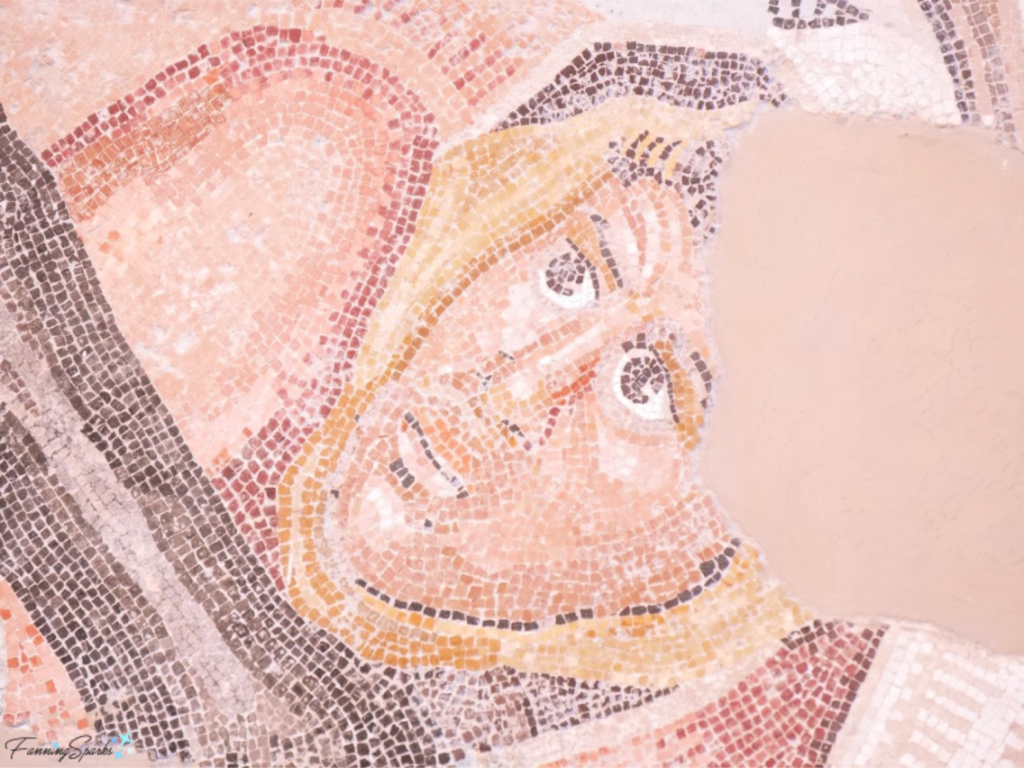
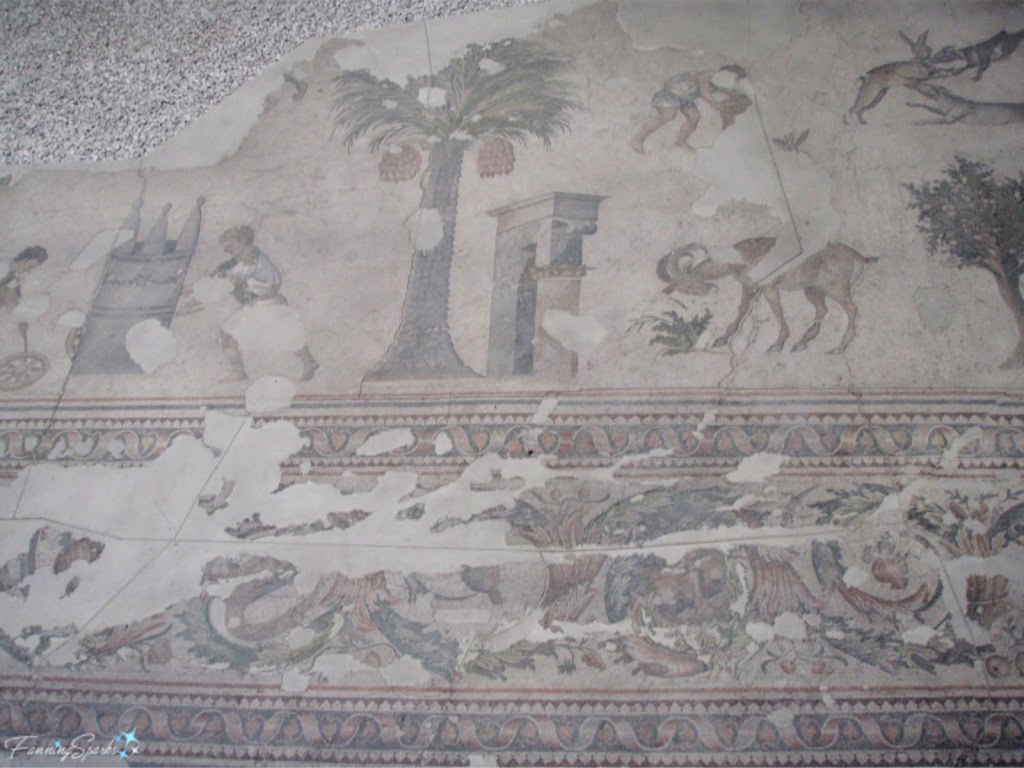
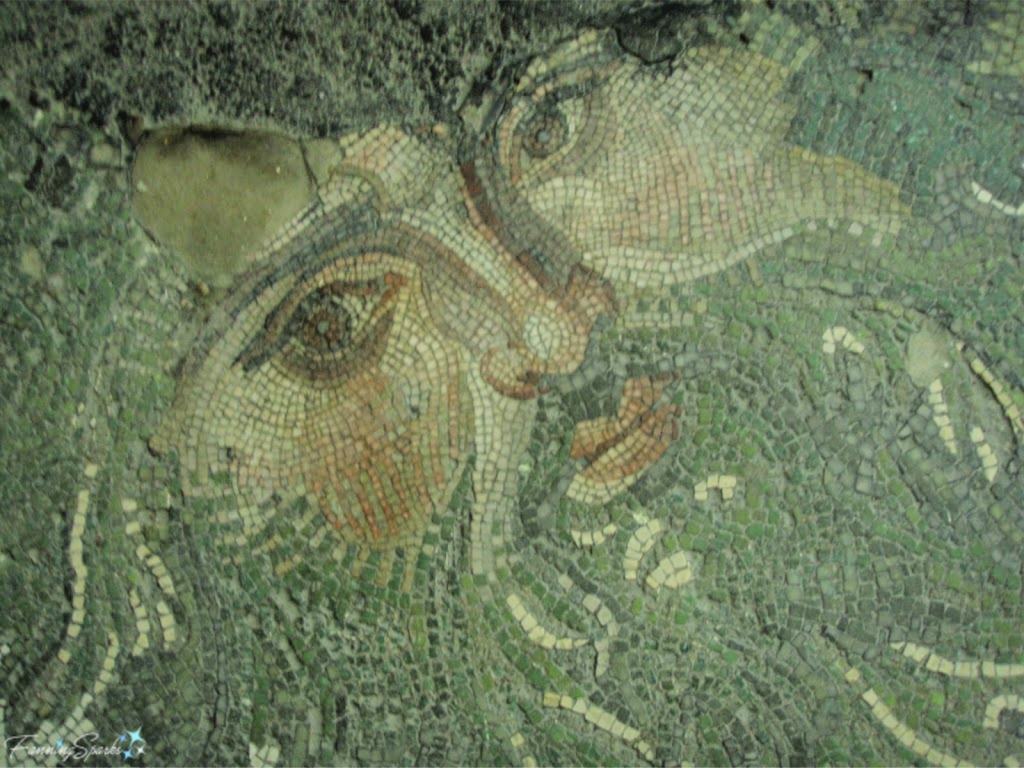
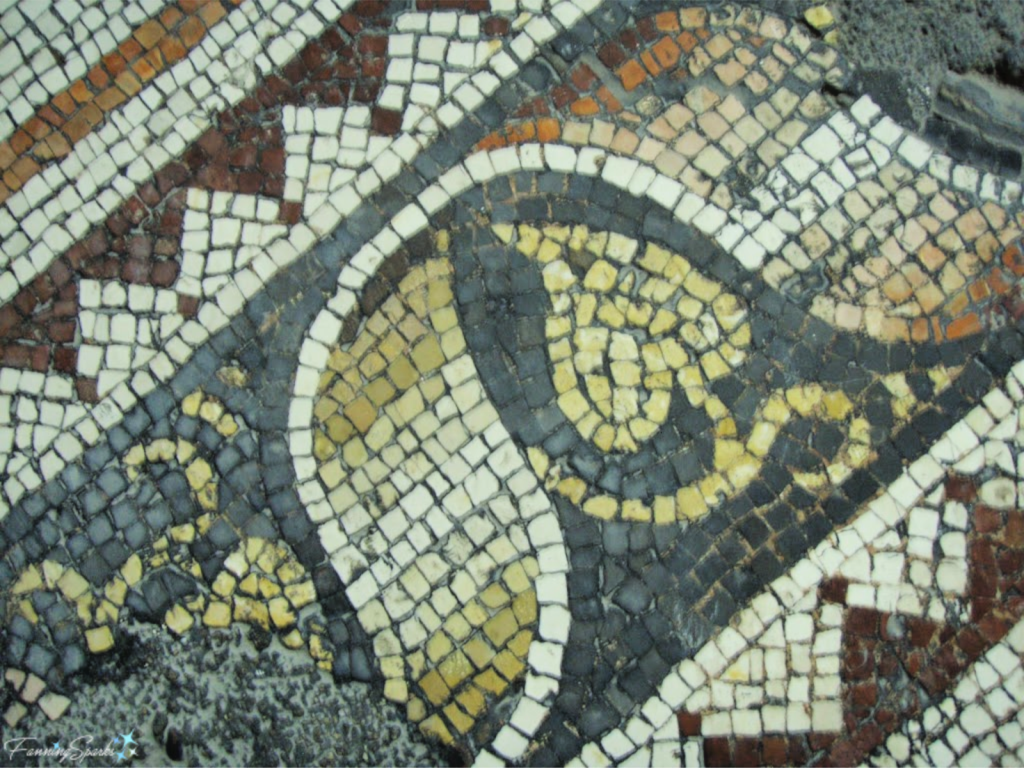
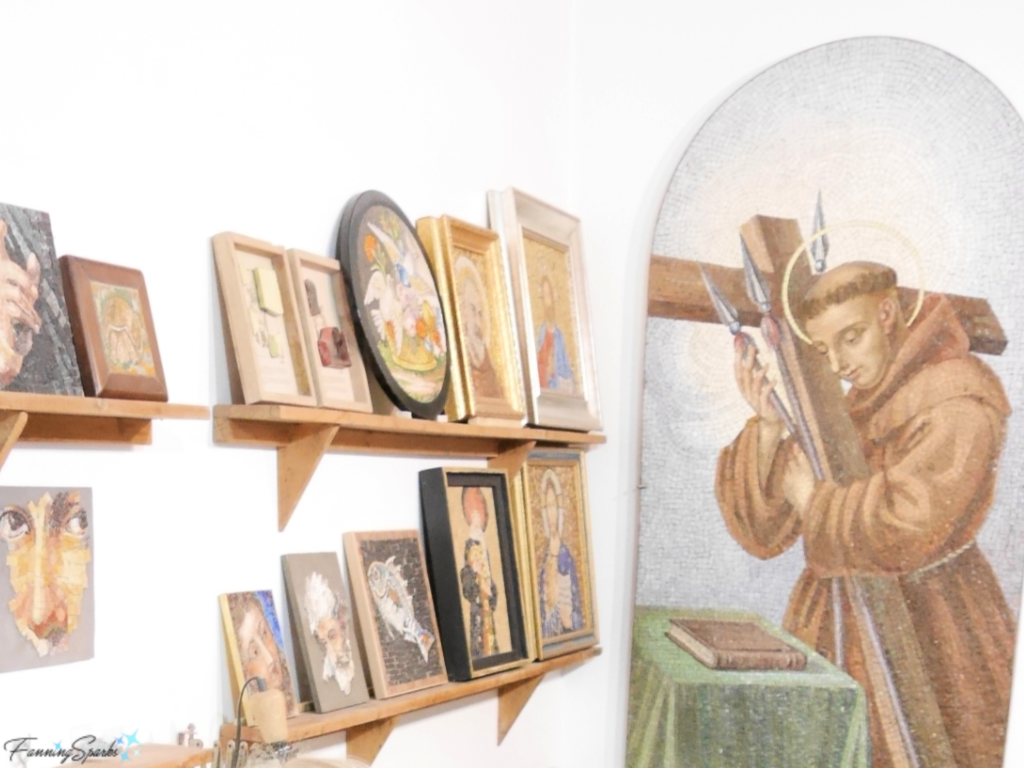
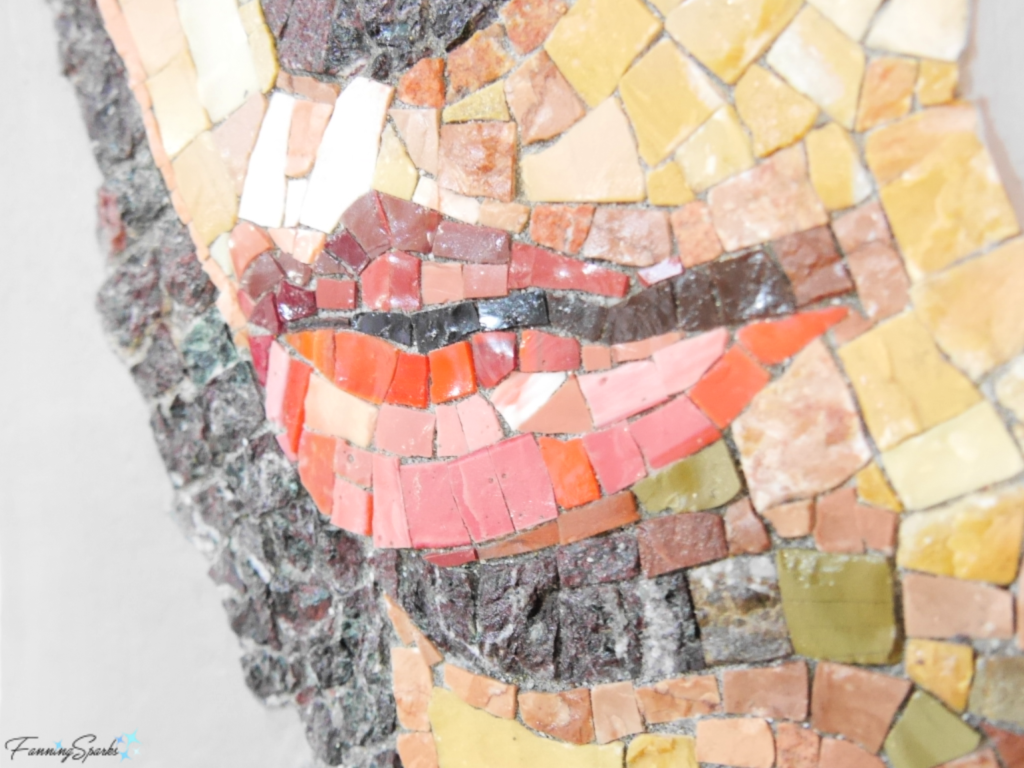
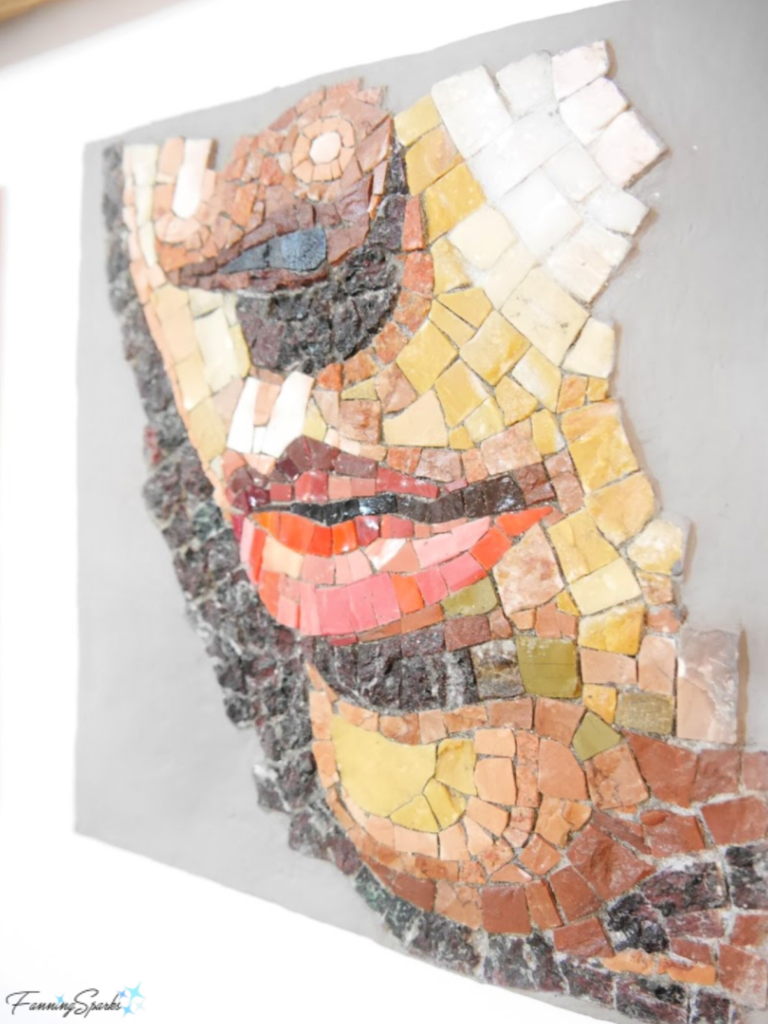
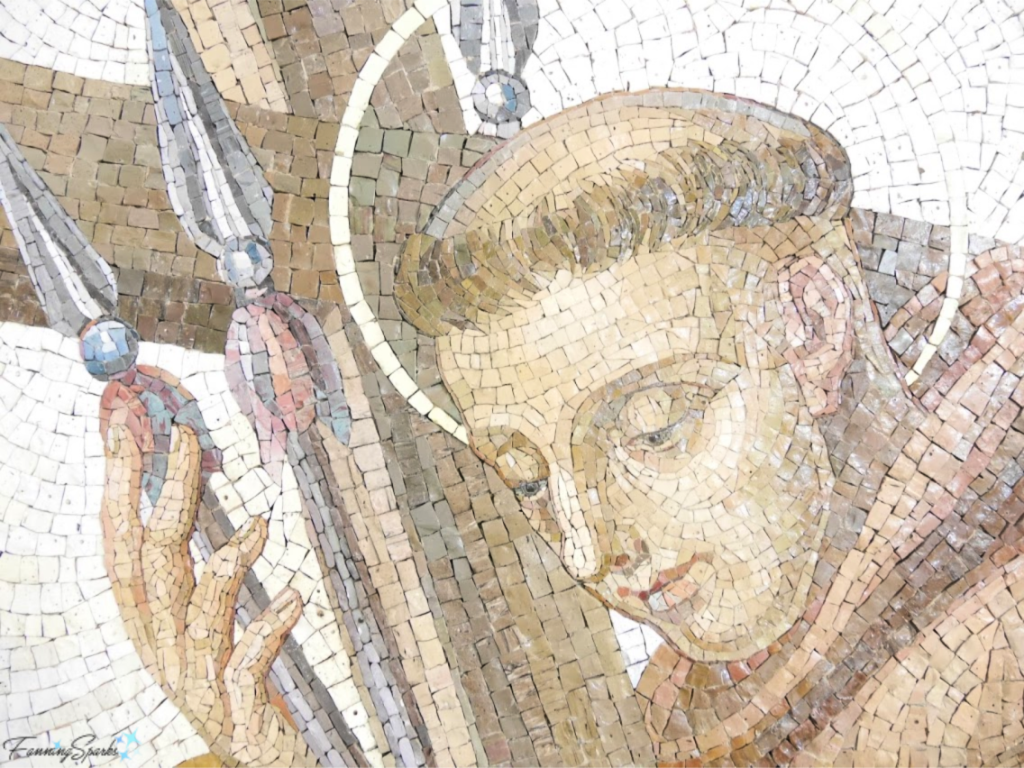
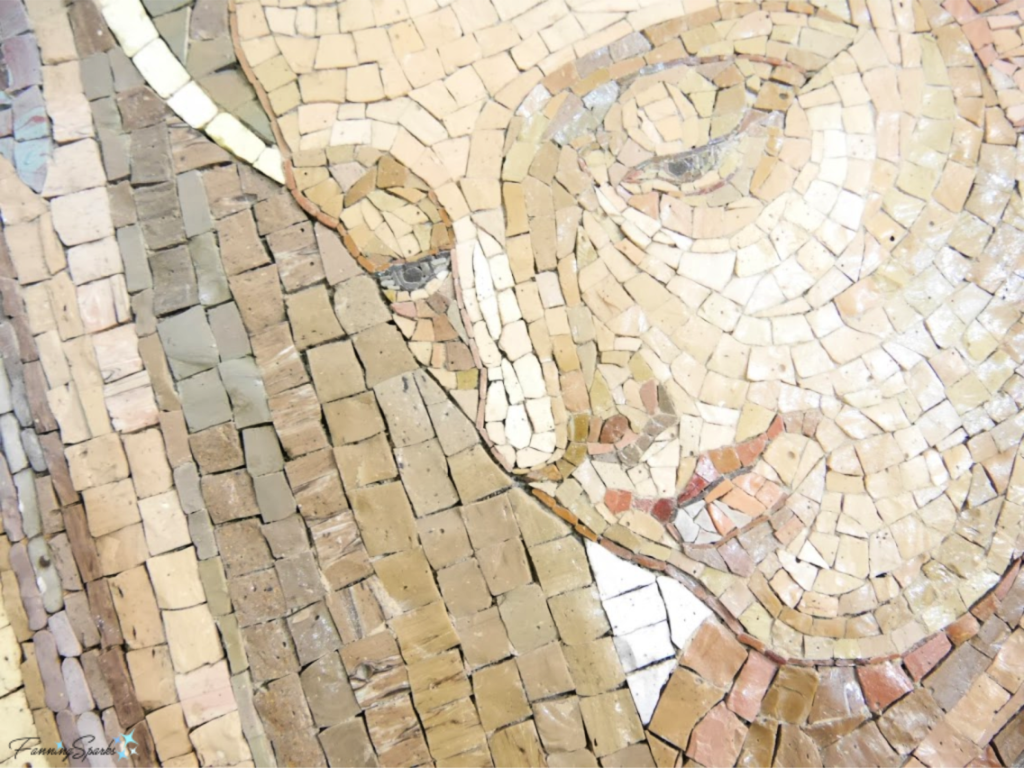
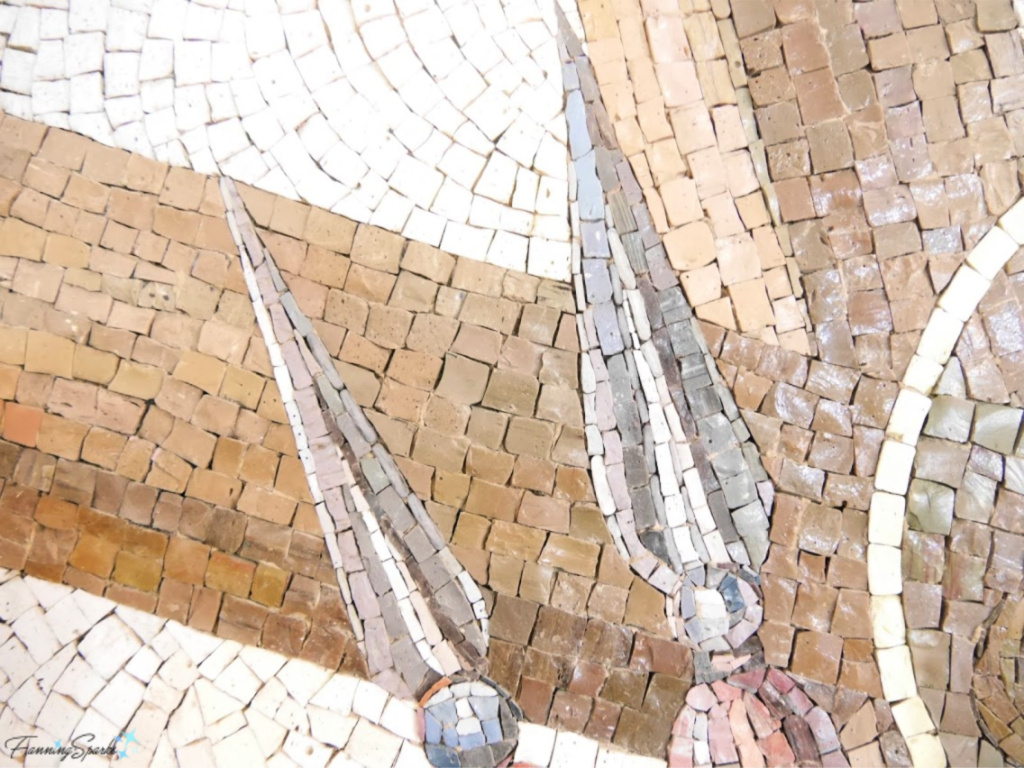
Ancient mosaics were typically made of uniform, cube-shaped stone including marble, slate and other natural materials.  Here’s one example from the ancient ruins of Ephesus in present-day Turkey.  I shared several other  examples in the post, Learning from the Ancient Masters.
Closeup of Ancient Mosaic Floors at Ruins of Ephesus in Turkey. @FanningSparks
In today’s post, we’ll look at another material used to make mosaics‒broken china and tiles.  This style of mosaic goes by a number of different names including “trencadis”, “pique assiette” and “crazy paving”.  The most well-known person to have advocated for this decorative technique was Catalan architect Antoni Gaudí.  Gaudí, who belonged to the Modernisme movement (ie the Art Nouveau movement in Catalonia), was famous for his architectural genius and unique style.  Seven of his sites in/near Barcelona Spain are designated a UNESCO World Heritage Site.  I’ve had the pleasure of seeing several of his works and they are stunning!  As is typical of proponents of the Art Nouveau movement, Gaudí took a holistic view of his creations and designed for all aspects of his one-of-a-kind style.  According to Wikipedia, “Gaudí was also an innovator in the realm of craftsmanship, conceiving new technical and decorative solutions with his materials, for example his way of designing ceramic mosaics made of waste pieces (“trencadís”) in original and imaginative combinations.”  Several outstanding examples of trencadis, such as the below bench back, can be seen at Park Güell in Barcelona.  
Park Guell Serpentine Bench with Beautiful Trencadis. @FanningSparks

Around 1900, Gaudí and his collaborator Josep Maria Jujol worked on this park for the Güell family.  As author and master mosaicist Sonia King put it in her book Mosaic Techniques & Traditions, “Parc Güell is a mosaicist’s dream-a fantasy environment of broken tile and glass.  It is a prime example of integrating three-dimensional surfaces with mosaic decoration.  Gaudí’s structures became huge mosaic-clad sculptures.”  As you enter the main entrance to Park Güell, you are greeted by the Casa del Guarda (Caretaker’s House).  The whimsical shapes of these structures are artfully covered in trencadis.
Park Guell Caretaker's House.   @FanningSparks
Park Guell Caretaker's House Tower.   @FanningSparksHere’s a closer look at the broken china trim framing a window.
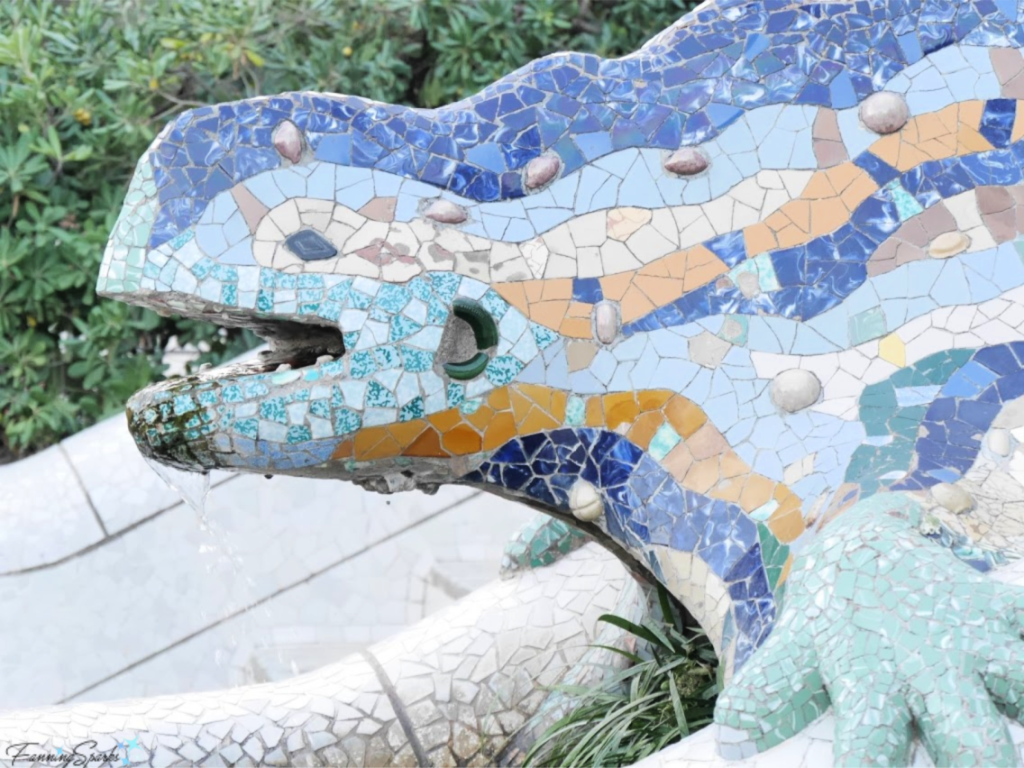
Park Guell Caretaker's House Window Frame.   @FanningSparksDirectly in front of the main entrance is the main stairway which is often called the Dragon Stairway.   The below dragon, or salamander, fountain is covered with a decorative tile-shard mosaic.  It’s a crowd favorite and visitors line up to have their photos taken with Gaudí’s dragon.
Park Guell Salamander (aka Dragon) Fountain.   @FanningSparks
Broken china and ceramic tiles seem to be on every surface around the main entrance and central stairway.  Here are a few examples of decorative panels from the garden walls.
Park Guell Trencadis Accents.   @FanningSparks
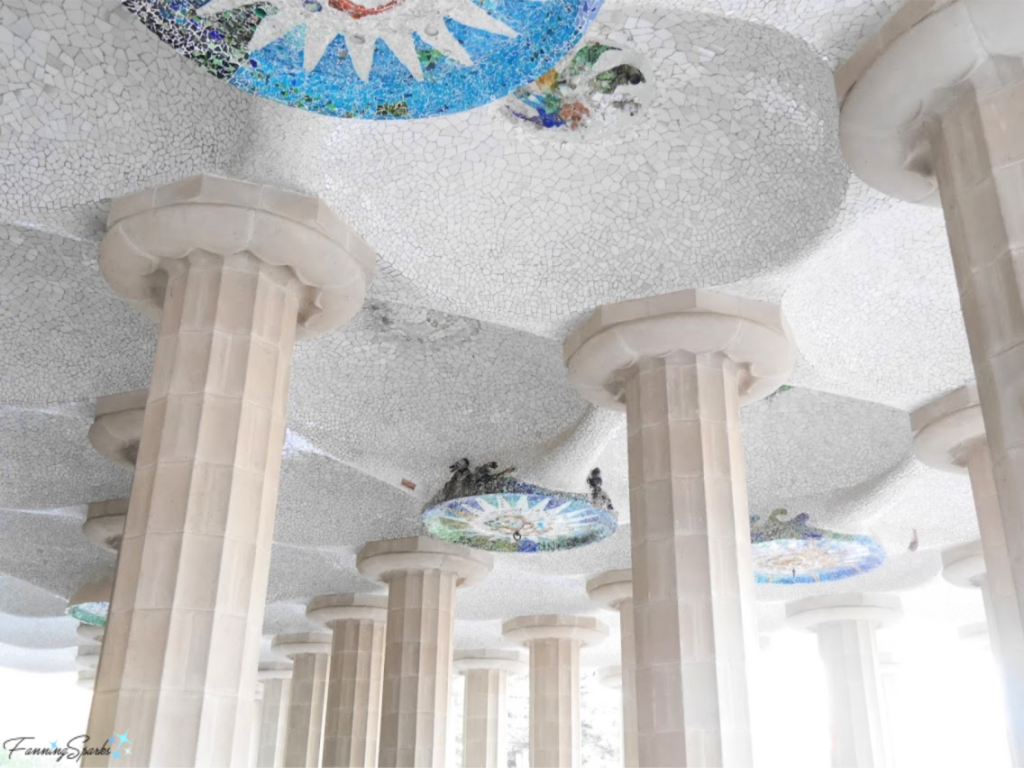
At the top of the Dragon Stairway, you enter the Hypostyle Room which was originally planned as a market place.  It is a covered area made up of 86 striated columns. The ceiling is formed of small domes covered with trencadis.
Park Guell Hypostyle Room Columns and Ceiling.   @FanningSparks
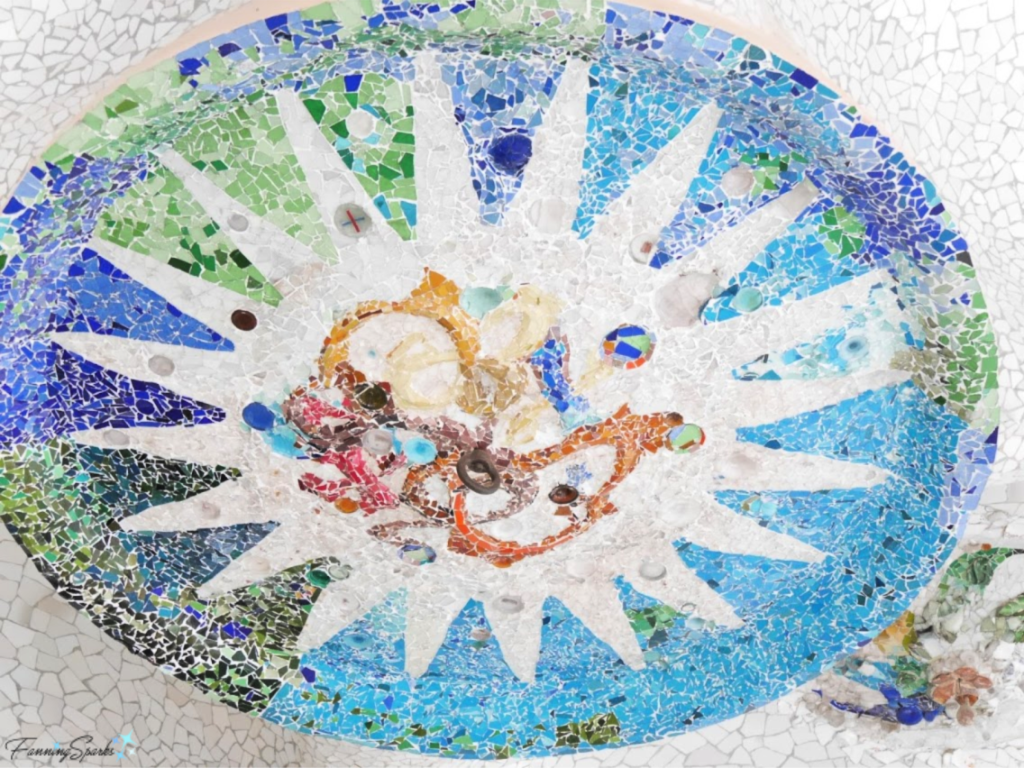
Here’s a closer look at one of the ceiling medallions.
Park Guell Hypostyle Room Ceiling Medallion.   @FanningSparks
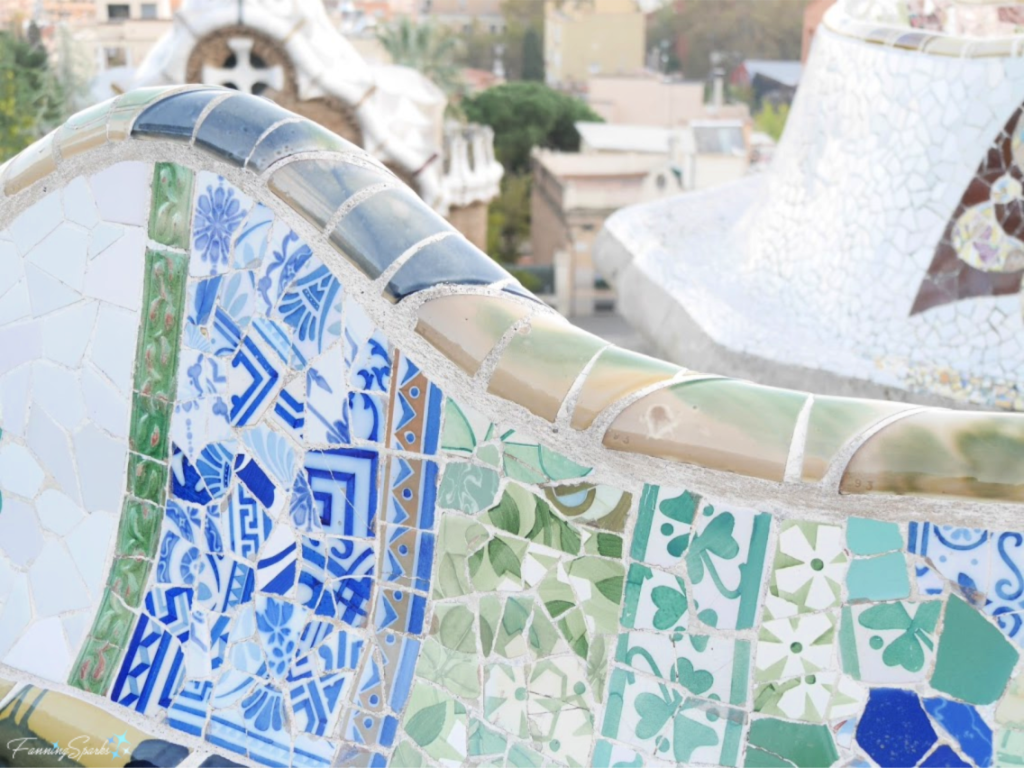
Above the Hypostyle Room and at the center of Park Güell is a large esplanade known as Plaça de la Natura (Nature Square).  A undulating bench covered in trencadis runs along several sides of the esplanade and acts as a balustrade.  In addition to being beautiful, these serpentine benches are surprisingly comfortable.  Note the white mosaic seat with the fantastic, colorful trencadis along the back.
Park Guell Serpentine Bench Showing Seat.   @FanningSparks
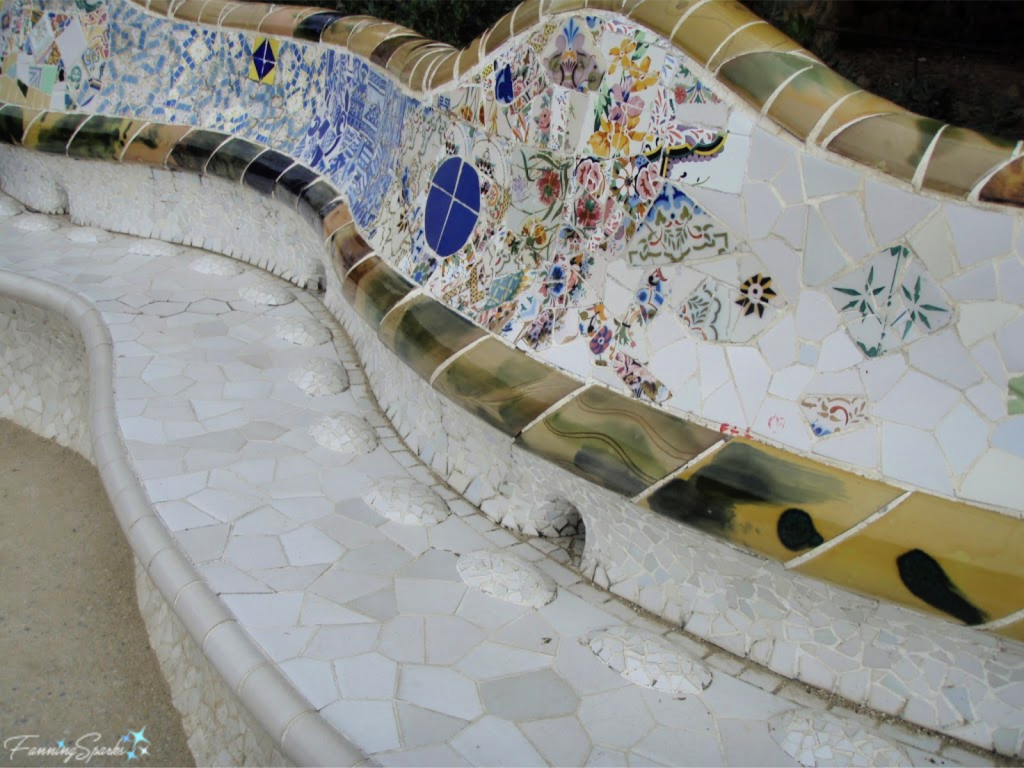
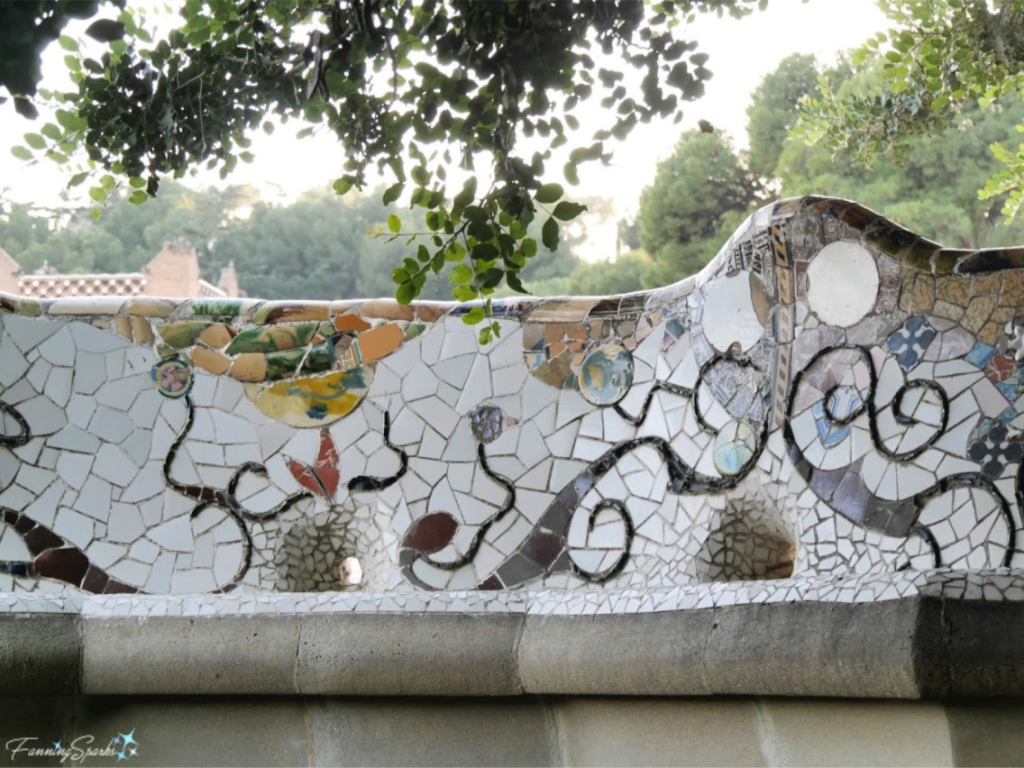
Here’s a view of the back side.
Park Guell Serpentine Bench Back Side.   @FanningSparks
Park Güell isn’t the only location where Gaudí showcased trencadis.  It is also used extensively at his residential masterpiece, Casa Batlló, especially on the  unusual rooftop structures.  The arched roofline is said to recall the spine of a dragon with the ceramic tiles being the dragon’s scales.
Casa Batllo Rooftop Trencadis.   @FanningSparks
This unique grouping of chimneys, also at Casa Batlló, is artfully covered in trencadis.
Casa Batllo Rooftop Chimneys in Trencadis.   @FanningSparks
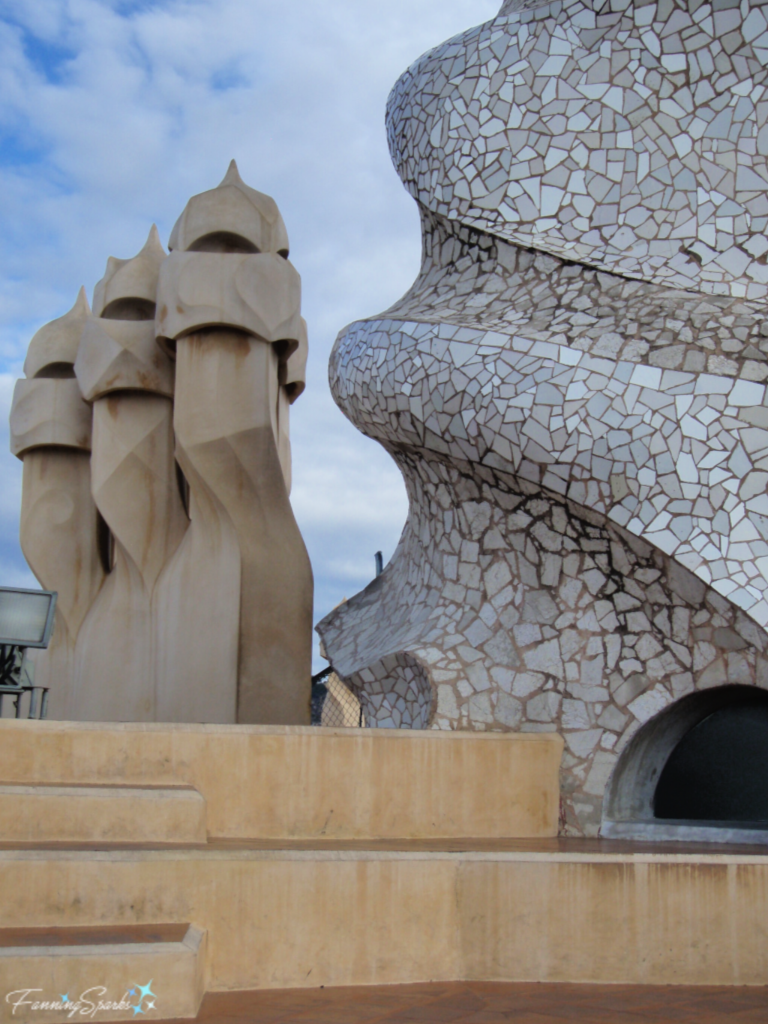
Similar marvels are revealed on the spectacular terrace on the roof at Casa Milà (popularly known as “La Pedrera” meaning the stone quarry) which is another one of Gaudí’s residential masterpieces.
Casa Mila Rooftop Trencadis.   @FanningSparks
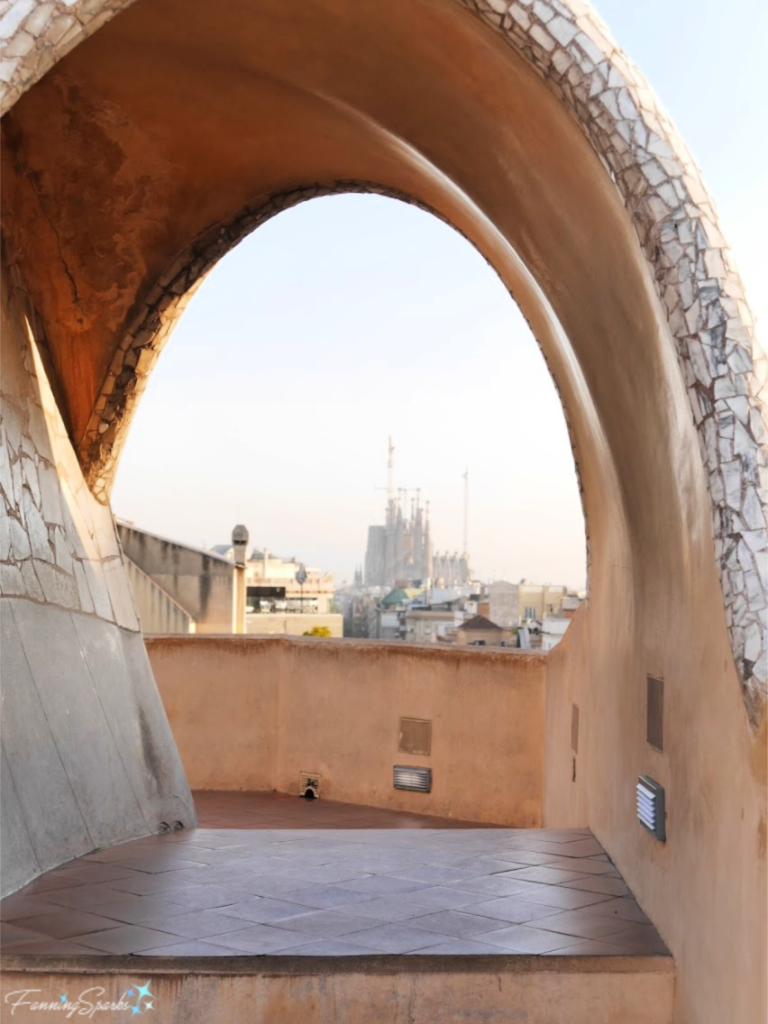
In the below photo, the rooftop arch frames the Sagrada Família in the distance.  The enormous Roman Catholic basilica was designed by Gaudi around 1882 and has been under construction ever since.  It is considered his most controversial creation.
Casa Mila Rooftop View of Sagrada Família.   @FanningSparks
I didn’t notice a great deal of trencadis in the Sagrada Família but these towers had recently been topped with clusters of trencadis fruit.
Sagrada Família Trencadis Atop Towers.   @FanningSparks
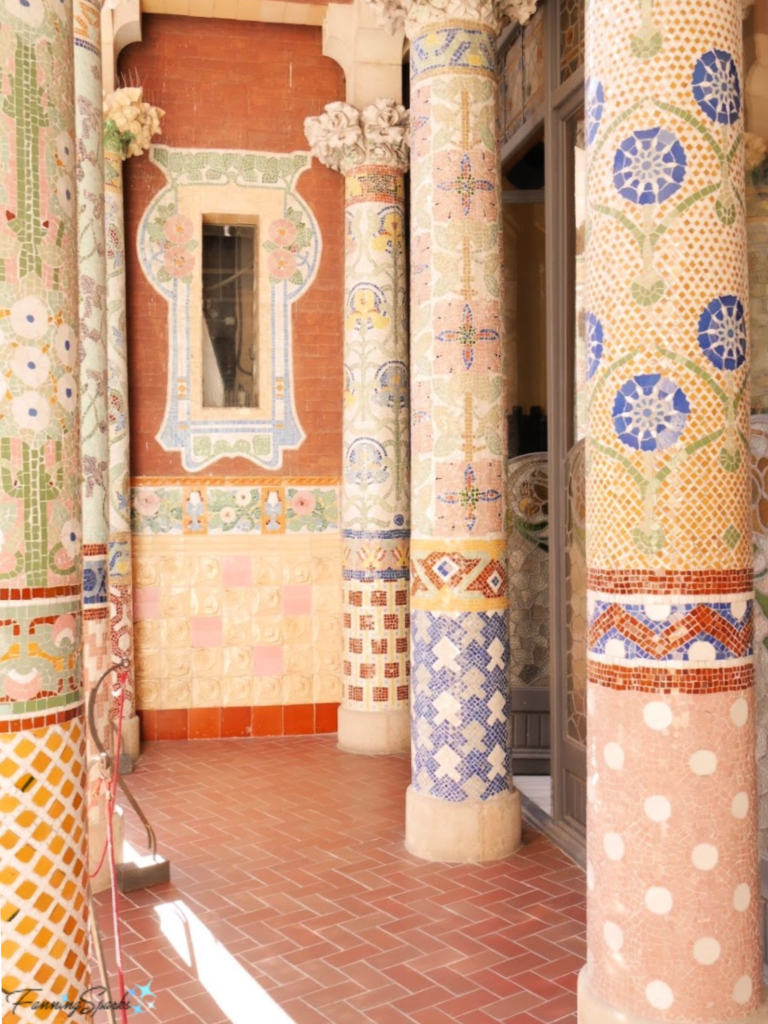
Gaudí was not the only proponent of trencadis.  The Palau de la Música (Music Palace) in Barcelona, designed by architect Lluís Domènech i Montaner, is a splendid structure which showcases a number of outstanding artworks including these trencadis-clad pillars.  I could go on and on but that will have to wait for another post.
Palau de la Musica Trencadis Pillars.   @FanningSparks

More Info

To learn more about mosaics, check out my posts Pair of Mosaic Mirrors Completed and Learning from the Ancient Masters.
You can learn more about Barcelona’s Park Güell on their website.
Excellent websites are available for Gaudí’s masterpieces at Casa Batlló, Casa Milà, and Sagrada Família.
Check out the Palau de la Música website for more information about this spectacular structure.
Sonia King’s book, Mosaic Tradition and Technique, is a great reference.
To learn more about the Modernisme movement as part of the Art Nouveau period, check out my post My Art Nouveau Love Affair.

Today’s Takeaways

1. Small pieces of various materials, including glass, mirror, stone, pebbles, and broken tile and china, can be assembled into a mosaic.
2. Mosaics can be made in different styles including the irregularity of trencadis.
3. If you have a chance to visit Barcelona Spain, be sure to take in the trencadis from the Modernisme movement.
Peg - FanningSparks Author

The more time I spend making mosaics, the more I want to know about their history and traditions.  I’ve had the good fortune to see many mosaic works, including priceless ancient masterpieces, during my travels.  I’d like to share a few highlights in today’s post.
The first mosaic works were made of water-smoothed pebbles in black and white.  The designs were primarily geometric shapes and patterns.  These mosaics were generally used on pavements and floors.  I don’t know if the below floor from the Topkapi Palace in Istanbul, Turkey is original but it’s a great example of a pebble mosaic.  Simple, yet beautiful!
A Beautiful Pebble Mosaic from the Topkapi Palace in Istanbul, Turkey.   @FanningSparks
Over time, craftsmen started cutting the pebbles into pieces which evolved into cubed pieces of stone (aka tesserae).  They also expanded the types of stone being used to introduce more colors.  Here’s an example of a mosaic floor uncovered in the ancient ruins of Ephesus.  Ephesus, an ancient Greek city dating back to 6000 BC, is located in present-day Turkey. Just imagine, these mosaic floors have survived for over 8000 years!
Ancient Mosaic Floors at Ruins of Ephesus in Turkey.   @FanningSparks
Closeup of Ancient Mosaic Floors at Ruins of Ephesus in Turkey.   @FanningSparks
As the art of mosaics continued to evolve, tesserae got smaller and mosaicists created more detailed designs.  Here’s an extraordinary example from the National Archaeological Museum in Naples, Italy where many of the treasures from the ancient city of Pompeii are displayed.  This mosaic, titled the Battle between Alexander and Darius III, is from between 125 and 120 BC.
Ancient Mosaic Depicting Battle Between Alexander and Darius III from Pompeii Italy.   @FanningSparks
According to the exhibit card, “This mosaic represents the moment in which Alexander the Great (to the left) attacks the chariot of Darius king of Persians.  The scene is commonly identified as one of the decisive battles in the conquest of the East… , even if an alternative hypothesis is that it brings together episodes from various battles so as to exhalt the figure of Alexander and his undertakings against the Persian king. …The mosaic is probably a copy … of a famous Greek picture painted by Philoxenos of Eretria … at the end of the fourth century B.C.  … This makes this mosaic the most significant documentation of this type of painting, the originals of which are now totally destroyed.”
Here’s a closer look at our hero, Alexander the Great.  Notice the amazing detail of his hair, eyes, eyebrow and other facial features.
Alexander the Great in the Mosaic Masterpiece Depicting Battle Between Alexander and Darius III from Pompeii Italy.   @FanningSparks
Here’s a doomed soldier offering his own horse to the retreating Darius III.
Soldier in the Mosaic Masterpiece Depicting Battle Between Alexander and Darius III from Pompeii Italy.   @FanningSparks
Here’s a closeup of another unidentified soldier.  Notice how skillfully tesserae are used to outline and shade his face.
Soldier in the Mosaic Masterpiece Depicting Battle Between Alexander and Darius III from Pompeii Italy.   @FanningSparks
Mosaicists continued to tell stories via their artwork‒sometimes on a grand scale.  Here’s a restored section from the Great Palace Mosaic in Istanbul, Turkey which dates back to around 306-337 AD.  As stated on the exhibit card: “Nowhere else in antiquity can we find a tessellated floor of quite the size and quality of the Great Palace Mosaic in Istanbul.  This unique masterpiece also provides us with the single reference that we have of the furnishings of the Imperial Palace of Constantinople.  At the time of its making, the mosaicist craft, rooted in Anatolia and artistically perfected in Greece and Italy, could draw on a long-established tradition.  The best artists from all corners of the Empire were employed to lay this splendidly ornamented floor.”  This floor required an astonishing 75-80 million tesserae!  Each tessera is about 5mm in edge length.
The Great Palace Mosaic in Istanbul, Turkey.   @FanningSparks
Unfortunately, only about 1/8 of the original floor survived but it is rich with elaborate design elements and details including 150 human and animal figures.  This is my favorite!
Handsome Man from the Great Palace Mosaic in Istanbul, Turkey.   @FanningSparks
This donkey is also outstanding.
Donkey from the Great Palace Mosaic in Istanbul, Turkey.   @FanningSparks
Here’s an example of a beautiful border.
Beautiful Border from the Great Palace Mosaic in Istanbul, Turkey.   @FanningSparks
A few years ago, I attended a Roman Mosaic Workshop while visiting Rome, Italy.  It was a unique opportunity to see an authentic mosaic studio and to learn from a professional master mosaicist. The workshop was hosted by Studio Cassio where mosaics have been the Cassio family business for the past two centuries.  The studio restores artwork at archaeological sites and monuments.  They have restored mosaics to their former splendor in more than 300 churches, museums, cemeteries, fountains and other buildings worldwide.  See More Info below.

In addition to learning about traditional methods, materials and tools, I was able to make a small mosaic picture from local marble tesserae.  Here’s my project in progress.  Notice how similar the tesserae are to those from the Ephesus ruins.
My Project at Roman Mosaics Workshop in Rome Italy.   @FanningSparks
Studio Cassio had a number of sample, reproduction works available for us to examine and study.
Samples of Mosaic Artwork at Studio Cassio in Rome Italy.   @FanningSparks
One of the challenges of working with mosaics is using small, individual pieces to create a pleasing, larger image.  Looking closely, the individual pieces don’t look like much but, looking from a normal viewing distance, the individual pieces meld together to create an overall image.  It’s similar to working with the individual pixels versus an overall photograph.  The added difficulty of working with a limited color palette and with materials which are not easily shaped increases the challenge.
In the below photo, the color and shape of the individual tessera are clearly visible and, frankly, not all that appealing.
Details of Mosaic Lips from Studio Cassio in Rome Italy.   @FanningSparks
But when you step away, the overall image is revealed.  It’s fascinating to me that this combination of colors and shapes could create such a beautiful set of lips!
Sample Mosaic of Lips from Studio Cassio in Rome Italy.   @FanningSparks
Here’s another example from Studio Cassio.  Notice how the monk’s head stands out from the background.
Mosaic Sample Showing Monk and Cross at Studio Cassio in Rome Italy.   @FanningSparks
The mosaicist has masterfully applied several techniques to accomplish this delineation. A very narrow, outline has been applied along the monk’s face‒with a combination of darker-colored tesserae and a perfectly placed intersection line.  In addition, the tesserae is deliberately placed in a different pattern on the surface of the face versus the cross behind it.  The face is laid in small, odd-shaped tesserae following the contours of the face while the cross is laid with angular, rather large tesserae in a regular linear pattern.
Closeup of Monk and Cross Mosaic at Studio Cassio in Rome Italy.   @FanningSparks
This close-up of the lance heads provides another example of how varying the color, size and pattern of the tesserae can effectively delineate elements of the overall image.
Closeup of Monk and Cross Mosaic at Studio Cassio in Rome Italy.   @FanningSparks
This is just a glimpse into the history and tradition of mosaics.  There is much more to be learned from the accomplished mosaic masters from the past.

More Info

Check out my previous post, Pair of Mosaic Mirrors Completed, to see a contemporary mosaic project I completed recently.
The 8000-year-old Golden City of Ephesus was the capital of the ancient world.  It’s no surprise, then, that Ephesus is on the list of UNESCO World Heritage sites.  You can learn more on the Visit Ephesus website.
The National Archaeological Museum in Naples Italy or, Museo Archeologico Nazionale di Napoli in Italian, has an amazing mosaic collection including a number of important mosaics recovered from the ruins of Pompeii.  You can find info on their website under Routes & Collections > Rooms & Exhibition Spaces > Mosaics.  This includes the Alexander Mosaic, which depicts a battle between the armies of Alexander the Great and Darius III of Persia.
The Great Palace Mosaic Museum in Istanbul, Turkey exhibits magnificent mosaics dated to 450-550 AD.  You can learn more on the Go Turkey Tourism website.
I’d highly recommend Studio Cassio where I attended the Roman Mosaic Workshop in Rome, Italy.  More information is available on the Studio Cassio website or under Things To Do in Rome on TripAdvisor.

Today’s Takeaways

1. Mosaics have a long and rich history.
2. Consider attending a workshop relevant to your travel destination.
3. Evaluate the work of experts in an art form or media that interests you.
Peg - FanningSparks Author

You know that special feeling you get when you finally see the results of the project you’re making?  Especially if it’s a project you’ve been working on for a long time?  And you didn’t really know if it would turn out how you imagined?  There’s such a sense of accomplishment!  Ahhh… the sweet joy of making!
That’s how I felt recently when my mosaic project was finally done!  We now have two framed mosaic mirrors hanging in our master bathroom.  Here they are in all their glory.  I’m so pleased with how they turned out.
Custom Made Mosaic Mirrors for Master Bathroom by FanningSparks.   @FanningSparks
This was quite an undertaking.  It all started with a frameless mirror from Ikea (see More Info below).  I used wood molding and 5mm thin plywood to build custom frames.  The frames are about 27” x 32” allowing for a 2 ½” border around the mirror.  I used several coats of primer and paint to ensure the backing was sealed.  Then the mosaic fun began!
Before moving into our new house (see A Before Tour of Our New Casual Lake House ), we had the shower in the Master Bathroom rebuilt.  We selected new tile including an accent section of circular tiles in shades of grey and white.  You can see it reflected in the mirror below.
Mosaic Mirror Designed to Reflect Bubble Tile in Shower by FanningSparks.   @FanningSparks
The circular shapes remind me of bubbles which seemed appropriate for a bathroom.  I decided to incorporate the circular pattern into the mirror design.  The idea was to add colorful bubbles as a focal point.  I’d had good success with a multi-layered design in a previous project and decided to try it again.  The layering is achieved with an extra piece of backing cut to shape and glued onto the frame.
Overlay Used to Layer in Bubble Design on Mosaic Mirror by FanningSparks.   @FanningSparks
I’d already made a full length mosaic mirror frame for the Master Bedroom and was really pleased with the results.
Custom Made Full Length Mosaic Mirror by FanningSparks.   @FanningSparks
And here’s a closer look at the mosaic border.  It’s a combination of ¾” glass tiles, ¾” glass penny rounds and custom-cut stained glass.
Closeup of Custom Made Full Length Mosaic Mirror by FanningSparks.   @FanningSparks
I decided to merge all these ideas into a single design for the Master Bathroom mirrors.   We needed two mirrors so the design was mirrored but not replicated.  Both mirrors have a bottom corner of “bubbles” one is on the left …
Custom Made Mosaic Mirror for Master Bath by FanningSparks.   @FanningSparks
…and the other is on the right.
Custom Made Mosaic Mirror for Master Bath by FanningSparks.   @FanningSparks
Now that you’ve seen the results, let’s take a look at the process for making these mosaic mirrors.  I should point out that I’m not a mosaic expert‒I’m still learning and I rely heavily on the expertise and advice available online (see More Info below).  After the idea of the bubble corners started to gel, I laid out a few variations of tesserae (ie the small pieces used in mosaic work) to see how they looked.
Designing the Layout for Mosaic Mirrors by FanningSparks.   @FanningSparks
A little experimentation also helped to determine the composition of the border.  With the exception of the mirror tiles, the borders are made of ¾” x ¾” vitreous glass tiles (see More Info below).  I chose 4 colors from the Kaleidoscope Color Grove line: Smoke, Night, Rochester and Alpine Blue.  I love using these tiles‒the colors are vibrant and they’re easy to cut.
Experimenting with Border Design for Mosaic Mirror by FanningSparks.   @FanningSparksHere’s a closeup showing the bottom of the tiles‒they are formed into 9 quadrants for good adherence but that also makes them easy to cut with a pair of tile nippers.
Cutting the Kaleidoscope Vitreous Glass Tiles in Alpine Blue.   @FanningSparks
The mirror tiles are cut from a sheet of mirror glass.  First I measured and marked lines to cut a ¾” strip of glass.  Then a glass cutter was used to score a line in the glass.
Marking Mirror Glass for Cutting.   @FanningSparks
After scoring the glass, running pliers were used to run the score and separate the glass pieces.  The running pliers have a slightly curved jaw which ensures equal pressure is applied on both sides of the score line.  The trick is to align the pliers with the score line and squeeze firmly.
Running the Score on Mirror Glass.   @FanningSparks
Turning that strip of glass, into tiles is a simple matter of scoring and breaking into ¾” squares‒over and over again.
Breaking Mirror Glass for Tiles.   @FanningSparks
The round circles for the bubble corners required a little more work.  I purchased a handy circle cutter called an Easy-Cut (see More Info below).  I really like this cutter.  But if you’re thinking of buying one, don’t expect the circles to simply fall out of the cutter.
Using Circle Cutter to Score Round Glass Pieces.   @FanningSparks
The cutter does a beautiful job of creating a perfect round score but you’ll have to extend that score to all the edges to actually break out the circle.  And you’ll surely want an electric grinder (see More Info below) to smooth and finish those edges.
Making Circular Glass Pieces.   @FanningSparks
Once the design was finalized and the glass pieces were cut, it was time to start putting it together.  This is where I would highly recommend a self-adhesive fiberglass mesh such as QuikStik Mosaic Mesh™ (see More Info below).  This is the first time I tried this product but I swear I’ll never again take on a project like this without it.  The reason is simple, it cuts the time required for this step in half.  Seriously!  Without this mesh I had to pick up every single tessera and glue it into place on the final piece… one tessera at a time.  Usually this meant synchronizing two versions of the layout… one for planning and one for gluing.  It was tedious, to say the least.  With QuikStik, I cut the mesh to fit my backing and then positioned my tesserae.  I could adjust until I was happy with the design and then I moved on to the next step.  There’s no need to manage a second version of the design and no need to pick up and glue every single tessera individually.
Using Adhesive Mesh to Layout Tesserae.   @FanningSparks
After all the tesserae were in place, I carefully lifted the mesh out of the frame and set it to the side.  I taped the edges of the frame and covered the mirrors with paper to protect them.  Then I prepared and applied a thin layer of thinset mortar to the border and the bubble corner.
Attaching Tesserae with Thinset Mortar.  @FanningSparks
I carefully lifted the mesh back into place to permanently attach the tiles.   Here’s how the tesserae and mesh look sitting in the thinset.
Tiles in Thinset Mortar.  @FanningSparks
After waiting 24 hours for the thinset to harden, I was able to apply the grout.  Here’s my frame covered in black grout.
Applying Grout to Mosaic Mirror.   @FanningSparks
Next I removed the excess grout and, after letting it sit for 20-30 minutes, I removed the haziness.  Finally it started to look like the desired result.
Removing Excess Grout and Hazing from Mosaic.   @FanningSparks

The final steps were to let the grout cure and then to seal the piece with a tile and grout sealer.  I hope you’ve enjoyed this glimpse into the making of a mosaic mirror.  I’ve already started my next project and can’t wait to see how it turns out.

Aug 21, 2019 Update: Please Note: Ordinary glass mirror stock will oxidize and blacken if the silver backing comes into contact with ordinary adhesives. To prevent that from happening, I used special mirror adhesive to adhere the mirror to the frame.  The mirror tiles in the decorative border, however, were adhered with thinset so they may blacken over time.  Alternatively, I could have used pre-made mirror tiles which have a special epoxy coating to protect the silver backing.  Special thanks to Joe Moorman from Mosaic Art Supply for this clarification. 

More Info

The frame-less mirror I used is from Ikea.  It is the EIDSÅ Mirror in 18 ⅞” x 23 ⅝”.

The ¾” vitreous glass tiles are from the Kaleidoscope Color Grove line by Mosaic Tile Supplies (MTS).  MTS is the manufacturer of Kaleidoscope®, Prism® and Illuminati® Glass Mosaic Tile Brands, and more.  You’ll want to optimize your order since shipping costs are pricey.

The glass circle cutter is Easy-Cut from Diamond Tech International.  It cuts ½” to 5” diameter circles.

The self-adhesive fiberglass mesh I used is QuikStik Mosaic Mesh™ from Skeew.   Lou Ann Weeks, who is the co-founder of Skeew, has been a mosaic artist for nearly 20 years.  She has published a wealth of helpful information about making mosaics which you can access on her website under How To > Make Mosaics > Articles.

The electric grinder I use is a Gryphette Diamond Grinder from Gryphon Corporation.

There’s another online source of supplies and helpful reference material I’d highly recommend.  It is Mosaic Art Supply.  I’ve always had a good experience purchasing from them plus their online reference info found under Learn to Mosaic is clear,  practical and reliable.   I’ve consulted it numerous times and have always found good advice.

Today’s Takeaways

1. Experience the joy of making.
2. Consider trying mosaics‒they offer a vast variety of styles, materials and uses.
3. Imagine how you can customize and personalize a mosaic project for your own home.
Peg - FanningSparks Author

Every year Southern Living magazine designs, builds and decorates a model home.  The home, referred to as the “Idea House”, is featured in the magazine and opened to the public for viewing.  This year’s Southern Living Idea House is located on Amelia Island, Florida in a new development called Crane Island.  It is surrounded by natural marshlands on the Intracoastal Waterway (ICW) which is a 3,000-mile inland waterway from Massachusetts to Texas.  When I arrived early for a recent visit, I decided to take a little walk on the dock.
Boardwalk to Dock at Southern Living Idea House 2019.   @FanningSparks
My curiosity was rewarded when I witnessed a beautiful dolphin gliding along the waterway.
Dolphin Swimming by in ICW at Southern Living Idea House 2019.   @FanningSparks
The ICW isn’t only for wildlife, though, I also witnessed several commercial vessels during my visit.  Here’s a barge as viewed from the back porch.  There’s no question it’s a beautiful and entertaining setting.
Commercial Barge Passing on ICW at Southern Living Idea House 2019.   @FanningSparks
In realtor-speak, the Idea House is 5 bed, 5.5 bath, 4,540 sq ft.   But it’s so much more than that!
The Southern Living Idea House 2019.   @FanningSparks
When you enter the house, you are greeted by a spacious living/dining/kitchen area.  Large windows provide an expansive view of the spectacular setting.
Living Room from Front Entry at Southern Living Idea House 2019.   @FanningSparks
Those large windows are actually full height bi-fold doors that open onto a porch.  There’s no shortage of porches in the Idea House‒I counted 5 including one that was screened.  They’re on nearly all sides of the house so there’s one for every time of day or night.  This is the second floor back porch which is charmingly called the “swinging porch”.
Upstairs Swinging Porch at Southern Living Idea House 2019.   @FanningSparks
The color scheme throughout the house is soft and muted‒soothing blues, neutral taupes/buffs and calming whites.  It’s perfect for this elegant waterfront home.  This is the Game Room on the second floor.
Game Room in Southern Living Idea House 2019.   @FanningSparks
I noticed a large variety of patterns used throughout the house.  There are patterns on the wallpaper, tablecloths, table and vanity skirts, linens, bed canopies, pillows and so on.  Here’s a closeup of the Game Room drapery and wallpaper.
Wallpaper and Drapes from Game Room at Southern Living Idea House 2019.   @FanningSparks
Texture was also prevalent throughout the house.  In the Master Bedroom, for instance, shiplap walls, luxurious bed linens, glossy wood furniture and a variety of interesting accessories built a rich textural experience.
Master Bedroom at Southern Living Idea House 2019.   @FanningSparks
While I admired everything about the Idea House, I’m not in the market for a new house or a major renovation, so I focused on details and little things that I knew I could apply in my own home.  Here are my top 8 ideas from the Idea House.

Idea 1: Add Local Interest  I love how cranes are sprinkled throughout the Idea House in recognition of the Crane Island location.  There’s a striking gallery wall in the Living Room featuring illustrations of cranes and other wild birds.  The middle callout shows a chair upholstered in crane-patterned fabric.  The bottom callout shows towel hooks in one of the bathrooms topped with bird illustrations.  Cranes would not be relevant to everyone’s home, of course, but every location has its own unique and interesting elements.
Idea 1 from Southern Living Idea House - Add Local Interest.   @FanningSparks

Idea 2: Add Life with Fronds and Leaves  Large palm fronds and plant cuttings are used throughout the Idea House to add greenery and life.  It’s a nice alternative to cut flowers or house plants.
Idea 2 from Southern Living Idea House - Add Life with Fronds and Leaves.   @FanningSparks

Idea 3: Repeat Pattern on Walls and Windows  If you follow home decorating trends, you’ll know wallpaper is back in style.  I didn’t actually count the number of rooms with wallpaper but I’d guess more than half had a wallpaper treatment of some kind.  But the idea that caught my attention was extending the wallpaper pattern onto the window blind fabric.  It makes for a nice, seamless treatment.  Here’s an example from the Laundry Room.  And, yes, there are two washers and two dryers!  I guess when you have a big house in a beautiful waterfront location that everyone wants to visit, you can expect to generate a lot of laundry!
Idea 3 from Southern Living Idea House - Repeat Pattern on Walls and Windows.   @FanningSparks

Idea 4: Decorate Top of Cabinet  Admittedly, this is a rather small point.  I’ve never quite known what to put on the top of a standalone cabinet‒aside from the predictable collection of baskets.  I like the idea of hanging a photo or print in the space above the cabinet with just a simple piece of pottery placed on the cabinet itself.
Idea 4 from the Idea House - Decorate Top of a Cabinet.   @FanningSparks

Idea 5: Frame Wallpaper as Art  The vanity area of the Twin Bedroom is papered in a lovely pattern of birds and foliage.  It seems a section of that wallpaper was then framed and hung in the adjacent bathroom. Great idea!
Idea 5 from the Southern Living Idea House - Frame Wallpaper as Artwork. @FanningSparks

Idea 6: Camouflage a Switchplate  Another small but impactful idea.  Why not make those ugly switchplates and outlet covers disappear?  Here’s an example from the far wall in the kitchen.
Idea 6 from the Southern Living Idea House - Camouflage a Switchplate. @FanningSparks

Idea 7: Dress Up the Ceiling  I was surprised to see at least two rooms with wallpaper on the ceiling.  It was such a pleasant surprise.  Here’s the cozy little Bunk Room with 2 sets of bunk beds ready for guests.  The ceiling treatment adds style and glamour to this small space.
Idea 7 from the Southern Living Idea House - Dress Up the Ceiling. @FanningSparks

Idea 8: Add an Unexpected Piece  The designer, Heather Chadduck Hillegas, called this out as one of her signature style moves in the August 2019 issue of Southern Living magazine.  She said “It’s always nice to throw an oddball into the mix.  A chair is a good option in a hallway.  It can hold a stack of laundry or a stray handbag.”  I love a few surprises in a home’s decor and this quirky chair is a great example.
Idea 8 from the Southern Living Idea House - Add an Unexpected Piece. @FanningSparks
I hope you’ve found these ideas interesting and that you might be tempted to try them, too.

More Info

You can learn more about the Southern Living Idea House on the Southern Living website or the Crane Island website.

There are 7 elements of design including color, pattern, texture, space, line, form and light.  The Interior Design Academy explains these elements must work in harmony to create an aesthetically pleasing interior.  I’ve discussed some of these topics in previous posts.  See my  Color Palette by Mother Nature post for more information about inspiring color palettes.  See my Patterns by Mother Nature post for inspiration about patterns.  In my posts, Texture by Mother Nature and Decorating With Texture, we looked at texture.  Decorating with Texture includes quite a few photos from previous Southern Living Idea Houses.

Today’s Takeaways

1. Consider visiting the Southern Living Idea House or a similar model home near you.
2. Study the setting, architecture and décor to identify elements that appeal to you.
3. Take photos and/or notes of ideas that inspire you.
Peg - FanningSparks Author

It’s sea turtle nesting season along the coast of Florida.  There are 7 species of sea turtles, 5 of which can be found nesting in Florida.  These include the Loggerhead, Green, Hawksbill, Kemp’s Ridley and Leatherback.  Sadly, all sea turtles are threatened or endangered. According to The National Wildlife Federation, “They face an uncertain future due to threats of many kinds, including pollution and the encroachment of coastal development on their nesting beaches. They are also susceptible to accidental drowning in fishing gear and are at risk from the international trade in turtle meat and shell products.”
The Loggerhead (Caretta caretta) is the most common sea turtle in U. S. coastal waters.  In fact, the Archie Carr National Wildlife Refuge, 20 miles of coastline from Melbourne Beach to Wabasso Beach, along the northeast coast of Florida is one of the two most important places in the world for loggerhead nesting.  The other is Masirah Island at the Sultanate of Oman.  Many organizations, including the Sea Turtle Conservancy, Amelia Island Sea Turtle Watch, Florida Fish and Wildlife Services, National Marine Fisheries Services, and others, are actively working to preserve and protect the world’s sea turtles.
The Sea Turtle Conservancy hosts an annual event called Tour de Turtles.  This event is designed to increase awareness and gain financial support.
Tour de Turtles Live Release at Melbourne Beach Florida.   @FanningSparks
Satellite telemetry is used to follow a group of sea turtles from their nesting beaches to their foraging grounds.  Since only female turtles come ashore for nesting most of the Tour de Turtles participants are female.  I had the opportunity to witness two female loggerhead turtles at a Live Release event on Melbourne Beach.  Philanthropy Phyllis (Phyllis) is sponsored by the Community Foundation for Brevard.  Lulu (shown in the photo below) is sponsored by, honu, a UK-based jewelry company with “a mission to help save one of the Earth’s oldest inhabitants from extinction by creating pretty, ocean inspired jewellery and accessories”.
Female Loggerhead Turtle Known As Lulu in Tour de Turtles.   @FanningSparks
Phyllis and Lulu were selected after nesting at a nearby location and detained for a few hours.  During this time, the turtles were outfitted with a satellite transmitter.
Adhering the Transmitter to the Turtle's Shell at Tour de Turtles.   @FanningSparks
The race begins when the newly-wired turtles are released back to the ocean.  Here the gate is being opened to release Phyllis.
Releasing Loggerhead Turtle Known as Phyllis at Tour de Turtles.   @FanningSparks
This is Phyllis making her way back to the ocean.  She headed straight to the water’s edge and moved surprisingly fast.
Female Loggerhead Turtle Known as Phyllis Released at Tour de Turtles.   @FanningSparks
Here’s Lulu crawling across the beach to the water.  She also made a speedy exit.
Female Loggerhead Turtle Known as Lulu Released at Tour de Turtles.   @FanningSparks
These turtles are tracked for about 3 months.  The turtle who swims the furthest distance during the migration marathon is declared the Tour de Turtles winner.  Live turtle releases, involving various species, are hosted in a series of locations.  In addition to the Melbourne Beach, Florida Live Release which I attended, turtles will be/have been released from 7 other locations: Tortuguero, Costa Rica; Vero Beach, Florida; Florida Keyes, Florida; Nevis, West Indies; Guanahacabibes National Park, Cuba; Anna Maria Island, Florida; and Soropta Beach, Panama.
It was an amazing experience watching these creatures crawl across the sand and glide into the ocean.
Female Loggerhead Turtle Known as Lulu Enters the Water at Tour de Turtles.   @FanningSparks
The Tour de Turtles website has a cool tracking feature where you can watch the turtles’ progress.  Check out Phyllis’ progress here.  She seems to be taking the long way home.  Here is the link to Lulu’s marathon migration map.  She seems to be taking a more direct route.
Sea turtles as I’ve learned have a unique life cycle.  Here’s the explanation from The National Wildlife Federation (NWF):  “Mating occurs roughly every two to three years in shallow waters. In summer, an ancient reproductive ritual begins when the female leaves the sea and crawls ashore to dig a nest in the sand. She uses her rear flippers to dig the nest hole, then deposits 80 to 150 eggs that look a lot like Ping-Pong balls.  When egg-laying is complete, the turtle covers the eggs, camouflages the nest site, and returns to the ocean. Nesting turtles may come to shore several times in a nesting season to repeat the process.”  Interestingly, the mother turtle never sees her young.  She simply deposits the eggs and moves on.
Amelia Island does not have the nesting density of south Florida beaches and does not conduct turtle walks to look for and observe sea turtles nesting.  However, the Amelia Island Sea Turtle Watch organization does have a strong force of volunteers who monitor sea turtle nesting activity, gather statistical data and address sea turtle emergency situations. The volunteers survey the beach at daybreak each morning looking for signs that a turtle came ashore during the night.  Nests are taped off and posted.
Do Not Disturb Sea Turtle Nest Sign.   @FanningSparks
The volunteers also conduct excavations of sea turtle nests to gather data for assessing nesting success.  The excavations, which are open to the public, are a great opportunity to learn more about sea turtles.  I attended an early morning excavation on North Beach on beautiful Amelia Island.
Sunrise at North Beach on Amelia Island.   @FanningSparks
The excavation was hosted by Len Kreger (Thank you, Len!).  He explained the loggerhead turtle nest he would excavate had emerged at least 72 hours earlier meaning the hatchlings had already crawled out and entered the ocean.  Here is Len digging out the nest.
Amelia Island Sea Turtle Watch Volunteer Digs Out a Turtle Nest for Excavation.   @FanningSparks
Continuing with the NWF explanation of the turtle life cycle: “After incubating for about two months, the eggs begin to hatch. Hatchlings range from 1.5 to 3 inches (3.8 to 7.6 centimeters) in size, depending on the species, and emerge from the nest as a group. This usually occurs at night, and the hatchlings use the bright, open view of the night sky over the water to find their way to the sea. After their first frantic crawl from the nest to the ocean, male sea turtles never return to the shore again, and females come back only long enough to lay eggs.”
The purpose of excavating a turtle nest is simply to inventory the remaining nest contents: unhatched eggs, shards (empty egg shells), dead hatchlings and, sometimes, live hatchlings.  Len stressed the nest had emerged 3 days prior and we should hope not to find any live hatchlings.  Live hatchlings at this stage would have a lower than normal chance of survival.  That’s significant given that typically only 1 in a 1000 hatchlings survive to maturity.  The below photo shows some of the nest remains including 2 unhatched eggs (top left), several shards and a few dead hatchlings.
Contents of Emerged Loggerhead Turtle Nest Excavation by Amelia Island Sea Turtle Watch.   @FanningSparks
But the biggest surprise was live hatchlings… 18 in total.  Here are the first 2 hatchlings recovered.
Live Hatchlings Found in Loggerhead Turtle Nest Excavation by Amelia Island Sea Turtle Watch.   @FanningSparks
Len gathered them in a bucket and then released them at the water’s edge.
Amelia Island Sea Turtle Watch Volunteer Assists Live Hatchlings after Nest Excavation.   @FanningSparks
Live Hatchlings Released after Loggerhead Turtle Nest Excavation by Amelia Island Sea Turtle Watch.   @FanningSparks
Despite knowing the hatchlings had little chance of survival, it was thrilling to see them up close and in person and then to witness their eager rush into the sea.

I would be remiss if I didn’t pass on these reminders.  Please abide by the following rules if you’re in a sea turtle zone during nesting season.

  1. Keep Dark Minimize beachside lighting. Close drapes in oceanfront rooms at night.  Do not use white flashlights (including smart phone flashlights) or flash cameras at night.
  2. Stay Clear Do not disturb nests, eggs, markers, signs or tracks. Do not approach, touch, or get in front of adult or baby turtles.
  3. Remove Obstacles Take your trash with you when you leave the beach. Do not dig holes on the beach without filling them in before leaving.  This includes knocking down and filling in sandcastles.  Remove beach furniture (beach chairs, umbrellas, canopies, etc) at the end of the day.
  4. Control Pets Keep dogs on a leash, and away from turtle nests, at all times.

More Info

There are numerous online reference sites regarding sea turtles.  I found the following helpful:
The National Wildlife Federation – Sea Turtles
U.S. Fish and Wildlife Service – Sea Turtles
U.S. Fish and Wildlife Service – Archie Carr National Wildlife Refuge
Sea Turtle Conservancy
You can learn more about the Tour de Turtles annual event hosted by the Sea Turtle Conservancy on the Tour de Turtles website.
The Amelia Island Sea Turtle Watch website provides information about their nest excavations.

Today’s Takeaways

1. There’s nothing like seeing a wild creature in its natural habitat.
2. Strive to learn all you can about a creature that interests you.
3. Consider actions you can take, both large and small, to preserve and protect wildlife.

Peg - FanningSparks Author

If you’re looking for some light summer reading, you might want to consider the book “Clara and Mr Tiffany” by Susan Vreeland.  It’s not a new book (published 2011) but well worth reading if you missed it when it first hit the market.  The story, which takes place in New York City from about 1888 to 1909, tells the intriguing tale of Clara Wolcott Driscoll and her work for Louis Comfort Tiffany at Tiffany Studios.  It’s well written and thoroughly researched and, while it’s a work of fiction, it is built upon actual facts.  How these facts came to light makes the story even more interesting.

Louis Comfort Tiffany (1848-1933) is considered one of the most influential creative designers of his time.  Tiffany Studios was famous for innovative stained glass windows.  Tiffany Studios is said to have produced about 5,000 windows during its 50-year history.  Many of those windows had a religious theme including the one pictured below called “The Righteous Shall Receive a Crown of Glory” from 1901.  This window was commissioned for the United Methodist Church in Waterville, New York.  It is currently on display at the Corning Museum of Glass in Corning, New York.  The exhibit card indicates this window is made of “handmade colored and opalescent sheet glass and textured glass, cut and assembled, painted; lead came”.
Tiffany Stained Glass Window: The Righteous Shall Receive a Crown of Glory.   @FanningSparks
Here is a closeup of the cross.
Tiffany Stained Glass Window Details: The Righteous Shall Receive a Crown of Glory.   @FanningSparks
A notable exception to the religious theme was the below window which can be seen at the Morse Museum in Winter Park, Florida.  The museum describes the window as “Maiden feeding flamingos in the court of a Roman house”.  The window was designed by Tiffany for the World’s Exposition in Chicago in 1893.  There is an amusing little story about this window in the book Clara and Mr Tiffany.
Tiffany Stained Glass Window: Maiden Feeding Flamingos.   @FanningSparks
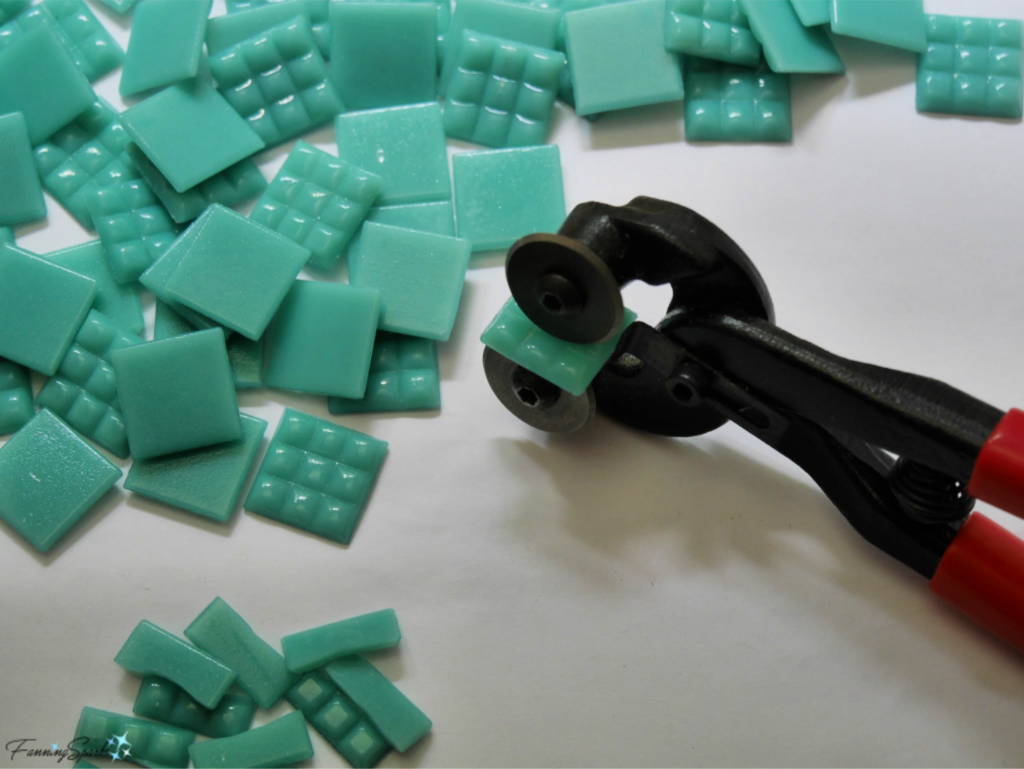
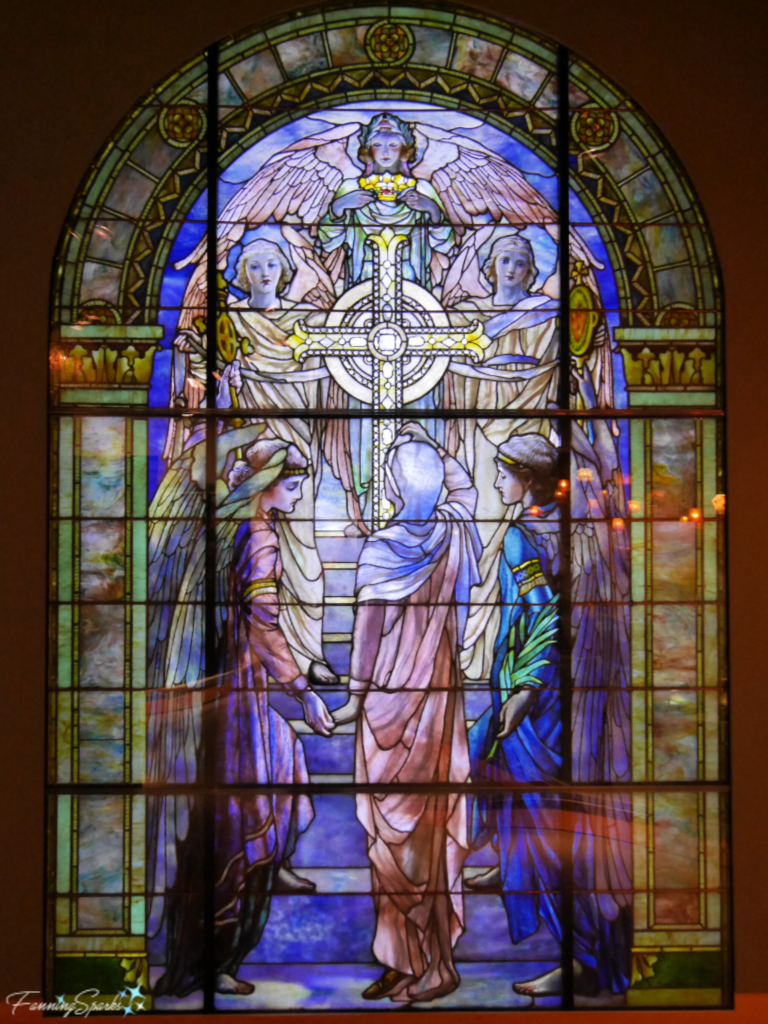
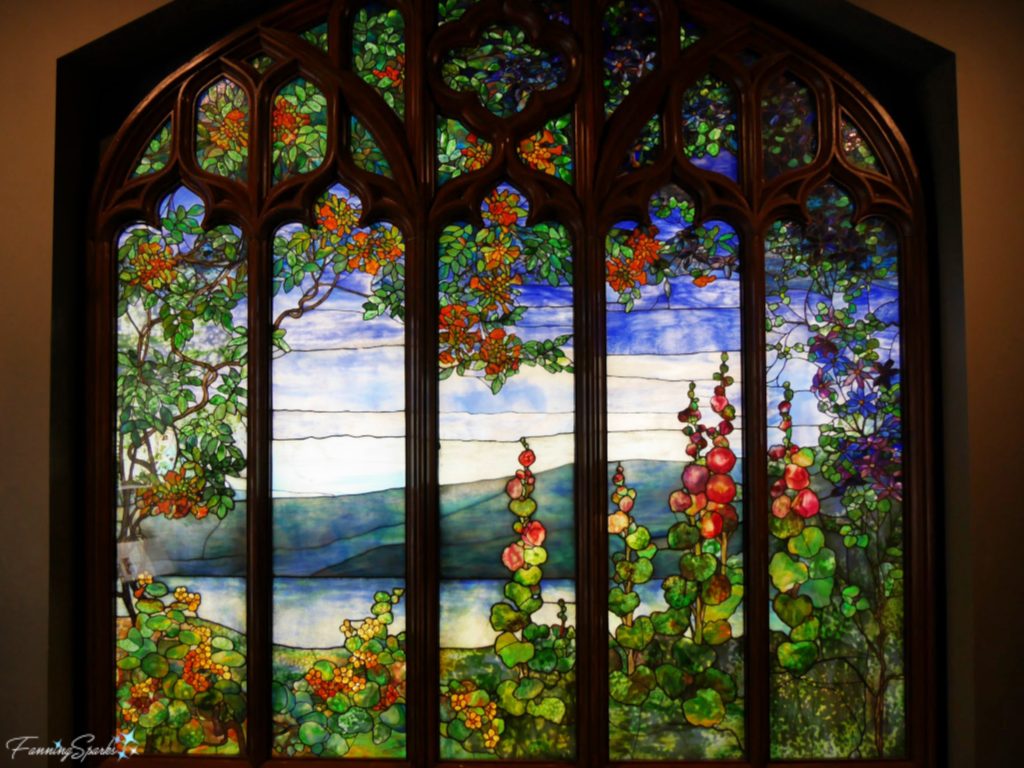
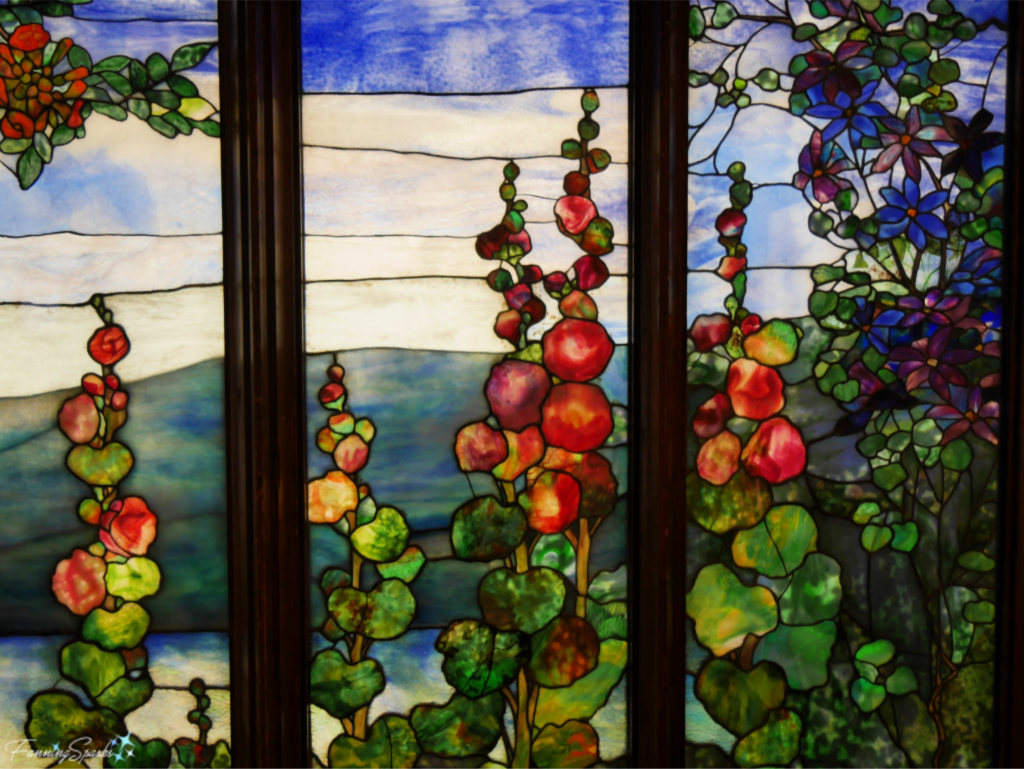
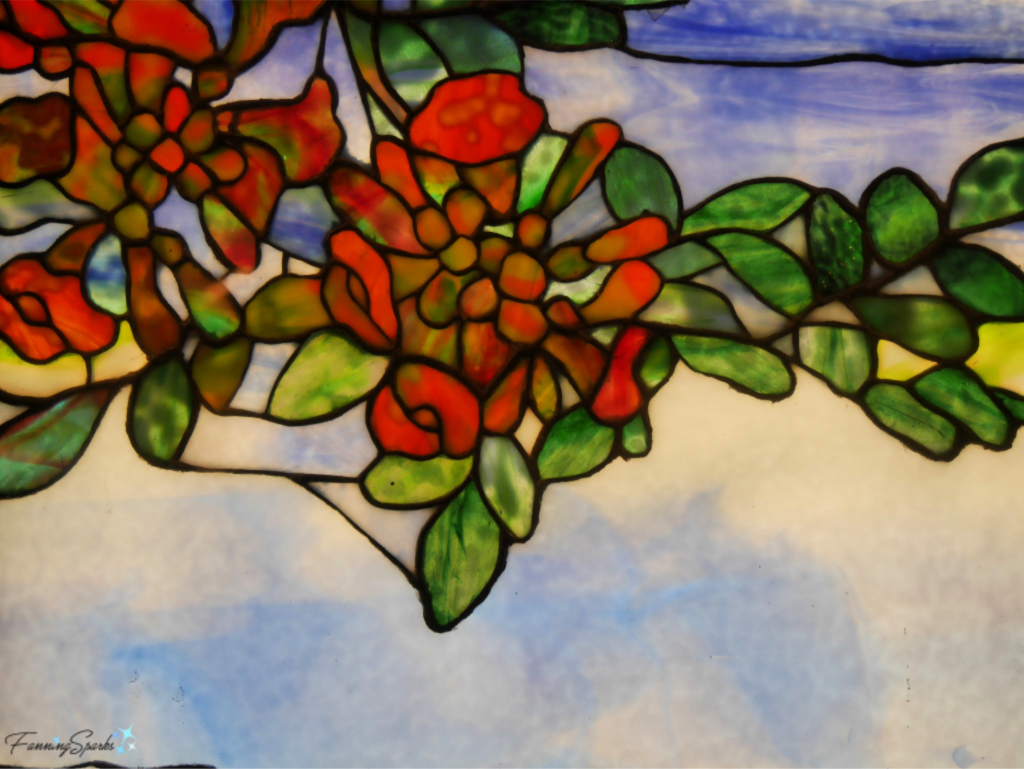
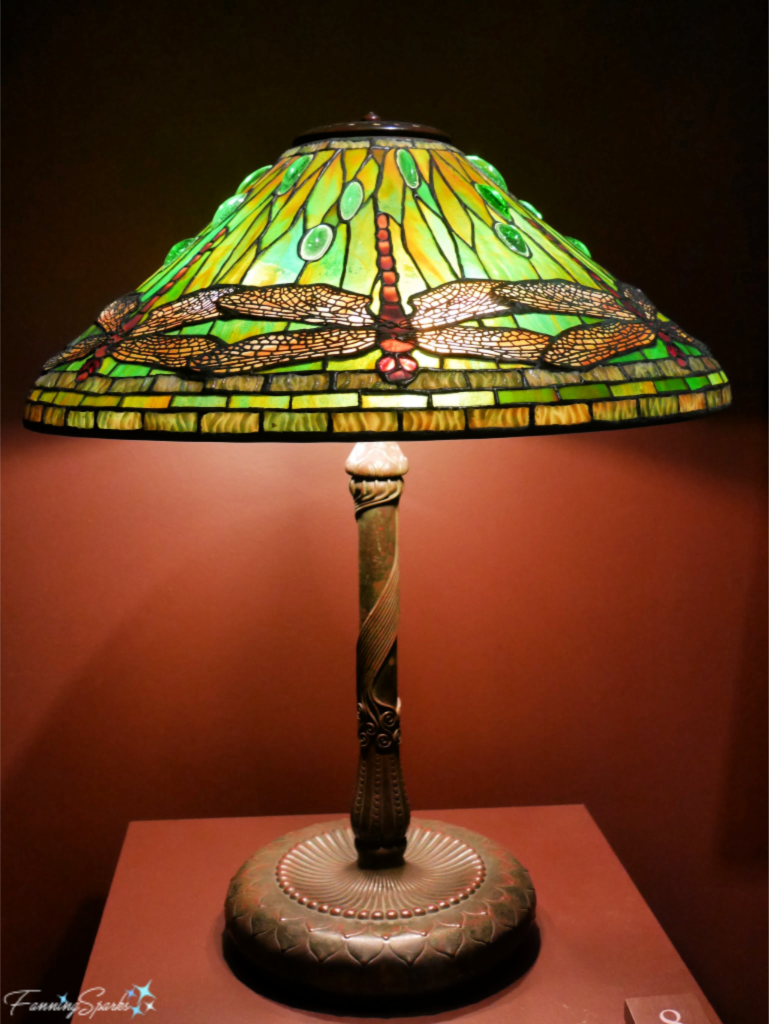
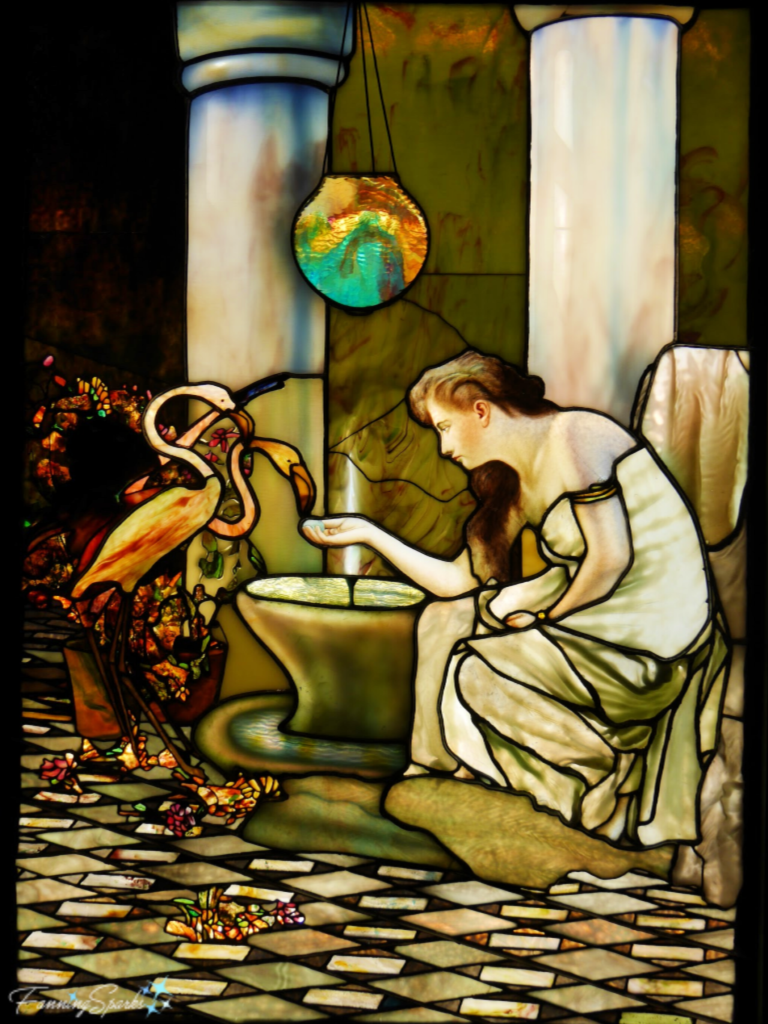
Below is an example of a Tiffany glass window made with techniques described in Clara and Mr Tiffany.  The Hudson River landscape window was commissioned for a Gothic Revival Music Room at Rochroane Castle, Irvington-on-Hudson, New York.  It was recognized by International Style magazine in 1905 as one of the most important residential commissions of its day.  The exhibit card explains “Tiffany did not use paints or stains in the execution of the window.  The rich colors, details, and illusionistic effects are produced with different types of textured glasses, and by layering pieces of colored glass – a technique called plating – on the front and back of the window.”
Tiffany Stained Glass Window: Hudson River landscape.   @FanningSparks
Here’s a closer look at the hollyhocks and the trumpet vine in the foreground.
Tiffany Stained Glass Window Details: Hollyhocks in the Hudson River landscape.   @FanningSparks

Tiffany Stained Glass Window: Trumpet Vine Details in Hudson Valley Landscape Window.   @FanningSparks
Meanwhile, around 1898, the first leaded glass lamp shades appeared.  These iconic lamps incorporated insect and floral motifs and became known by names such as the Dragonfly, Cobweb, Butterfly, Wisteria, Poppy, Laburnum, Arrowhead and Geranium.
Tiffany Stained Glass Lamps on Display at Morse Museum.   @FanningSparks
The lamps were costly but quickly became sought after by New York’s wealthy citizens.  For years, Tiffany was credited with designing these beautiful lamps.  Then in 2005, a marvelous discovery revealed a different story.  Two separate collections of personal correspondence written by Clara Driscoll and her family were brought together and studied as a whole.  As it turns out, Clara Driscoll is actually the designer of several of the Tiffany leaded glass lamp shades!  Two years later, the New York Historical Society hosted an exhibition based on this ground breaking research.  It was called “A New Light on Tiffany: Clara Driscoll and the Tiffany Girls”.  As stated in the exhibition press release, “The exhibition presents the renowned works of Tiffany Studios in an entirely new context, focusing on the women who labored behind the scenes to create the masterpieces now inextricably linked to the Tiffany name.”  The exhibition has long since dissolved but many of these Tiffany lamps can still be seen in museum collections.
The Wisteria lamp, an iconic masterpiece of leaded-glass art, can be seen at the Morse Museum.  The designer of the Wisteria lamp is clearly identified as Clara Driscoll in the exhibit guide.  Aside from the sheer beauty of this lamp, it’s impressive to think about how it was constructed‒over 2000 individual pieces had to be selected, cut, pieced together and soldered into place.
Tiffany Stained Glass Lamp: Wisteria Designed by Clara Driscoll.   @FanningSparks
Here’s a closeup of the Laburnum lamp, also on display at the Morse Museum, which is equally intricate.
Tiffany Stained Glass Lamp: Laburnum Designed by Clara Driscoll.   @FanningSparks
Here’s a look at the Dogwood design with an emphasis on glass colors and patterns.  The form is less complex with straight edges and a simple bottom edge.
Tiffany Stained Glass Lamp: Dogwood Design.   @FanningSparks
An early model of the famous Dragonfly lamp (aka Dragonflies and Water Flowers Lamp) can be seen at the Corning Museum of Glass.  This 1899 version has a large base designed to hold kerosene oil.

Subsequent models, like this one from 1910, had a slimmer, more elegant base designed to be used with electricity.
Tiffany Stained Glass Lamp: Dragonfly and Water Designed by Clara Driscoll.   @FanningSparks
It’s magical to see a Dragonfly lamp in person because of the prominent role it plays in the story of Clara and Mr Tiffany.  At one point in the story, Clara says “It still leaves me on edge. I have to make this dragonfly lamp more exquisite and more individual than any blown shade, more art than craft. It’s got to have a place in Mr. Tiffany’s heart.
Tiffany Stained Glass Lamp Details: Dragonfly Designed by Clara Driscoll.   @FanningSparks

More Info

Learn more about the Charles Hosmer Morse Museum of American Art, in Winter Park, Florida, on their website.  The Morse Museum is known internationally for its collection of works by Louis Comfort Tiffany.  It is considered by experts as “the most comprehensive and the most interesting collection of Tiffany anywhere.”  I enjoyed the museum immensely and would not hesitate to recommend it.

The Corning Museum of Glass is another museum well worth visiting.  Their website provides all necessary information.  In addition, their collections are beautifully captured with photos and descriptions online.  For instance, here is the listing of the Dragonflies and Water Flowers Lamp.  The Corning Museum of Glass is home to the world’s most comprehensive collection of glass, the world’s foremost library on glass, and one of the top glassworking schools in the world.  I would highly recommend this museum as well.

Another great source of information about Clara Driscoll and Tiffany Studios is Susan Vreeland’s website.

Today’s Takeaways

1. Reading fact-based fiction about art and artists is a great way to learn.
2. Consider combining travel and art viewing to see works you’ve read about.
3. Imagine how the artwork you’ve read about and/or viewed could influence your own designs and projects.
Peg - FanningSparks Author