
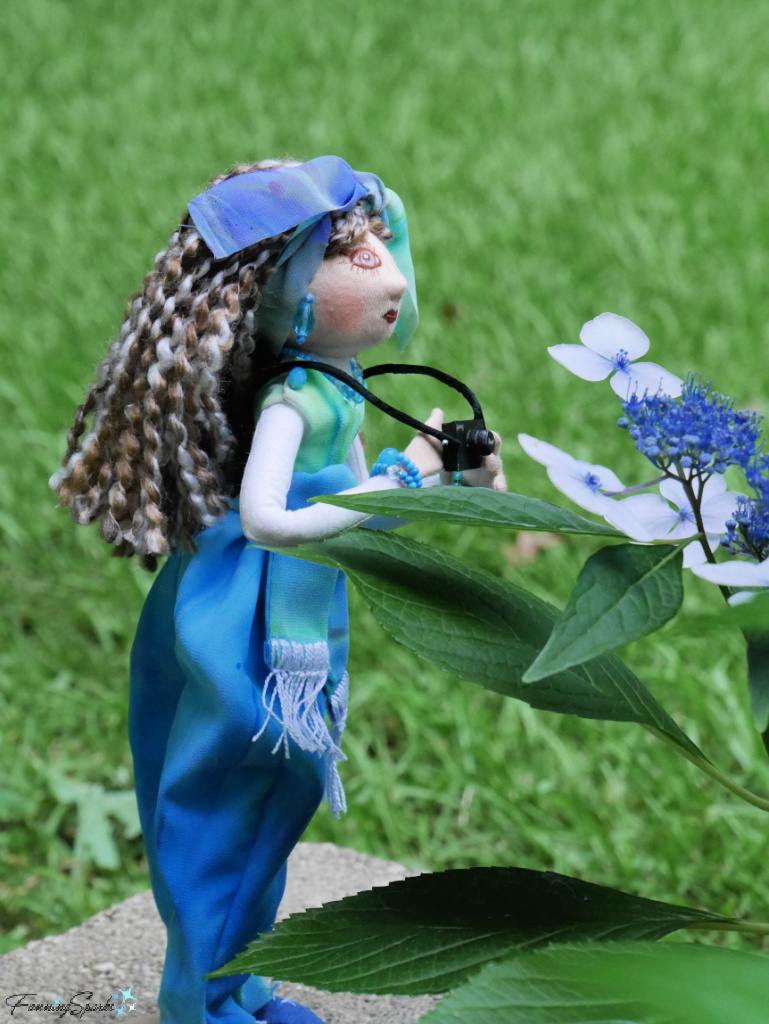
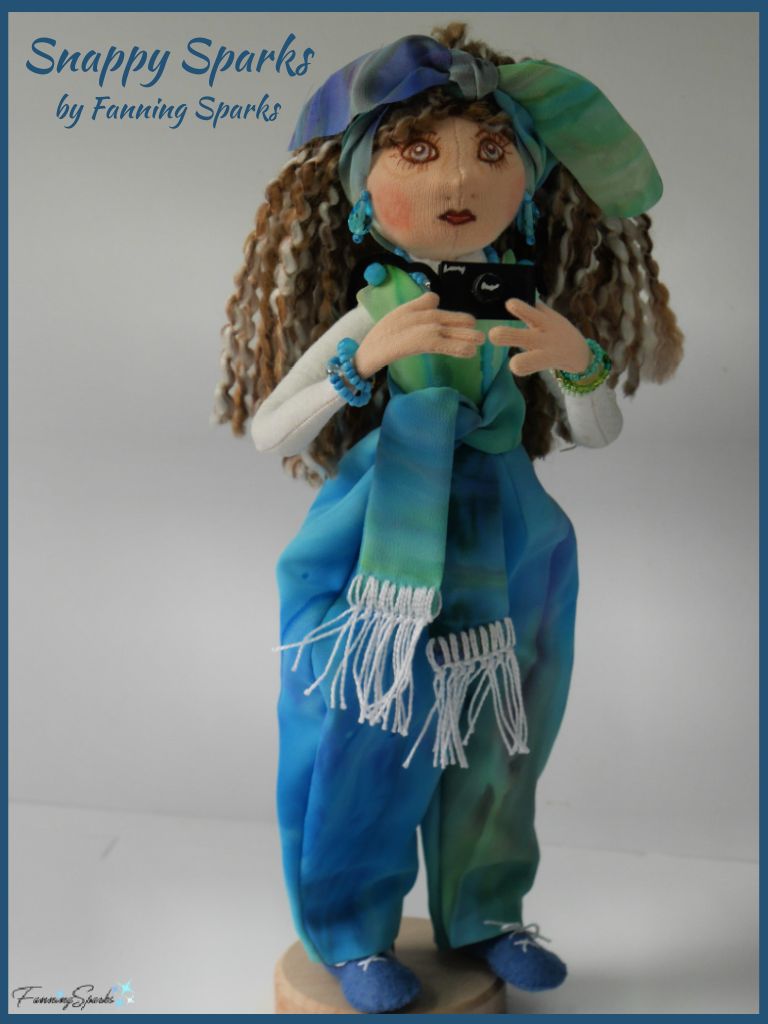
Following last week’s teaser about the Cloth Art Doll workshop, I’d like to introduce Snappy Sparks, my one-of-a-kind cloth art doll.
I won’t give away all the secrets of Charlie Patricolo’s workshop project but I will share some insights into the dollmaking process as well as some great tips and tricks.
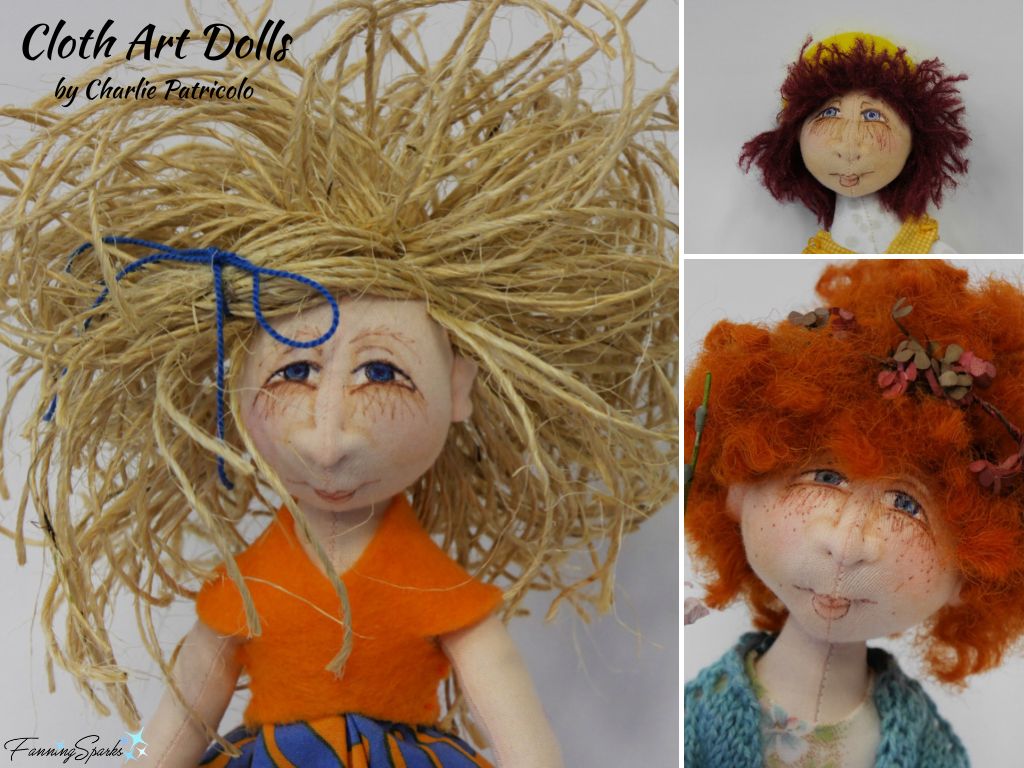
First, some context. If you saw last week’s blog post, What are Cloth Art Dolls?, you’ll know one-of-a-kind art dolls are created with an incredible variety of imaginative concepts and technical skills. Every art doll artist has their own style and technique―every art doll has their own personality and character. Snappy Sparks is a cloth art doll with a needle-sculpted face.
She is my spin on instructor Charlie Patricolo’s Spring Sprite.![]() One thing I learned about making cloth art dolls is you don’t need a lot of materials but choosing good quality and fit-for-purpose supplies is important. This is especially true for the doll’s head since it is the face, more than any other feature, which brings the doll to life. In the workshop, we used cotton double knit in a variety of skin-tone colors. Fabric specifically designed for dollmaking is available online. For instance, WeirCrafts, (see More Info section below), sells a “Cotton Knit Waldorf Doll Skin Fabric” which they describe as a “top quality 100% cotton doll skin fabric for cloth bodied dolls” featuring “a nice weight for doll making: 11.5 oz. per linear yard; [and a] pill-resistant finish, [with] moderate stretch, [which] stuffs beautifully”.
One thing I learned about making cloth art dolls is you don’t need a lot of materials but choosing good quality and fit-for-purpose supplies is important. This is especially true for the doll’s head since it is the face, more than any other feature, which brings the doll to life. In the workshop, we used cotton double knit in a variety of skin-tone colors. Fabric specifically designed for dollmaking is available online. For instance, WeirCrafts, (see More Info section below), sells a “Cotton Knit Waldorf Doll Skin Fabric” which they describe as a “top quality 100% cotton doll skin fabric for cloth bodied dolls” featuring “a nice weight for doll making: 11.5 oz. per linear yard; [and a] pill-resistant finish, [with] moderate stretch, [which] stuffs beautifully”.
When I decided to tackle a second doll on my own, I, rather predictably, tried using repurposed fabric. My first attempt involved a discarded knit camisole. Unfortunately, the fabric was too stretchy making it difficult to sew smooth seams.
Doll parts are small―this doll head, for instance, has 4 pieces each less than 3” x 2”―which means sewing the pieces together is tricky. Sewing with a less-than-ideal fabric is even more difficult. My second attempt involved a discarded man’s T-shirt. The results were much better.
While making my second doll’s head, I documented the process so I could share it here. These steps are a combination of what I learned from Charlie during the workshop, how it is done by Patti Medaris Culea in her book Creative Cloth Doll Faces and my own trial and error.
Note: I used Medaris Culea’s pattern for Tania, which is available in her book (see More Info section below), to capture most of the process photos.
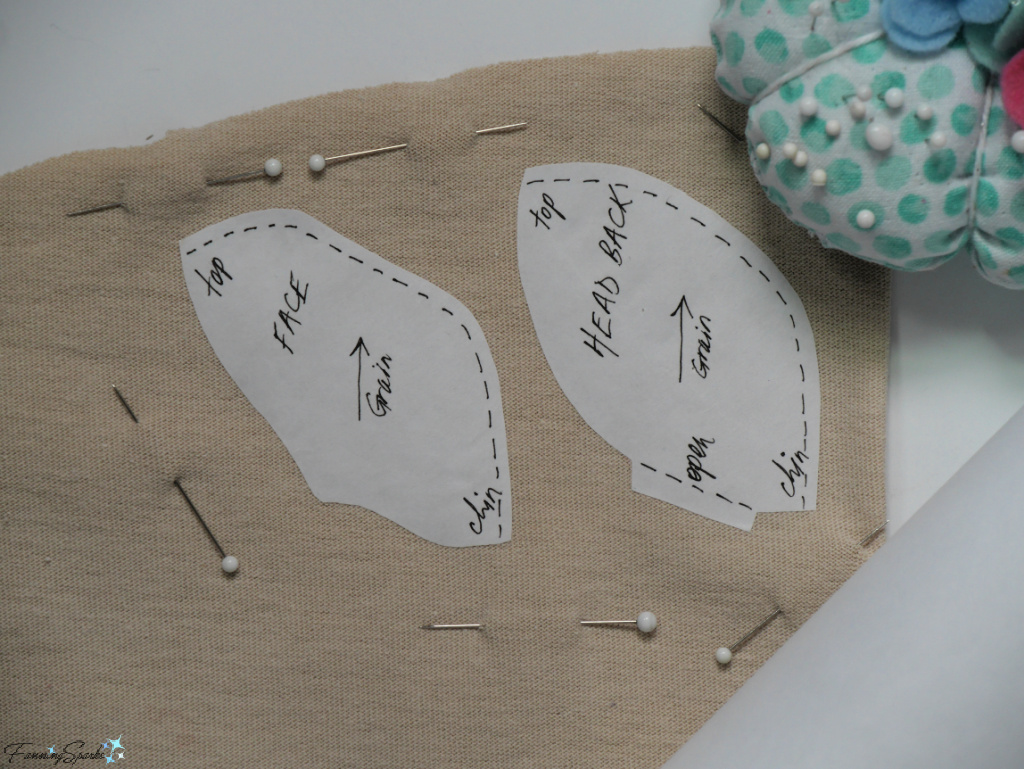
Step 1 – Prepare Pattern Pieces At the workshop, we used freezer paper to make small pattern pieces. I was familiar with this technique having used it to cut small flower parts from felt for a keepsake box a while ago. See Freezer Paper Technique in the blog post Vintage Bangle to Keepsake Box – DIY Tutorial for detailed steps on how to use freezer paper on fabric.
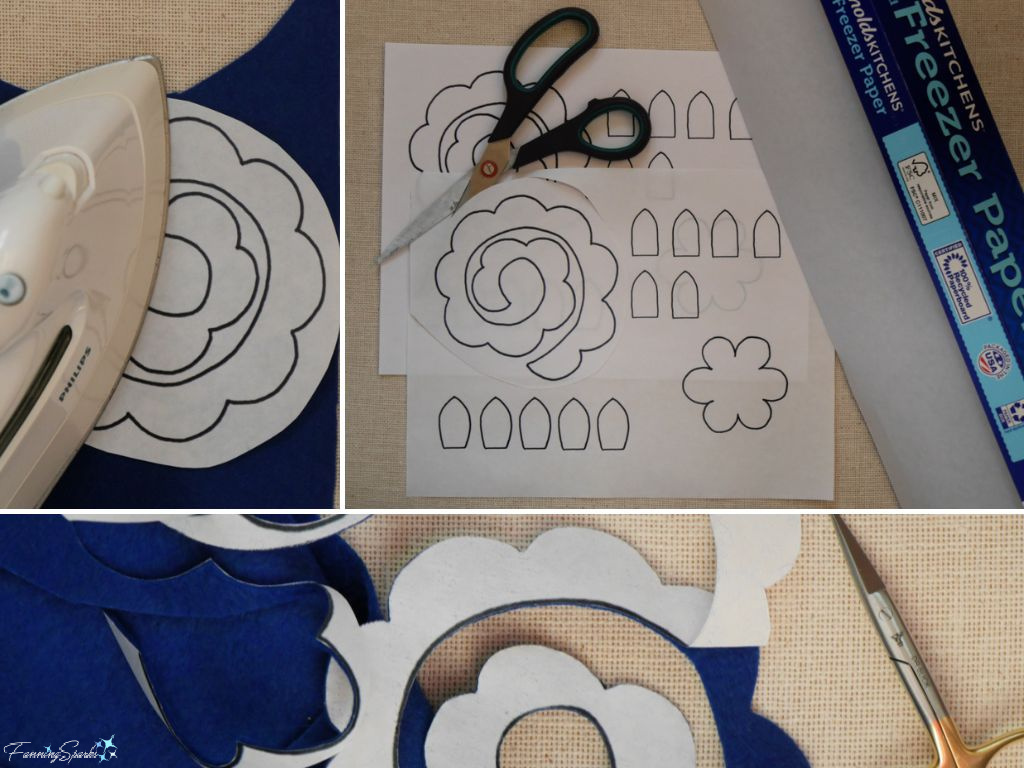
To make Tania’s doll head, start by copying the FACE and HEAD BACK pattern pieces onto freezer paper. Cut out the pattern pieces taking care to cut precisely along the outside lines.
Step 2 – Attach Pattern Pieces to Fabric Prepare two layers of the knit fabric you’ve chosen for your doll’s head with the right sides together, the grainlines aligned and both layers smooth and flat. Position the FACE and HEAD BACK freezer paper pattern pieces on the fabric with the glossy side down and the pattern grainline arrows aligned with the grainline of the fabric. Pin around the outside of the pattern pieces―avoid pinning into the pattern pieces. Use a hot iron to adhere the pattern pieces onto the top layer of knit fabric. Do NOT cut out the individual pieces―instead cut a large section of fabric leaving a generous margin all around the pattern pieces as shown below.
Step 3 Prepare to Sew with Sewing Machine Prepare your sewing machine with a sharp needle, matching thread and (preferably) a transparent presser foot. Select a straight stitch with a short stitch length―I dropped the stitch length down to 1.5mm on my sewing machine. Be aware this short stitch length works well when sewing tiny parts but it is difficult to rip out should you need to correct stitches.
Doll parts are small and shapely so you’ll need to stitch VERY slowly while manually coaxing the machine around curves. To turn around tight curves, leave the sewing machine needle down, lift the presser foot, and rotate the fabric. Then lower the presser foot and resume sewing―one slow stitch at a time. Some pieces will require you to stop and rotate repeatedly.
Begin seams about 4-6 stitches away from outer edge and sew backwards to the outer edge―then sew forwards as usual. This allows you to secure the beginning of the seam without risking the machine “chewing up” the tiny seam allowances. Remember to lock, aka back tack, at the end of the seam as well.
Sewing doll parts with freezer paper pattern pieces is an unusual technique which took me a few minutes to get my head around. You don’t cut out the fabric parts and you don’t remove the pattern pieces from the fabric until AFTER you sew. Keep the pattern pieces adhered to the fabric so you can sew, very precisely, next to the edge of the pattern pieces. This technique applies to the edges of the pattern which are UNMARKED―not the edges with the dotted stitch lines.
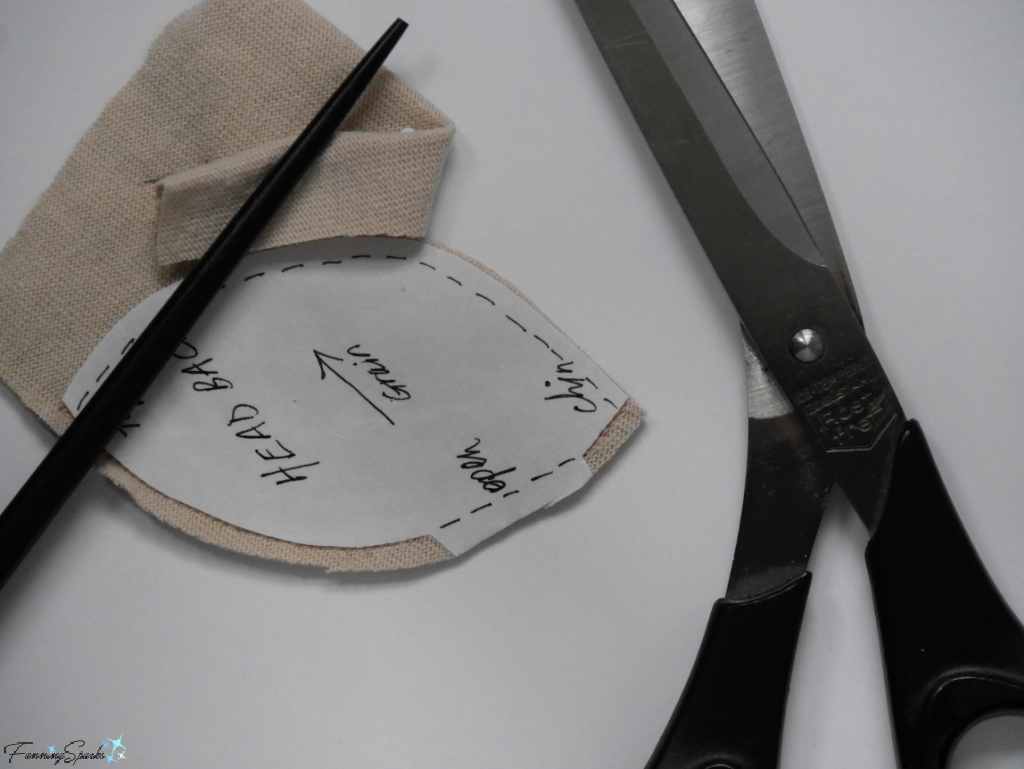
Step 4 Sew FACE and HEAD BACK Using the freezer paper technique just described, prepare to sew the two layers of fabric together at two seams―along the center of the FACE and along the center of the HEAD BACK. Do not sew across the tab, marked “open”, on the HEAD BACK.

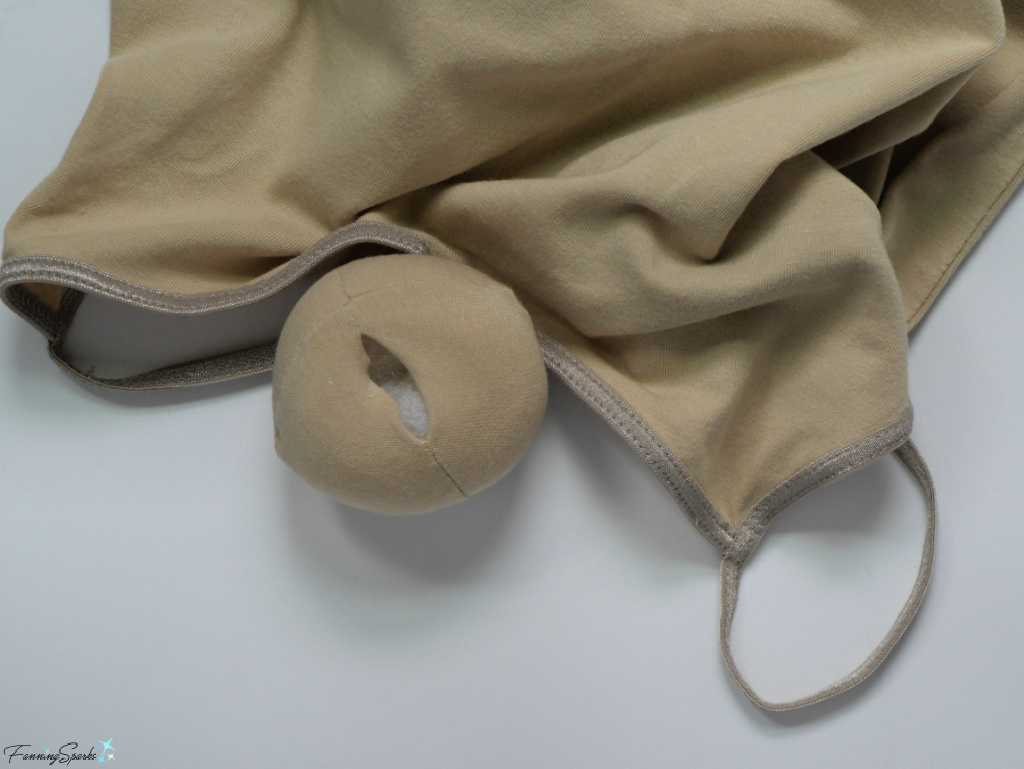
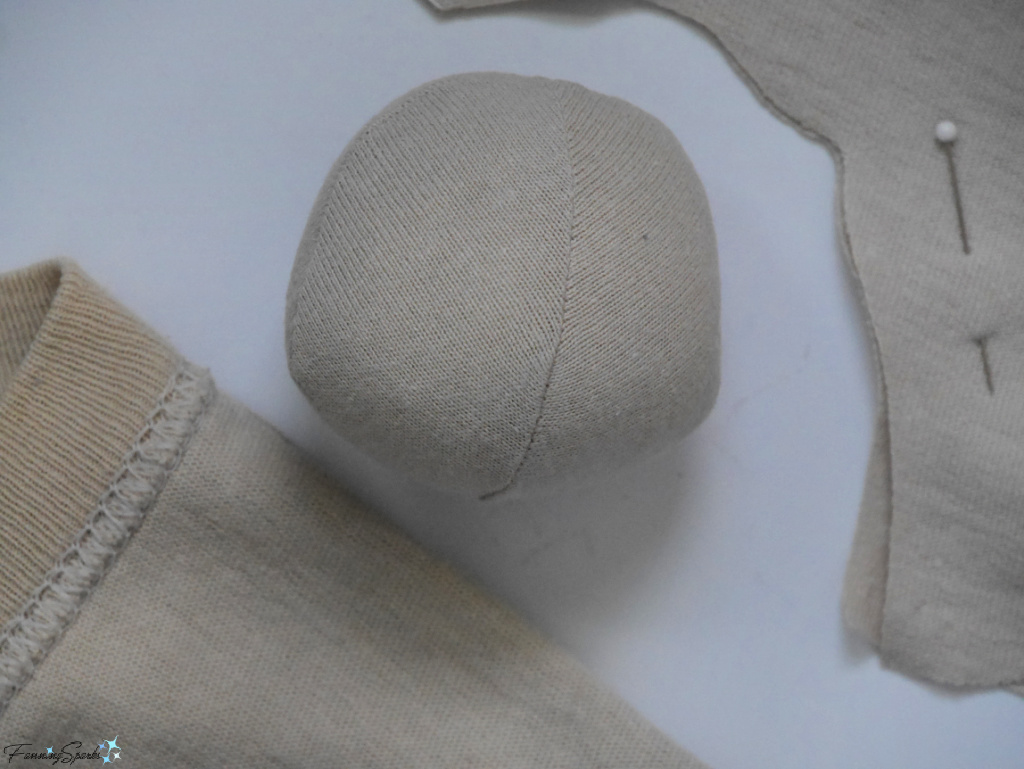
Step 5 Cut Out FACE and HEAD BACK Carefully cut out the FACE and HEAD BACK leaving a scant ⅛” seam allowance along the stitched edges and cutting next to the pattern pieces for all other edges.
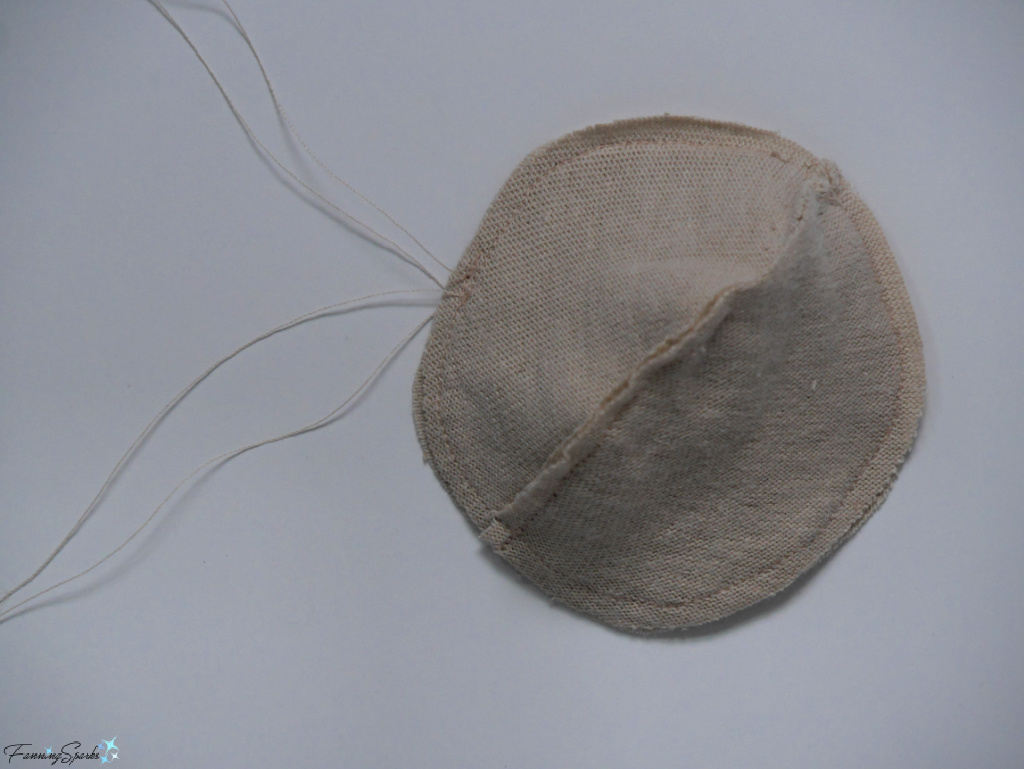
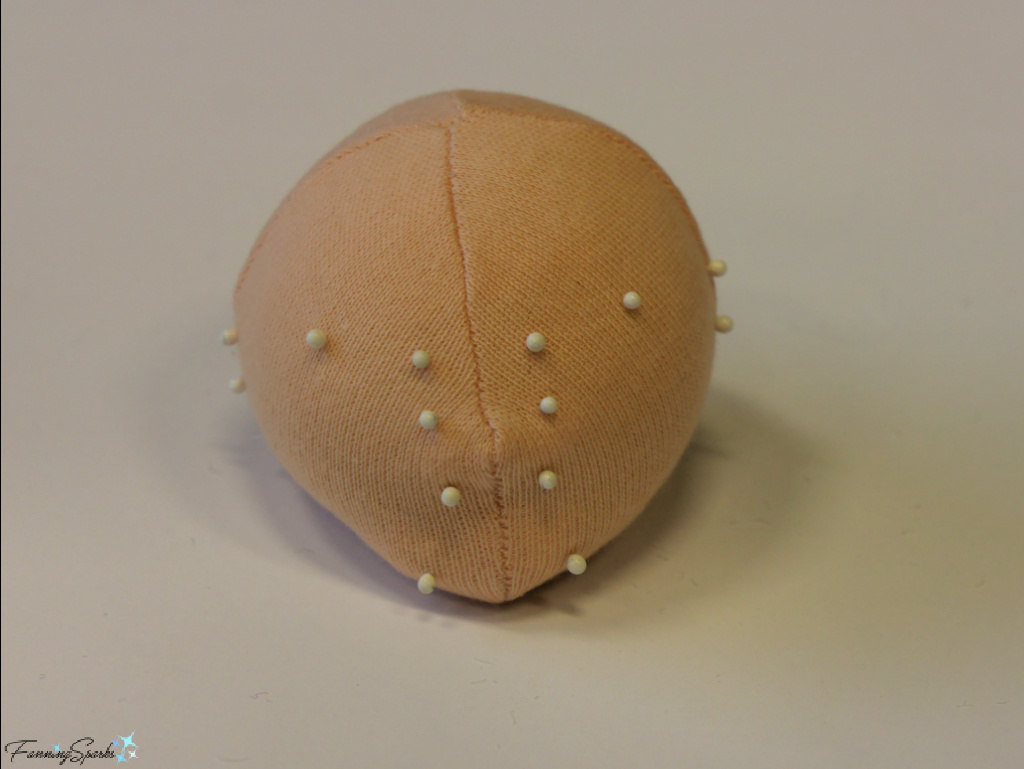
Step 6 Sew Head Open up the FACE and the HEAD BACK. Turn the FACE right side out and tuck it inside the HEAD BACK with the fabric right sides together. Take care to ensure the tops and chins are matched and the ends of seams are aligned. Pin in one or two spots if needed. Sew slowly around the entire outside edge using the “stop and rotate” method described in Step 3. Turn the head right side out. Use fingers to press the seams towards the HEAD BACK―don’t bother trying to press the sewn seam open because it’s too narrow. Check the turned seam for any puckers or unevenness―if necessary, turn head wrong side out again to clip curves taking care not to snip the stitches.
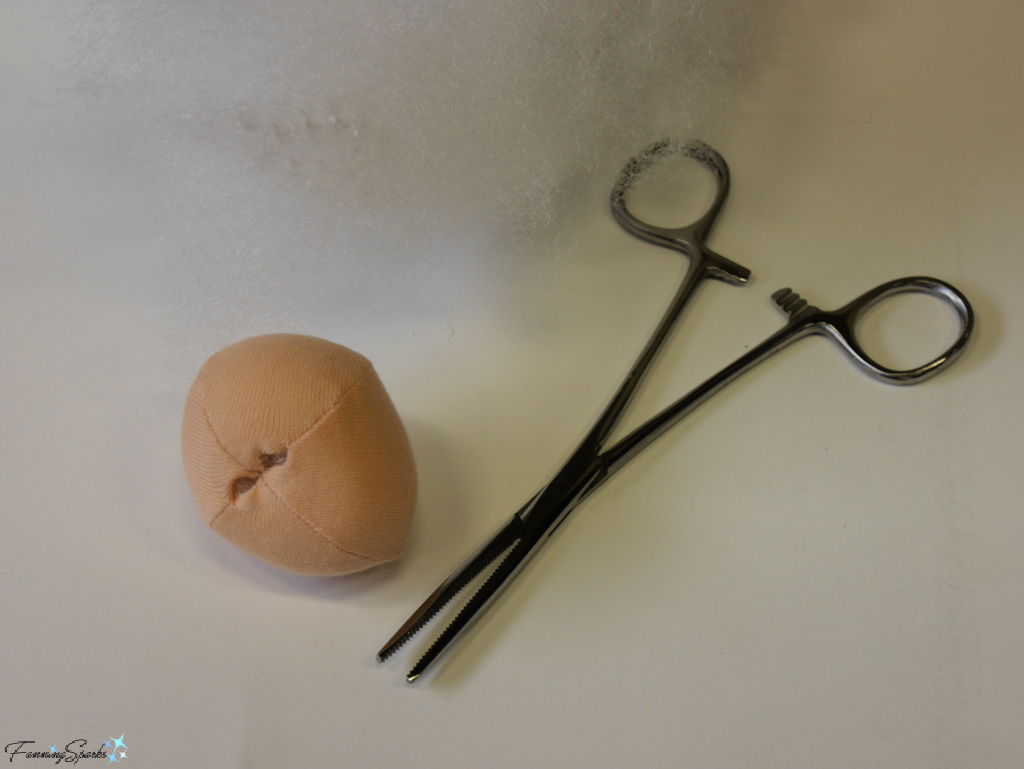
Step 7 Stuff Head Stuffing is another area which requires some explanation. Both Charlie and Medaris Culea recommend using Fairfield Poly-Fil Premium Fiber Fill because it stays in place and has a smooth consistency. At the workshop, we learned to use hemostats, which are hand-held surgical clamps, to turn and stuff the small doll parts. To get a smooth, full surface stuff the cavity with a few large, smooth sections of fiber fill instead of numerous small chunks.
Leave the opening unstitched for the next steps.
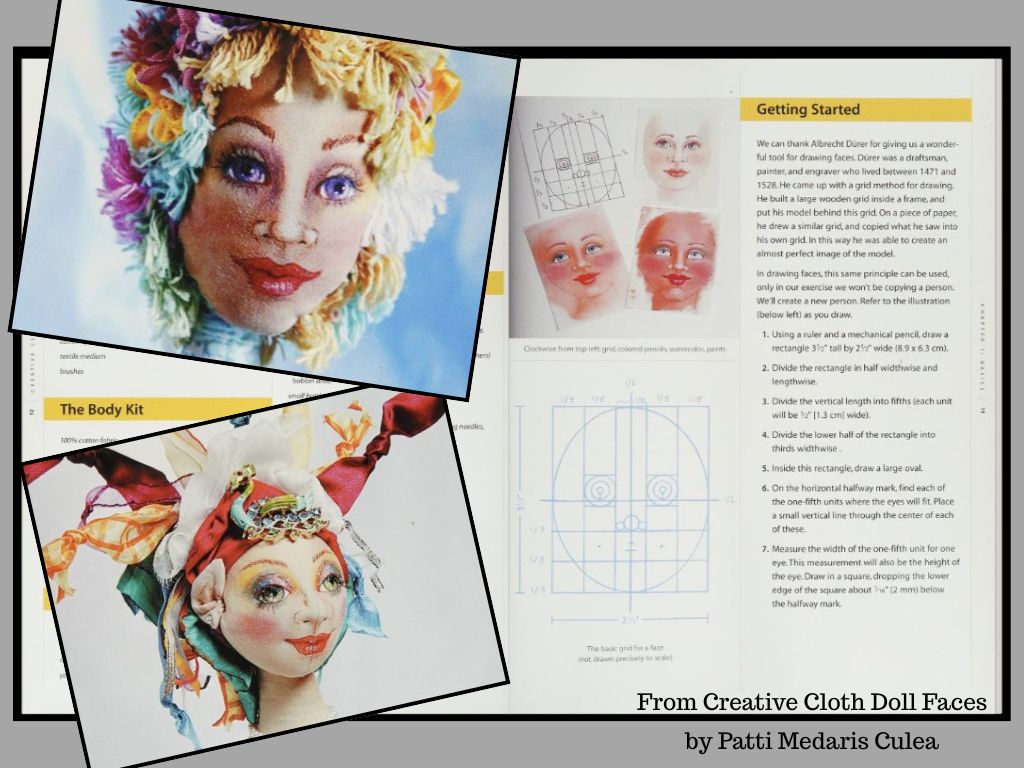
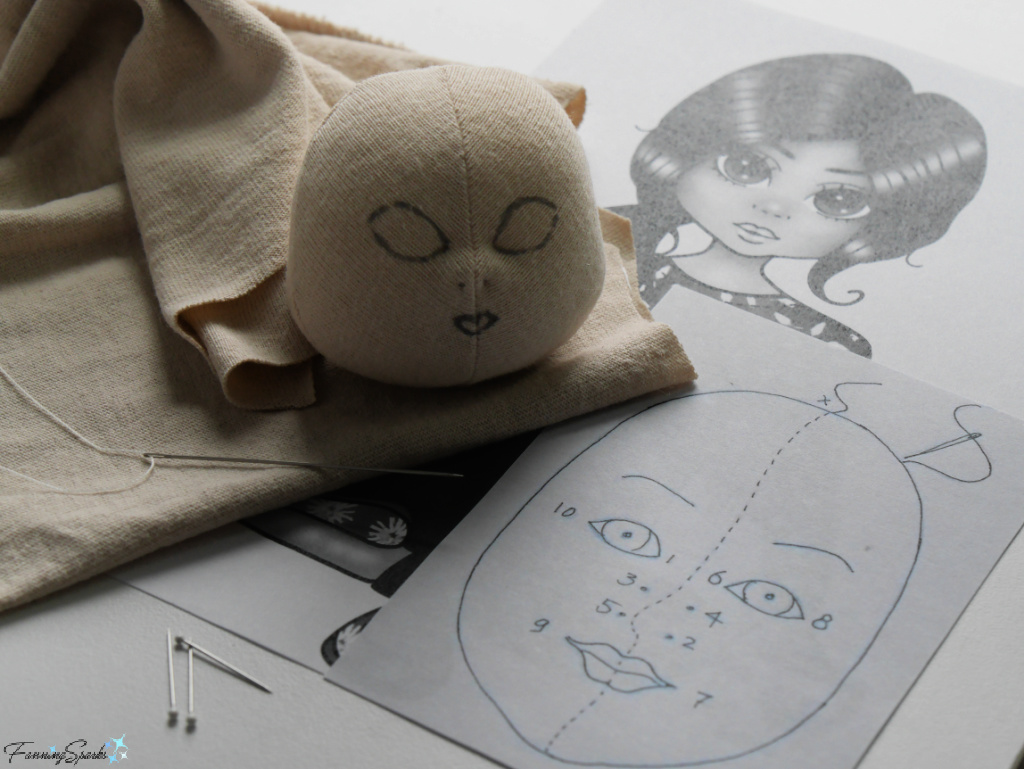
Step 8 Mark Face “The face is an important part of doll making … It reflects what you want your doll to be. It’s who she is. … The face brings a doll to life.” writes Medaris Culea. With this in mind, you’ll want to take a little time to get it right. Luckily, there are a few different options.
Here’s a closer look at Charlie’s Spring Sprite doll face with its alert eyes, pleasant half-smile and standout lower lashes.
![]()
At the workshop, we started our faces by using pins to mark important facial points on our blank doll faces. Charlie patiently instructed us on where to place the pins according to Spring Sprite’s design and dimensions.
Medaris Culea’s book, on the other hand, explains in great detail how to sketch faces by mapping out facial features on a grid. Here’s a peek inside her book with two examples of her completed doll faces―Claudia is shown at the top and Tania is at the bottom.
Drawing freehand is not my forte so I created a template instead. I chose a face drawn by a professional artist (regular readers may recognize Willow―a digital stamp purchased from Pink Gem Designs) and resized it to fit my doll’s head. Then I created a simple paper template with the eyes, nose nostrils and mouth cut out.
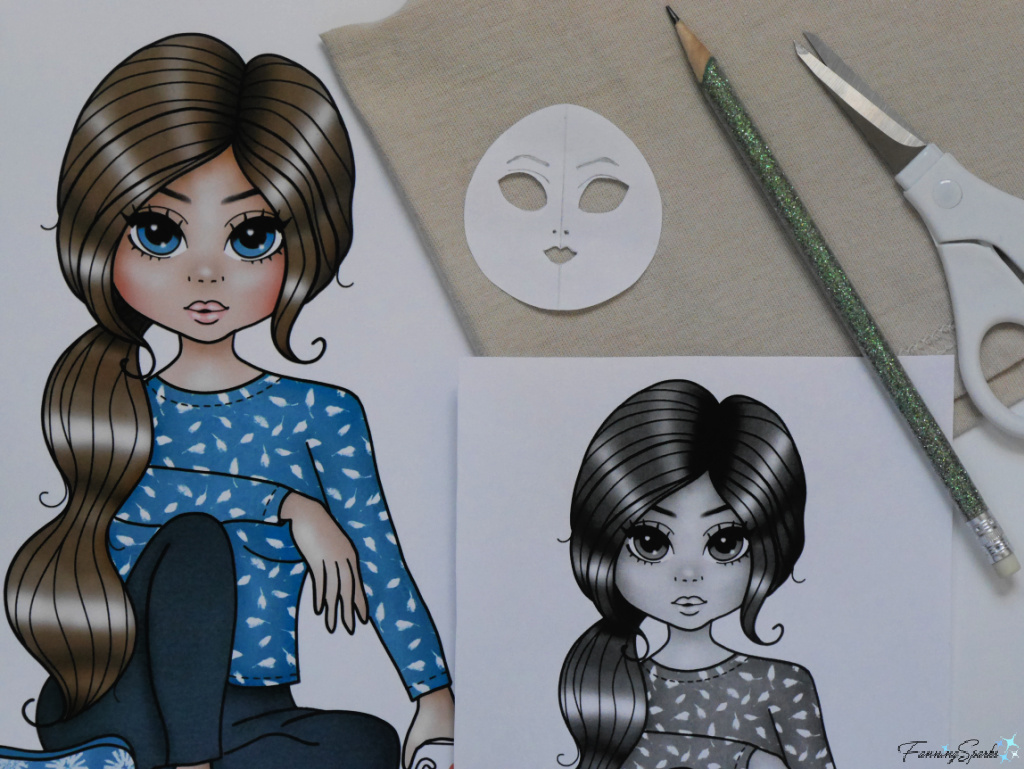
It was surprisingly easy to trace the facial features onto the doll head using my reliable Pilot Frixion Erasable Marker Pen. The advantage of using this pen is that the marks can easily be removed with the heat of an iron (obviously, you wouldn’t press the doll’s head flat―you would, instead, carefully touch the face to the iron).
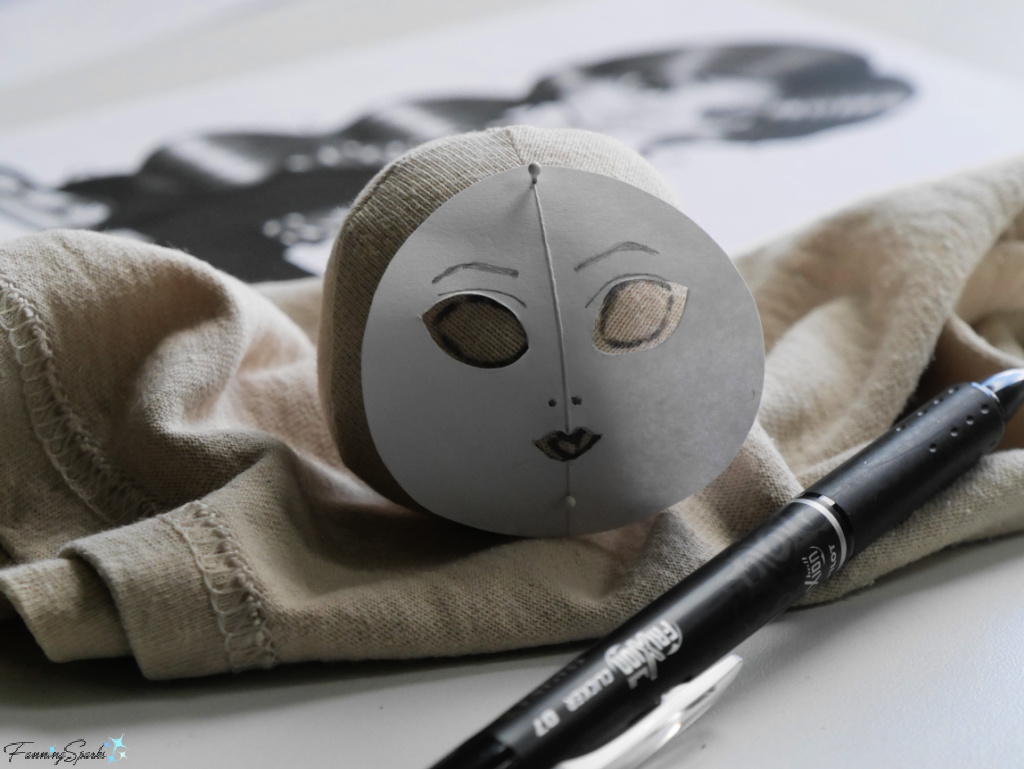
Step 9 Sculpt the Face The next step is to use a needle and thread to “sculpt” the face―drawing the thread tight to give form to the facial features.
A strong thread, such as Coats and Clark Extra Strong Upholstery Thread, is recommended to ensure the thread doesn’t break. In addition, an extra-long, hand-sewing needle such as a John James size 7 (58 mm long) long darner or a 5” long dollmaking needle is recommended.
Here’s a look at Charlie’s model at this stage of the process.
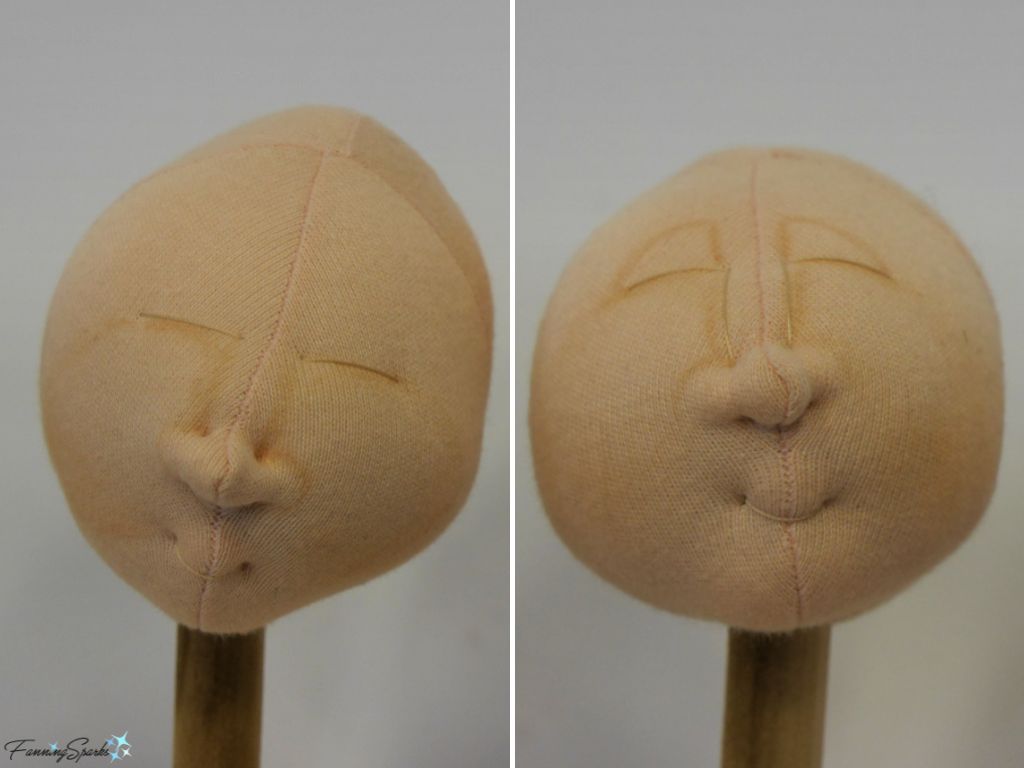
Medaris Culea’s Chart of Sculpting Points was also very helpful. Shown below is my sculpted doll head with tiny stitches in the inner corners of the eyes and the nose nostrils. It’s surprising how much difference a few small stitches can make.
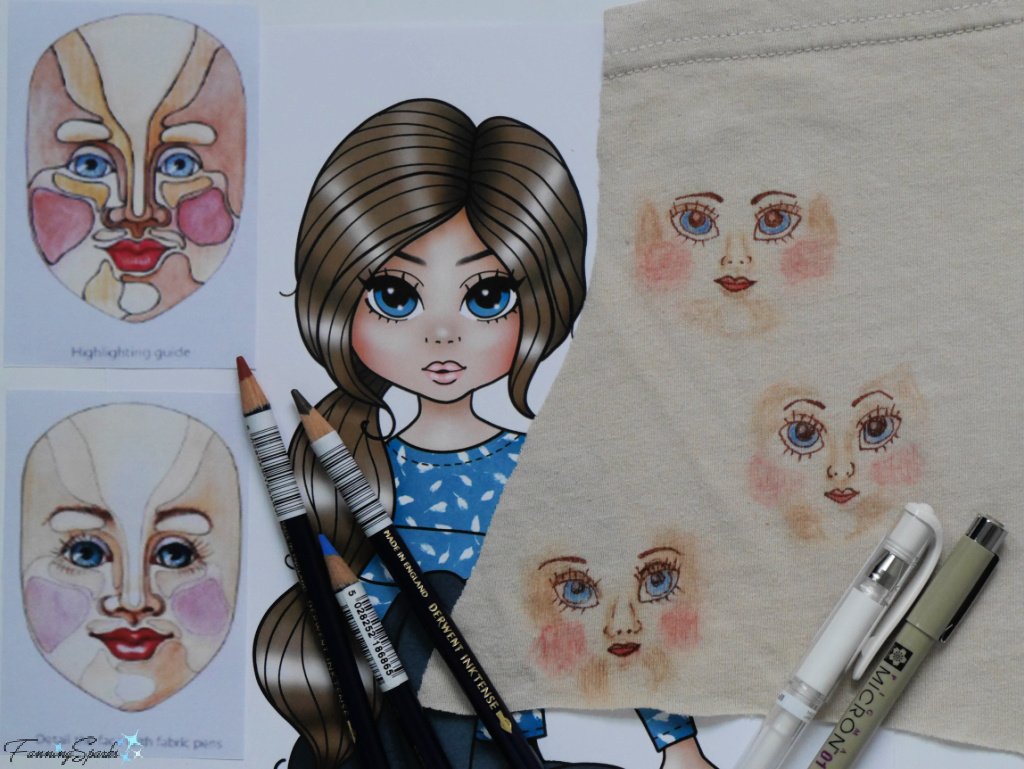
Steps 10 Color the Face This is the stage where your doll’s personality will really shine through. To create a face with recognizable features, you’ll want to start with shading and finish with details.
Charlie recommends these basics: a Derwent Inktense watercolor ink pencil in Willow, a Sakura Pigma Micron 01 marker in brown and a Uni-ball Signo Broad gel pen in white. Additional Derwent Inktense pencils in various colors for lips and eyes are also needed.
As explained on the Derwent website, Derwent Inktense pencils are “highly blendable”, the pencils “can be layered and keep colours vivid”, the colour becomes “permanent when dry” and it “doesn’t washout like watercolor”. We used the pencils dry for shading, highlighting and coloring and got excellent results.
The brown Micron marker is used to outline the facial details―brown gives a softer, more subtle outline than black. The white Uni-ball Signo Broad gel pen is used for highlights such as the dots of light in the eyes.
Medaris Culea provides detailed instructions for coloring doll heads. For instance, she recommends that you “Start with the shading. Use sienna brown, if you have it, or another light brown. Shade the temples, around where the crease of the eyelids will be, down the sides of the nose, under the nose, around the flares, down the center seam under the nose, under the lower lip, and around the chin. … Shade lightly on the upper lip, around the crease of the smile, and under the eyelids. Really rub in the color; when it is blended, it will fade quite a bit.” Please check out her book, Creative Cloth Doll Faces (see link in More Info section below), for the complete set of instructions and diagrams.
One tip provided by Medaris Culea is to “wrap a piece of fabric around your index finger and use it to blend the colors”. I found this worked very well!
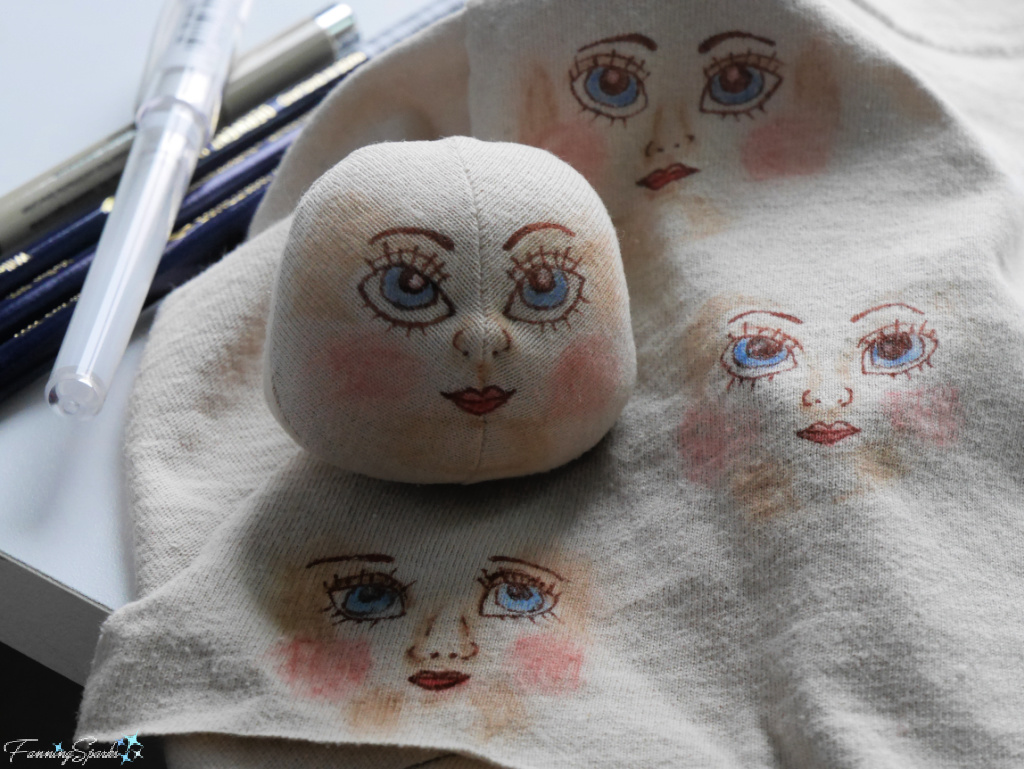
I decided to practice on a few test faces before attempting to color my stuffed doll head. The highlighting and fine detail diagrams shown below are from Creative Cloth Doll Faces.
My shading isn’t great but I was ready to move on. Here’s how my actual doll face turned out. Not perfect but I like it!
This concludes the detailed process steps I wanted to capture in this blog post. But there are, obviously, more steps to complete a cloth art doll. Many of the techniques used to make the doll’s head are also used to create the doll’s body and costumes. For instance, the torso, legs and arms are cut, sewn and stuffed in much the same way the doll’s head was in steps 1 to 7.
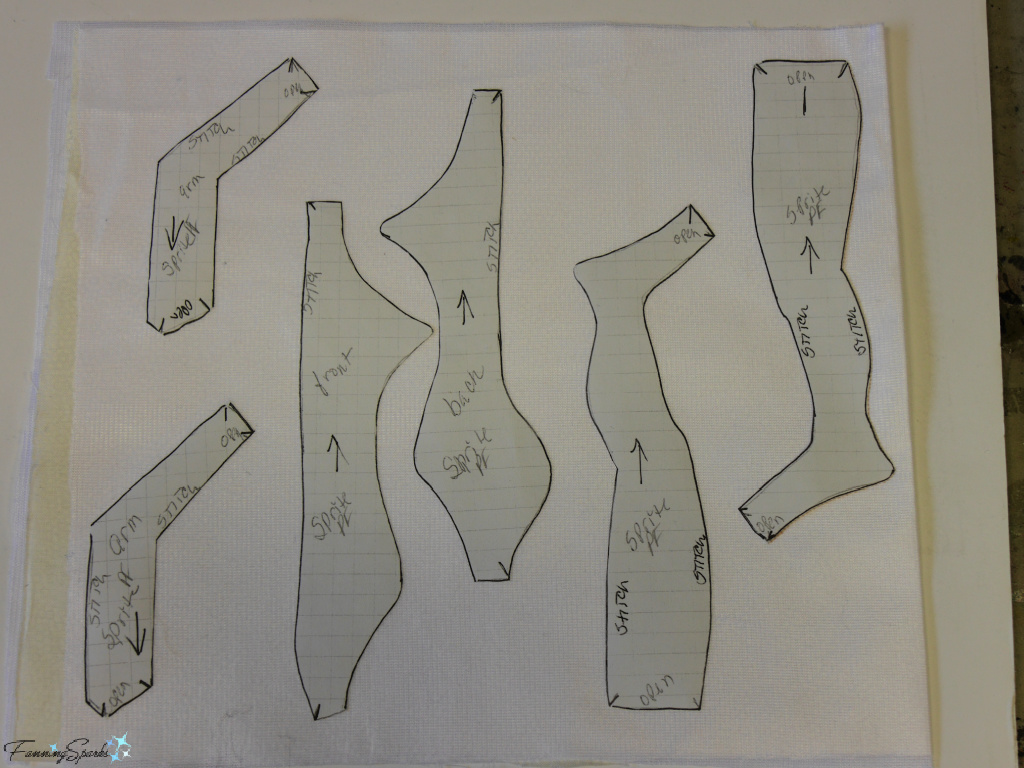
Here are the parts for the doll I made at the workshop cut from freezer paper and laid out on the fabric.
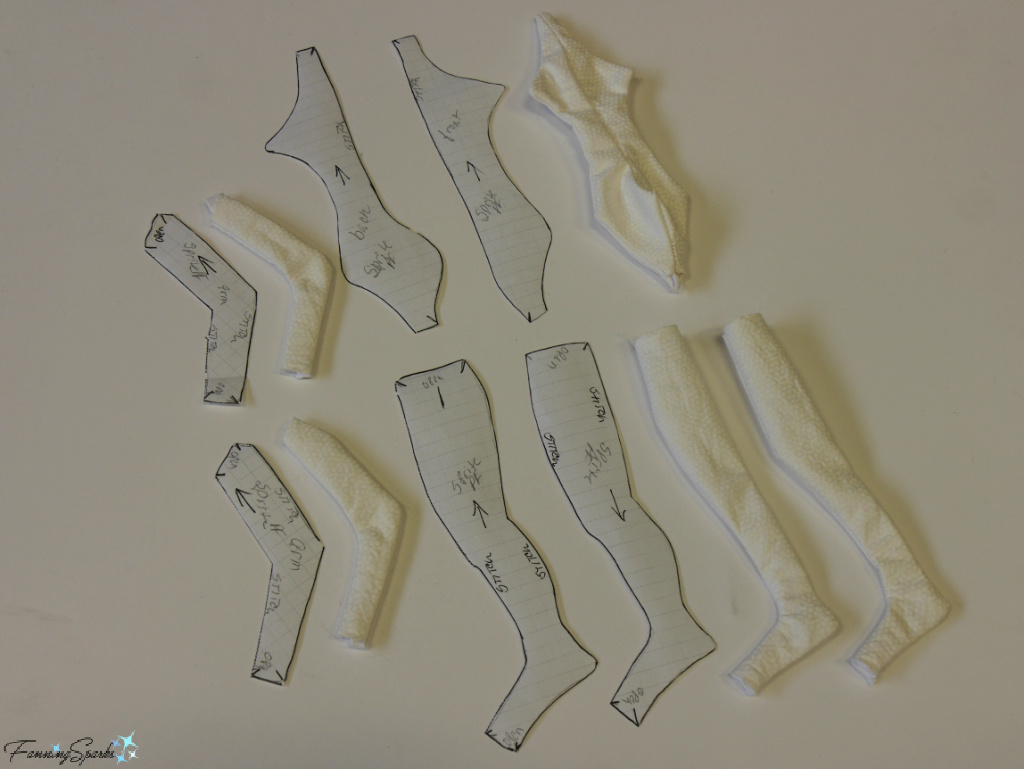
Shown below are the same arms, torso and legs after stitching.
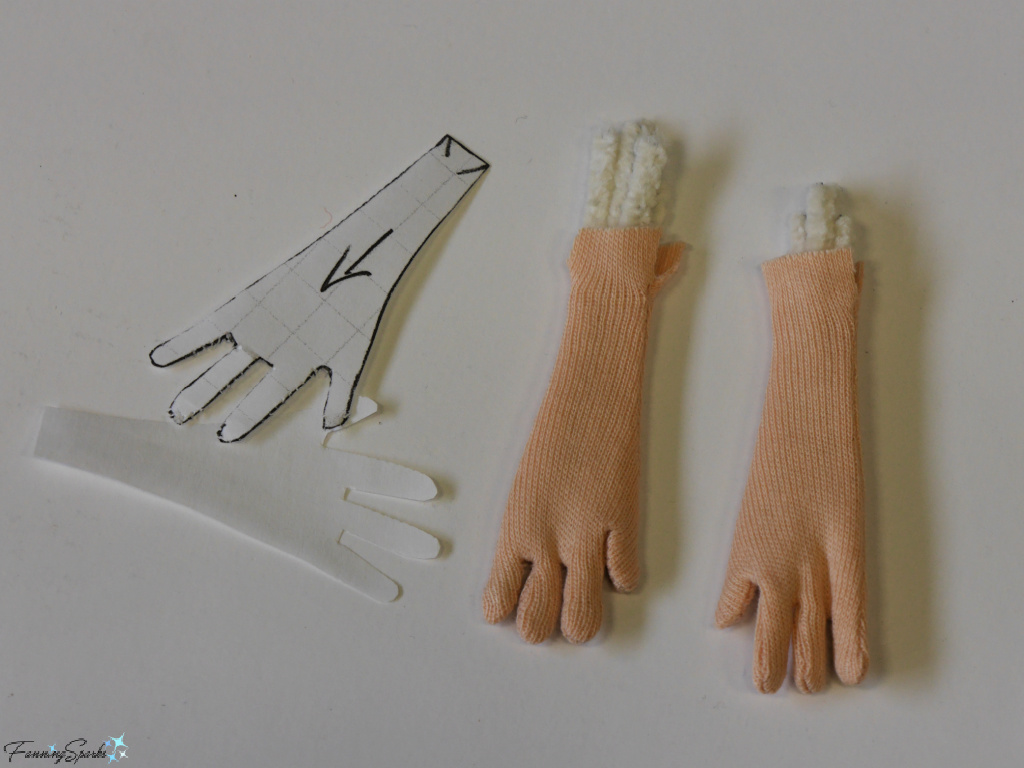
Here are the doll’s hands which are stuffed with pipe cleaners instead of fiber fill. Note these are cotton plush pipe cleaners with steel wire cores not the chenille stems often used in children’s craft. Using pipe cleaners in this way allows you to manipulate and pose the finished doll’s hands.
As the various body parts are cut, sewn and stuffed, they can be pinned together. We used applique pins to hold our doll parts together as we worked. Applique pins, by the way, are tiny, straight pins that are only ¾” long making them ideal for working with small parts and, I assume, applique embroidery.
Charlie encouraged us to put off sewing the body parts until we’d assembled and fine-tuned everything. The applique pins worked great for this approach.
After we confirmed their placement, we attached the body parts with a ladder stitch to ensure our hand-sewing would not be visible on our finished dolls. If you’re not familiar with the ladder stitch or need a refresher, check out the article 23 Embroidery Stitches that will Transform your Projects and How to do Them (see More Info section below for link) for detailed instructions.
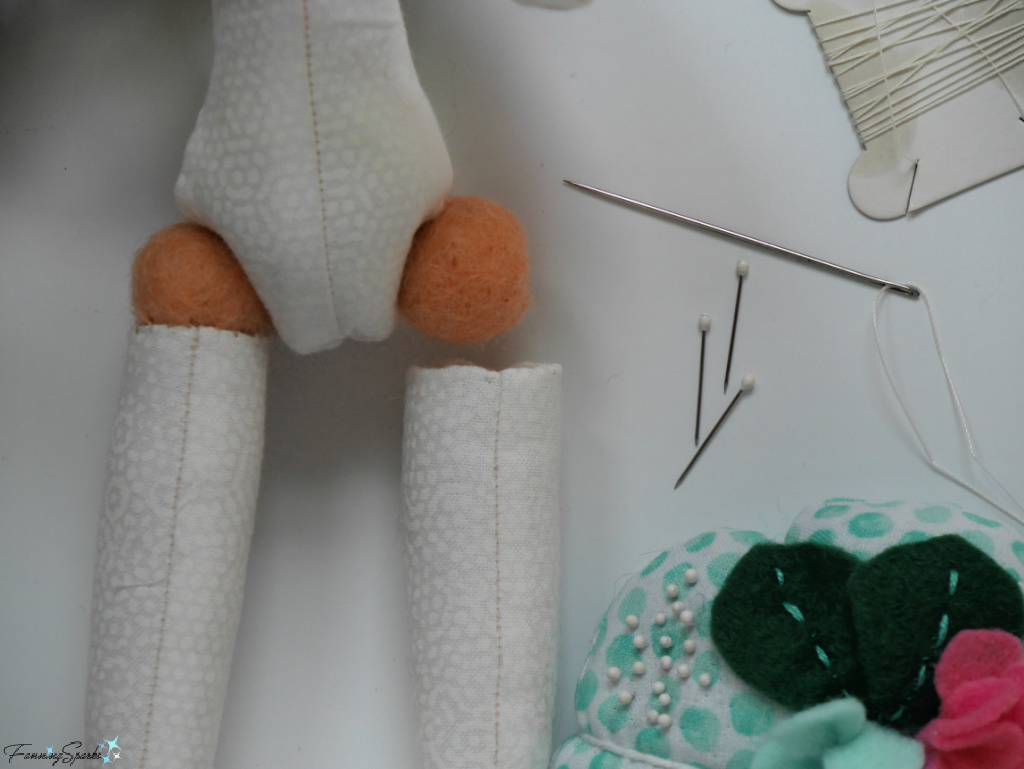
Armatures and joints are two major factors to consider in the construction of a cloth art doll. Art dolls may be built with an armature―an internal framework―to provide structure and support to the doll’s body. In dollmaking, armatures are typically made of wire although they can be built from other materials.
Joints can be created to allow a doll’s head, shoulders, arms, elbows, hands, legs, knees, feet and so on to move. They can be constructed in a number of different ways ranging from a simple stitched cloth fold to an elaborate porcelain ball joint. Joints enable dolls to change position and pose.
We were able to try both construction techniques in our workshop. We created a partial armature with a short piece of 17-gauge galvanized steel electric fence wire. We inserted the wire into one arm, in through the shoulder, across the torso, out the other shoulder and into the other arm. This allows us to pose the doll’s arms.
We constructed hip joints using 2cm felt balls. A felt ball was positioned at the hip on each side of the torso. Then we used a double strand of upholstery thread to string the balls in place. Next, we stitched the tops of the stuffed legs to the felt balls. These joints allow the doll to stand and sit.
Hair can add a great deal of personality and character to your doll. Charlie has a real eye for fun and interesting hair styles and materials as evidenced by these examples―Daisies and Denim, Spring Sprite and Sweater Girl. Daisies and Denim’s distinctive, wild hair is made of twine.
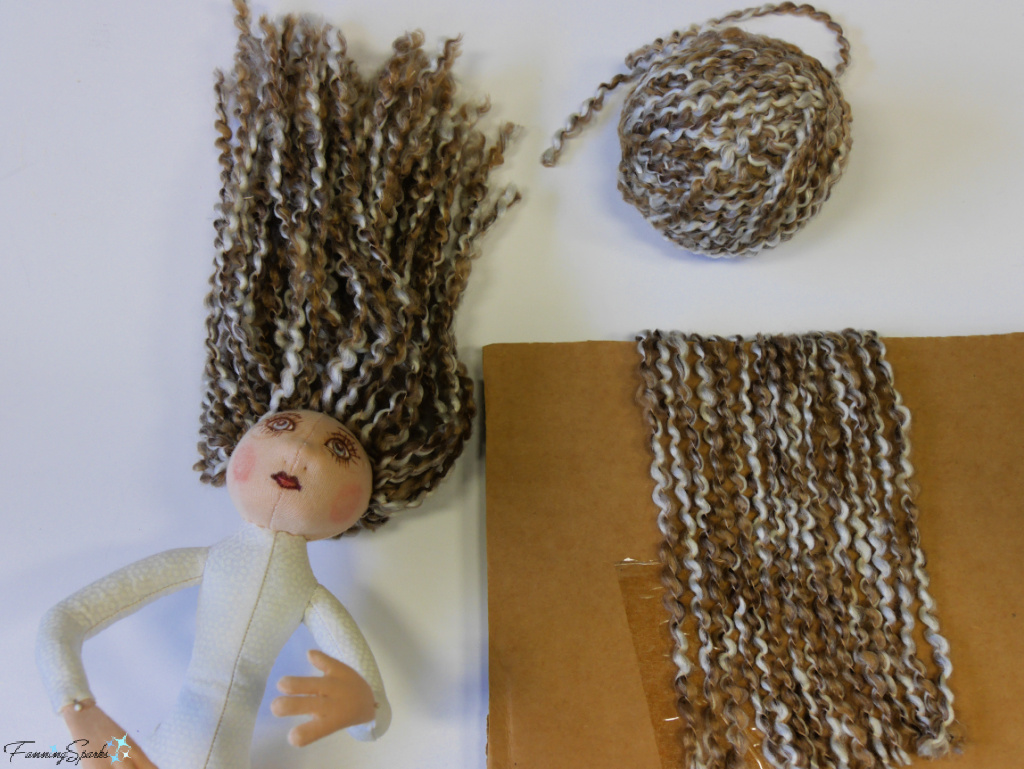
I chose a multi-colored “crinkle” yarn (sorry I didn’t catch its correct name) to make hair for my doll.
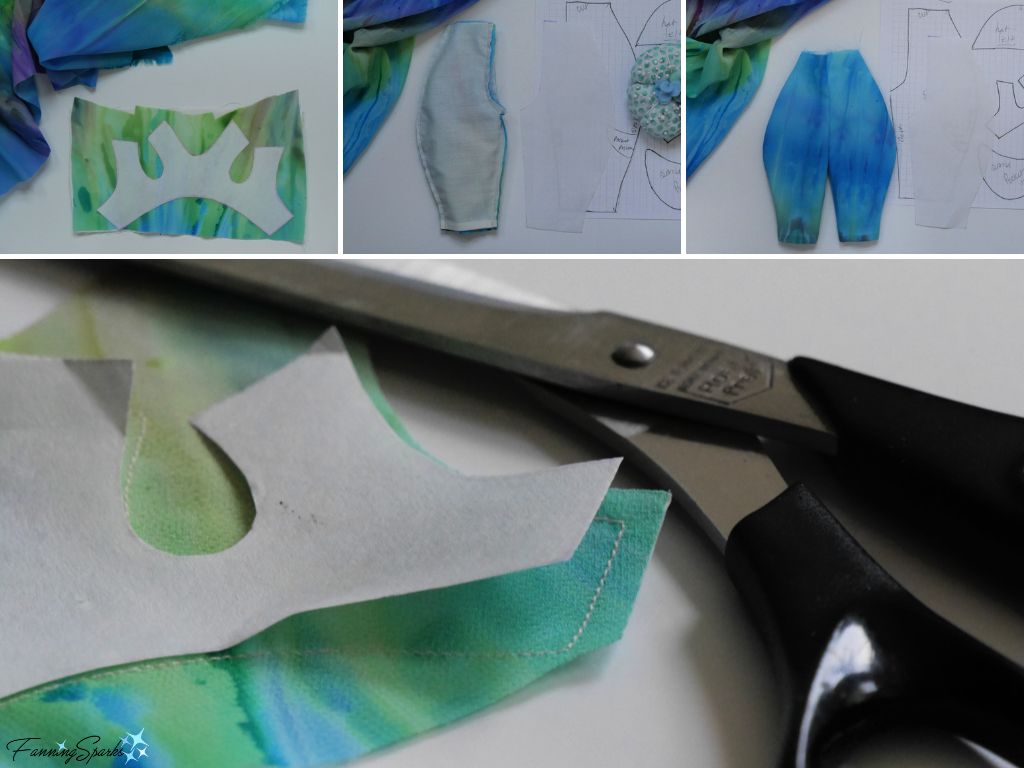
I tried a number of different ideas for her outfit before settling on the Spring Sprite vest and harem pants in a pretty, watercolor fabric. The vest and pants are lined with a plain beige cotton to showcase the fabric’s vibrant colors and pretty pattern.
Making custom accessories for my cloth art doll was lots of fun. Check out her beaded earrings, bracelets and necklace; her knotted head scarf; her fringed sash belt; her little blue, tie-up shoes; and―most importantly, her mini camera.

Et voilà! Here’s my first cloth art doll, affectionally dubbed Snappy Sparks, in all her glory.
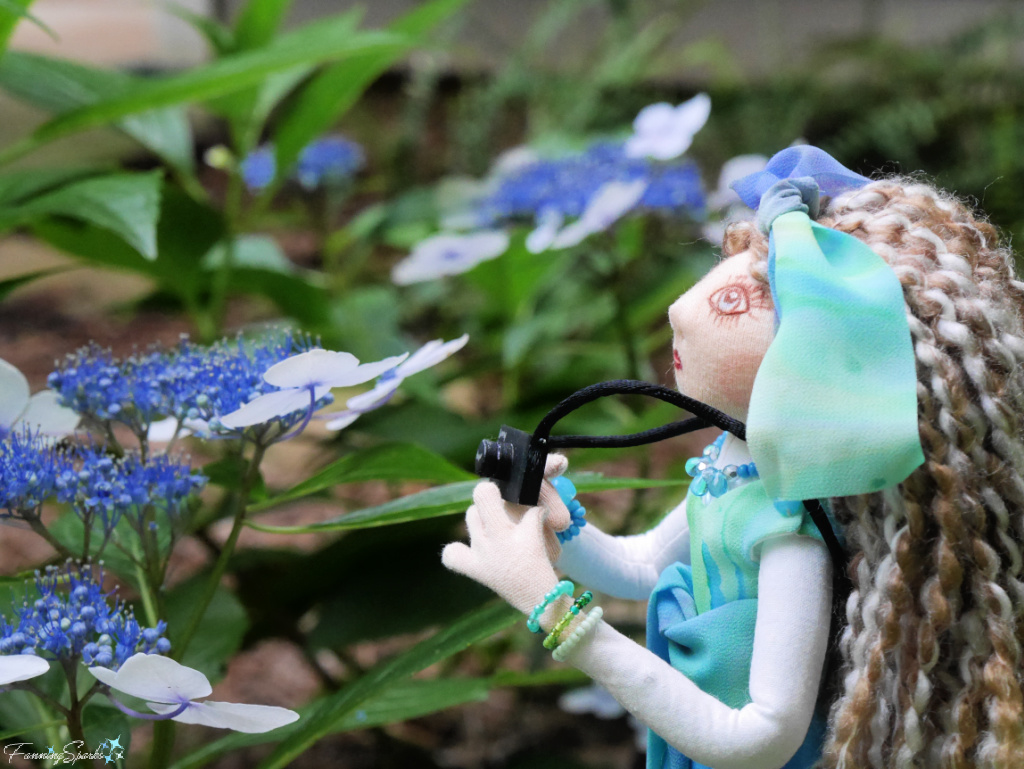
And, finally, one more shot of Snappy Sparks taking pics of the hydrangea blooms in our yard.
More Info
The workshop mentioned in this blog post, “Cloth Art Dolls”, was taught by Charlie Patricolo and hosted by the Oconee Cultural Arts Foundation. You may want to check out my previous blog post, What are Cloth Art Dolls?, to learn more about the workshop. Or to learn more about this talented doll artist, check out Charlie Patricolo’s website. You’ll also find a schedule of all her upcoming workshops posted there.
Many thanks to Charlie, and my fellow students Lori and Diane, for making our three days of dollmaking entertaining, educational and memorable.
Oconee Cultural Arts Foundation (OCAF) is located in Watkinsville, Georgia. OCAF offers a variety of workshops which are listed on the OCAF website or on the OCAF Facebook page.
Previous blog posts mentioned in this blog post include:
. What are Cloth Art Dolls?
. Vintage Bangle to Keepsake Box – DIY Tutorial.
The following books, articles and websites were consulted in the writing of this blog post:
. WeirCrafts website which is an online shop specializing in fiber crafts including dollmaking
. Creative Cloth Doll Faces book by Patti Medaris Culea which is available here on Internet Archives. The pattern for Tania, mentioned in this blog post, can be found on page 112.
. 23 Embroidery Stitches that will Transform your Projects and How to do Them article on Gathered.How “the digital hub for your favourite craft magazine brands”
. Derwent website―UK firm specializing in art supplies.
Today’s Takeaways
1. Dollmaking involves a variety of skills such as sculpting, drawing, sewing, miniature making, assemblage and general crafting.
2. Every art doll artist has their own style and technique―every art doll has their own personality and character.
3. Challenge yourself to take a workshop or attend a class on a subject you wouldn’t normally seek out.


2 Comments
@Marian, LOL… that’s a little bit creepy! Peg
Snappy is beautiful!
Is she kinda like my niece?