
This little sailboat may have started out as a photo prop but it quickly became so much more. It became a lesson in buoyancy, center of mass and balance. It became an introduction to nautical terminology. A landlubber, for instance, is a person unfamiliar with the sea or sailing. And it became a test of patience and determination. Then this little sailboat became fun! While it definitely doesn’t “sail”, it does an amazing job of floating in still waters and gentle breezes. It’s also amazingly easy to make… especially with the step-by-step instructions in today’s post. It may just be the ideal sailboat for all those landlubbers who’ve always wanted to sail. Or at the very least, it can be a great subject for your next Instagram post!
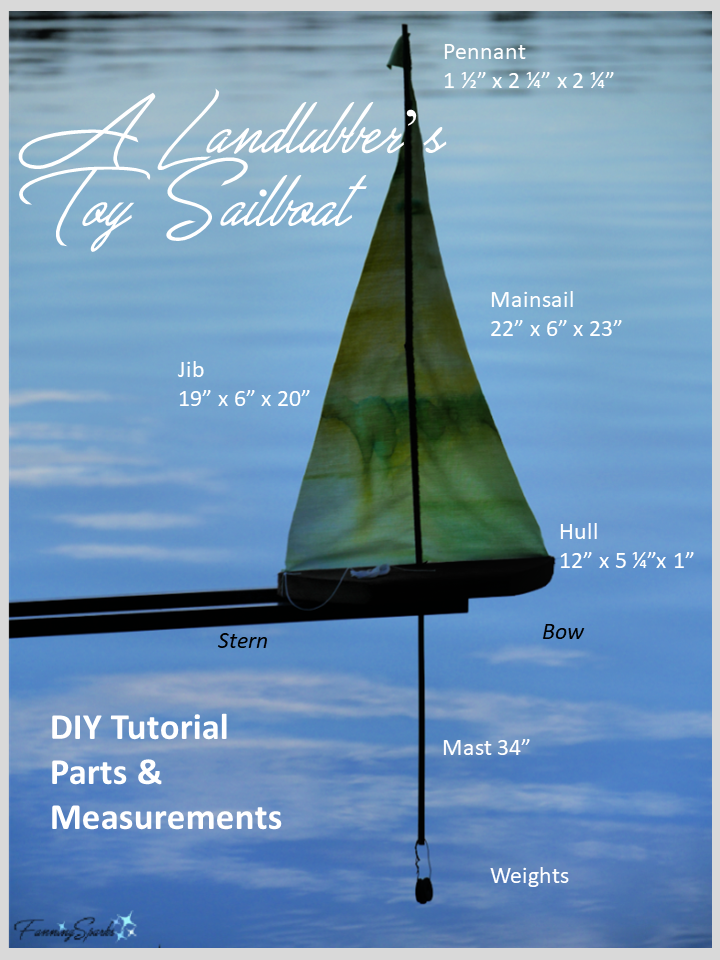
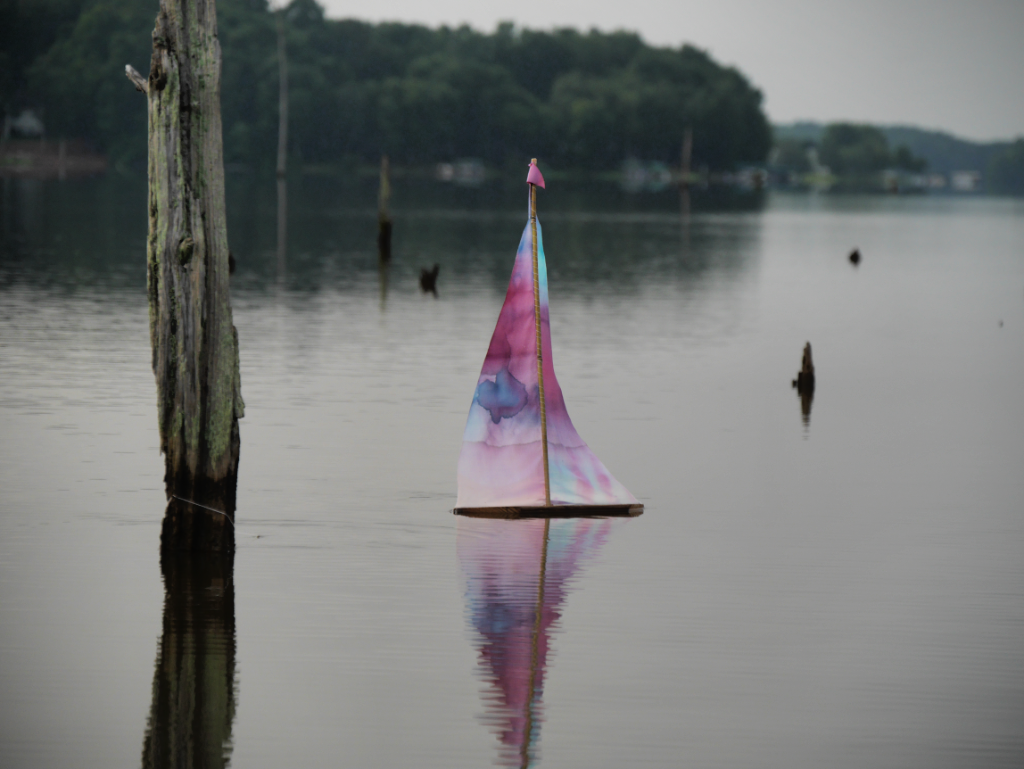 The below graphic illustrates the parts and measurements for the landlubber’s toy sailboat. Essentially, it’s a piece of flat wood (aka Hull) with a vertical stick (aka Mast) and some pieces of fabric (aka Mainsail and Jib). The trick is to get it to float and stay upright. That’s where determination and perseverance came into play. It took lots of trial and error and several test runs to get to a solution that works. Now that I’ve figured it out, I’m happy to share the details with you!
Gather the supplies and tools as listed below. Then follow the step-by-step instructions to make your own landlubber’s toy sailboat.
Supplies Needed
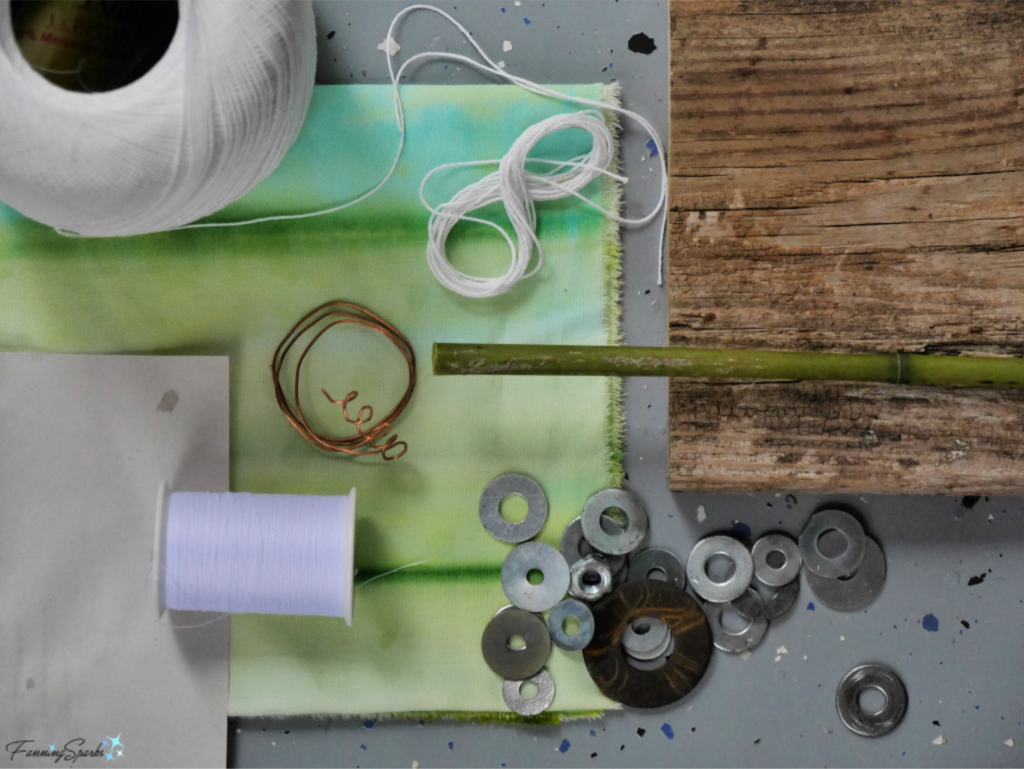 . Weathered Wood 12” x 5 ¼” x 1” (actual dimensions)
. Bamboo Stick (or wood dowel) 34” x ⅜”
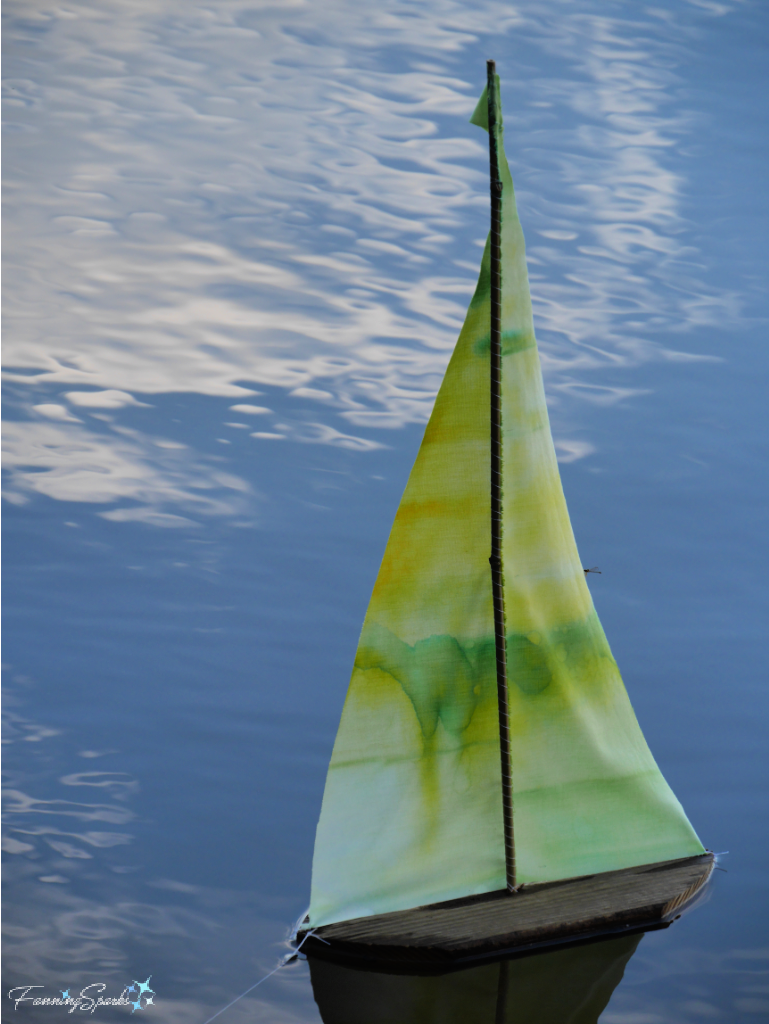
. Fabric 24” x 10”. I used cotton fabric from a previous fabric dyeing experiment. Choose a light fabric that won’t get waterlogged and will dry quickly.
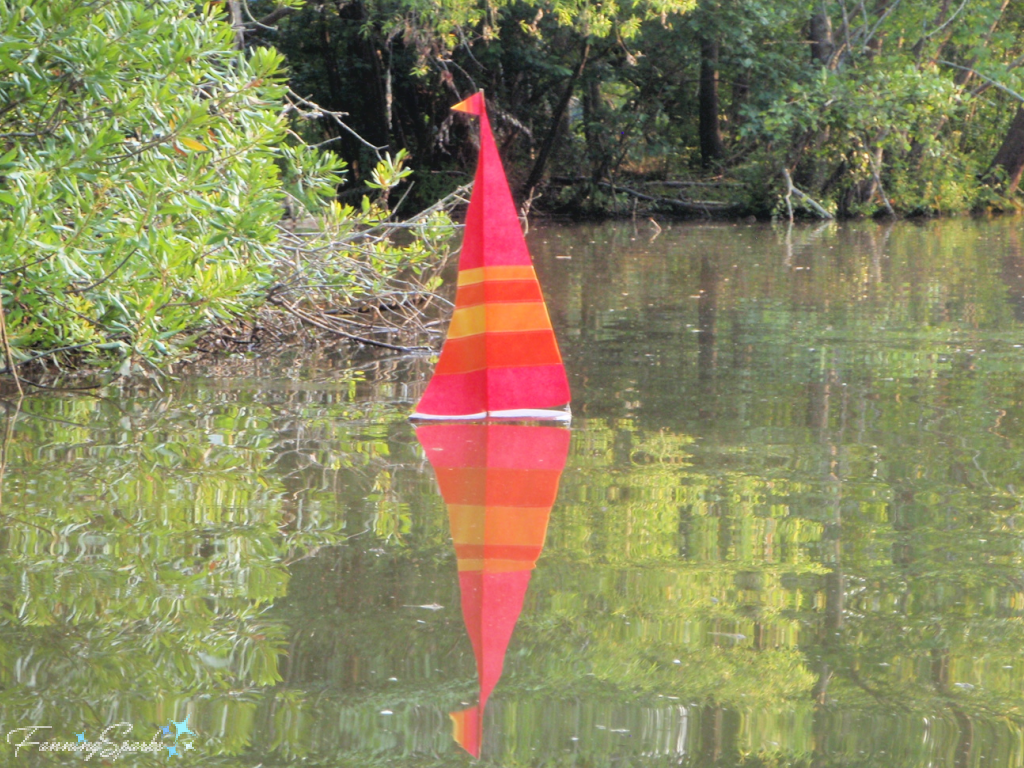
UPDATE July 6, 2021: I tried re-making the sails from a polypropylene fabric called Oly*Fun™. This fabric repels water so the sails stay dry. Cotton fabric, on the other hand, can get wet and throw off the balance of the sailboat. Oly*Fun fabric is available from craft and hobby stores. It is sold in sheets or by the yard and comes in a variety of colors .
. Thread
. Wire 20 gauge – 1 piece about 1 ½” and 1 piece about 6”
. Washers 4 to 6 – 1” washers. Alternatively heavy nuts could be used.
. String about 6’ I used cotton crochet cotton.
. Paper about 6” x 6” To make a template.
Tools and Equipment Needed
. Jigsaw (or whatever type of saw you prefer to cut wood)
. Tape Measure
. Pencil
. Drill with ⅜” and ⅟₁₆” bits
. Scissors
. Sewing Machine. Alternatively waterproof glue could be used.
. Sewing Needle must be small enough to pass through ⅟₁₆” holes in Hull
. Pliers. To cut and bend wire.
Instructions for Landlubber’s Toy Sailboat
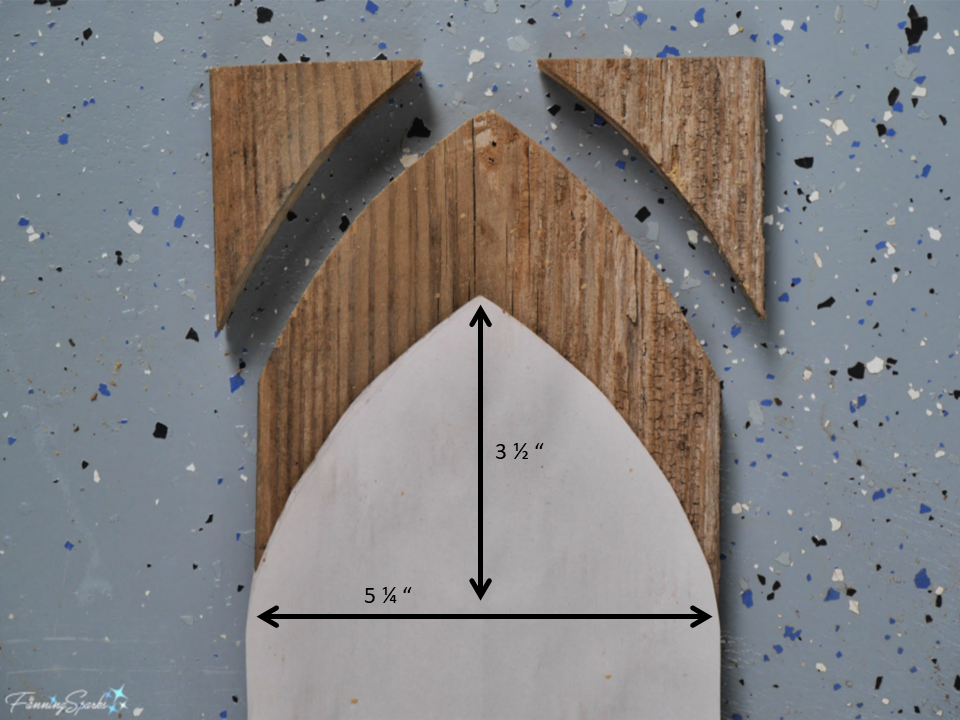
Step 1 – Cut Hull Cut 12” x 5 ¼” rectangle from 1” weathered wood. Draw lines from corner to corner to find center. Mark and drill hole through wood using ⅜” bit. Prepare a template for shaping the Hull. Cut a piece of paper 6” x 5 ¼”. Find center point of 5 ¼” edge and mark. Measure about 3 ½” from 5¼” edge and mark. Sketch a curved line from the 3 ½“ mark to the center point. Fold and cut out both sides at the same time creating a template similar to the one shown below.
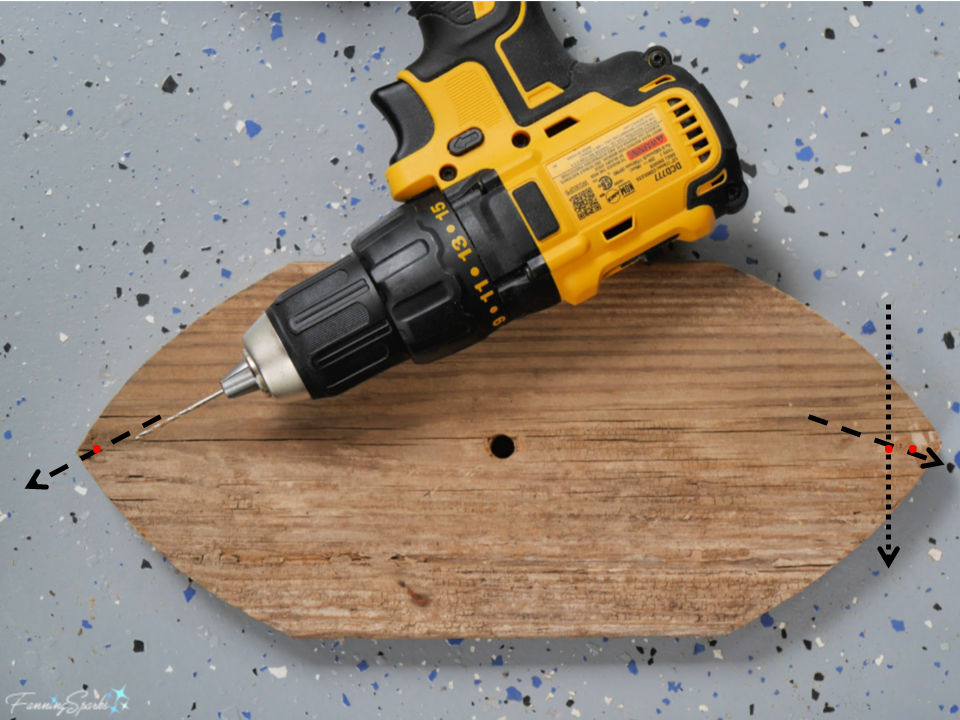
 Step 2 – Drill Hull Using the ⅟₁₆” bit, drill 3 holes for thread and string as illustrated with black arrows on the below photo:
. 1) one hole at the tip of bow drilled at an angle entering from the top and exiting about halfway through the Hull
. 2) one hole at the tip of the stern drilled at an angle entering from the top and exiting about halfway through the Hull
. 3) one hole at the stern drilled straight through the Hull.
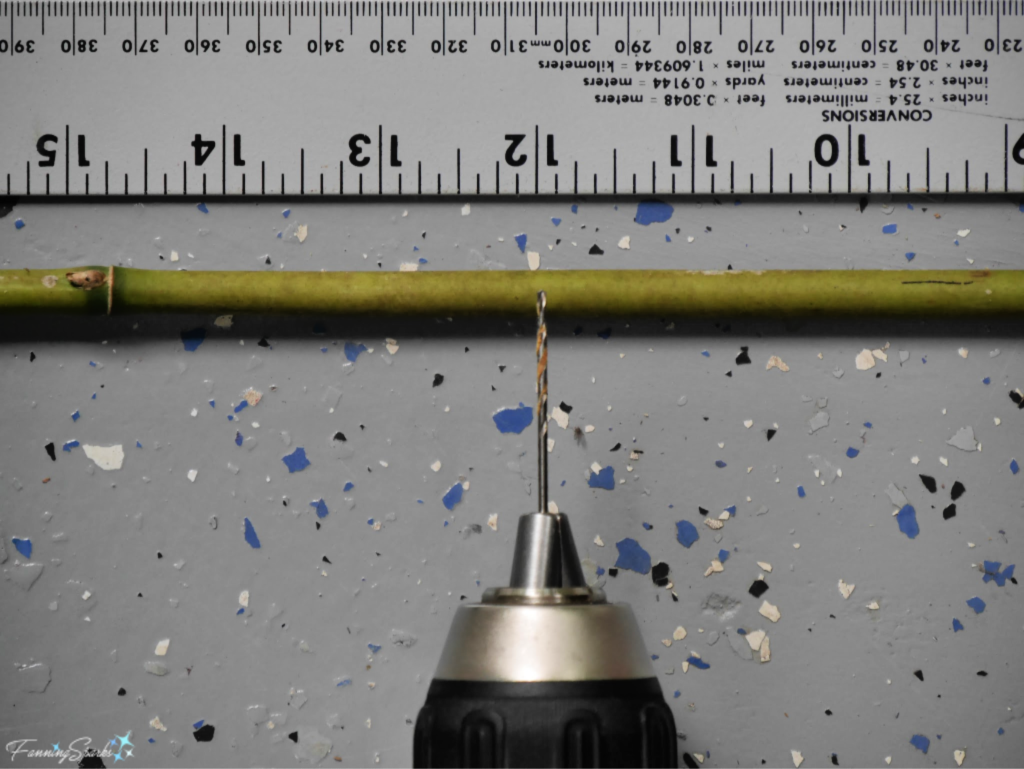
 Step 3 – Cut Mast Cut a 34” section of ⅜” bamboo (or dowel) to make the Mast. Measure up 12” from the bottom of the Mast and drill with the ⅟₁₆” bit through the center of the bamboo rod at this point. Drill through the bamboo rod at each end of the Mast.
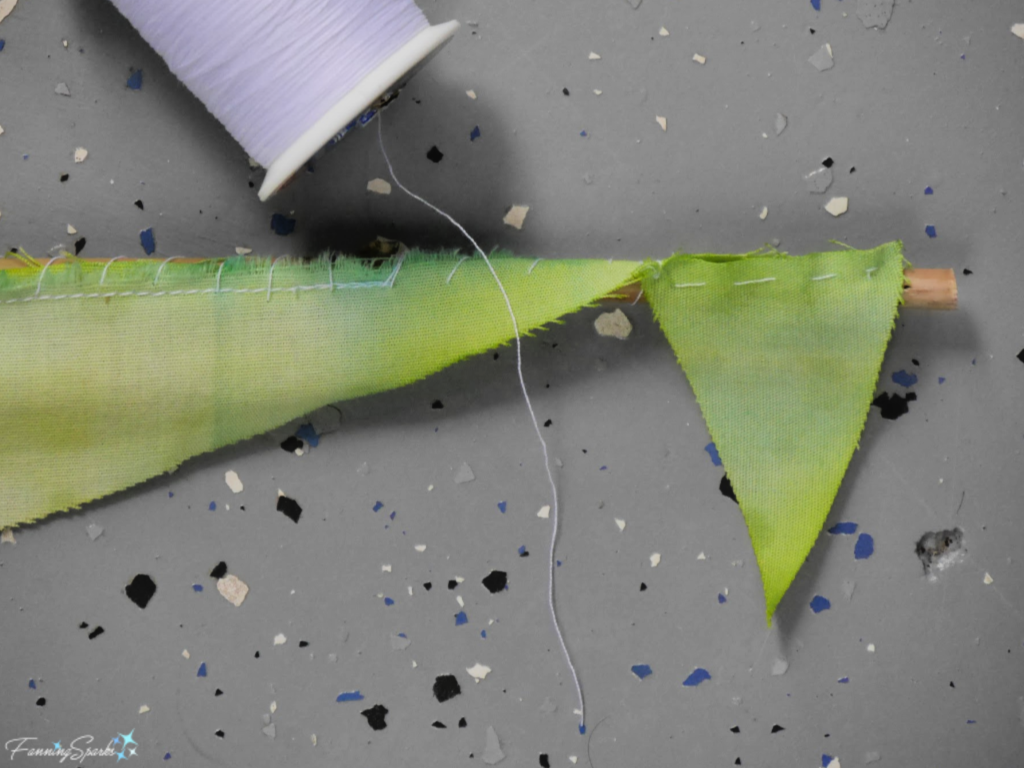
 Step 4 – Cut Sails Cut the sails from the fabric. You will need 3 triangles of fabric:
. 1) Mainsail at 22” (height) x 6” (width) x 23”
. 2) Jib at 19” (height) x 6” (width) x 20”
. 3) Pennant at 1 ½” (height) x 2 ¼” x 2 ¼”.
If you wish to decorate your sails, this would be the ideal time to embellish them. Add a colorful design, motif, name or message.
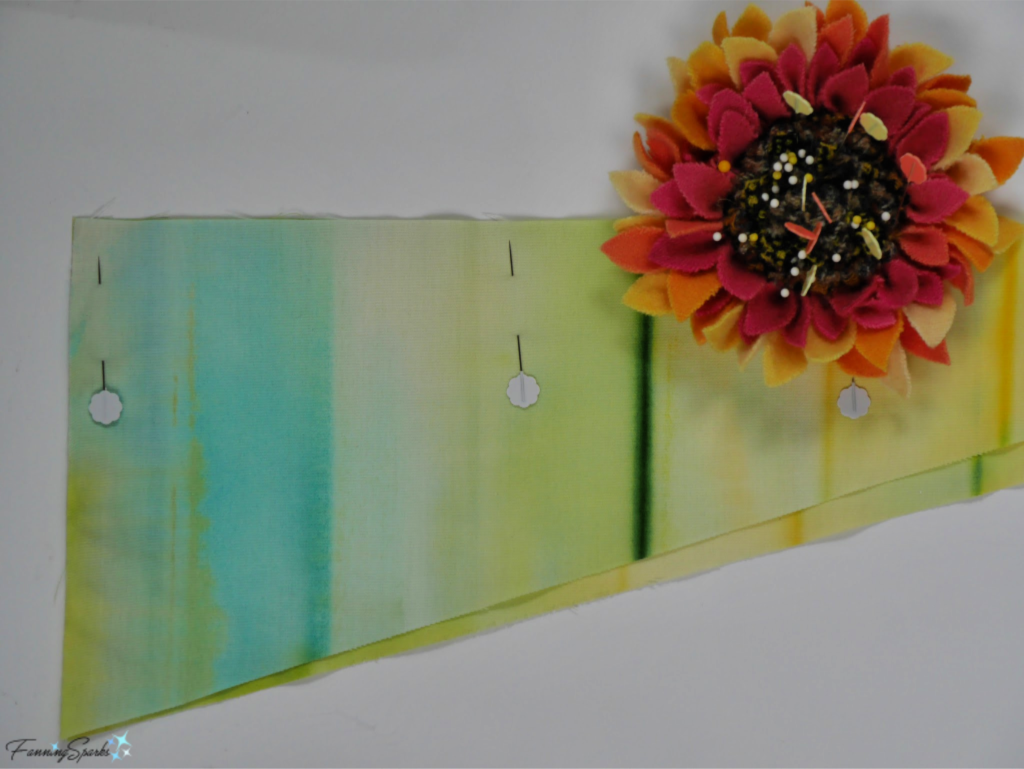
 Step 5 – Sew Sails Lay the Jib on the Mainsail aligning the right angle corners and the long straight edges (Mainsail 22” and Jib 19”). Sew a small ¼” seam. Alternatively, you could use waterproof glue.
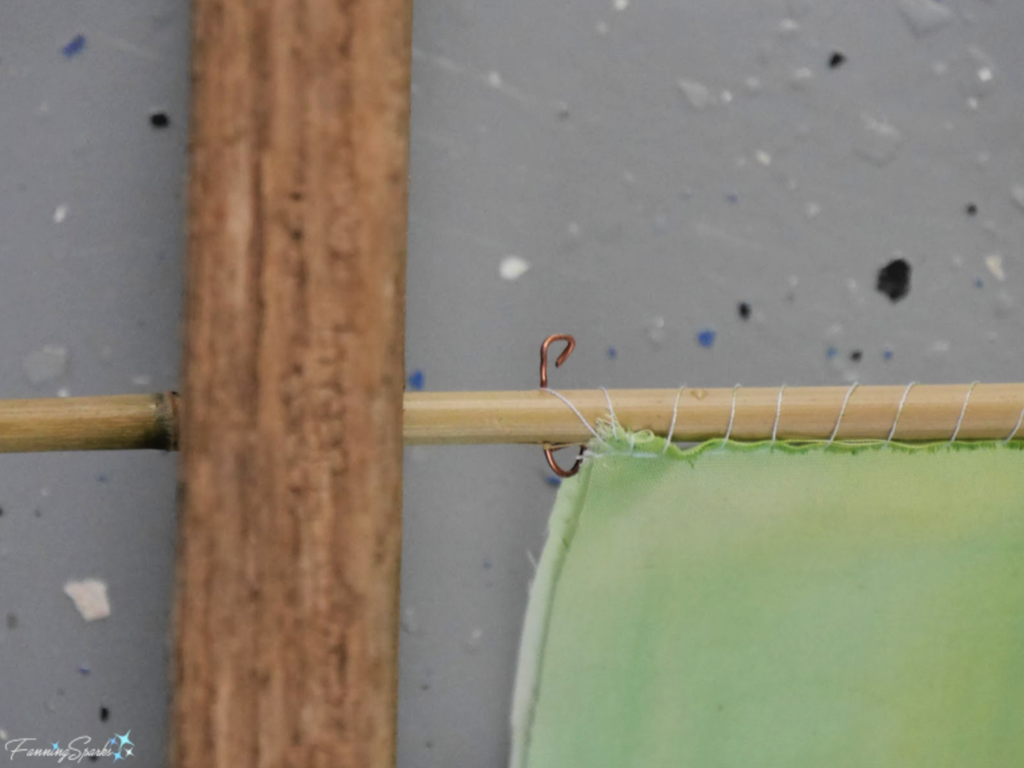
 Step 6 – Attach Sails Cut about 1 ½” of wire. Bend loop into one end. Insert wire through the middle hole in Mast (at 12” mark). Bend loop in other end of wire to keep it snuggly in place. Sew the sails to the mast. Start by stitching thread through the bottom of the sails and the wire. Stitch by looping thread around Mast and through seam on sails. At the top of the Mast, insert needle and thread through hole in Mast to secure top of Mainsail. Take a few last stitches through the fabric to finish securely. Alternatively, you could use waterproof glue to attach the sails to the Mast.
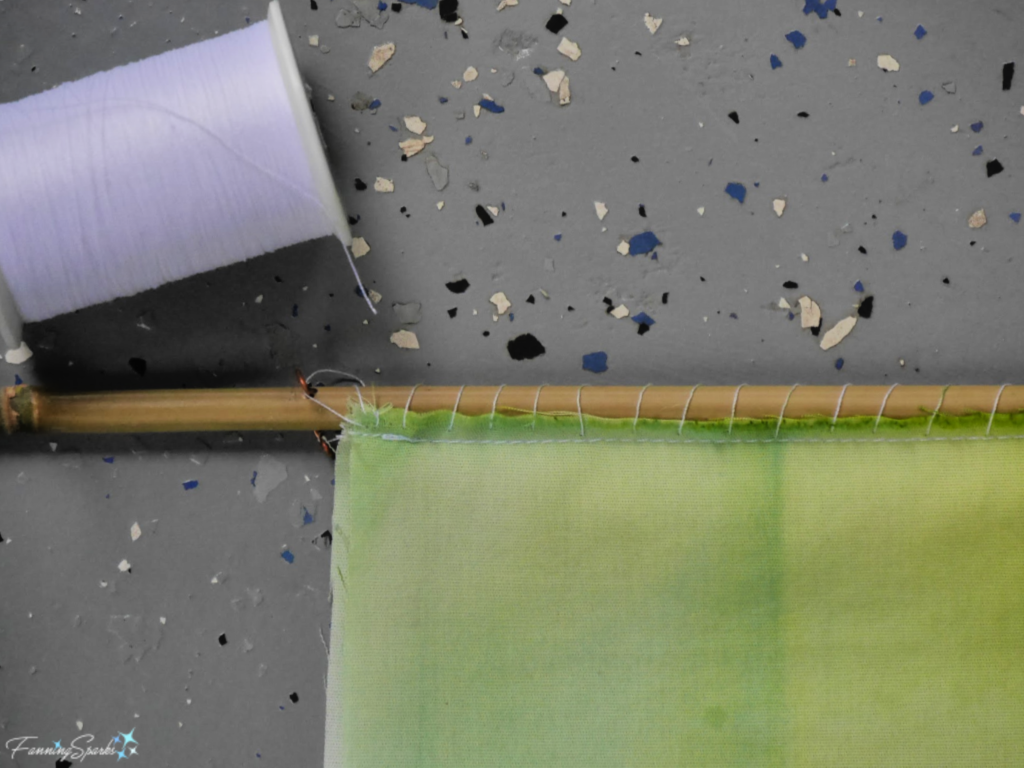 Step 7 – Attach Pennant Sew Pennant to top of Mast. Start at the top of the Mast, take a few stitches through the fabric to start securely. Insert needle and thread through hole in Mast to secure Pennant. Use running stitch to bring thread down to bottom of the Pennant. Wrap thread around Mast. Take a few last stitches through the fabric to finish securely. Alternatively, you could use waterproof glue to attach the Pennant to the Mast.
Step 8 – Assemble Boat Insert Mast into the Hull. Hold Hull just below the bent wire. The wire will keep the Mast from slipping down through the Hull when in the water.
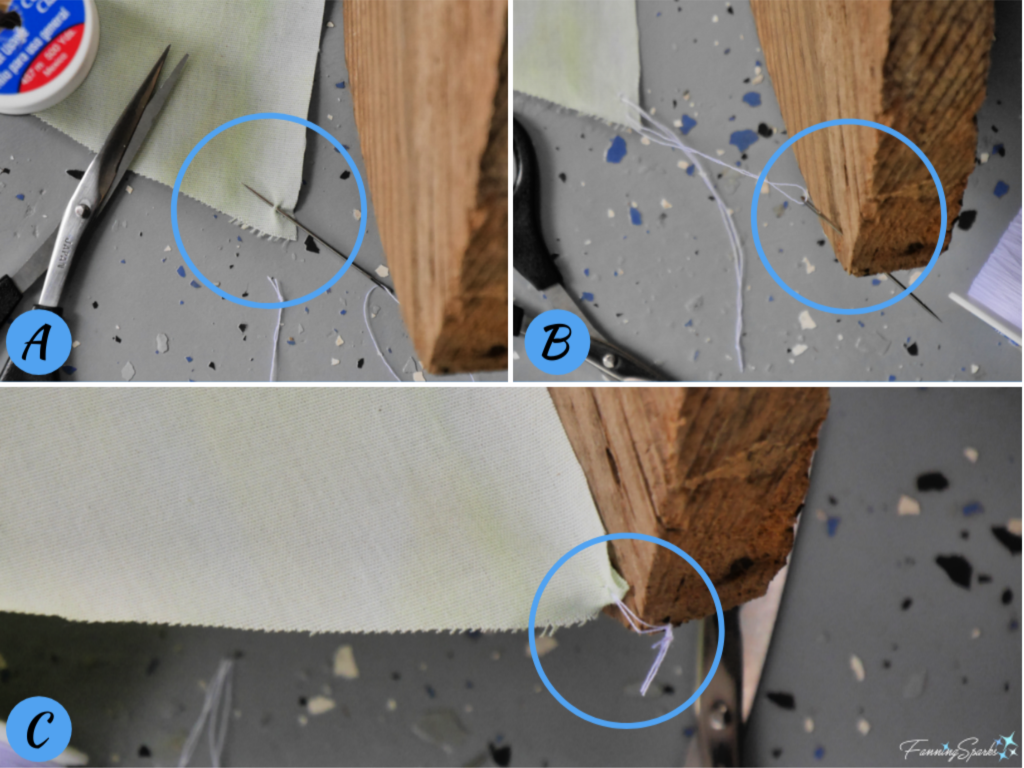
 Step 9 – Attach Sails to Hull Attach front and back corners of sails to Hull with thread. Start with the Mainsail and the bow of the Hull.
. A) Thread a needle with double thread and knot the end. Take a small stitch in the front corner of the Mainsail. Do not pull the thread all the way through leaving a long tail.
. B) Pass needle through the angled hole in the Hull from top entrance to side exit.
. C) Pull the ends of the thread together bringing the Mainsail in tight contact with the Hull. Knot securely.
Repeat with the Jib at the stern of the Hull.
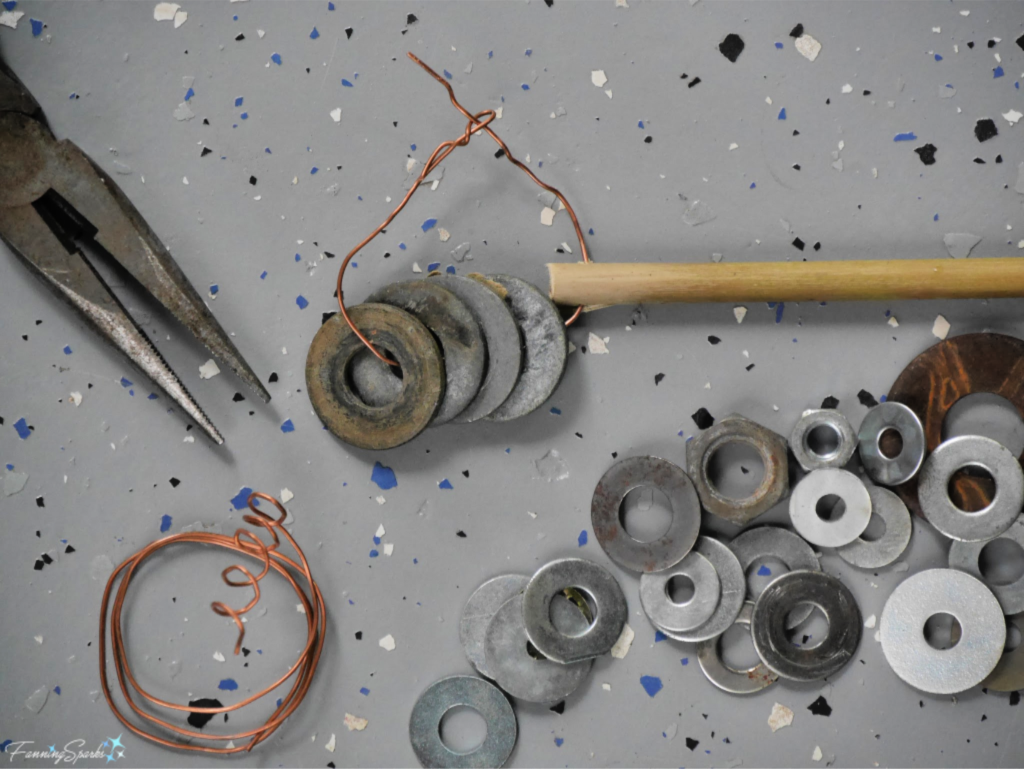
 Step 10 – Attach Weights to Mast Cut about 6” of wire, put 4-6 1”washers (or nuts) on wire, thread wire through bottom hole of the Mast. This weight forms a keel, of sorts, and serves to keep the sailboat upright.
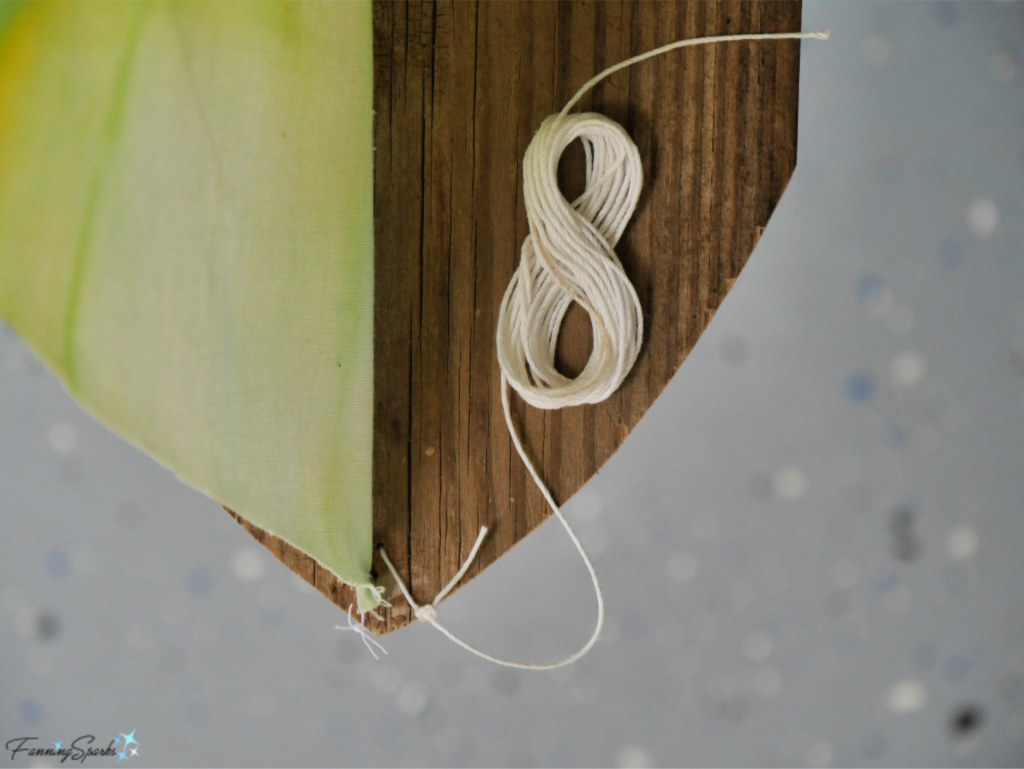
 Step 11 – Attach String Cut a piece of string about 6 feet long. Use needle to thread the string through the hole at the stern of the Hull. Knot to attach securely. You’ll need this string to keep the sailboat from floating off into the sunset!
 Step 12 Test Run It’s time to give your sailboat a try. This sailboat needs about 1 ½ feet of water to stand upright. Gently set it in water to ensure it floats and stays upright. Adjust if necessary; for example by centering or adding washers to the weights.
Step 13 Christen Your Boat You may wish to name your boat and celebrate your maiden voyage with a mock boat christening ceremony. The tradition of christening vessels dates back to the Vikings and is believed to bring good fortune and safe returns. But don’t even think about smashing a bottle of champagne on your boat’s hull! Apparently, this old tradition is no longer practiced for safety and environmental reasons. A more suitable approach might be to simply proclaim “I christen thee, (your boat’s name).” Enjoy your new landlubber toy sailboat!
 UPDATE July 6, 2021: Shown below is my latest iteration of this sailboat. This time I made the sails with a polypropylene fabric called Oly*Fun™. This fabric repels water so the sails stay dry and the sailboat stays balanced.
More Info
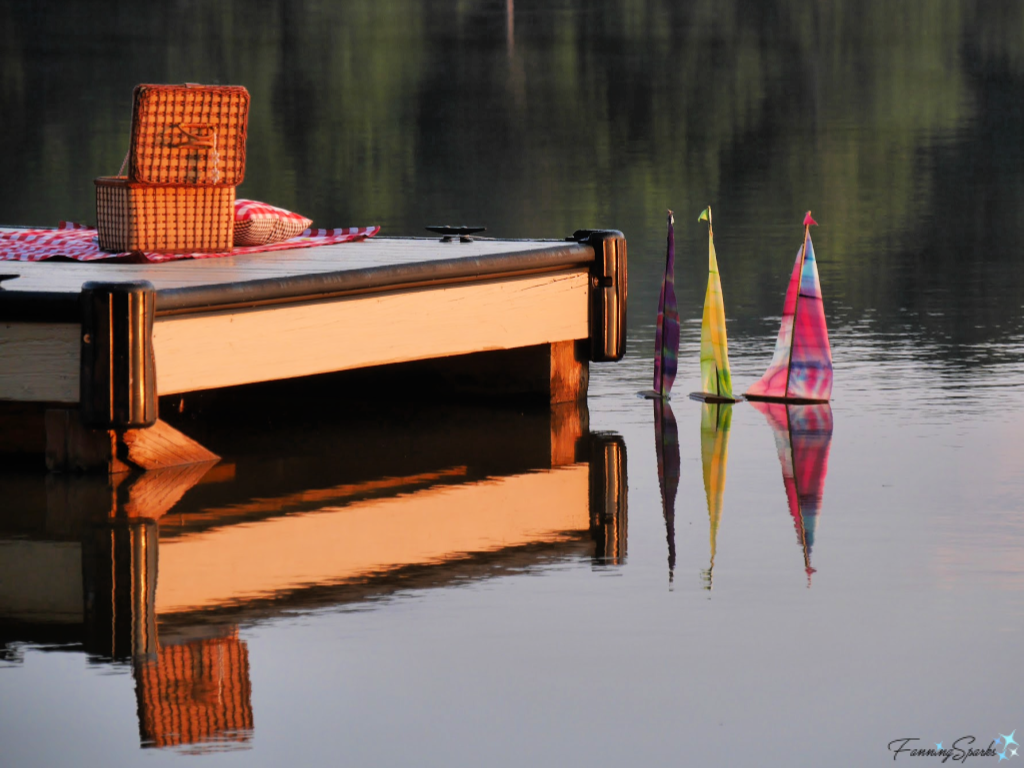
My post Sunrise Breakfast Picnic triggered the idea for this toy sailboat. I made 3 as photo props.
 You can learn to build a tiny toy sailboat with a cork, craft foam and a toothpick in the hands-on science activity in this DIY Toy Sailboat from Science Buddies on YouTube.
Cautionary Note: Please follow sound water safety practices.
UPDATE August 20, 2023: Warning from experts: “Remove toys. Don’t leave pool toys in the water. A child might fall into the water while trying to retrieve a toy.”
Today’s Takeaways
1. This landlubber’s toy sailboat can serve as a water toy, decorative item or photo prop.
2. Consider following this tutorial to make your own toy sailboat.
3. Don’t underestimate the charm of a simple, old-fashioned toy.


Comments are closed.