Hello All,
Instead of a full post this week, I will simply wish you a safe and joyous holiday season!


Hello All,
Instead of a full post this week, I will simply wish you a safe and joyous holiday season!

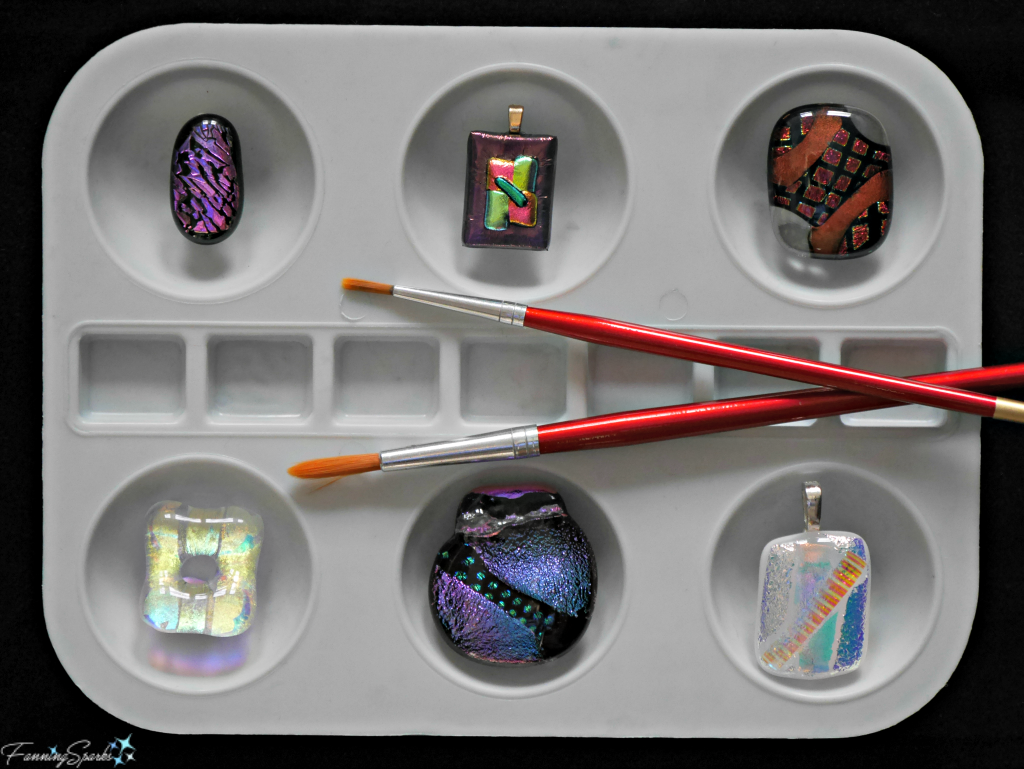
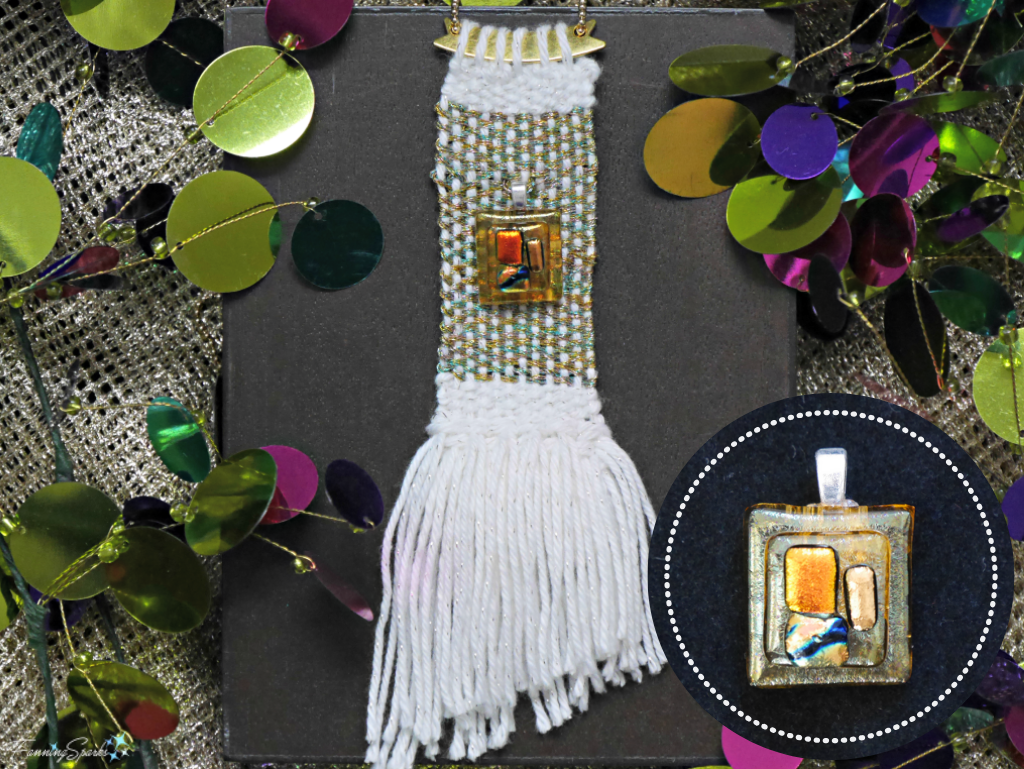
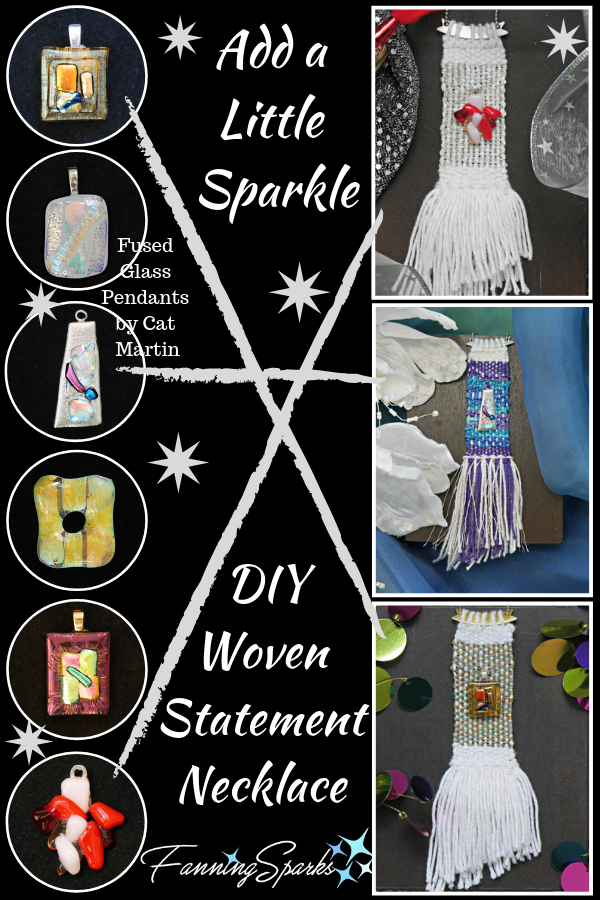
A recent visit to Cat Martin’s glass studio triggered an idea. Why not add a little sparkle to my favorite DIY woven statement necklace for the holidays? Cat has a large selection of fused glass jewelry pieces made of dichroic glass. Dichroic glass has a beautiful shimmer and shine. Viewing it at different angles, backgrounds and lighting, causes the color to shift creating a dazzling array of color. Dichroic glass is a composite of non-translucent glass that is produced by stacking layers of glass and micro-layers of metals or oxides. Choosing which piece to use wasn’t easy; there were so many great options. Each piece suggested a different color palette and style.
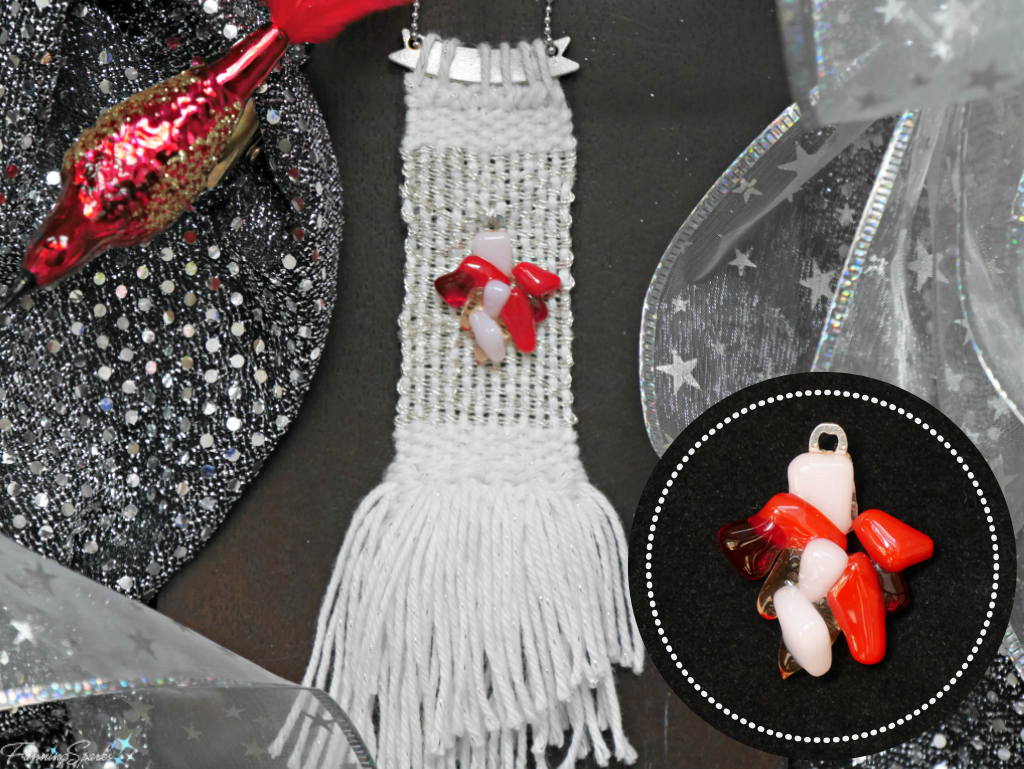
Here are the three fused glass accent pieces I chose and the resulting DIY Woven Statement Necklaces. First is a red abstract fused glass mosaic on silver thread weaving.
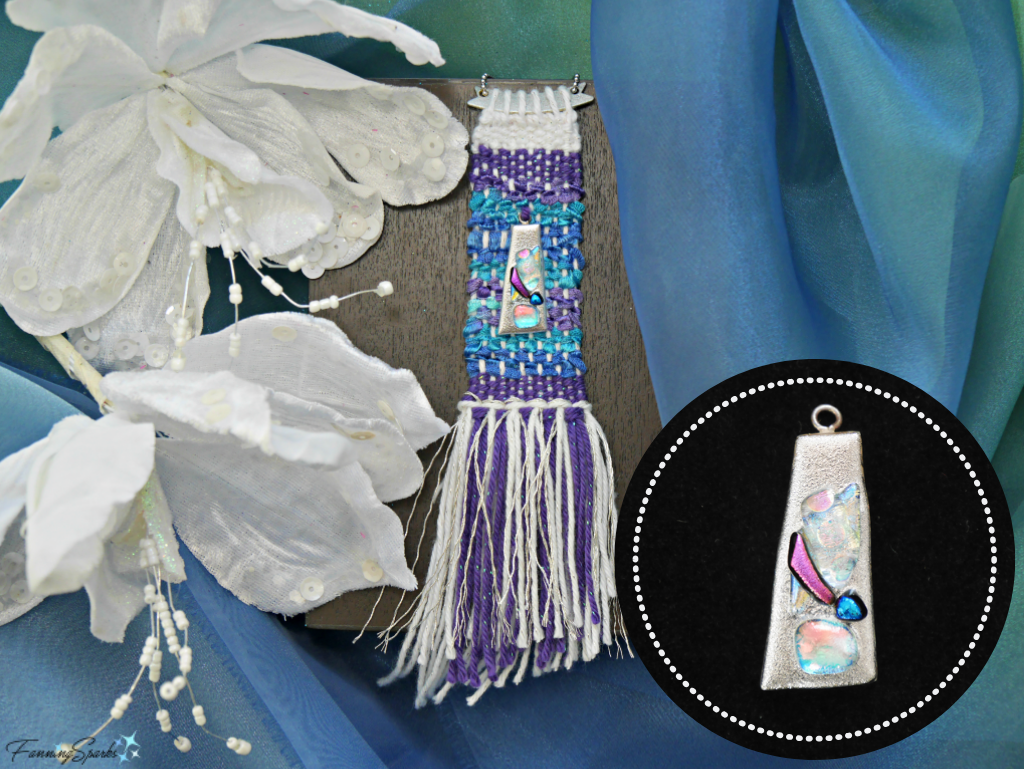
Next is a gorgeous silver dichroic glass pendant with purple and blue accents on purple and blue yarn weaving.
The last one is various shades of gold dichroic glass on variegated gold thread weaving.
Making these Woven Statement Necklaces isn’t difficult but working with metallic thread can be challenging. It took a few attempts to figure out which materials worked best and how to adjust my technique. Today I’d like to share the lessons I learned so you can add a little sparkle to your own Woven Statement Necklace. The complete tutorial, with step by step instructions, on how to make these necklaces can be found in this post DIY Woven Statement Necklace Tutorial. Instead of repeating the full tutorial here, I’ll just point out the adjustments I recommend. Please be sure to start with the full tutorial.
It can be challenging to find yarn with significant shimmer in an appropriate weight. At one point, I tried a white and silver baker’s twine. It looked nice in the weaving but, as I discovered when I trimmed the fringe, the twine was far too stiff and made the fringe stick out in all directions. It was back to the yarn shop after that fail!
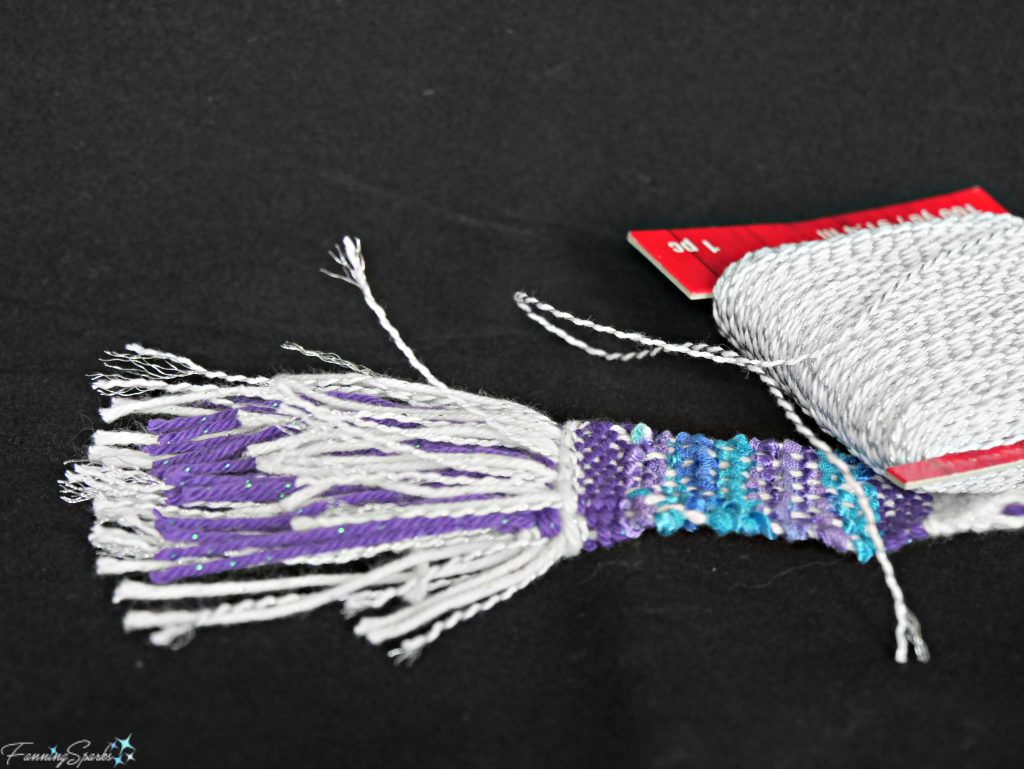
Step 10. On the Silver Dichroic Glass Necklace, I used a mix of white, purple and silver yarns for the fringe. The other necklaces used only the primary white yarn for the fringe.
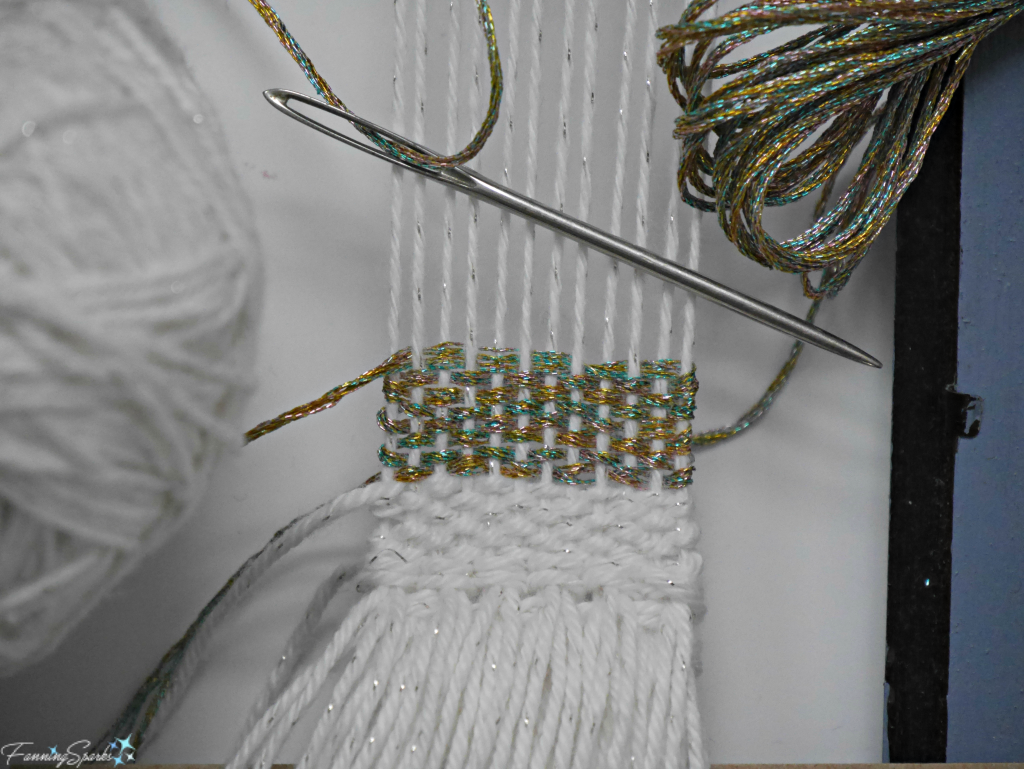
Step 15. In general, working with metallic yarn/thread requires more care. Weave slowly and ensure the metallic thread lies flat and smooth before locking the weaving in place (as shown below). This will give the best light reflection. I learned the hard way that letting the metallic thread twist and turn (as I normally would with other yarn) results in a dull, lackluster finish. I had to redo an entire necklace to achieve my objective of adding shimmer and shine. Go slowly and check/adjust the metallic thread placement after every other stitch. Take extra care to smooth and flatten when turning at the ends. When you reach the end of a row, it helps to let your needle hang loose for a moment so the metallic thread can unwind.
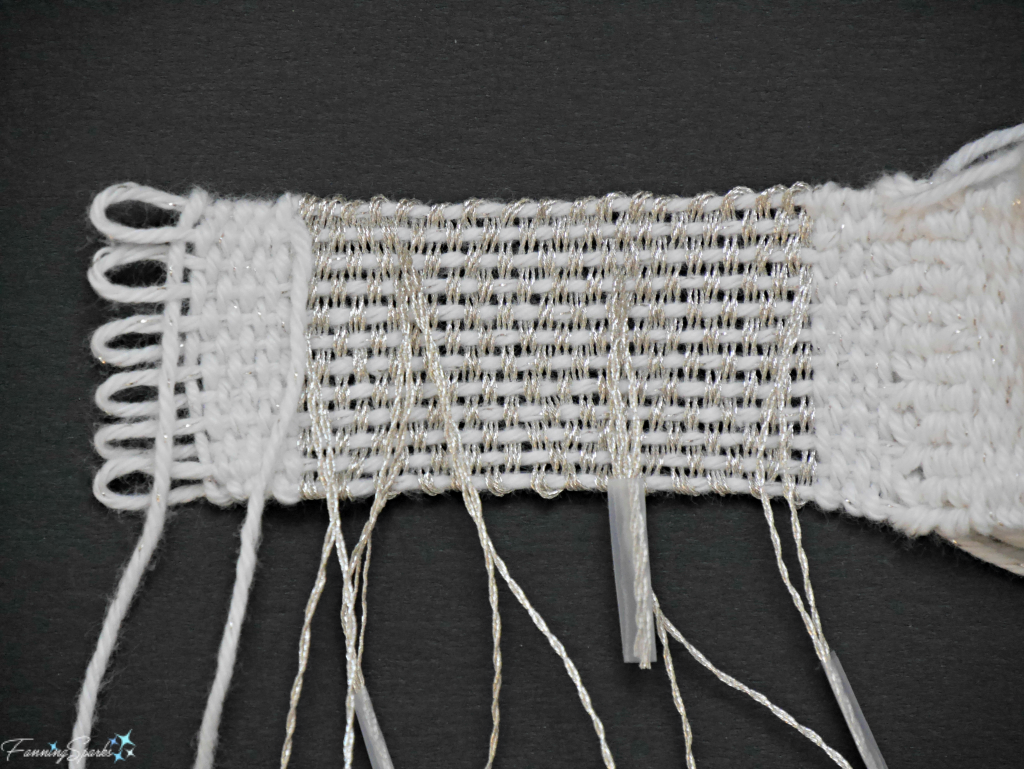
Step 15. Instead of starting and ending a piece of metallic thread at the outer edge, start and end 2-3 warp strands in from the edge. The metallic threads (ie new thread started and “old” thread ended) will overlap for about 2-3 stitches but the overlap disappears as you continue weaving. In addition, leave slightly longer tails when starting and ending a strand of metallic thread. I found it helpful to put a small piece of tape over the ends of the metallic thread to prevent them from unraveling. Here’s a photo showing the back of a section of metallic thread weaving.
Step 15. Adjust the number of rows of weaving. The size of the embellishment should determine the size of the metallic/ decorative yarn section. More rows of decorative weaving may be needed because the metallic thread is lighter/thinner than other yarn. The Gold Dichroic Glass Necklace, for instance, has 34 rows of decorative yarn/thread.
Step 21. When finishing the tails on the back of the weaving, it’s better to hide the ends by weaving them vertically along the warp threads (instead of horizontally along the weaving). This helps keep the weaving square and avoids puckers on the front. Finish the final tail (the end from the last row of plain weaving) by overcasting through the TOP loops and the last row of weaving.
Step 22. Insert the Ribbon Connector Metal Blank through the TOP loops. This replaces the piece of cocktail straw used in the original necklace.
I hope you’ll give this holiday version of the DIY Woven Statement Necklace a try. Have fun selecting a nice embellishment with lots of sparkle. Then follow the step-by-step instructions from the full tutorial incorporating the modifications for selecting and working with metallic yarn/thread.
Please pin this image.
This is the original DIY Woven Statement Necklace Tutorial. A second version of the necklace was introduced in the post Artisan Transforms Quahog Shells.
For more information about Cat Martin and her beautiful fused glass, see the post Peeking Behind the Studio Curtain. Contact Cat at CatMartinGlassArt@hotmail.com
1. The holidays provide a great opportunity to add sparkle and shine.
2. Consider re-working a successful project in a different material or design.
3. Much can be learned from trial and error when making something new.

One of my favorite things about the holidays is gift wrapping. You could say gift wrapping is my jam. I readily admit to going overboard but I just love creating and giving pretty packages. It helps to take a thoughtful approach and plan in advance. Today I’d like to share 8 tips to jazz up your holiday gift wrapping. The tips are illustrated with some of the gifts I’ve wrapped over the last few holiday seasons.
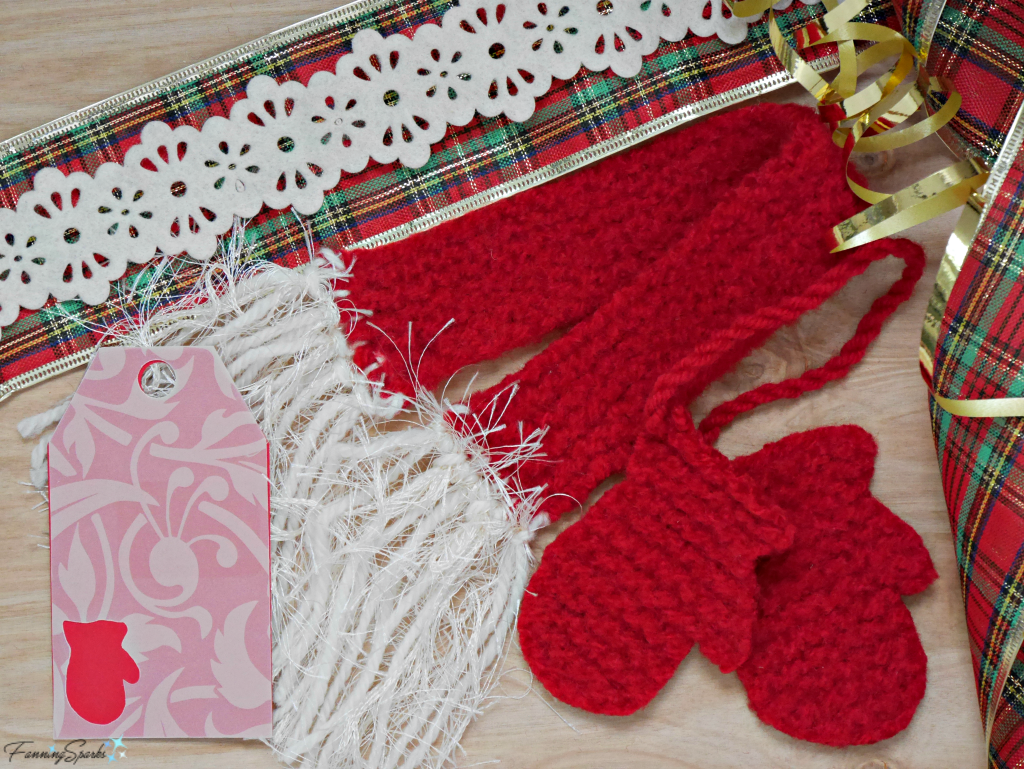
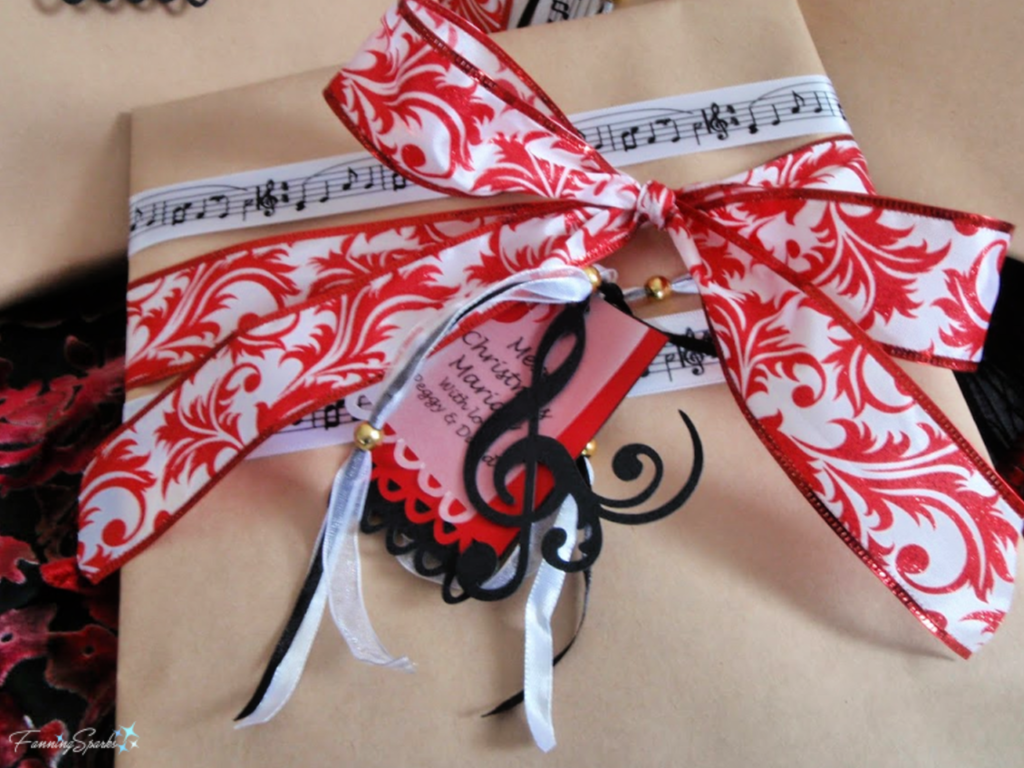
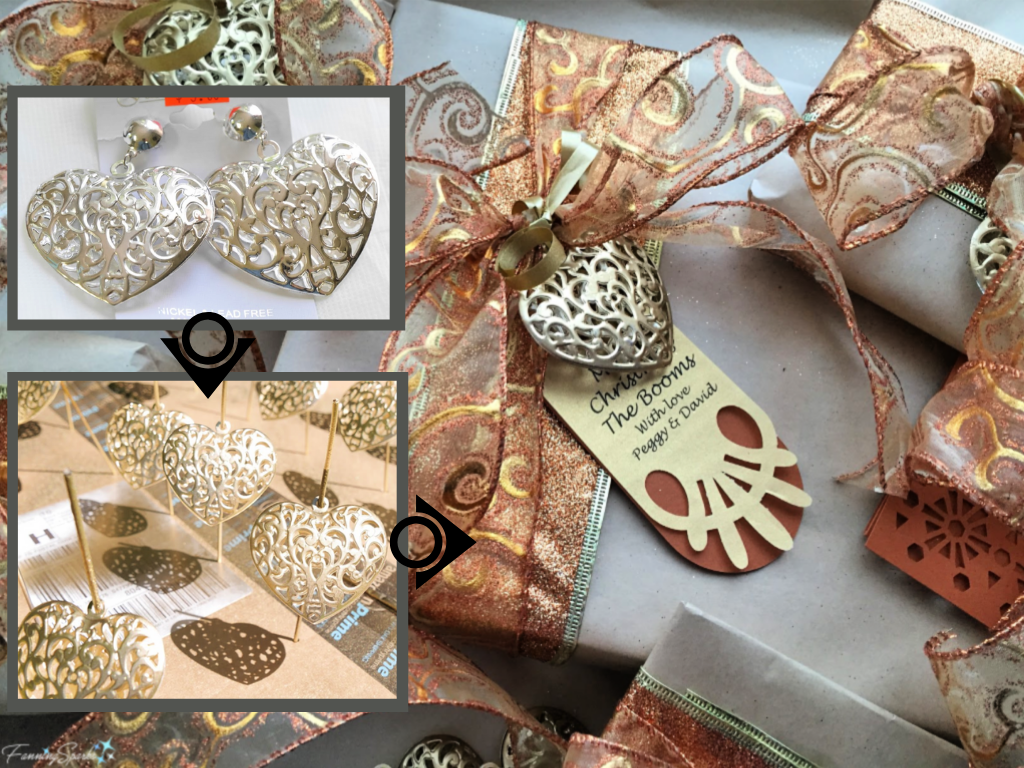
TIP 1: Choose a theme and color palette. I’ve found that sometimes the ribbon or the gift topper will set the theme and color palette. Other times, I start with the theme and work from there. Here’s an example of traditional, warm and cozy theme with a red, cream and gold color palette. This idea started with the mini-scarf and mittens gift toppers.
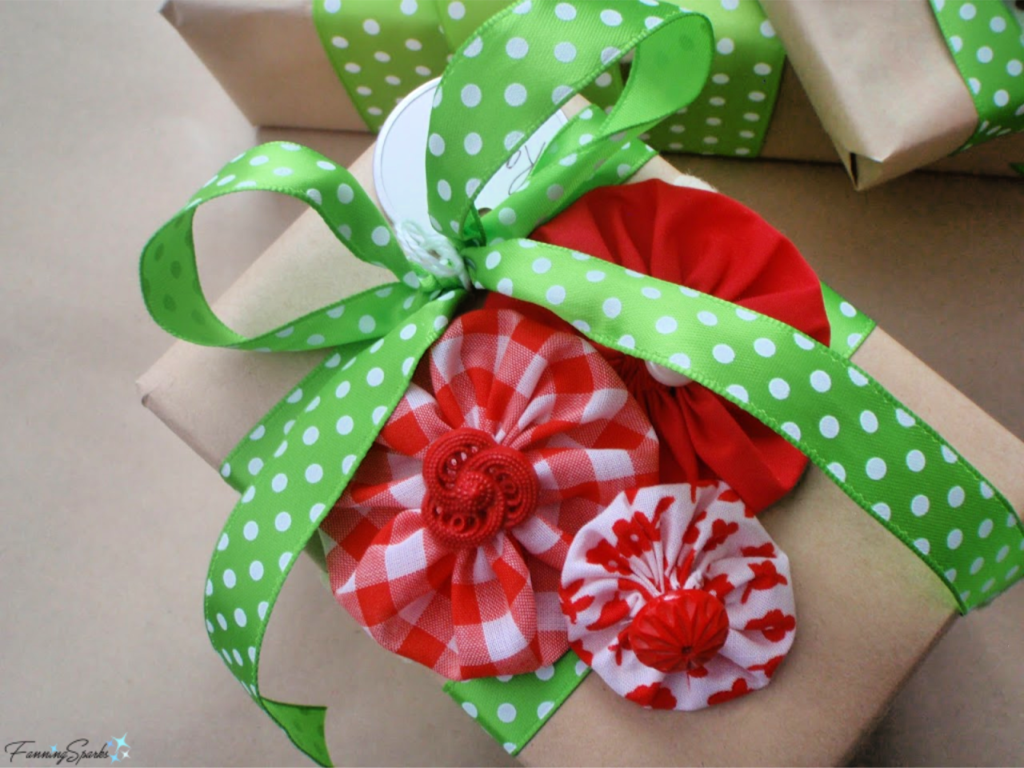
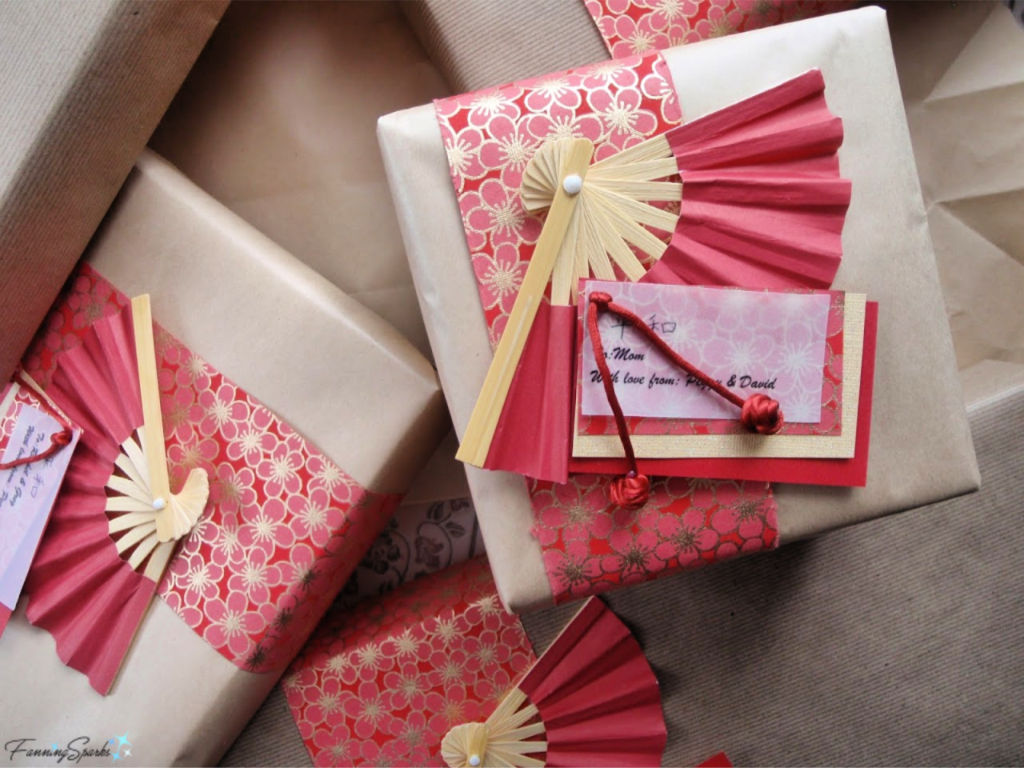
TIP 2: Use a gift topper. Make or buy gift toppers in keeping with the theme and color palette. The below gift features fabric yoyos made in festive holiday colors and accented with antique buttons. Other examples of gift toppers I’ve used include wooden ornaments, decorative hearts, fabric flowers, peacock feathers, glass ornaments, mini felt mittens and paper fans. Attach the gift topper to the package after the ribbon is in place.
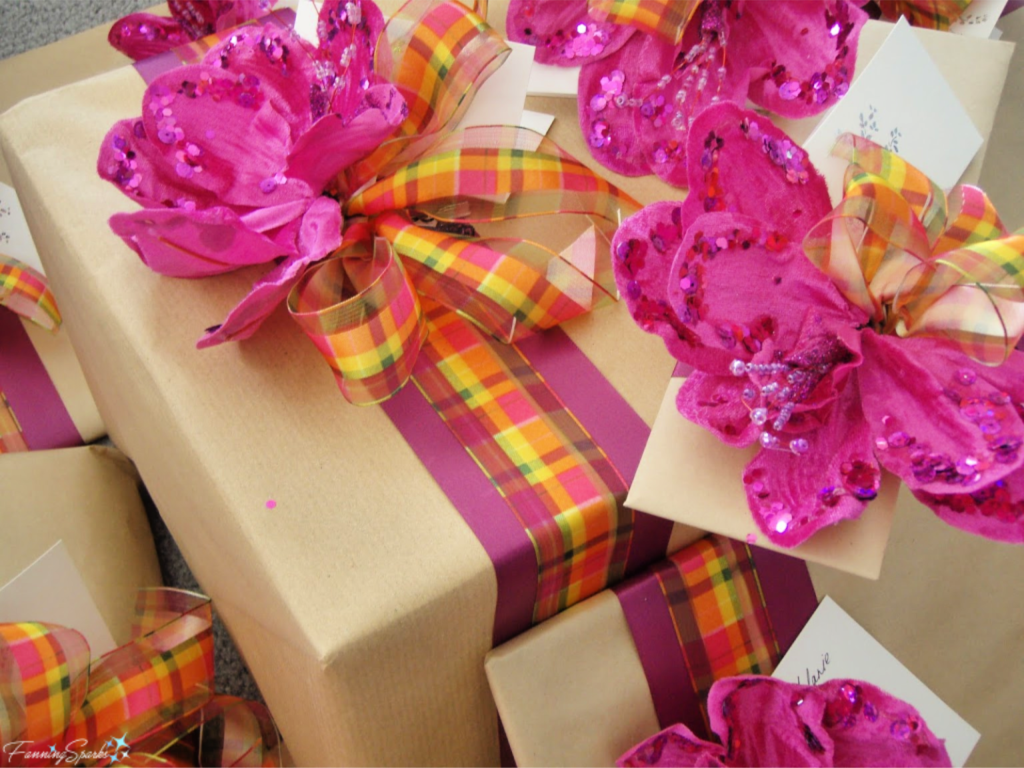
TIP 3: Use multiple ribbons. Choose at least 3 ribbons in keeping with the theme and color palette. Buy coordinating ribbons in three different widths; wide, medium and narrow. Choose one of the ribbons, either the wide or medium, in a pattern and the other two in a solid color. At least one of the ribbons, either the wide or medium, should be wire-edged. Ribbon is available in a variety of patterns, colors and materials. Experiment with different materials such as lace, tulle, yarn or beaded trim.
TIP 4: Make the gift tag special. Choose or make gift tags in keeping with the theme and color palette. Use multiple layers of paper, decorative cuts and pretty font to make the gift tags part of the decoration. One option is to print a greeting on vellum and back it with colored card stock. Use a punch or electronic cutter to add an interesting edge. Punch a hole in the gift tag so it can be tied on with a piece of narrow ribbon.
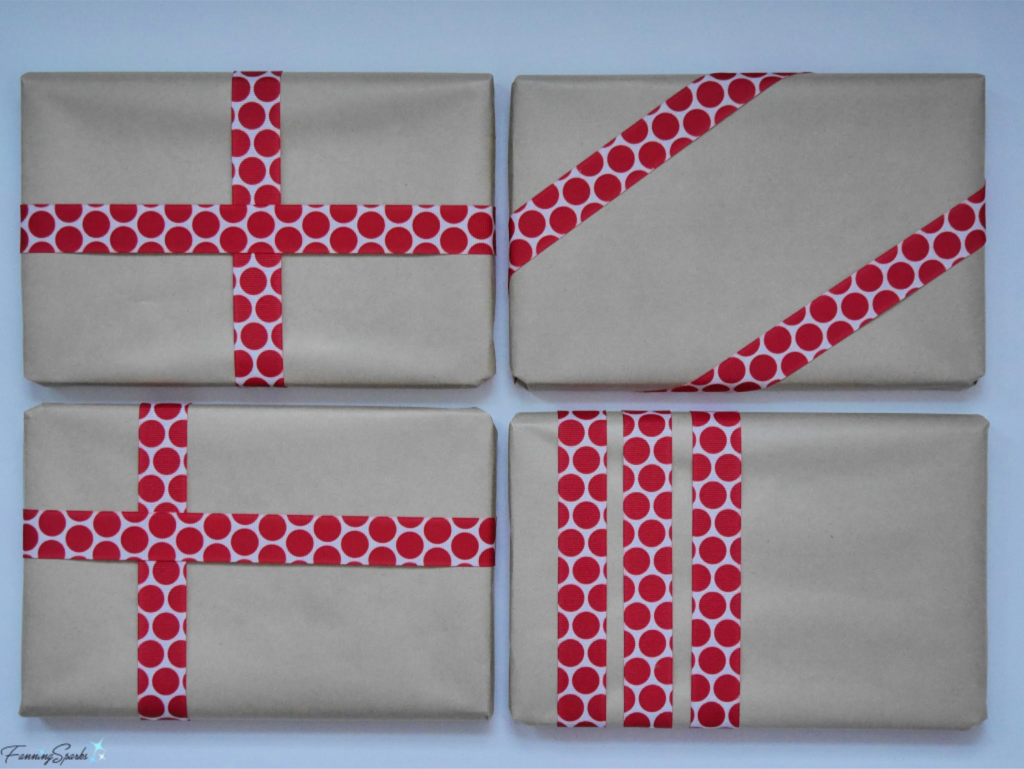
TIP 5: Use plain wrapping paper. I like to wrap the gift box in plain brown kraft paper. This plain background serves to showcase the gift’s decoration. Alternatively, use gift wrap in a complementary color with a subtle pattern.

TIP 6: Use a “belly band”. A “belly band” is a strip of paper wrapped around the gift box. The ribbons and other decoration will sit on top of the belly band. Choose specialty paper, such as handmade or Japanese paper, in keeping with the theme and color palette.
TIP 7: Consider ribbon placement. Experiment with different options for wrapping the ribbon around the gift box. The most common is a crossover at the center. Try an off-center crossover, a diagonal wrap or parallel stripes. Starting with the widest ribbon, wrap around and use double-sided tape to secure. Layer on the next widest ribbon in a similar way. Consider adding a second or third stripe of the medium ribbon. It can be tricky to make a nice bow with the same piece of ribbon you’re wrapping around the package so try tying the bow separately instead… which is the next tip.
TIP 8: Make a separate ribbon bow. Use wire-edged ribbon and narrow ribbon to make a separate bow. Attach the bow to the gift box after the ribbon is in place.
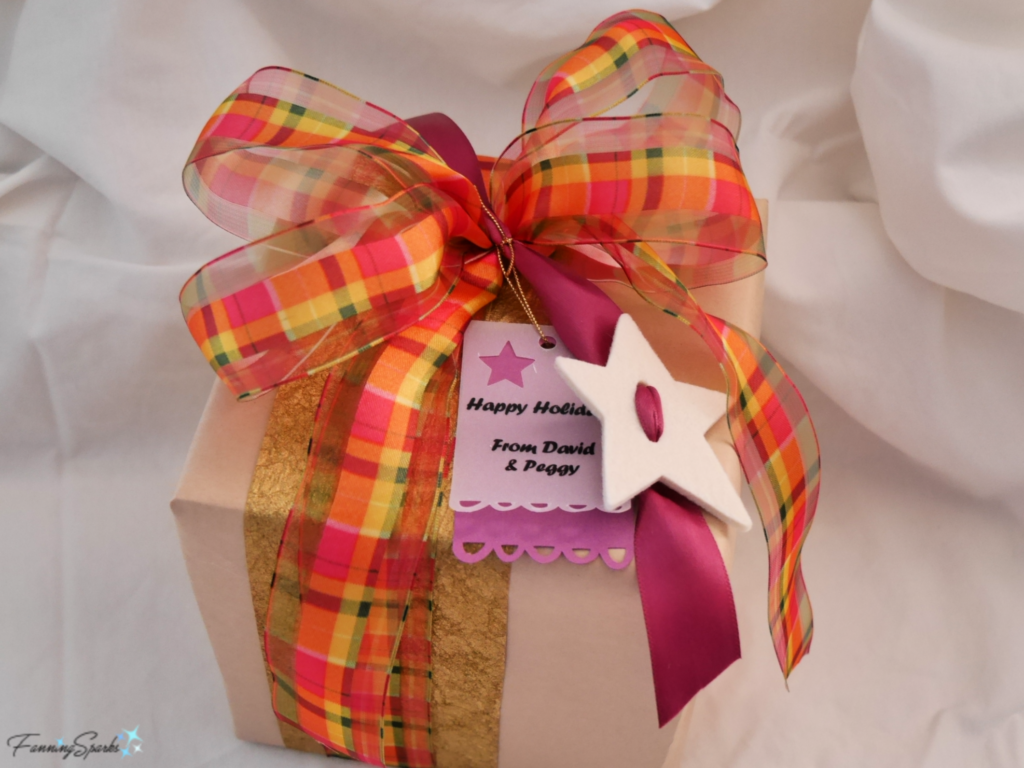
BONUS TIP: Plan ahead. It’s common for the price of ribbon to be drastically reduced after Christmas so be sure to check out the possibilities for next season. It’s also helpful to look for gift toppers throughout the year. You never know where you might find the perfect little accent. The below hearts are a case in point. I found inexpensive silver-colored heart earrings in a small gift shop in July. It was easy to take them apart and spray paint them gold to match my planned theme and color palette.
1. A beautifully wrapped gift enhances the gift giving experience.
2. Consider the above tips to jazz up your gift wrapping.
3. Holiday gifts are the ideal opportunity to experiment with gift wrapping themes and color palettes.

Christmas at Biltmore is sure to put you in a festive mood. I recently had the pleasure of attending the Biltmore candlelight tour and visiting the estate. If you’re not familiar with Biltmore, it is a large private estate with a grand mansion and beautiful property located in Asheville, North Carolina. Biltmore bills itself as “America’s Largest Home” and with over 4 acres of floor space and a total of 250 rooms I have to believe that must be the record. The below photo, which I took on a previous visit in the late summer, shows the impressive Châteauesque-style mansion.

Biltmore House was built by George Washington Vanderbilt II between 1889 and 1895. Today, it is privately owned by George Vanderbilt’s descendants. It operates as a historic house museum and welcomes over 1.4 million visitors each year. Biltmore is astonishing from many perspectives. Its mammoth size is mind boggling. Its location in the Blue Ridge Mountains is magnificent. This is the South Terrace Tea House which overlooks Mount Pisgah.

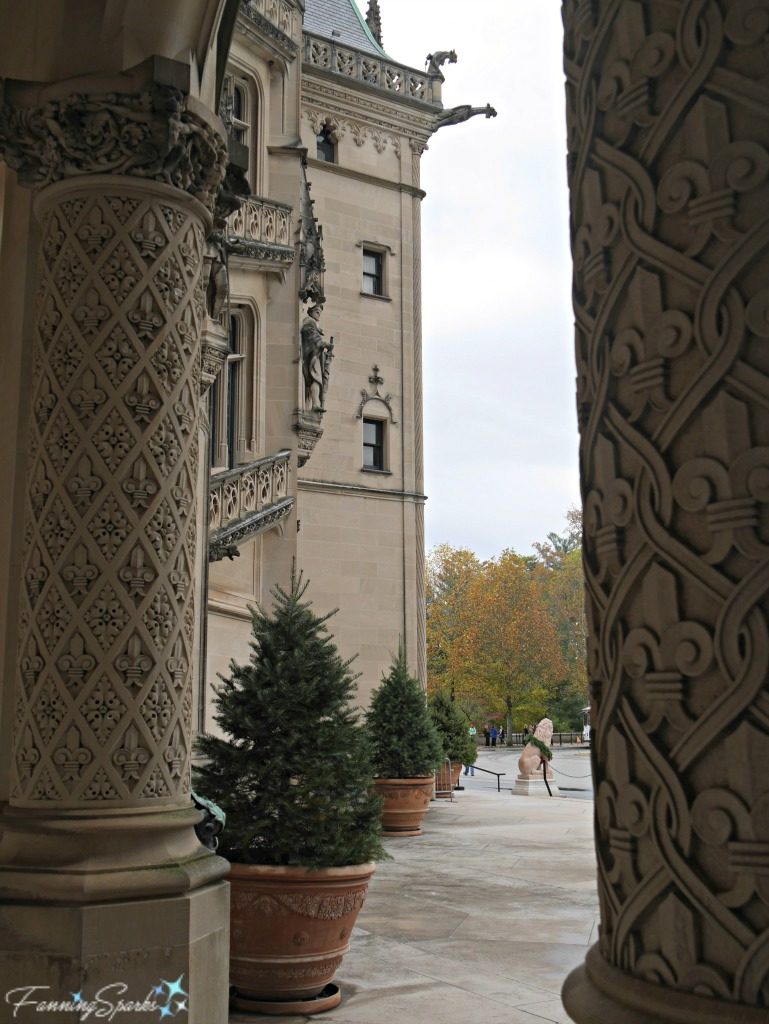
Biltmore’s architecture and craftsmanship are beautiful… ostentatious and over-the-top… but beautiful. The below photo showcases the outstanding carving on the limestone facade.
This statue and ornate staircase are on the South Terrace.

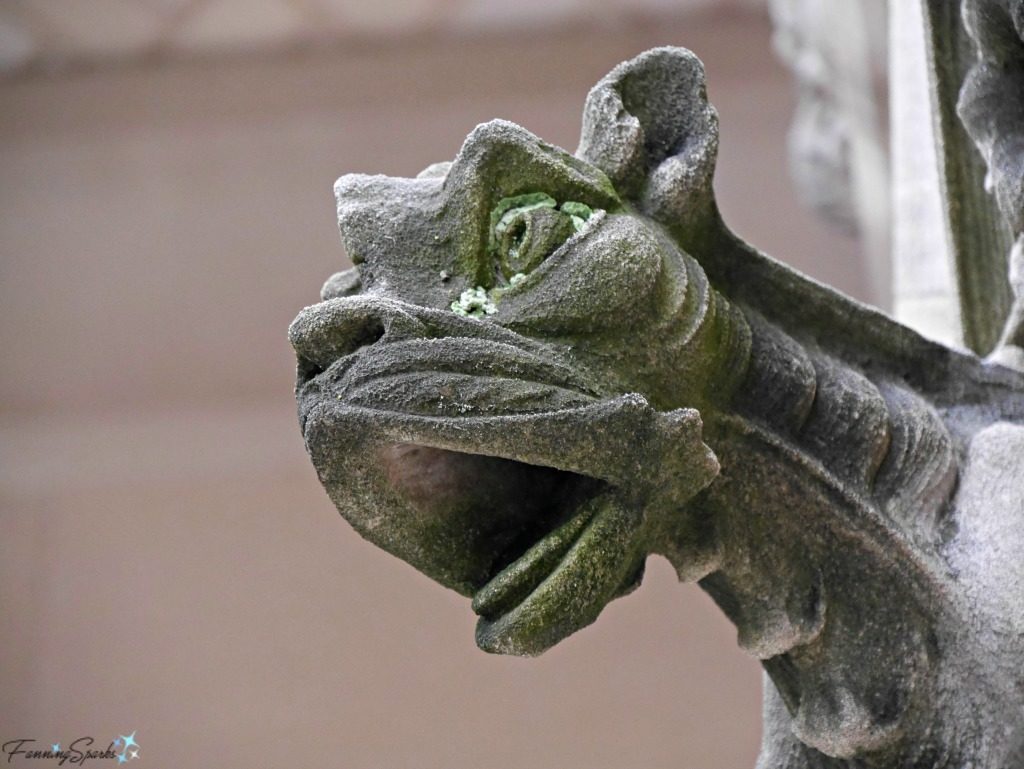
Here’s a closeup of one of the carved gargoyles.
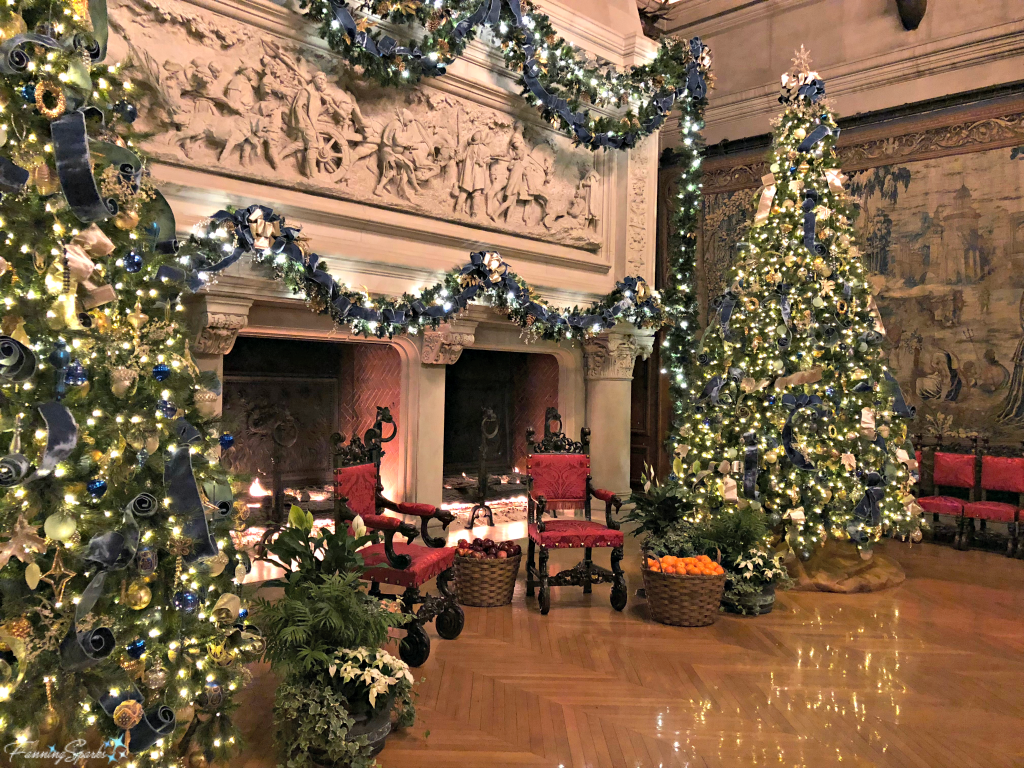
Biltmore leaves me awestruck! But all that wonder is fleeting because, honestly, there’s not a lot that applies to my own home and surroundings. After all, who has (or would even want) a Banquet Hall with 70-foot ceilings and seating for 64?
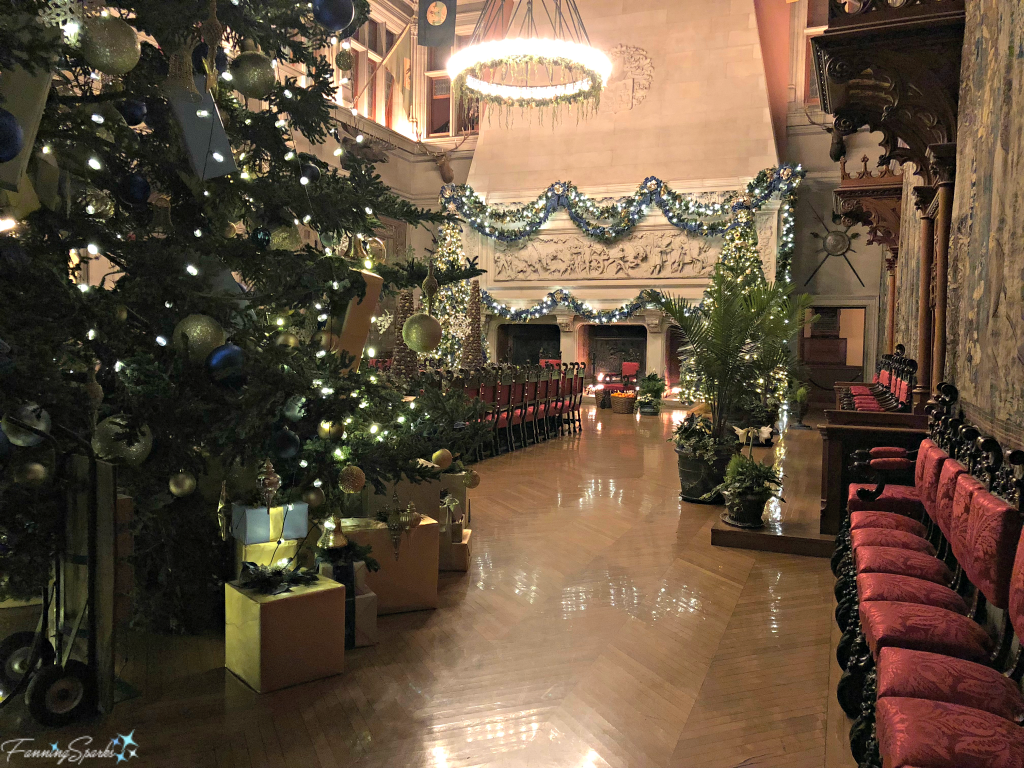
The Banquet Hall has special significance in Biltmore’s Christmas traditions. George Vanderbilt formally opened Biltmore House on Christmas Eve in 1895 with a grand holiday housewarming party. According to the Galveston Tribune. “Mr. Vanderbilt is to entertain in his chateau 300 guests from New York, who will arrive by special train. The scene of mirth and happiness which the yule-tide season will witness in this modern Aladdin’s palace will be the realization of even that lucky man’s wildest dreams…” It became George Vanderbilt’s tradition to greet his guests in the Banquet Hall on Christmas afternoon. He and members of his family distributed gifts to 300-500 guests including estate workers and their families. Ahhhh…yes… an intimate Christmas gathering of 300 guests!
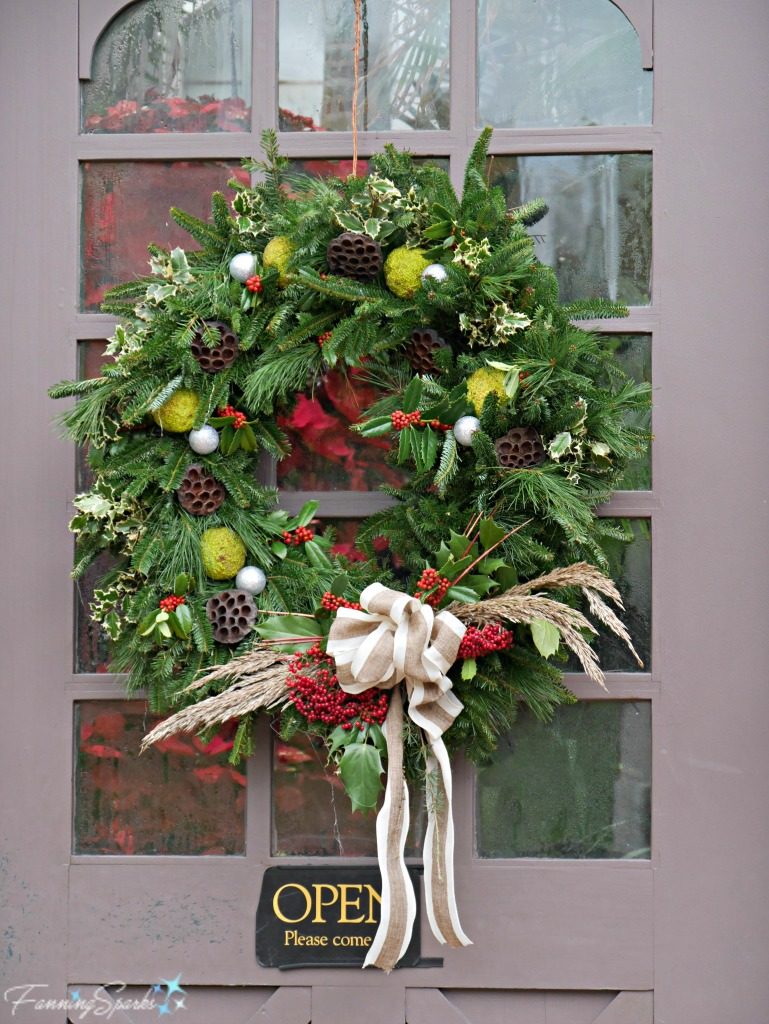
Regardless of the vast differences in lifestyle, I did manage to find a few ideas I could apply to my own home. I found inspiration in a series of natural wreaths in the Conservatory. The Biltmore Floral team installs nearly 500 wreaths and sprays around the estate. The vast majority of these are made of fresh white pine and Fraser fir and ornamented with natural materials. The vast majority of these are, also, much too grand for me. But the Conservatory wreaths are more modest and in scale with a typical house. Their natural embellishments caught my eye. I love how the color, texture and form of the natural materials are woven into the evergreen base.
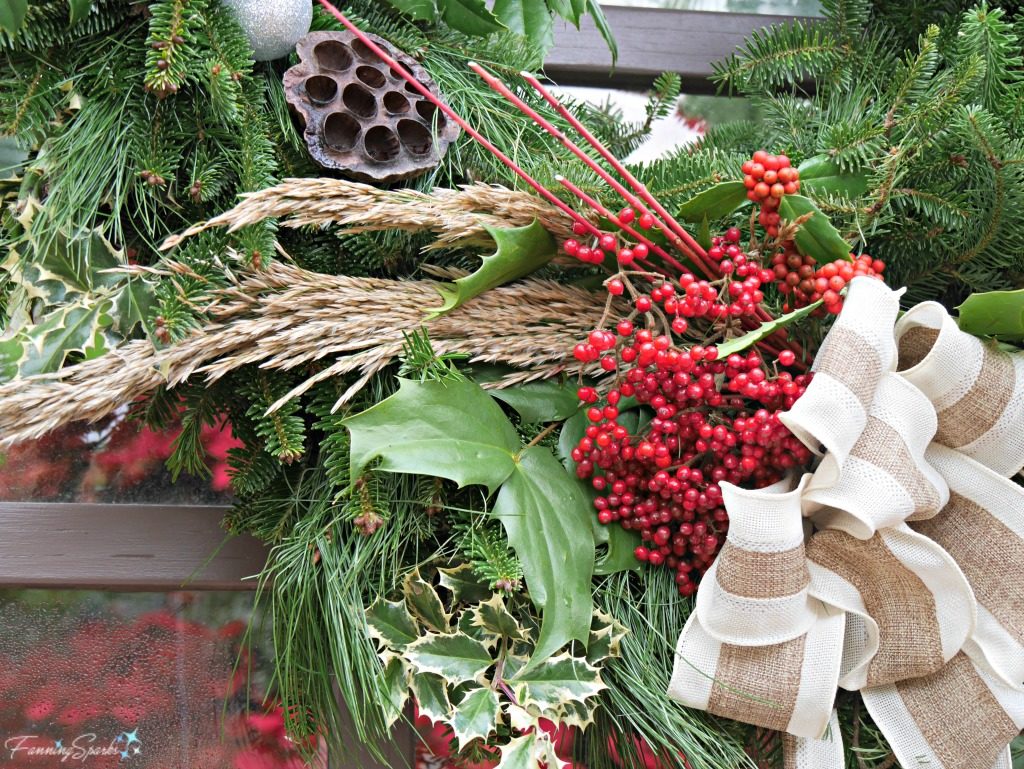
This first wreath is decorated with Osage oranges (the strange bright green balls), dried lotus pods, red holly berries, variegated holly and some silver balls. The burlap bow is backed by dried flowering stems from some type of ornamental grass along with what-appears-to-be red Viburnum berries and red twig dogwood.
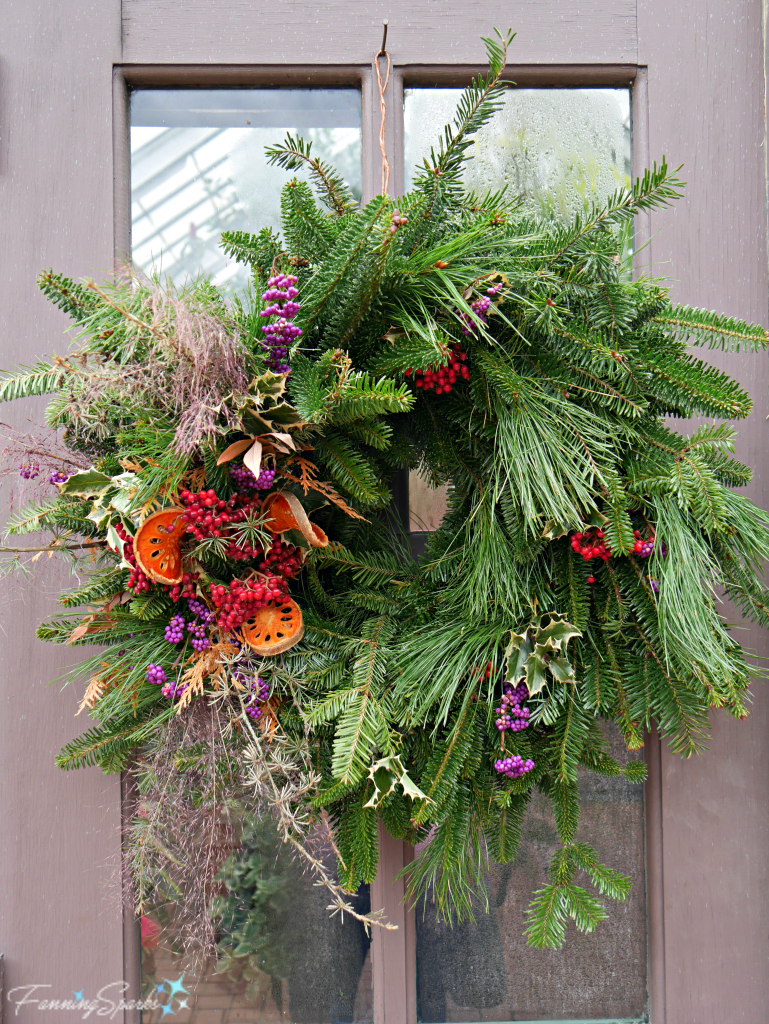
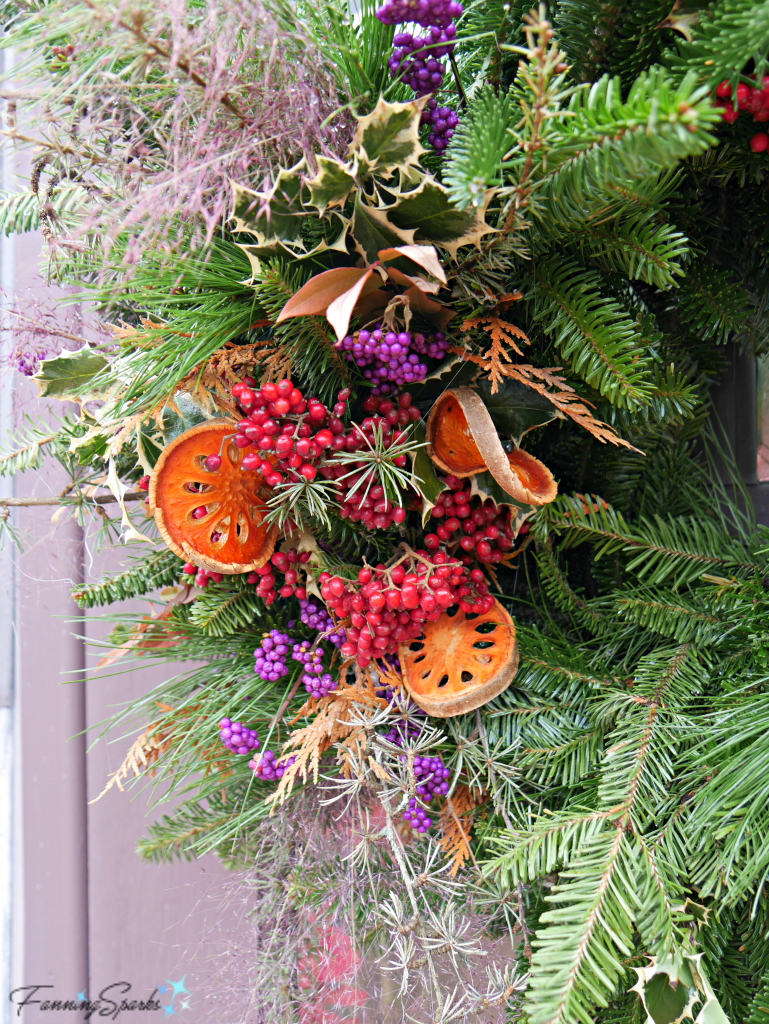
This next wreath features dried orange-colored fruit slices. At first, I thought the slices were oranges but after looking more carefully I discovered they are dried quince slices. The red berries appear to be the same Viburnum berries as on the previous wreath. The purple berries are from a shrub commonly called Beauty Berry (ie Callicarpa dichotoma). Also, there appear to be some holly leaves and purple muhly grass seed heads tucked in.
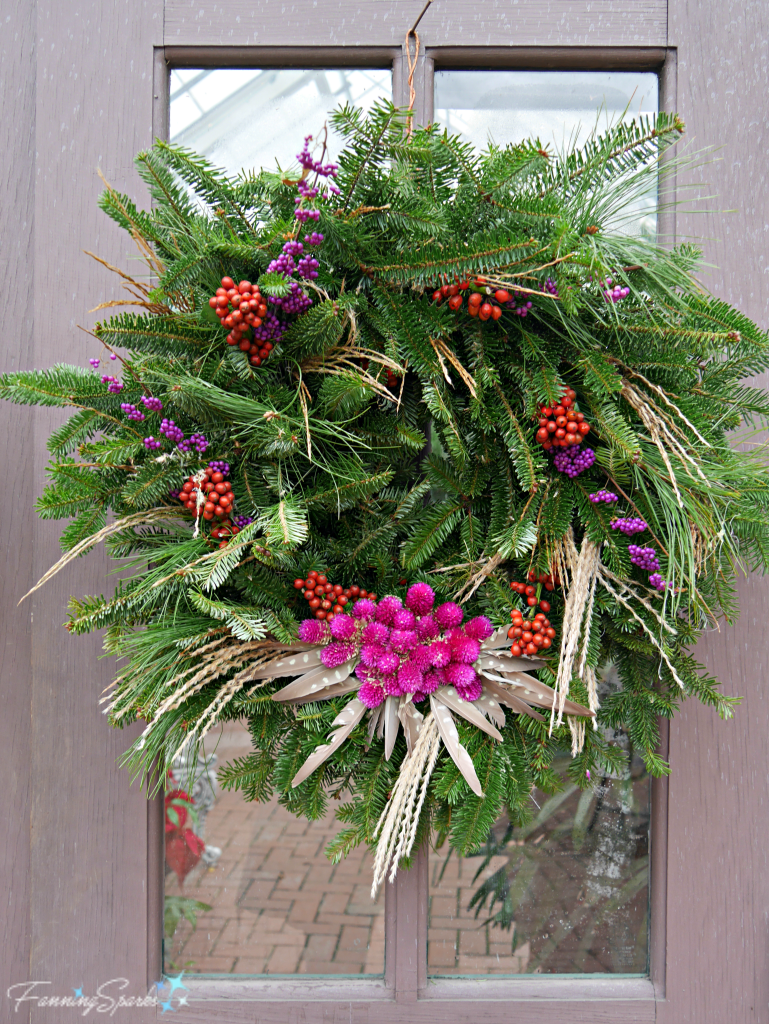
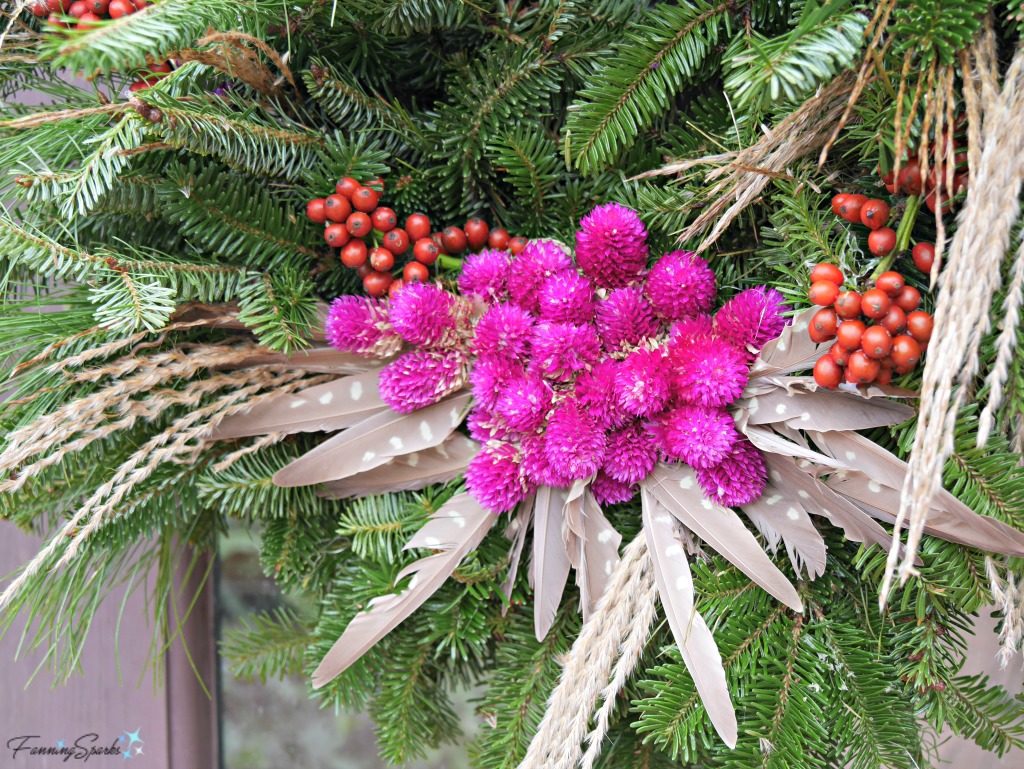
This next wreath is my favorite because of the cluster of dried Globe Amaranth blooms. Not only do these flowers contribute an unexpected vibrant magenta color but they also act as a bow. They are backed by dried flowering stems from some type of ornamental grass and some lovely taupe-colored feathers. The red berries appear to be Winterberry and the purple berries are the same Beauty Berry we saw in the previous wreath.
We typically buy a fresh evergreen wreath along with our Christmas tree at a local Christmas tree farm. But they’re usually only decorated with a simple red bow and rather lackluster. I think I’ll try some of these ideas and bring some Biltmore glamour to our home this year!
You can learn all about Biltmore on their website. Be sure to check out Open House the Official Blog of Biltmore for lots of interesting articles like this one about “Christmas at Biltmore 2018: By the Numbers“.
Details about the Biltmore Candlelight Christmas Tours are on the website. Plan in advance since several tour dates for 2018 are already sold out.
1. Consider visiting Biltmore if you have the opportunity.
2. House and garden tours can be a great source of ideas. Look for details to recreate/ re-imagine in your own home.
3. Incorporate natural elements into your home decor to add interest and personality.

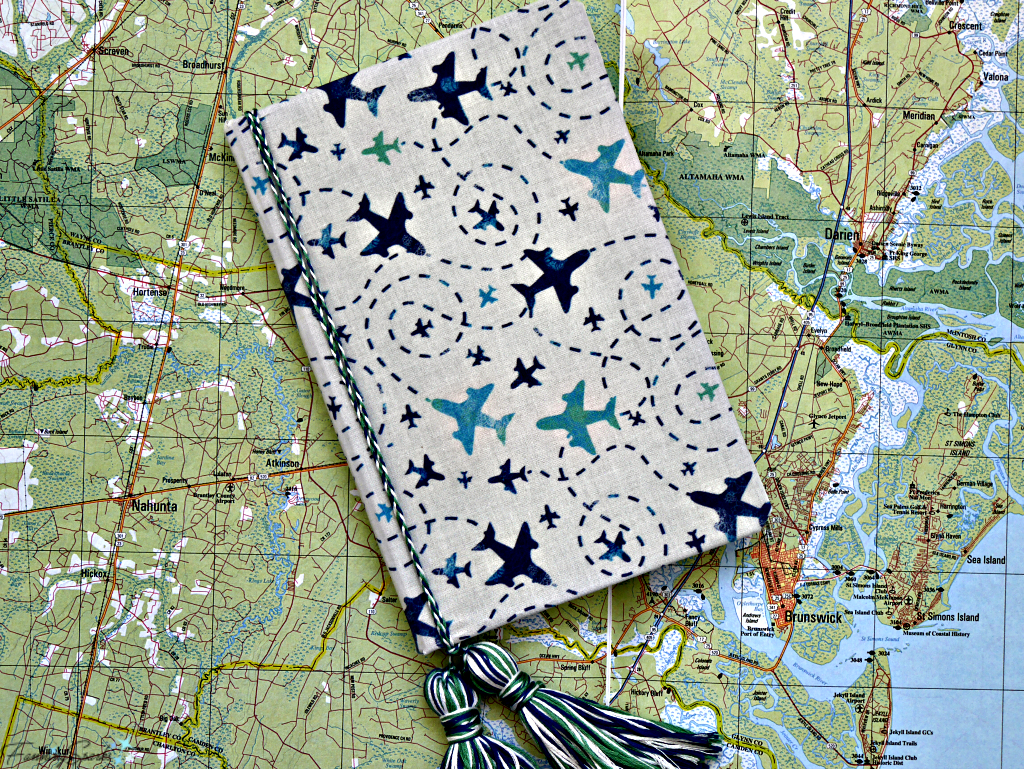
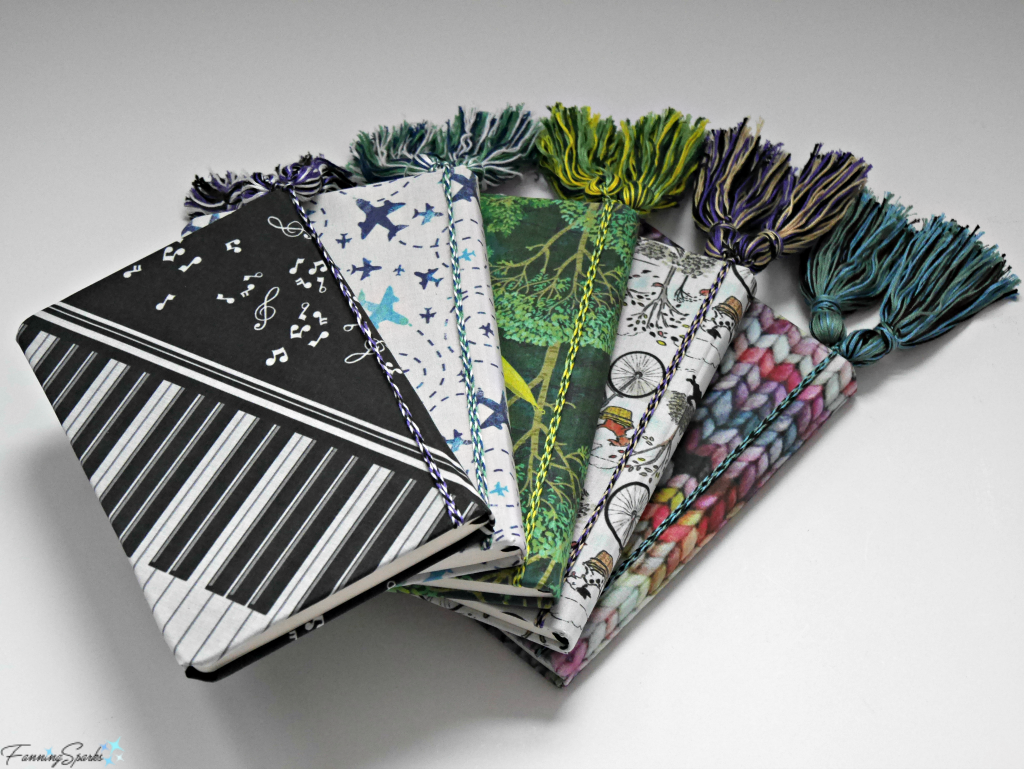
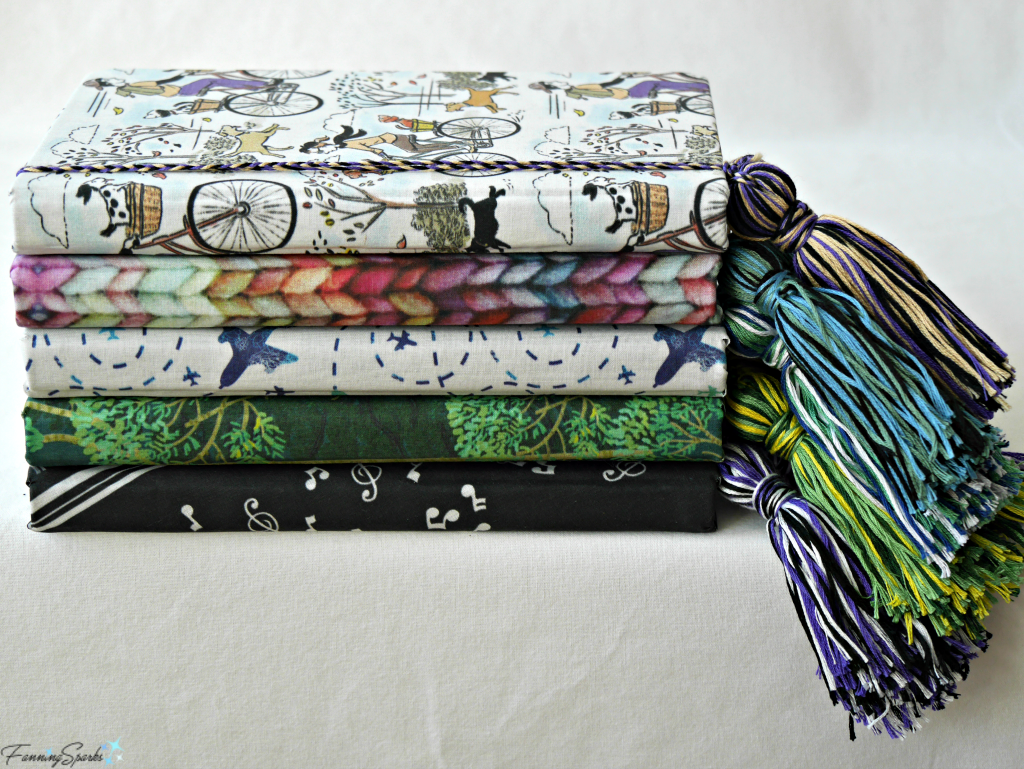
In my last post, Part 1 of the DIY Personalized Fabric-Covered Journal Tutorial, I introduced this great make-and-give DIY project and suggested ways to find the perfect fabric. We used the question “What’s Their Passion” to find a fabric design with special meaning. Here are some additional ideas to consider. How about a trip diary for the avid traveler on your gift list?
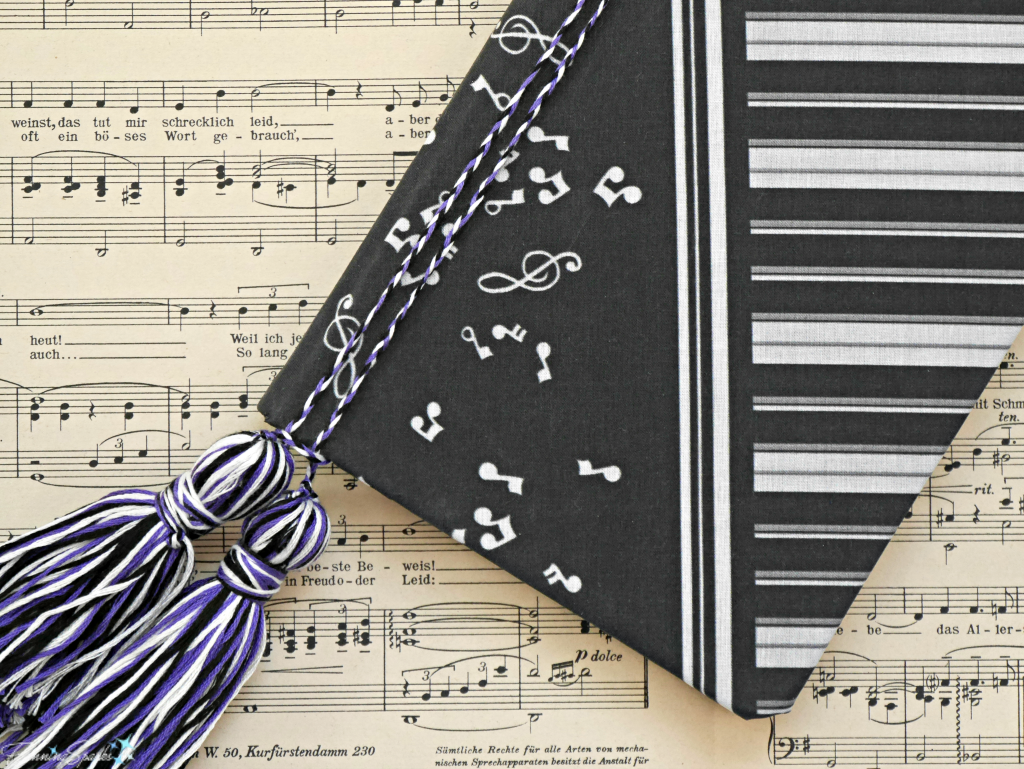
Or a notebook for favorite songs and musical scores for the music lover?
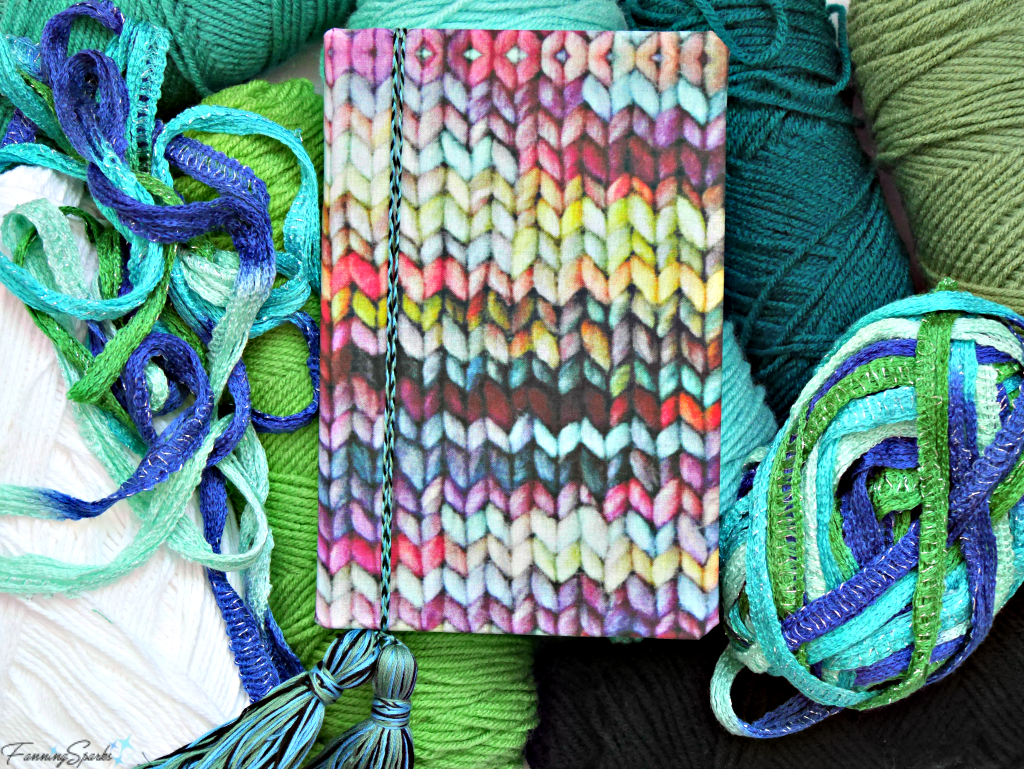
Or a knitting project planner for the person who loves to knit?
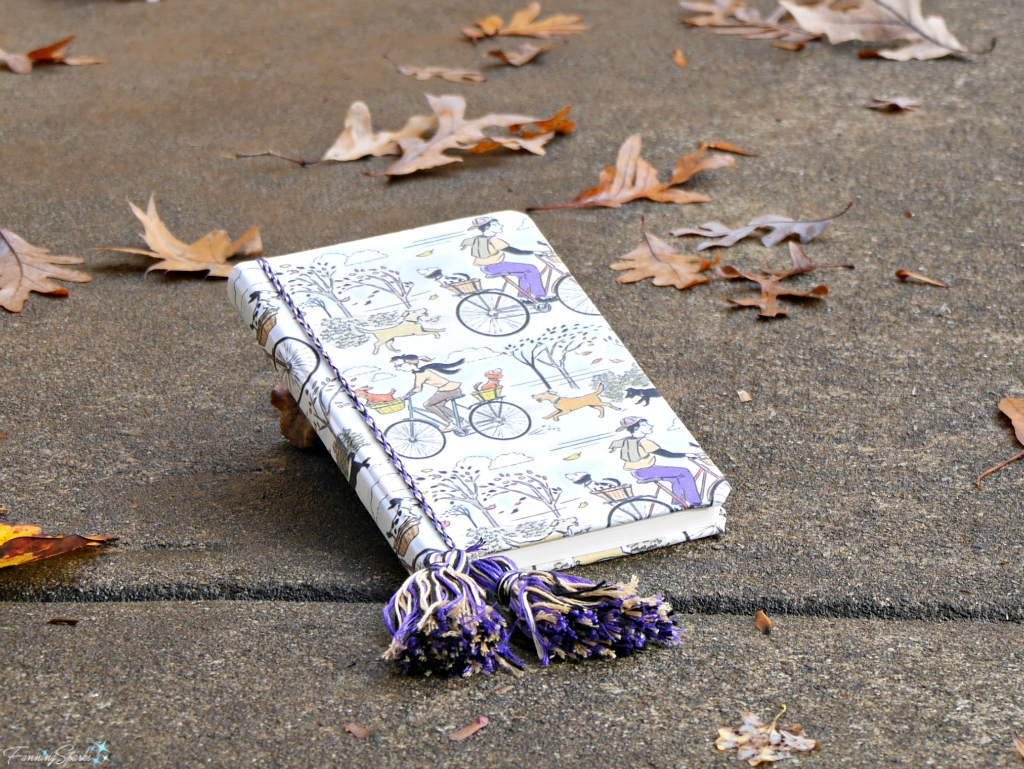
Or a Biking Log for trips planned and taken by an adventurous cyclist?
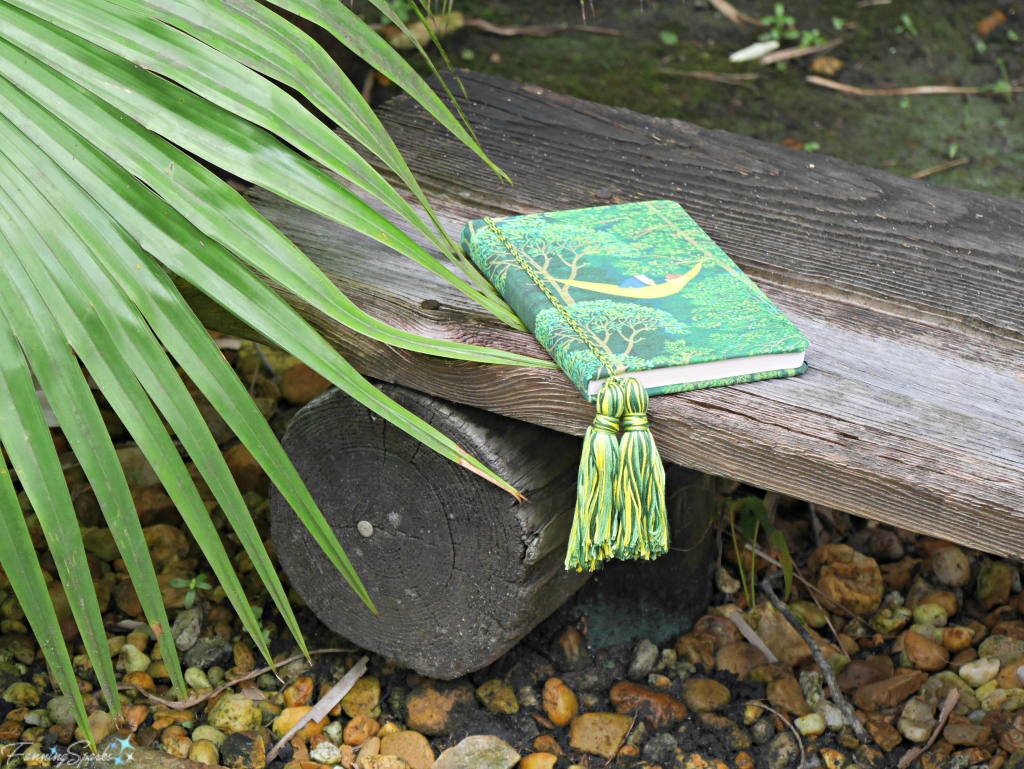
Or a Reading Notebook for the avid reader to record favorite books and authors?
The possibilities are endless.
In this post, we’ll gather the rest of the supplies and put the journals together. It’s a very simple, old-fashioned cut-and-paste process.
Supplies Needed
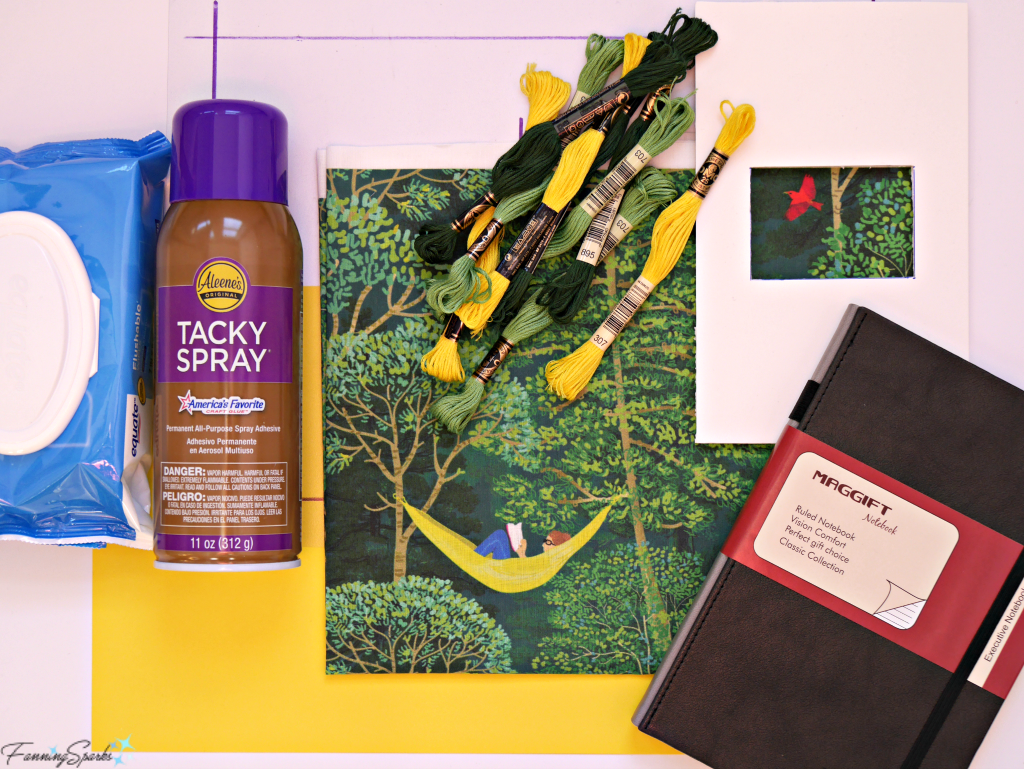
Notebook: A hardcover notebook approximately 5″ by 7″. I chose the Maggift Hardcover Notebook with 240 Pages, 8.5 x 5.7 in from Amazon. See link in More Info below.
Fabric: Fat quarter of cotton fabric. See Tutorial Part 1 for fabric suggestions and detailed explanation of requirements.
Spray Adhesive: I’ve had good results with Aleene’s Tacky Spray.
Wipes : For cleanup.
Thin Plastic: Sheet of thin clear plastic, at least as large as your fabric rectangle, to be used for a template.
Card Stock: One 8.5” x 11” sheet of card stock in white or a color matching the fabric. You will need a second sheet of card stock if your notebook is bigger.
Protective Paper: A sheet of paper, such as kraft paper, packing paper or newsprint, to protect your working surface when gluing.
Tassel Maker: Cut a piece of foam core board to 5” by 8” with a 3” by 2” hole in the center. Alternatively, use a book or piece of cardboard approximately 8” wide.
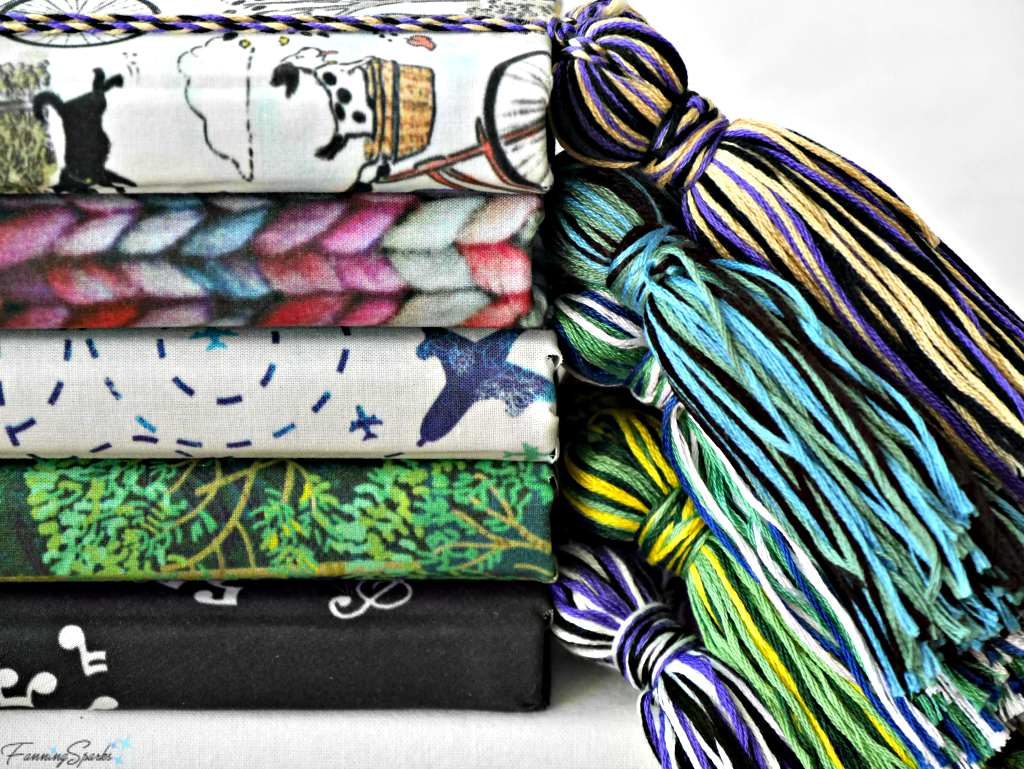
Embroidery Floss: 9 skeins 6-strand embroidery floss in 3 colors matching the fabric. This allows for 2 3-color tassels and one 3-color braided cord.
The beauty of using embroidery floss for the tassels and braided cord is the wide variety of colors available. It’s easy to find colors to match the fabric designs. The resulting customized corded tassels elevate the fabric-covered notebook making it unique and special.
Tools Needed
Marker
Scissors
Rotary Cutter, Ruler and Cutting Surface (alternatively use Fabric Scissors/ Shears)
Iron
Ironing Board
Face Mask and Gloves
Tape
Popsicle Stick
Instructions for Personalized Fabric-Covered Journal
Preparations
Step 1 Measure Notebook. You’ll need precise measurements for the notebook. Please refer back to Part 1 of this tutorial for instructions. Take note of the measurements for the next steps. We’ll continue to use the Maggift Notebook as our example. This notebook has the following measurements:
. Cover Width = 5 ⅝”
. Cover Thickness = ⅛”
. Cover Height = 8 ⁷⁄₁₆”
. Spine Thickness = ¾”
It requires a rectangle of fabric measuring: Width 13 ¾” x Height 10 ³⁄₁₆”; I’ll refer to these as the Outside Dimensions.
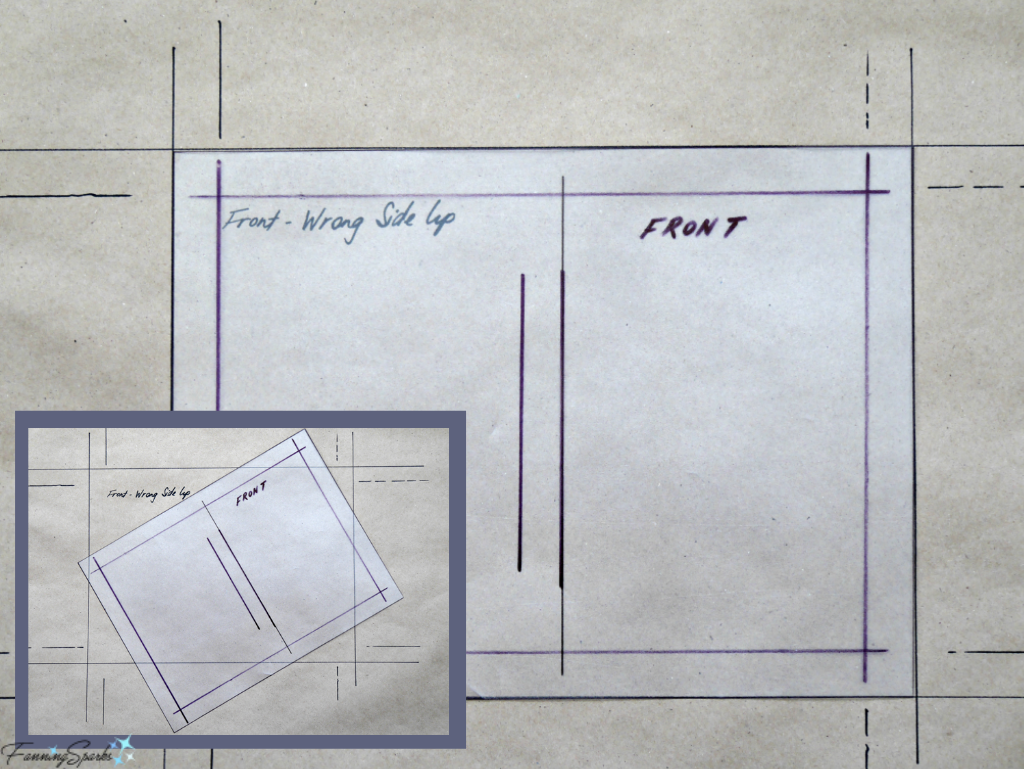
Step 2 Create Cutting Template. Use a thin sheet of clear plastic to make a template for cutting the fabric. Cut the template to the Outside Dimensions (13 ¾” x 10 ³⁄₁₆”) and mark the outside border (⅞” = Cover Thickness plus a ¾” overlap) and mark the spine (¾”). Label the right section with “FRONT”. Alternatively, you could skip the cutting template and just eyeball your fabric placement. However, I did find the cutting template extremely helpful for the fabrics with a distinct design and it was necessary for the unexpected, off-grain placement of the Piano Music fabric.
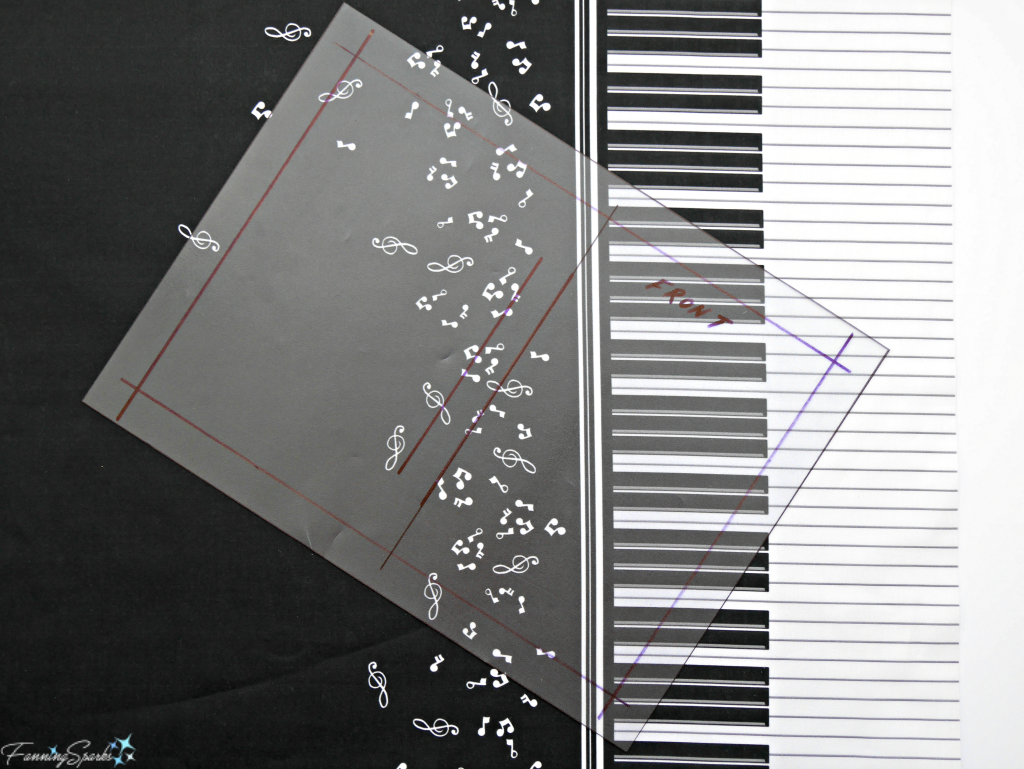
Step 3 Cut Fabric. Press fabric. Use the cutting template to determine final placement. Pay close attention to what will be on the front cover. Try not to cut off important design elements. Cut the fabric around the outside of the cutting template. The resulting rectangle of fabric should match the Outside Dimensions.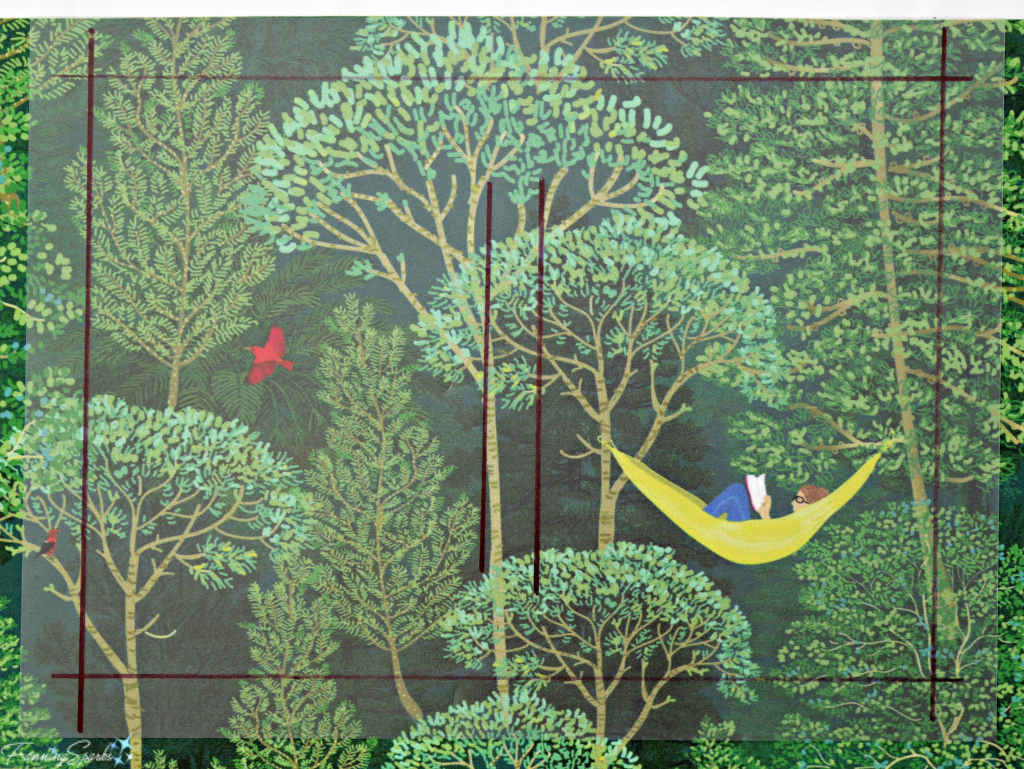
Step 4 Prepare Protective Paper. Trace around the cutting template to sketch a rectangle of the Outside Dimensions on the protective paper. Extend the outside lines and the border lines outside the rectangle so they’ll be visible when covered. Label the TOP LEFT section, I used “Front – Wrong Side Up”, to indicate how the fabric should be positioned for gluing.
Step 5 Prepare Notebook. If the notebook has an elastic ribbon and/or pen loop, use scissors to remove them. If the notebook has an expanding pocket inside the back cover, you may wish to remove it as well. This pocket will no longer expand after the fabric is glued to the cover.
Step 6 Prepare Working Surface. Set up in a well ventilated area. Spray adhesive tends to go everywhere so I always do this outdoors while wearing a mask and gloves. You need to be fast with the gluing step so plan ahead to ensure you can move quickly. Clear the space where you’ll be adhering the fabric and allowing the notebook to dry.
Cover your working surface with the protective paper we prepared in Step 4. It helps to tape it in place. Prepare a few strips of protective paper.
Have your notebook ready. I found it helpful to lay the notebook in the exact same position it will be placed on the glued fabric ie with the cover facing down and the top towards the top of the working surface.
Have wipes, scissors and popsicle stick ready.
Assembly
Step 7 Spray Adhesive on Fabric. Place the fabric rectangle on the protective paper. Take care to place it correctly. The fabric must face down with the wrong side up. The top should be at the top of your working surface. This means the section that will be on the front cover of the notebook is on the left of your working surface. Align edges of fabric with the gridlines on the protective paper. I found it helpful to cover the surrounding area with a few strips of protective paper.
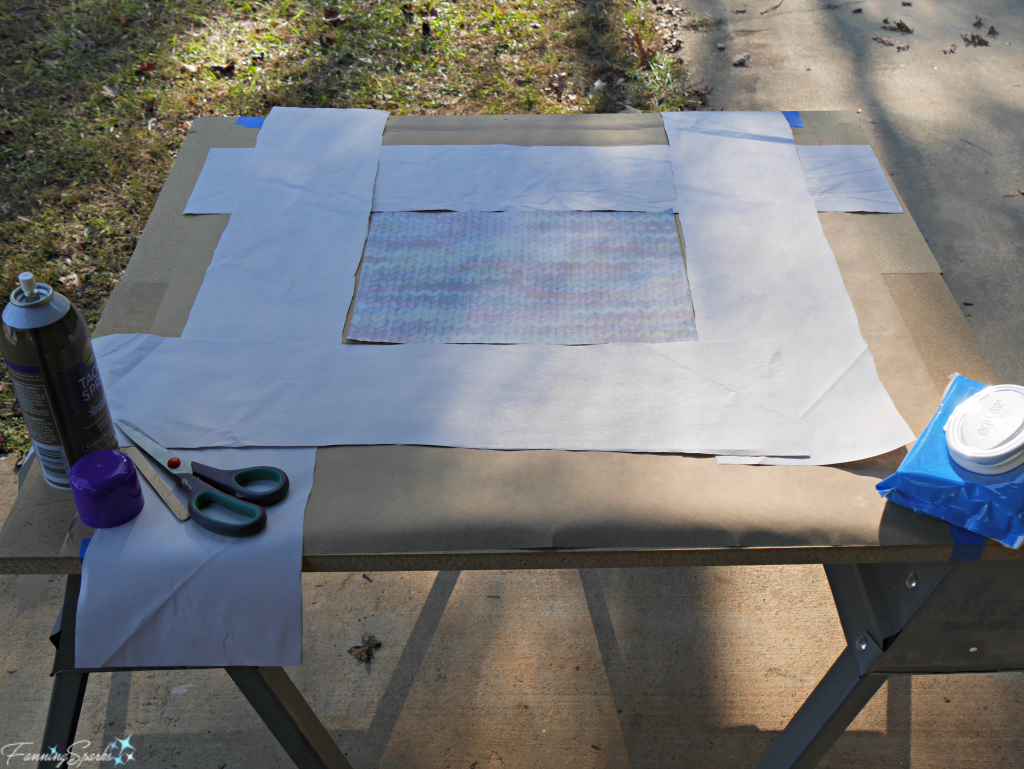
Shake and apply the spray adhesive according to the directions on the container. Cover the entire piece of fabric spraying evenly with repeated strokes. Apply a generous coat but take care not to saturate the fabric.
Carefully remove and discard the strips of protective paper to clear the work surface of unwanted glue.
Step 8 Adhere Fabric to Notebook. With the notebook closed and front cover facing down, visually align the notebook front cover with the gridlines you sketched on the protective paper. Ensure you’re placing the front cover on the left side of the fabric with the top away from you. Use the label to confirm the placement. Carefully lower the notebook onto the fabric. Press firmly.
Lift notebook onto spine so fabric attaches to spine. Press firmly. Lift notebook so back cover is facing down. Press firmly.
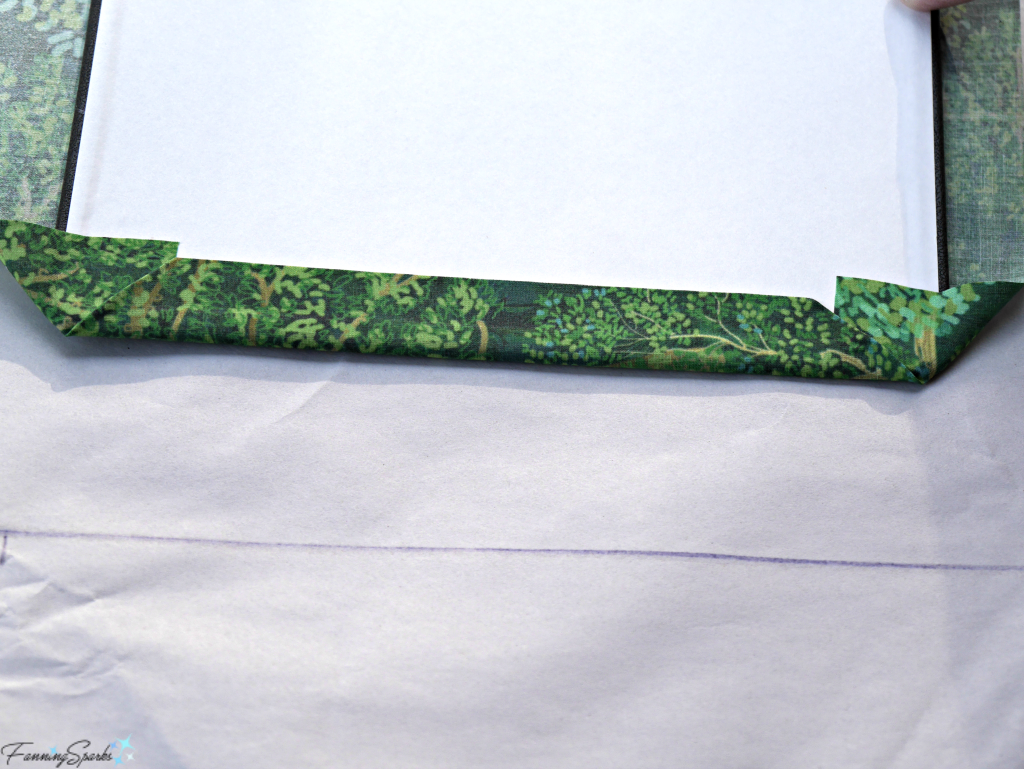
Use hands to smooth fabric over entire surface of notebook including front cover, spine and back cover. Working quickly, open the front cover to work the overlap. Start by folding the fabric over the top corner. The Maggift Notebook has rounded corners so it is easy to fold the fabric over.
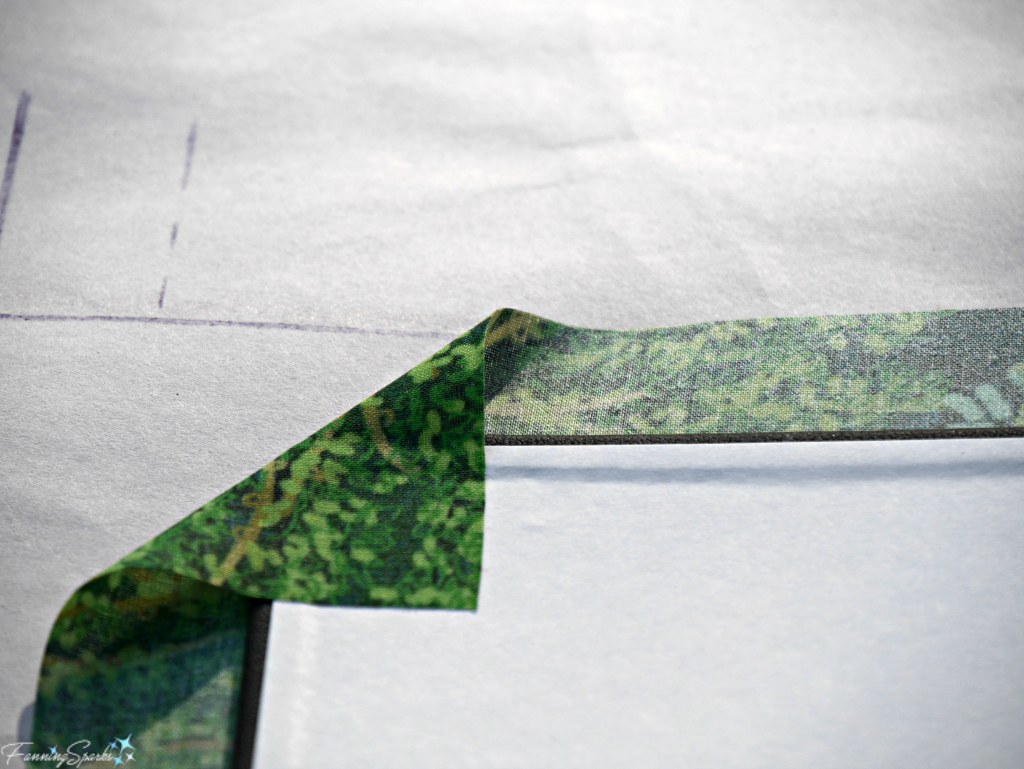
Repeat for bottom corner. Then pull fabric in over the side edge. Press down corners and edge. Repeat on back cover.
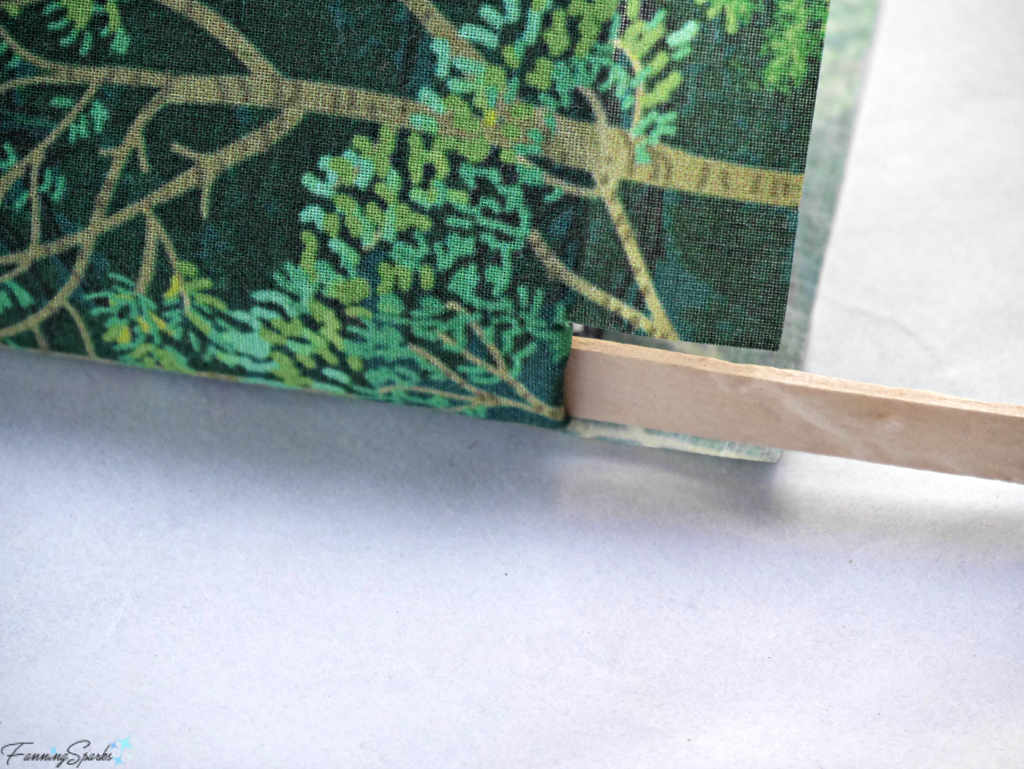
To wrap glued fabric around the spine, use scissors to snip the fabric. At the spot where the spine and the cover meet, cut from the outside to the edge of the notebook. Make 2 snips at the top of the spine resulting in a small tab of fabric. Cut off about half of the tab. Repeat at the bottom of the spine.
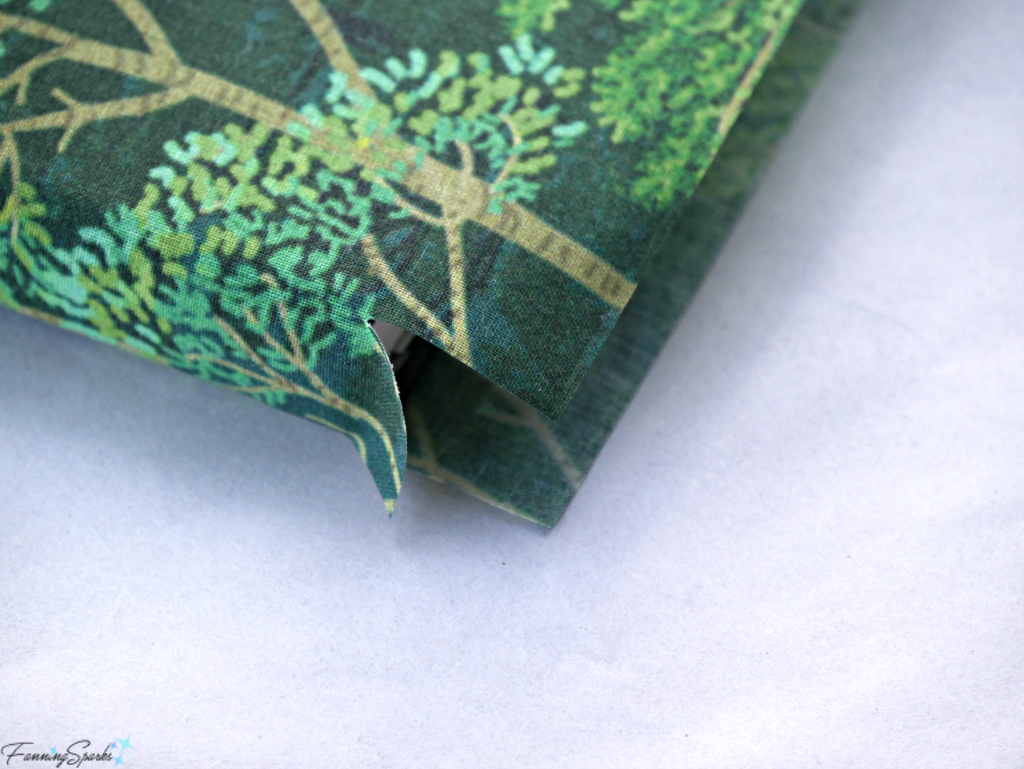
Open the notebook and bend back the covers. This will open up the spine. Tuck the fabric tab inside the spine using the popsicle stick to push it in smoothly. Fold and press remaining overlap to the inside of the cover along top and bottom edges on front and back covers.
Step 9 Allow to Dry. Keep the notebook open by standing on the bottom edge. Allow to dry.
Step 10 Finish Inside Covers. Use card stock to cover the raw edges of fabric inside the front and back covers. Cut 2 pieces of card stock measuring Cover Width less ⅜” x Cover Height less ¾” ( 5 ⅟₄” x 7 ¹¹⁄₁₆”). Taking the same precautions as outlined above in Step 6, adhere card stock using spray adhesive. Keep notebook open until dry.
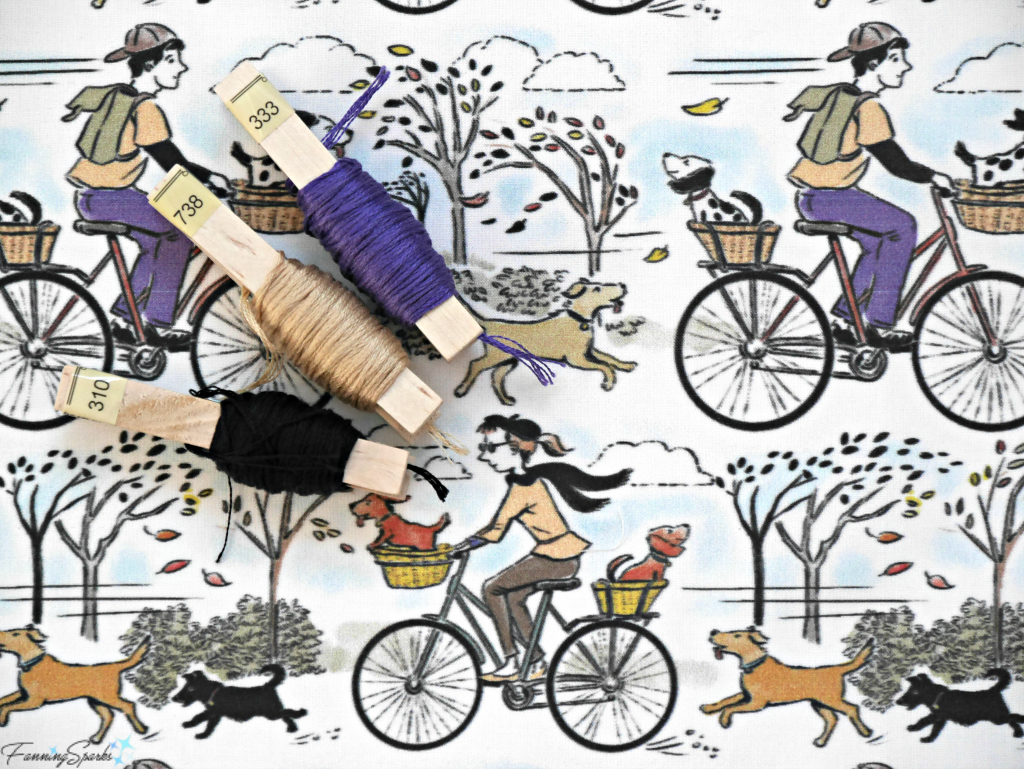
Step 11 Braid Cord. Use embroidery floss in 3 different colors to make corded tassels for a decorative bookmark. It will be a long braided cord with a tassel at both ends. The finished cord should be 4 times the Cover Height plus about 4 inches (about 38”). Use 3 pieces of 50” embroidery floss to allow for tying knots and finishing ends. Tie the 3 strands together, secure to a stationary end point and braid the strands. Tie a knot at the end.
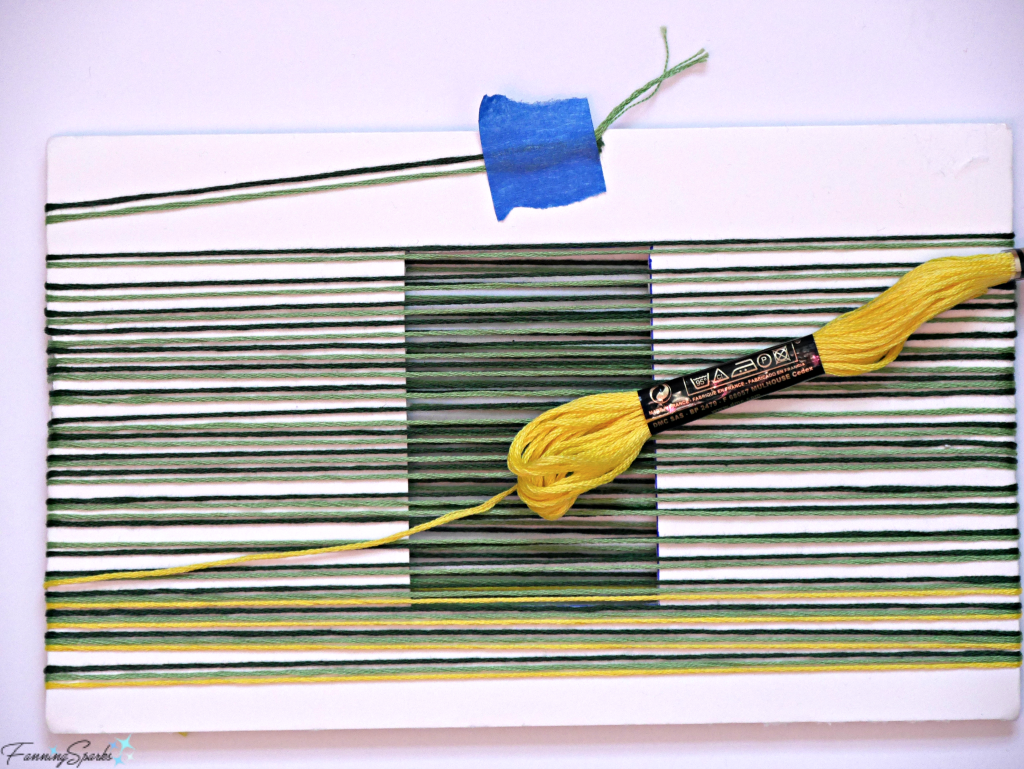
Step 12 Make Tassels. Prepare to wind 3 skeins of embroidery floss in 3 different colors. Use a small piece of tape to hold the start of the first skein. Wrap around the Tassel Maker (described above in Supplies Needed). Leave a little space between the threads so the second and third skeins can be inserted. Use a small piece of tape to hold the end of the first skein. Repeat this process with the second skein. Repeat this process with the third skein. You should end up with a single layer of threads in alternating colors.
Carefully slide the threads towards the center of the Tassel Maker and move the taped ends closer to the center. Take one end of the braided cord and wrap around all threads through the center hole. Pull tight and knot.
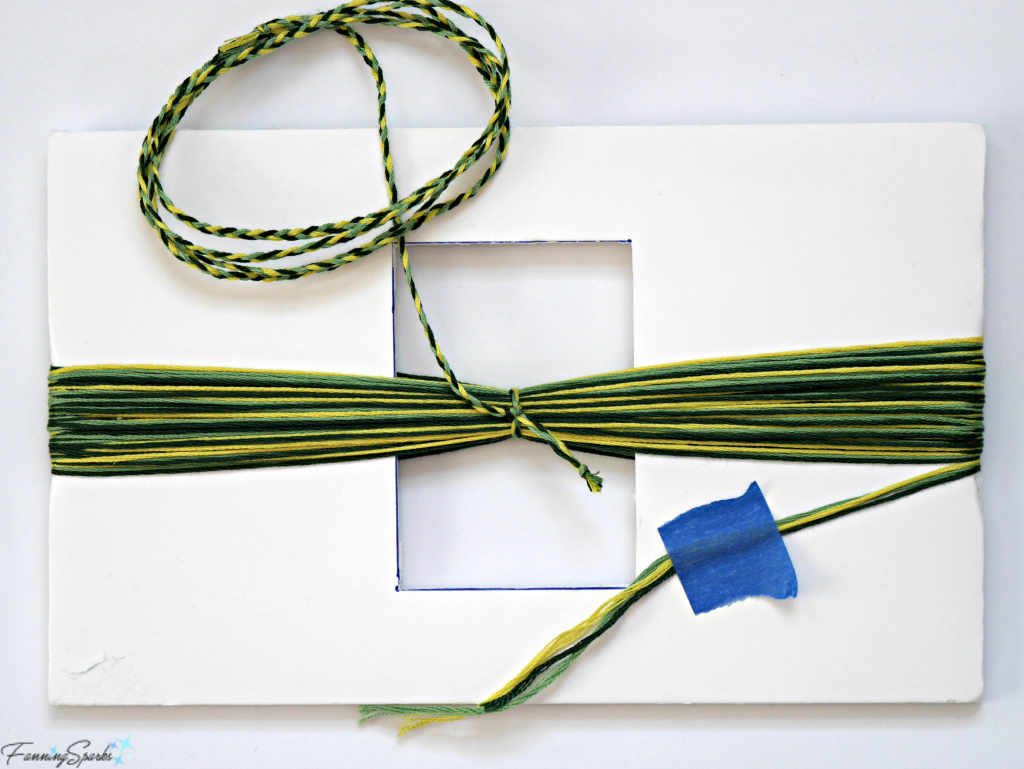
Slip sharp point of scissors under threads at end of Tassel Maker and cut slowly across all threads. Repeat at other end of Tassel Maker. Remove tassel from Tassel Maker. Wrap braided cord around, pull tight and knot again. Smooth all threads down from knotted end. Pull braided cord to top of tassel and tuck knotted end into tassel.
Make a second tassel and repeat process with the other end of the braided cord.
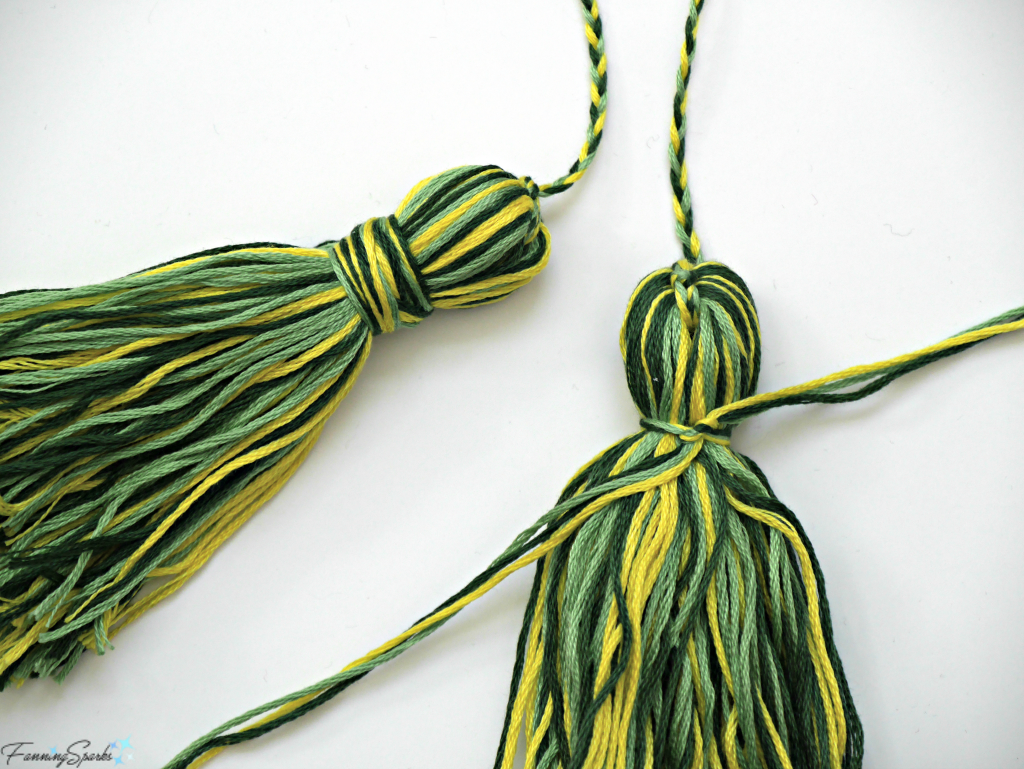
Cut 3 24” pieces of embroidery floss in 3 different colors. Smooth 3 strands of floss together and fold in half. Place head of tassel in fold about 1” down from the top knot. Tie a tight knot. Wrap around about 8 more times creating about a 3/8” wrapped section. Tie one final knot. Pull ends into the tassel and trim even with other tassel strands. Repeat for second tassel.
TIP: Use a plastic fork to smooth and fluff the tassel threads.
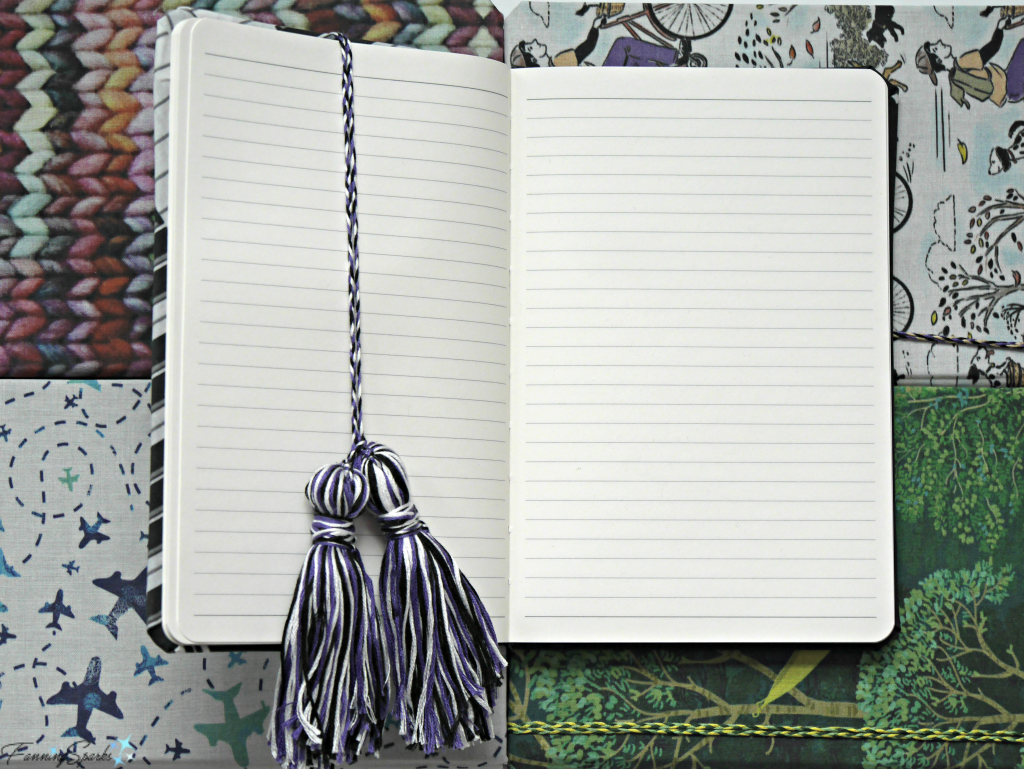
Step 13 Slide Corded Tassels on Journal. The final touch is to slide the corded tassels onto the journal. Simply fold the cord in half, slide between the front cover and the first page and pull around to the front. Slip tassels through fold, slide the fold down to the bottom left edge of the front cover, and pull the tassels to tighten.
Your personalized fabric-covered journal is complete! The lucky recipient will surely be pleased to receive this thoughtful gift made especially for them. And if you haven’t already, be sure to make one for yourself too!
This is a two-part tutorial. Be sure to read both posts:
This is the link to the Maggift Notebook I used.
All fabrics used in this tutorial were purchased from Spoonflower. Check out the Spoonflower website for more info.
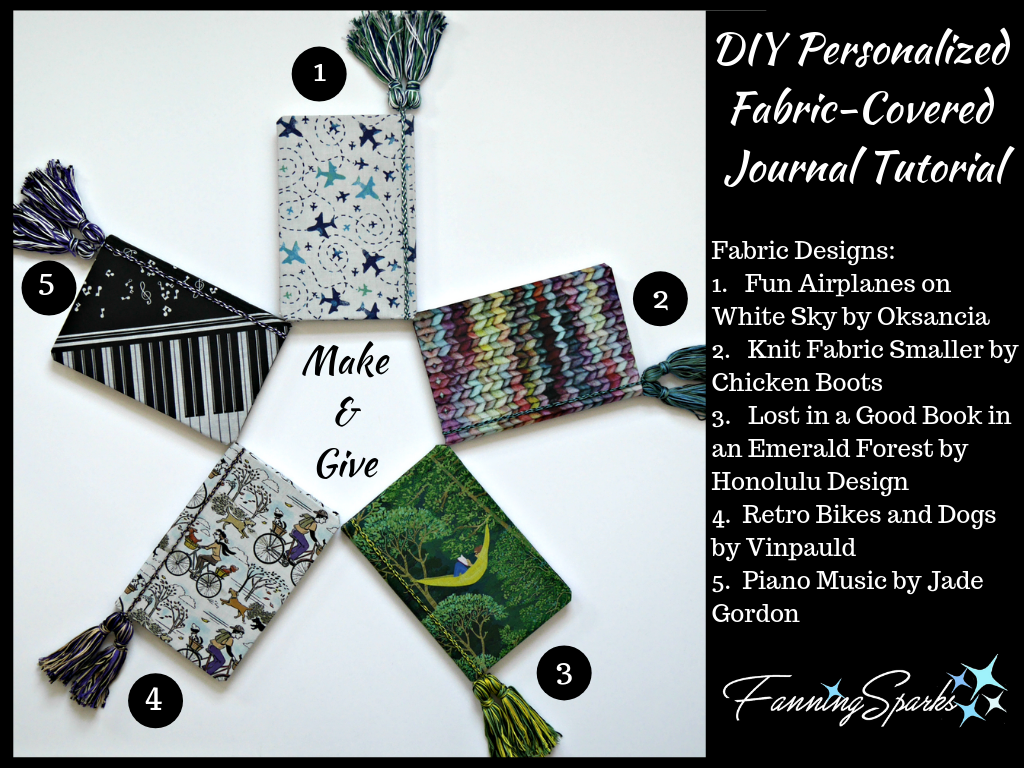
Hats off to the talented designers who created the splendid designs used in this tutorial. Links for each design are below this image.

I love to make gifts with a thoughtful, personal connection. Thinking about what the recipient likes to do in their spare time can lead to some good ideas. What’s their passion? Do they like biking? Knitting? Traveling? Nature? Music? The possibilities are endless. That’s why I think these Personalized Fabric-Covered Journals may just be the best make-and-give DIY project ever.
The journals make a lovely gift yet they are fast and easy to put together. Choose a fabric that reflects the recipient’s passion and simply cut-and-paste it to a notebook. No sewing required. Add a colorful tassel and braided cord bookmark and you’re all set. There are two major steps which I’ll cover in two separate posts. In this first post, we’ll discuss selecting the perfect fabric. In the second post, DIY Personalized Fabric-Covered Journal Tutorial Part 2, I provide step by step instructions for the cut-and-paste construction.
Choose a Fabric
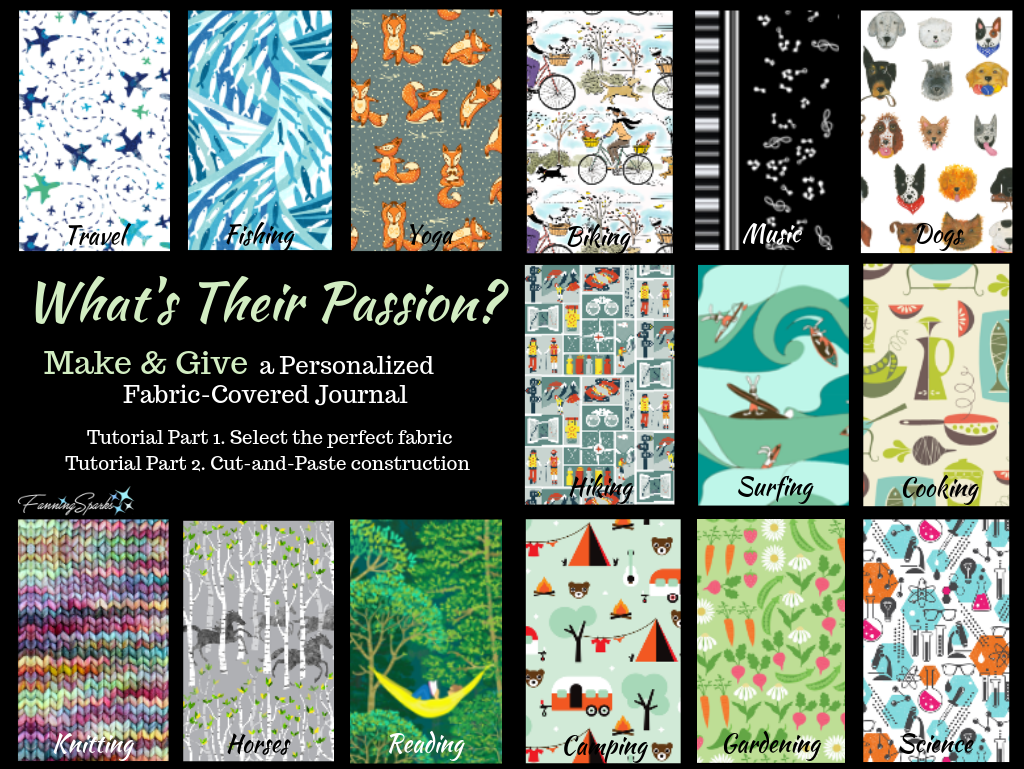
The key to these personalized journals is the fabric. The fabric design makes it personal. It’s the linchpin. Therefore, it’s worth the effort to seek out a design that reflects something unique about the recipient. It could be a favorite hobby, interest, or pastime. I like to ask myself “What’s their passion?”
All of the fabrics shown in the above image were found on Spoonflower. Many thanks to the following designers who agreed to have their designs included in this post:
Travel – Fun Airplanes on White Sky by Oksancia
Fishing – Ocean-Life by Gaia Marfurt
Yoga – Foxes Yoga by Penguin House
Biking – Retro Bikes and Dogs by Vinpauld
Music – Piano Music by Jade Gordon
Dogs – Dogs by Little Island Company
Hiking – I Love Hiking by EbyGomm
Surfing – Colored 2 by Belana
Cooking – In the Kitchen Cream by Studio Jenny
Knitting – Knit Fabric Smaller by Chicken Boots
Horses – Spring: All the Pretty Little Horses by VO aka VirginiaO
Reading – Lost in a Good Book in an Emerald Forest by Honolulu Design
Camping – Retro Camping Canada Woodland Kids by Little Smile Makers
Gardening – Home Grown Garden by Andie Hanna
Science – Chemistry Lab Modern Girl Small by Heather Dutton
A simple 100% cotton fabric is ideal for this project. Spoonflower is my favorite source, and the one I’d like to share with you today, but it is just one option. You could select fabric at your local fabric store, online from an Etsy curated fabric shop, or an online fabric store.
With over 750,000 designs, the Spoonflower Marketplace is the largest collection of independent designers in the world. This is not a sponsored post and I hope I don’t sound like a Spoonflower salesperson but that’s a lot of options! There’s a very good chance they’ll have a design for your selected passion… the trick is to find it!
Spoonflower has multiple ways to search for designs. If you’re new to Spoonflower, it’s worth taking a few minutes to get familiar with their website.
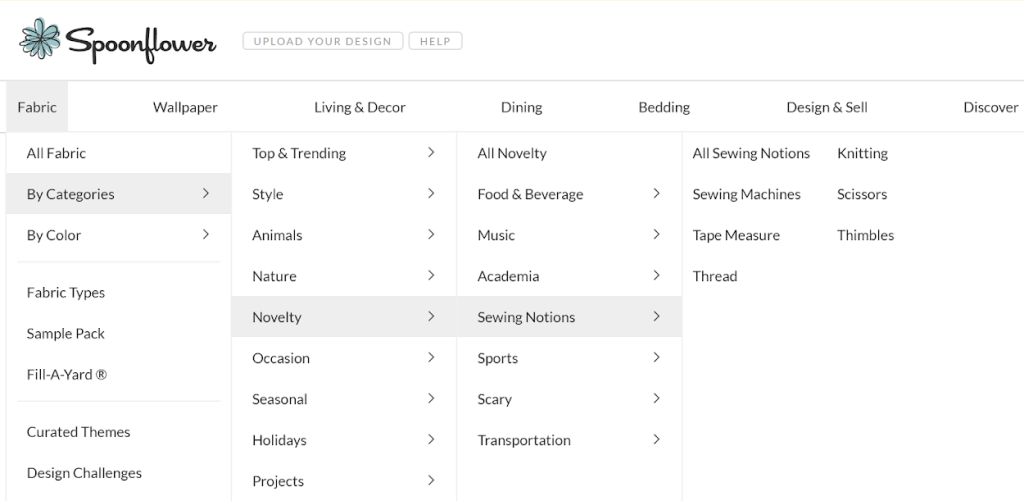
Design Challenges are one of the things that make Spoonflower unique. Every week, Spoonflower selects a topic and challenges designers to enter their best designs. Challenges cover a broad range of topics. Some examples are Circles, Hedgehogs, Marrakesh, Cycling, and 1920s. Designs are posted for public voting and the popular vote determines the top 50 winning designs. Be sure to explore Challenge Winners for some exceptional designs.
I recommend you start by looking for 3-5 possible designs. Be sure to mark your favorites, by clicking the little heart, as you go. After you’ve found some good options, go to Favorites (little heart in the top right menu bar) to review your selections and narrow it down.
One important factor to consider in making your final selection is the scale of the design. If the design is too large, the beauty of the design may be lost on the notebook cover.
Select and Measure the Notebook
At this point, we need to switch gears and determine the size of your notebook. Here is the notebook I purchased from Amazon (see More Details below for link). I purchased 5 notebooks so I can make and give a few as gifts.
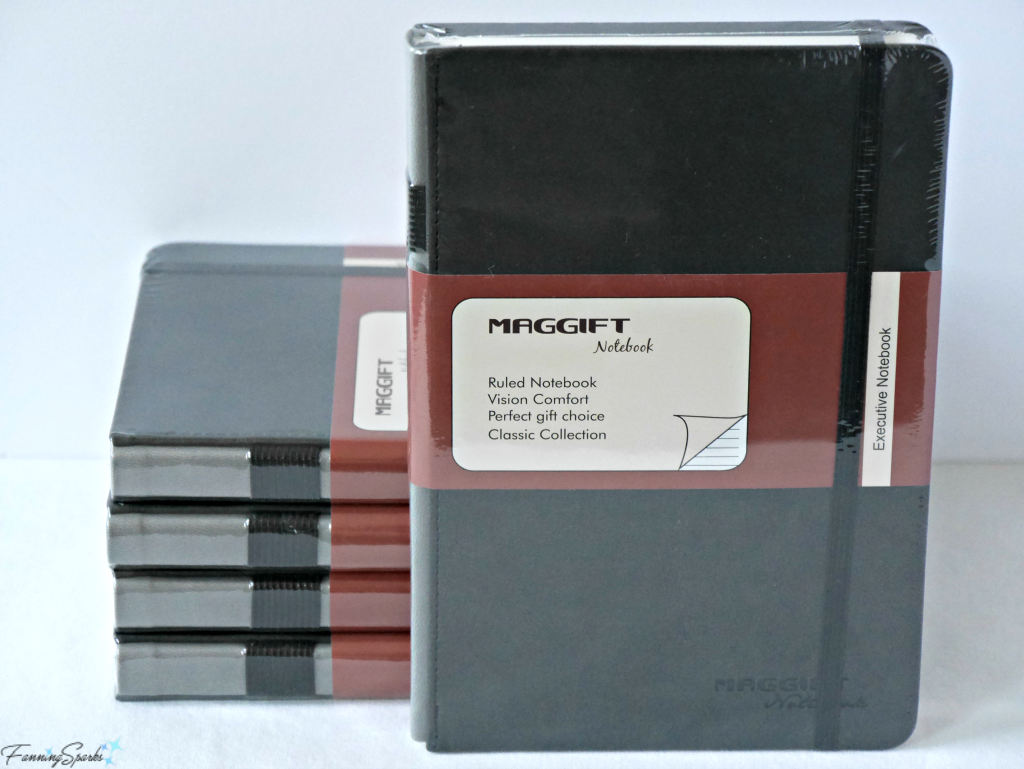
If you use the same notebook, you can simply use my measurements. Otherwise, measure your notebook carefully to determine 1) a suitable scale for the design and 2) the quantity of fabric needed. Begin by measuring the following elements of the notebook:
We need to add ¾” of fabric to wrap around and glue to the inside of the cover. Use these formulas to calculate the size of the fabric rectangle you’ll need:
. Width = ((Cover Width + ¾” + Cover Thickness) x 2) + Spine Thickness
. Height = Cover Height + ((¾” + Cover Thickness) x 2)
Let’s use the Maggift Notebook as an example. Its precise measurements are:
. Cover Width = 5 ¹⁰⁄₁₆”
. Cover Thickness = ²⁄₁₆”
. Cover Height = 8 ⁷⁄₁₆”
. Spine Thickness = ¹²⁄₁₆”
Using the formula from above, we can determine the Width of the fabric rectangle should be:
Width = ((Cover Width + ¾” + Cover Thickness) x 2) + Spine Thickness
Width = ((5 ¹⁰⁄₁₆” + ¹²⁄₁₆” + ²⁄₁₆”) x 2 ) + ¹²⁄₁₆”
Width = 13 ¾
The Height of the fabric rectangle should be:
Height = Cover Height + ((¾” + Cover Thickness) x 2)
Height = 8 ⁷⁄₁₆” + ((¹²⁄₁₆” + ²⁄₁₆”) x 2
Height = 10 ³⁄₁₆”
Thus, a 13 ¾” x 10 ³⁄₁₆” rectangle of fabric is needed.
As a general rule of thumb, a fat quarter of fabric is sufficient to cover a typical notebook. If you’re not familiar with this term, it is simply a piece of fabric that measures about 21” wide by 18” long. The term, commonly used in the quilting world, comes from the way in which the fabric is cut as shown below.
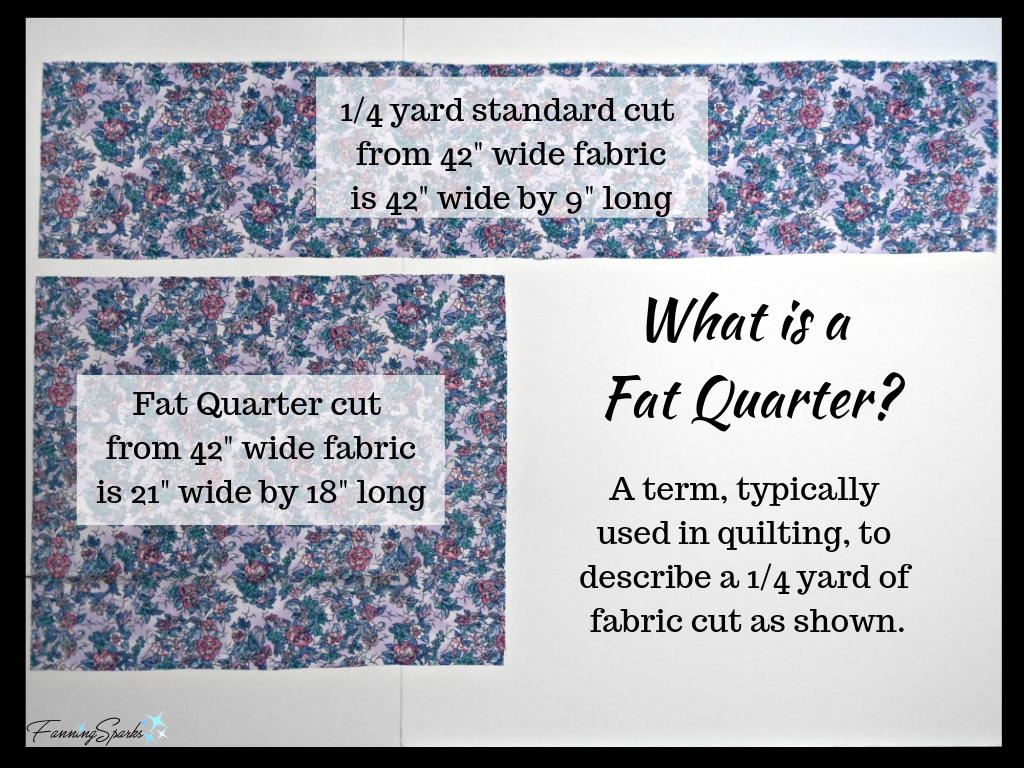
Since the Maggift Notebook requires a 13 ¾” x 10 ³⁄₁₆” rectangle of fabric, a fat quarter at 21” x 18” is ideal. You can order a fat quarter of any design on Spoonflower. Many fabric stores offer pre-cut fat quarters. When buying fabric off the bolt, however, you can typically only buy full width cuts meaning you would have to purchase a ½ yard of fabric.
Select the Final Design
Let’s return to our Spoonflower favorites. As noted above, the scale of the design is an important consideration in making your final selection. The ideal scale will showcase the beauty and detail of the design on the notebook cover. Please note many designers will adjust the scale of their design for a custom order; just ask via the Contact option in the designer’s shop.
To gauge the scale of your design, we’ll use another one of Spoonflower’s cool features. Select your fabric design. Choose “Basic Cotton Ultra”. Set the Choose Amount to “Fat Quarter” to see your chosen fabric displayed as a fat quarter. The design and the rulers will adjust to 21” by 18”. Genius!
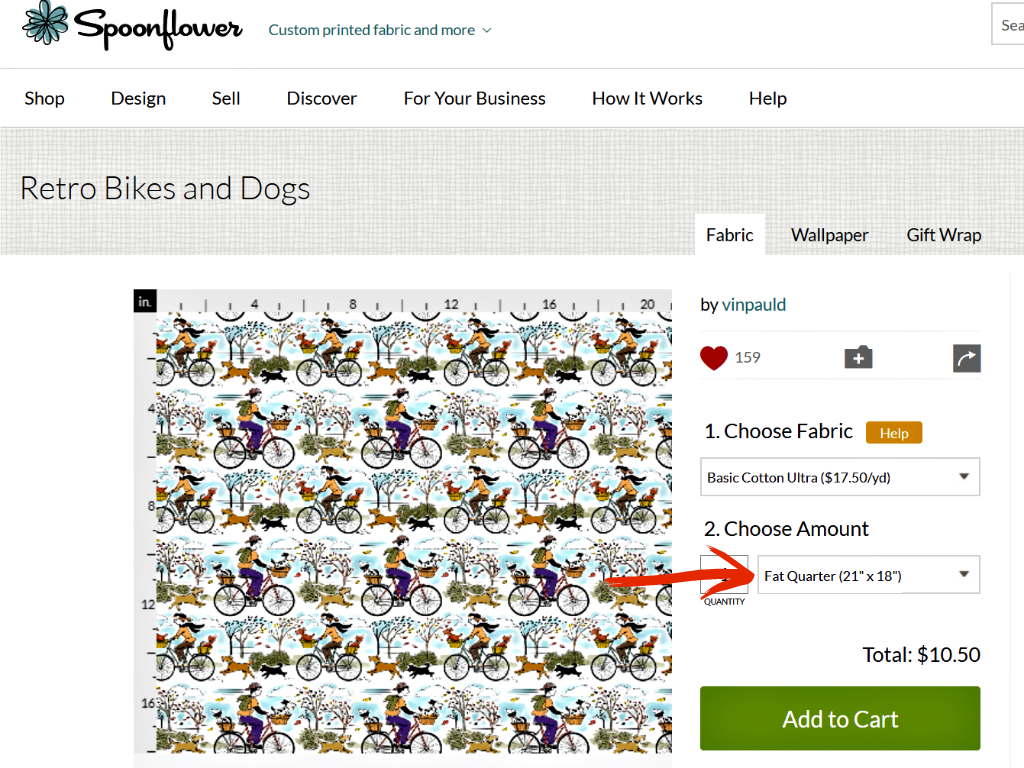
With your chosen fabric displayed to scale, you can easily check how it will appear on your notebook cover. Use the Cover Width and Cover Height measurements from above. In our example, the Cover Width is 5 ¹⁰⁄₁₆” and the Cover Height is 8 ⁷⁄₁₆”. You can use a tool, such as Snipping Tool, to carefully mark your cover design to size or you can simply eyeball it.
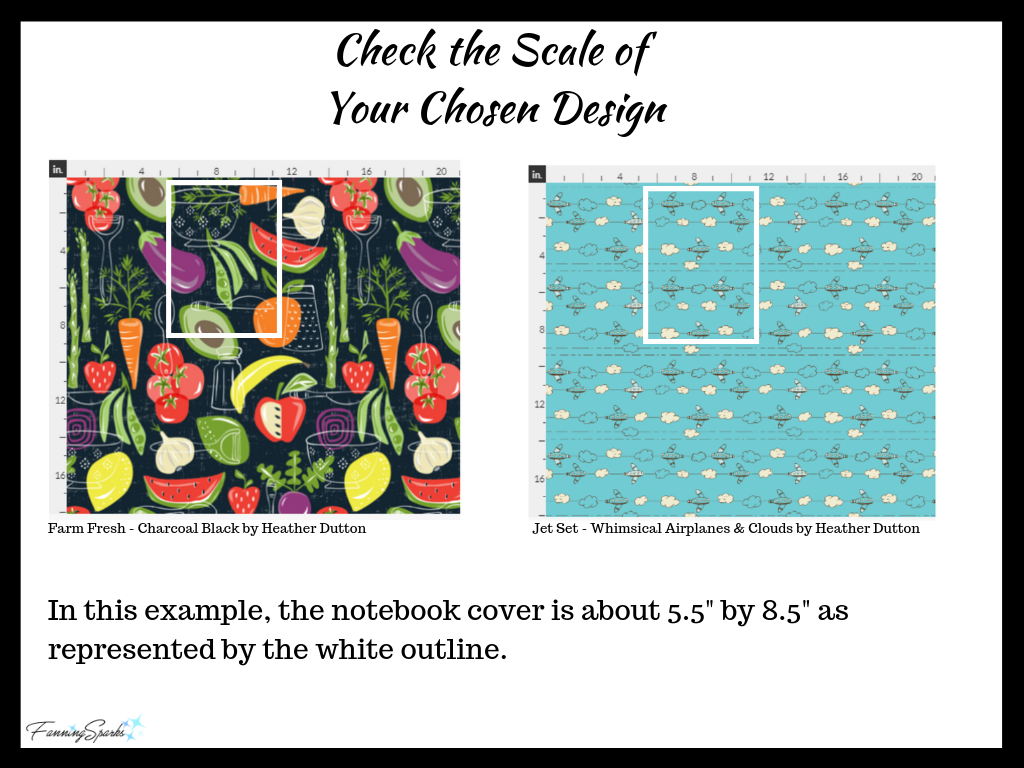
I created the below graphic to illustrate the point. I think both designs are excellent but, based on the detail that would appear on the cover, I would more likely choose the airplanes than the vegetables for this particular project.
Please note all of the designs shown in the What’s Their Passion? image at the top of this post have already been cropped to the size of a Maggift Notebook cover.
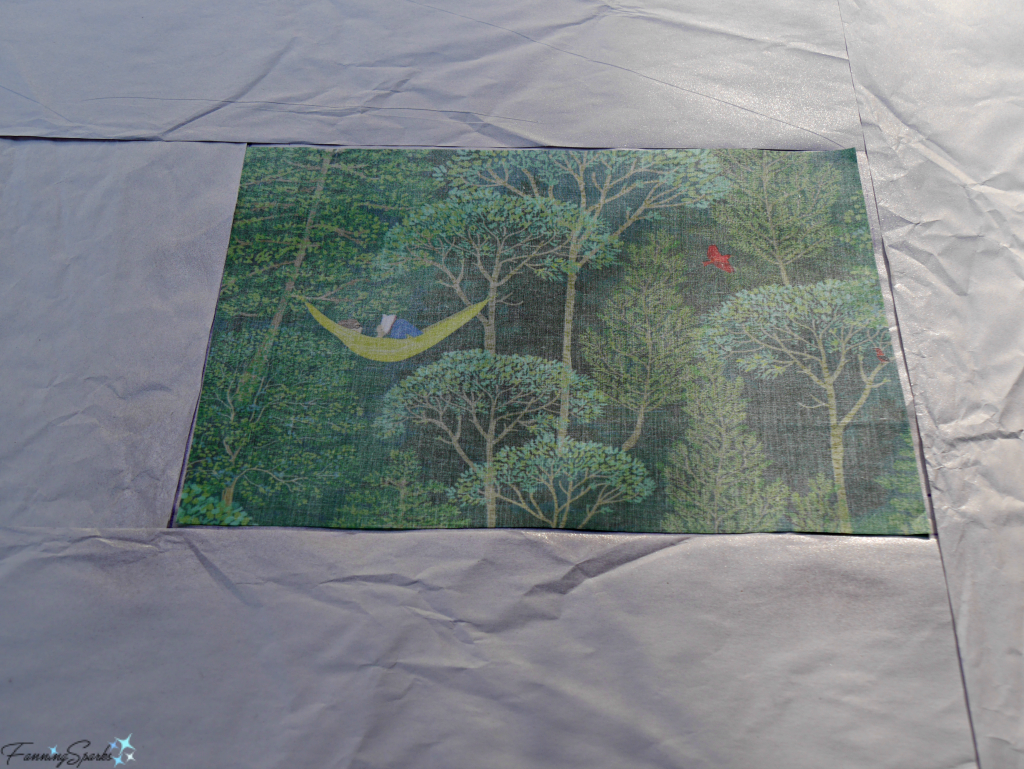
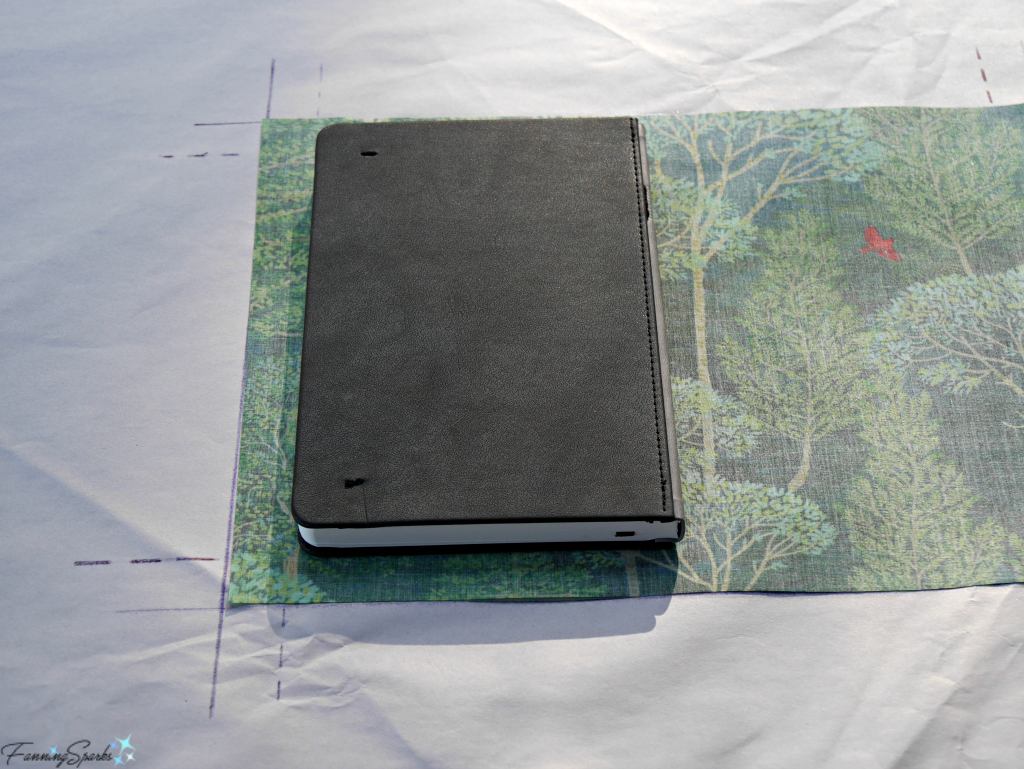
Placement is another factor to consider at this point. If you have a design with an obvious focal point, you’ll want to ensure it can be positioned effectively on the notebook cover. We examine this topic in more detail in the next post, DIY Personalized Fabric-Covered Journal Tutorial Part 2, but in the meantime the below photo should help you visualize how placement may impact your design. Note: the front of the notebook will be covered with the fabric in the right section of the template.
Have fun selecting the perfect fabric for your journal! If you’re ordering from Spoonflower take note of their holiday shipping deadlines since they’re approaching fast.
This is a two-part tutorial. Be sure to read both posts:
Check out the Spoonflower website for more info.
This is the link to the Maggift Notebook I used.