There’s an entire segment of the DIY blog world dedicated to repurposing items. Creative DIYers transform, upcycle and revive thrift store or unwanted items into something new. Wondering what to do with that old book? China plate? Sweater? Necktie? Window frame? Wood pallet? Tin can? There are countless suggestions for all those things. The ingenuity is amazing. Some of the ideas may seem a little farfetched but it’s always fun to see what people come up with.
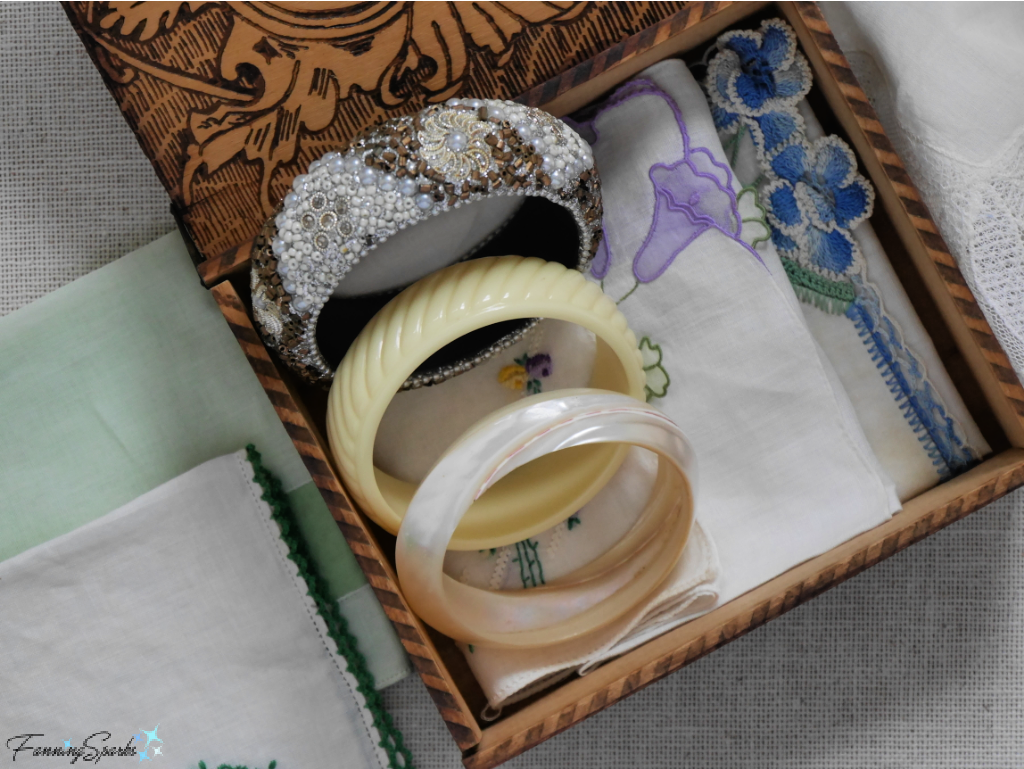
Recently, I tried my own little transformation project. I found a few bangle bracelets nestled amongst my vintage finds while preparing last week’s post about Treasured Vintage Finds.
 One in particular, a chunky, bejeweled costume jewelry bangle, caught my imagination. With the help of a little felt flower-making research, some colorful felt and a few accents, a pretty little keepsake box emerged. It was a fun process with lots of opportunity to get creative. Today’s post includes detailed step-by-step instructions for transforming any bangle bracelet into a keepsake or trinket box.
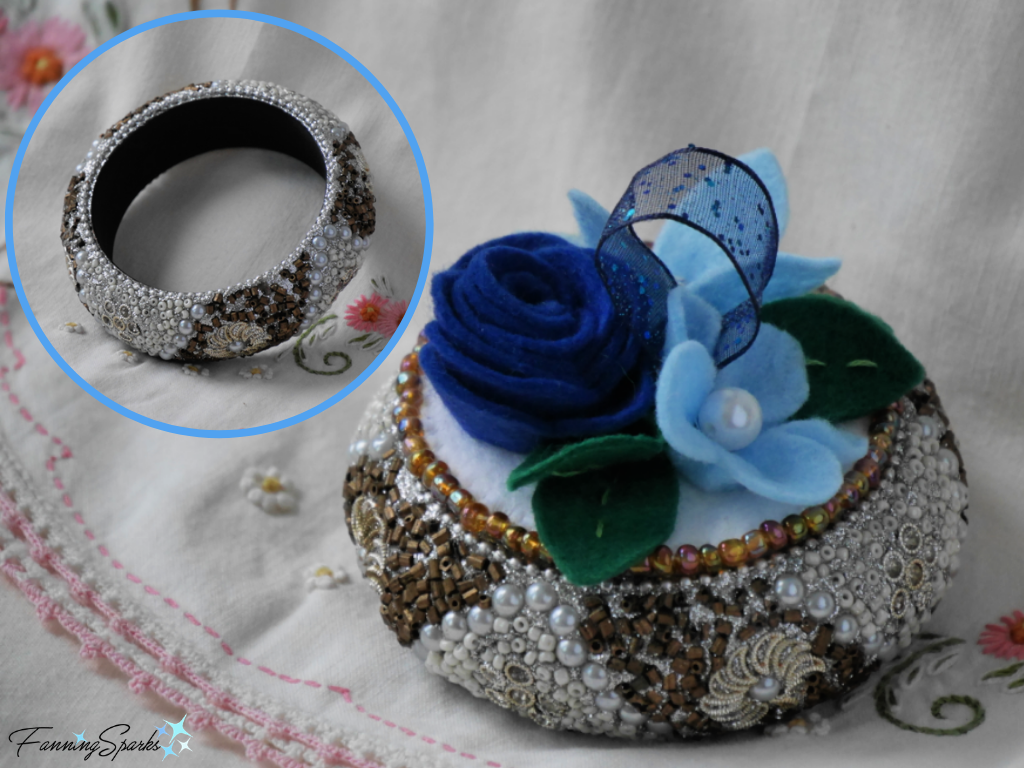
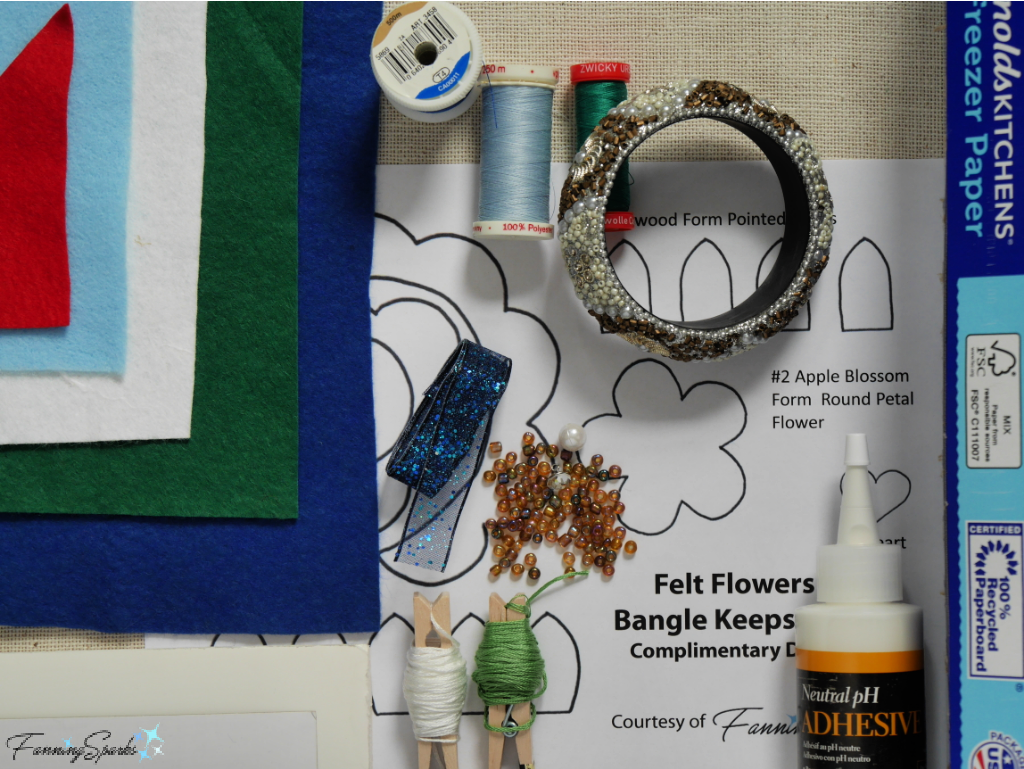
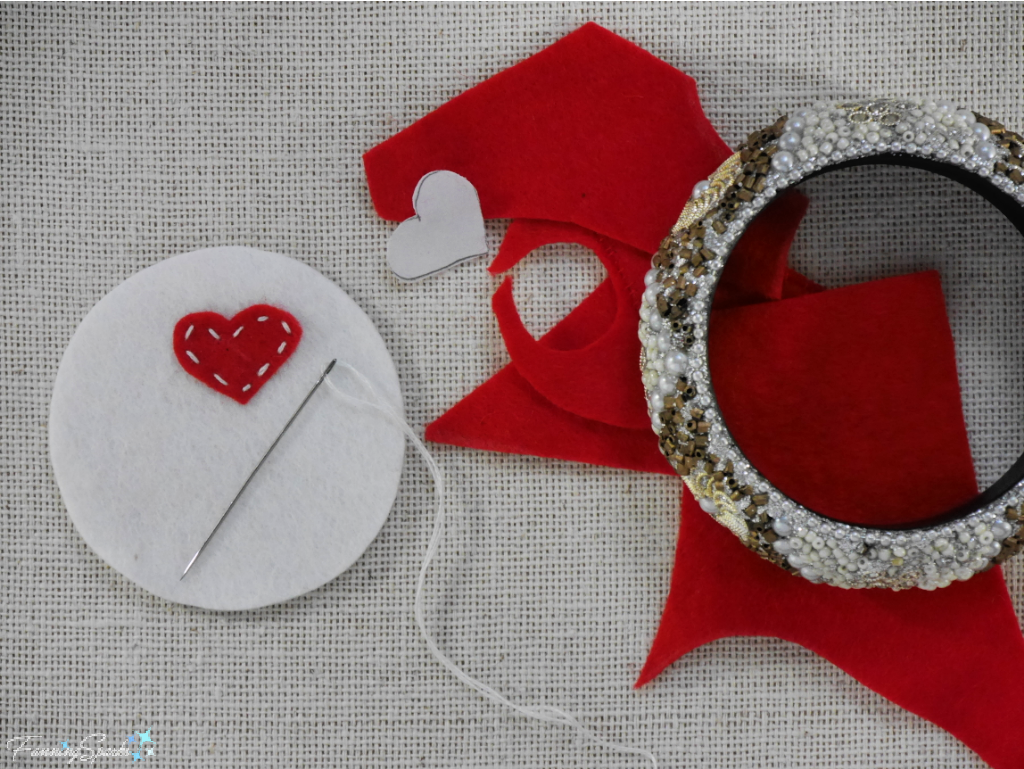
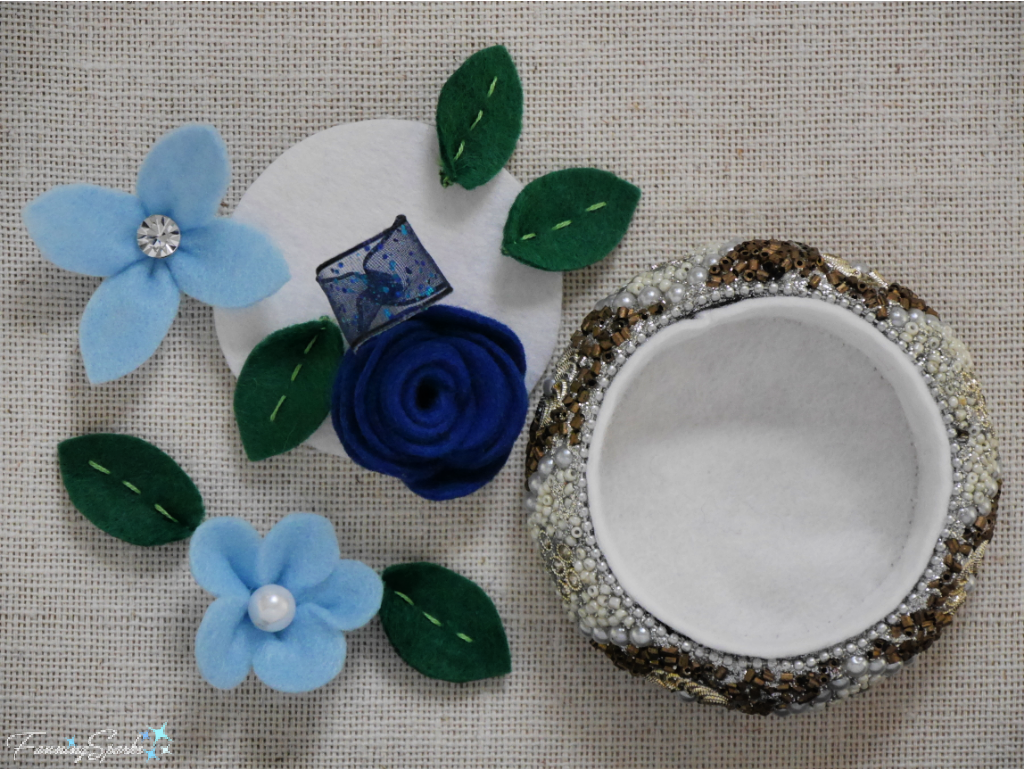
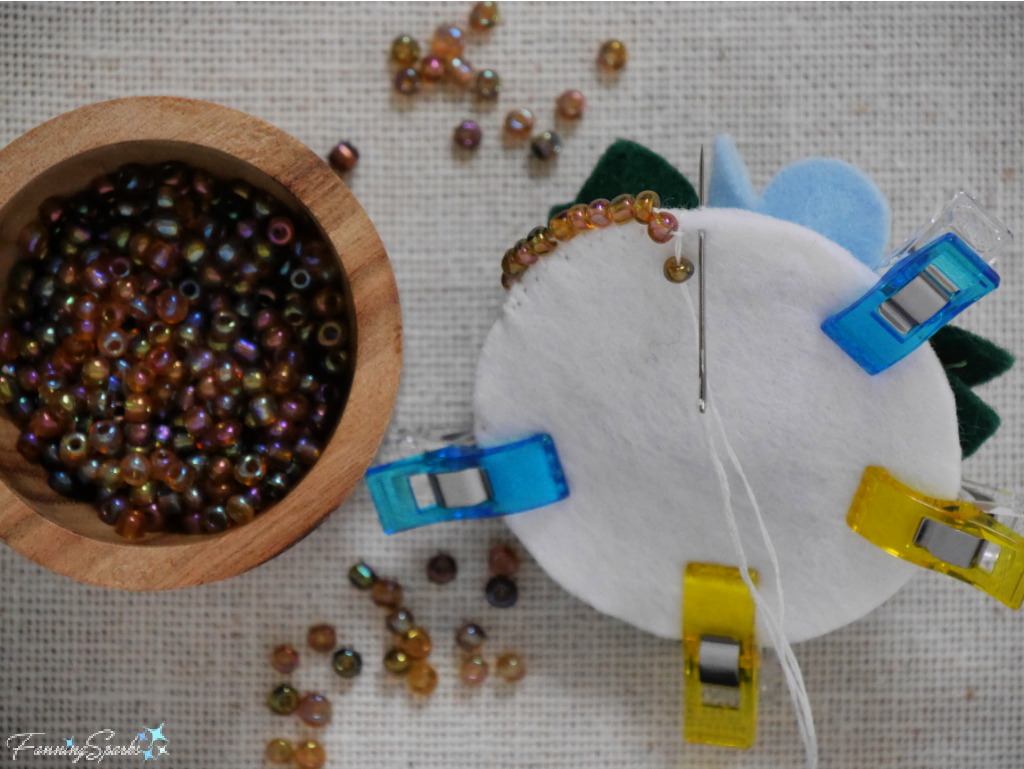
The keepsake box consists of 3 components: a vintage bangle, an embellished lid and a felt liner. The embellished lid sits on top of the bangle. The lid is lavishly embellished with felt flowers, ribbon, beads and embroidery. There are 3 different felt flowers: a rose form in deep blue, an apple blossom form in pale blue and a dogwood form in pale blue. The lid is strengthened with thin cardboard and covered with 2 circles of felt. A loop of ribbon creates a convenient handle to easily lift and replace the lid. The felt liner fits snuggly inside the bangle. The liner bottom is strengthened with foam board and covered with 2 circles of felt. The liner walls are made of a thin strip of felt. The liner bottom and walls are sewn together. A small, red felt heart is hidden on the liner bottom. Only basic hand sewing skills are needed.
Supplies Needed
. Template – Download Felt Flowers for Bangle Keepsake Box – Complimentary Download to print the patterns for the felt flowers.
. Vintage Bangle Bracelet – Look for a wide bracelet. The one I used is 1” wide.
. Felt – For liner and embellishments. I used about 5” x 12” white felt, 5” x 5” deep blue felt, 5” x 3” light blue felt, 5” x 1½“ green felt and 1” x 1” red felt.
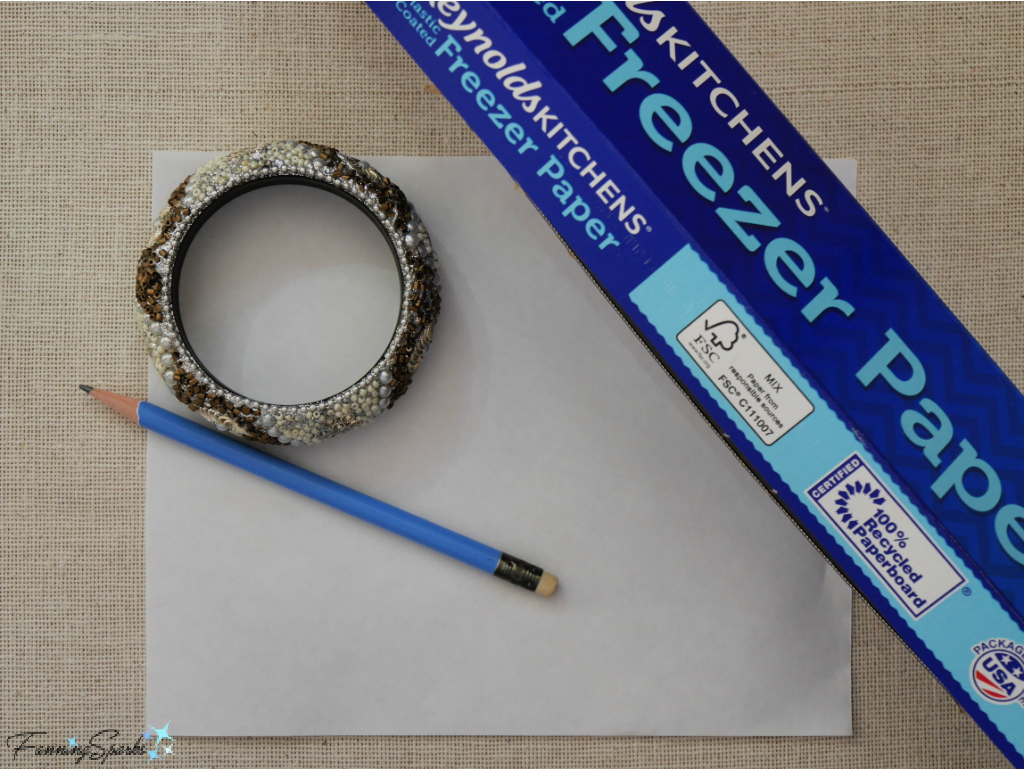
. Freezer Paper
. Paper
. Foam Board – 3” x 3” with ⅛“ thickness.
. Thin Cardboard – 3” x 3” boxboard (such as the cardboard used for cereal boxes).
. Embroidery Floss – To match the liner felt and to contrast with the red felt heart and the green felt leaves.
. Thread – To match the felt flowers and leaves.
. Ribbon – About 6” long x ⅝“ wide to make the loop handle.
. Beads or Buttons – TWO small beads or buttons for the inside of the light blue flowers.
. Beads – To embellish the outside edge of the lid. I used 6/0 glass seed beads in Tortoise Rainbow.
. Glue
 Equipment and Tools Needed
. Printer – For printing patterns.
. Iron
. Needles – 1 for hand sewing with thread and 1 for embroidering with floss.
. Pins or Clips
. Ruler
. Pencil
. Scissors – Sharp, short-bladed scissors, such as embroidery or applique scissors, are ideal.
. Scissors – To cut thin cardboard.
. Utility Knife – X-ACTO, or similar sharp craft knife, to cut foam board.
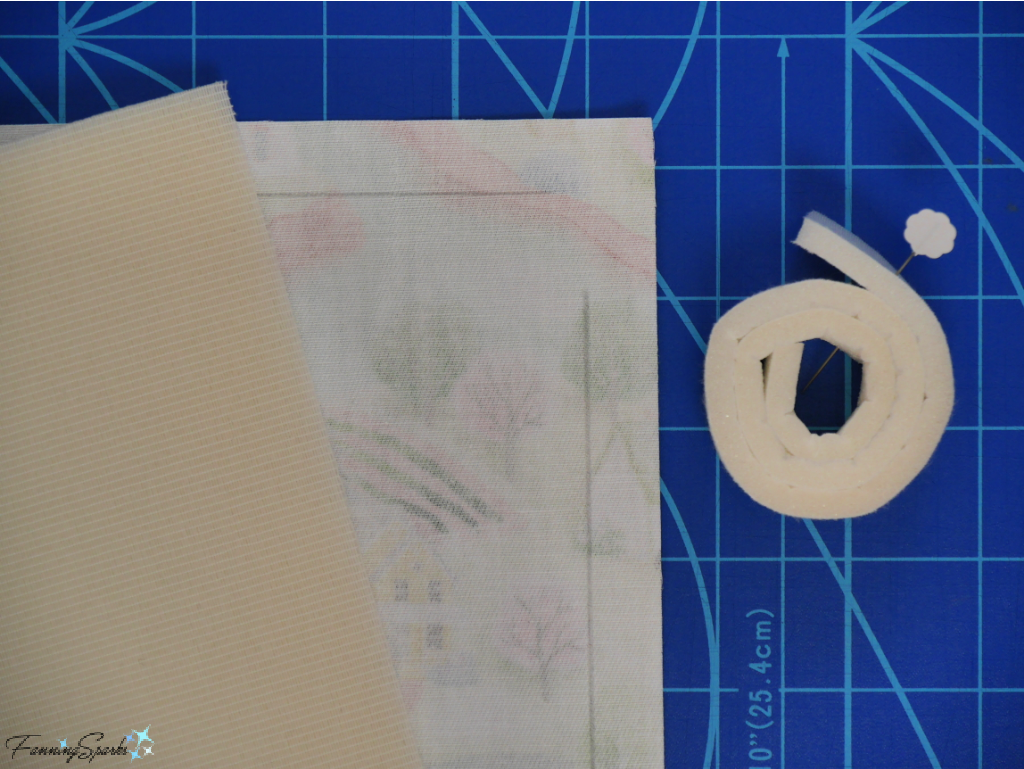
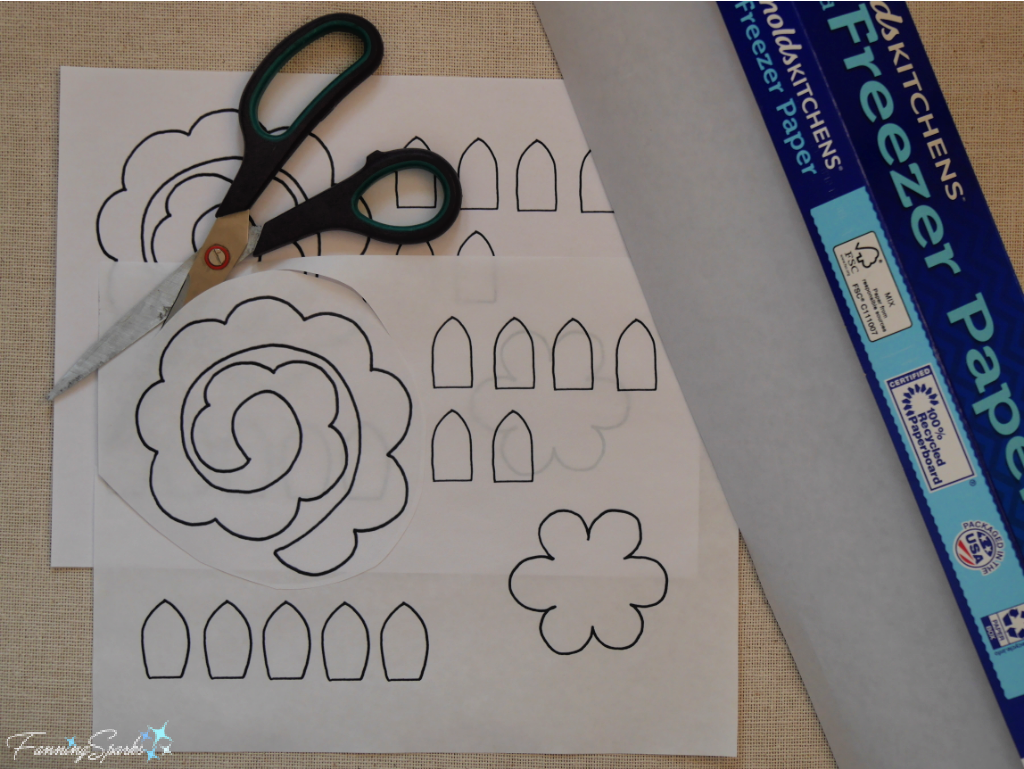
Freezer Paper Technique A great way to cut neat and precise parts from felt is to use freezer paper. Freezer paper is a plastic-coated paper designed to wrap and freeze meat. But it is also widely used for creating patterns to cut fabric for quilting, applique and felt flower making. As explained in the steps that follow there are several reasons why freezer paper is ideal for this purpose.
A. The paper-side of freezer paper looks like regular paper while the plastic-coated side is shiny and smooth. You can easily draw or trace on the paper side. And even better, you can print your design onto freezer paper with your regular laser printer. Just cut a sheet of freezer paper to the size of a sheet of printer paper (ie 8 ½“ x 11“) and put it into the printer tray with the shiny side down. Since not all printers work the same, please adjust this technique to the specifics of your own printer. Once you have your design printed on the freezer paper, cut out the individual patterns leaving a small border outside the cutting lines.
 B. Next comes the best part, place your felt on your ironing surface and lay the freezer paper pattern on top of the felt with the shiny side down. Use your iron to press the freezer paper pattern into place—a few seconds is all that’s needed. Take care to use the heat setting appropriate for your felt. The amazing thing is the iron melts the plastic just enough to make the paper stick to the felt while you cut out your piece.
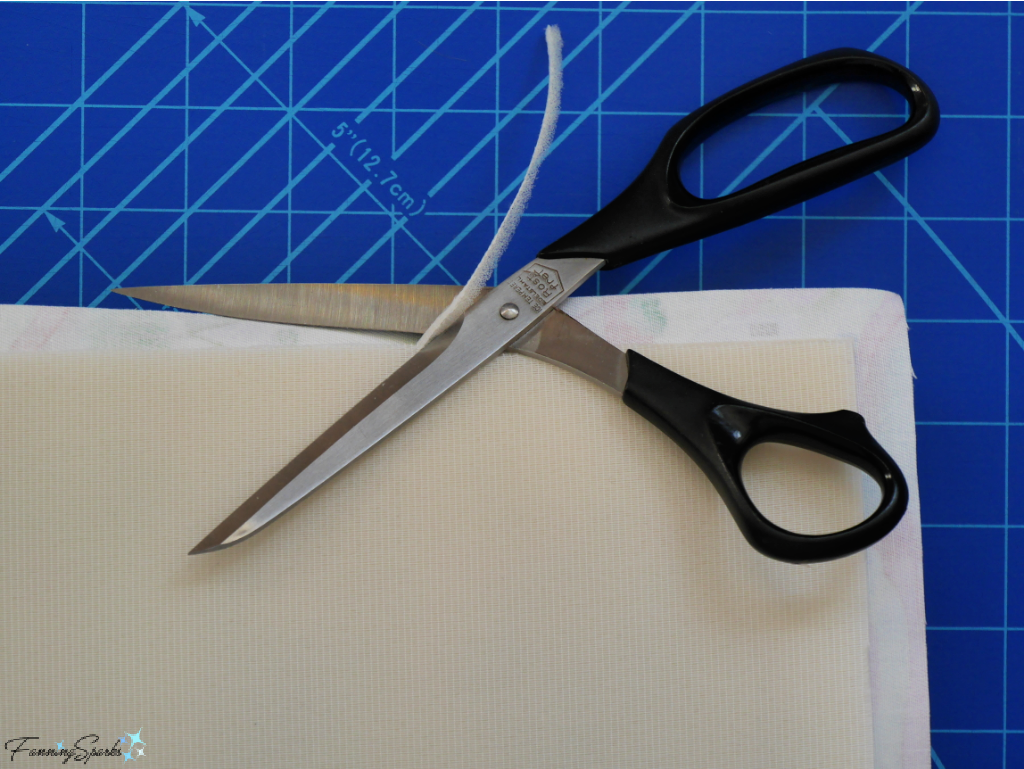
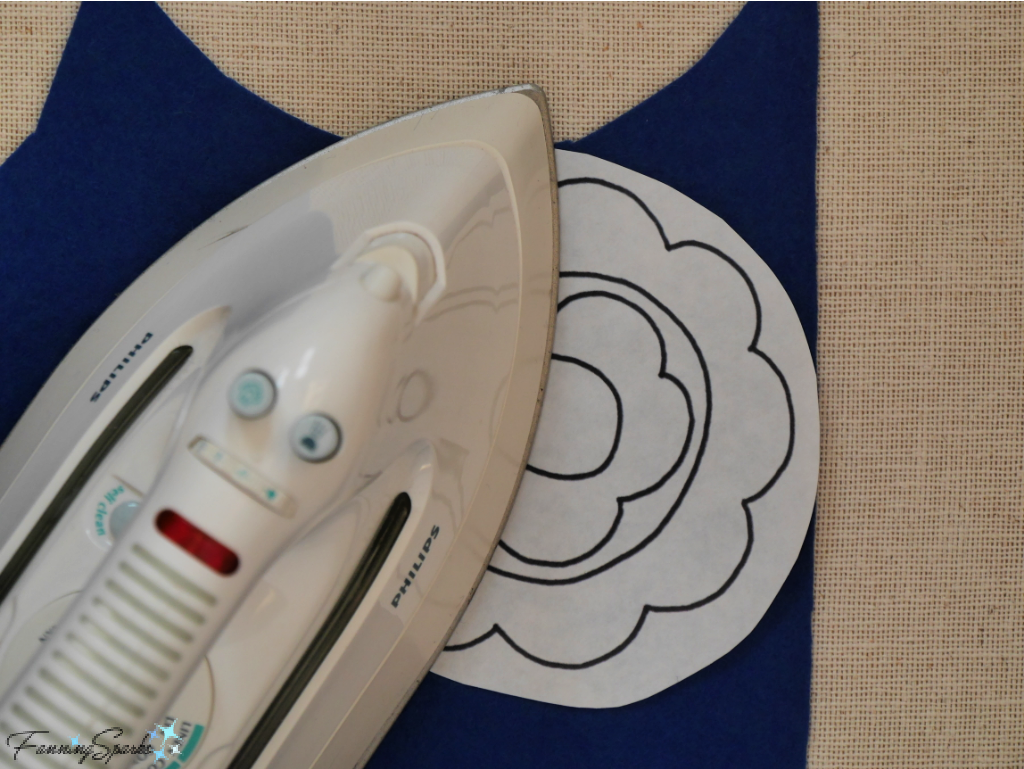 C. Cut out the pattern piece (freezer paper and felt) using sharp, short-bladed scissors for precision. Then simply pull the freezer paper off the felt. Surprisingly, it comes off very easily and no residue is left behind. Pattern pieces can be reused so take care when removing them from the felt.
Instructions to Make Bangle Keepsake Box
Step 1 Print Patterns Download Felt Flowers for Bangle Keepsake Box – Complimentary Download to print the patterns for the felt flowers, leaves and hidden heart. Follow Step A of the Freezer Paper Technique as described above to print the patterns on freezer paper. Set aside.
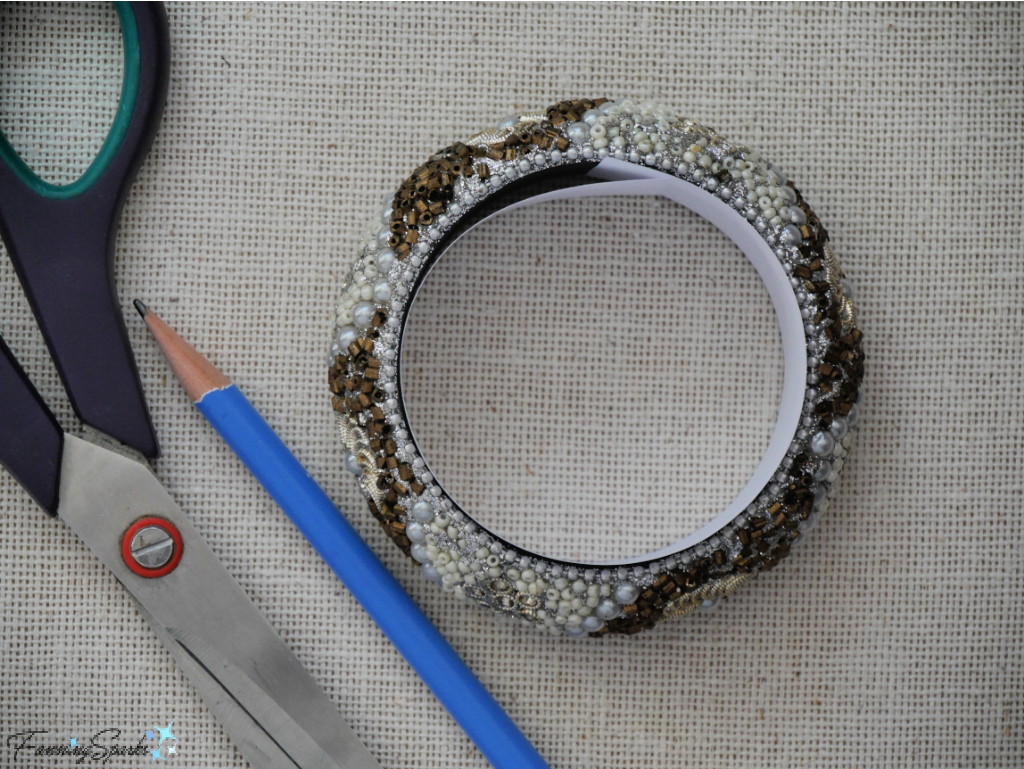
Step 2 Cut Liner Parts Begin by determining the size of the liner parts. Use a strip of scrap paper to measure the inside circumference of the bangle. Cut the paper strip a little longer than needed. Tuck the paper strip inside the bangle ensuring it is snug up against the inside edge all the way around. Mark the point where the paper overlaps. Add ¼“ for the seam allowance. This will be the length of the liner wall.
 Measure the height of the inside of the bangle using a ruler. Add ¼“ for the seam allowance. This will be the height of the liner wall. Cut a rectangle of white felt with the length and width calculated.
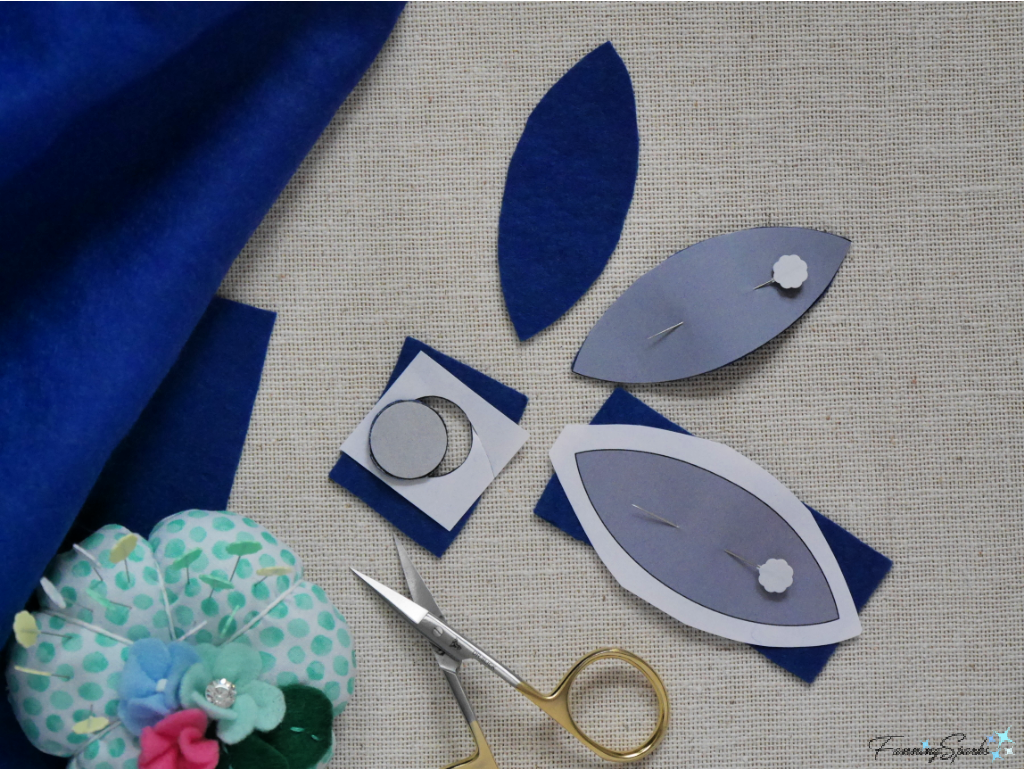
Lay the bangle on a piece of freezer paper with the shiny side down. Use a pencil to trace around the inside edge of the bangle.
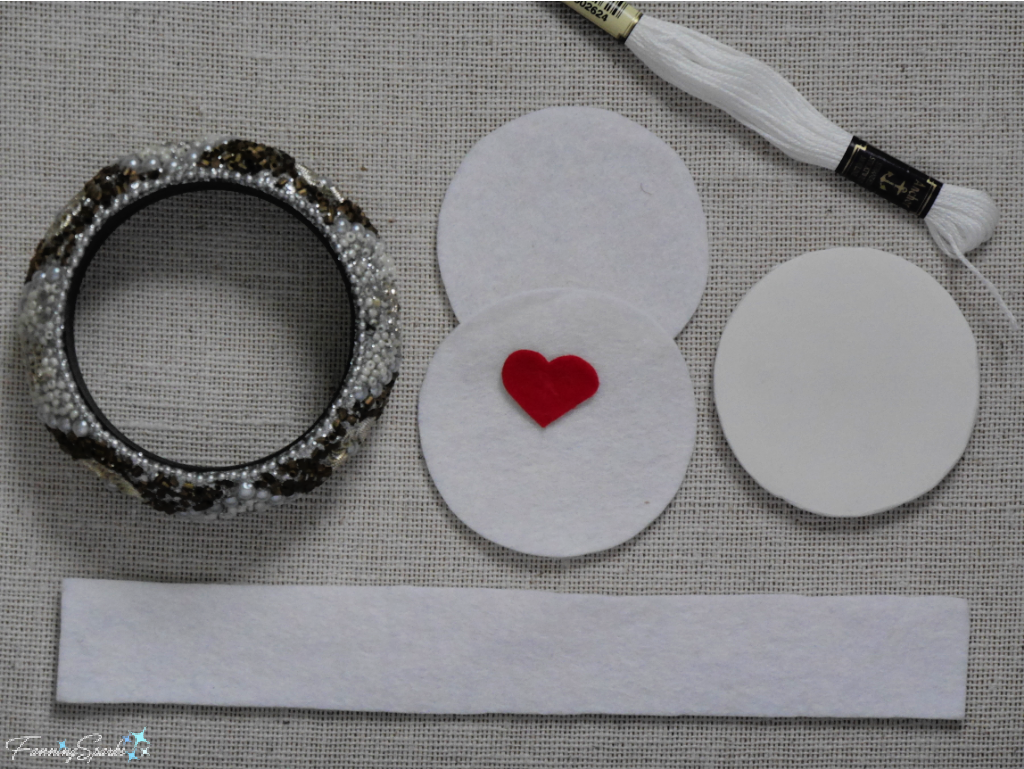
 Cut out the circle leaving a small border outside the cutting line. Follow Steps B-C of the Freezer Paper Technique as described above to adhere and cut out a white felt circle. Reuse the freezer paper pattern to cut 3 more white felt circles.
Lay the bangle on a piece of foam board. Use a pencil to trace around the inside edge of the bangle. Use a sharp utility knife such as an X-ACTO knife to cut out the foam board circle.
Lay the bangle on a piece of thin cardboard. Use a pencil to trace around the inside edge of the bangle. The cardboard circle needs to be slightly smaller than the inside of the bangle so draw a second circle ⅛“ inside the traced circle. Use scissors to cut out the smaller circle. Set aside for the lid.
A small heart is stitched to the bottom of the liner as a fun surprise. Cut ONE #5 Heart part from red felt following the Freezer Paper Technique as described above.
Step 3 Make Felt Liner The felt liner is made with 2 circles of felt, a rectangle of felt, a foam board circle and a hidden felt heart.
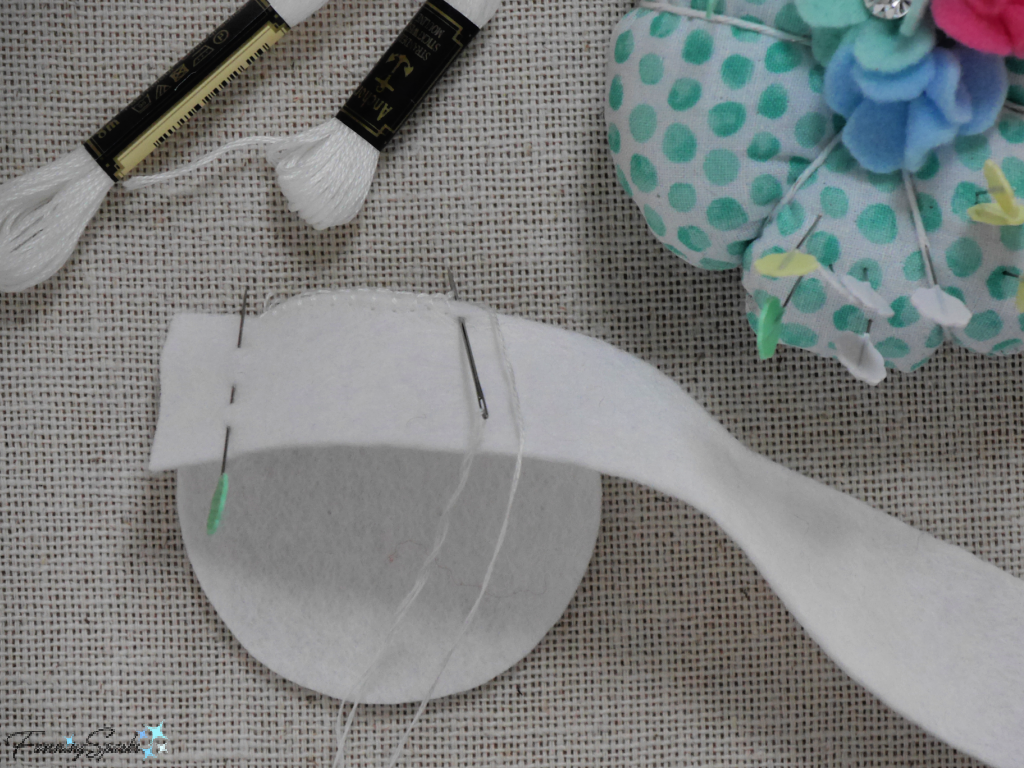
 Start by sewing one long edge of the felt rectangle, which will become the liner wall, to one of the felt circles. Use 2-strands of matching embroidery floss with a blanket stitch. Start and finish ½“ from the ends of the rectangle.
TIP: Instead of cutting the thread at the stopping point, just remove the needle and hold the remaining thread out of the way. This will allow you to the finish stitching later without interrupting the flow of the seam.
 Hold the short ends of the rectangle together ensuring the remaining unsewn bottom edges are aligned and fit snuggly against the bottom circle. Trim the short ends if necessary. Pin and stitch the short ends with a blanket stitch. Finish stitching the long edge of the felt rectangle to the bottom circle.
Insert the foam board circle into the felt liner. Then slip it inside the bangle. The liner and foam board bottom should fit snuggly. Finetune the foam board circle to adjust fit, if necessary. I found it easiest to shave off small amounts with scissors. Trim one of the felt circles to match the size of the trimmed foam board circle. Sew red felt heart to this felt circle. For contrast, I used 2-strands of white embroidery floss in a running stitch.
 Glue this felt circle to the top of the foam board circle. Insert embellished bottom into the liner. If desired, glue felt liner walls to the inside edge of bangle.
Step 4 Make Felt Lid
Prepare to make the ribbon loop for lifting and replacing the lid. Cut a piece of ribbon about 6” long. Find and mark the center of one of the felt circles. Use sharp-tipped scissors to make a small snip at the mark. Find and mark center of thin cardboard. Use scissors to make a small hole at the mark. Fold the ribbon in half.
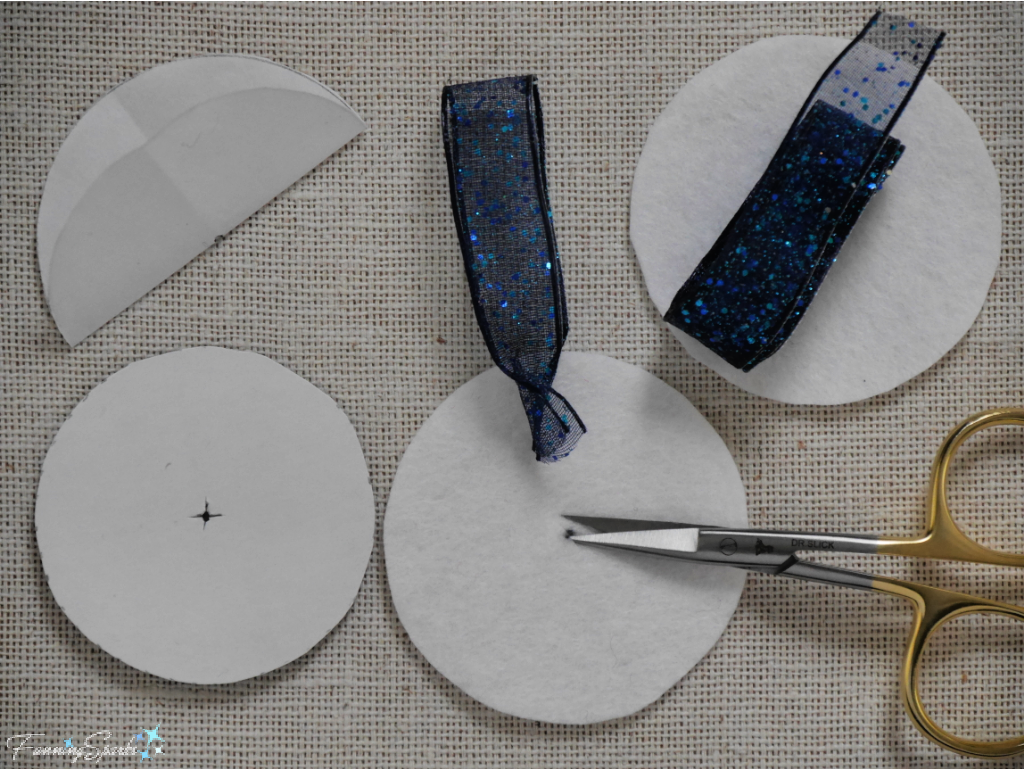 Hold ribbon by loop and gently pull the ends of the ribbon through the hole in the felt circle and then the hole in the cardboard. Push cardboard and felt circle together. Securely fasten the ends of the ribbon together. You can twist the ends if the ribbon is wired. Knot or stitch if the ribbon is unwired. Keep ends as flat as possible under the cardboard. You may wish to glue or tape the ends in place.
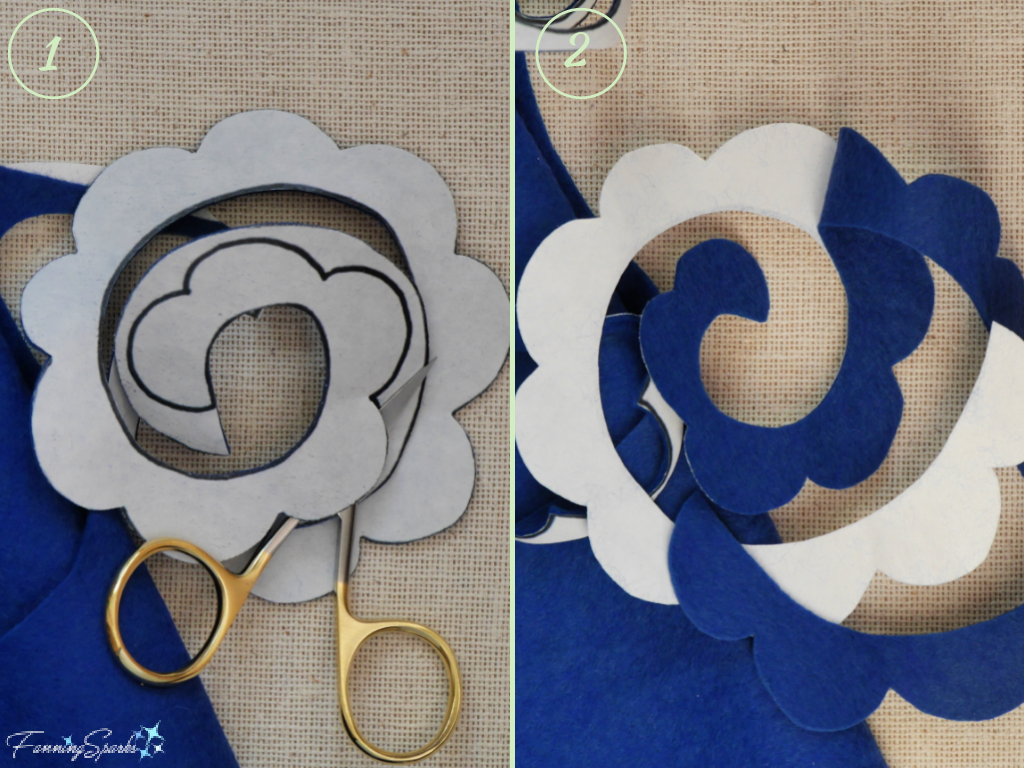
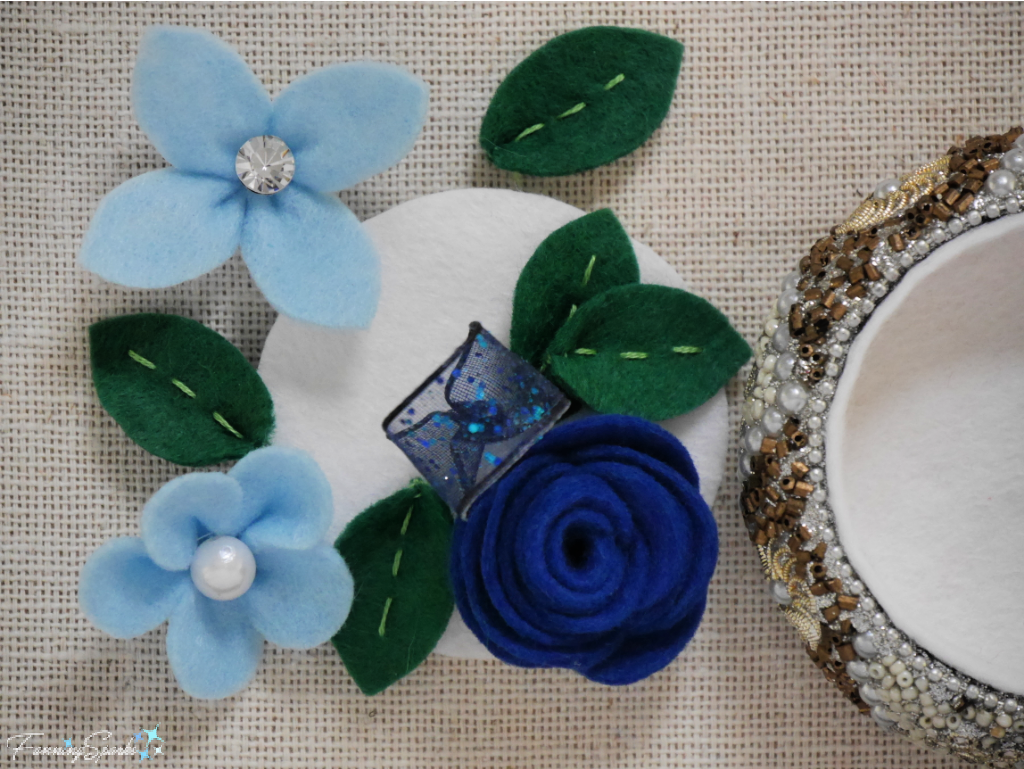
Step 5 Make Flowers I chose to include 3 different flower forms including a Rose Form, an Apple Blossom Form and a Dogwood Form. The Rose Form, made in deep blue felt, is constructed by rolling a scalloped spiral cut. The Apple Blossom Form, made in light blue felt with a pearl bead center, is created by gathering a flat cut of 5 rounded petals. The Dogwood Form, made in light blue felt with a sparkling button center, is assembled by sewing together and gathering 4 cathedral window-shaped petals. There are 5 green felt leaves with veins embroidered in floss. Feel free to follow this same design or customize the embellishments as you wish.
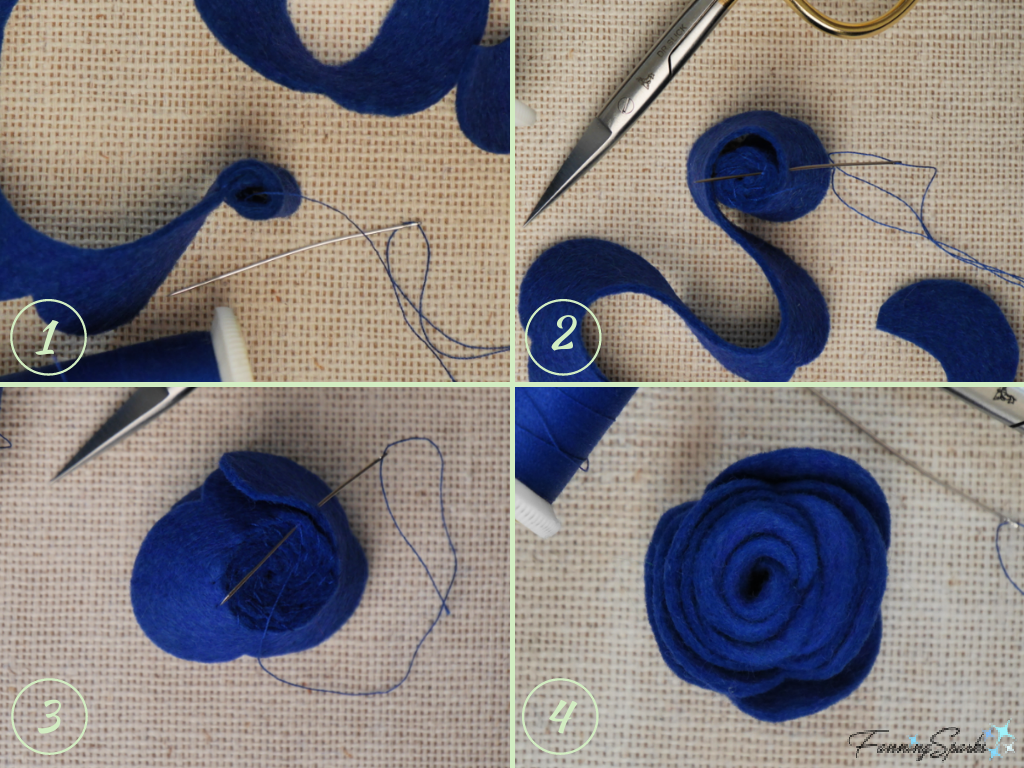
Make Rose Form Rolled Spiral Flower
Cut ONE #1 Rose Form Rolled Spiral Flower from deep blue felt following the Freezer Paper Technique as described above. Thread needle with matching thread. Anchor thread on outside tip of felt spiral. Roll spiral for one round. Stitch edge in place. Continue to wind and stitch layers keeping roll tight and surface flat.
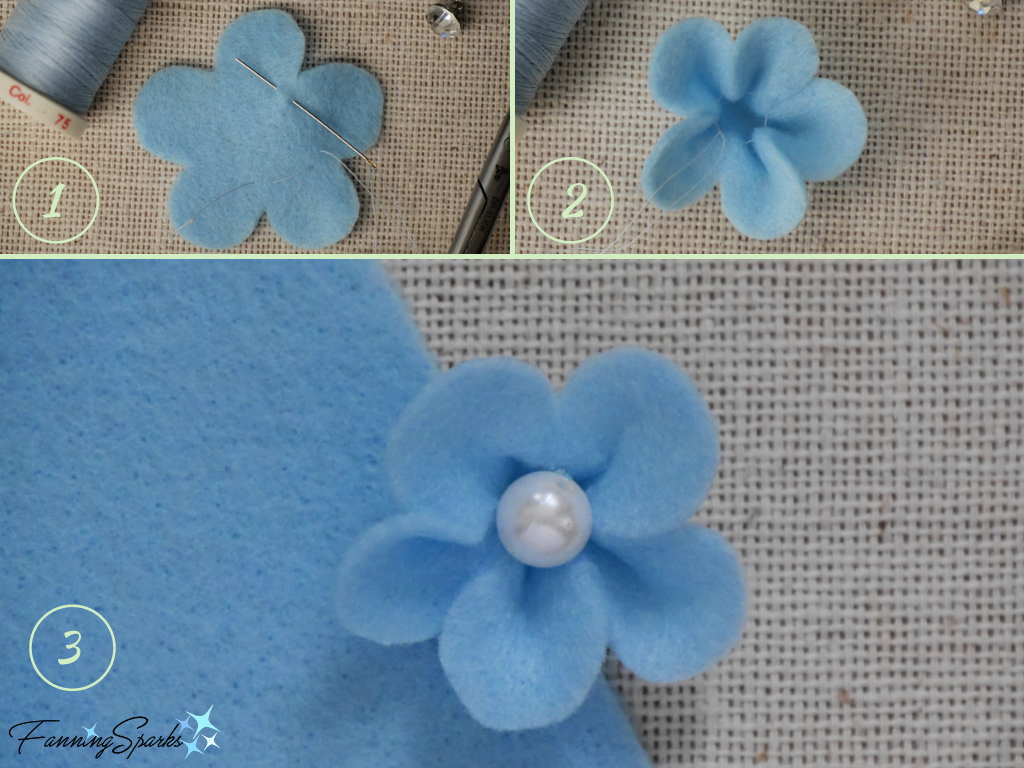
 Make Apple Blossom Form Round Petal Flower
Cut ONE #2 Apple Blossom Form Round Petal flower part from light blue felt following the Freezer Paper Technique as described above. Thread needle with matching thread. Work on the front side of the felt flower. Do not pull thread end snug instead leave a 3-4“ tail. Take small stitch across the bottom of the valley where petals meet at about ¼“ from tip of V. Continue around the flower form taking small stitches at each valley. Pull ends of thread together gathering the flower form. Tie thread ends into firm knot. Trim and hide thread ends inside flower “throat”. Sew a pearl bead (or your choice of accent) inside the flower throat.
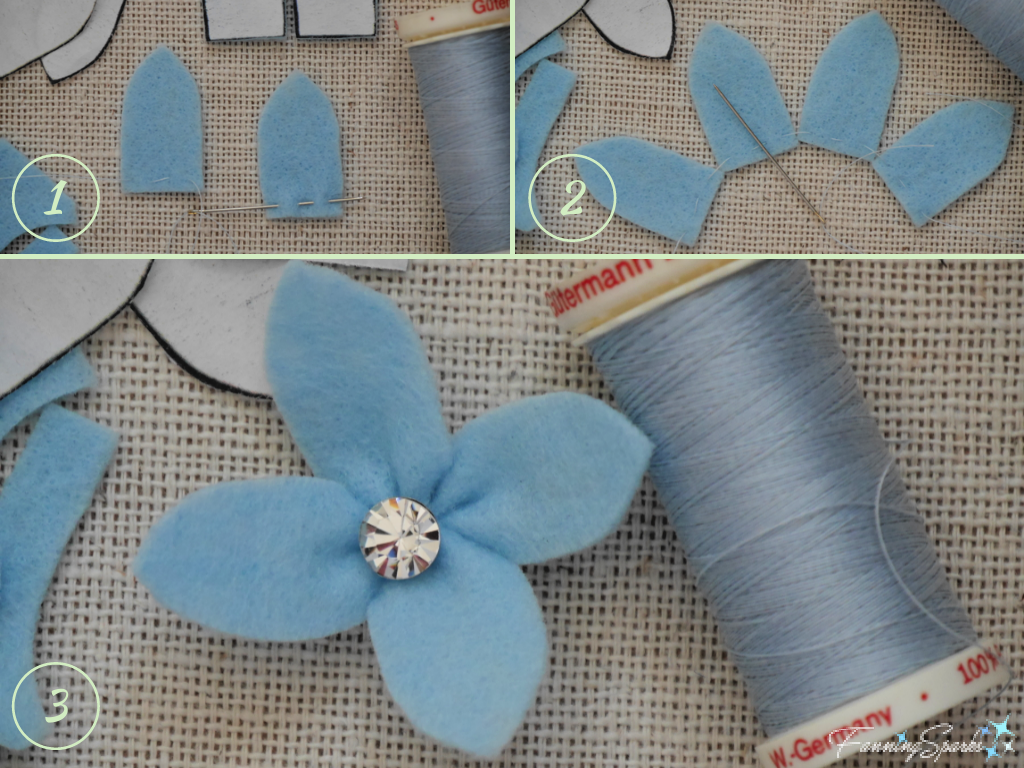
 Make Dogwood Form Pointed Petals Flower
Cut FOUR #3 Dogwood Form Pointed Petals from light blue felt following the Freezer Paper Technique as described above.
Thread needle with matching thread. Work on the back side of the felt flower petals. Do not pull thread end snug instead leave a 3-4“ tail. Take a few small stitches across the flat end of the petal. Stitch the other 3 petals in the same way attaching all 4 petals onto the single thread. Pull ends of thread together gathering the petals. Tie thread ends into firm knot. Trim and hide thread ends at back of flower. Sew a sparkling button (or accent of your choice) at the center of the flower.
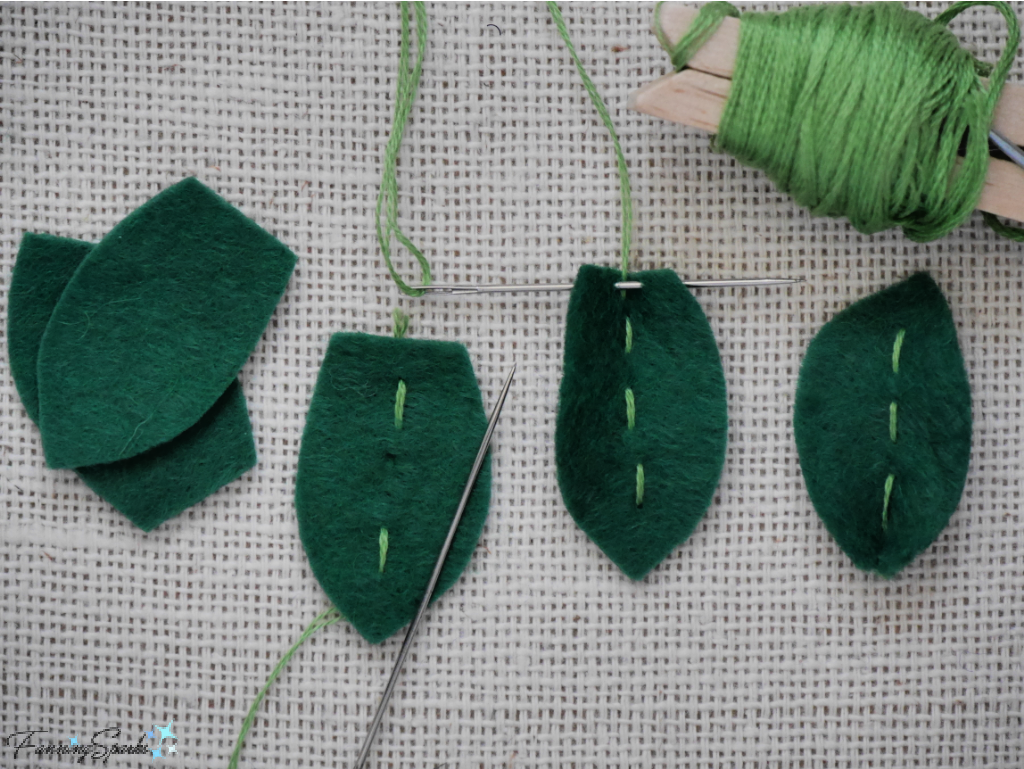
 Make the Leaves
Cut FIVE #4 Leaves from green felt following the Freezer Paper Technique as described above.
Use 2-strands of contrasting embroidery floss to stitch a decorative vein down the center of each leaf. Fold leaf in half. Take 2-3 small whipstitches along the base of the leaf near the folded center. This creates a slight tuck at the base of the leaf.
 Step 6 Embellish Lid Now comes the fun part—embellishing the felt lid! Position the flowers and leaves in a pleasing arrangement.
Use needle with matching thread to attach each element. Work from the back of the felt lid. Make small stitches taking care to keep them hidden. Alternatively, you may choose to glue the elements in place.
After all the elements have been attached, cover the bottom of the embellished lid with the fourth felt circle. Align the two felt circles with the thin cardboard in between the layers. There should be a scant ⅛“ margin of felt around the cardboard. Clip, or pin, layers in place. Use 2-strands of matching embroidery floss to sew the felt circles together. Use a small, even blanket stitch (or stitch of your choice). I chose to dress up my blanket stitch with glass beads. This is done by sliding a bead onto the needle for every horizontal wrap. Check More Info below if you need a refresher or more details for this technique.
 Voilà! Your new keepsake box is done!
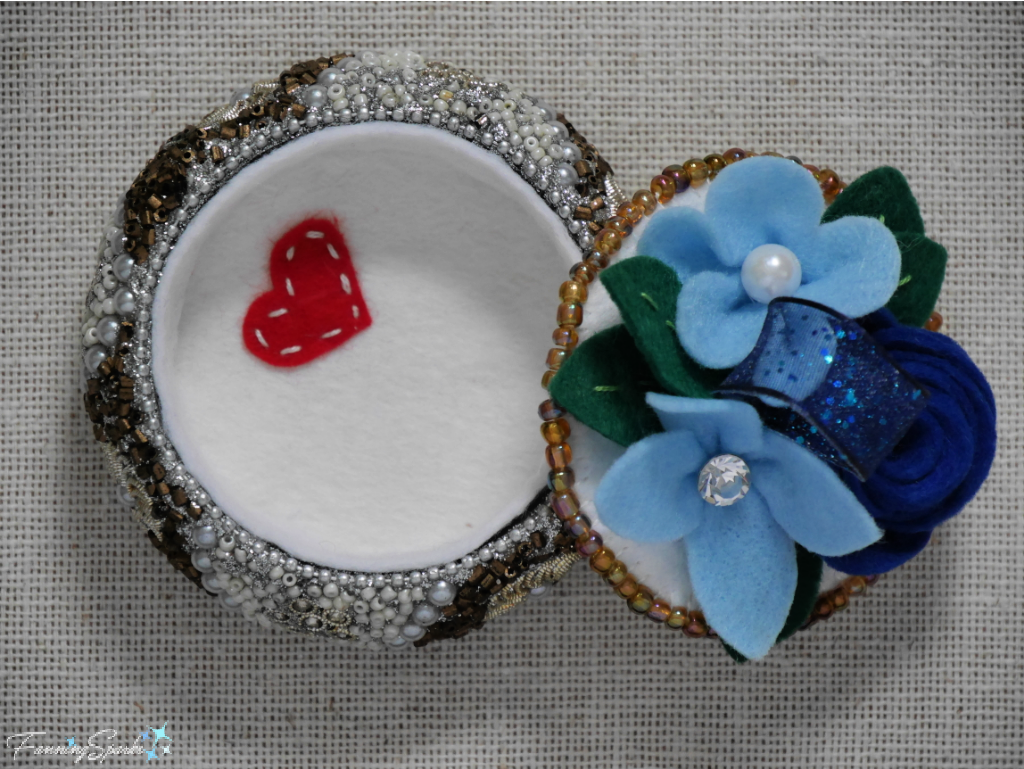 Now it’s time to put your new creation to work—mine holds a pretty little vintage button collection.
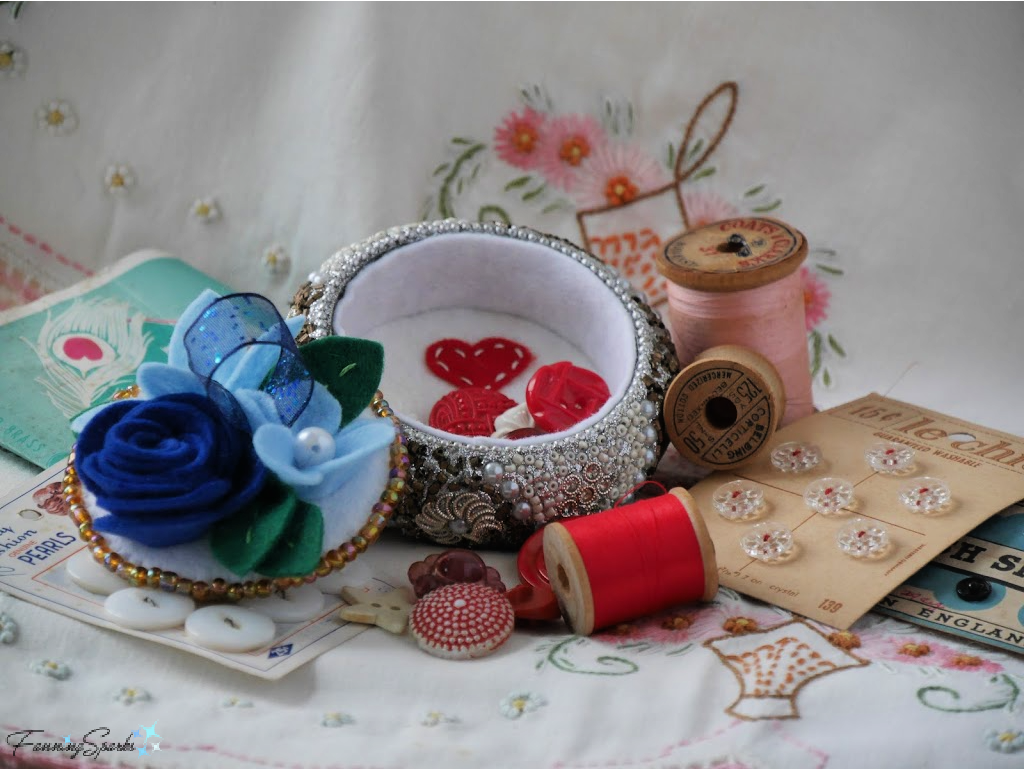
More Info
You can download the project template here: Felt Flowers for Bangle Keepsake Box – Complimentary Download.
Please pin this image to share or save for future reference.
 Gathered.How, publishers of Mollie Makes and other fine craft magazines, provides helpful instructions in their Library of Embroidery Stitches for Beginners. A general Google search will find instructions for a beaded blanket stitch.
You may also like the posts Treasured Vintage Finds or Thrifted Frame to Small Tray.
Today’s Takeaways
1. Consider ways to repurpose a vintage or thrift store find.
2. Felt flowers, which can be made in a multitude of colors, shapes and sizes, are a versatile way to embellish home accessories.
3. A small keepsake, or trinket, box can add a pretty touch while storing a few special items.


 Another item that seems to have grown into a collection is vintage textiles. I have a few displayed on a ladder in the hallway to my studio. The top piece, taking pride of place, is a tablecloth hand-embroidered by my Mom. It’s a beautiful piece! The other pieces were collected from near (US Southeast) and far (Japan and Germany).
 Sometimes a vintage or thrift store find can be repurposed for an entirely new role. I shared an example in the post
 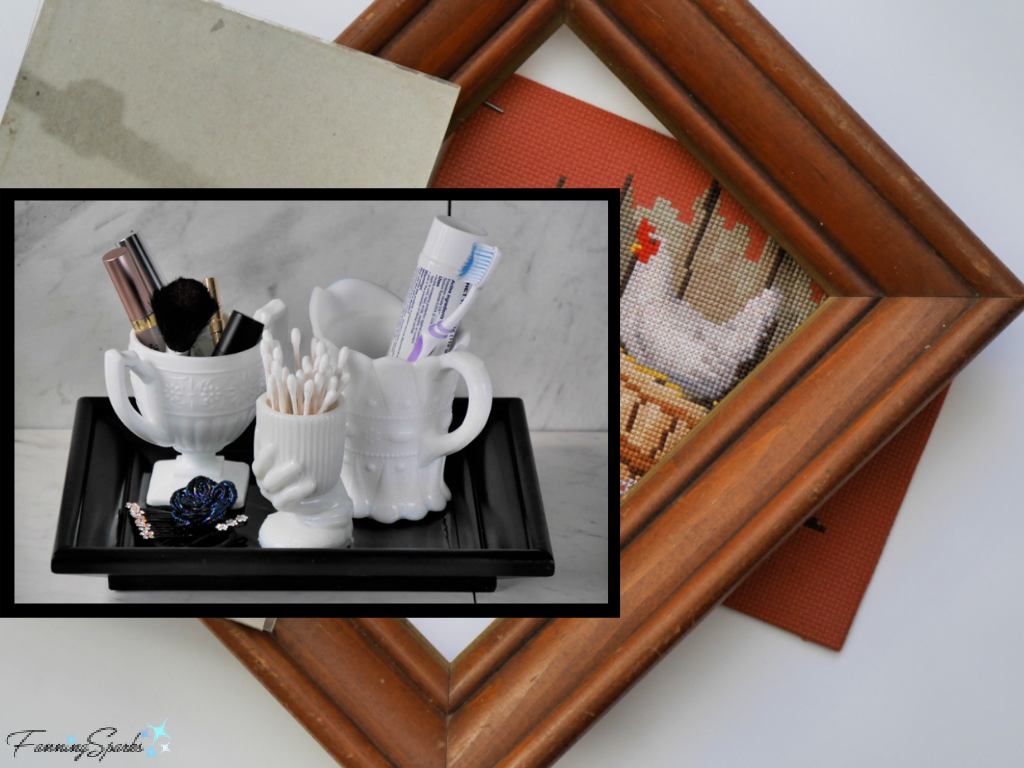 But vintage finds need not be limited to the inside of the home. We have a small collection of vintage white French enamelware which we collected while living in Germany. It’s displayed on our porch and reminds us of our time in Europe. Here’s one of those pieces playing an unexpected role as a wren’s nest.
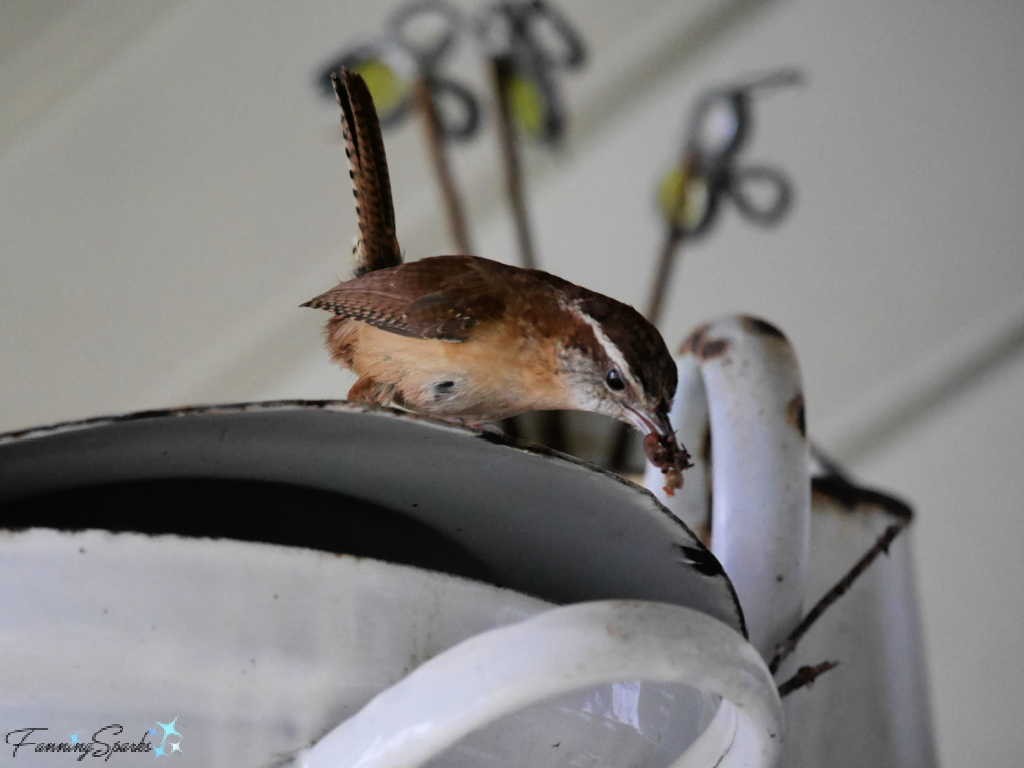
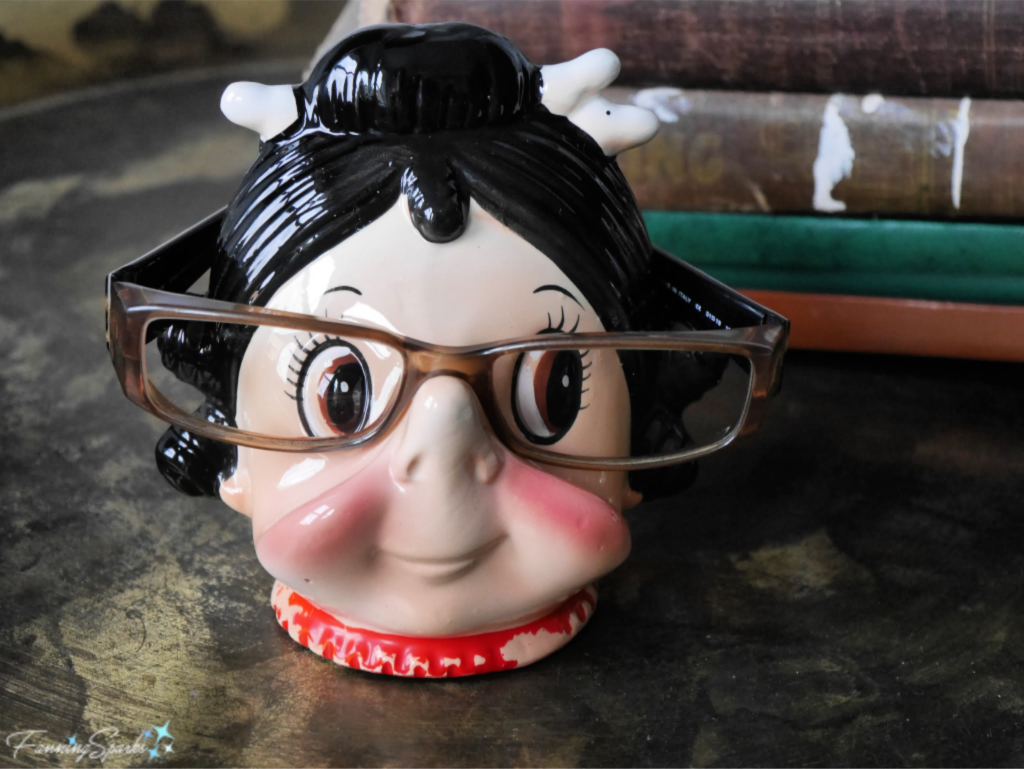
 In the same way vintage finds add interest and uniqueness to our home, they can add personality and punch to photos. I’m always on the lookout for vintage or thrift store finds to serve as photo props. The little porcelain figurine of a young girl holding the number 2 was a timely vintage find for the post
  Here’s another example of a thrift store find that needed a little attention. The wicker picnic basket was in good condition but the top covers were missing. The updated basket, complete with new covers, starred in the post
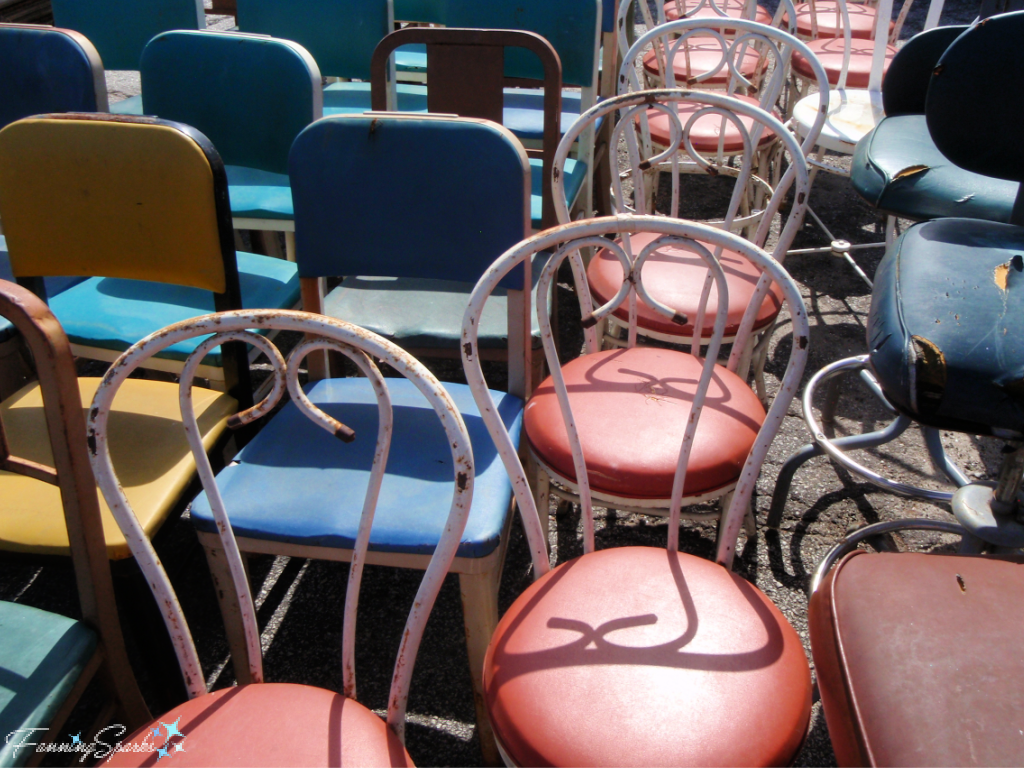
  Vintage pieces are often time-worn but I think that can add to their appeal. This vintage croquet set, which played a key role in the post
 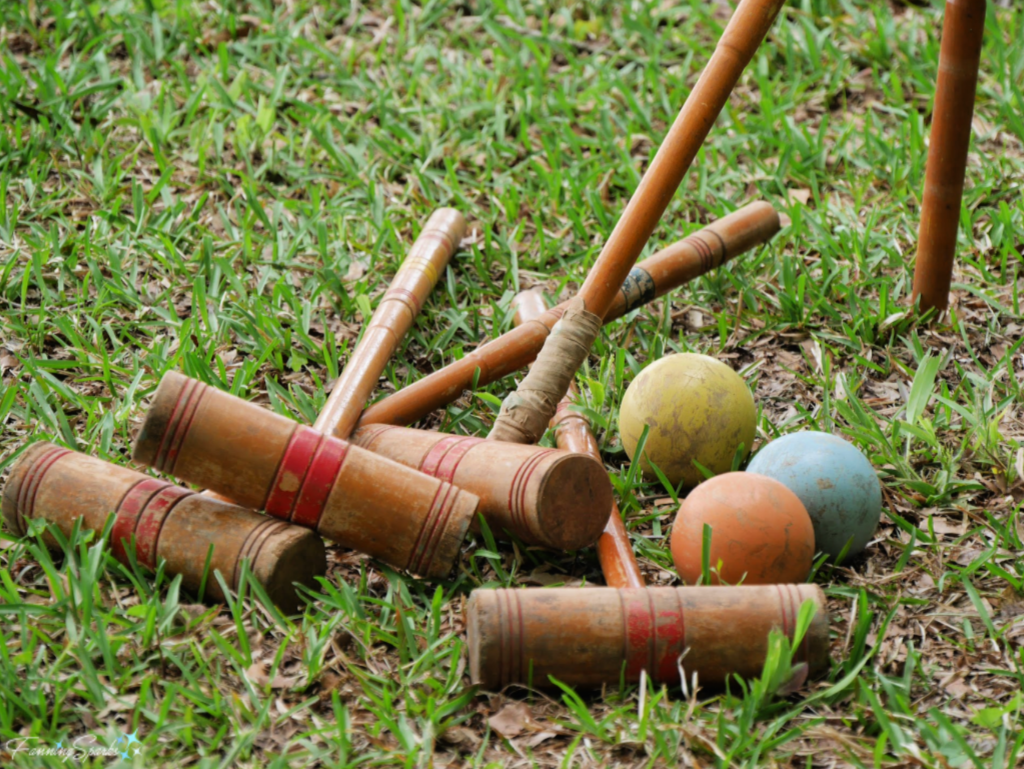 There’s one more reason I like to explore vintage shops—to scout for inspiration. I love to find handmade items from the past. It’s interesting to see what people made—to see what materials and techniques they used. These vintage finds can serve as thought-starters for new projects. The wooden trivet, shown top right in the photo below, inspired the Christmas wreath I shared in the post
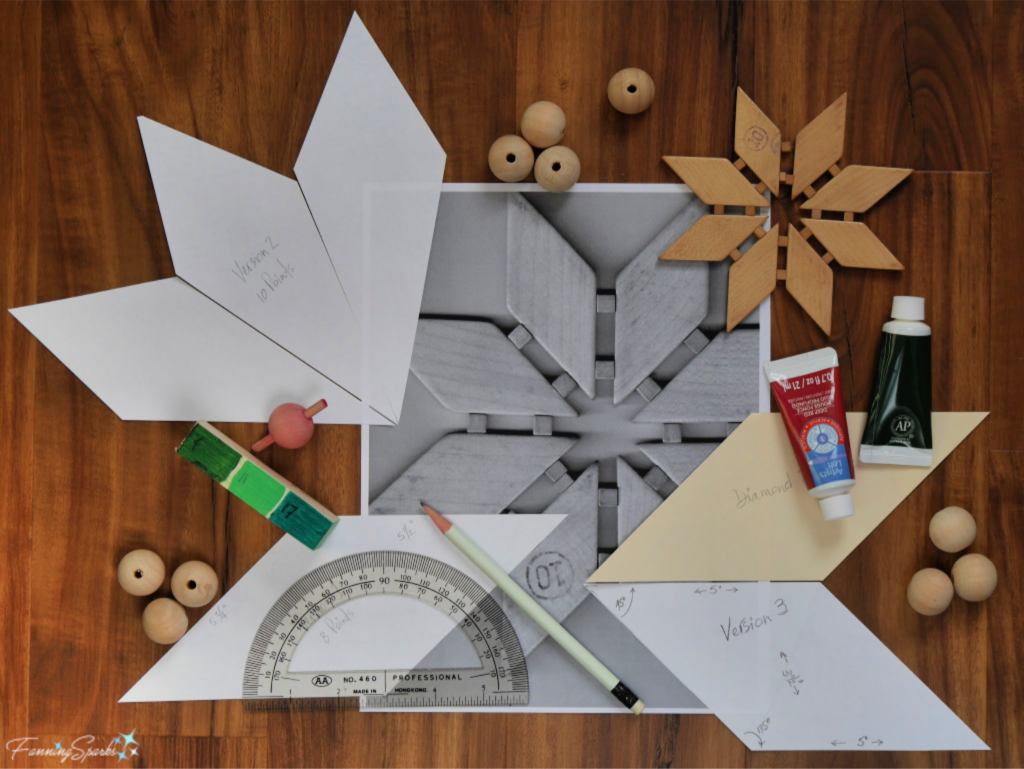
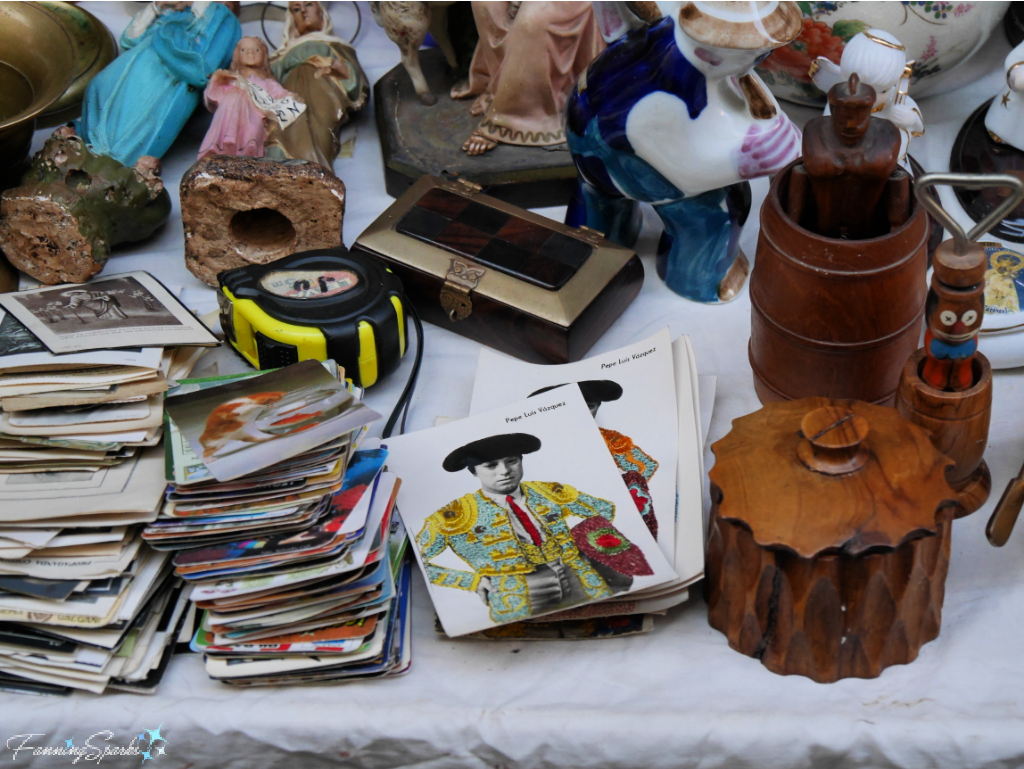 This postcard featuring Rafael Ortega, a famous Spanish bullfighter, is elaborately enhanced with embroidery.
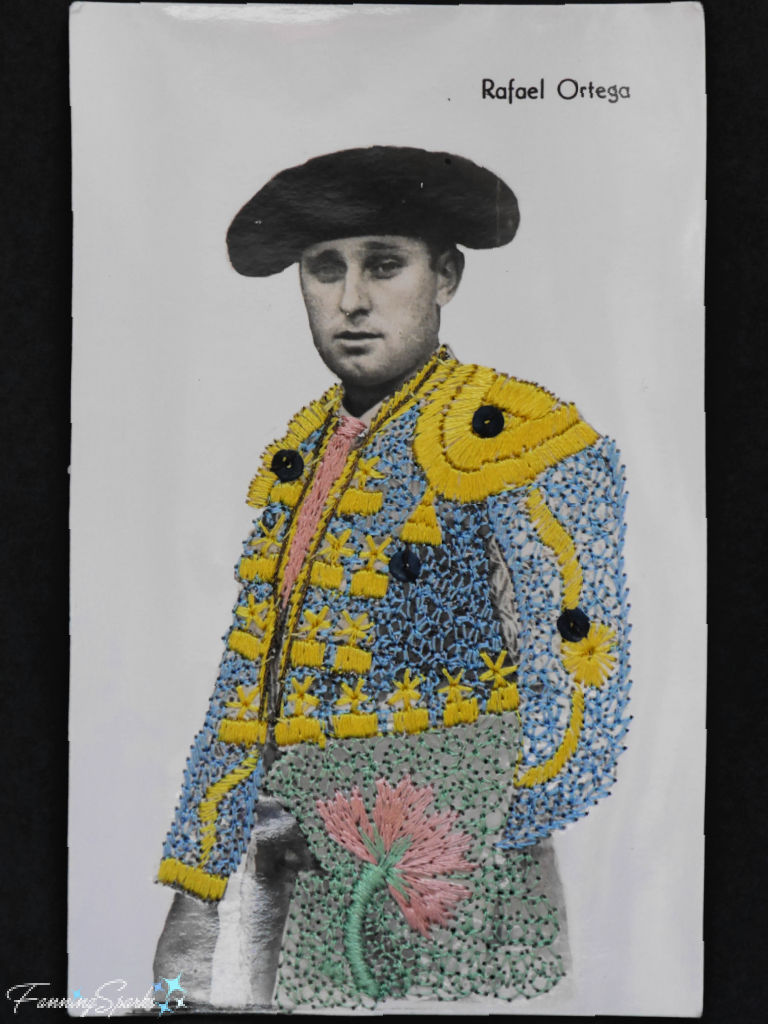 Vintage postcards are fun to collect. They’re small and easy to transport and store. Yet they can be quite fascinating as can be seen in this set of 3 vintage postcards from an antique market in Tongeren, Belgium.
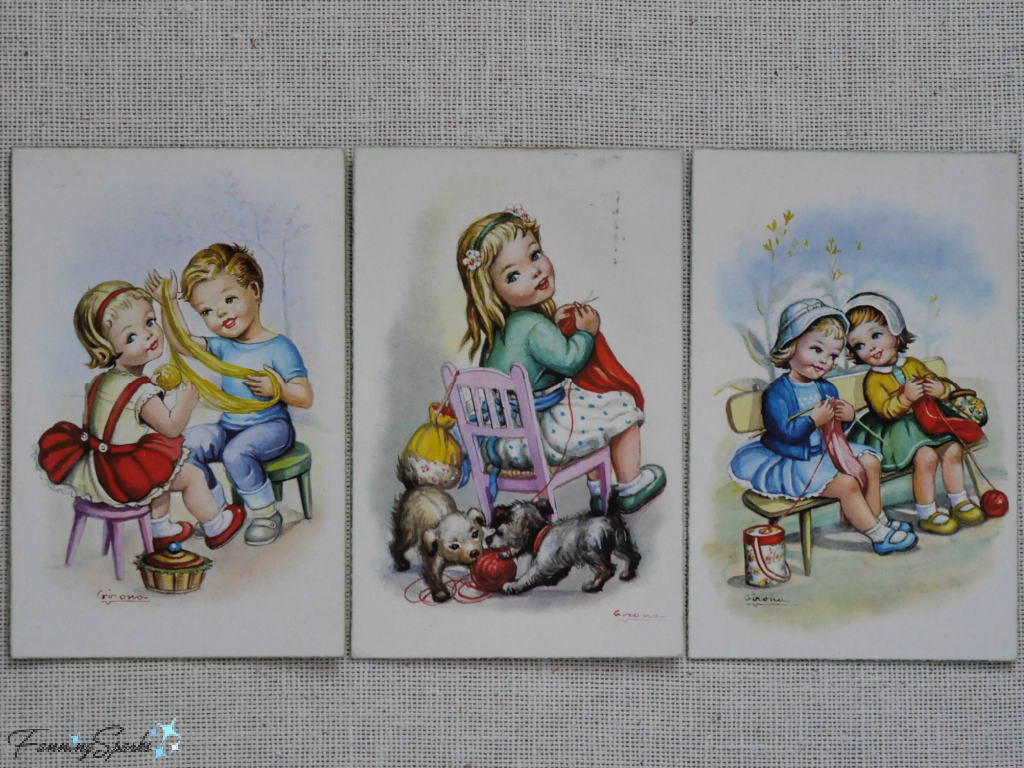 The illustrations are signed by “Girona”. The postcards were printed in Spain. They are incredibly cutesy but special and unique. Here’s a closer look at the little girl and boy winding yarn.
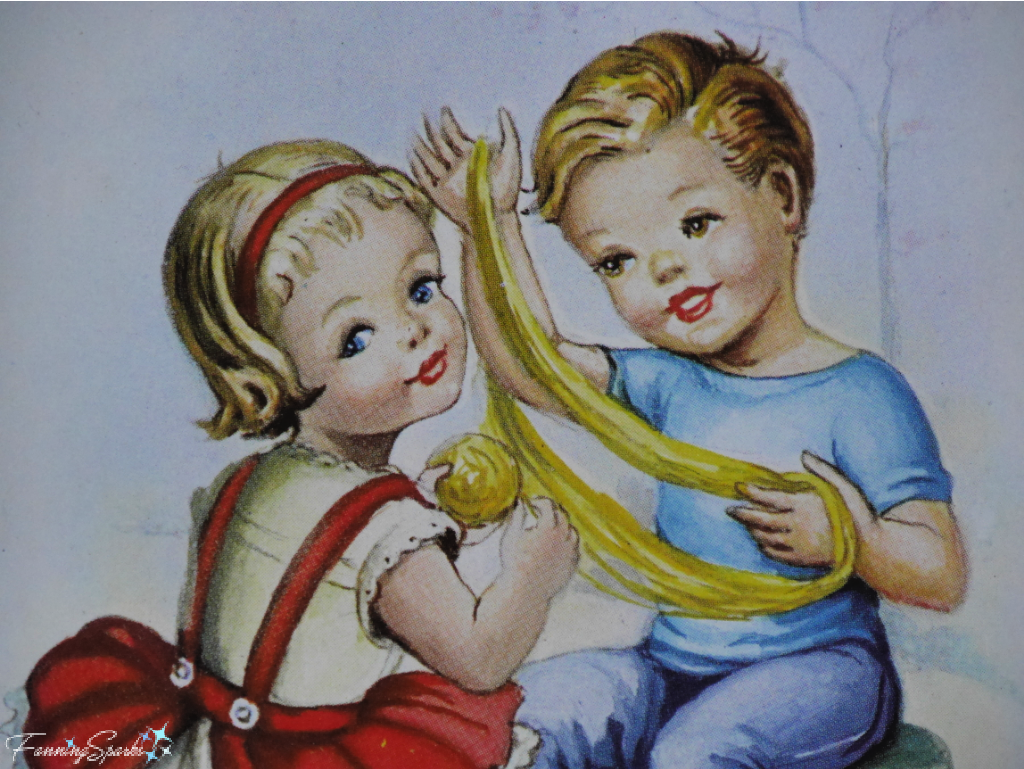 An interesting detail that I didn’t notice before is the girls are knitting with extra-long straight needles positioned under their arms—that’s the way my mother knits too. It’s just another reason to treasure these vintage finds!

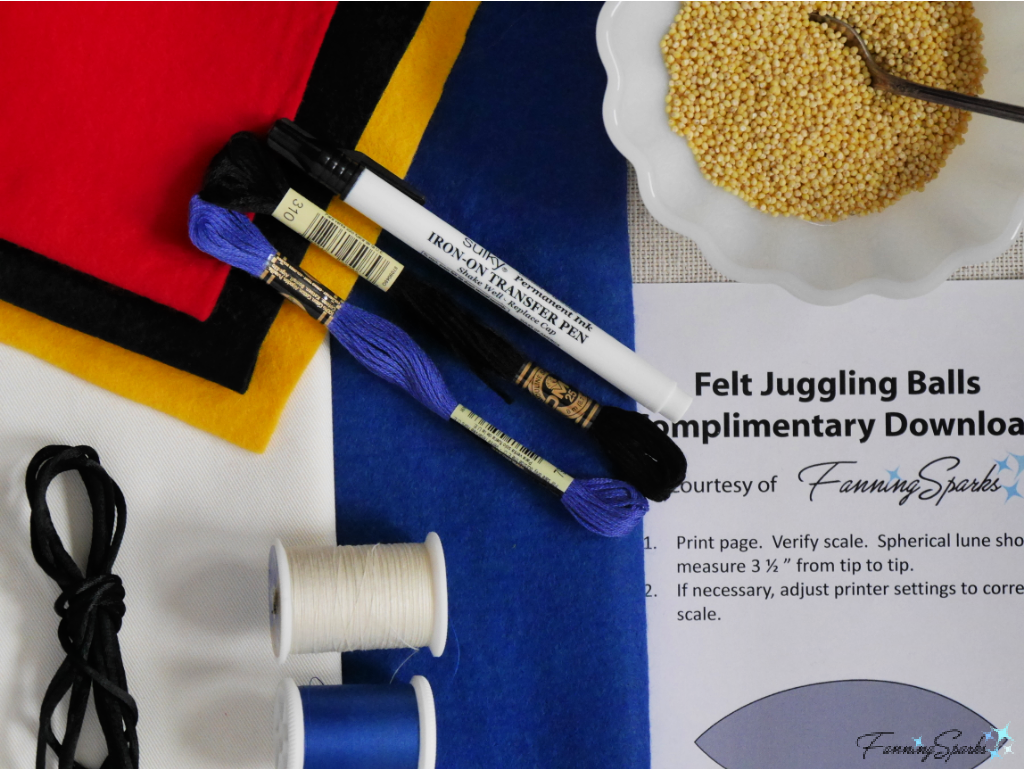
 Cut 6 lunar panels and 2 end circles for EACH ball. Use a fabric marker or chalk to clearly mark the wrong sides of the cut pieces.
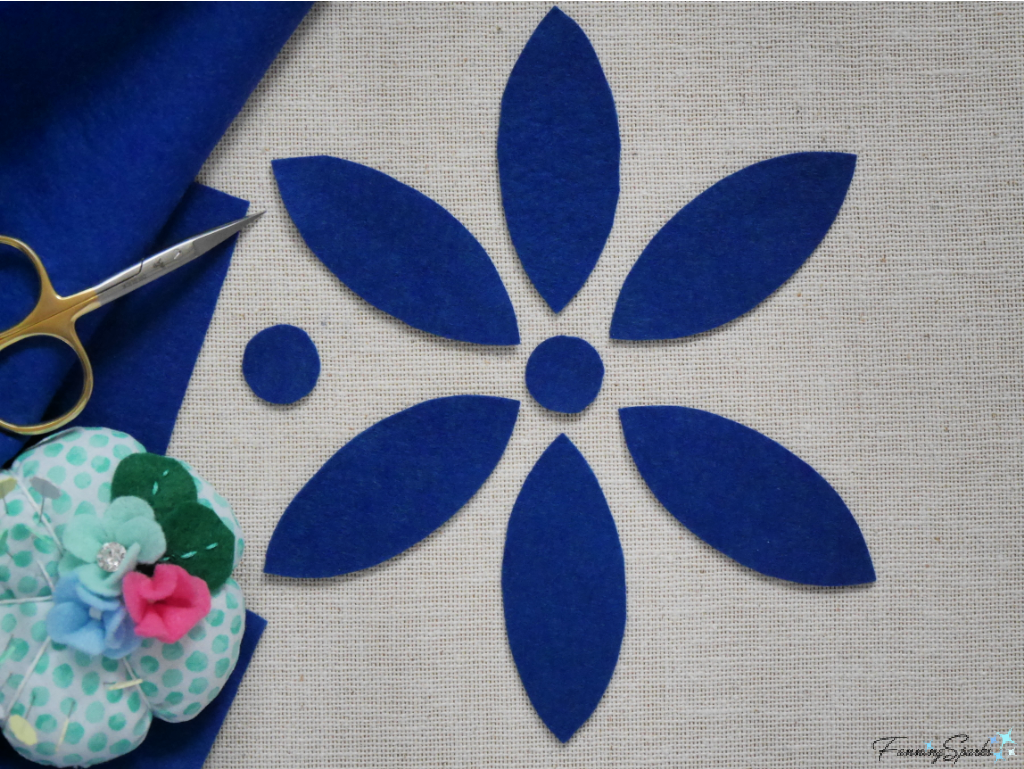 Step 3 Sew Juggling Ball Align a pair of matching lunar panels with RIGHT sides together. Pin. Check that the two pieces are identical especially at the tips. Sew only one side of the lunar panels. Use a single strand of matching sewing thread and a whipstitch/ overcast stitch (or your stitch of choice). Note: I’m using white (instead of blue) thread for visibility in the photo below. Take your time to firmly secure the lunar panels with small, strong, even stitches, spaced close together, catching both edges in each stitch.
 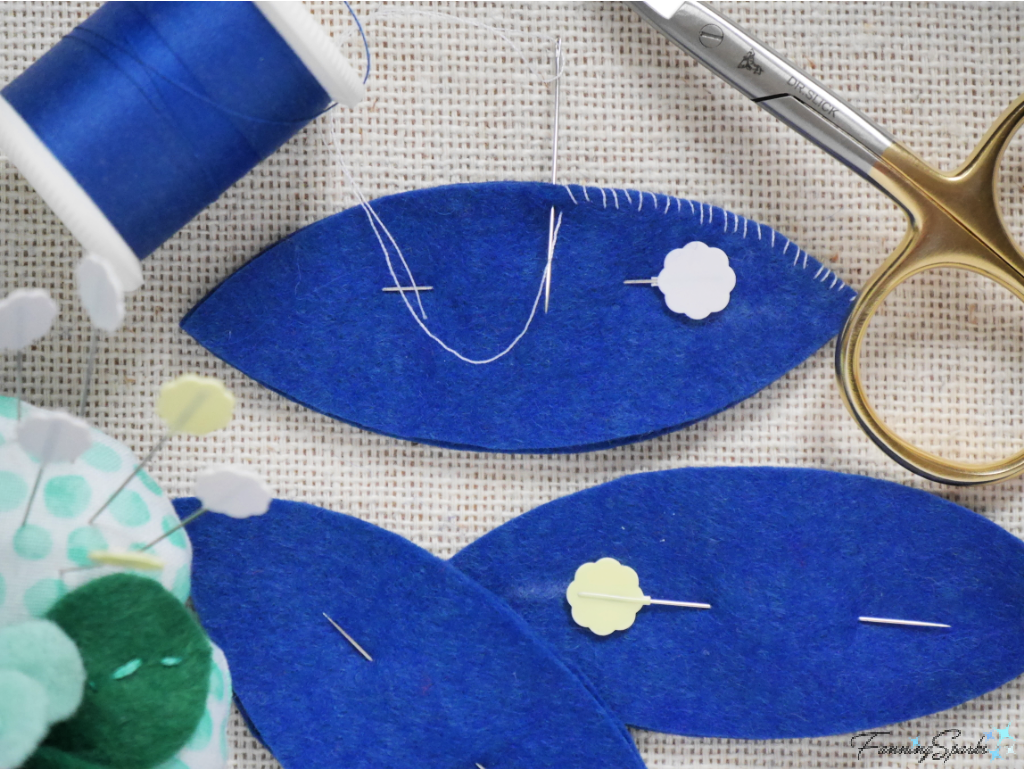 Repeat this process with the other 2 sets of lunar panels. You should have 3 pairs of lunar panels stitched together along one side. Prepare to sew 2 sets of lunar panels together by tucking one set of panels inside the other. Ensure the RIGHT sides are facing. Once again, take care to align the tips. Connect the final set of lunar panels in this same manner.
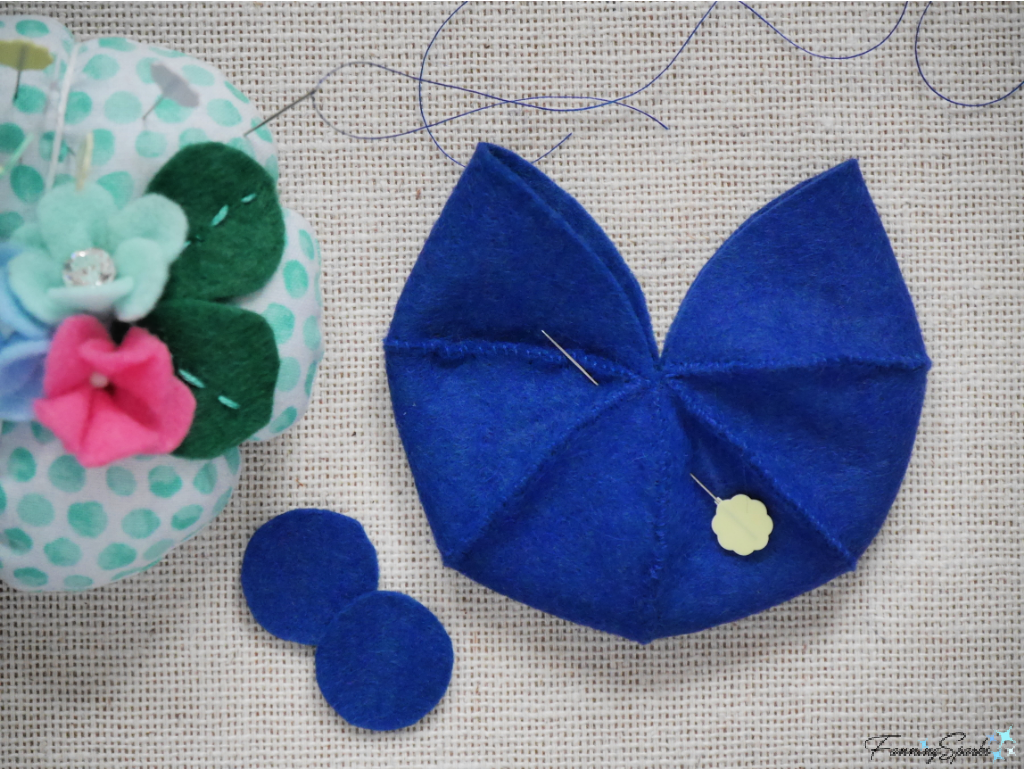 Sew the final seam connecting the first and sixth lunar panel sides. Stop sewing about 1” before the tip leaving a small opening for turning and filling. At this point, you may want to sew the other 2 balls together. Follow the same process, as outlined in this step, for each set of 6 lunar panels.
 Step 4 Fill Juggling Ball Gradually turn the ball right side out. Take care not to stretch the felt at the opening. Insert finger into the turned ball. Run finger along each seam, firmly pressing it smooth and flat. Working over a container or bowl, insert a small funnel into the unsewn opening in the ball. Use a spoon to slowly scoop the millet into the funnel. Carefully tamp down the millet so it runs into the ball. Remove funnel. Spoon small amounts of millet directly into the ball. Use the spoon handle to gently pack the millet into the ball.
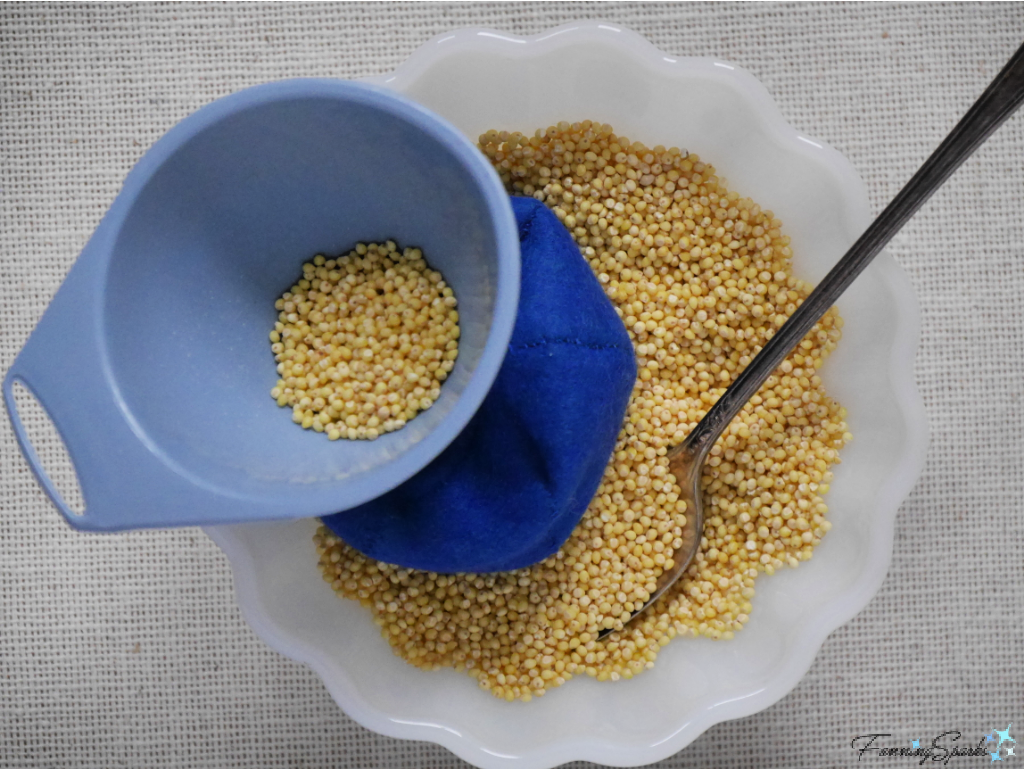 Fill the ball as full as possible while ensuring you can still grasp the edges of the opening. Pin the opening. Sew the opening closed with a whipstitch/ overcast stitch. Repeat on the other 2 juggling balls.
 Step 6 Cut Pouch Parts Cut TWO 10” x 6 ½ “ rectangles from fabric.
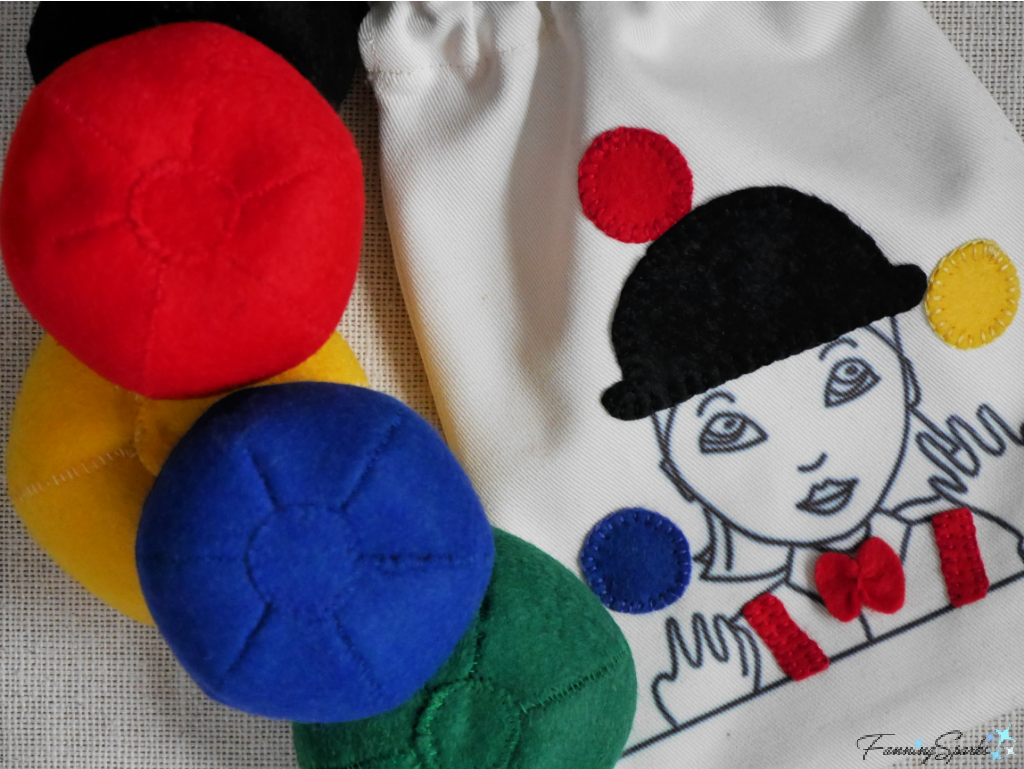
 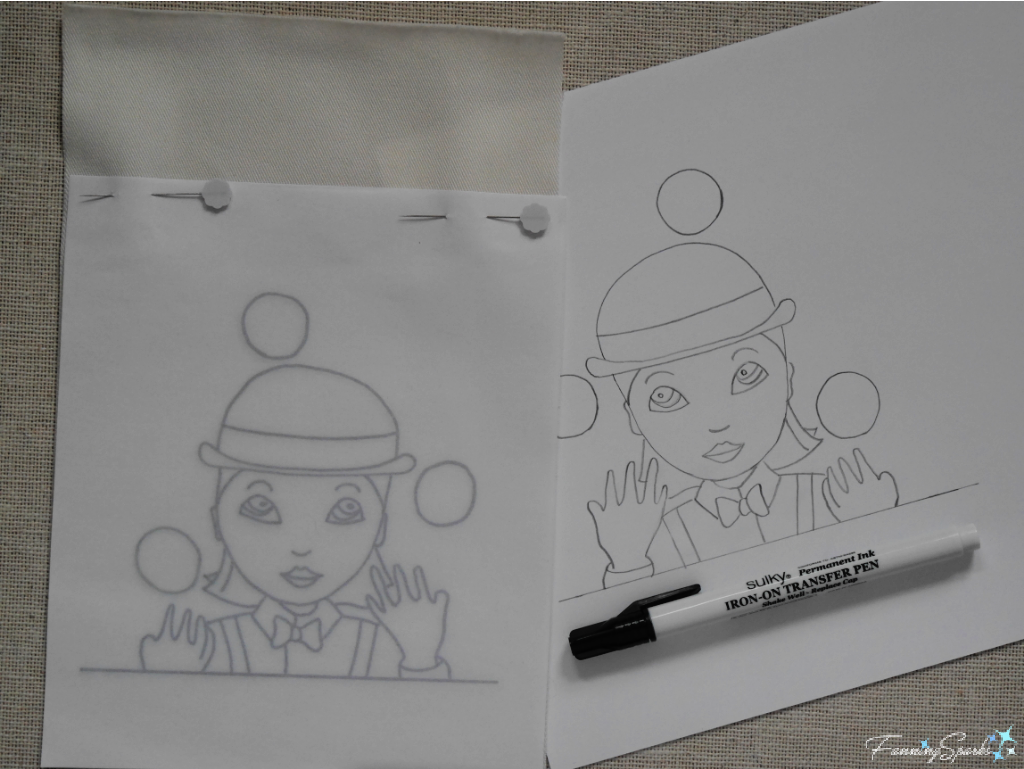 I chose to add a few felt appliques for a little color and punch on my emoji juggler. I simply cut these pieces, a hat, 3 balls, bowtie and suspenders, from small pieces of felt. Then I hand-stitched them into place with a blanket stitch using 2-strands of matching embroidery floss. Alternatively, you could use fabric glue to attach felt pieces.
 Step 8 Sew Pouch Note: Take care not to touch the transferred design with a hot iron as you construct the pouch.
 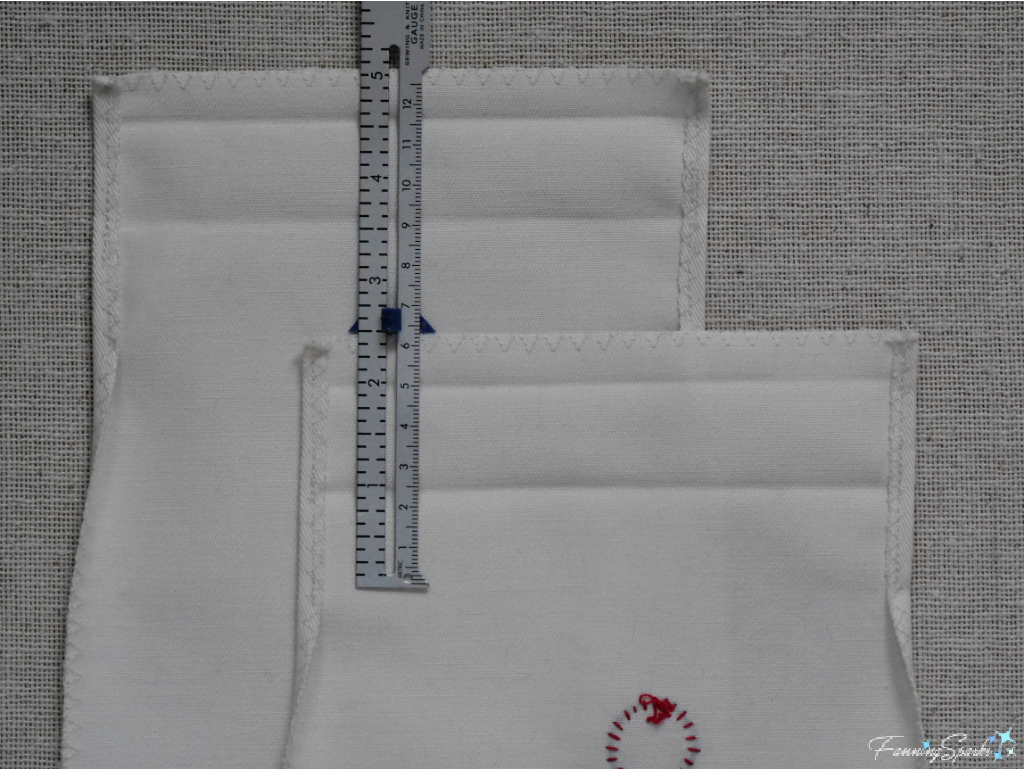 Pin folds. Make a tiny snip into the seam allowances on the sides just below the folded edge. Sew across the top edge of the front pouch panel. Sew a second seam along the folded edge. Repeat with back pouch panel.
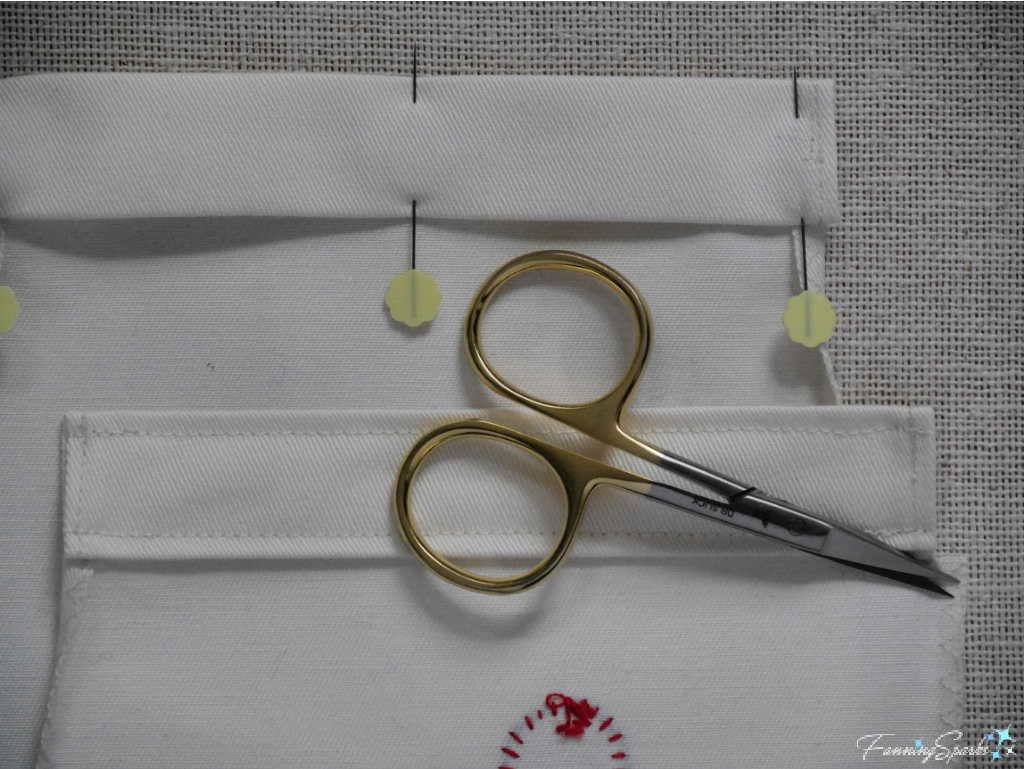 Prepare to sew front and back pouch panels together. Place the pouch panels on your working surface with the right sides together. Align edges and pin. Stitch ¼” seam along the sides and bottom—beginning and ending at the folded edge. Turn the pouch right side out. Push out the seams and corners. Press edges.
  There are a number of free online resources that will teach you how to juggle. I suggest checking out the videos on the International Jugglers Association website (see More Info) or on YouTube. Look for a 3-Ball Cascade—this seems to be the easiest technique for beginners to learn. Here are a few tips I gleaned by comparing several resources:
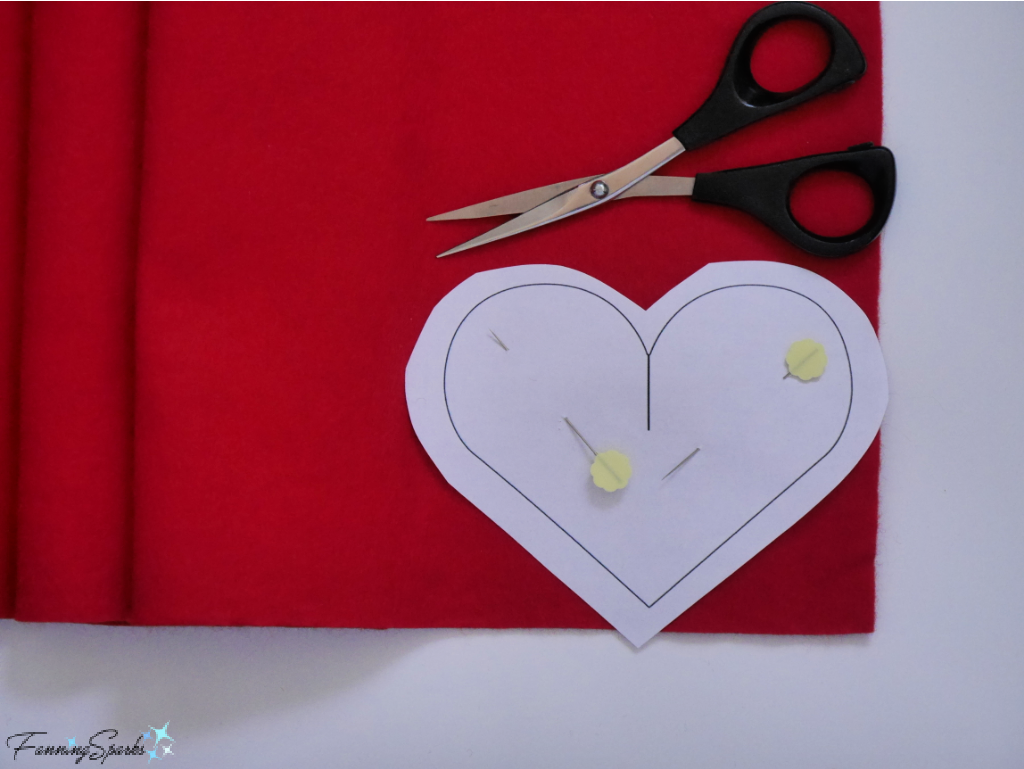 Step 3 Sew Heart Slit Fold a felt heart vertically along the cut slit with right sides together. Use a whipstitch/overcast stitch to sew the two sides of the slit together with tiny, tight stitches. The sewn slit adds shape and dimension to the heart. Repeat on the other five felt hearts.
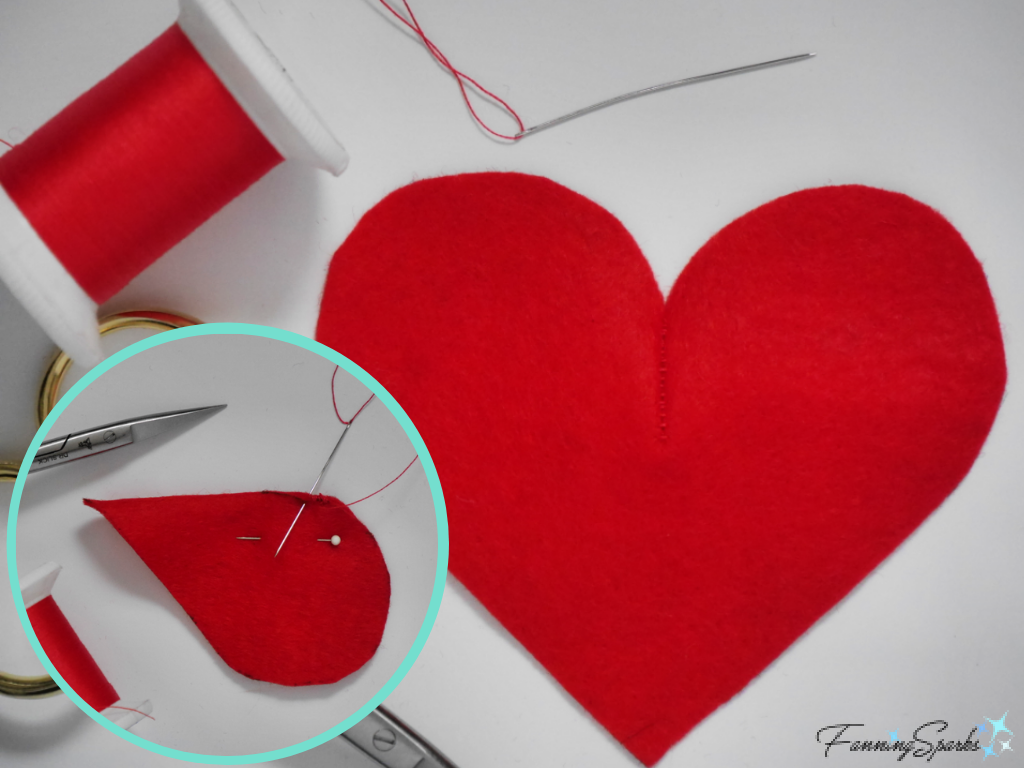 Step 4 Embroider Heart Lay a piece of tissue or parchment paper over one of the heart design patterns. Trace the outline of the heart as well as the inside design (X, O and heart). Trim the outside edge of the tissue paper heart. Align the tissue paper heart with a felt heart and pin in place. Use an outline/stem stitch (or your stitch of choice) to embroider the design onto the felt heart with 2 strands of white embroidery floss. If you’re new to embroidery or need a refresher, check out the More Info section at the end of the post. Stitch through the tissue paper. After stitching is completed, carefully tear away the tissue paper. Repeat on the other five felt hearts embroidering 2 X’s, 2 O’s, and 2 hearts.
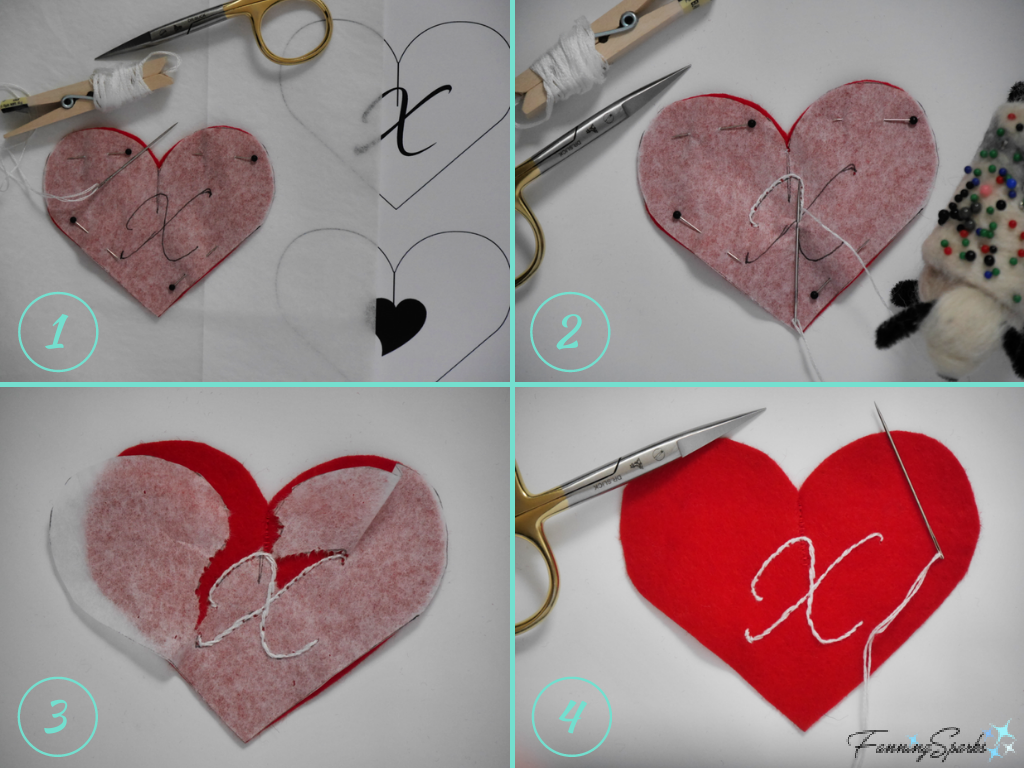 Step 5 Sew Hearts Together Align a pair of matching hearts with WRONG sides together. Pin. Use a single strand of matching sewing thread. (Note: I’m using white thread for visibility in the photo below.) Use a whipstitch/ overcast stitch (or your stitch of choice) to sew the hearts together. Leave a small 1” opening along one of the long sides. Take your time to firmly secure the hearts with small, strong even stitches, spaced close together, catching both edges in each stitch. You don’t want the filling to come out when the juggling begins!
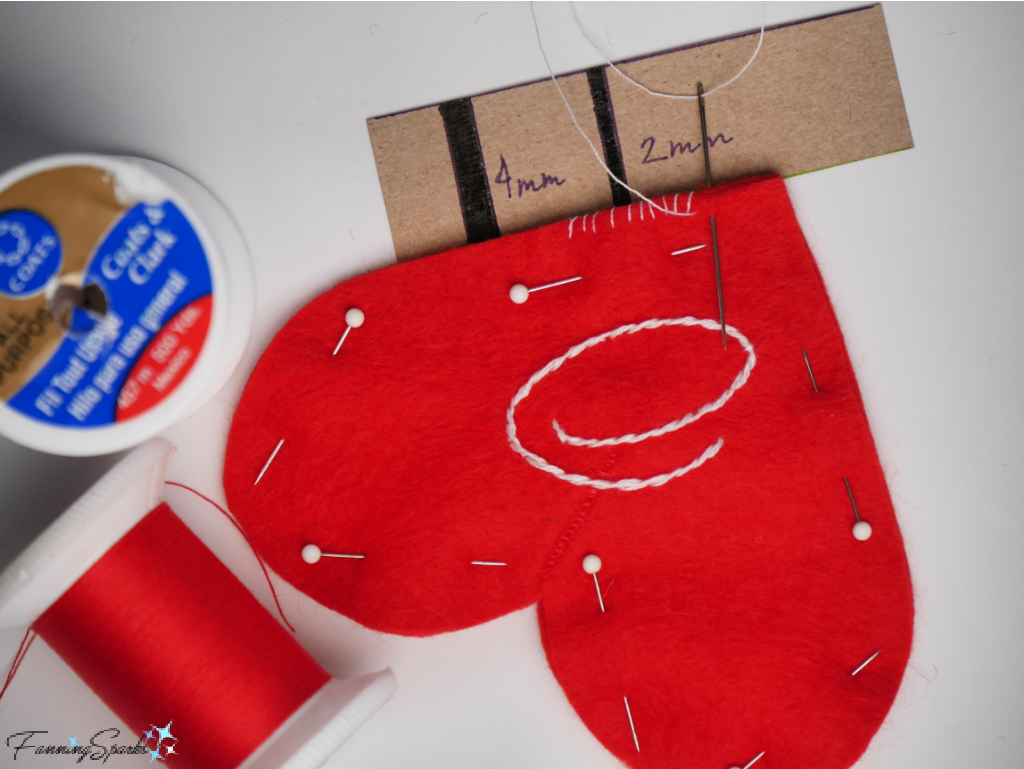 Step 6 Fill Heart Working over a container or bowl, insert a small funnel into the unsewn opening in the heart. Use a spoon to slowly scoop the millet into the funnel. Carefully tamp down the millet so it runs into the heart. Remove funnel. Spoon small amounts of millet directly into the heart. Use the spoon handle, or a thin stick such as a chopstick, to gently push the millet into all the sections of the heart.
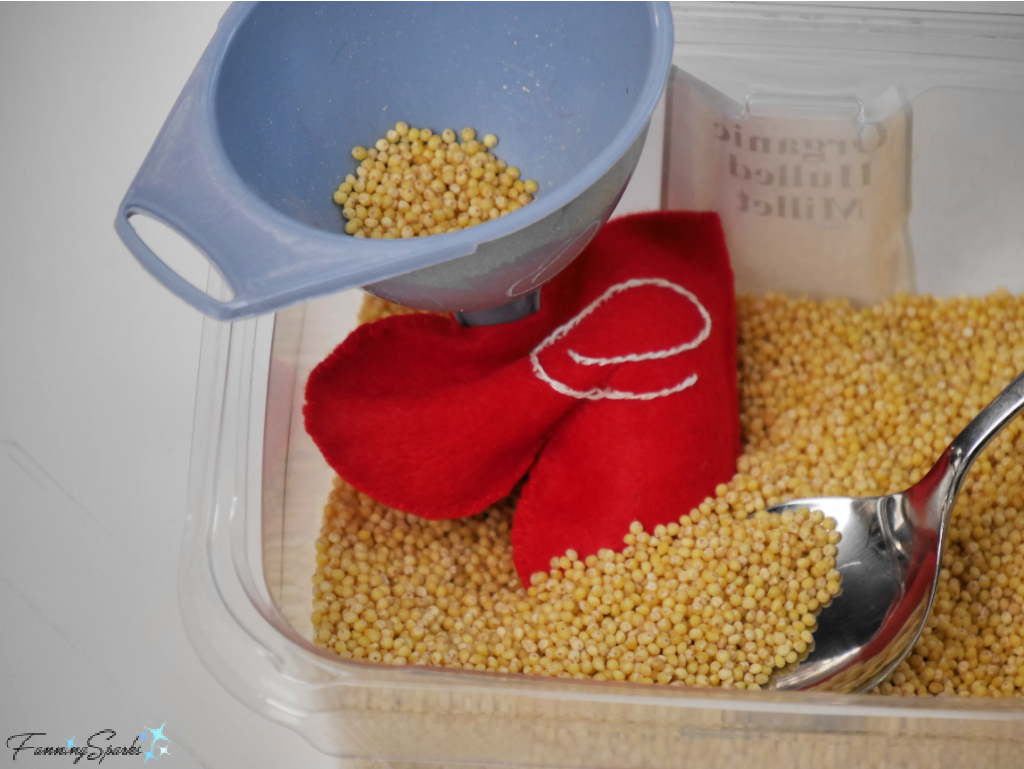 Fill the heart as full as possible while ensuring you can still grasp the edges of the opening. Pin the opening. Sew the opening closed with a whipstitch/ overcast stitch. Repeat on 2 remaining hearts.
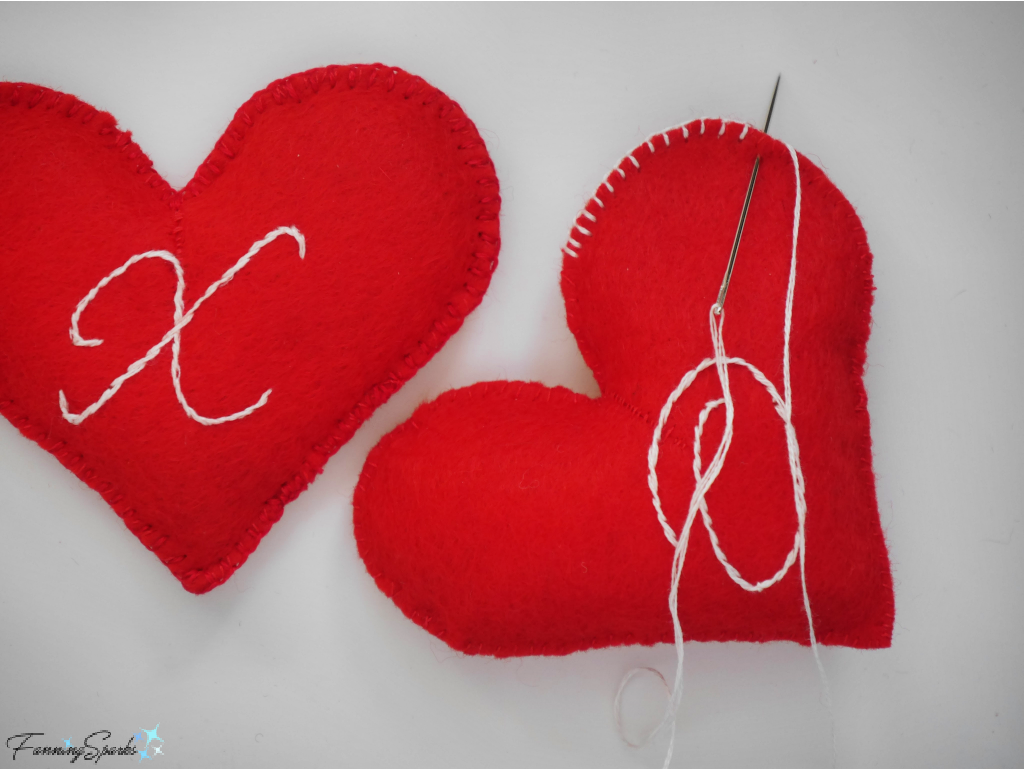 Step 8 Cut Pouch Parts Cut TWO 10” x 6 ½ “ rectangles from white felt. Cut TWO 7 ½“ lengths of 1” red grosgrain ribbon. Cut THREE small applique hearts from red felt using the method described above in Step 2.
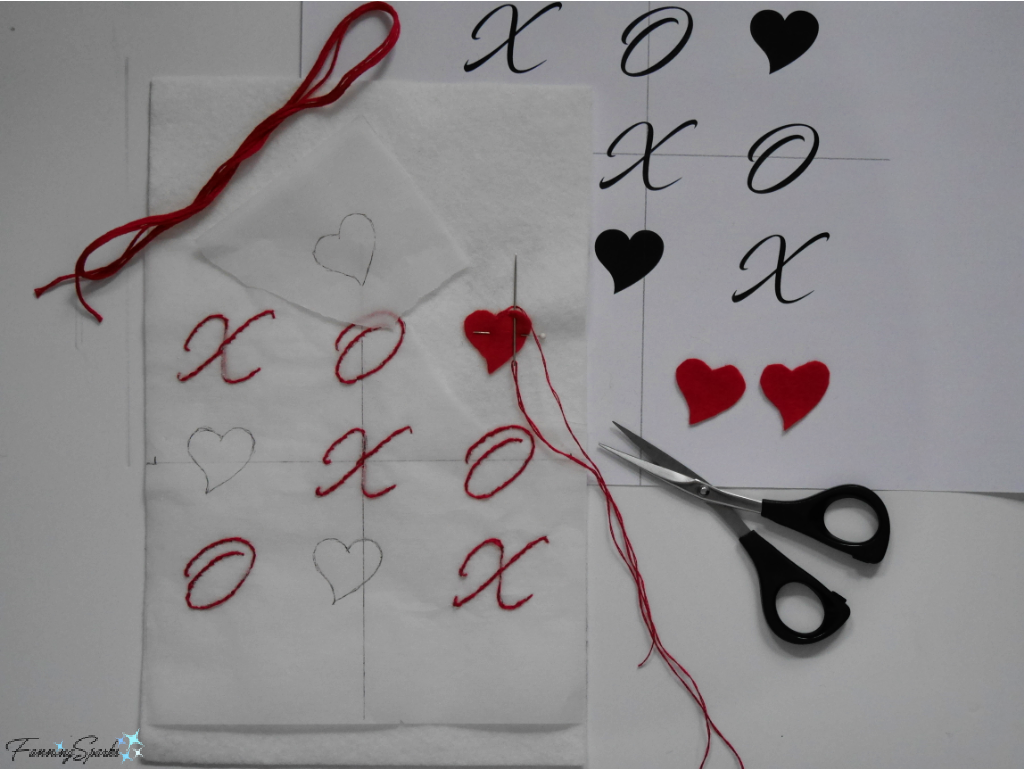 Repeat for the remaining 2 small hearts. After stitching is completed, carefully tear away the remaining tissue paper. It’s best to press down on the embroidery stitches with the fingers of one hand while tearing the tissue paper with the other hand.
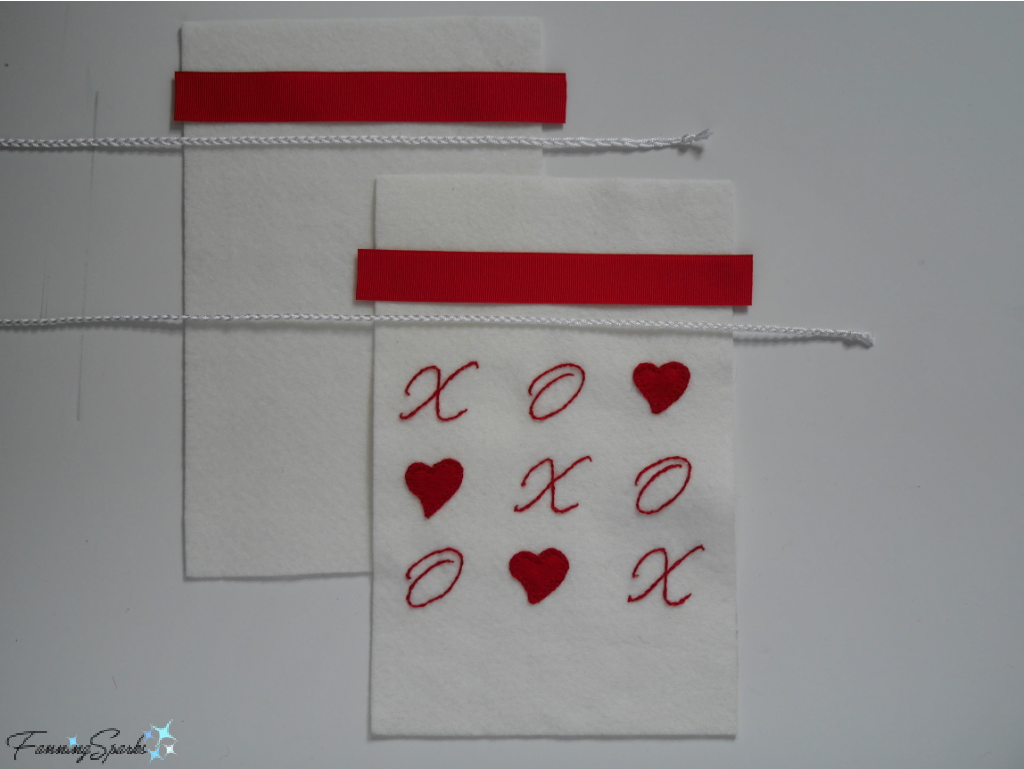 Start by making the casing. Place front pouch panel on working surface with the wrong side facing up. Fold down 1½“ from the top edge. Press. Unfold top edge. Place front pouch panel on working surface with right side facing up. Measure down ½” from pressed fold edge and align top edge of grosgrain ribbon with this line—top edge of ribbon is 2” from top edge of panel. Pin ribbon in place. Ends of ribbon should extend over side edges by ½“. Fold ribbon ends to the back side of the panel. Pin and stitch ribbon ends at the side edges of the front pouch panel. Repeat with back pouch panel.
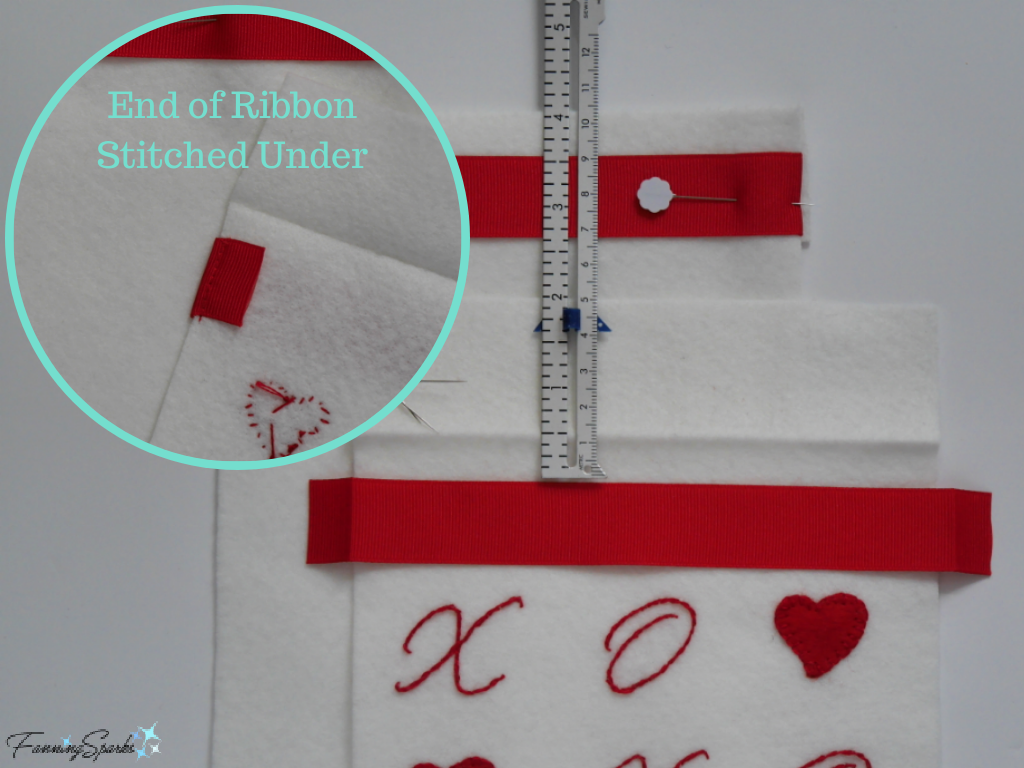 Place front pouch panel on working surface with the right side facing up. Refold the top edge to the back at the pressed fold which is 1½” from top edge. Ensure ribbon is placed straight and level at ½” from folded edge. Pin ribbon in place. Stitch across the panel along the top and bottom edges of the ribbon. Repeat with back pouch panel.
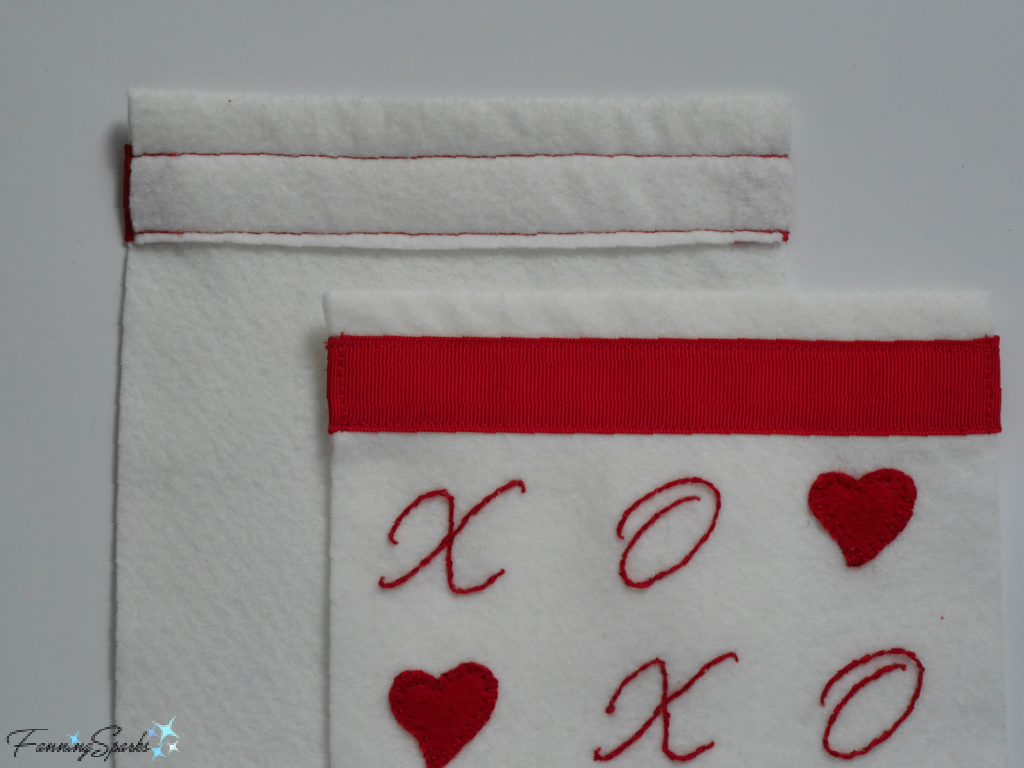 Prepare to sew front and back pouch panels together. Place back pouch panel on working surface with wrong side facing up. Place front pouch panel on back panel with right side facing up. The two panels should match and the ribbon ends should align. Pin in place. Stitch ¼” seam along the sides and bottom—beginning and ending at the bottom edge of the ribbon.
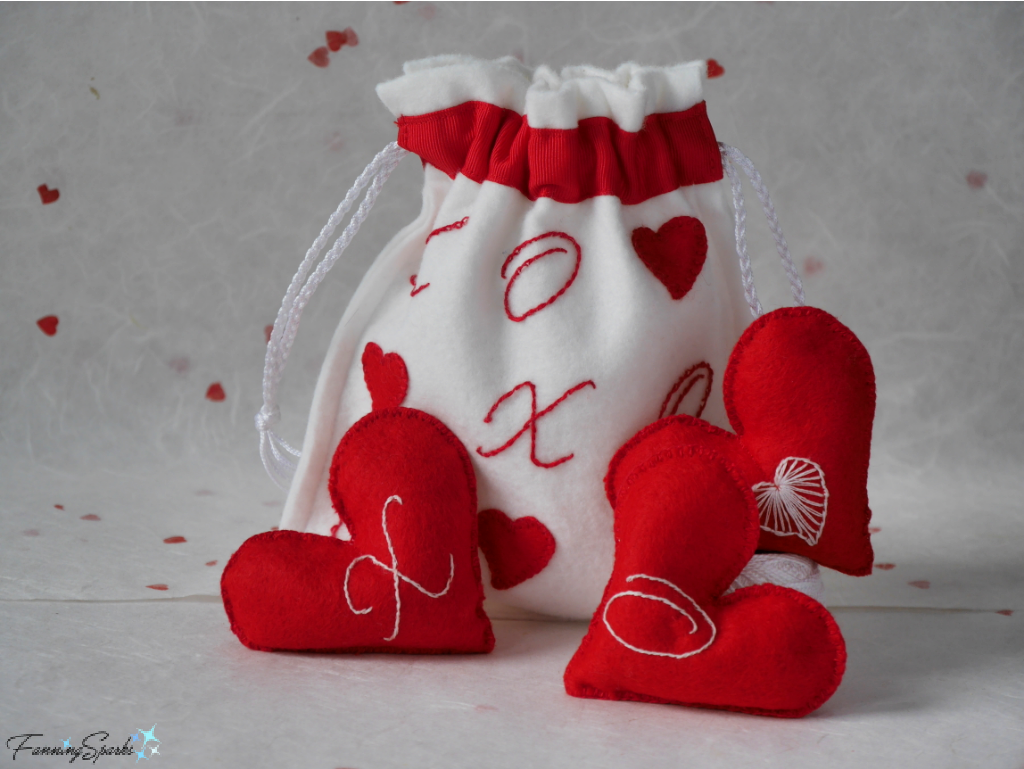
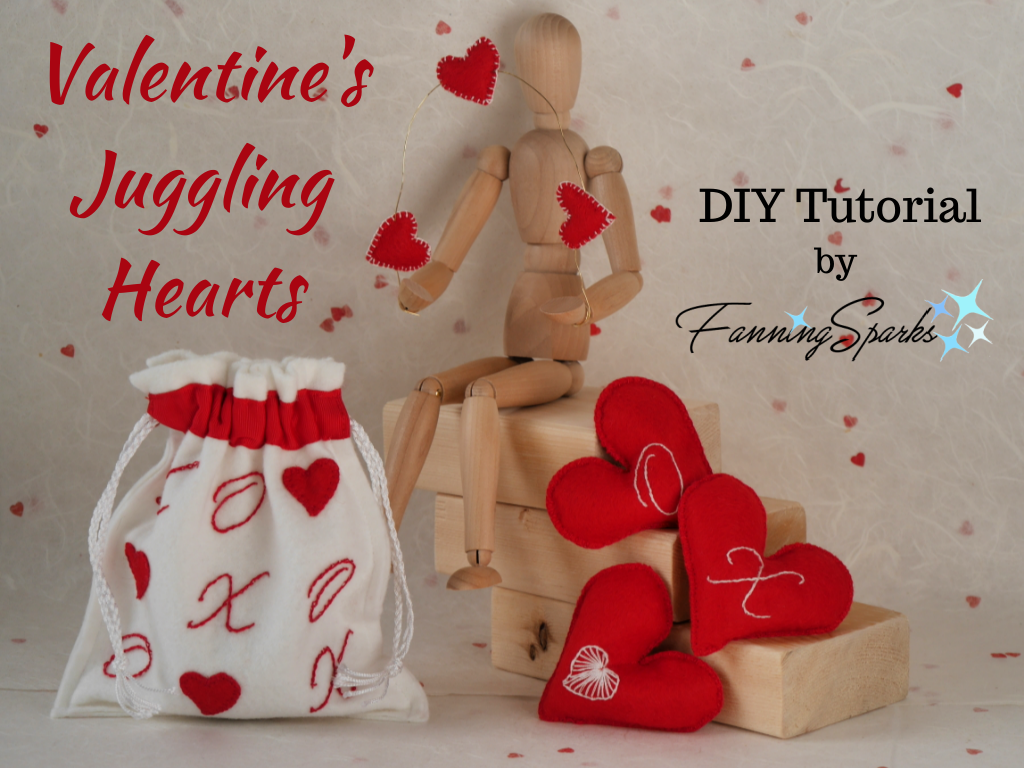
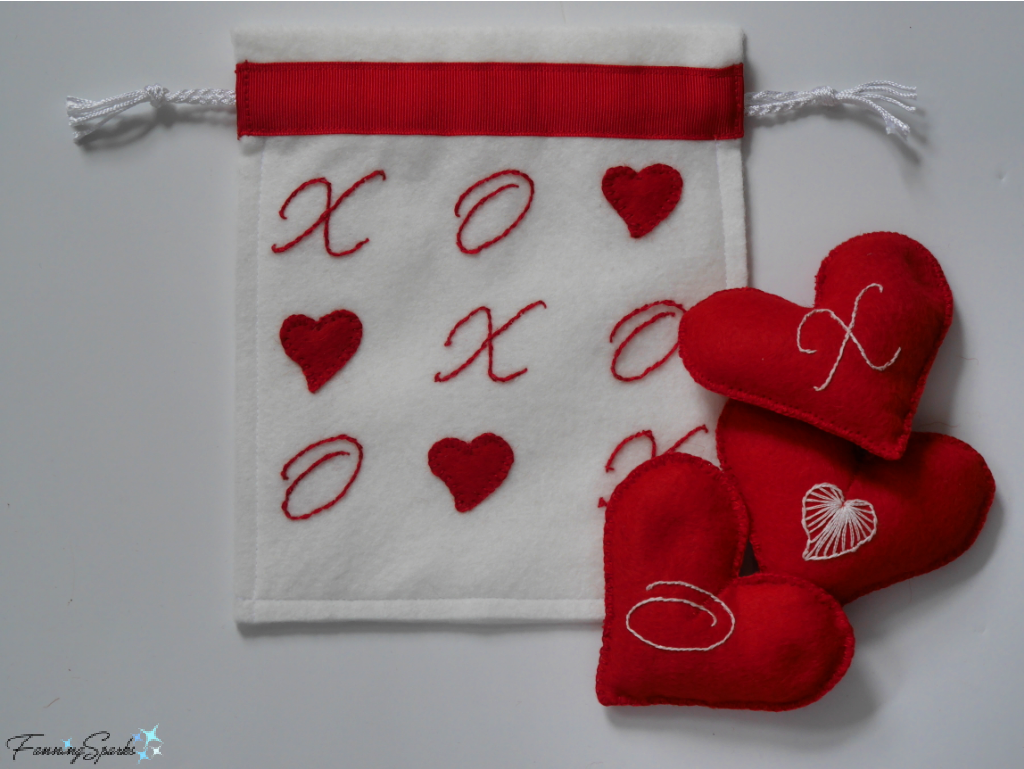 Your Valentine’s Juggling Hearts are ready to share with a fun-loving person in your life. Happy Valentine’s Day!
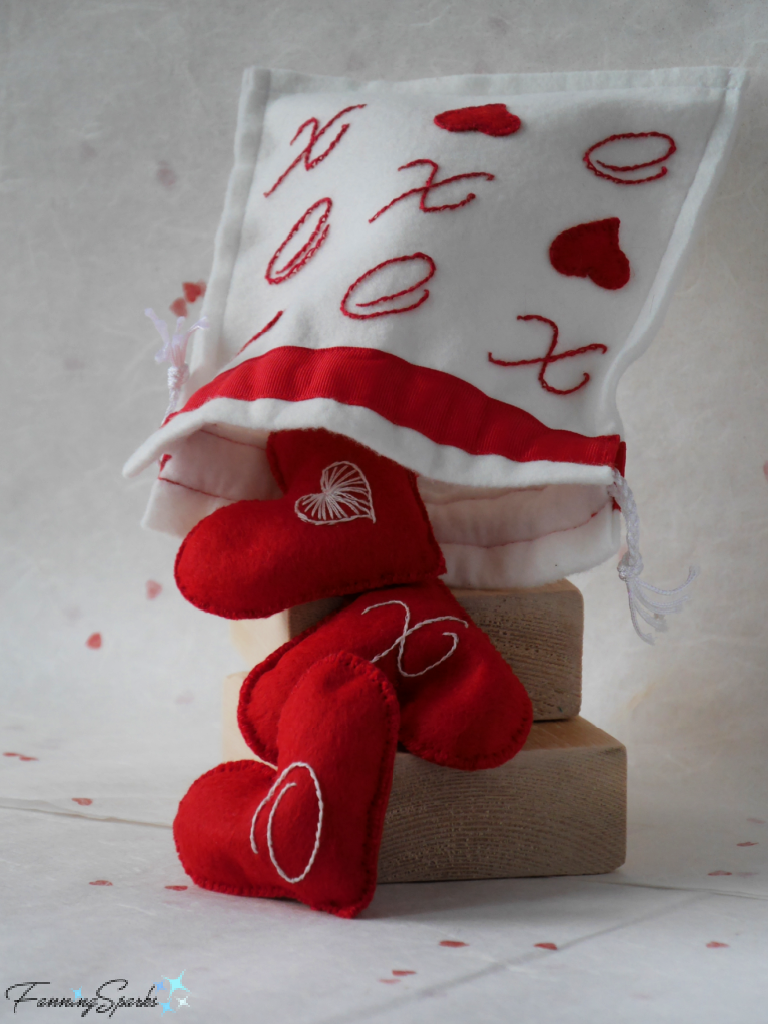

 Our hotel was in the Montmartre district close to the beautiful Sacré-Coeur Basilica.


 Despite the cool wintertime temperatures, there were lots of people strolling along the Via Partenope enjoying Naples’ seaport.
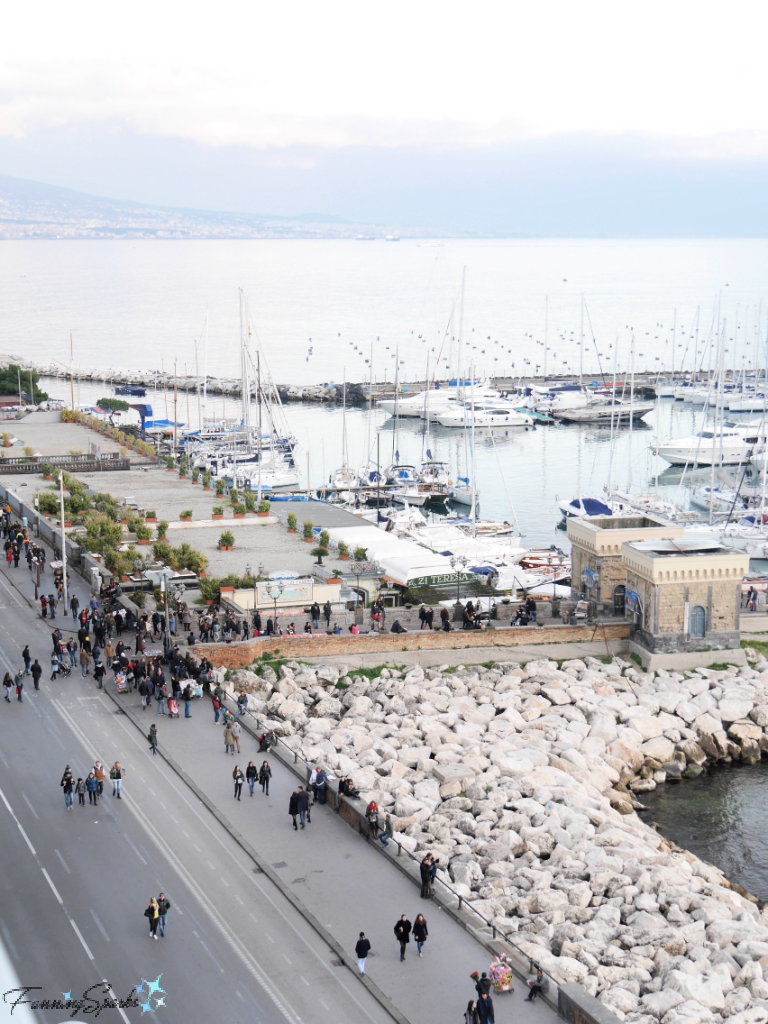 There were many beautiful views on that trip to Italy. We rented a car and drove along the magnificent Amalfi Coast. We spent a couple of nights in the small, scenic town of Ravello which is designated as a UNESCO World Heritage Site. The town was magical and the views were spectacular. This was the view from our hotel room balcony.
 Here’s the same view at night.


 That brings me full circle—back home to Georgia and our beautiful views of Lake Oconee. Sunrise over the lake is always beautiful but some conditions, such as a drastic temperature change, saturate the color and heighten the drama.