Found object assemblage, reclaimed creations or garbage design—whatever you choose to call it—the trend to upcycle, repurpose and transform discarded materials is gaining momentum.
Fans of NBC’s Making It reality crafting show know that this season’s Master Maker excelled at upcycling.  In his contestant application, Adam Kingman said “I’m most keen on turning discarded items into something unexpected… something a little useful, almost magical”.  He demonstrated several innovative ways to reuse materials in the projects he made during the show.  Used climbing ropes, for instance, were repurposed into lampshades, door mats and even furniture.  Kingman’s focus on “clever solutions with a sustainable footprint” was cited as one of the reasons he was awarded the top spot.
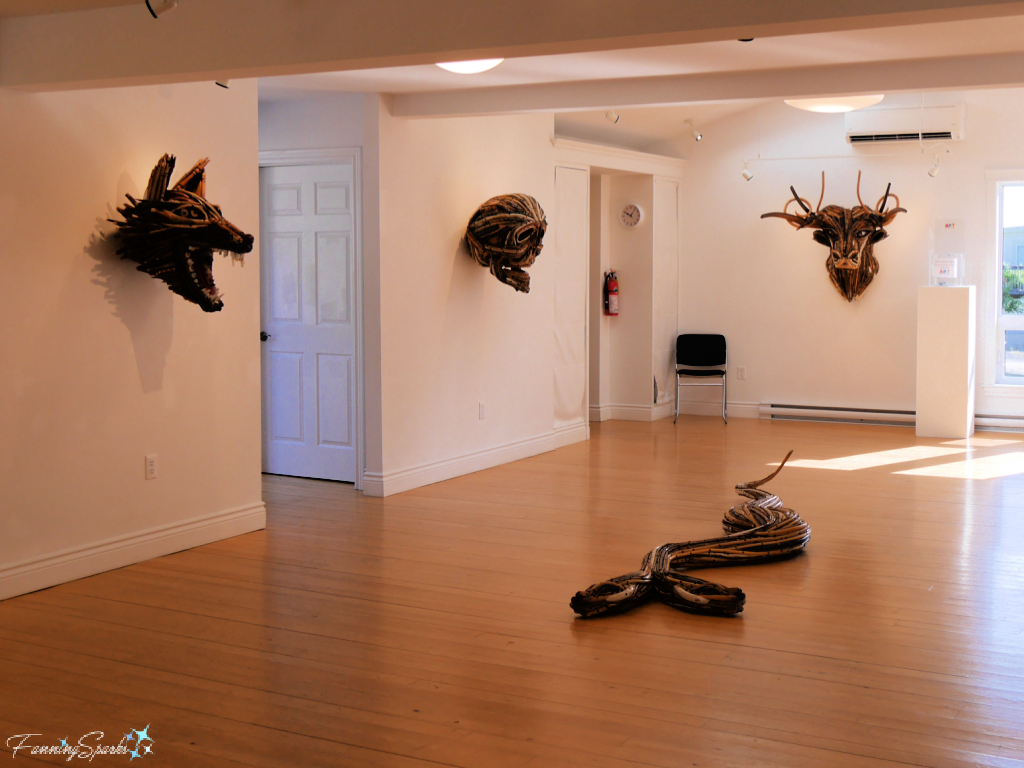
A recent exhibition at the Chester Art Center in Nova Scotia showcased Johnston Foster’s found object assemblage work.  Entitled Olde Growth, this body of work consisted of 9 splendid sculptures.
Olde Growth Exhibition at Chester Art Center   @FanningSparks
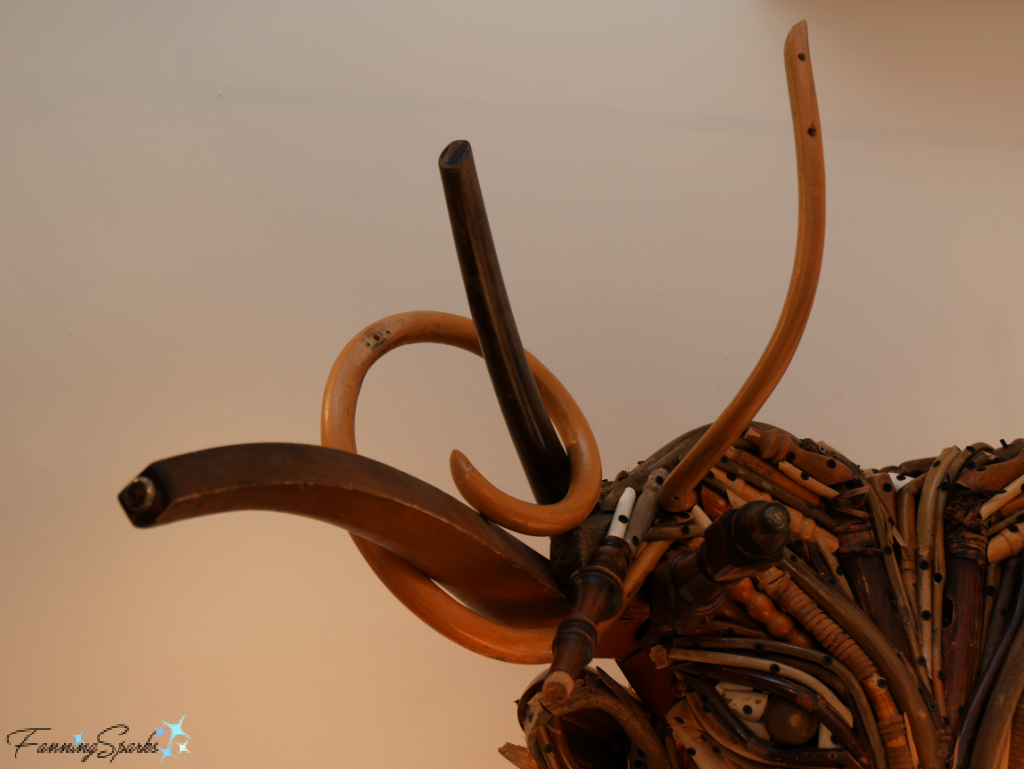
My favorite was this striking work called Maze Cutter.
Maze Cutter by Johnston Foster   @FanningSparks
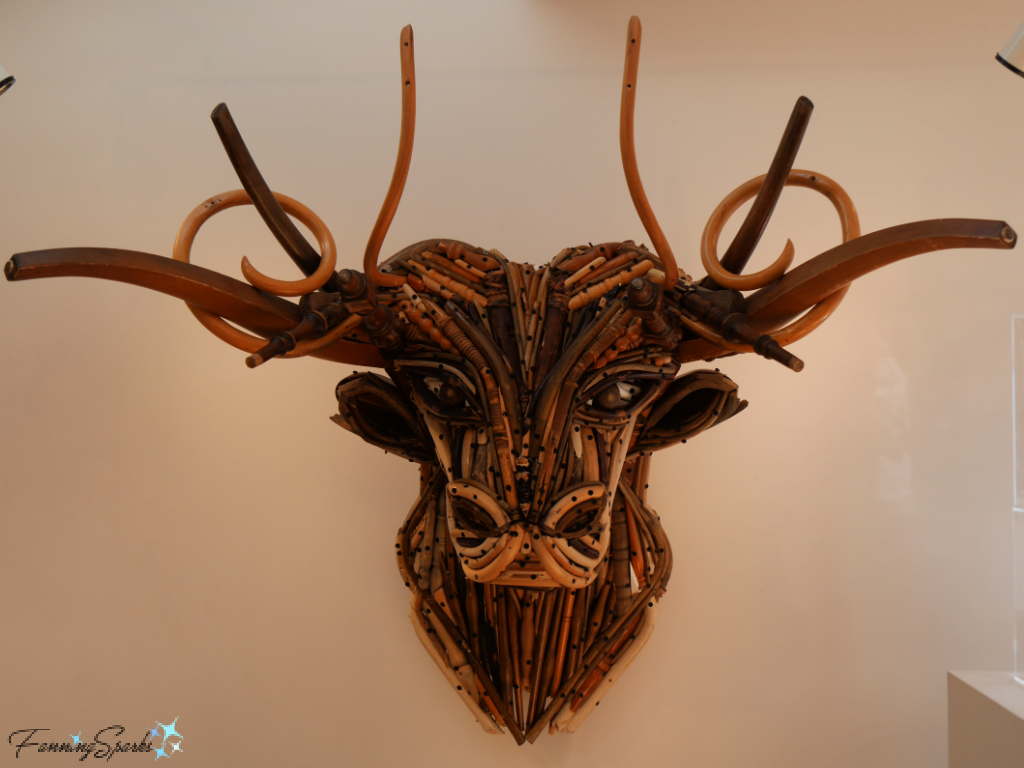
Foster’s Maze Cutter is amazing—the bull is majestic, fierce and intense.
Closeup of Maze Cutter by Johnston Foster   @FanningSparks
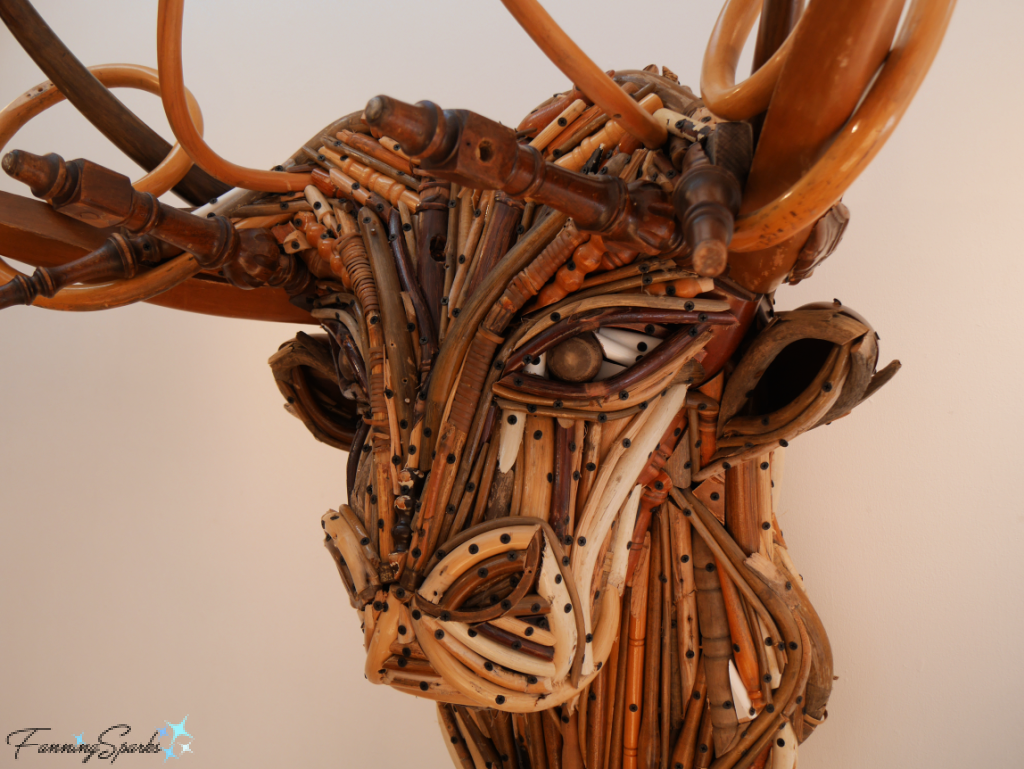
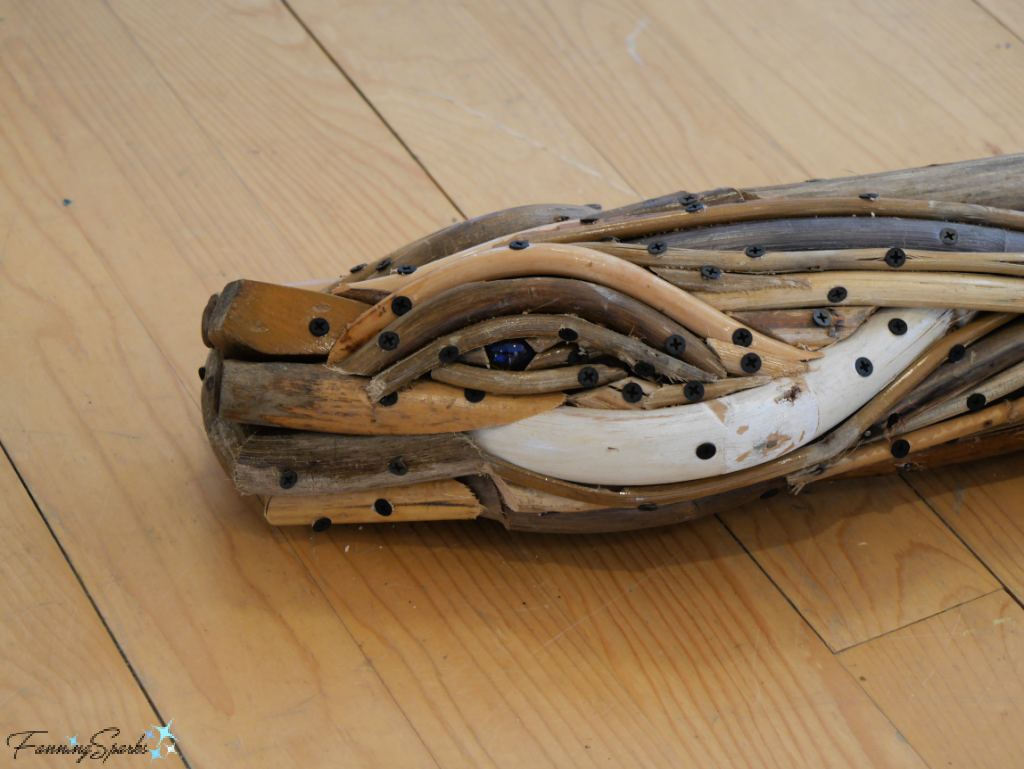
As I looked more closely, an astonishing secret was revealed!  The sculpture is made of chair backs, table legs, wooden spindles and various other bits of furniture screwed together with drywall screws.
Horns on Maze Cutter by Johnston Foster   @FanningSparks
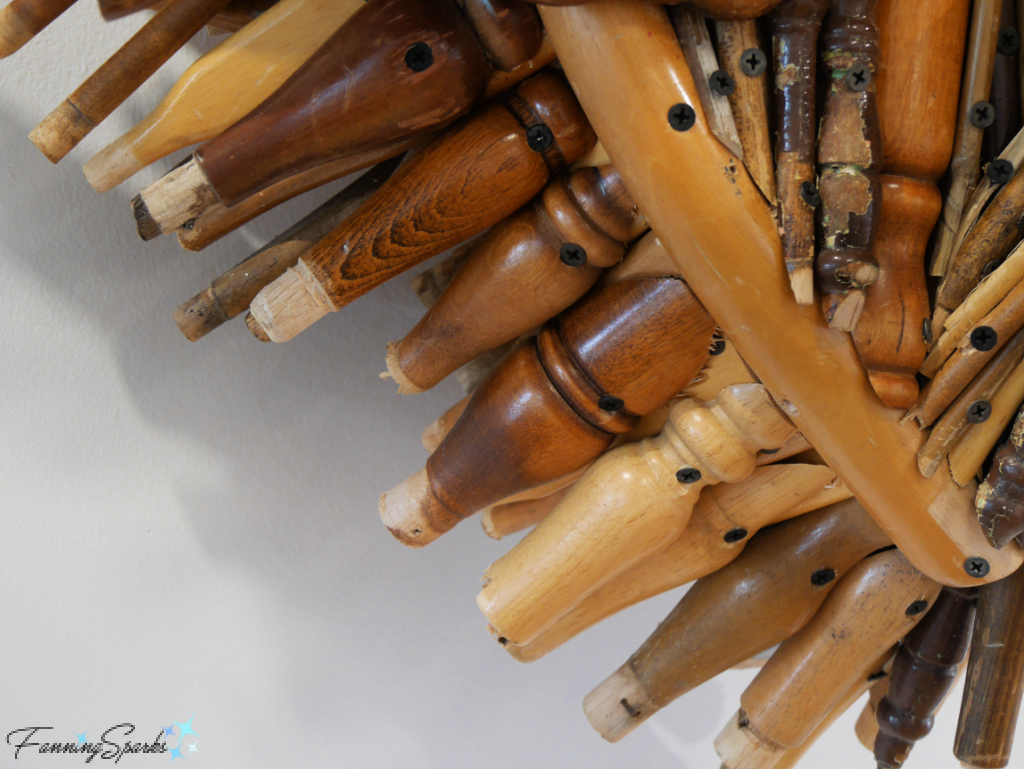
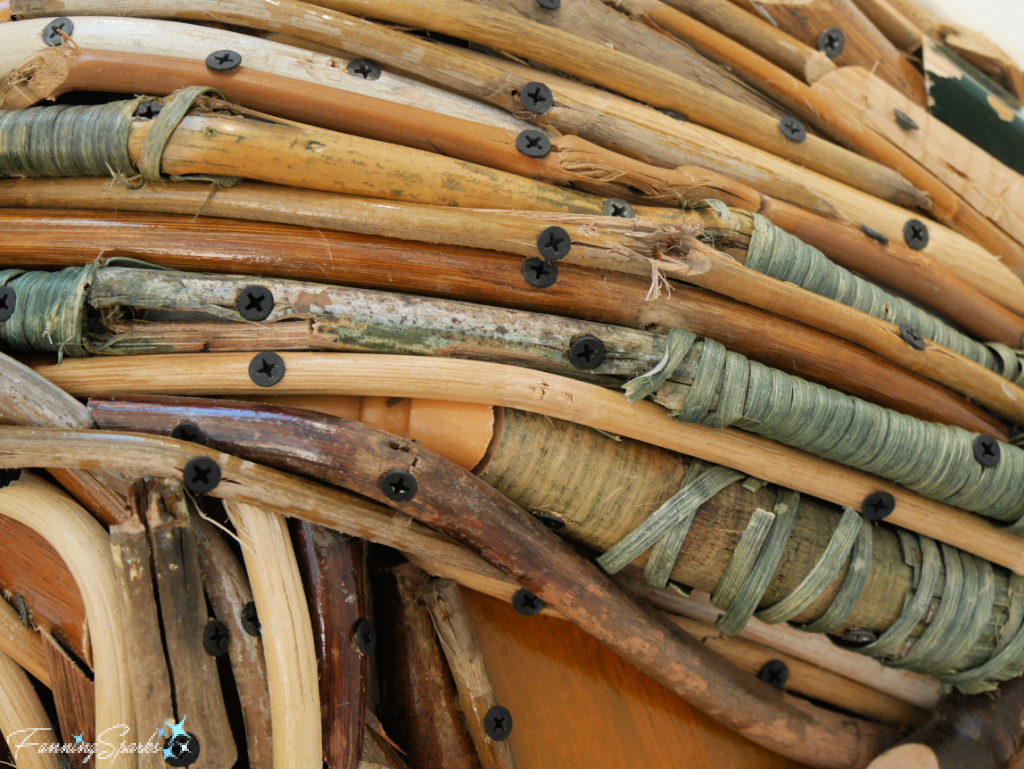
As stated in the exhibition program “Pulling from his immense inventory of salvaged/repurposed objects and materials, Foster has reduced the sculptural medium of his production to a single material: discarded and broken wooden furniture. …His initial attraction to discarded and broken wooden furniture was its abundance and variety in form, texture and malleability.  … Foster could not ignore the history, experience and energy each piece of furniture contained”.  Here’s a closer look at some of the components incorporated into his works.
Details from Garuda by Johnston Foster   @FanningSparks
Details from Denominator by Johnson Foster   @FanningSparks
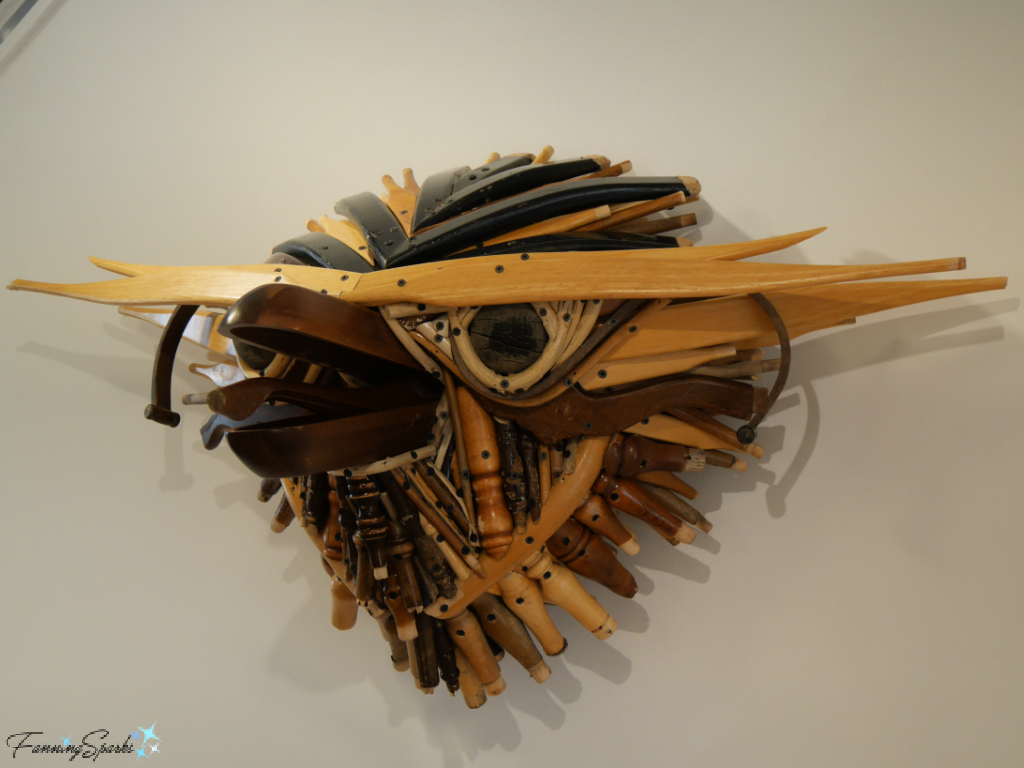
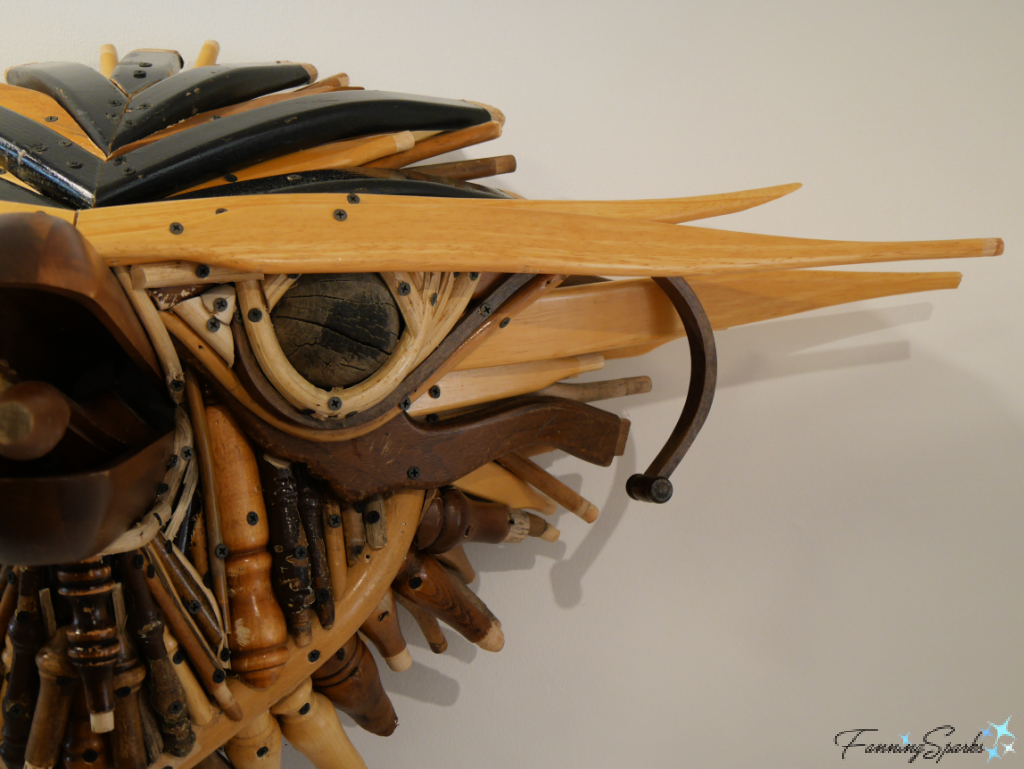
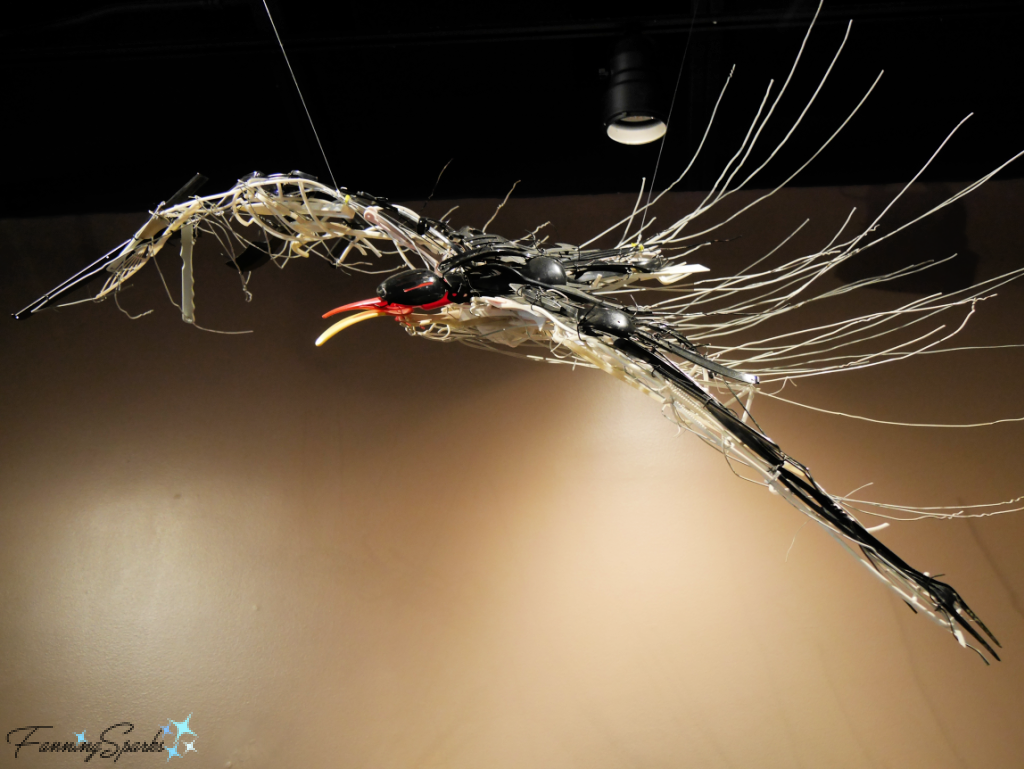
Foster’s reclaimed sculptures were inspired by anatomy, mythology and the animal kingdom.  Hindu methodology, for instance, includes Garuda which is a legendary bird or bird-like creature with a mix of eagle and human features.  This is Foster’s Garuda.
Garuda by Johnston Foster   @FanningSparks
Closeup of Garuda by Johnston Foster   @FanningSparks
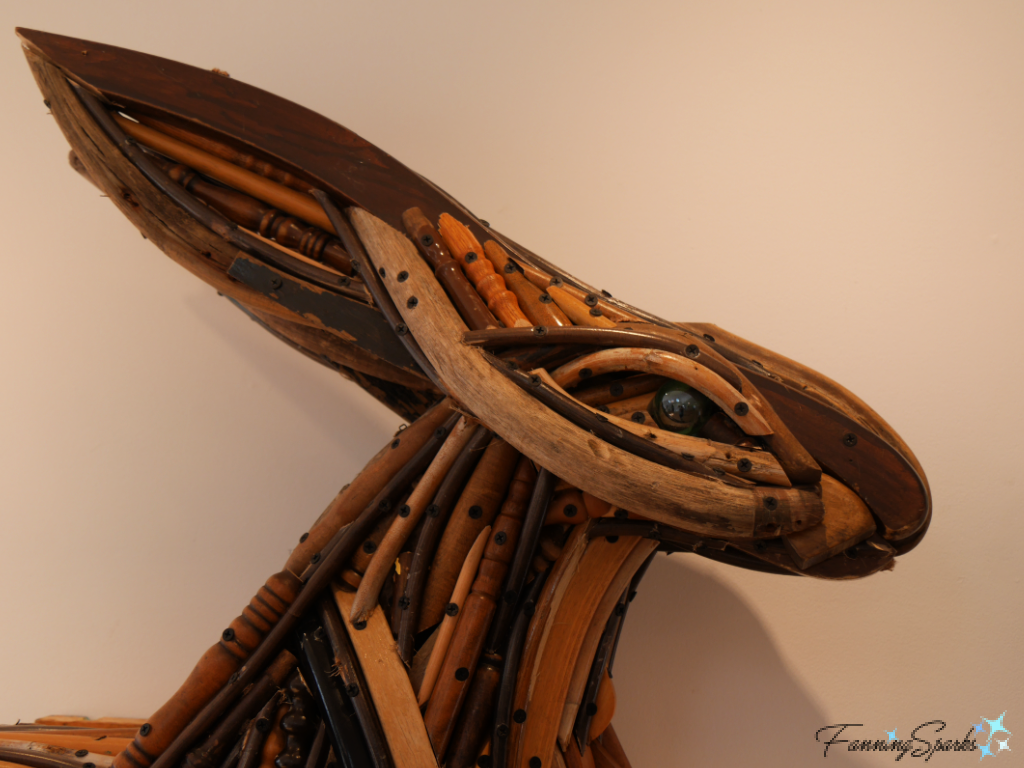
El-ahrairah is a rabbit folk hero from Richard Adams’ book Watership Down.  This is Foster’s sculpture El Ahrairah.
El Ahrairah by Johnston Foster   @FanningSparks
Closeup of El Ahrairah by Johnston Foster   @FanningSparks
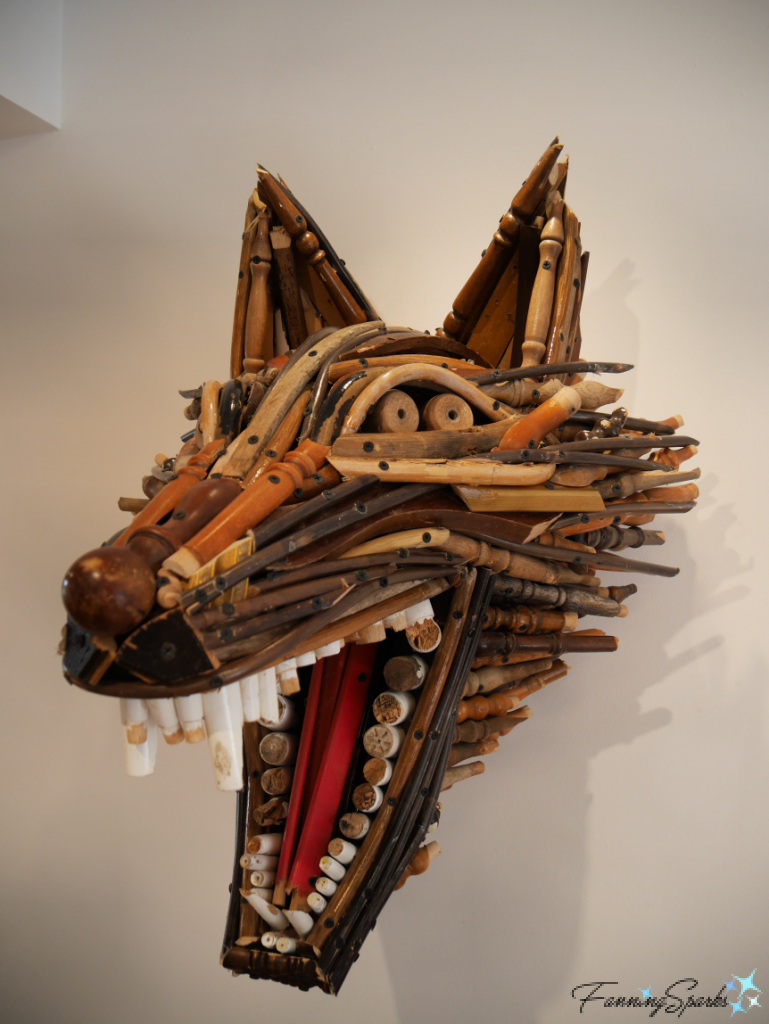
Fenrir is the most infamous of the many wolves in Norse mythology.  According to author Daniel McCoy, Fenrir ran “throughout the world with his lower jaw against the ground and his upper jaw in the sky, devouring everything in his path”.   This ferocious sculpture is Foster’s The Fenrir.
The Fenrir by Johnston Foster   @FanningSparks
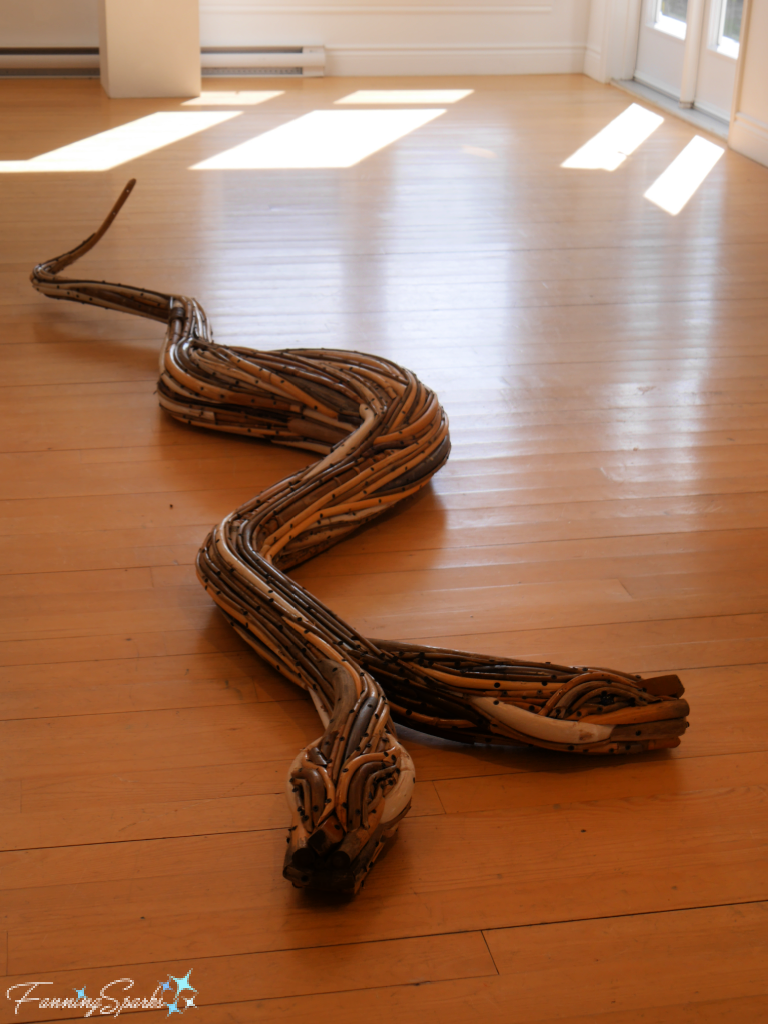
It’s fascinating to see broken furniture transformed into stunning sculptures but there’s a deeper message to be considered.  As explained in his artist statement, “Foster’s material of choice and in turn his creations reflect on our environmental cross roads, globalization, notions of craft and the consequences of uninhibited consumerism.  These assemblages are meant to inspire a sense of magic and wonder but also offer critical self-reflection.”  Perhaps this is the message behind his piece called The Fork in the Road. This 10-foot long, two-headed snake was displayed in the center of the gallery floor.
The Fork in the Road by Johnston Foster   @FanningSparks

Closeup of The Fork in the Road by Johnston Foster   @FanningSparks
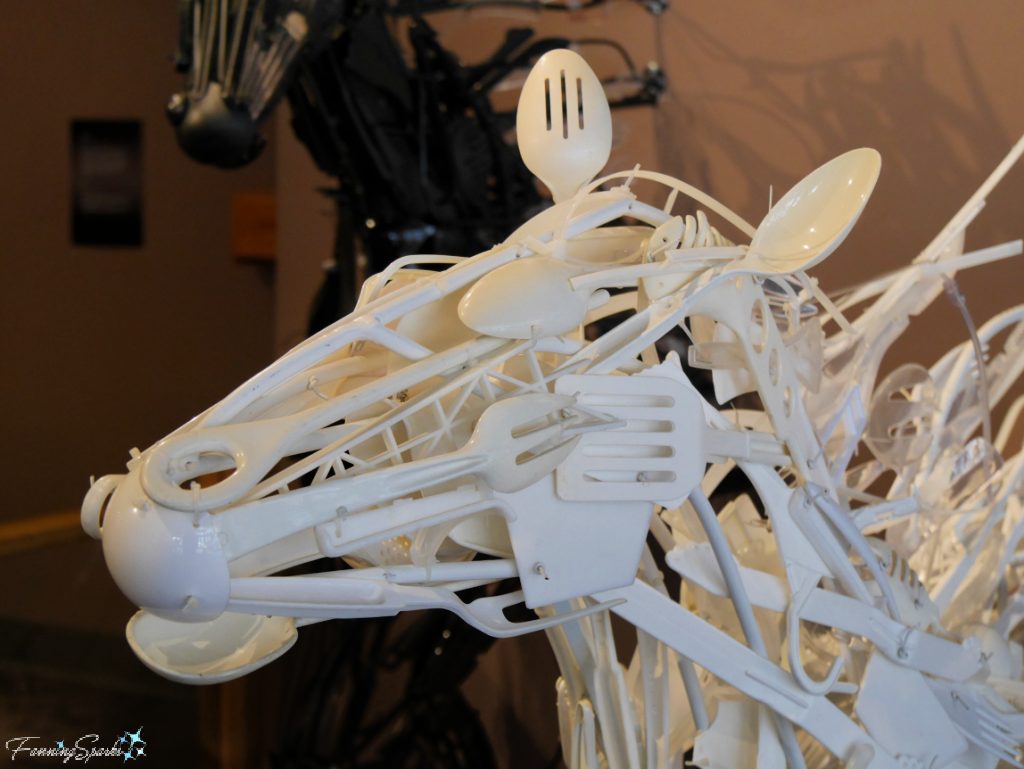
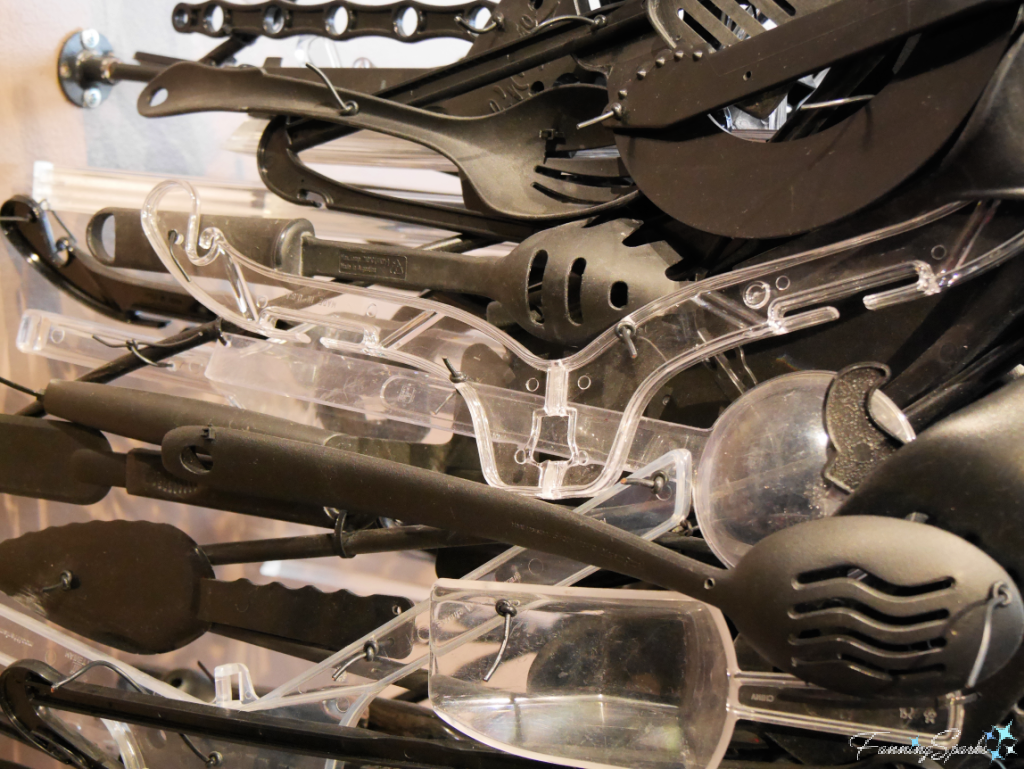
Some time ago, I had the opportunity to view a similar exhibition of reclaimed creations.  Artist Sayaka Ganz’s working material of choice was discarded plastic.  Her artist statement explained “I use plastics because of the variety of curvilinear forms and colors that are available.  I manipulate and assemble them together as brush strokes to create an effect similar to a van Gogh painting but in three-dimensional form.
Black Bird Reclaimed Creation by Sayaka Ganz   @FanningSparks
Black Horse Reclaimed Creation by Sayaka Ganz   @FanningSparks
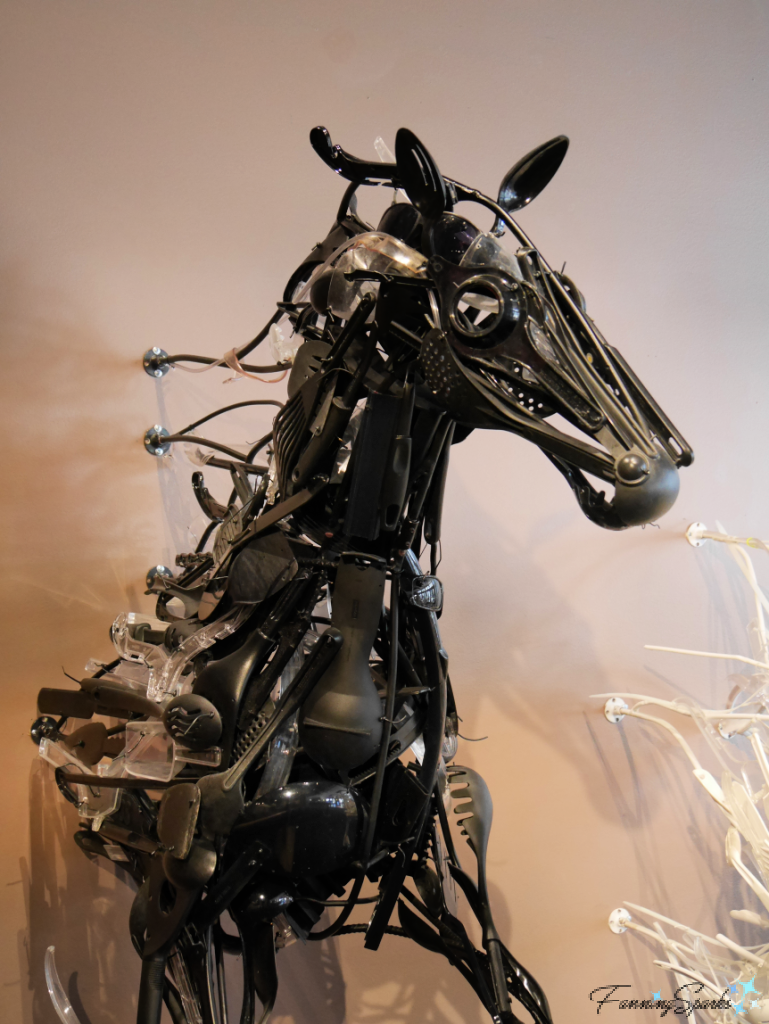
This artist has a unique connection with the reclaimed materials she uses for her sculptures.  “From a young age, Sayaka Ganz was influenced by the Japanese Shinto belief that all objects and organisms have spirits, and if these objects are discarded before their time they weep inside the trash bin.  This idea is the foundation that has shaped Sayaka and her sculptures.  Her strong artistic voice is expressed through her exclusive use of objects that have been discarded.  … She finds the process of reclamation and regeneration liberating.”  A closer look reveals the secret of Sayaka Ganz’s work.
Closeup of White Horse Reclaimed Creation by Sayaka Ganz   @FanningSparks

Closeup of Black Horse Reclaimed Creation by Sayaka Ganz   @FanningSparks
Circling back to NBC’s Making It winner, Adam Kingman presents this thought-provoking challenge under Garbage Design on his website: “How can we raise awareness of what we throw in the garbage?  Furthermore, can we take a surplus of unexpected, single use items, and create a positive conversation starter?  Our planet is riddled in garbage and plastic. I’ve designed outdoor gear for the past five years and have come to realize very few of us need more of anything. We already have what we really need. On a long drive through West Texas, I was upset with the rubbish strewn across the landscape. What’s the fate of this garbage? the planet? our outlook on it all?

More Info

Finding new ways to use old, discarded materials is an ongoing theme here on FanningSparks’ blog.  I’ve decided to add a new REPURPOSE sub-category in the MAKE section.  Check it out to see all my blog posts which share ideas for transforming, upcycling and repurposing.
NBC’s Making It is a lighthearted competition series, hosted by Amy Poehler and Nick Offerman, which celebrates the creativity and craftiness in all of us.  You can learn more about Adam Kingman, season 3 Master Maker, on his website or Instagram account.
Johnston Foster is an American artist living in Bedford, Nova Scotia.  Check out his website and Instagram account.  His exhibition, Olde Growth, was hosted by the Chester Art Center in Nova Scotia.
Sayaka Ganz was born in Japan and grew up living in Japan, Brazil and Hong Kong.  You can learn more on her website or Instagram account.

Today’s Takeaways

.1. “These assemblages are meant to inspire a sense of magic and wonder but also offer critical self-reflection.”
.2. Consider the “consequences of uninhibited consumerism”.
.3. Look for ways to use old, discarded materials.
Peg - FanningSparks Author

One of the many joys of visiting the Maritime Provinces in eastern Canada is a leisurely stroll around one of the charming seaside villages.  The historic villages of Chester, Nova Scotia; Victoria, Prince Edward Island; and Parrsboro, Nova Scotia are all picture postcard perfect.  Each has its own personality and charm yet there are many similarities.  All three seaside villages are surrounded by natural beauty.  They honor their sea-faring roots and take care to preserve their heritage.  They foster creative, artistic communities keeping them active, vibrant and viable.
Map Showing Villages of Chester, Victoria and Parrsboro, Canada    @FanningSparks
Chester, Victoria and Parrsboro all have a history of ocean-based commerce including shipping, shipbuilding and fishing.  These industries are no longer their primary focus but the sea continues to play a big part in these communities today.  For instance, the waters around Chester are well-known for yachting, sailing and kayaking.  Every August, the Chester Yacht Club hosts Chester Race Week which is Canada’s largest keelboat racing regatta.
This awe-inspiring view greets visitors at the Chester Yacht Club wharf.
Harbor View from Chester Yacht Club, Nova Scotia     @FanningSparks
Beautiful vistas and nautical scenes capture one’s attention all along Chester’s waterfront.
Row of White Boats at Chester Yacht Club
Two Sailboats in Chester Harbor, Nova Scotia        @FanningSparksDinghies at Wharf in Chester, Nova Scotia        @FanningSparks
The ocean-based commerce in these coastal villages was in its heyday in the 1800s.  It led to considerable prosperity which the citizens invested in their homes and communities.  These picture postcard coastal villages are their legacy.  The current homeowners in Victoria, or Victoria-by-the-Sea as they’ve branded the community, obviously take pride in their homes and surroundings.  Here are a few photos from this picturesque village.
Bardin St Building in Victoria, Prince Edward Island   @FanningSparks
Front Door of Turquoise House in Victoria, Prince Edward Island   @FanningSparks
Gable of Turquoise House in Victoria, Prince Edward Island      @FanningSparks
Old Red Barn in Victoria, Prince Edward Island      @FanningSparks
Old Grey Barn with Buoys in Victoria, Prince Edward Island      @FanningSparks
Current residents of these communities celebrate and nurture a creative spirit through art programs and events, theatres and playhouses, art galleries and studios.  Parrsboro, for instance, encourages visitors to “Explore.  Dream.  Create in our inspiring community.”.  Every year, Parrsboro hosts Canada’s largest outdoor painting festival—the Parrsboro International Plein Air Festival.  As explained on the Parrsboro Creative website, “‘En plein air’ is a French expression meaning “in the open air”. It describes the art of outdoor painting, using specific skills to capture landscapes and views in natural light. Plein Air painting requires adaptability to a changing environment and speed in applying painting techniques.”
The 2021 Plein Air Festival was underway when we visited Parrsboro.  In the below photo, well-known Nova Scotian artist Joy Laking puts the finishing touches on a street scene.
Joy Laking Painting at Parrsboro Street Corner, Nova Scotia        @FanningSparks
Locals might recognize this as the view from the Parrsboro Bandstand looking down Main Street.  I love how painters can capture what they see in their mind’s eye versus what’s actually in front of them.  For instance, notice how a scooter-rider has been inserted and the dominant Irving service station seen below…
Looking Down Main St from Bandstand, Nova Scotia        @FanningSparks
… has been skillfully eliminated from Joy Laking’s street scene.
Joy Laking Painting in Progress in Parrsboro, Nova Scotia        @FanningSparks
Nearby Partridge Island is a popular location for the plein air painters.  It’s little wonder—there is natural beauty in every direction!
Partridge Island Viewed from Beach in Parrsboro, Nova Scotia        @FanningSparks
We spotted artist Adam Tragakis capturing these stunning cloudy skies over the Fundy cliffs.
Adam Tragakis Painting at Partridge Island, Nova Scotia        @FanningSparks
Here’s how his painting had evolved a little over an hour later.  Splendid!
Adam Tragakis Painting in Progress at Partridge Island, Nova Scotia        @FanningSparks
Pictured below is the same view of the landscape.  Notice how Adam Tragakis expertly captured a slightly different scene—at the exact moment the dark, moody clouds dropped sheets of rain over the cliffs.
View from Partridge Island Beach, Nova Scotia        @FanningSparks
Chester, Victoria and Parrsboro may not get as much attention as some of the area’s bigger cities and more popular attractions. But this, I believe, works in their favor.  Author Stephen Kimber wrote “The Trans-Canada Highway bypassed Victoria. So did the shopping centres and tourist amusement parks.  And that – along with its independent-minded citizens – is what makes Victoria the enchanting, picture post card place it is today.”   The citizens of these villages have worked hard to build strong, creative communities and sponsor world-class events without compromising their character and uniqueness.  Well done, citizens of Chester, Victoria and Parrsboro!

More Info

You can learn more about visiting Nova Scotia and Prince Edward Island on their respective tourism websites or check out these FanningSparks’ posts:
. Solid as a Rock
Watching Humpbacks on the Bay of Fundy
We Dined on the Ocean Floor
The Perfect Reminder of Green Gables
Shutter Therapy in North Rustico
Beacons of Light
In Pursuit of Sea Glass
Falling Leaves and Floating Boats
First Light at Peggy’s Cove
Chester, Nova Scotia also provides information on its Village of Chester NS and Chester Race Week websites.
Check out the Victoria by the Sea website for more information about Victoria, Prince Edward Island.
More information about Parrsboro, Nova Scotia can be found on the Bay of Fundy website.  The Parrsboro Creative organization spearheads arts and culture in Parrsboro and organizes the annual Parrsboro International Plein Air Festival.
To learn more about the talented artists mentioned in this post, visit the Joy Laking Gallery website and Adam Tragakis on Instagram.  In fact, you can see the final result of the Parrsboro Plein Air painting we witnessed in this Instagram post.

Today’s Takeaways

1. Seek out lesser-known towns and villages when you travel.
2. Take time to explore with a leisurely stroll.
3. Consider and appreciate the efforts of the local citizens who keep these places picture postcard perfect.
Peg - FanningSparks Author

My Dad always used to joke that “The best crop to grow in Nova Scotia is rocks!”  After years of picking rock to clear farming land, he would have known.  Rocks may be a hindrance to farmers and gardeners but they are an integral part of the geological heritage of a place.
Nova Scotia, on Canada’s east coast, “has long been recognized for its rich and diverse geology” say authors J.H. Calder and G.J. DeMont in their article Geoheritage in Nova Scotia.  It is “a heritage that defines our landscape, is reflected in our industrial history, and has influenced some of the greatest ideas that have shaped human understanding of our place in the history of life.”
The iconic view of Peggy’s Cove lighthouse sitting proudly on huge granite rocks is a great example.   It is a “story of fire and ice: magma cooled deep in the Earth’s crust and 380 million years later was shaped by the last glaciers.”
Peggy’s Point Lighthouse at First Light, Nova Scotia @FanningSparksGranite Rocks at Peggy’s Cove Nova Scotia   @FanningSparks
The rocks along the coastline of nearby Island Rock Head, Nova Scotia are similar.  They originate from the Devonian to Carboniferous geological history period and are categorized as “granite batholith”.  Wikipedia defines a “batholith” as a “large mass of intrusive igneous rock … that forms from cooled magma deep in Earth’s crust”.
Coastline of Island Rock Head Nova Scotia   @FanningSparksRocks Along Shore of Island Rock Head Nova Scotia   @FanningSparks
A recent kayaking adventure in Prospect, Nova Scotia provided a different view of the dramatic shoreline.   Here the geology is described as an “erosional glacial landscape” originating from the Quaternary period.  The view shown below greets the visitor as they enter Lower Prospect.
Shoreline at Lower Prospect Nova Scotia   @FanningSparks
We kayaked to Hearn Island where we enjoyed a short hike and spectacular views.
Single Rock on Top Granite Boulders at Hearn Island   @FanningSparks
Sailboat Viewed from Hearn Island Nova Scotia   @FanningSparks
The geoheritage of the Digby, Nova Scotia area is noticeably different.  On Brier Island, the rocks are columnar basalt, cooled from magma in the Triassic period.   The columns along the shores of Seal Cove were eerily visible through the fog.
Brier Island Nova Scotia Along Seal Cove Trail in Fog   @FanningSparks
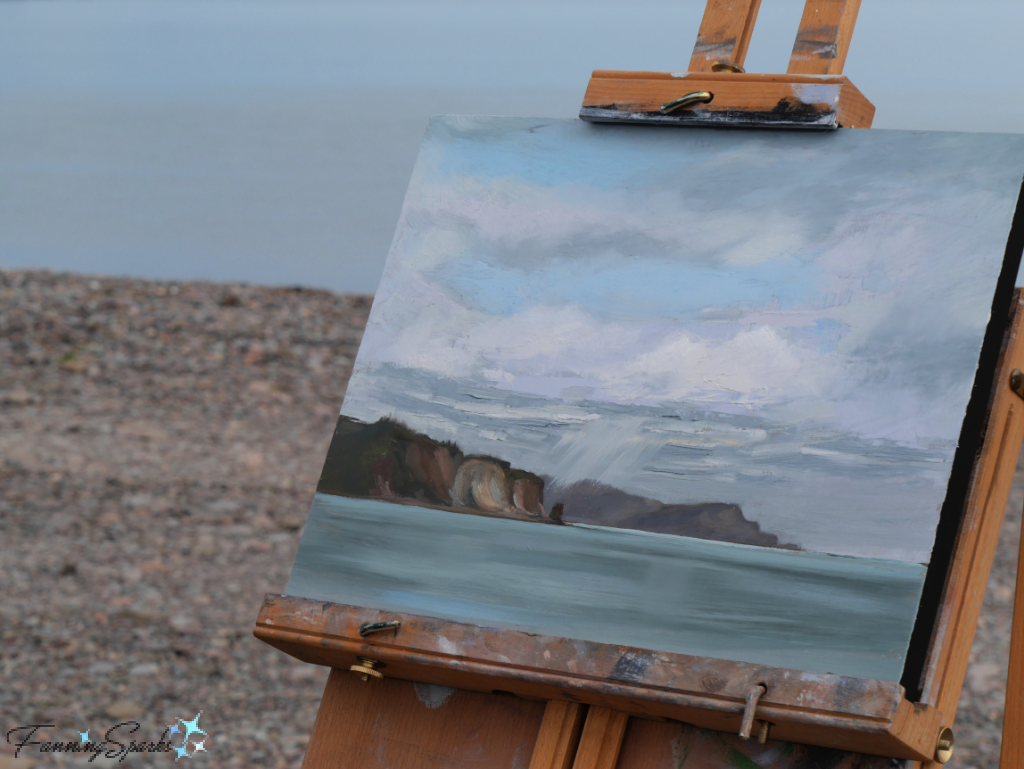
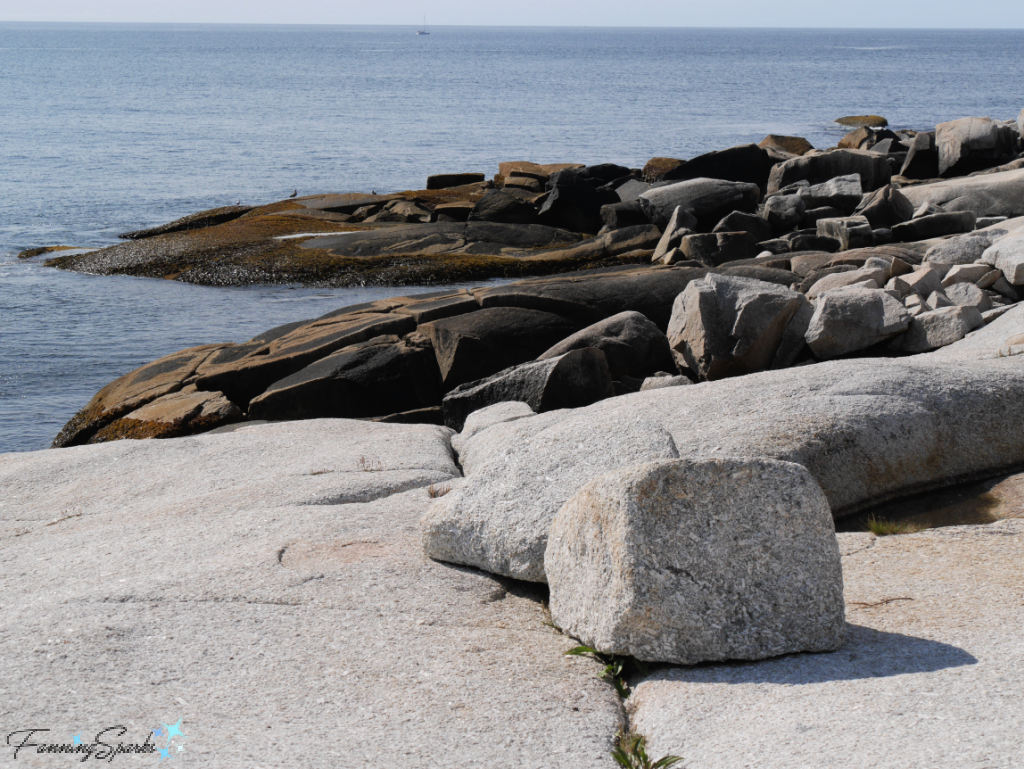
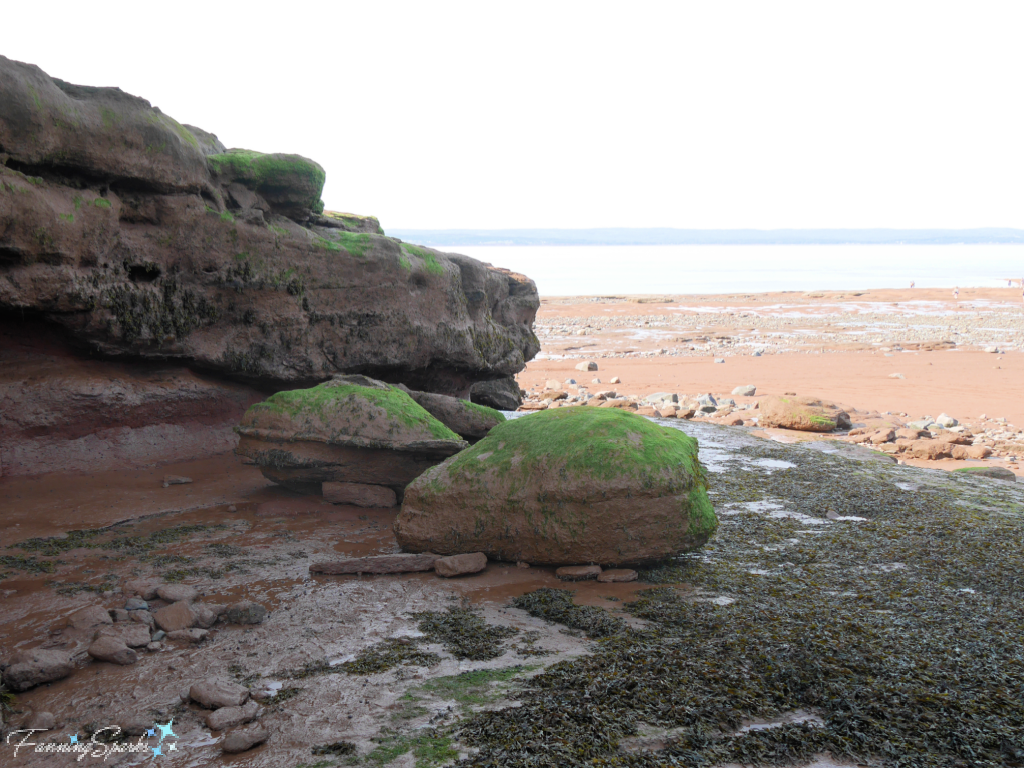
Fog also shrouded the rocky cliffs in the Nature Conservancy of Canada Reserve on the island’s west coast.
Foggy Coast in Nature Conservancy of Canada Reserve on Brier Island   @FanningSparks
This heart-shaped rock was propped up near the Brier Island Lighthouse.  How it came to be is a mystery.
Heart-Shaped Rock at Brier Island Lighthouse Nova Scotia  @FanningSparks
Arguably the most astonishing example of basalt columns is Balancing Rock in Tiverton on Long Island.  This 20-foot finger of volcanic rock, estimated to weigh 20 tonnes or more, is balanced precariously on the edge of the rock below.
View of Balancing Rock in Tiverton Nova Scotia   @FanningSparks
The basalt column, known as Nature’s Time Post, seems to defy gravity.
Column Balanced on its Tip at Tiverton Nova Scotia   @FanningSparks
The Bay of Fundy, the site of the world’s highest tides, provides yet another perspective of Nova Scotia’s geoheritage.  Burntcoat Head, for instance, holds a “fossil menagerie of life in the early days of the dinosaurs including creatures found nowhere else on Earth”.  Pictured below are the cliffs of Burntcoat Head in the warm glow of sunset.  Check out the post We Dined on the Ocean Floor for more photos and background on Burntcoat Head.
Cliffs at Burntcoat Head Nova Scotia   @FanningSparks
Interestingly, Nova Scotia boasts a UNESCO Global Geopark along the north shore of the Bay of Fundy.  The Cliffs of Fundy Geopark is one of only 163 UNESCO Global Geoparks around the world.  These geoparks are “single, unified geographical areas where sites and landscapes of international geological significance are managed with a holistic concept of protection, education and sustainable development.”
The Cliffs of Fundy UNESCO Global Geopark celebrates the highest tides in the world, honors the ethical space of the Mi’kmaw people and their oral traditions of cultural geoheritage, and provides evidence of the Earth’s incredible natural history with the massive Cobequid Fault.
On Partridge Island, in the Parrsboro area of the Geopark, visitors can enjoy an eco-tour hiking trail.  This is one aspect of the amazing view that rewards hikers at the trail’s lookoff.
Lookoff at Partridge Island Nova Scotia   @FanningSparks
It was low tide when we visited nearby Five Islands but the beautiful skies more than made up for the lack of water!
Magnificent Landscape and Sky at Five Islands  @FanningSparks
Nova Scotia is not the only Maritime province with an interesting geoheritage.  Most of Prince Edward Island’s north shore is rolling dunes and wide beaches of fine sand but Thunder Cove is different.  There a visitor will find sandstone cliffs, caves and sea stacks carved and shaped by the ocean and the winds.
Shoreline at Thunder Cove Prince Edward Island   @FanningSparks
The below sandstone sea stack is dubbed Teacup Rock for its unusual shape.
Teacup Rock at Thunder Cove Prince Edward Island   @FanningSparks
Learning about the geoheritage of the Maritimes has been fascinating.  It’s heartening to see my native province of Nova Scotia celebrate its natural and cultural sites of geological significance.  But there is much more to learn and I look forward to delving deeper during my next visit.

More Info

You can learn more about visiting Nova Scotia and Prince Edward Island on their respective tourism websites or check out these FanningSparks’ posts:
. Watching Humpbacks on the Bay of Fundy
. We Dined on the Ocean Floor
. The Perfect Reminder of Green Gables
. Shutter Therapy in North Rustico
. Beacons of Light
. In Pursuit of Sea Glass
. Falling Leaves and Floating Boats
. First Light at Peggy’s Cove
See the Geoheritage Resources section of Nova Scotia’s Geoscience and Mines Branch website for more information about Nova Scotia’s geoheritage including a virtual tour and the 2009 Report of Activities by J.H. Calder and G.J. DeMont.
Wikipedia is a great place to learn the basics of the geologic time scale.
Check out the Cliffs of Fundy Geopark website for information about the Cliffs of Fundy UNESCO Global Geopark.

Today’s Takeaways

1. Nova Scotia, on Canada’s east coast, “has long been recognized for its rich and diverse geology”.
2. “Geoheritage can be defined succinctly as geological features that inform humanity of its relationship with the Earth.”
3. Consider the geoheritage of the places you live and visit.
Peg - FanningSparks Author

There was a time when local newspapers printed a society page with a full accounting of who visited whom in the community.  They even reported who poured tea.  I’m reminded of this quaint custom when I see tea service sets like the one pictured below.
Old Silver Tea Service Used for Wind Chimes
The days of leisurely afternoon visits for tea are largely past and tea service sets are finding their way into vintage and thrift shops.  Many of these silver teapots, sugar bowls and creamers are ready for a new lease on life.  One option is to repurpose them as wind chimes. The silver-plated components, like the below sugar bowl, age beautifully shifting from a shiny, clear glow to a soft, weathered patina.
Top of Old Silver Sugar Bowl Wind Chimes   
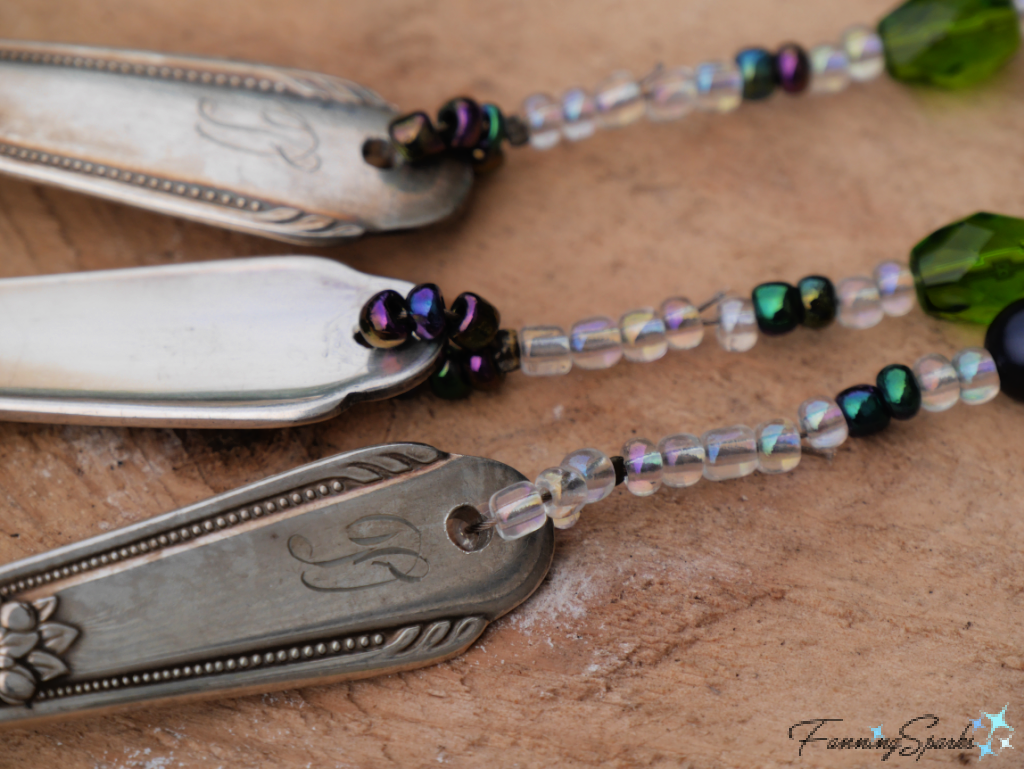
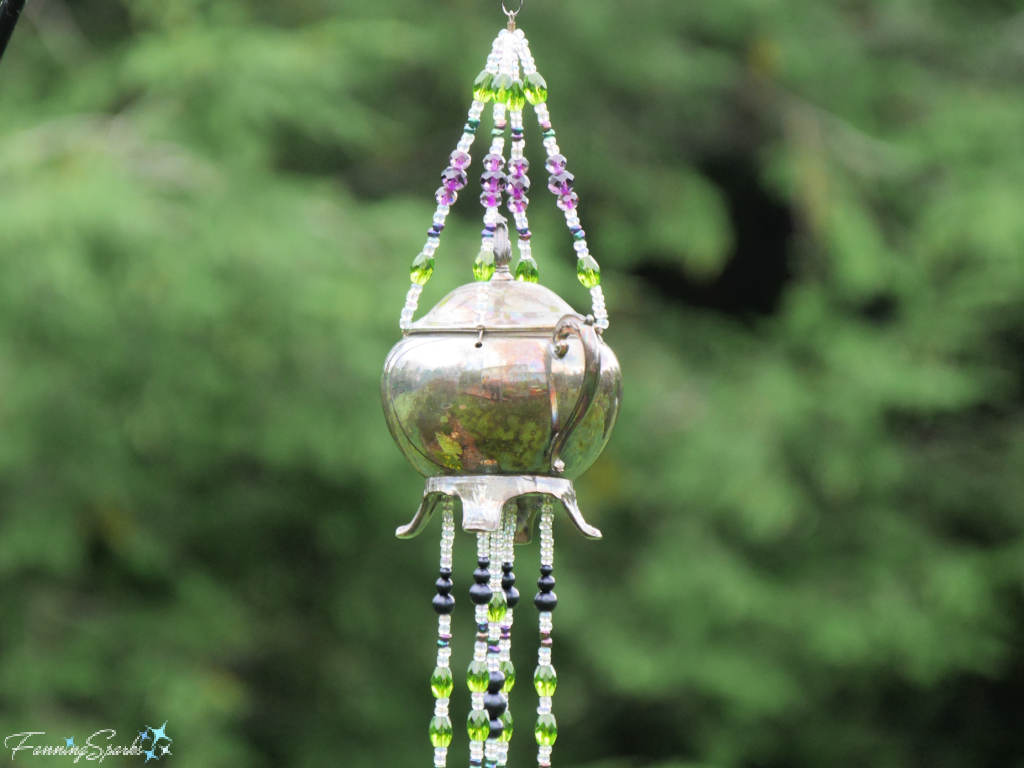
This project is completed with silver-plated cutlery hung from glass-beaded strands.  The spoons catch the breeze and produce a pleasant soft tinkling sound.  Here’s a closer look.
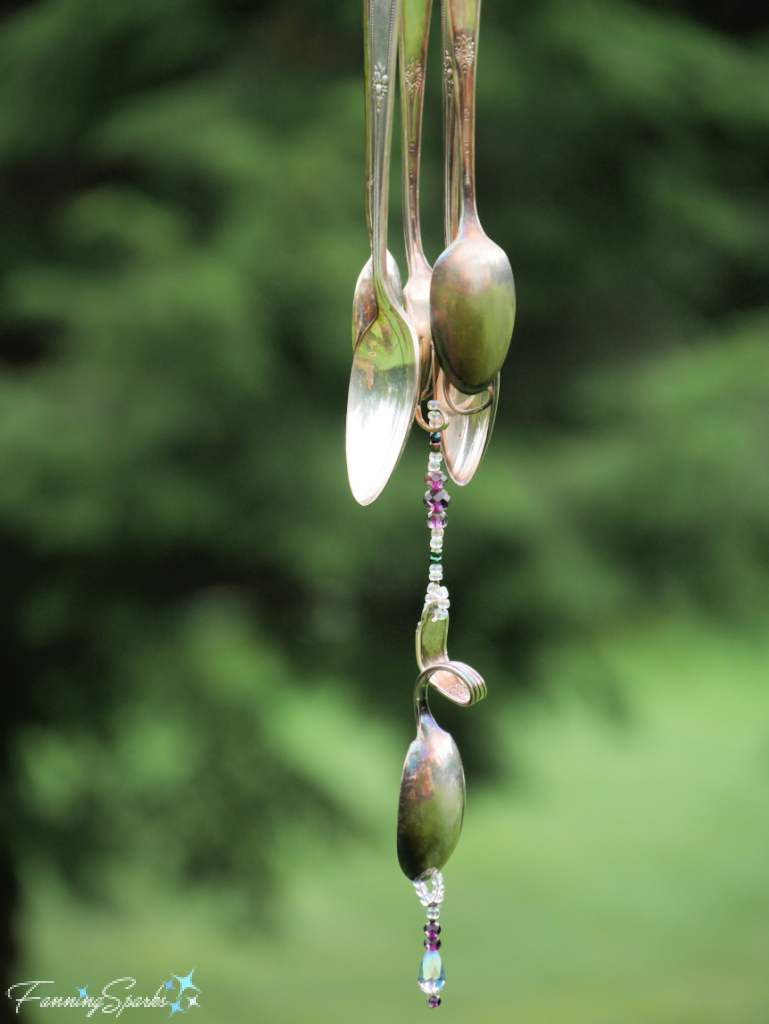
Spoons on Old Silver Wind Chimes      @FanningSparks
Today’s post includes full step-by-step instructions for making your own Old Silver Wind Chimes.  This project is fully customizable—you can make it as shown or improvise and make your own version.  Here are two different versions—one with a creamer and blue and green beads and the other with a sugar bowl and green and purple beads.
Old Silver Wind Chimes – Two WaysLet’s get started.
Supplies Needed
The following supplies are needed to make the Old Silver Wind Chimes:
. A Silver-Plated Sugar Bowl, Creamer or Teapot
. Silver-Plated Cutlery including 1 Fork, 2 Tablespoons and 3 Teaspoons.  Alternatively, you can select your own combination of cutlery pieces.
TIP: Thrift stores and yard sales are a good source for old silver-plated items.  If you’re uncertain of the metal content, you can use a strong magnet to check.  Silver is non-magnetic so if the magnet sticks to the metal it is unlikely to be silver.
Old Silver Flatware Used for Old Silver Wind Chimes
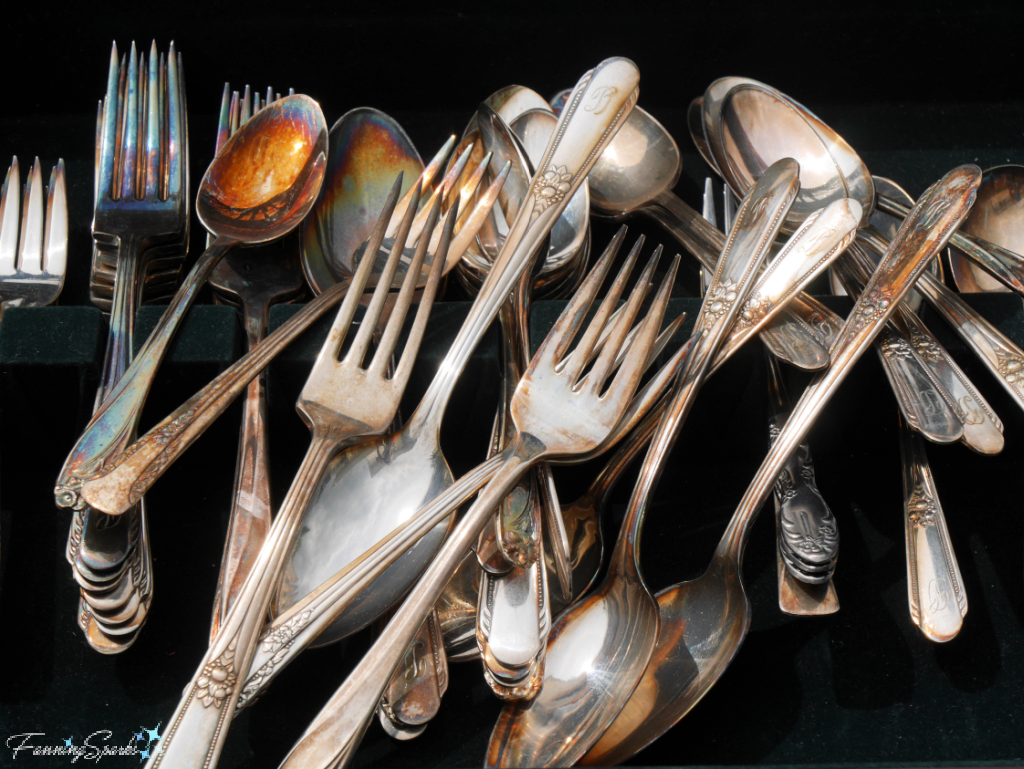
. Beads:  Approximately 60” of Glass Beads.  Glass beads may be more expensive than other materials but they catch the light beautifully and they tend to weather better.  Choose an assortment of colors, shapes and sizes.  I purchased a variety of beads, as shown below, to make colorful and interesting hangers but I didn’t use nearly as many beads as shown.  I found it helpful to include some “filler” beads (ie the white ones) to really let the other beads stand out.  Ensure your glass beads will fit onto your beading wire.
Assortment of Glass Beads for Old Silver Wind Chimes
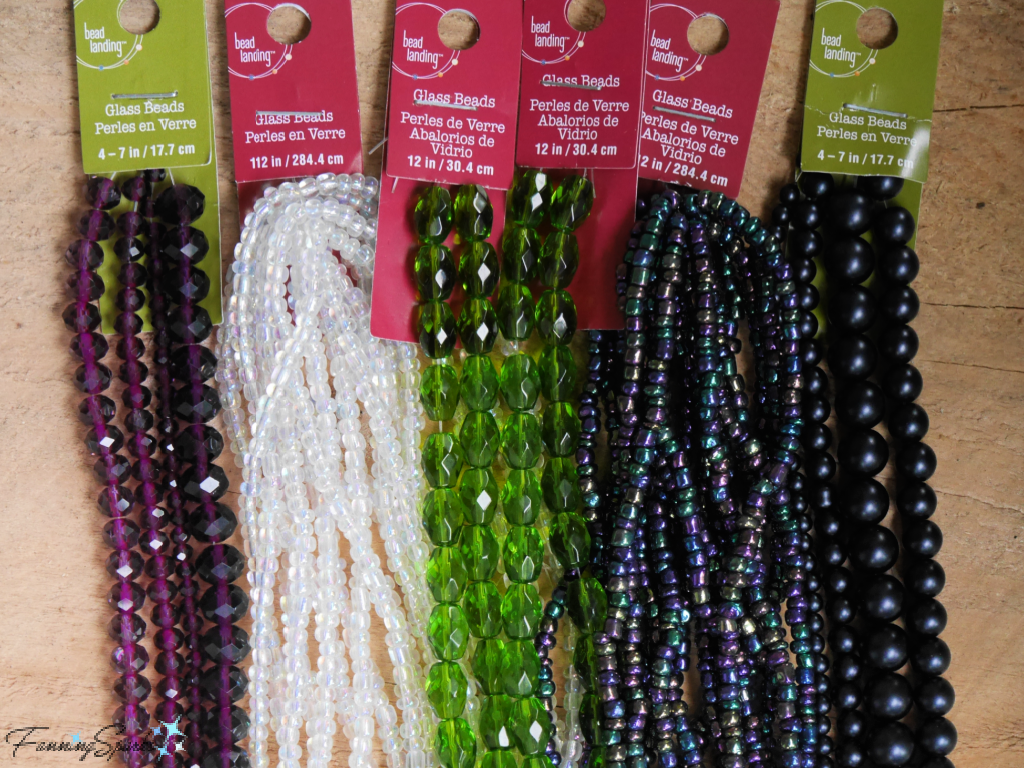
. Teardrop Beads: A teardrop-shaped glass bead adds a nice touch to the bottom of the wind chimes.  If using a creamer, teardrop beads are the perfect way to end the bead strands coming out of the creamer’s spout (see photo in Step 12).
Teardrop Glass Beads for Old Silver Wind Chimes
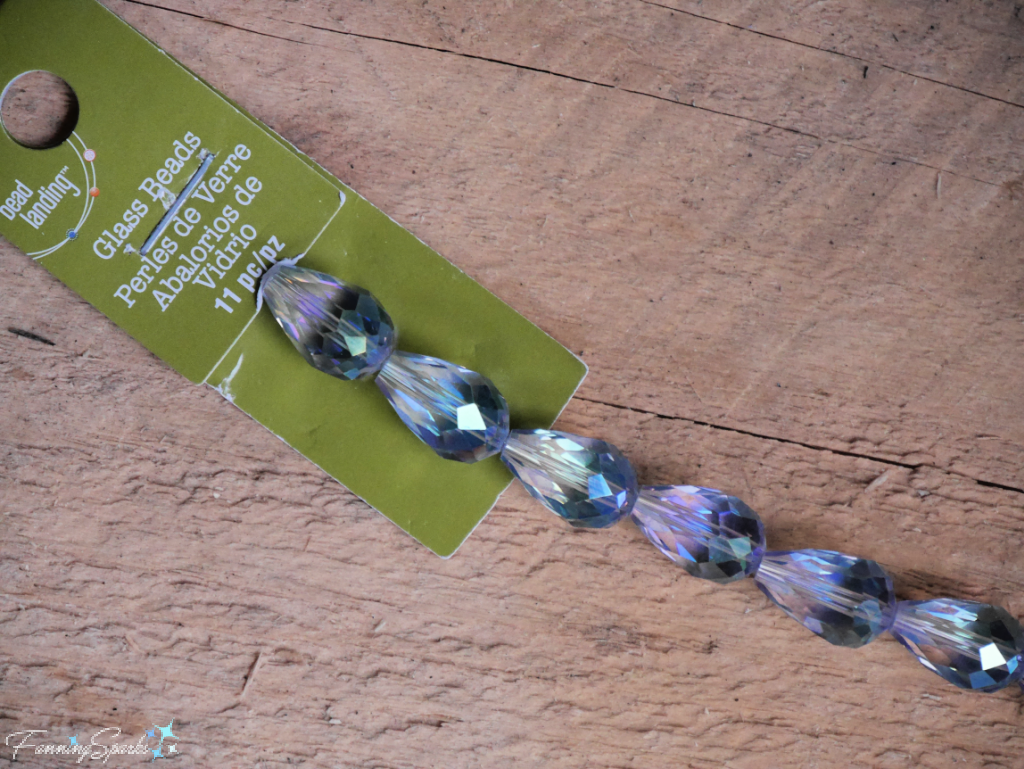
. Beading Wire: Approximately 100” (9 ft) of Beading Wire.  This stringing material is made of multiple strands of thin steel wire coated with a layer of nylon.  Surprisingly, this type of wire is available as a beading supply and as a fishing supply.  I’ve seen 7-strand Beading Wire in the beading section at my local craft store.  But I raided my husband’s fly fishing gear and selected a spool of 40-lb Knottable Wire Bite Tipper from RIO.  I reasoned that fishing line would be more durable and stand up better to the outdoor conditions I expected my wind chimes to endure.  Ensure your beading wire will fit into your glass beads.
. Snap Swivel Fittings: As with the beading wire, Snap Swivel Fittings are available as both beading and fishing supplies.  I used a Sports Professionals Taru Swivel with Interlock Snap in size 50-lb test. You’ll need only one.
. Crimp Beads: Used to secure the Beading Wire.  Crimp Beads come in different shapes and sizes.  Ensure your crimp beads fit onto your beading wire.  You’ll need about 30 crimp beads.
Supplies to String Beads for Old Silver Wind Chimes
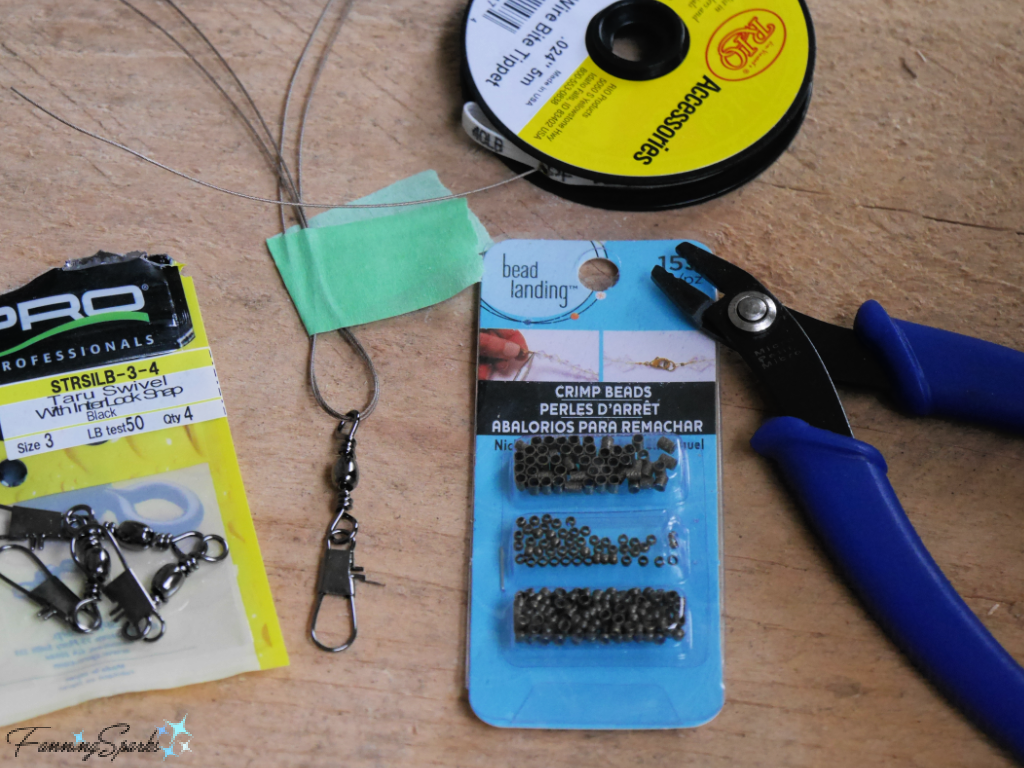
Tools and Equipment Needed
. Wood Block: A scrap block of hardwood for your working surface.  I used a 10” x 5” x 2” scrap piece of hemlock.
. Rubber Mallet
. Hammer and Sharp Nail: Used to indent before drilling.
. Drill with 7/64” Bit for drilling metal
. Painter’s Tape
. Pliers: Cutting Pliers, Flat-Nose Pliers and Round-Nose Pliers.
. Crimping Pliers: Used to squeeze the crimp beads onto the beading wire.  I purchased a Beadalon brand Micro Crimper Tool for this project and it worked perfectly.
. Tweezers (optional): Used to handle beads.
. Fabric Piece: A square of fabric, approximately 12″ x 12″, to cover your working surface for beading.  Ideally, the fabric would be light in color and have a short nap such as velour.
Instructions  The below illustration shows the various parts of the Old Silver Wind Chimes.  The labels match those used in the following instructions.  The measurements indicate the approximate length of each part.  Please note the total length is slightly shorter than the sum of the parts due to overlaps between components.
Old Silver Wind Chimes – Parts and Sizes
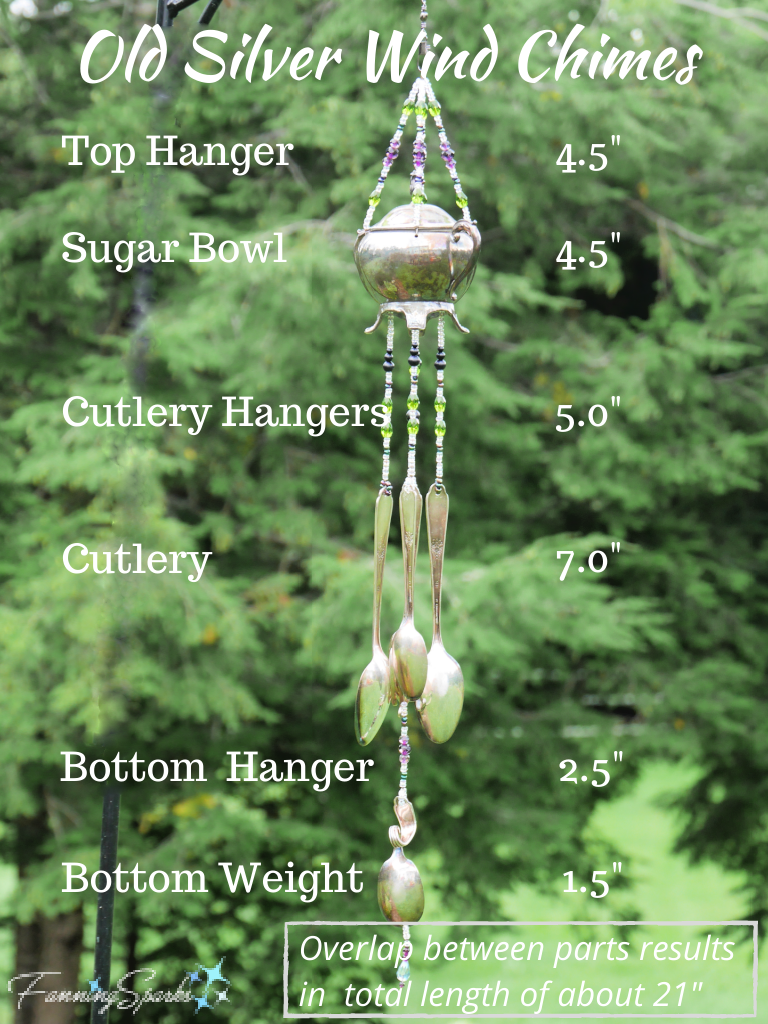
Step 1 – Select Components  Select your featured component—it could be a lidded sugar bowl or a creamer as shown in this tutorial.  Alternatively, you could use a teapot but the hangers would likely need to be longer so increase the number of glass beads and length of beading wire accordingly.
Select 1 fork for the center of the wind chimes.  Select 4 spoons to surround the fork.  I chose to use 2 tablespoons and 2 teaspoons in 2 different flatware patterns.  Select 1 spoon to be used as the bottom weight.  I chose a sugar spoon, with a large bowl, for this purpose.  Alternatively, you can choose any combination of silver-plated cutlery you like.
Selecting Spoons and Fork for Old Silver Wind Chimes
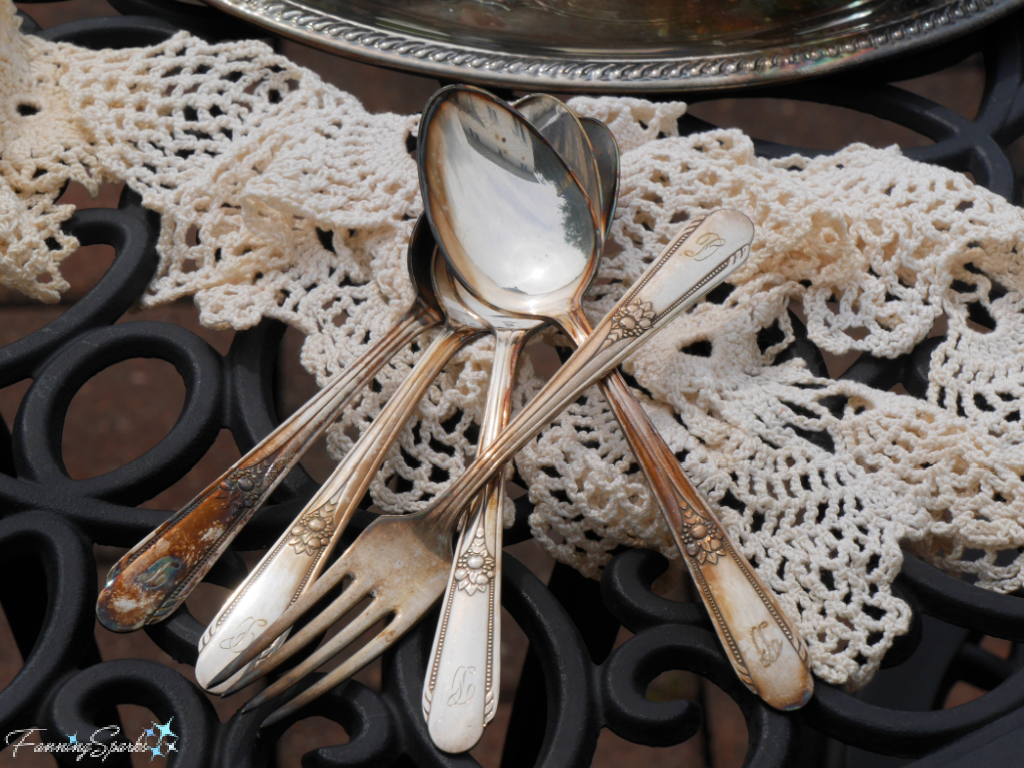
Step 2 – Flatten Spoons and Fork   Work on a block of scrap wood.  Hold a spoon firmly against the wood block and hit it with a rubber mallet to straighten/flatten the spoon handle.  The idea is to straighten the handle a little so the spoon will hang vertically.  Optionally, you may also want to hit the spoon bowl a few times to flatten it a little.  Repeat with the remaining spoons and fork.
Flattening Spoons for Old Silver Wind Chimes
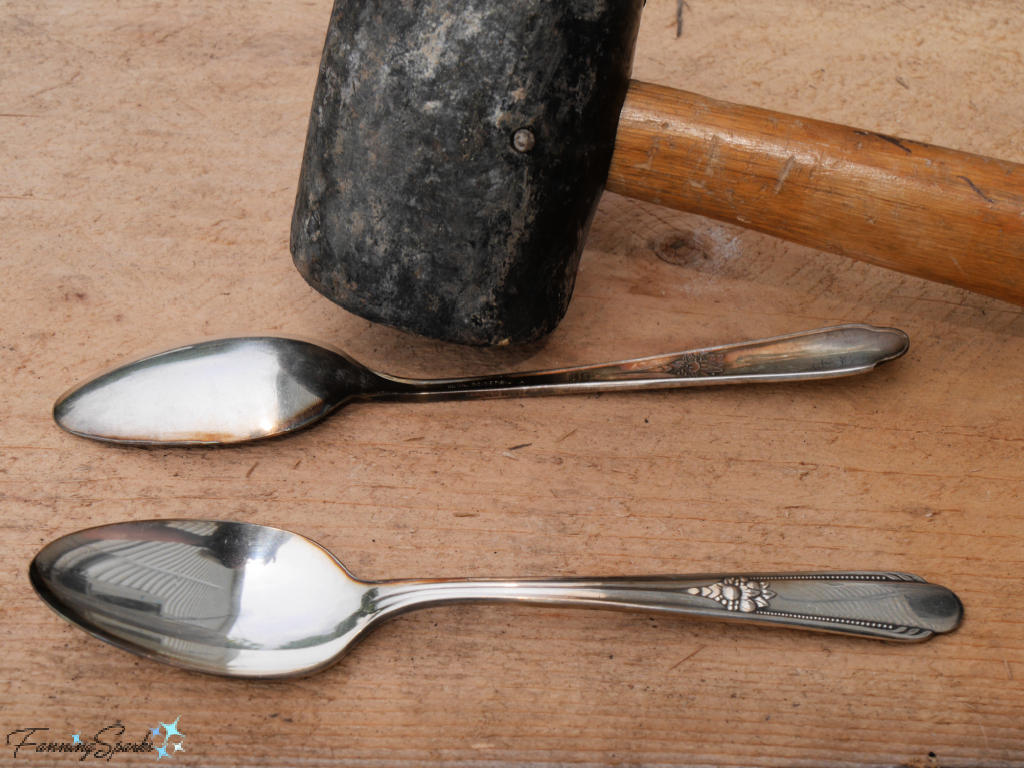
Step 3 – Bend Fork  Use flat-nose pliers to grip one of the fork’s tines.  Slowly bend the tine out and into a graceful curl.  It’s helpful to use round-nose pliers for the final bending.  Alternate the direction of the tine curls.  Curling out the fork tines increases their contact with the bowls of the spoons meaning the wind chimes will produce more music.
Bending Fork for Old Silver Wind Chimes
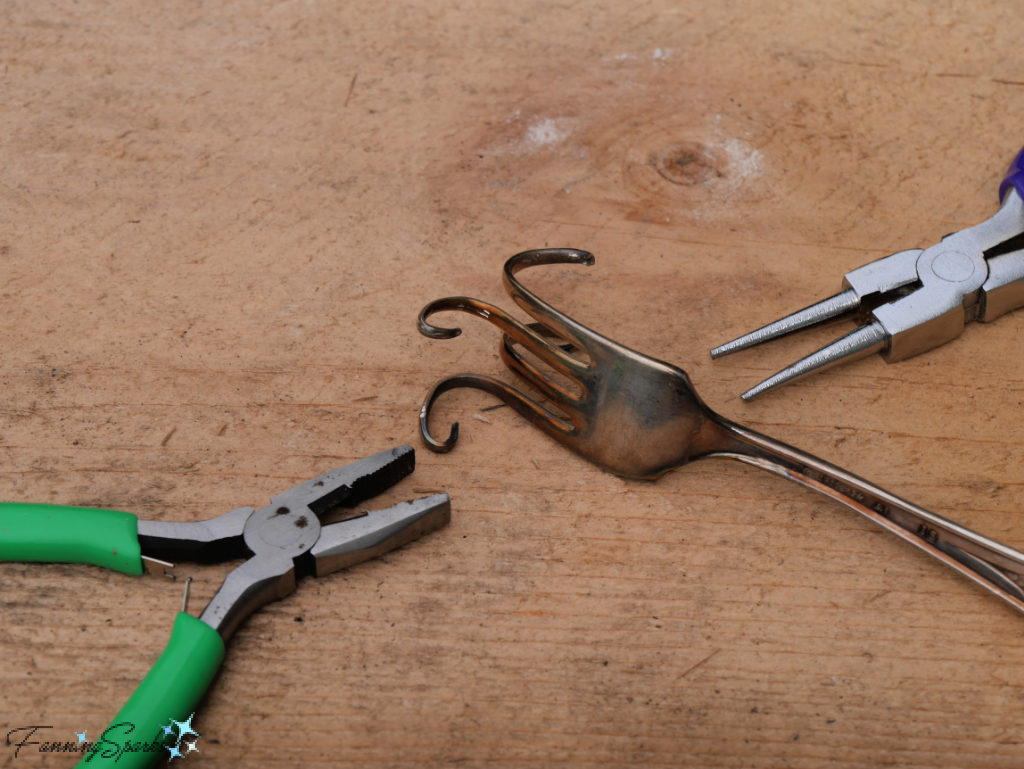
Step 4 –  Drill Holes in Spoons and Fork   Start with a spoon.  Choose a spot at the top of the handle—centered and about ¼” from the tip—to drill a hole for hanging.  Indent this spot with a sharp nail and a hammer.  Use the drill with a bit for drilling metal.  Drill through the spoon handle at the marked spot.  Take care to clear away metal filings since these can be sharp.  Use a hammer to knock off and flatten any sharp edges or tear-out on the backside of the drilled hole.  Repeat for the remaining spoons and fork.  Drill a second hole in the fork just above the top of the tines in the center.
Drilling Spoon Handles for Old Silver Wind Chimes
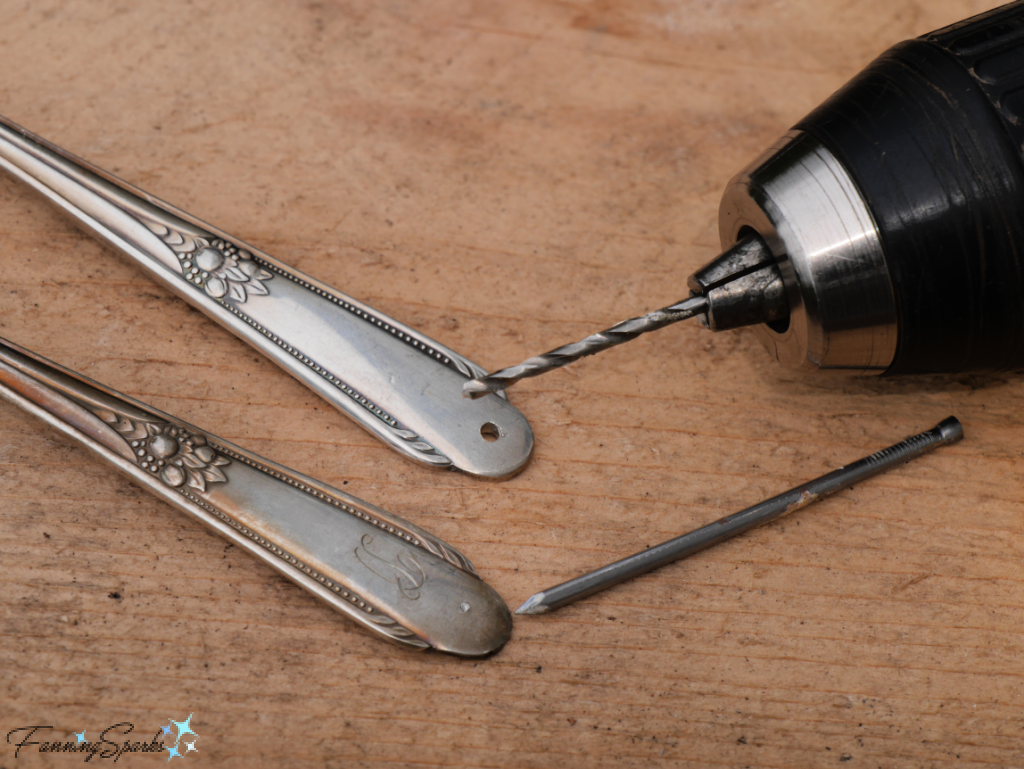
Step 5 – Drill Holes in Sugar Bowl   Choose 4 spots on the bottom of the sugar bowl for drilling holes.  It’s easiest to align these with the bowl’s feet.  As above, indent the selected spots with a sharp nail and hammer.  Drill the holes.  Locate the center of the bottom, mark and drill.  Use a hammer to gently smooth out the backside of the drilled holes.
Drilling Bottom of Sugar Bowl for Wind Chimes
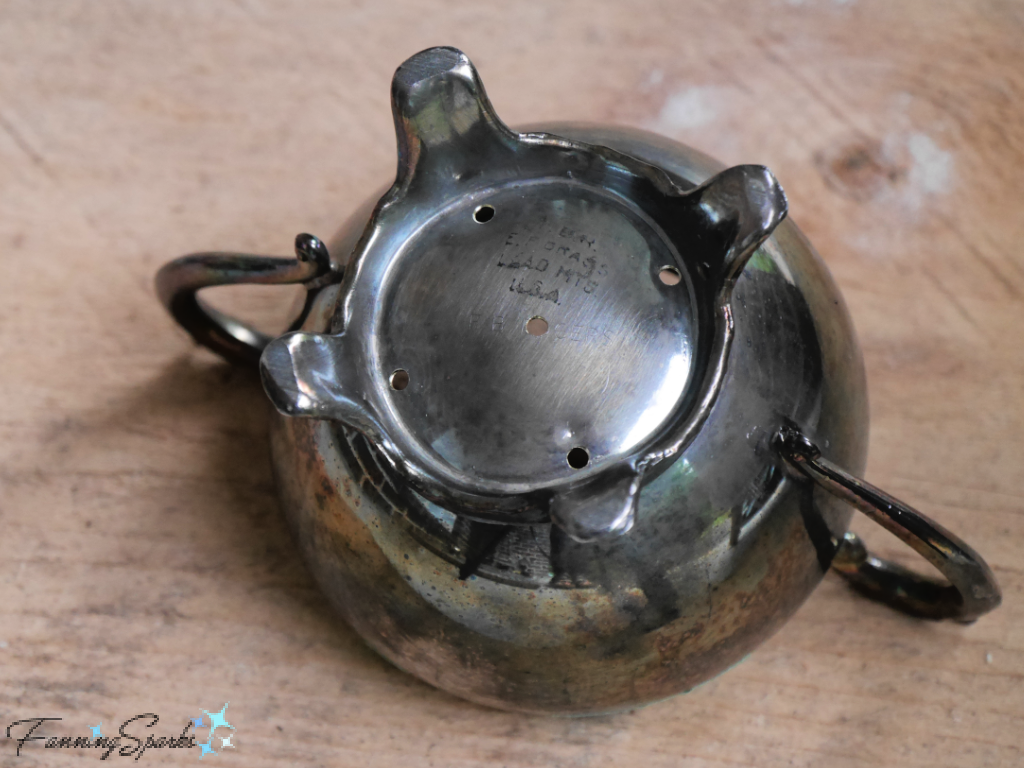
Next drill holes along the top rim of the sugar bowl.  Choose 4 spots at an equal distance from the handles and the top edge.  Due to the curved edge, drilling these can be tricky.
TIP: A small piece of painter’s tape covering your target spot will help prevent the drill bit from slipping.
Use a hammer to gently smooth out the backside of the drilled holes.
Drilling Top of Sugar Bowl for Wind Chimes
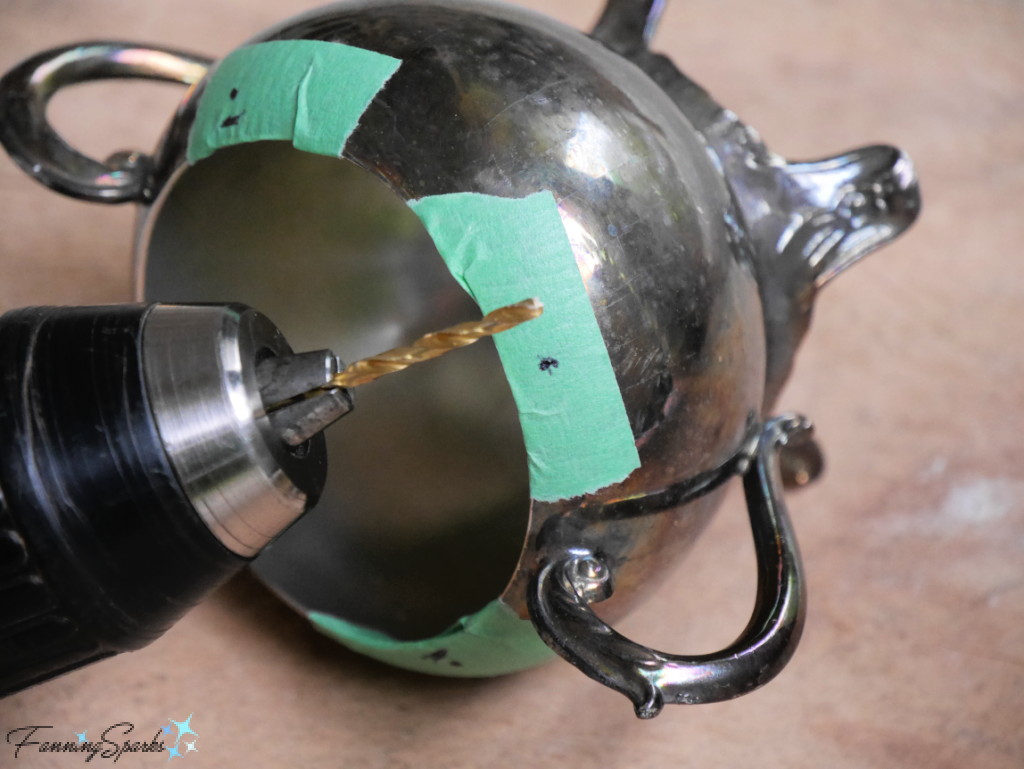
If using a creamer, drill a hole in the center of the creamer’s spout.
Drilled Creamer Spout for Old Silver Wind Chimes
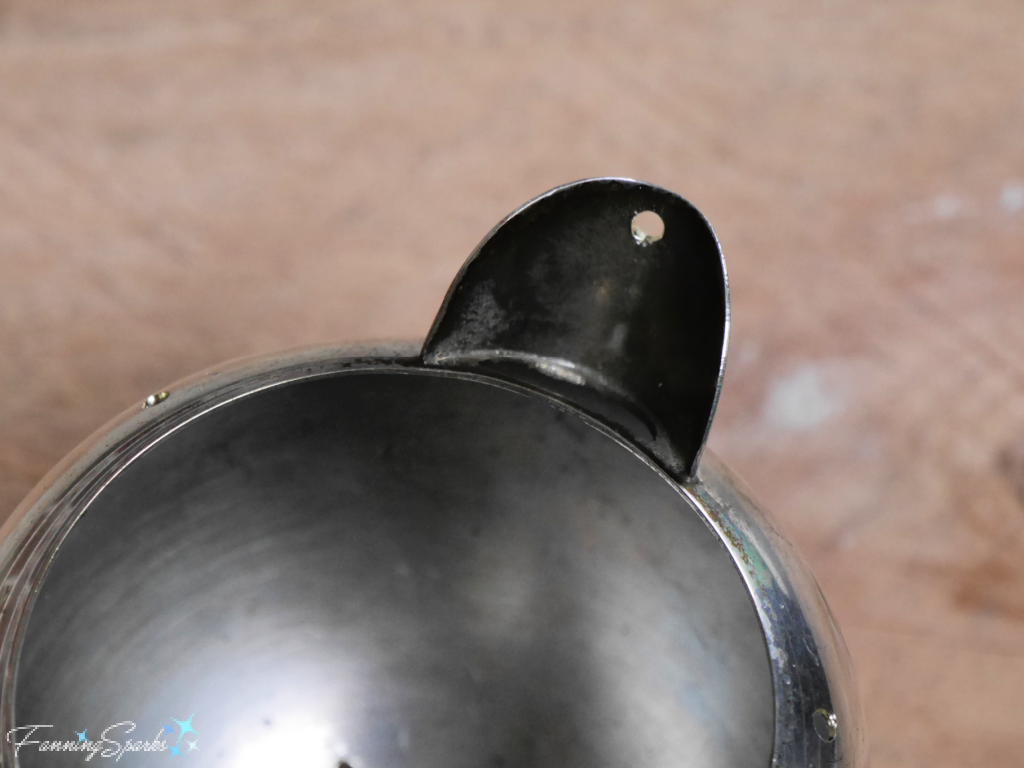
Step 6 – String Beads for Top Hanger  Place a piece of fabric on your working surface to keep your beads from rolling away.  Cut 2 pieces of beading wire each 16” long.  Insert both pieces through the bottom of a swivel snap fitting.  Fold wires in half.  Slip a crimp bead onto the wire ends and slide it up to the swivel snap fitting.  Use crimping pliers to squeeze the crimp bead and lock it into place.
Assemble Top Hanger for Old Silver Wind Chimes
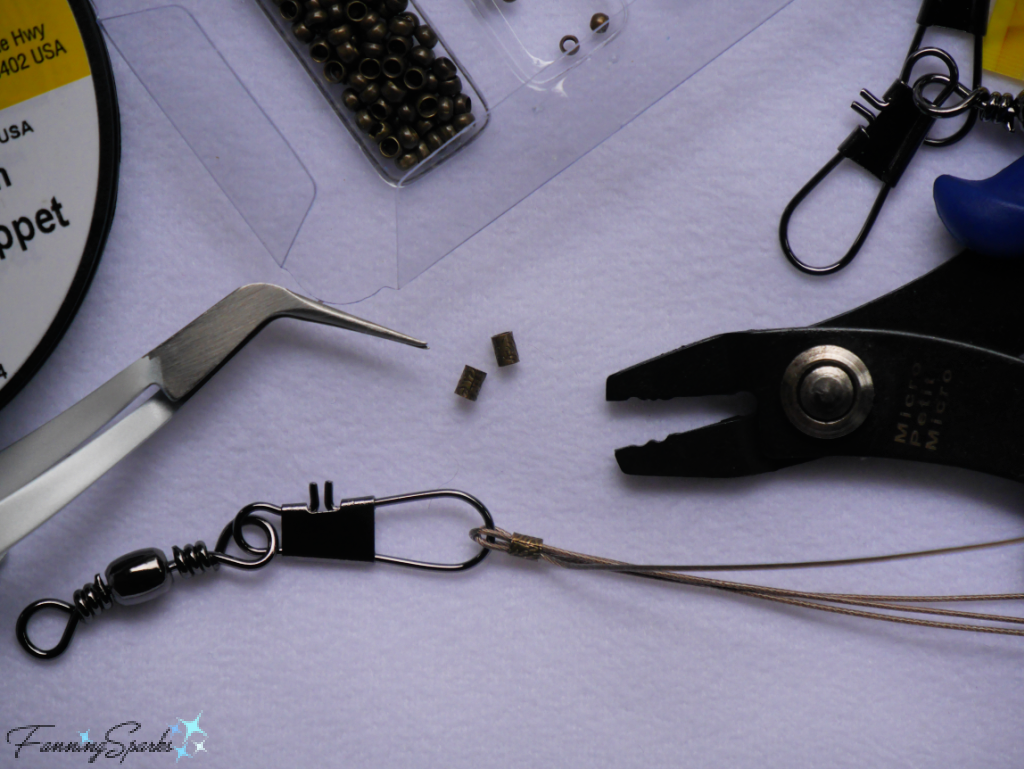
Take a few minutes to plan your bead design.  The beaded section should be about 4.5” long.  You may want to play around with different combinations of colors and shapes to create a pleasing pattern.  Once happy with your design, string the beads onto one of the wires ending with 1 or 2 crimp beads.  Then finish with a small crimp bead positioned at the end tip of the wire.  Use the crimping pliers to squeeze the end crimp bead into place—temporarily keeping the beads in place while you work on the other sections.
Stringing Beads for Top Hanger on Wind Chimes
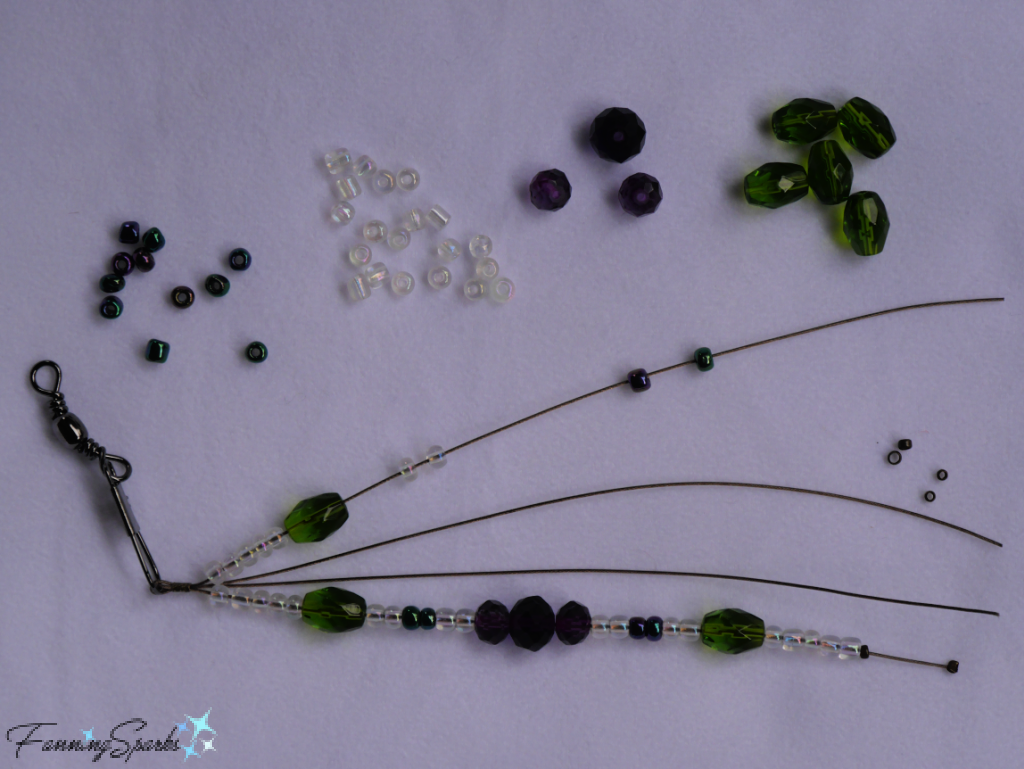
Step 7 – Attach Top Hanger  Prepare to attach the beaded wires into the 4 drilled holes on the top edge of the sugar bowl.  Snip off the crimped bead from the end tip of the wire.  Thread the end of the wire through the drilled hole and back up through 3-5 beads.  Ensure beads are snug against the swivel snap fitting at the top.
Connect Top Hanger to Sugar Bowl for Wind Chimes
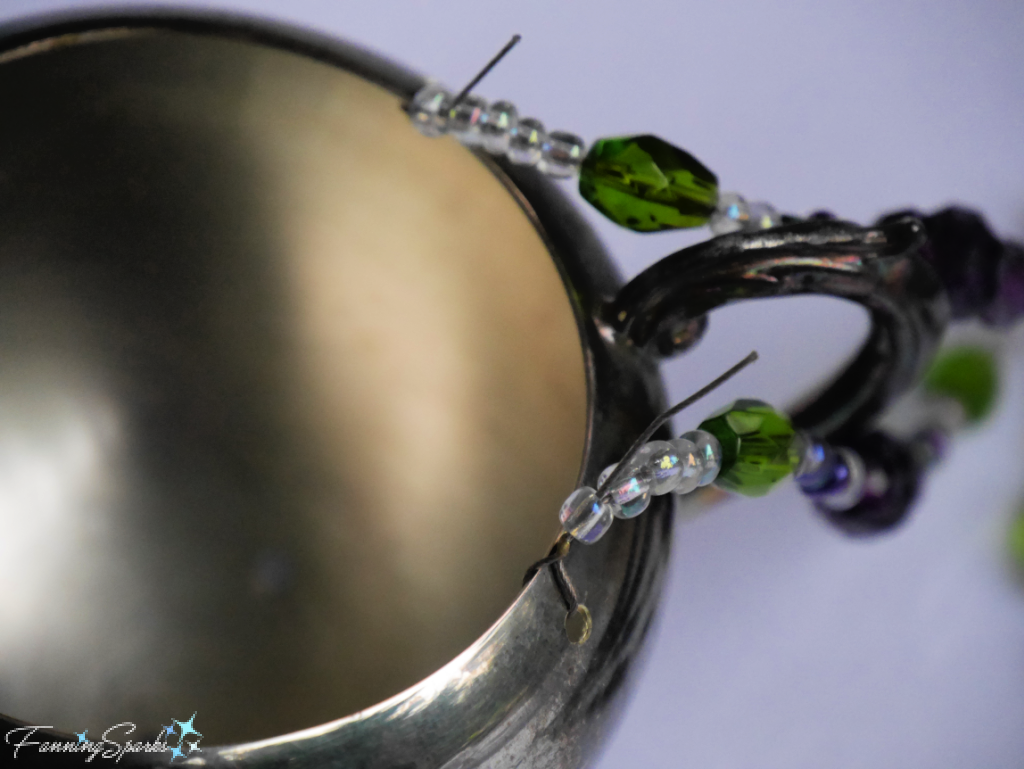
If using a lid on a sugar bowl, put the lid in place and adjust the wire loops to fit.  Lock in place, by squeezing the remaining crimp bead(s) with the crimping pliers.  Trim off the end of the wire with the cutting pliers.  Repeat for the 3 remaining wires.
Top Hanger with Sugar Bowl Lid in Place 
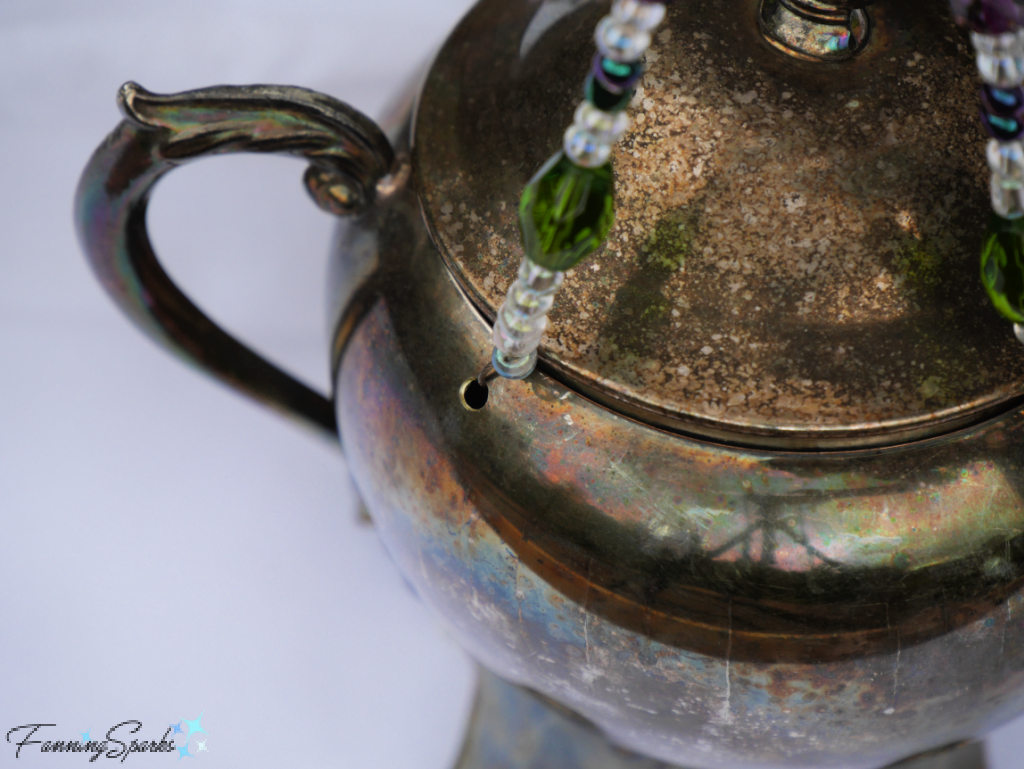
Step 8 – String Beads for Cutlery Hangers  Cut a piece of beading wire 10” long.  Squeeze a small crimp bead onto one end of the wire.  Thread a plain bead onto the wire, slide up to the crimped bead, loop wire around and thread back through bead.  Place the beaded end of the wire inside the sugar bowl and pull the wire down through the drilled hole.  Repeat for the remaining 4 drilled holes.
Insert Anchor Wires for Hanging Cutlery 
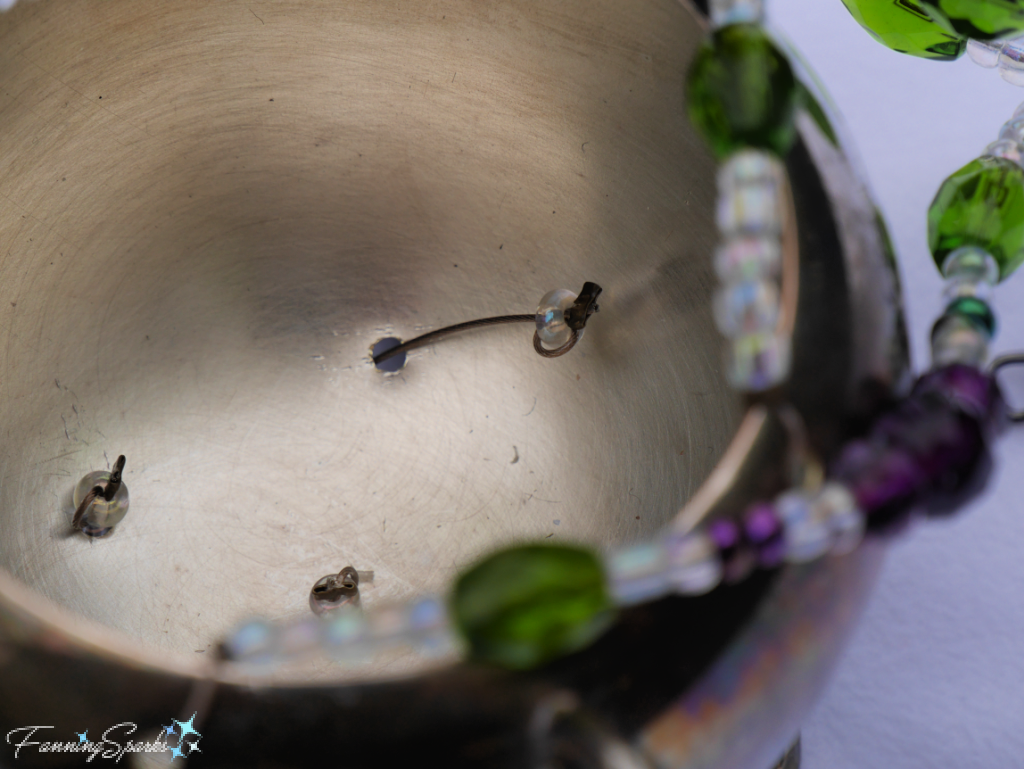
String the beads onto one of the beading wires in your desired pattern.  The beaded section should be about 5” long.  Choose 6 small plain beads to wrap around the spoon handle.  Add 3 of the small plain beads and a crimp bead to the wire.  Then squeeze another crimp bead on the very end of the wire to temporarily hold the beads in place.   Repeat for remaining 4 wires.
String Beads on Wire to Hang CutleryStep 9 – Attach Cutlery  Prepare to attach the spoons and fork to the beaded wires.  Start with one of the beaded wires and one spoon.  Push all the beads up against the bottom of the sugar bowl.  Snip off the crimped bead from the end tip of the wire.  Thread the end of the wire through the drilled hole in the spoon handle, from front to back, add 3 small plain beads and pull the wire back up through the crimp bead and the last 3-5 beads above the crimp bead.  Lock in place, by squeezing the crimp bead with the crimping pliers.  Trim off the end of the wire with the cutting pliers.  Repeat for the 4 remaining wires.
Attach Cutlery to Strung Beads
Cutlery Attached to Beaded Hangers

4 of 5 Cutlery Pieces Attached to Bottom of Sugar Bowl
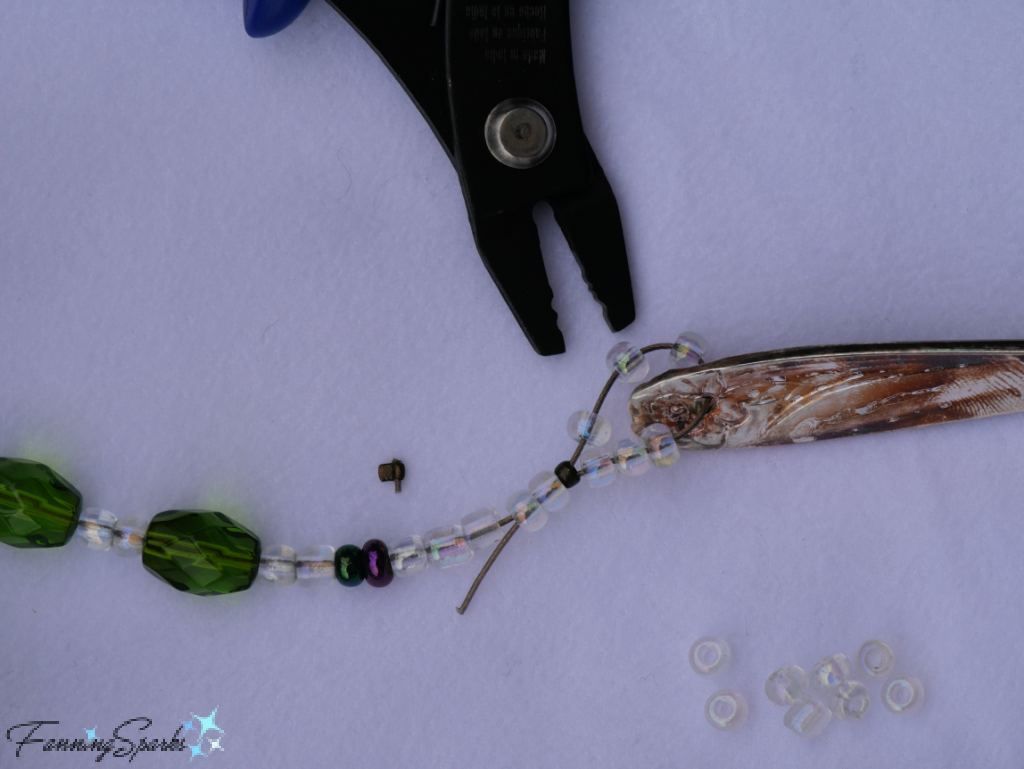
Step 10 – Prepare Bottom Weight  Hold the handle of the spoon with a set of flat-nose pliers.  Then use your other hand to bend the spoon handle into an interesting shape.  Work carefully to gradually bend the handle.  Drill a hole in the handle of the spoon if not done previously.  Drill hole at the tip of the spoon bowl.
Bending Spoon Handle for Bottom Weight 
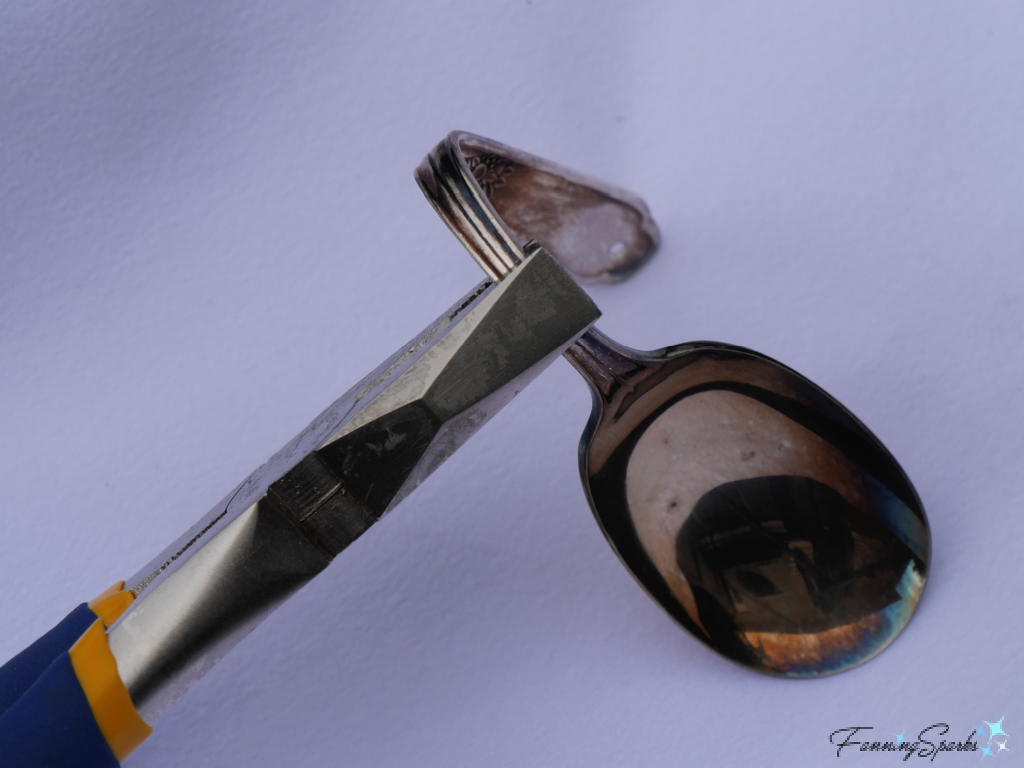
Cut an 8” piece of beading wire.  String a small single bead onto the wire and center.  Pull both ends of the wire through a teardrop bead.  String 2-3 beads and a crimp bead onto the double wire.  Then separate the 2 wires and prepare to attach to the tip of the spoon.   Choose 7 small plain beads.  Thread 4 small plain beads on one end of the wire.  Thread the same end of the wire through the drilled hole in the spoon’s bowl, from front to back, add 3 more small plain beads and pull the wire back up through the crimp bead and the last 2-3 beads above the crimp bead.  Pull the second end through the beads in a similar way.  Lock in place, by squeezing the crimp bead with the crimping pliers.  Trim off the ends of the wire with the cutting pliers.
Attach Beaded Droplet to Spoon for Bottom Weight @FanningSparks
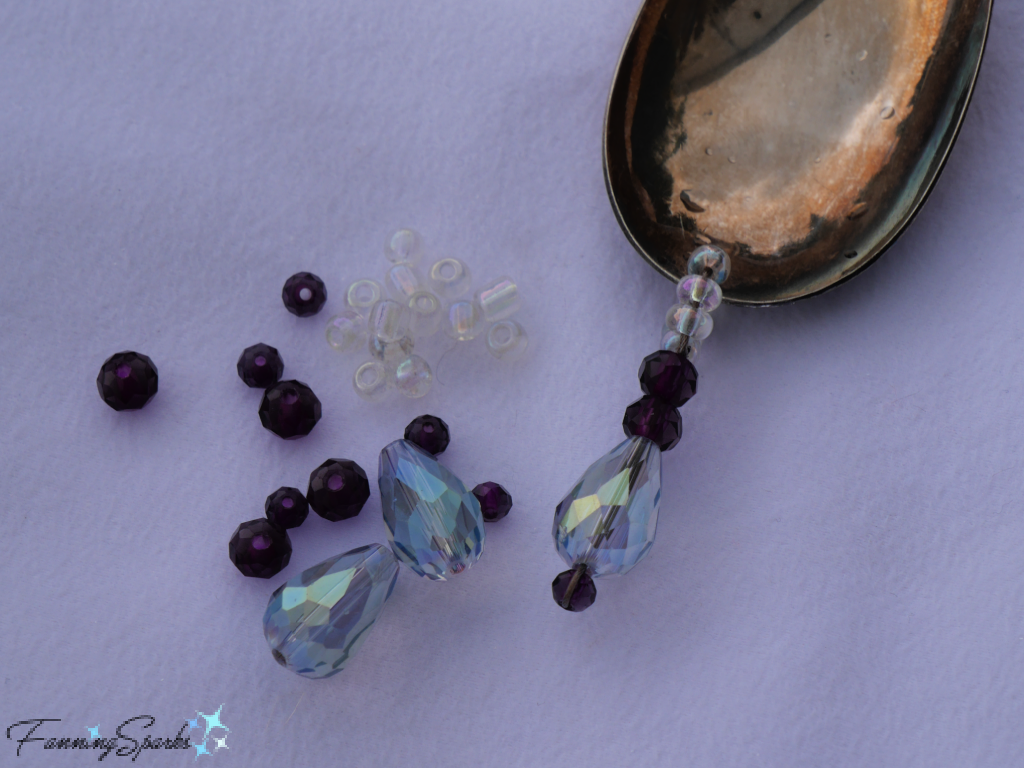
Step 11 – Attach Bottom Weight   Prepare to attach the bottom weight to the fork.  Drill a hole in the fork just above the top of the tines, if not done previously.
Cut a piece of wire 10” long.  Pull the wire through the hole above the fork tines.  Pull one end of the wire about 1” below the tips of the fork tines.  String a crimp bead onto both wires and push up between the fork tines.  Lock in place, by squeezing the crimp bead with the crimping pliers.  String about 3 beads onto both wires and add another crimp bead.  Lock in place, by squeezing the crimp bead with the crimping pliers.  Trim off the ends of the wire with the cutting pliers.  String beads onto the beading wire in your desired pattern.  The beaded section should be about 2.5” long.
The handle of the bottom weight is attached in the same way as the other spoon handles.  Choose 7 small plain beads to wrap around the spoon handle.  Add a crimp bead and 3 of the small plain beads to the wire.  Push all the beads up against the crimped bead near the fork tines.  Thread the end of the wire through the drilled hole in the spoon handle, from front to back, add 4 small plain beads and pull the wire back up through the crimp bead and the last 3-5 beads above the crimp bead.  Lock in place, by squeezing the crimp bead with the crimping pliers.  Trim off the end of the wire with the cutting pliers.
Bottom Weight Attached to Fork @FanningSparks
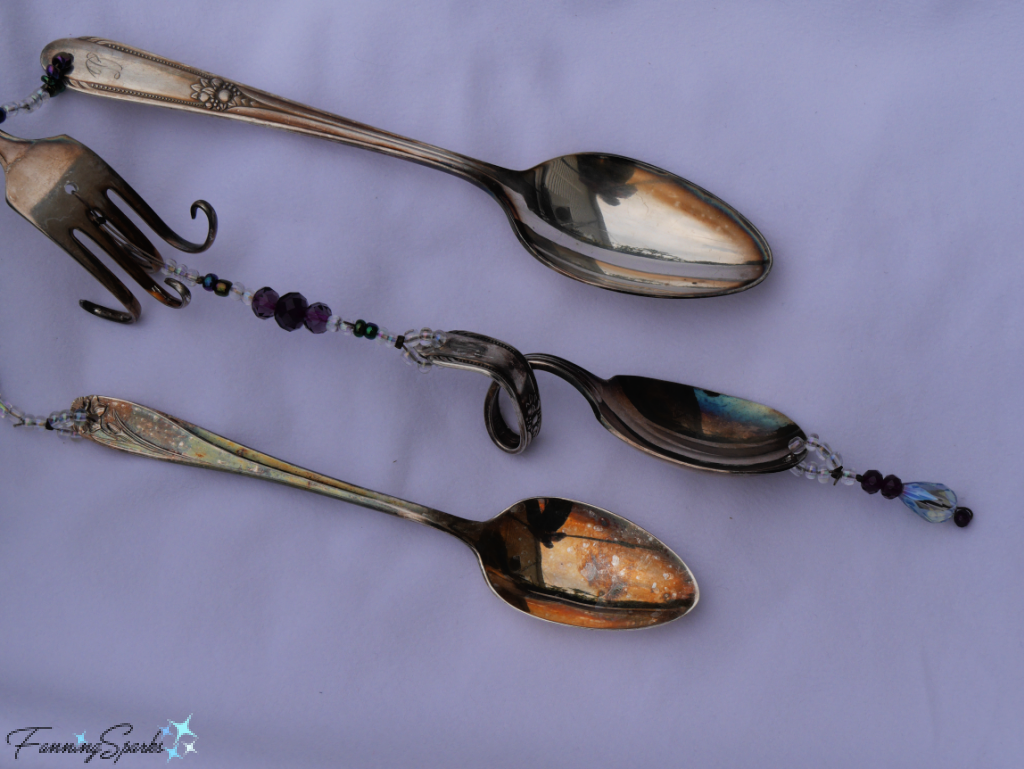
Step 12 – Add Beads to Creamer Spout  If using a creamer, prepare to string beads for the creamer’s spout.  Cut 3 pieces of beading wire, approximately 6” long.  Begin each wire with a teardrop bead using the same technique as described in Step 10 Prepare Bottom Weight.  String beads onto the beading wire in your desired pattern.  Hold the beaded sections in place on the spout to judge the final length.  The beaded sections shown below are 3.5”, 3” and 2.5”.  The objective is to create a graceful arch simulating streams of water pouring from the spout.  When satisfied with the beaded sections, prepare to attach them to the creamer’s spout.
Insert the end(s) of the wire through the hole in the spout, front to back, slide on a crimp bead followed by a plain bead.  Loop the wire around the plain bead and back through the crimp bead and previous beads.  Push beads up to the spout for a snug fit.  Squeeze the crimp bead to lock in place.  If it’s too difficult to thread all 3 beaded wires in this way, you could attach the shortest beaded wire midway up one of the other wires (as shown below).
Beaded Spout on Creamer @FanningSparks
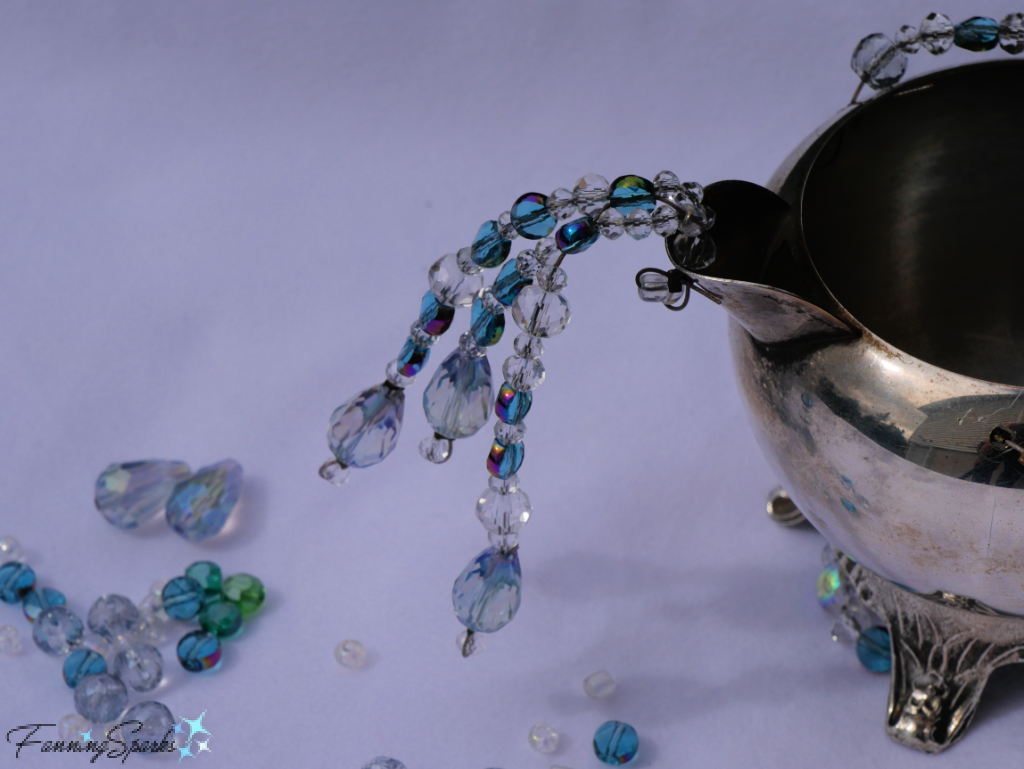
Step 13 – Hang and Enjoy!  Get ready to enjoy the sparkling lights and sweet sounds of your new Old Silver Wind Chimes!

More Info

Please pin this image to share or save for future reference.
Old Silver Wind Chimes DIY Tutorial @FanningSparksSpecial thanks to Marian, my sister, for crafting along with me on this project.  She gets full credit for the beautiful creamer wind chimes shown in this post.
You may also enjoy these FanningSparks’ blog posts featuring ways to repurpose items:
1. A Transformation Worthy of HGTV
2. Teacup Pincushion – DIY Tutorial
3. Vintage Bangle to Keepsake Box – DIY Tutorial
4. Thrifted Frame to Small Tray

Today’s Takeaways

1. Bringing new life to abandoned vintage items is a great way to reuse resources.
2. Enrich your décor by incorporating items with an interesting past.
3. Make your own one-of-a-kind wind chimes with old silver and beading.
Peg - FanningSparks Author

Whale watching is always on my travel wish list.  Viewing these incredible creatures in their natural environment is simply magical.  So I jumped at the opportunity to travel to Tiverton Nova Scotia with my sister for a whale watching adventure.  We were not disappointed—we saw 4 humpback whales (Megaptera novaeangliae) and they weren’t just tiny specks on the horizon—one was nearly close enough to touch!  Here’s the scoop.
Tiverton is on Long Island, one of the Digby Islands, located at the base of the Bay of Fundy in Nova Scotia.
Map Showing Tiverton, Nova Scotia   @FanningSparks
It’s a pretty little fishing village.
Fishing Boats at Tiverton Docks Nova Scotia   @FanningSparks
We booked a whale watching tour with Ocean Explorations Zodiac Whale Cruises.  We chose this tour because of Tom Goodwin.  Tom is a biologist who has spent his entire 40+ year career studying, guiding and working around whales.  He is a native Newfoundlander but has been conducting whale/seabird tours from Nova Scotia for 35 years.  He is a founding year (1975) member of the Cousteau Society, has worked with the Calpyso crew, and has been supporting the World Wildlife Fund for 40+ years.  On the wall in the Ocean Explorations office, there is a faded 1982 photo of Tom meeting Jacques Yves Cousteau, the world-famous ocean explorer.  Tom’s tours are conducted in Zodiac™ boats (ie rigid hull inflatable boats) meaning we would be viewing whales at water-level.
Ocean Explorations Zodiac Docking in Tiverton NS   @FanningSparks
Ocean Explorations’ guests are outfitted in survival suits for safety and comfort.
Survival Suits Ready for Ocean Explorations Guests   @FanningSparks
After getting suited up in our orange finery, we climbed aboard the Zodiac and set off at a fast clip.  The fog was so thick it was nearly impossible to see beyond the boat.
Zodiac Trip in the Fog   @FanningSparks
Then, like a miracle, the fog cleared and we were sitting on calm waters in bright sunshine.  We waited patiently, along with the lobster fishing boat tour shown below, for the whales which had been spotted in the area.
Lobster Fishing Boat Watching for Whales   @FanningSparks
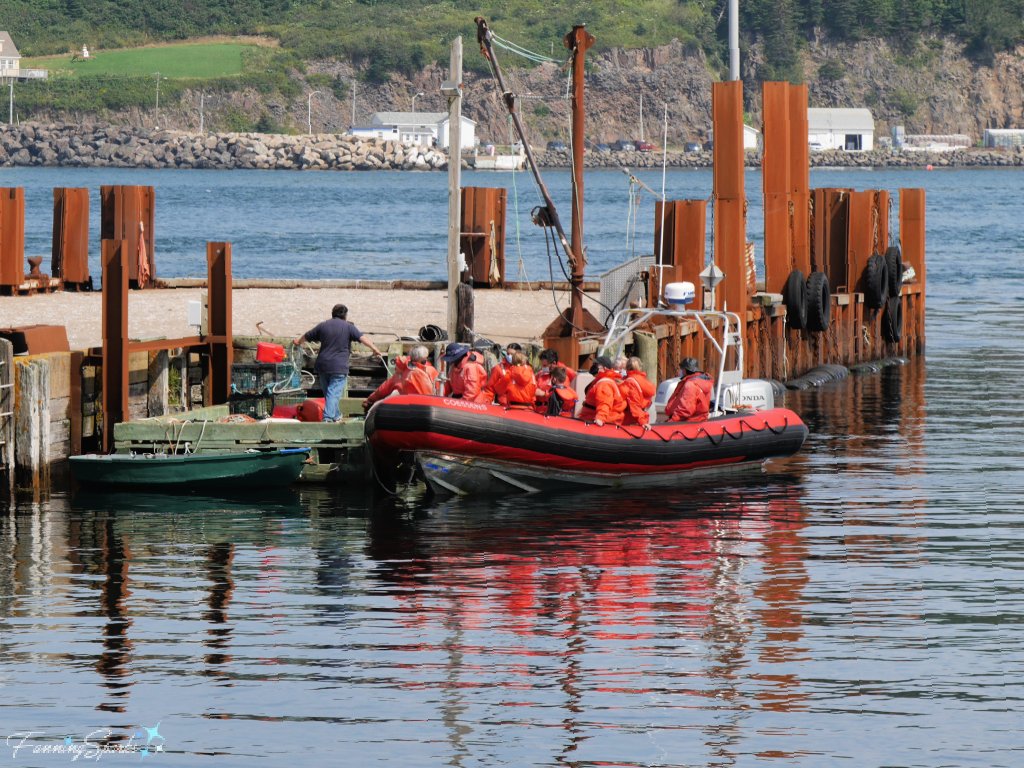
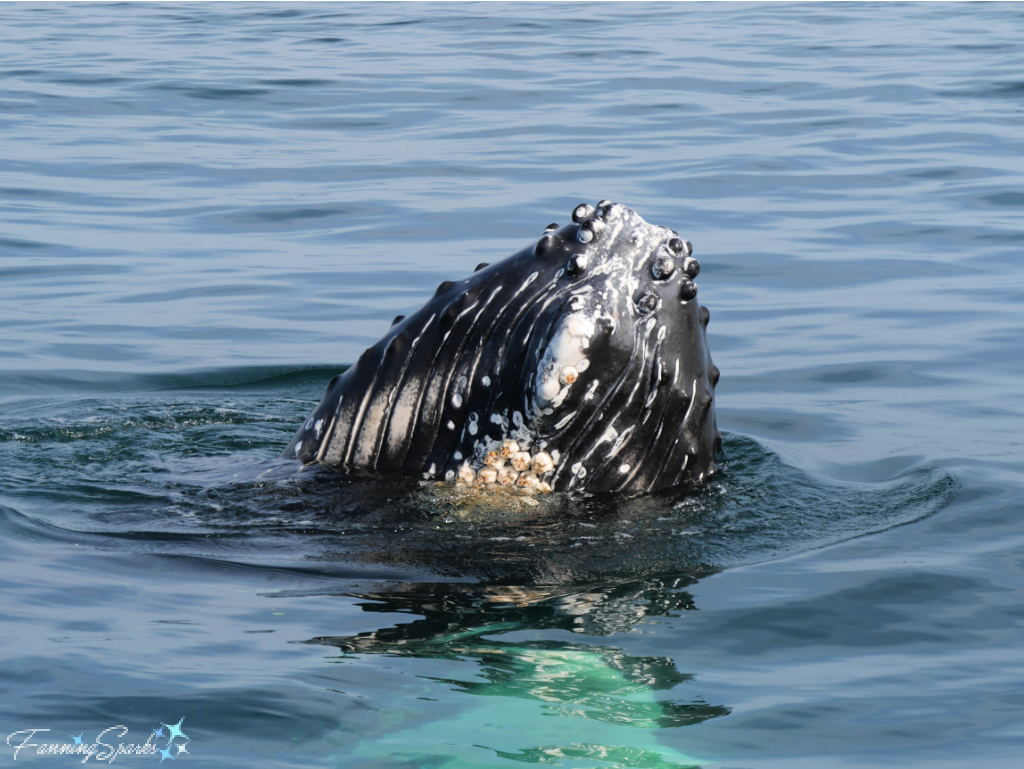
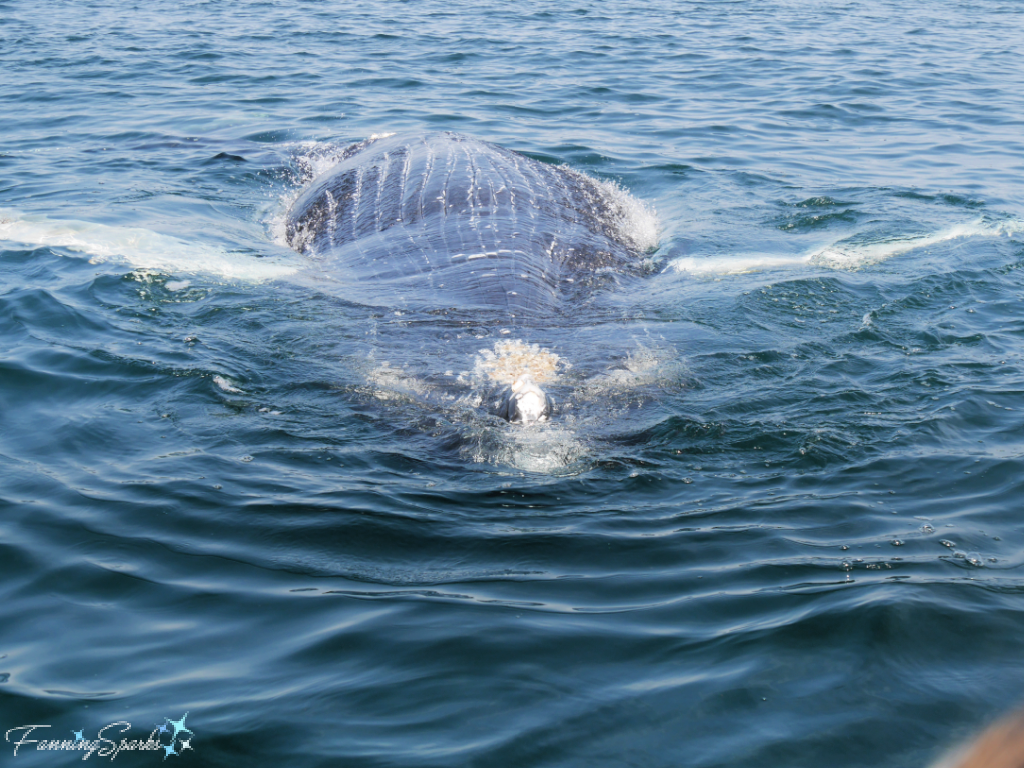
And then they came!  A humpback whale surfaced off in the distance!
Humpback Whale Sighting in the Distance   @FanningSparks
And then the most amazing things happened!  More than one humpback whale surfaced including a mother and calf.
Two Humpback Whales Sighted in Distance   @FanningSparks
We saw whales spouting, aka blowing, which happens when a whale exhales air as it comes to the surface to breathe.  I was fascinated to learn that you can hear the humpback whale spouting as far as 800 feet away.
We saw whales lifting their tails out of the water.  Our guide Tom referred to this action as “tail rolls” and explained the whales do this before diving.  A whale raises its tail, or more accurately a “cetacean raises its fluke”, to descend steeply beneath the surface instead of descending progressively.
Humpback Whale Tail Roll   @FanningSparks
Humpback whales, like the ones we saw, “fluke-up” meaning the tail is brought high in the air clearly showing the undersides.
Humpback Whale Fluke Up   @FanningSparks
Then the whales came over to watch us—or so it seemed!  Here’s a photo showing just how close the whales came to our boat.
Watching Humpback Whales from Ocean Explorations Zodiac   @FanningSparks
The whale calf seemed the most curious.  It swam right along the side of the boat.  The next photo shows the whale’s head or “rostrum”.  The small bumps that are visible on the humpback whales rostrum are called “tubercles”.  According to NOAA (USA National Oceanic and Atmospheric Administration), “Each tupercle has one hair that grows out of it.  No one knows exactly why humpbacks have tubercles, but it is thought that they function in some sensory perception.”
Humpback Whale Calf Swimming Along Side Zodiac Boat   @FanningSparks
Humpback Whale Rostrum Above Water   @FanningSparks
Here’s an illustration used by NOAA to explain the anatomy of a humpback whale.  You can’t really see the entire whale when it’s in the water so a visual aid is helpful.
NOAA Humpback Whale Illustration   @FanningSparks
The whale calf swam around and under the boat.  At one point, it did an amazing backflip.  The next photo shows the whale’s underside.  The clearly-visible vertical lines are called “ventral pleats”.  NOAA explains, “The pleats on a humpback whale run from the chin all the way to the umbilicus (belly-button).  Humpback whales are one of six species belonging to the Balaenopteridae family, or rorqual family. All rorquals have ventral pleats on the underside of their throat that allow them to expand their throat greatly while feeding.”  Incredibly, an average-sized humpback whale can hold about 5,000 gallons of water in its mouth.  That’s about the same amount of water needed to fill a 12-foot x 10-foot x 7-foot swimming pool.
Humpback Whale Calf Belly Up with Ventral Pleats Visible   @FanningSparks
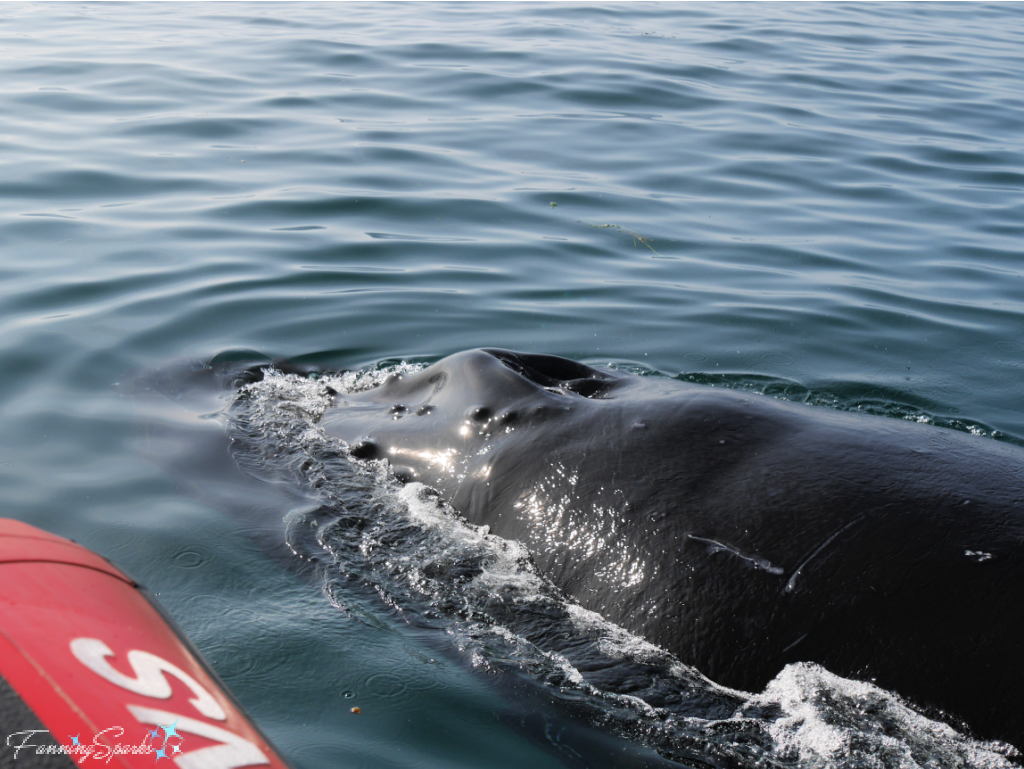
We also witnessed lots of flippering or flipper slapping.  NOAA says “Humpback whales are the most famous flipper slapper, as they possess the longest flippers of all cetaceans (around 1/3 of their body size). … A cetacean at the surface rolls onto its side, raises a flipper out of the water, and then hits the surface with it. The whale may do it once or several times in a row.”  Check out this flipper action!
Humpback Whale with Flipper Up at 45 Degree Angle   @FanningSparks
Humpback Whale with Flipper Perfectly Vertical   @FanningSparks
Humpback Whale with Tail Up and Flipper Perfectly Vertical   @FanningSparks
A little online research reveals a wealth of fascinating facts about humpback whales.   Here are a few other examples.
. Humpback whales are huge!  According to iNaturalist, “Adult humpback whales are 11 to 16 m (36-52 ft) long. … Weights of at least 35 t (38.5 short tons) are attained by adults.”  Some references suggest that if humpback whales lived on land, they would be crushed under their own weight.  A newborn humpback whale calf is 4.5 to 5 m (14.7-16.4ft) in length and weighs about 1.5 tons.  The calf consumes up to 52 gallons of milk per day.
How Big is a Humpback Whale Illustration   @FanningSparks
. Humpback whales migrate between feeding grounds in polar waters and breeding grounds in tropical waters.  Our guide Tom indicated the humpback whales we saw in the Bay of Fundy would likely migrate down to the Caribbean.  The whales mate, calve and nurse in the tropics.
. Humpback whales stay in the feeding grounds for only about 120 days.  During this time they need an astonishing amount of krill and small fish—about 1.5 tons every day.  They gain about 12 pounds per hour during their twice daily feedings.   During the remaining 245 days of the year, the humpback whale lives off its fat reserves.
After some time, the humpback whales we were watching decided it was time to move on.  For their final bow, they delighted us by breaching.  NOAA explains “The whale leaps out of the water head first. Usually, whales and dolphins roll in the air so that they land on their side when they hit the water, creating a lot of noise and a big splash.”  I was astonished to learn that the power required for a humpback whale to breach is equivalent to the power needed for a 747 aircraft to liftoff.  Incredible!
Humpback Whale Breaching   @FanningSparks
NOAA continues, “Researchers generally use the word breaching when at least 40% of the animal body clears the water. Despite its important energetic cost, breaching is often carried out in series. It is not clear for scientists why cetaceans are breaching. A breach might be a sign that the animal is physically fit enough to afford energy for this acrobatic display, hence it could be used for ascertaining dominance, courting or warning. Also, as the noise produced is extremely loud, this behavior might be a way of communicating over very long distances with other individuals. Another widely accepted reason is to dislodge parasites. The cetacean will fall onto its side which will bring down a layer of skin along with the attached parasites. The behavior may also be more simply a form of play or an exuberant display of joy.”
Shockingly, about 50 years ago, humpback whales were hunted to the brink of extinction.  Global populations had declined by more than 90% before the International Whaling Commission enacted a worldwide moratorium on hunting in 1982.  But the good news is, according to NatureServe an organization focused on halting the decline of biodiversity by providing accurate, current scientific information, the global status of the humpback whale is “Apparently Secure”.  They report “Large worldwide range extends throughout all oceans; depleted by past overharvesting; population size now exceeds 60,000 and has increased over the past several decades; vulnerable to marine pollution, disturbance by boat traffic, and entanglement in fishing gear, but these are not major threats, and the species is now apparently secure.”
I’ll wrap up this week’s post with a quote from the legendary Jacques Yves Cousteau “Learning science, learning about nature, is more than the mere right of taxpayers; it is more than the mere responsibility of voters. It is the privilege of the human being.” from The Human, the Orchid, and the Octopus: Exploring and Conserving Our Natural World (2007).

More Info

To learn more about Tiverton, Nova Scotia, Canada and why the broader Bay of Fundy area is called “Canada’s Natural Wonder”, check out the Bay of Fundy Tourism website.  You may also enjoy the FanningSparks’ blog post We Dined on the Ocean Floor.
Check out the Ocean Explorations Zodiac Whale Adventures website for information about Tom Goodwin and his fantastic whale watching tours.
For lots of educational resources about the Humpback Whale, check out the USA National Oceanic and Atmospheric Administration (NOAA)’s Sea Earth Atmosphere (SEA) program and NOAA SEA website.
I’m a huge fan of iNaturalist and their Seek app.  See the iNaturalist website for identification tools and reference information about wildlife.
NatureServe “is a U.S. – based nonprofit organization made up of passionate biodiversity scientists who want to apply the best information to decision-making. … As rapid changes threaten our planet and all life that depends on it, someone must keep their finger on the pulse of the planet and its plants and animals whose future depends on conservation action. NatureServe and our Network fill this role. Together, we are on the front lines of halting the decline of biodiversity.”

Today’s Takeaways

1. Watching whales in their natural environment is magical.
2. Take the time to select a tour guide with the knowledge, expertise and values that are important to you.
3. “Learning science, learning about nature … is the privilege of the human being.” Jacques Yves Cousteau
Peg - FanningSparks Author

The Bay of Fundy is one of the many natural wonders found along the coastlines of Canada’s Maritime Provinces.  Located between the provinces of Nova Scotia and New Brunswick, the Bay of Fundy is the site of the world’s highest tides.  Globally, the average difference between high tide and low tide, called the tidal range, is about 3 feet.  But in the funnel-shaped Bay of Fundy the tidal range is about 52 feet—more than 17 times the global average!  Since the tide changes about every 6 hours and 13 minutes that means the water goes up and down by about 52 feet twice every day.  And since the Bay of Fundy is no small body of water—it’s about 250 miles long and has an average depth of about ½ mile—that’s an astonishing amount of water moving in and out of the bay.  To help paint the picture here’s the Boar’s Head Lighthouse on a foggy section of the Bay of Fundy viewed from East Ferry, Nova Scotia.
Boar’s Head Lighthouse and Bay of Fundy viewed from East Ferry NS    @FanningSparks
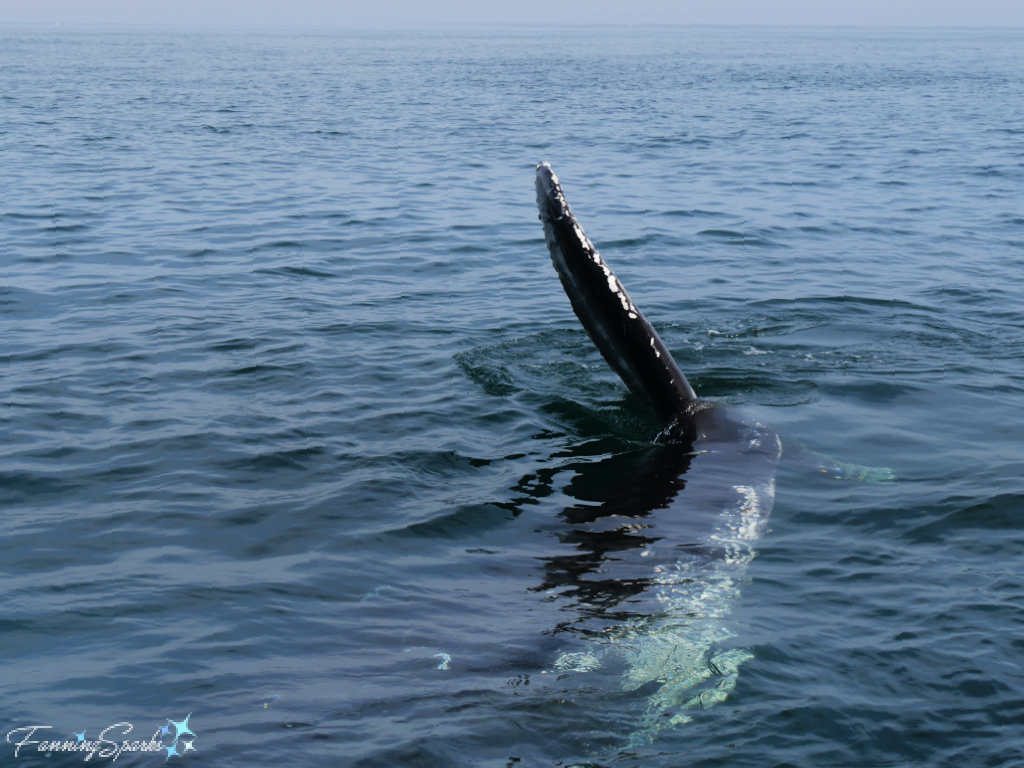
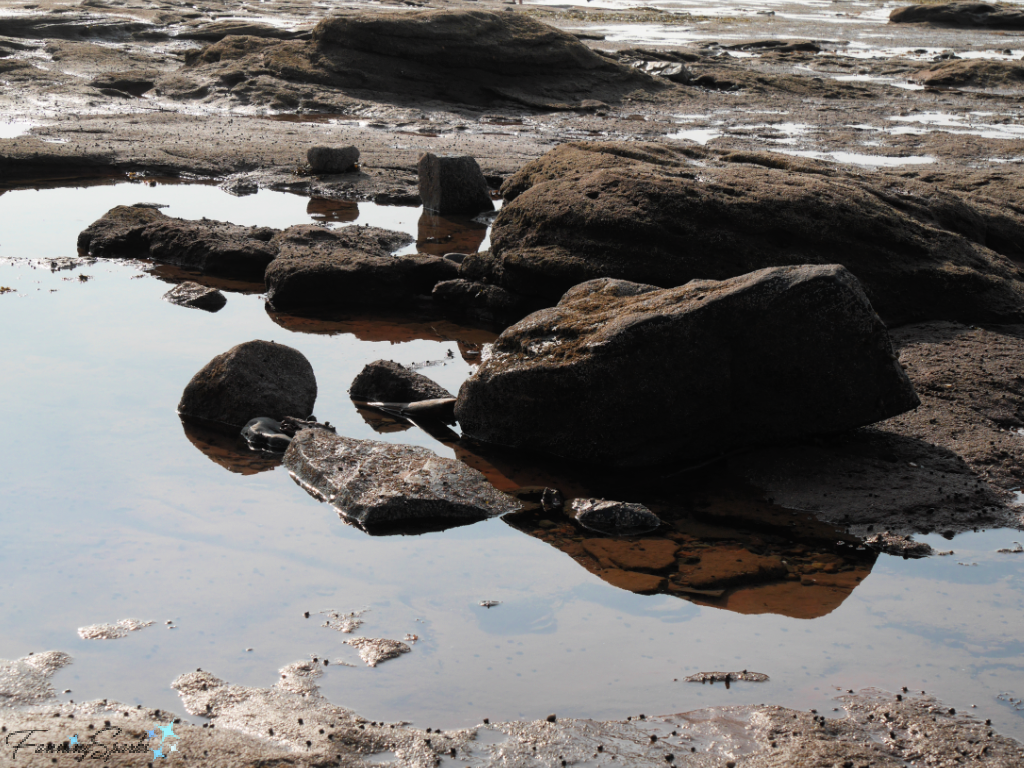
Wikipedia puts it this way “the tides that flow through the channel are very powerful. In one 12-hour tidal cycle, about 100 billion tonnes of water flows in and out of the bay, which is twice as much as the combined total flow of all the rivers of the world over the same period.  They are as powerful as 8,000 train engines or 25 million horses.”  Imagine—25 million horses!
All that tidal action creates some dramatic shorelines and some astonishing opportunities.  At Burntcoat Head, for instance, one can visit at low tide to walk around the ocean floor.  The tide was out at the time these photos were taken but we never forgot that within 6 hours this entire area would be totally submerged.
Cliff Walls on Right at Burntcoat Head NS    @FanningSparks
Sea Lettuce on Rocks at Burntcoat Head NS  @FanningSparks
The trees, visible on top of the red sandstone cliffs, provide a strong visual clue as to how high the water will rise.
Red Sandstone Cliff with Sea Lettuce at Burntcoat Head NS     @FanningSparks
Mud Covered Sandstone Walls at Burntcoat Head NS    @FanningSparks
There were tide pools to observe and rock piles to explore…
Tide Pools on Ocean Floor at Burntcoat Head NS    @FanningSparks
Rocks Strewn on Ocean Floor at Burntcoat Head NS    @FanningSparks
…as well as, invertebrates, crustaceans and seaweed to examine.
Periwinkles and Driftwood at Burntcoat Head NS    @FanningSparks
False Angelwing on Sand at Burntcoat Head NS    @FanningSparks
One might wonder how “Burntcoat Head” got its name.  As the story goes “In 1795 … residents Thomas and Robert Faulkner were burning the marsh and hung a coat too close to a fire.  Another story tells of the crew of a ship landing to spend the night.  One of the men got too close to the fire and set his coat ablaze.  His crewmates woke, yelling “Burnt coat!”.  As colourful as these stories are, it’s more likely that “burnt coat” is an English pronunciation of “Pointe Cloche”, French for “Bell Point”.“
Exploring the ocean floor during low tide is a pretty amazing adventure but it gets even better than that.  Visitors can “experience the ultimate culinary adventure at the site of the world’s highest tides” by participating in a Dining on the Ocean Floor by Food Fantastique event.  A local chef hosts the event which includes guided tours, a lunchtime seafood feast, a 3-course sit-down dinner and a beach campfire—all on the ocean floor.  It’s a super posh once-in-a-lifetime event.  Alternatively, it’s possible to do what I did—host my own ocean floor dining experience.
We cracked open a locally-brewed beer from our fisherman’s lunch bucket.  This item was handmade using the same skills practiced by Newfoundland coopers for hundreds of years.  These buckets were used to keep a fisherman’s lunch safe and dry at sea.
Craft Beer in Fisherman’s Lunch Bucket at Burntcoat Head NS   @FanningSparks
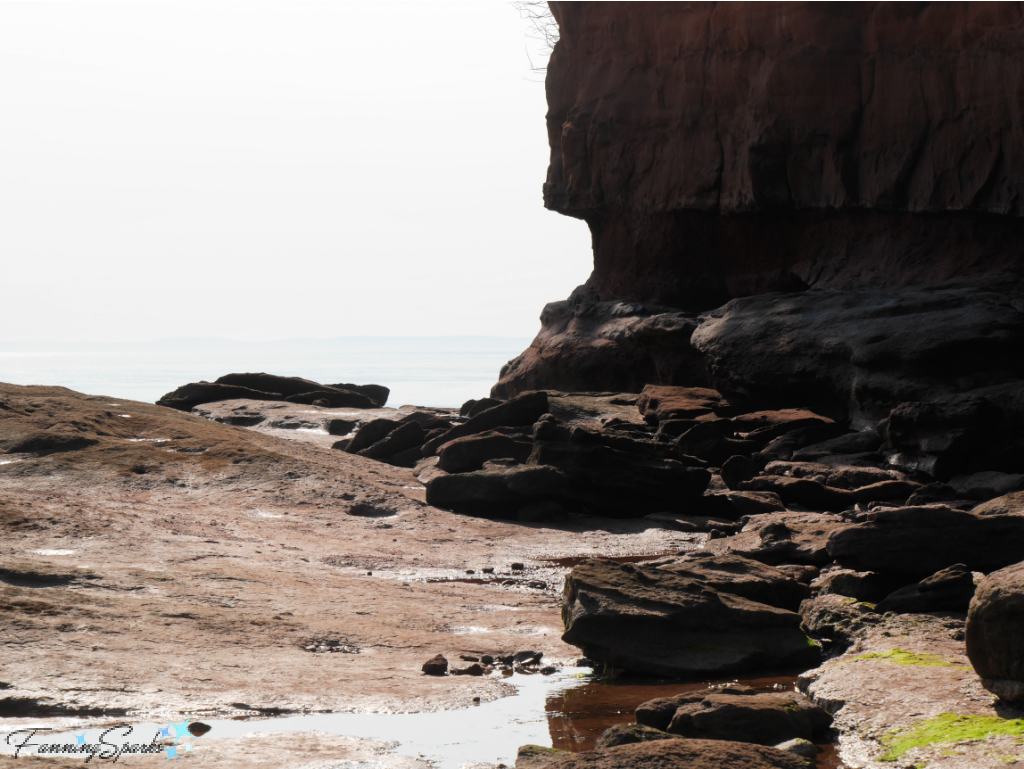
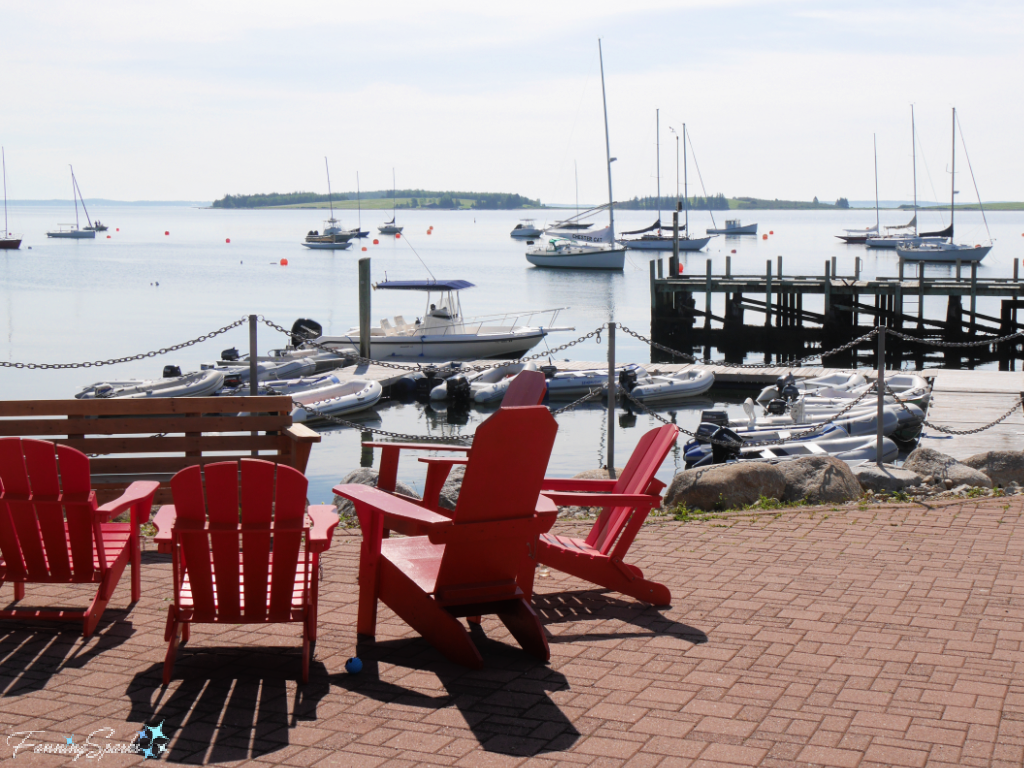
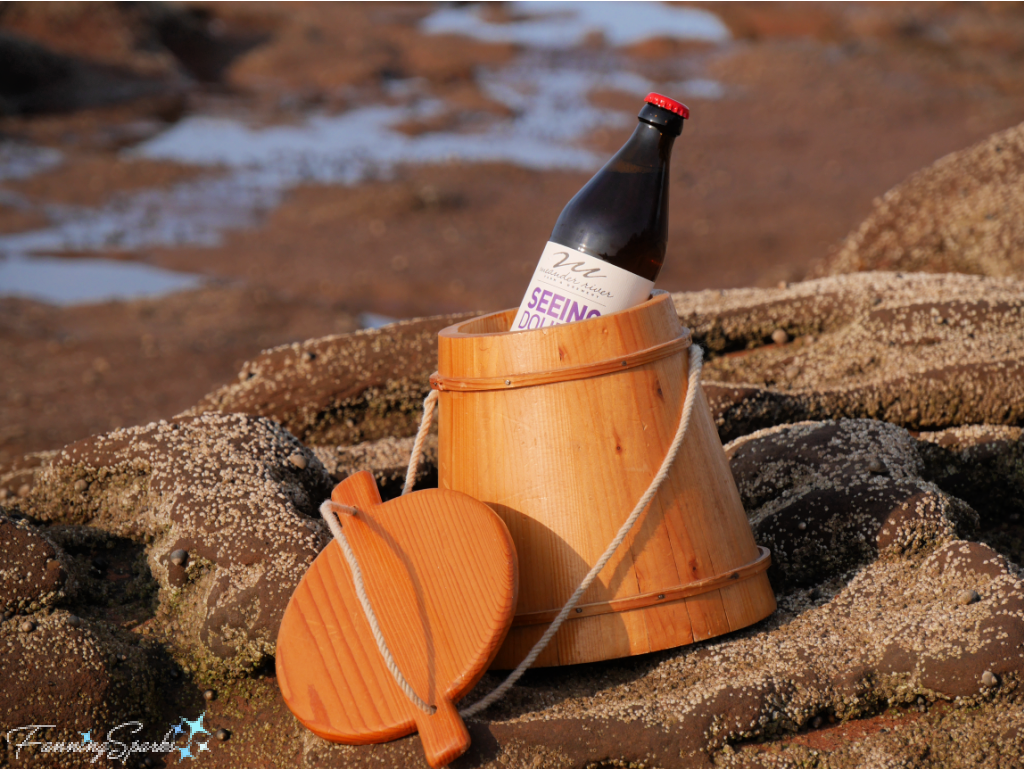
Later in the day, we enjoyed with a nice glass of white wine…
White Wine with Basket on Ocean Floor at Burntcoat Head NS    @FanningSparks…followed by cheese, crackers and fresh fruit.
Picnic Lunch of Cheese, Crackers and Fruit at Burntcoat Head NS    @FanningSparksIt was a simple meal in an extraordinary setting!
Picnic Laid Out on Ocean Floor at Burntcoat Head  NS   @FanningSparks
Slowly the sun started to set as the tide returned.
Rocks and Tide Pool in Evening Light at Burntcoat Head  NS    @FanningSparks
Flower Pot Island in Evening Light at Burntcoat Head  NS         @FanningSparks
Sandstone Cliffs in Evening Light at Burntcoat Head  NS    @FanningSparks
A gorgeous sunset topped off an extraordinary day!
Sun Setting at Burntcoat Head NS   @FanningSparks

More Info

You can learn more about visiting the Bay of Fundy and the Annapolis Valley in Nova Scotia, Canada on the Tourism Nova Scotia website.
The Burntcoat Head Park website provides information about the Park, shore life and ocean floor adventures as well as tips for planning your visit.
Special thanks to my sister Marian for collaborating on the Burntcoat Head photo shoot and for taking the below picture.
Tip: Rubber boots are best for traversing the muddy sections along the shoreline—plus they make quite the fashion statement!
Peg Frizzell Taking Photos at Burntcoat Head NS   @FanningSparks
You can learn more about Dining on the Ocean Floor by Food Fantastique on their website.
You may also enjoy these FanningSparks’ posts about picnicking and dining out-of-doors:
. Picnic Under the Wisteria
. A Colorful Backyard Picnic
. Sunrise Breakfast Picnic
. The Ultimate Picnic Blanket – DIY Tutorial.

Today’s Takeaways

1. The Bay of Fundy, located between the Canadian provinces of Nova Scotia and New Brunswick, has the highest tides in the world.
2. Explore, observe and relish nature’s wonders.
3. Sometimes a do-it-yourself version of a packaged experience is a great alternative.
Peg - FanningSparks Author