Author

Peg

Browsing

There’s no shortage of the “best of” photography and “photographer of the year” awards at this time of year.  I’m drawn into nearly every one—the photographs are astounding!  Sparked by all these award-winning photos, I decided to take a look back through my own photos from 2019 and select a few to share with you today.  After scanning a year’s worth of photos, 220 folders containing over 15 thousand photos, I had it narrowed down to 46 shots.
At this point, I have to admit—15,000 photos is a lot!  I can’t help but stop to be grateful for the way the technology of photography has evolved.  I saw a lot of film negatives (like those pictured above) during the five years I worked in a photography studio.  It was my first job after graduating from high school and a great experience. (Special thanks to the fine folks at Pridham’s Studio in Truro, Nova Scotia!).  Back in those days, you had to pay for every photo you took.  I don’t remember the exact costs but I do remember a good chunk of my paycheck never left the studio.
So back to today’s topic.  I had to find a way to narrow down the 46 photos from my first cut.  To be as objective as possible, I considered the following criteria:  1) Interest 2) Composition 3) Viewpoint 4) Lighting  5) Color  6) Timing  7) Uniqueness.  A good photo tells a story and draws the viewer in for a closer look.  I hope these photos do that.  I also considered the elements of art (ie line, shape, form, texture, color, value/tone and space) and the principles of design (ie balance, harmony, pattern, contrast, movement, emphasis and hierarchy) as they relate to photography.  While my photos aren’t in the same league as the award winners, I’m pleased to share, in no particular order, FanningSparks’ Top 19 Photos from 2019.

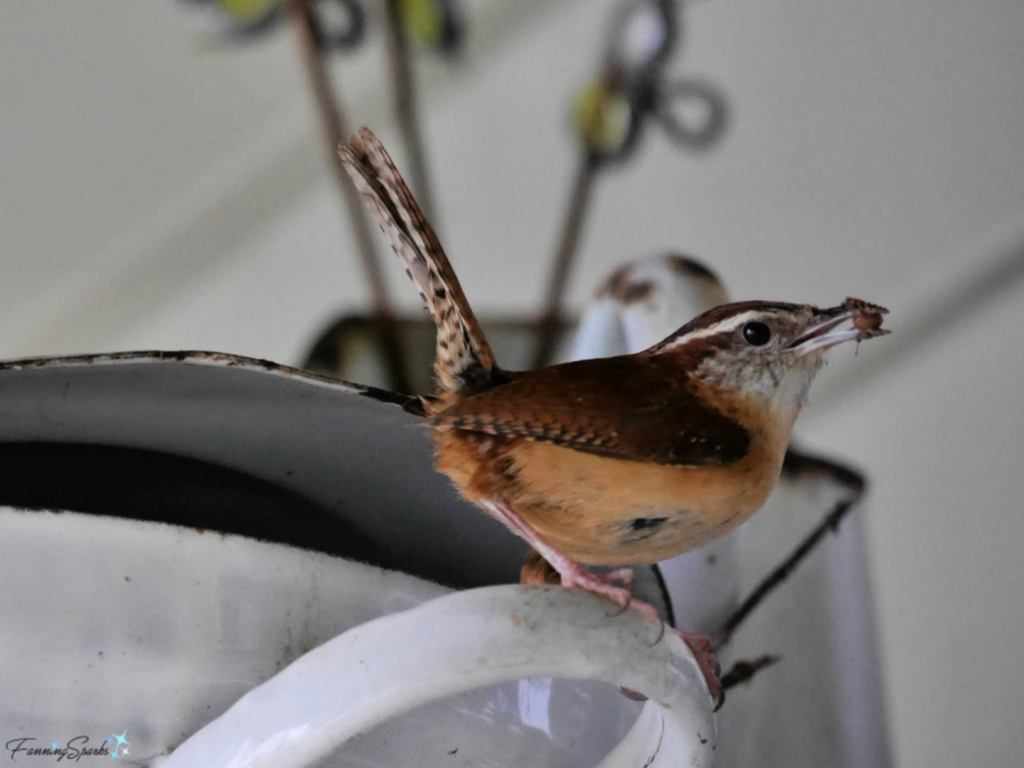
This past spring, a pair of Carolina Wrens decided to build their nest in one of our French enamelware pots (don’t worry—we use them for decorating not cooking!).  Watching these wrens was endlessly entertaining.  This photo, showing one of the parents delivering dinner, was my reward for several hours behind the camera lens.
Wren Delivers Bug for Lunch.   @FanningSparks
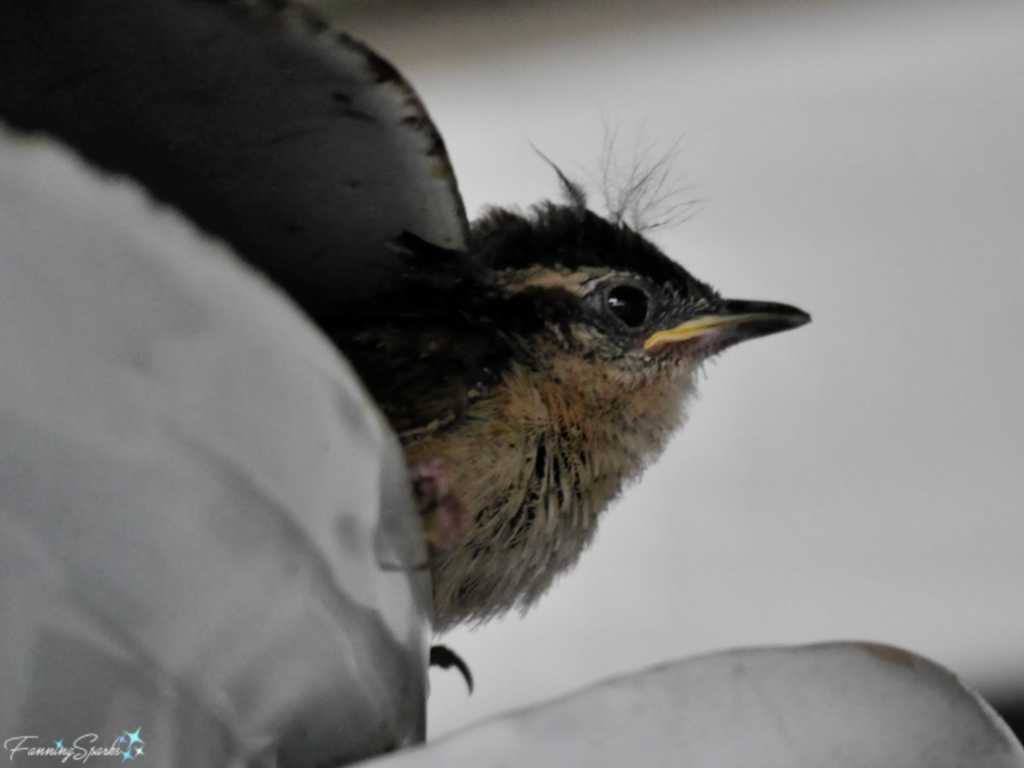
Eventually the little ones were ready to leave the nest.  The below wren chick is emerging for the first time.  Watching the chicks learn to move around and fly for the first time was amazing.  I selected these photos for their uniqueness and the story they tell.
Baby Wren Ready to Leave Nest.   @FanningSparksThis foxglove was glowing in the morning sunshine at the Georgia State Botanical Garden in Athens, Georgia.  I chose this shot for the dramatic lighting, the strong use of negative space and the striking contrast.
Foxglove in Sunlight.   @FanningSparks
That same early morning sunshine, shone a spotlight on this pretty red poppy just as a honey bee flew in.  The sunlight also emphasizes a pollen basket on her back leg.  I chose this photo for the lighting and composition.  The angled bloom fills the frame in an interesting way and highlights the bee.  The bee is positioned according to the rule of thirds.  The rule of thirds, if you’re not familiar with this term, refers to visually dividing the viewfinder into 9 quadrants (a grid of 3×3) and then deliberately placing the focal point at one of the intersections.  Apparently, studies have shown the viewer’s eye is more comfortable looking at something off center.
Poppy with Busy Bee in Sunshine.   @FanningSparks
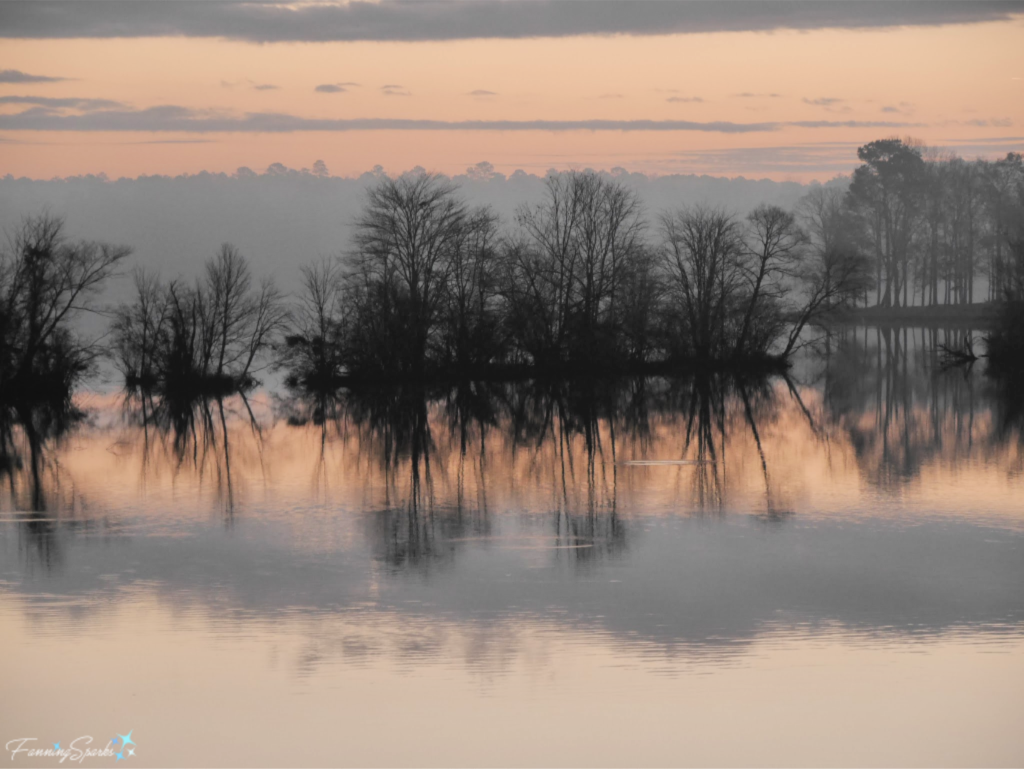
Timing was everything in this shot over Lake Oconee, Georgia.  The gentle light of daybreak, the soft reflection on the water’s surface and the pastel colors of the imminent sunrise all combine to make an extraordinary moment in time.
Misty Morning Sunrise Over Lake Oconee Georgia.   @FanningSparks
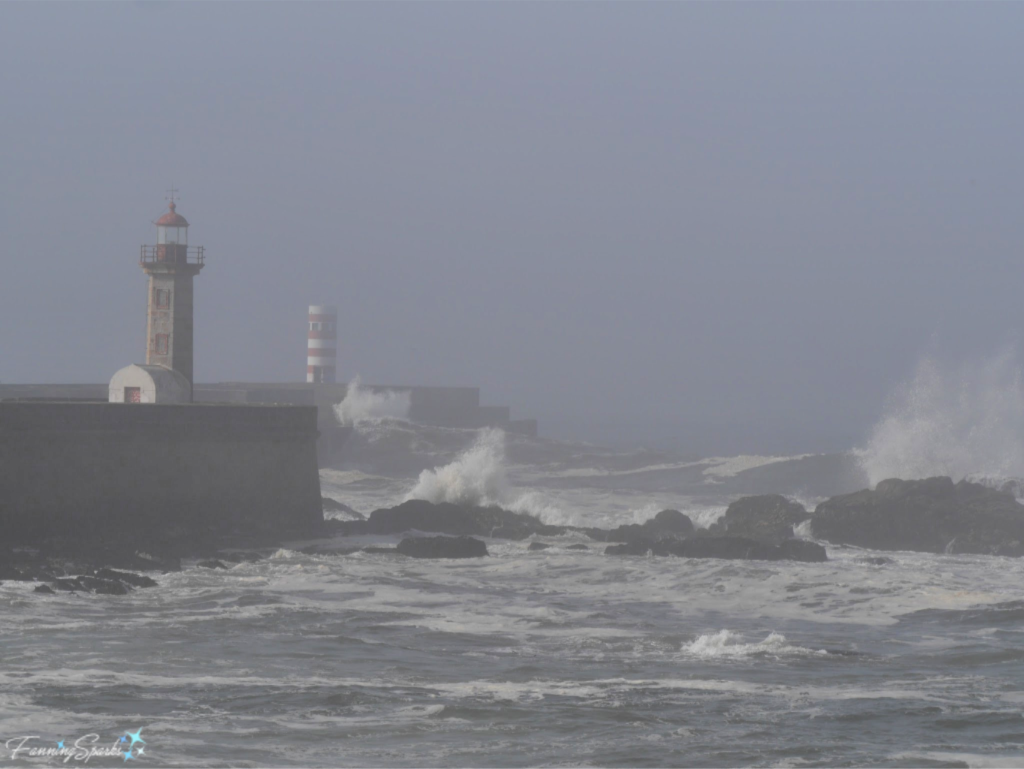
Here’s another shot where timing played a critical role.  The heavy morning fog shrouds the lighthouse, bringing it in and out of focus, while the ocean waves crash on the rocky shore.  This is the Felgueiras Lighthouse near Porto, Portugal.  See my post, Following the Yellow Arrows, for more photos from Portugal’s beautiful coastline.
Felgueiras Lighthouse in Early Morning Fog at Porto Portugal.  @FanningSparks
Speaking of timing, catching this pair of male Wild Turkeys took some quick action.  While trying to find an art gallery near Asheville, North Carolina, I took the wrong turn and found myself driving through a small rural community.  Suddenly a flock of wild turkeys came out of the woods and crossed the road in front of me.  Luckily there was no traffic and I was able to focus my attention on this magnificent sight.   I still can’t believe how the toms posed so perfectly giving this shot the ultimate repetition.
Pair of Strutting Tom Turkeys.   @FanningSparks
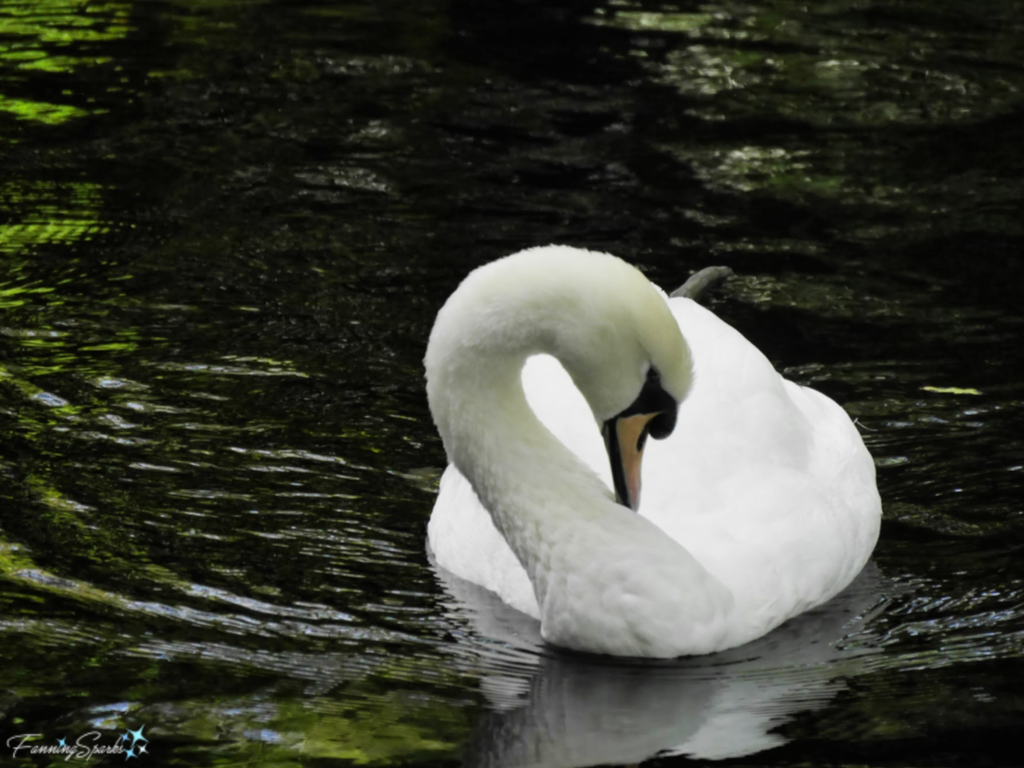
Birds seem to be a recurring theme.  This gorgeous Mute Swan was busy preening in the Pena Gardens in Sintra, Portugal.   The graceful line of its neck, highlighted by its sunlit back, was just spectacular.  I chose this photo for the pleasing lines, the unusual lighting and the dramatic contrast.
Graceful Swan at Pena Park in Sintra Portugal.   @FanningSparks
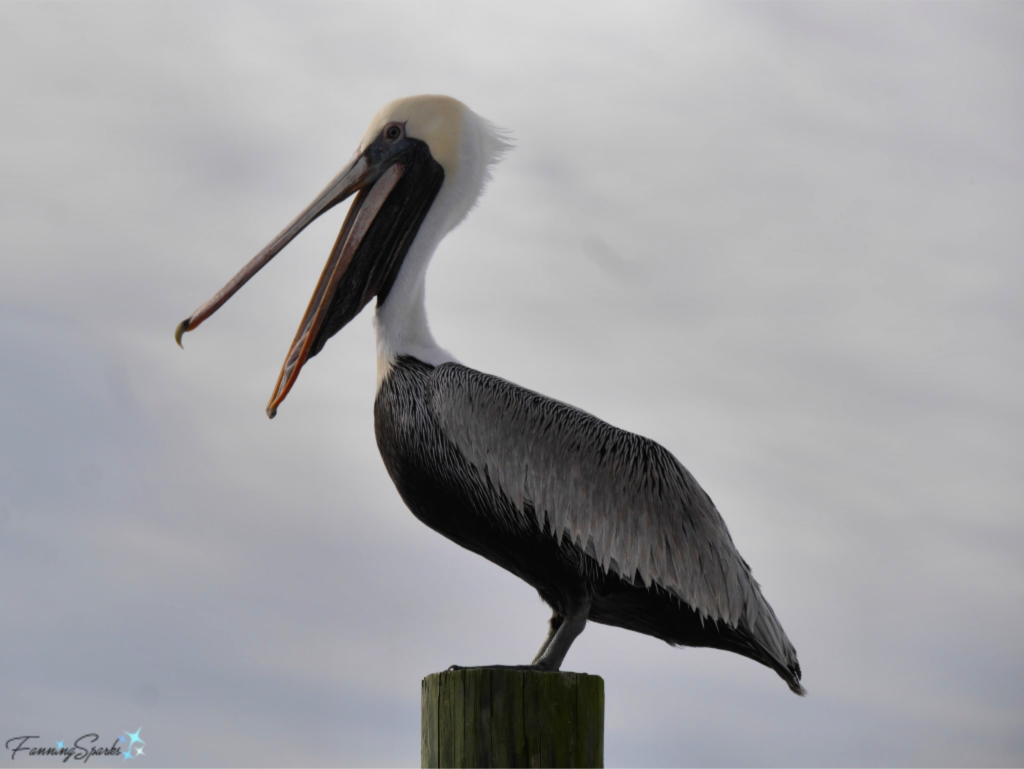
This Brown Pelican, on the other hand, captured my attention with its unlikely balance and open bill.  What it lacks in grace, it more than makes up for with personality.  This pelican was spotted near Pensacola Beach in Florida.  I selected this photo for its simple composition and humorous subject matter.
Pelican with Open Mouth.  @FanningSparks
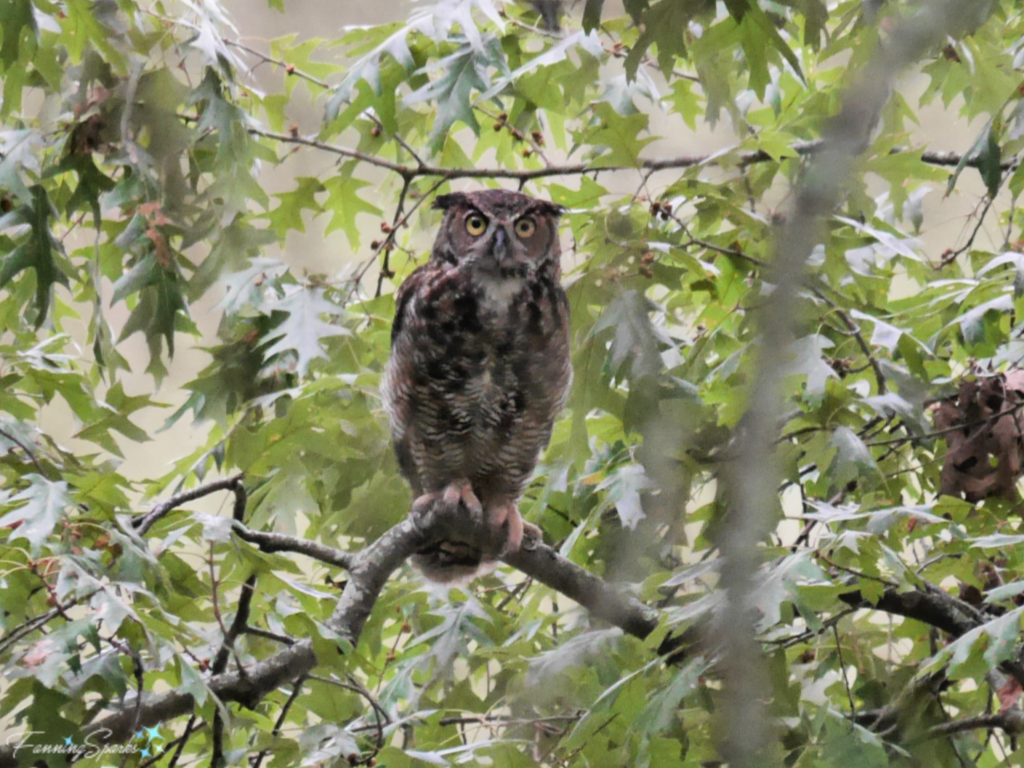
This Great Horned Owl was a regular visitor in our backyard this past July.  It was extremely difficult to photograph but I managed to get this shot just before nightfall.   Judging by the way the owl is looking directly at the camera, it’s obvious it saw me too.  I chose this photo for the strong focal point provided by the the owl’s penetrating stare.
Great Horned Owl at Lake Oconee Georgia.   @FanningSparks
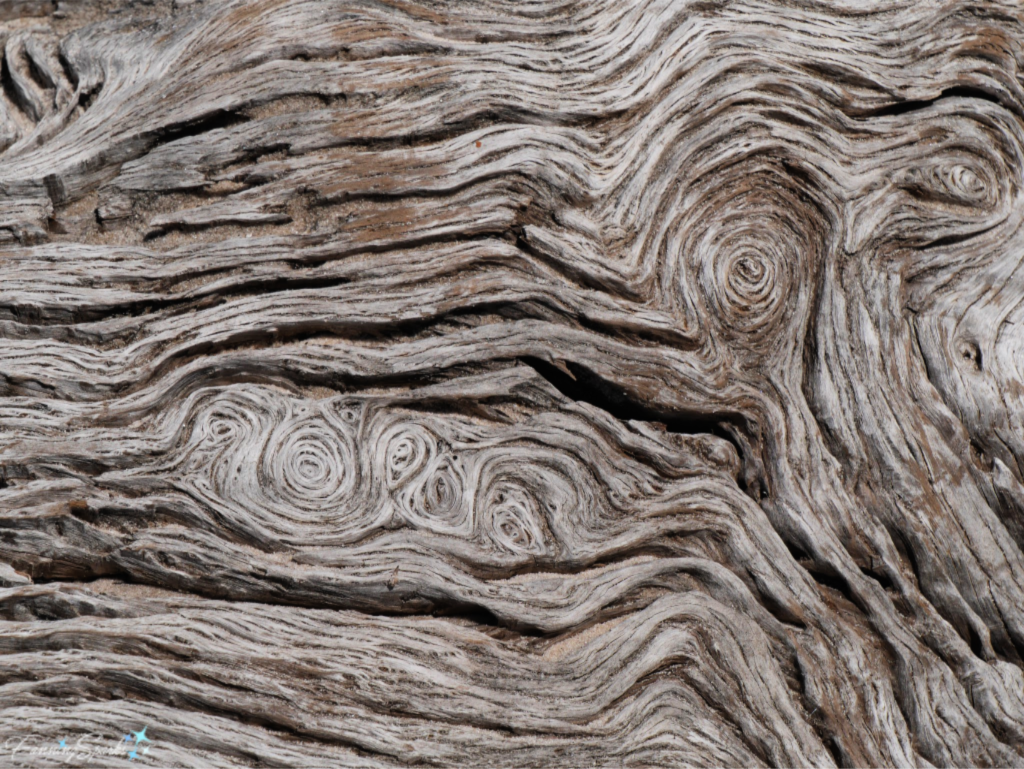
This next photo is a great example of appealing lines and patterns.  The photo is rich with texture—it’s easy for the viewer to imagine how it feels.  These gorgeous driftwood details were spotted at Boneyard Beach near Amelia Island, Florida.
Driftwood at Boneyard Beach near Amelia Island Florida.  @FanningSparks
Here’s another example of strong lines.  The rather unusual placement of the Cinnamon Fern frond adds interest while the repetition of the pinna and pinnules creates a pleasing pattern.  See my post, Southern Ladies, Christmas Stockings and Hairy Armpits, if you’d like to learn more about the fascinating world of ferns.
Cinnamon Fern Frond. @FanningSparks
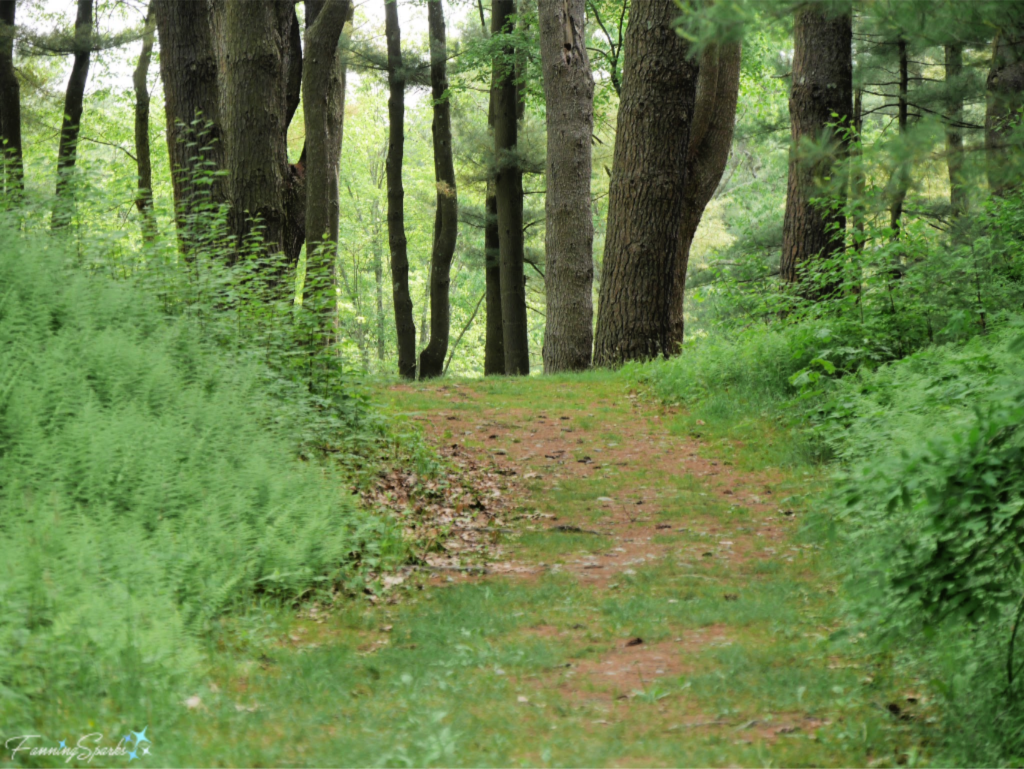
Another popular technique is to use lines to lead the viewer into a photo.  Here the leading lines of the forest path invite the viewer to look towards the trees in the distance.  This photo, taken in the springtime in Innisfree Gardens in New York state, is a medley of soft greens and browns.   I chose this photo for the leading lines and the soothing colors.
Inviting Forest Path in Innisfree Gardens in New York State.   @FanningSparks
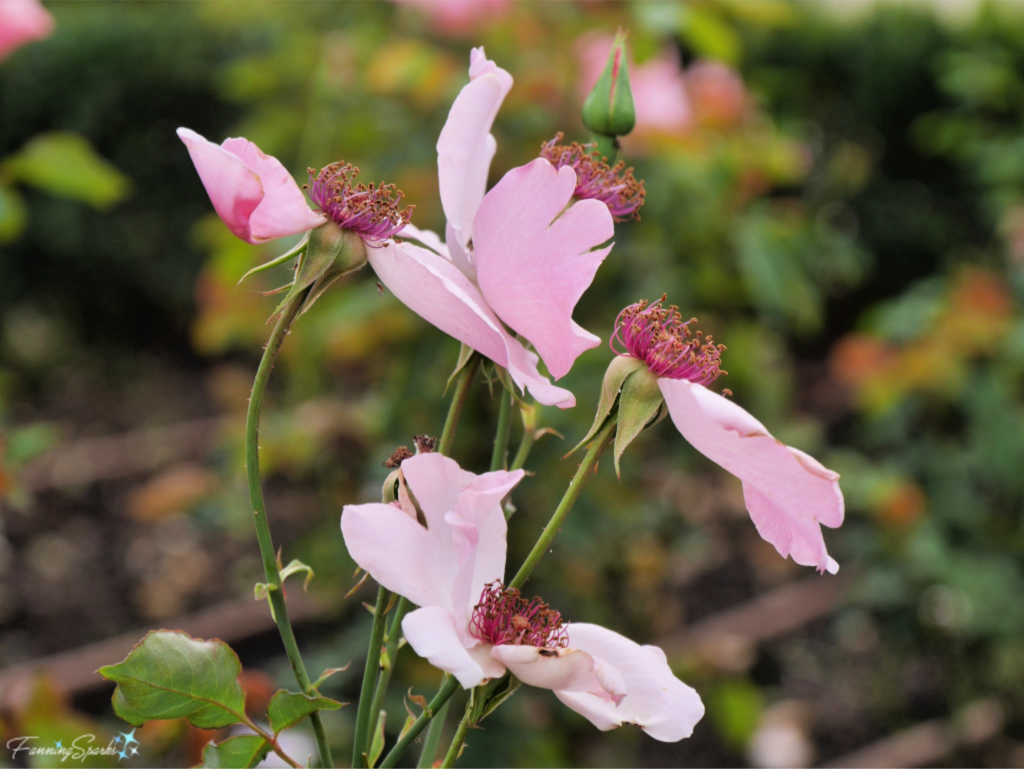
Color plays a big role in this photo with the soft pink of the roses contrasting nicely with the green background.  But it’s the repetition of the petals and the various flowering stages, from unopened bud to spent bloom, that creates a pleasing unity and interesting contrast.  These roses were spotted at Retiro Park in Madrid.
Roses in Park Retiro Madrid.   @FanningSparksHere’s another example of repetition and contrast.  The angular window frame and the square tiles provide a nice contrast to the curvy wrought iron and flowers on the tiles.  While the contrast of the aging and damaged tiles adds interest and pop.  I chose this photo for the strong lines and interesting contrasts.  This photo was taken in Ovar, Portugal.  You can see lots more Portuguese tiles in my post Talk About Tiles!
Portuguese Tiles/ Azulejos on a Home in Ovar. @FanningSparks
This wrought iron fence surrounds the Panteon de Hombres Ilustres in Madrid.  I chose this photo for its composition.  Three distinctive layers (fence in foreground, roof in mid-ground and cross in background) give the photo strong depth.  The precise alignment of the elements results in a pleasing harmony.  See my post, Lines and Patterns in Wrought Iron, for several examples of beautiful wrought iron from Portugal.
Wrought Iron at Panteon de Hombres Ilustres in Madrid.   @FanningSparks
This next photo of the Forsyth Fountain in Savannah, Georgia is another example of timing.  The early morning sunshine hits the spraying water at exactly the right angle.  I chose this photo for its sense of movement and dramatic lighting.
Fountain Caught in the Early Morning Sunshine in Forsyth Park in Savannah Georgia. @FanningSparks
All of the photos I’ve shared thus far have been carefully composed but none are actually staged.  Yet I stage a lot of photos for the blog to illustrate stories, demonstrate techniques and illustrate tutorials.  These last two photos are examples of staged and styled photos.  This next photo was created and composed for dramatic contrast.  It was meant to surprise the viewer and invite them to take a closer look… “Hey, wait a minute, that button looks like a blueberry.  Why is there a blueberry on that shirt cuff?”  This wacky shot was part of the fun I had with a post called Blueberry Zaniness.
Blueberry as a Cuff Link... that's zany! @FanningSparks
This last photo is one of my all-time favorites.  It is a flat-plane carving created by Harley Refsal, a talented woodcarver I met at the John C Campbell Folk School.  You can learn more in my post Flat-Plane Carving with Harley.   This carving is a true work of art—it exemplifies the Scandinavian style of flat-plane carving.  But what I love about this photo is the way the light hits his face and emphasizes the planes of the carving.  The light and position showcase the expression on his face and bring him to life.  I swear there’s a mischievous twinkle in his eyes!  And that is pure magic!
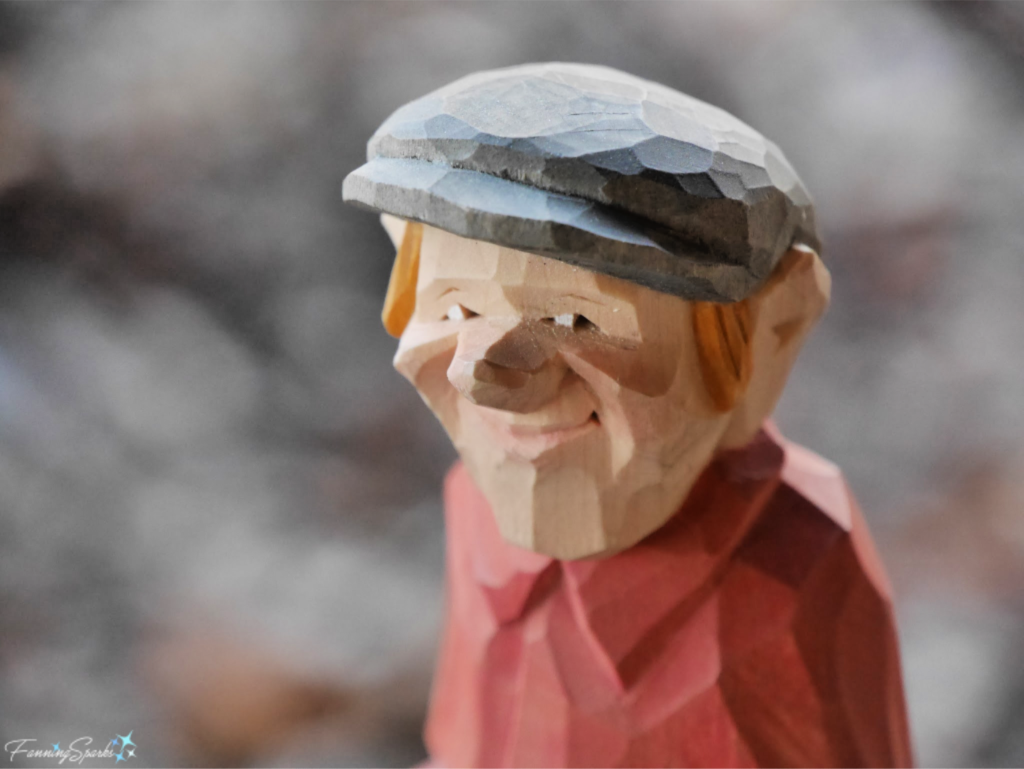
Closeup of Flat-Plane Carved Figure by Harley Refsal. @FanningSparks

More Info

Here’s a summary list of the posts I mentioned above:
Following the Yellow Arrows
Southern Ladies, Christmas Stockings and Hairy Armpits
Talk About Tiles!
Lines and Patterns in Wrought Iron
Blueberry Zaniness
Flat-Plane Carving with Harley

Here are some of the 2019 photography contests I’ve been enjoying:
Bird Photographer of the Year
Comedy Wildlife Photography Awards
EyeEm Awards which includes 10 categories such as The Traveler, The Great Outdoors, The Foodie, The Portraitist, The Photojournalist
Fine Art Photography Awards
National Geographic Travel Photo Contest 
National Wildlife Federation Photo Contest
Siena International Photo Awards
Sony World Photography Awards
Wildlife Photographer of the Year

Today’s Takeaways

1.  Enjoy and learn from the work of award-winning photographers.
2. Consider trying different angles and viewpoints to enhance your own photos.
3. Think about how the elements of art and principles of design apply to photography.
Peg - FanningSparks Author

Greetings Family, Friends and Followers,
No post this week—just heartfelt wishes for a safe and joyous holiday season!
Joyous Greetings 2019 Paper Stitching by FanningSparks.

About this photo which I’ve embellished with embroidery and beading: This is a camellia, a winter-blooming shrub, beloved by gardeners across the US Southeast.  Camellias have been called the Southern belles of the plant world.  Camellias do not, typically, tolerate snow and cold.  In fact, this was a rare moment after a freak snowfall in Georgia before all the blooms fell off the shrub.  A joyous sight made all the more special by its fleeting beauty.

Peg - FanningSparks Author

Every year the lovely southern town of Madison, Georgia hosts a Holiday Tour of Homes.  The town puts on its holiday finery and welcomes visitors from near and far.
Welcoming Wreaths Spotted on Main Street during Madison Holiday Tour of Homes   @FanningSparks
The home tour features several private homes, historic house museums and churches.  It’s a festive event with hundreds of cheerful visitors taking in the charms of this unique town.  Madison is steeped in history boasting more than 100 antebellum homes and buildings.  It’s rare to find houses of this era in Georgia because most were destroyed by General Sherman’s “March to the Sea” at the end of the Civil War.  Home tours are a great opportunity to admire these treasured historic houses.  Many thanks to the generous citizens of Madison who graciously open their homes for these tours!
Madison is a quick 20-minute drive for me so I can easily enjoy all these home tours.  In today’s post, I’d like to share a few highlights from the 2019 and 2018 Madison Holiday Tour of Homes.  I’ll also call out a few clever ideas that you might want to incorporate into your own holiday décor.
A row of flickering white candles, tucked beside the Madison Jasmine-covered porch rails, invited guests to enter the Barnett-Stokes-Ball House for a Candlelight Tour.
Glowing Candles Greet Visitors to Barnett-Stokes-Ball House during Madison Holiday Tour of Homes   @FanningSparks
With Georgia’s wonderful mild winters, porch-living is a year round possibility.  The front porch, at the Porch House, exuded holiday spirit.
Festive Porch at the Porch House during Madison Holiday Tour of Homes   @FanningSparks
At the Massey House, the front porch was packed with charming little details such as this display of horse and sleigh bells.
Horse and Sleigh Bells at Massey House during Madison Holiday Tour of Homes   @FanningSparks
Given that most historic homes relied on fireplaces for heat, there was no shortage of beautifully decorated mantels on the tour.  This stunning fireplace and mantel, decked out in magnolia foliage, were spotted at the Richter-Wingate House.
Stunning Fireplace Décor at Richter-Wingate House during Madison Holiday Tour of Homes   @FanningSparks
A nice, light touch was used with the holiday decorations in this gorgeous living room in the Barnett-Stokes-Ball House.
Living Room at Barnett-Stokes-Ball House during Madison Holiday Tour of Homes   @FanningSparks
Here’s a great decorating idea spotted at the Hilltop House: string together pecans into a pretty, natural garland.
Pecan Garland at Hilltop House during Madison Holiday Tour of Homes   @FanningSparks
Formal dining rooms are another feature of these lovely historic homes.  Tables sparkled with china, crystal and silver.  Pretty table linens and gorgeous floral arrangements completed the picture.  This stunningly elegant setting was spotted at the Broyles House.
Formal Table Setting at Broyles House during Madison Holiday Tour of Homes   @FanningSparks
The dining room at the Barnett-Stokes-Ball House was spectacular.
Dining Room at Barnett-Stokes-Ball House during Madison Holiday Tour of Homes   @FanningSparks
Candles and greenery added a welcoming glow to the beautifully set table. Dining Table at Barnett-Stokes-Ball House during Madison Holiday Tour of Homes   @FanningSparks
Notice the thoughtful little details in this pleasing place setting at the McLeod House.  Simple white flowers, unusually shaped dinnerware, a few feathers tucked into the napkin ring and a clove-studded orange.
Table Setting at McLeod House during Madison Holiday Tour of Homes   @FanningSparks
Here’s a less formal, fun place setting spotted on the kitchen island at the McLeod House.
Festive Place Setting at McLeod House during Madison Holiday Tour of Homes   @FanningSparks
As you can imagine, the kitchens in these historic homes are not original.  Several homes had fairly recent renovations or additions with modern kitchens.  Here’s a glimpse of the kitchen at the Brick Cottage.  I love how the trio of wreaths is perfectly fitted to the window which in turn frames the gorgeous back garden.
Kitchen Window at Brick Cottage during Madison Holiday Tour of Homes   @FanningSparks
Not all the houses on the tours are historic.  The Massey House, for instance, was built in 2005.  The warm glow of copper and vintage finds, complemented with greenery and a hand-crafted Santa, graced their kitchen counter.
Festive Kitchen at Massey House during Madison Holiday Tour of Homes   @FanningSparks
A great decorating technique I spotted at several homes was to sprinkle groupings and collections throughout the formal and informal living spaces.  Here’s an example, also from the Massey House, showcasing a collection of handcrafted Santas on a side table.
Santa Collection at Massey House during Madison Holiday Tour of Homes   @FanningSparks
This collection of nutcrackers (including one of the biggest nutcrackers I’ve ever seen) add punch and personality to the formal living room at the Porch House.
Nutcracker Collection at Porch House during Madison Holiday Tour of Homes   @FanningSparks
While the nutcrackers were stunning, this old-timey portable TV displayed in the same cabinet, was really eye-catching.  I heard several folks admiring it.   Not only is it pretty, but it lights up, the winter scene rotates and it plays holiday music.  I’m already trying to find one for myself!
Old-Timey TV at Porch House during Madison Holiday Tour of Homes   @FanningSparks
Here’s a great way to display a collection of Christmas ornaments—arrange them in a vintage wooden dough bowl and display as a centerpiece—as they did at the Richter-Wingate House.
Ornaments in Wood Dough Bowl at Richter-Wingate House during Madison Holiday Tour of Homes   @FanningSparks
Bedrooms, playrooms, and even bathrooms, all received a touch of holiday spirit.  For instance, this pretty little display featuring vintage quilts was a delightful surprise in one of the bedrooms at the Newsome Farmhouse.
Quilts and Tabletop Tree at Newsome Farmhouse during Madison Holiday Tour of Homes   @FanningSparks
A simple, old-fashioned garland added a festive touch to this grand bedframe at Heritage Hall.
Grand Bedframe at Heritage Hall during Madison Holiday Tour of Homes   @FanningSparks
This chalkboard sign, in the playroom at the Barnett-Stokes-Ball House, added some humorous fun. I wonder if little Evie will get the “real live horse” she requested.
Playroom Chalkboard at Barnett-Stokes-Ball House during Madison Holiday Tour of Homes   @FanningSparks
Here in the bathroom at the Brick Cottage, a jar of special soaps got an extra boost with a single holiday motif.
Festive Soaps at Brick Cottage during Madison Holiday Tour of Homes   @FanningSparks
But the best part of this bathroom, and my favorite décor detail, was this bathing snowman!
Bathing Snowman at Brick Cottage during Madison Holiday Tour of Homes   @FanningSparks

More Info

I hope you’ve enjoyed this glimpse into the Madison Holiday Tour of Homes.  There was so much more to see than what I’ve been able to include in this post.  If you’re ever in the Georgia area during May or December, please try to take in a Madison House Tour.  These house tours are typically fundraisers so it’s a great way to support a good cause.  You can find more info on the Visit Madison GA website.  Again, special thanks to all the homeowners who graciously share their homes.
You may also like these posts regarding Madison’s Spring Tour of Homes:
. Madison’s House Beautiful
. Madison in May – 15 Favorite Fotos

Today’s Takeaways

1. House tours are typically fundraisers so you can support a good cause while enjoying yourself.
2. Consider attending a house tour to see some fresh ideas and get inspired.
3. Holiday house tours are sure to put you in the holiday spirit.
Peg - FanningSparks Author

Wreaths are a sign of welcome.  Hung on the front door, above the mantel or elsewhere, a wreath invites guests to enter and get comfortable.  Some folks have different wreaths for every season and major holiday.  I haven’t reached that level of wreath mastery but I do like to hang wreaths during the Christmas holidays.  This year I decided to try something a little different and make a wreath out of wood.  The wreath is in the shape of an 8-point star.  It showcases the natural grain of unfinished wood with subtle color-washed red wooden beads.  The diamonds resemble leaves and the beads look like berries.  All of which, gives it a nice Scandinavian, minimalist vibe.
It’s always fun to let an idea evolve and unfold.  In this case, a wooden trivet found at a thrift store sparked the idea for a wooden wreath. I have a vague recollection of trivets like this (shown top right) being made during craft period at summer camp.  The wreath design came together as I tried different shapes and sizes of paper diamonds.
Designing the Wreath for Diamonds and Beads Wooden Wreath   @FanningSparks
There are many ways to finish this wreath.  You could choose to paint it, add more or less berries, add ribbon, or insert greenery.  I decided to keep it clean and simple.  In keeping with the natural theme, I found a curly branch in the yard and propped it in a simple white vase.  Then I cut a few miniature wooden diamonds and stained a few more wooden beads.  These were hung with fishing line from the branch.  A red striped tablecloth, a little wood figure and this lovely holiday tablescape came together.
Tablescape Featuring Diamonds and Beads Wooden Wreath   @FanningSparks
Today’s post provides easy, step-by-step instructions to make your very own Diamonds and Beads Wooden Wreath.

Supplies Needed
The following supplies are needed for this project:
Supplies Needed for Diamonds and Beads Wooden Wreath   @FanningSparks
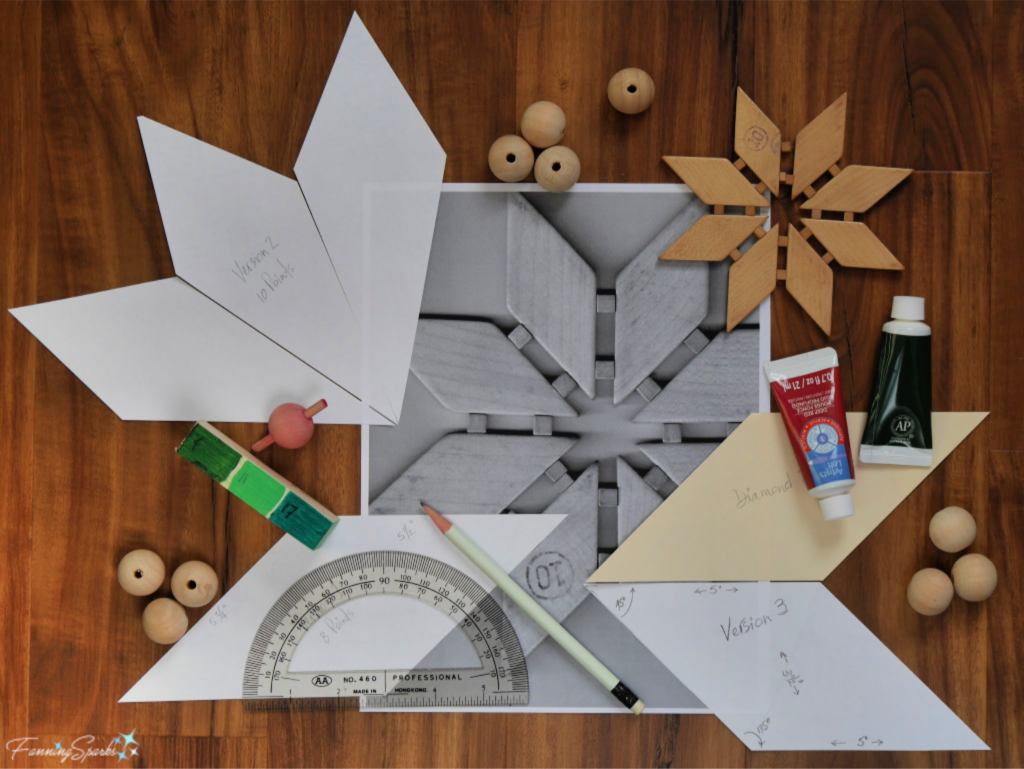
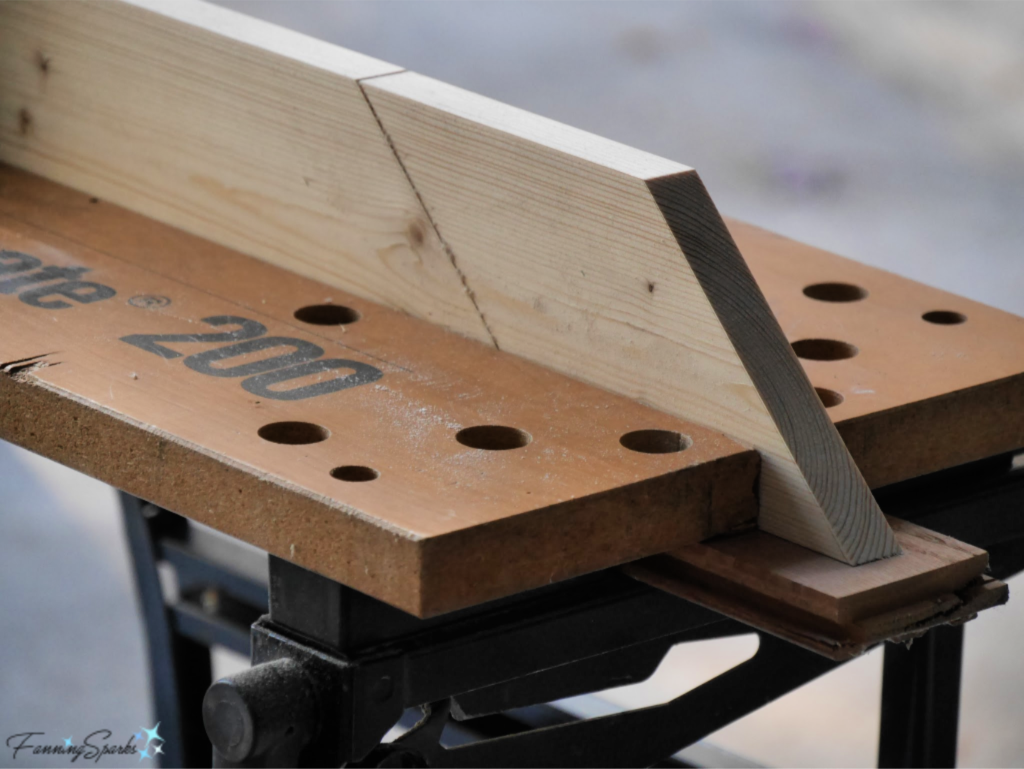
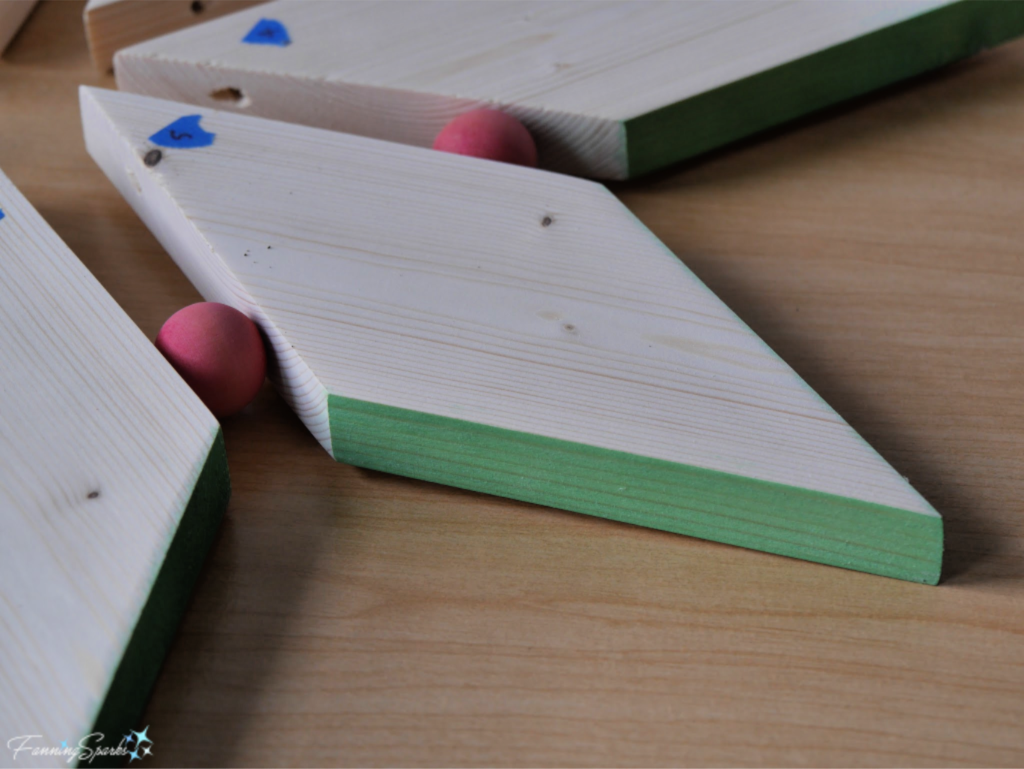
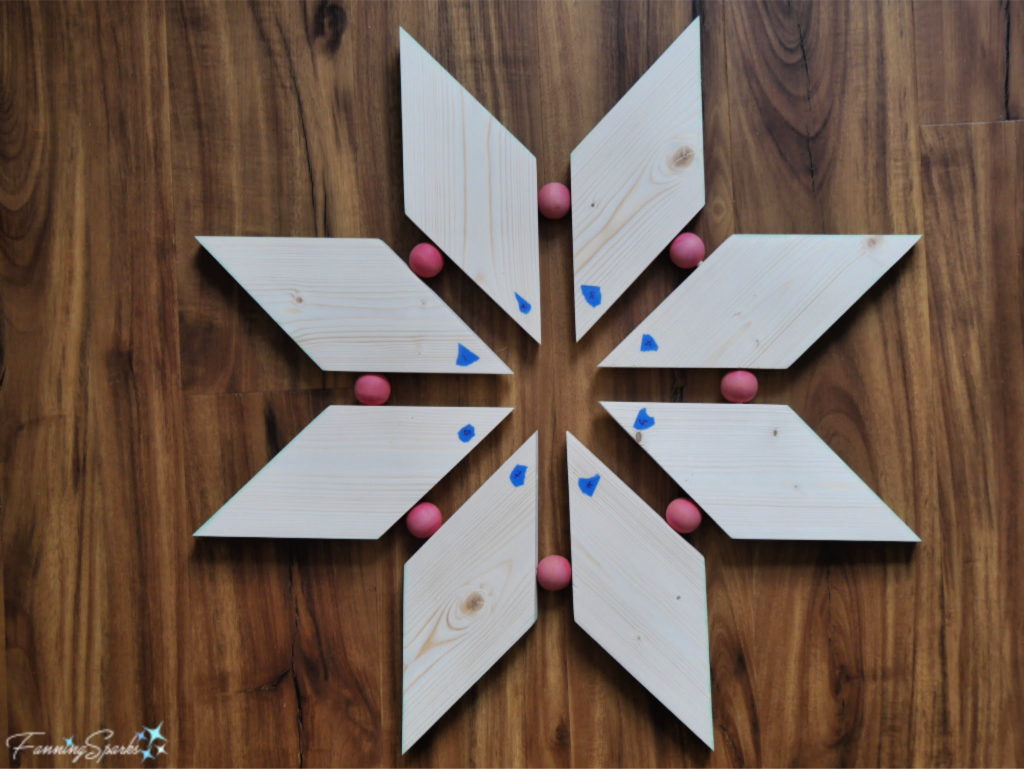
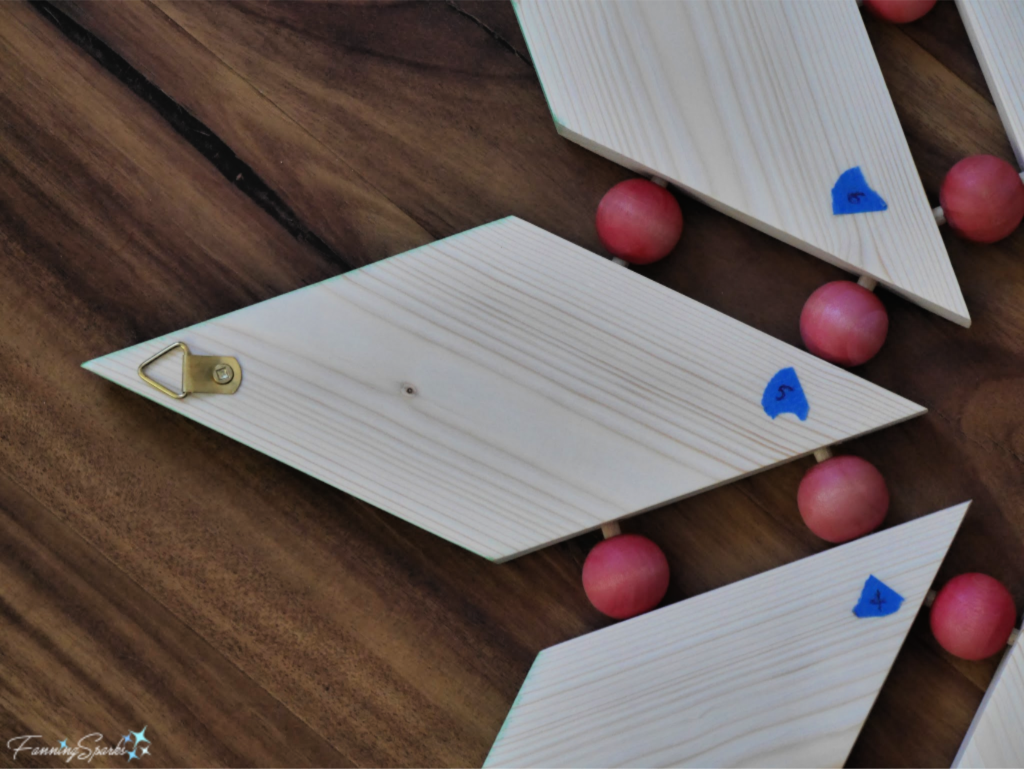
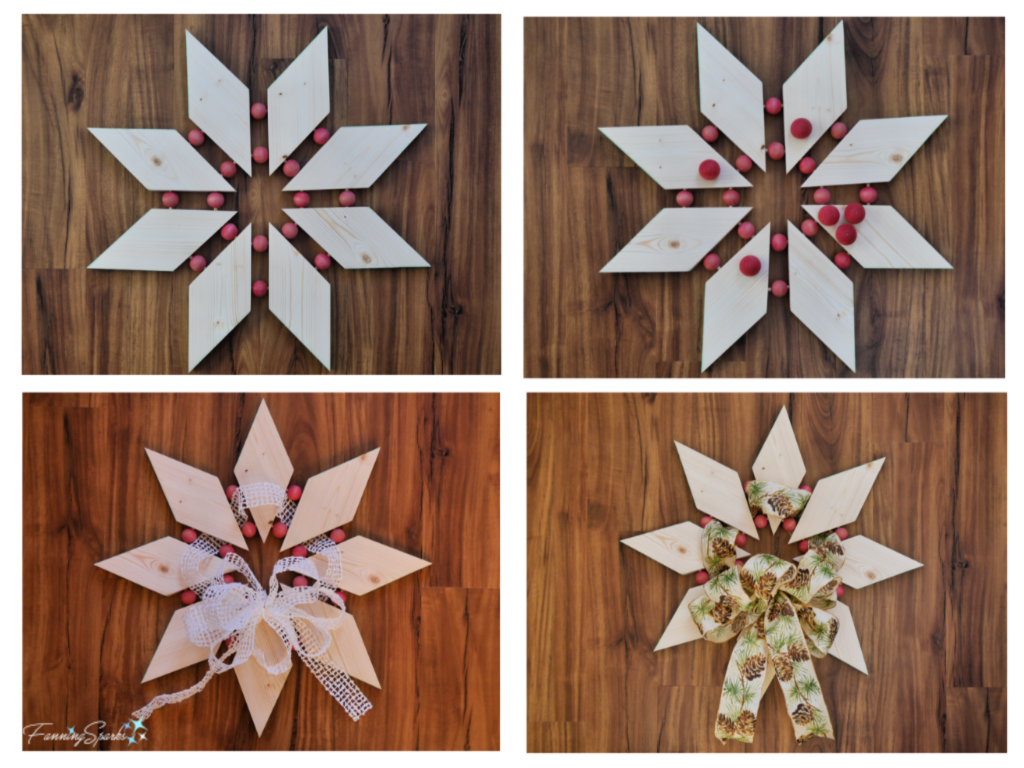
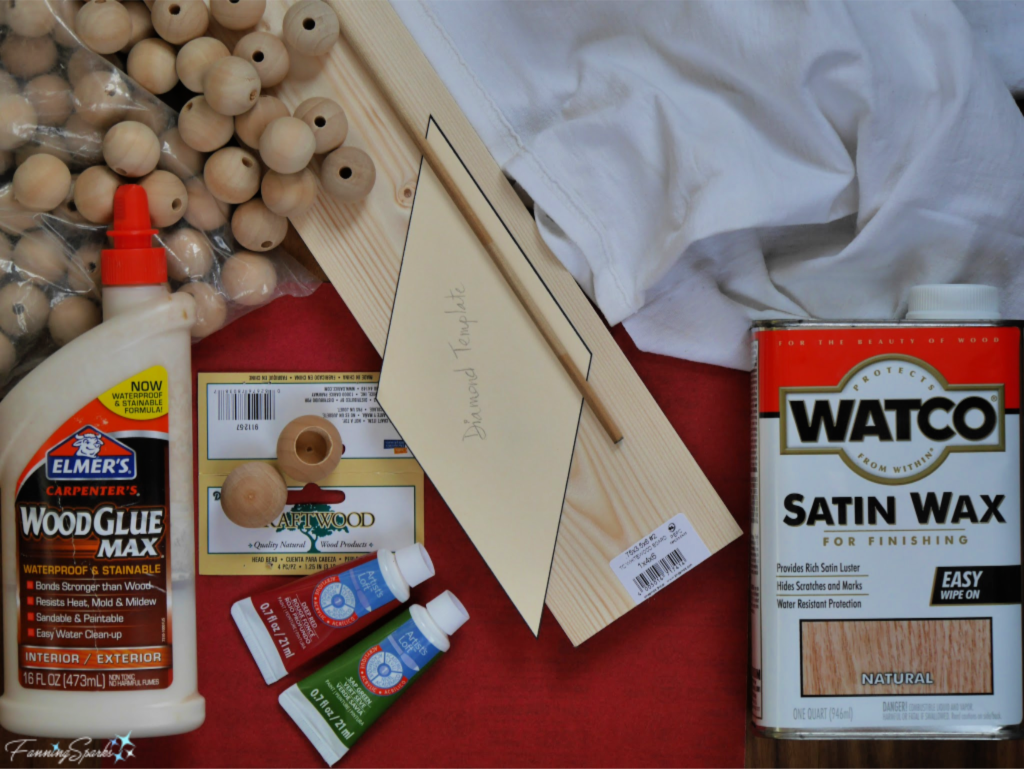
Pine Board: 1″ x 4″ x 6’ to cut the diamonds.  Note the actual size of the wood will be only ¾” x 3 ½”.
Wood Beads: 16 – 1″ unfinished wooden beads with 1/5 ” hole.  I purchased a bag of 100 by JUNKE on Amazon.
Wood Dowel: 1 – 3/16″ x 48″ poplar dowel for connecting the diamonds.
Wood Glue
Heavy Paper: 8 ½” x 11″ sheet of heavy paper, such as a manila folder, to cut a template.
Tape: To mark wood diamonds and drill bit.  I used painter’s tape because it’s easy to remove.
Sandpaper. Fine 220 grit sandpaper for finishing.
Acrylic Paint: Water-based acrylic paint to stain the beads and diamond edges.  Very little paint is needed since it is diluted with water to create a color wash affect.  I used Artist’s Loft in Deep Red for the berries and Sap Green for the leaf edges.
Water
Finishing Wax: WATCO Satin Wax for Finishing in Natural color.
Rags: Lint-free rags for removing finishing wax.  I used an old t shirt.
Hanger: Small triangle ring hanger, or similar hanger, to hang wreath.
Head Beads: 6 – 1¼” unfinished wooden head beads (beads are solid on top with an opening on the bottom).  These are optional depending on how you choose to finish the wreath.  See step 12 below.

Tools Needed
The following tools are needed for this project:
Tape Measure
Pencil
Jigsaw (or whatever type of saw you prefer to cut the wood)
Clamps: To hold pine board while cutting and drilling.  I used a Workmate to hold the wood for drilling.
Nail: Nail or other sharply pointed tool to indent marks for drilling.
Drill with 3/16″ drill bit: To cut holes for the dowels.
Plier Cutters: To cut the dowel.  Alternatively, you could saw the dowels but I’ve found simply snipping them is faster and easier.
Container: Small, shallow cup or similar container for mixing the paint.  I re-purposed a refrigerator egg tray.
Paint Brush: Small artist’s paint brush.
Foam Brush: Disposable foam brush.
Styrofoam or a cardboard box: A piece of scrap styrofoam or an empty cardboard box about 12″ by 8″ to insert the dowels into so the beads can dry.
Gloves: Disposable gloves for painting and waxing.
Container: Small container, such as a plastic glass or glass jar, to hold finishing wax.

Instructions
Step 1 Prepare Template  Use heavy paper, such as a manila folder, to create a template for the diamond.  Draw two parallel lines about 9″ long and 3.5″ apart.  Measure 5″ from the start of the top line and mark.  Measure 3 ½” and at 8 ½” from the start of the bottom line and mark both.  Connect the start of the top line with the 3½” mark on the bottom line.  Connect the 5″ mark on the top line with the 8 ½” mark on the bottom line.  This should result in a diamond with 45⁰ and 135⁰ angles.

Step 2  Cut and Sand Wood Parts  Cut the 1″ x 4″ x 6’ pine board into 8 diamonds using the template.
Cutting Wood for Diamonds and Beads Wooden Wreath   @FanningSparks
TIP: Approximately 2′ of the pine board will remain.  Keep this scrap to set up for drilling the holes later.
Lightly sand all cut parts to ensure a smooth, unblemished finish.
Cut Wood for Diamonds and Beads Wooden Wreath   @FanningSparks
Step 3 Check Diamonds  Lay the wood diamonds on a flat working surface.  Check that inside edges match as shown below.  Flip and reverse diamonds to find best fit.  Adjust as necessary.  Using small pieces of tape on the front inside tips, number the diamonds from 1 to 8 for reassembly.
Dry Fit Diamonds for Diamonds and Beads Wooden Wreath   @FanningSparks
Step 4 Drill the Holes for Dowels   Using the template, mark 4 points on the inside tips of every diamond.  These points are equally spaced at 1¼” from each end.  Transfer these points to the ¾” side edges of the diamonds taking care to find the exact center and mark accurately.  Indent the mark with a nail or other sharply pointed tool.  This makes it easier to position the drill bit.
Set up for drilling the holes by clamping a diamond vertically.  Use the board end set aside in step 2 with scrap wood and clamps to hold the wood diamond securely.  I used the clamping jaws of my Workmate to secure my setup as shown below.
Setup to Drill Diamons for Diamonds and Beads Wooden Wreath   @FanningSparks
Insert 3/16″ bit into drill.  Prepare to drill holes 5/8″ deep.
TIP: Mark drill bit at 5/8″ by wrapping a piece of tape around the bit above the 5/8″ mark.  Use this as your visual cue when drilling.  Be sure to check the tape periodically to ensure it hasn’t slipped or worn away.
Drill 4 holes in each wood diamond.  Ensure holes are drilled as accurately as possible so diamonds will align correctly.
Drilling Holes in Diamonds for Diamonds and Beads Wooden Wreath   @FanningSparks
Step 5 Cut Dowels  Measure and mark 16 sections of the 3/16″ dowel at 2″ increments.  Use the plier cutters to cut the dowel.  The ends will not be visible so it’s not necessary to sand them.
Cutting Dowels for Diamonds and Beads Wooden Wreath   @FanningSparks
Step 6 Insert Dowels  Insert a piece of dowel in each wooden bead.  Some may be a little snug and need some gentle force.
Insert Dowels into Beads for Diamonds and Beads Wooden Wreath   @FanningSparks
Step 7 Stain Wood Beads  Squeeze a small amount of the red acrylic paint into a small, shallow container.  Carefully add water and mix thoroughly.  I used an old refrigerator egg tray because only a small amount of paint and water are needed.  The idea is to create a color wash that will add color without hiding the wood.
Slide the bead to the end of a dowel.  Dunk the bead into the color wash.  Let it soak for a few minutes.  The beads can soak up a surprising amount of liquid.  Remove the bead from the color wash and insert the dowel into a piece of styrofoam or a cardboard box to let the bead dry.  Repeat for the remaining 15 beads.
Staining Beads for Diamonds and Beads Wooden Wreath   @FanningSparks
Allow the beads to dry.  Assess if enough color has been absorbed for your liking.  If not, repeat this step a second time.  I applied 2 coats of red color wash to my beads.
Step 8 Stain Diamond Edges  Squeeze a small amount of the green acrylic paint into a small, shallow container.  Carefully add water and mix thoroughly.  As described in the previous step for the wood beads, only a small amount of paint and water are needed.  Use a paint brush to apply the color wash to the outside edges of the wooden diamonds.  Alternatively, you could choose to stain all or none of the edges.  Take care not to put stain on the front of the diamonds.  Allow to dry.  Apply a second coat if desired.
After the wood diamonds are completely dry, use sandpaper to remove any stain from the fronts or unstained edges.   The objective is to have sharp clean edges as shown below.
Stained Edges for Diamonds and Beads Wooden Wreath   @FanningSparks
Step 9 Dry Fit Wreath  After the beads and diamond edges are stained and dry, assemble the wreath to check the fit.  Here’s how my wreath looked at this point.  Note the blue tape indicates the number of each diamond (as discussed in step 3).  Adjust as necessary.
Checking Fit for Diamonds and Beads Wooden Wreath   @FanningSparks
Step 10 Wax Wreath  Prepare to wax the wreath by disassembling the pieces and moving the tape to the back of the diamonds.  Follow the manufacturer’s instructions for applying the wax.  I used Watco Satin Wax for Finishing in Natural.  Apply a generous coating to the diamonds (front and edges) and the wood beads.
Waxing Wooden Diamonds for Diamonds and Beads Wooden Wreath   @FanningSparks
Let it soak in for about 15 minutes and reapply to any areas that dry out.
Drying Waxed Beads for Diamonds and Beads Wooden Wreath   @FanningSparks
Then wipe off the excess with lint-free rags.  Buff and let dry.
Please note: this product has a very strong odor so be sure to use it in a well ventilated area and allow plenty of time for the wax to dry and the smell to dissipate.  I waited 4 days.
Step 11 Assemble Wreath  Assemble the wreath by sliding the beads to the center of the dowels.  Start with one diamond.  Insert a dowel (with bead) into the 2 holes on one side of the diamond.  Slide the next diamond onto the end of these same dowels.  Repeat this process, working around the wreath, until all diamonds are connected.  This can be a little fussy because not all diamonds and dowels are likely to fit perfectly right away.  It may be necessary to re-drill a hole for a little extra room.  Or it may be necessary to shorten a dowel to provide a tighter connection.  Work around the wreath adjusting and fine-tuning until all diamonds are firmly in place.  Use wood glue to permanently attach the pieces.
Determine which diamond will be at the top of the wreath.  Attach a small triangle ring hanger, or similar hanger, to the back of that diamond.
Attaching Hanger for Diamonds and Beads Wooden Wreath   @FanningSparks
Step 12 Decorate Wreath   There are many options for finishing the wreath.  You could choose to leave the wreath as it is.  I glued on 6 wooden head beads which I stained red to resemble berries on the wreath.  Or you could choose to embellish with ribbon.
Options for Finishing the Diamonds and Beads Wooden Wreath @FanningSparks
Your wreath is ready to showcase in your holiday decor!  Consider adding other elements, such as this branch hung with mini-diamonds and beads, to build on the theme.
Decorate a Branch with Mini-Diamonds and Beads to Match Wooden Wreath  @FanningSparks
UPDATE Nov 24, 2020:  You may also like the Starry Stitched Sphere pictured below.  This decorative wooden sphere has a similar style to the Diamonds and Beads Wooden Wreath.  Check out the Starry Stitched Sphere – DIY Tutorial for step-by-step instructions.
Starry Stitched Sphere with Wood Wreath @FanningSparks

More Info

You may wish to save this DIY Tutorial for future reference.  Please pin this image.
Diamonds and Beads Wooden Wreath DIY Tutorial by FanningSparks

Today’s Takeaways

1. Hang wreaths throughout your home to welcome guests.
2. Consider making this Diamonds and Beads Wooden Wreath in the Scandinavian, minimalist style.
3. Embellish your wreath and decorate the surrounding area with your own personal touch.
Peg - FanningSparks Author

Looking for something unique and special for someone on your holiday gift list?  Would they appreciate a handmade gift created especially for them?  Perhaps one of the items featured in a DIY tutorial here on the FanningSparks blog would be a good fit.  These are not your run-of-the-mill predictable presents.  I’ve given several of these items as gifts and they’ve all been well received.  These items are made with a variety of techniques including general crafting, weaving, mosaic making, woodworking, and sewing.  But they’re all quite doable with the detailed step-by-step instructions I’ve provided.  Here are the tutorials I’ve rounded up for you today.
Make and Give DIY Tutorial Roundup   @FanningSparks
1. Turkish Mosaic Candle Holder
2. Woven Statement Necklace
3. Personalized Fabric-Covered Journal
4. Pyramid Trellis
5. Bespoke Pillows
6. Bluebird-Approved Birdhouse

1. Turkish Mosaic Candle Holder
This Turkish Mosaic Candle Holder is perfect for this time of year.  It has a pretty 6-point star design that glitters and shines when a candle is lit inside.  This project takes a little time since thinset mortar and grout need time to cure.  It requires basic glass cutting skills and a few glass cutting tools.  See DIY Tutorial here.
DIY Turkish Mosaic Candle Holder Tutorial pin. @FanningSparks

2. Woven Statement Necklace
The woven statement necklace has gone through a few iterations.  This necklace is striking and I often receive compliments when I wear one of mine.  This is a simple project which does not require special tools or skills… well… other than patience.  The tutorial was first shared in this post.
DIY Woven Necklace Tutorial   @FanningSparks
The post,  Add a Little Sparkle, includes special holiday versions of the woven statement necklace.
Add a Little Sparkle to the DIY Woven Statement Necklace from FanningSparks.

3. Personalized Fabric-Covered Journal
The Personalized Fabric-Covered Journals are one of my favorite because they are easy to customize to the recipient.  Got someone who likes to cycle?  There’s fabric for them.  Got someone who likes music?  Covered!  Someone who travels?  Covered!  Someone who knits?  Covered!   Someone who reads?  Yep!  This is the quickest and simplest project.  It requires cut and paste assembly and no special tools or skills are needed.  This tutorial was presented in two parts.  Part 1 addresses selecting the perfect fabric.
What's Their Passion? Selecting the Perfect Fabric for DIY Personalized Fabric-Covered Journals. @FanningSparks
Part 2 of the DIY Personalized Fabric-Covered Journal Tutorial covers the cut-and-paste construction of the journal.
DIY Tutorial for Personalized Fabric-Covered Journal by FanningSparks

4. Pyramid Trellis
The Pyramid Trellis is perfect for someone who likes to garden or is looking to beautify their property.  It will be tricky to place under the tree, however, since it stands nearly 6′ high.  This project is suitable for someone with basic woodworking skills including cutting and assembling wood.  Only standard tools including a jigsaw, drill and staple gun are needed.  See post here.
DIY Pyramid Trellis Tutorial by FanningSparks

5. Bespoke Pillows
These bespoke pillows can be made in any color or pattern.  So they can be perfectly coordinated to the recipient’s décor.  This project is a little more difficult and does require intermediate sewing skills.  Alternatively, the design could be simplified by eliminating the more difficult embellishments such as the piping.  A sewing machine and standard sewing tools are needed.  See post here.
DIY Bespoke Pillows Tutorial by FanningSparks

6. Bluebird-Approved Birdhouse
The Bluebird-Approved Birdhouse is a nice addition to a garden or yard.  This project is suitable for someone with basic woodworking skills including cutting and assembling wood.  Only standard tools including a jigsaw, drill and screwdriver are needed.  See post here.
DIY Bluebird-Approved Birdhouse Tutorial by FanningSparks. @FanningSparks

25 Moments of Joy Tabletop Tree/ Advent Calendar
In case you missed it, I recently shared a DIY Tutorial to make a Tabletop Tree/ Advent Calendar.  This project is suitable for someone with basic woodworking skills including cutting and assembling wood.  Only standard tools including a jigsaw, drill and screwdriver are needed for the tree frame.  Basic cut and paste assembly skills are needed for the gift packets.  Check it out here.
25 Moments of Joy Tabletop Tree/ Advent Calendar DIY Tutorial. @FanningSparks

As a bonus, I’ve pulled in a few previous posts that offer suggestions for other holiday traditions including greeting cards, holiday wreaths and gift wrapping.

It’s become the tradition in our household to select greeting cards made by local artists. We choose cards with a personal connection that represent an aspect of our lives.  It’s a small way to support local artists plus we get to share a small work of art with our family and friends.  See the post, Win-Win with your Holiday Cards.
Artists Greeting Cards Arrive in Mailbox. @FanningSparks

The post, Holiday Wreath Inspiration from Biltmore, features the holiday wreaths which decorated the Conservatory at Biltmore last year.  They are embellished with natural materials which provide color, texture and form.  Check it out for ideas to bring some Biltmore glamour to your home this year!
Closeup of Biltmore Holiday Wreath Featuring Globe Amaranth. @FanningSparks

In the post, 8 Tips to Jazz Up Your Gift Wrapping, I share suggestions to add pizzazz to your holiday gift wrapping.  The tips are illustrated with lots of examples.Tips for Jazzing Up Your Holiday Gift Wrapping   @FanningSparks

More Info

You may wish to pin this post for later reference.  Save this image to Pinterest.
Make and Give DIY Tutorial Roundup @FanningSparks

Today’s Takeaways

1. Handmade gifts are unique and can be tailored to the recipient.
2. Taking the time and making the effort to create a handmade gift signals care and affection.
3. Consider making a gift for someone special this holiday season.

Peg - FanningSparks Author

There is a design maxim to transcend the ordinary.  The idea is to transform ordinary items from their predictable form into an innovative, unfamiliar form.  I’ve always been drawn to everyday items with extraordinary design.  I love that simple household items—commonplace things people use on a regular basis—can be made to look like something unique and special.  As product design firm, Kikkerland Designs, puts it “even the most utilitarian gadget becomes a delightful discovery”.  I’m reminded of these delightful surprises in the midst of holiday gift shopping.
In today’s post, I’d like to share some examples of everyday items that aren’t every day.  I admit I’ve collected more of these items than I actually use.  I like to sprinkle them throughout my home to replace everyday items.  I love the clever designs and the bright pops of color.  But having them all displayed at the same time would be too kitschy and visually jarring for me—definitely a case of “too much of a good thing”.
A majority of the items I’ve come across are for the kitchen probably because there are more functional items in this area of the home.  I couldn’t resist this spoon rest, called “Betty’s”, designed by Wishlist for US-based Monkey Business.  Monkey Business collaborates with the leading product designers from Israel to “create useful objects with a smile”.
Betty’s Spoon Rest by Monkey Business. An Everyday Thing That Isn’t Every Day.  @FanningSparksThis sponge holder, called “Mr Sponge”, is by PELEG DESIGN from Israel.  This design studio encourages the viewer “to discover that beyond the products’ functionality there is a surprising game of enchantment and humor”. 
Mr Sponge Sponge Holder by PELEG DESIGN. An Everyday Thing That Isn’t Every Day.  @FanningSparksMoving on to entertaining.  Who would have thought to make ice cubes in the shape of guitars?  Apparently, designer Liz Goulet Dubois from US-based Fred Studio did.  These groovy guitar ice cubes are promoted as “Cool Jazz”.
Cool Jazz Guitar Ice Cubes by Liz Goulet Dubois at Fred Studio. An Everyday Thing That Isn’t Every Day.  @FanningSparks
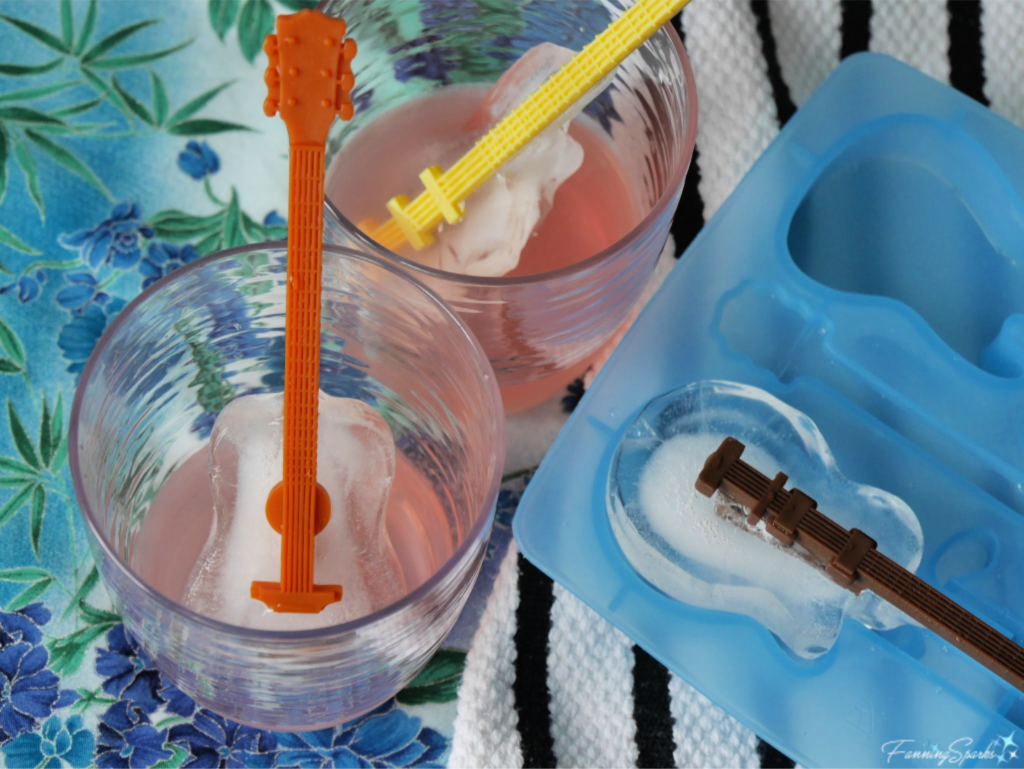
This next item is my favorite.  Honestly, these salt and pepper shakers don’t hold much but those little birds hanging from that little tree are just so bright and cheerful.  They add instant character to the dinner table.  This item, from Italian design firm A. di Alessi, was designed by S. Giovannoni with R. Takeda in collaboration with the National Palace Museum of Taiwan.
Salt & Pepper by A Alessi.  An Everyday Thing That Isn’t Every Day.  @FanningSparks
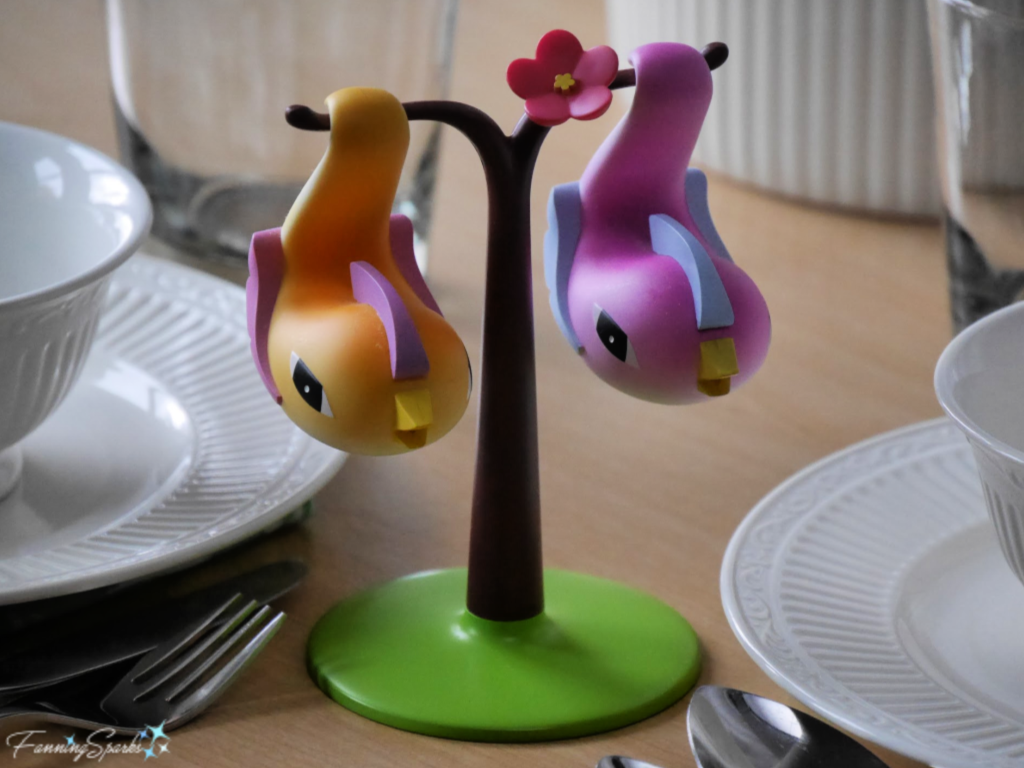
Bath items seem to be another popular subject.  This bath sponge adds character and personality to a space that’s typically very utilitarian.  It was designed and made by Pylones, a French design firm.
Bath Sponge by Pylones.  An Everyday Thing That Isn’t Every Day.  @FanningSparksIs there anything more mundane than a nail brush?  But look what US-based Kikkerland did with this one.  It’s the cutest little whale!
Whale Nail Brush by Kikkerland.  An Everyday Thing That Isn’t Every Day.  @FanningSparks
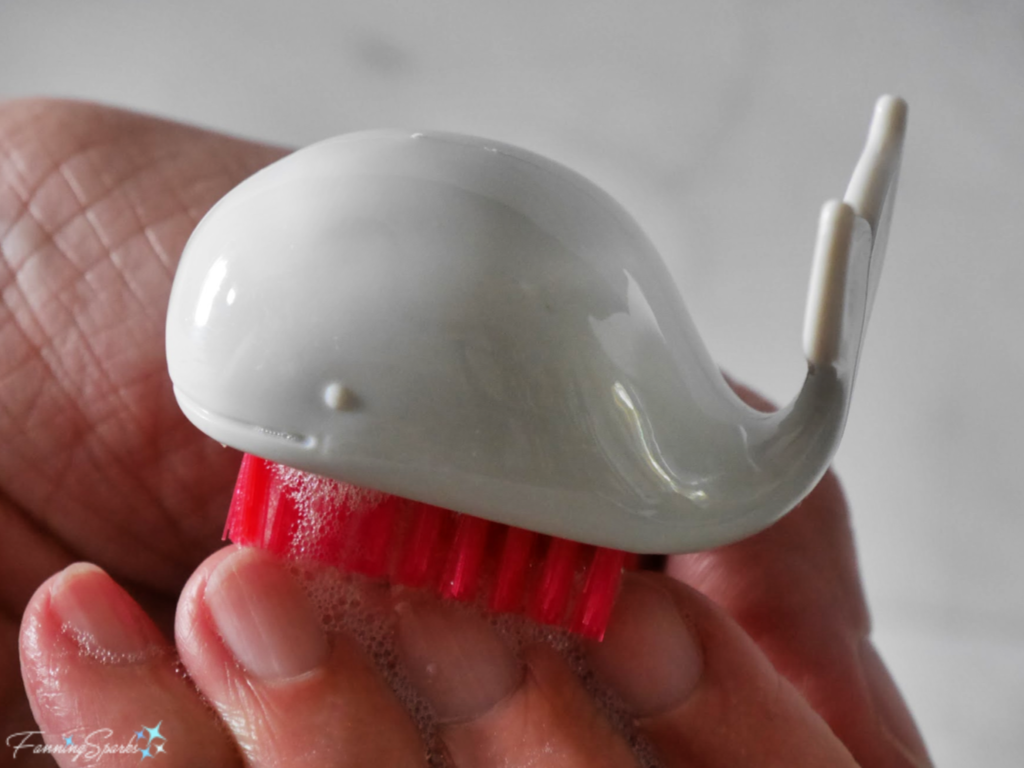
The office, whether at home or at work, is another area with lots of functional items.  Here’s an interesting take on a memo holder.  He’s called “Morris” and designed by Studio Yaacov Kaufman for Monkey Business.  These days we’re more likely to record a note on our phones but it’s always handy to have paper and pen nearby.
Morris Memo’s Best Friend by Studio Yaacov Kaufman for Monkey Business. An Everyday Thing That Isn’t Every Day.  @FanningSparks
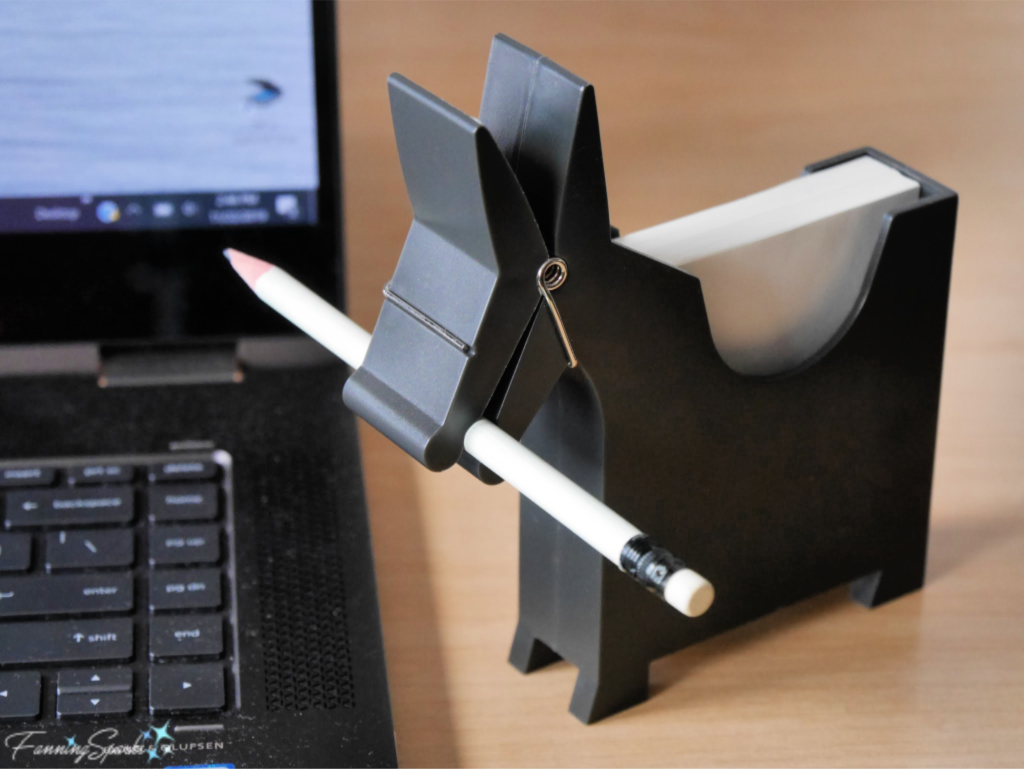
This Ninja flash drive is the coolest one I’ve ever seen.  It’s made by Bone Collection from Taiwan.  Interestingly, this product received the Red Dot Design Award in 2011.  Red Dot Award is an international design competition for product design, communication design and design concepts. It’s always fun to see what products have been recognized by this prestigious award.
Ninja Flash Drive by Bone Collection. An Everyday Thing That Isn’t Every Day.  @FanningSparksIn the category of general household items, this high-heeled shoe from Fred is the perfect door stopper.
Door Stopper by Fred and Friends.  An Everyday Thing That Isn’t Every Day.  @FanningSparks
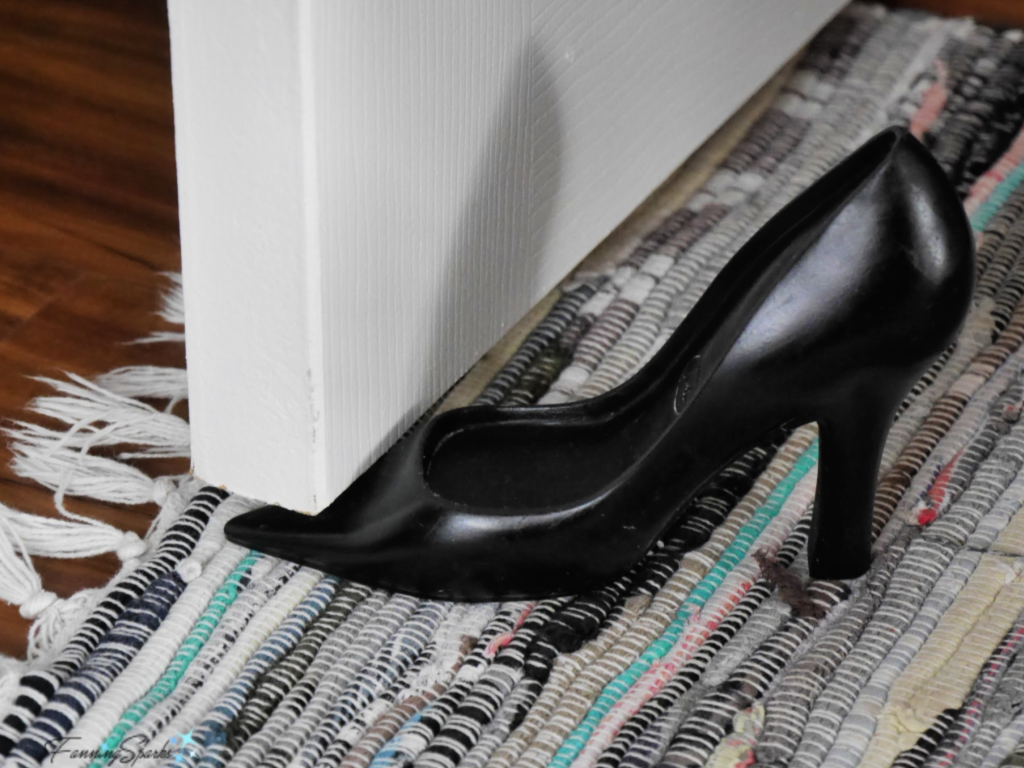
Most of the unusual functional items in this post were found in gift and museum shops.  But another great source is vintage and antique shops.  Here’s an example of a recent vintage purchase that adds personality to the boring job of keeping track of my sunglasses…
Vintage Glasses Holder.  An Everyday Thing That Isn’t Every Day.  @FanningSparks
… or my eyeglasses.
Vintage Glasses Holder.  An Everyday Thing That Isn’t Every Day.  @FanningSparks
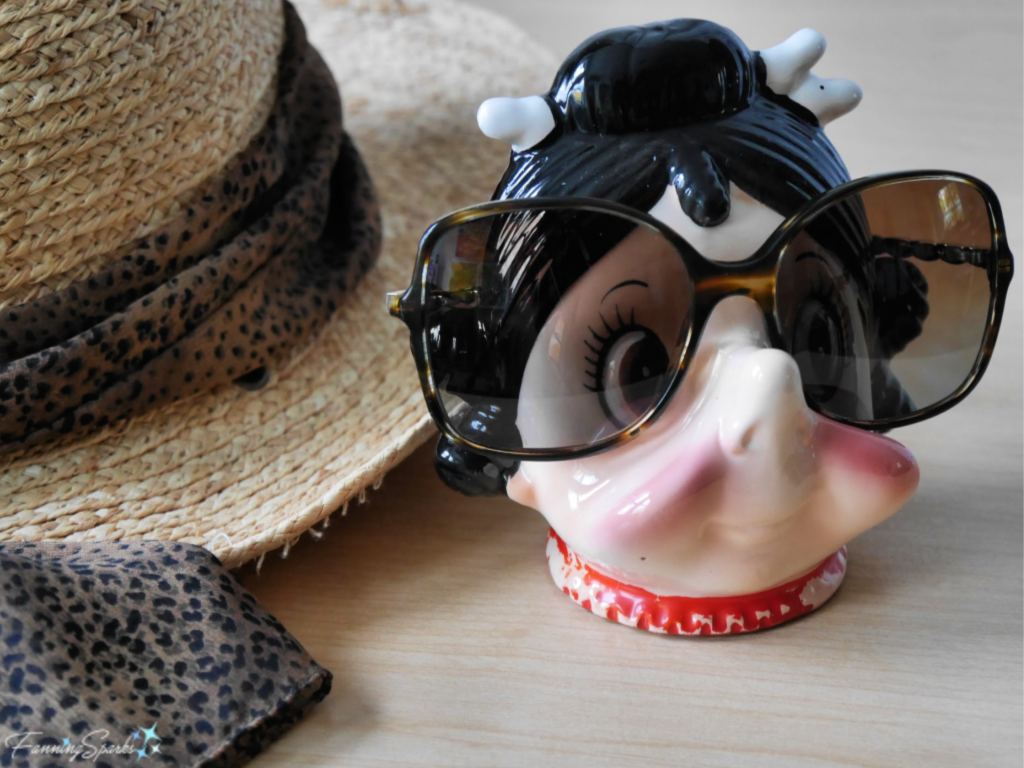
Art and gift galleries are another source for unusual functional items.  This sunflower pin cushion was designed and made by Linda Bell from North Carolina.  It’s shown with a cute little snail tape measure from OTOTO, a design firm from Israel.  I like this quote from the OTOTO website “The OTOTO team believes humor to be an important part of their design process. They try to infuse that whimsy and playfulness into every product, alongside its functionality.”
Sunflower Pin Cushion by Linda Bell and Snail Measuring Tape by OTOTO.  Everyday Things That Aren’t Every Day.  @FanningSparks
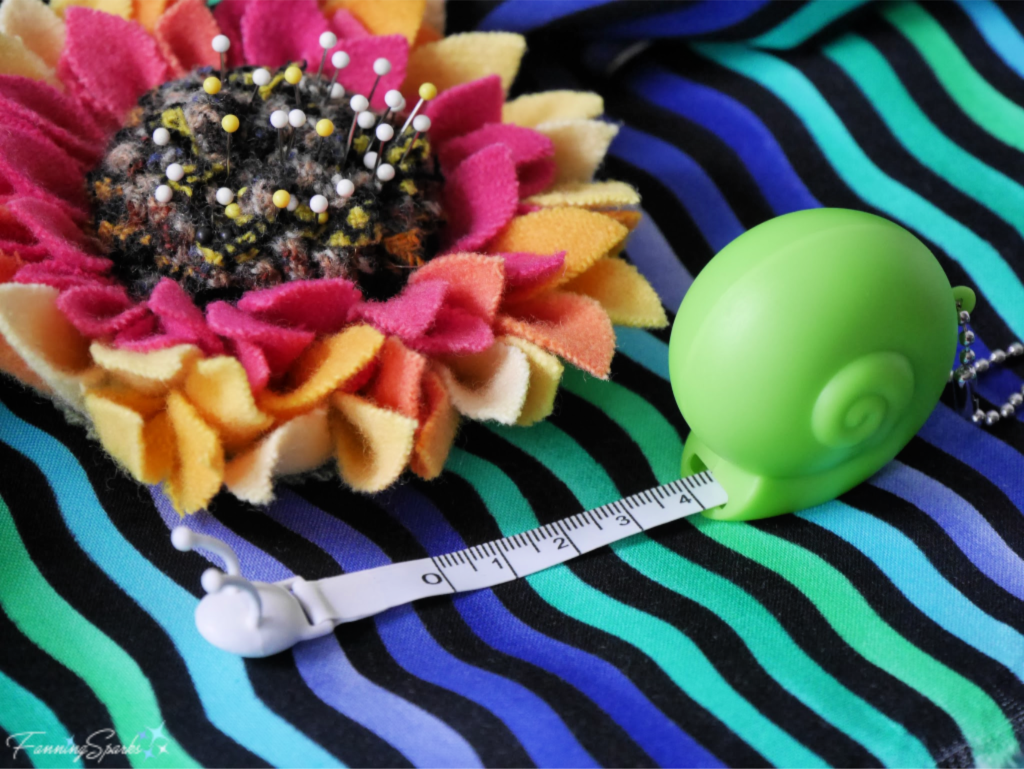
Here’s another example of combining whimsy, playfulness and functionality.  You may recall potter Sandy Culp’s “Blueberries: Teapot” from a recent post on the Georgia Pottery Invitational Perspectives show (see Admiring Evidence of Process).  Amazingly, it’s a functional teapot which you open by lifting the center leaf and you pour through the stem spout.
Blueberries Teapot by Sandy Culp. @FanningSparks
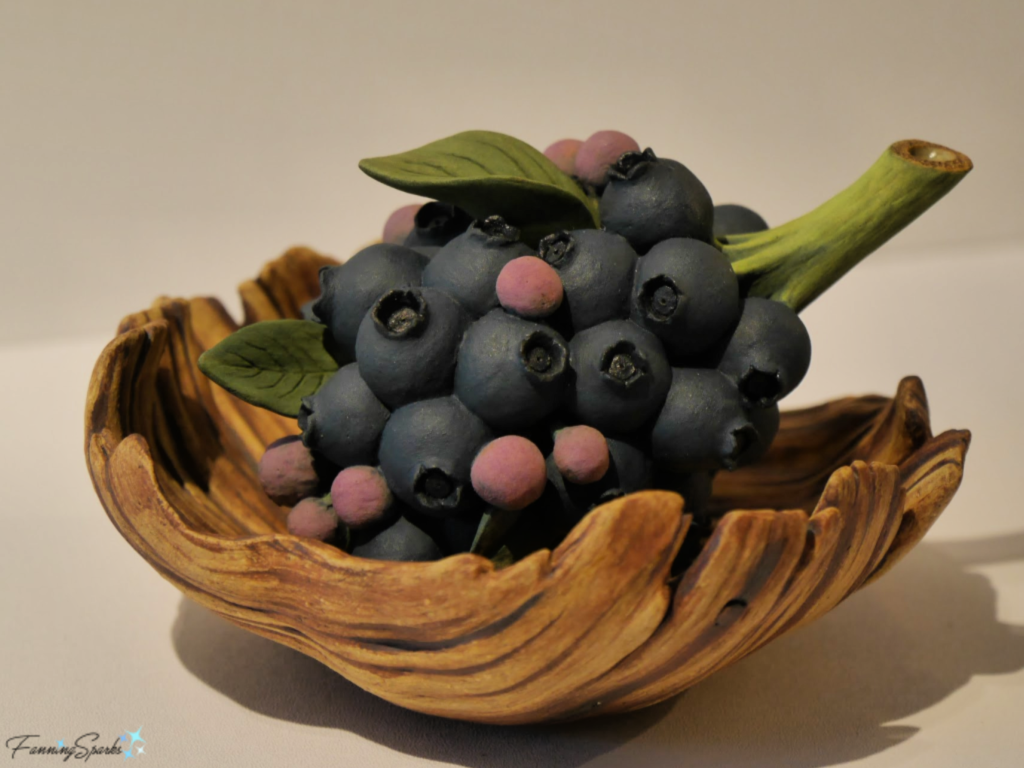
I hope today’s post has sparked a few ideas for injecting a little fun into your everyday things.

More Info

The items featured in the post were collected over a number of years so I’m unable to link to them.  But I have included the names of the design firms and artists to help you find these or similar items.  Here’s a summarized list linked to their websites.  I’ve also included links to their Amazon storefronts where I could find them.
. Monkey Business website or their Amazon storefront.
. PELEG DESIGN website or their Amazon storefront.
. Fred and Friends website or their Amazon storefront.
. Pylones website.
. Kikkerland website or their Amazon storefront.
. Bone Collection website or on their Amazon storefront.
. Alessi website or their Amazon storefront.
. Linda Bell exhibits at ArtWorks Gallery and Gifts in Hiawassee, North Carolina, USA.
. OTOTO website or on their Amazon storefront.
. Sandy Culp is a potter based in Georgia, USA.
Learn more about Red Dot product design awards on the Red Dot Award website.

Today’s Takeaways

1. Look for everyday things with an unexpected twist.
2. Think about adding an extraordinary household item in your home.
3. Consider giving a unique and special everyday item this holiday season.
Peg - FanningSparks Author