
Coiled rope basketry continues to dominate the FanningSparks studio. The techniques are easy to learn and projects can be completed quickly. Once you get the hang of it, coiling basic projects like coasters, trivets, platters and shallow bowls is very relaxing. Plus, there are countless ways to get creative with handles, loops, knots, tassels, braids and so on. It’s not difficult to create amazing coiled rope projects. In fact, it’s rather addictive!
However, as I learned the hard way, complex coiled rope objects can be quite challenging. The overly ambitious projects I attempted this week weren’t easy nor fast. But they were very instructive and I learned a number of helpful lessons.
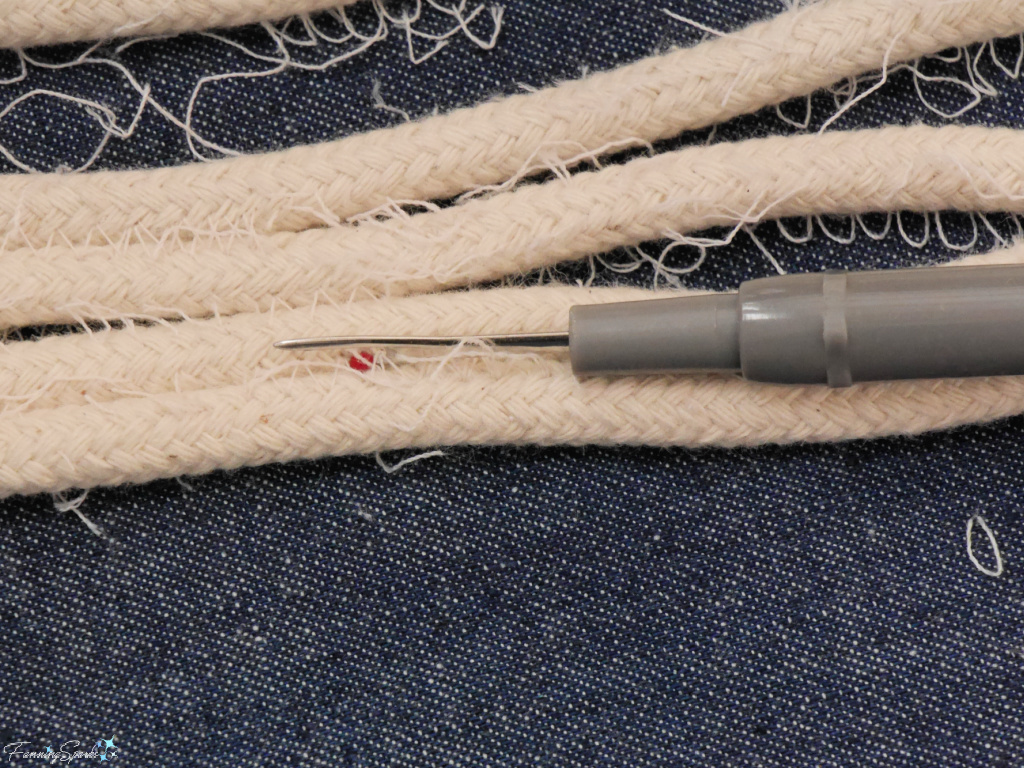
Truth is, I had to restart one of my new rope coiling projects four times.
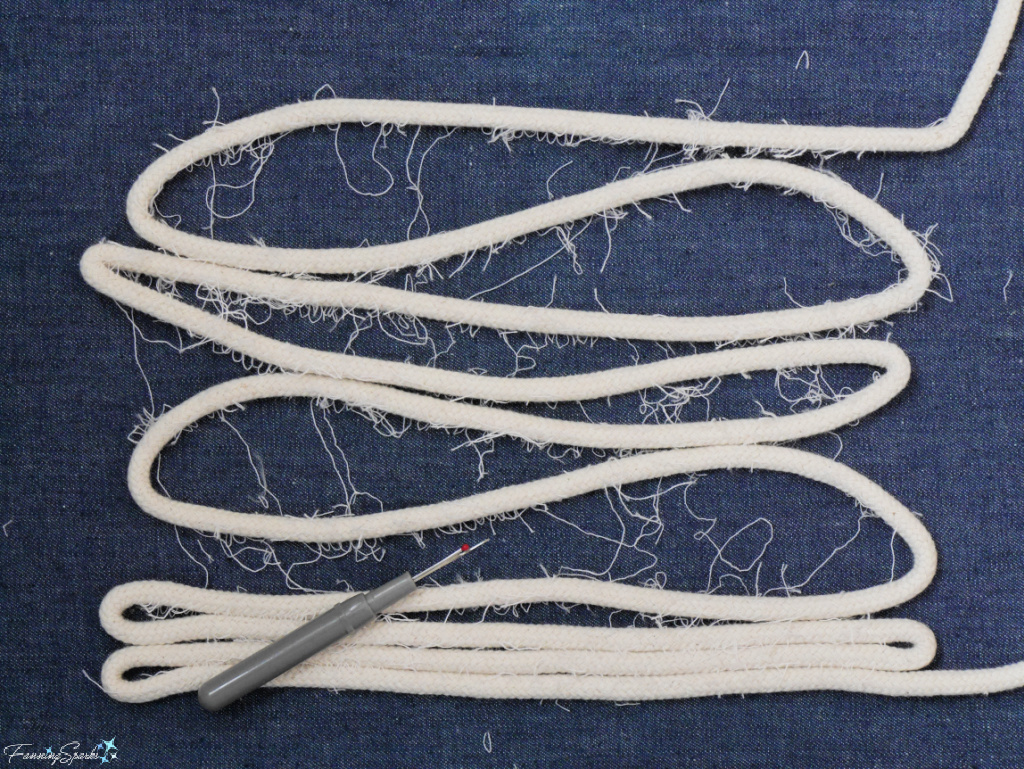
At least, all those false starts helped me sharpen my seam ripping skills! I got rather good at removing zigzag stitching with a seam ripper. The trick is to use the red tip of the seam ripper’s cutting edge. Insert it under the first few thread stitches of the seam and then carefully slide it all the way to the other end of the seam. The entire seam will be cut in one swipe!
After lots of trial and error and several internet searches for help, my projects finally started moving in the right direction. Unsurprisingly, all that internet research led to lots of new ideas for rope coiling. Here are some of my new favorite finds from Instagram.
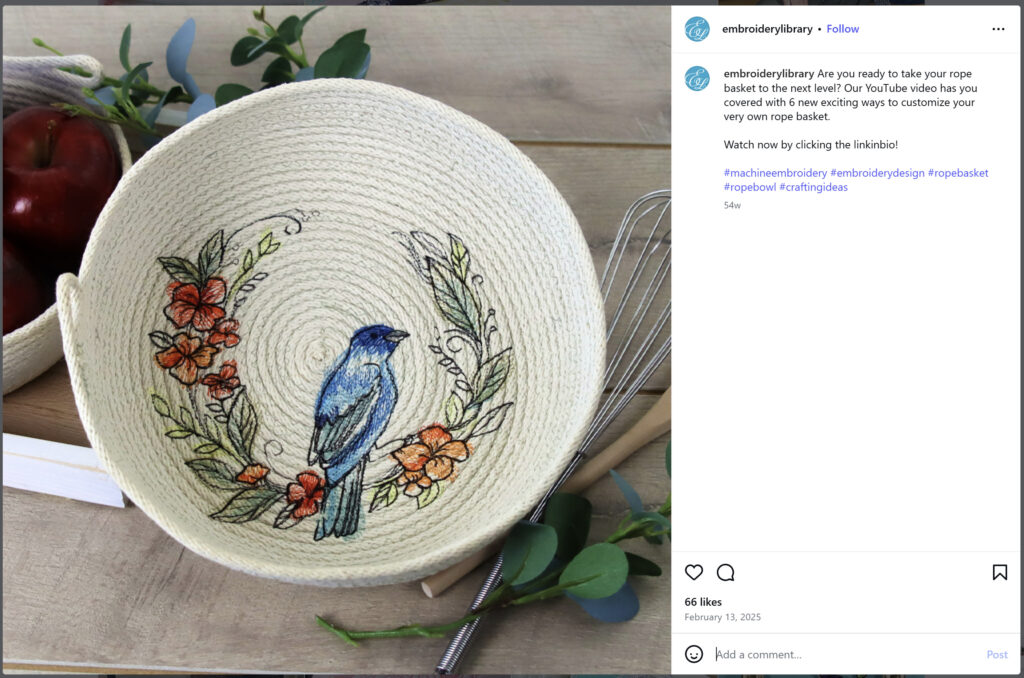
Shown below is a shallow round bowl, by Embroidery Library, showcasing a beautiful thread painting. The accompanying video revealed the maker’s process. She started by coiling the flat bottom of the bowl and then stopped to add the embroidery with her machine. Next, she resumed coiling to add the sides of the bowl with fabric-covered rope. Stopping midway to embellish a coiled rope project presents some interesting options.
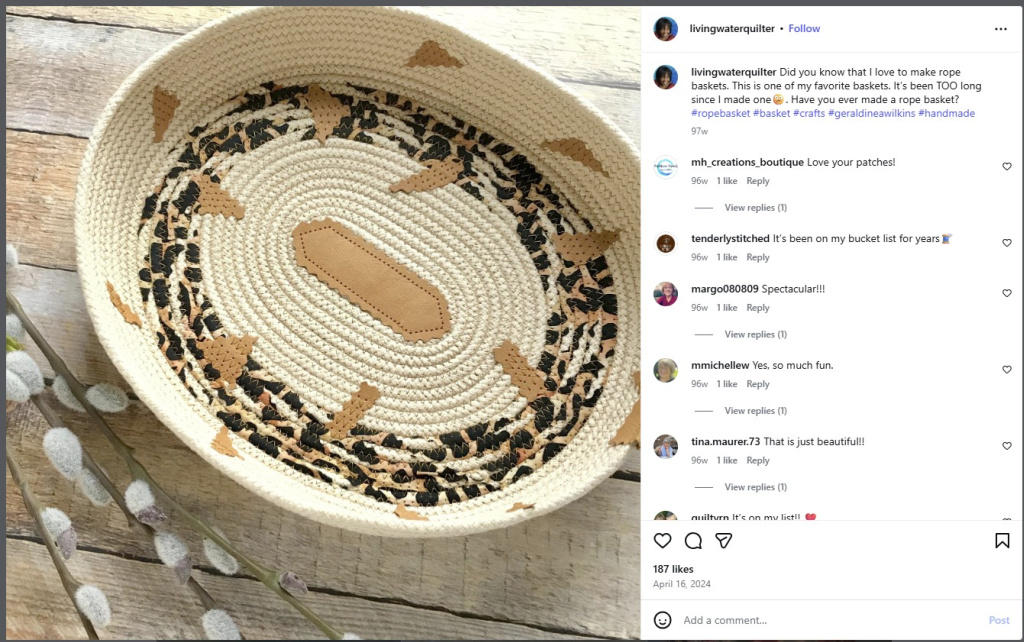
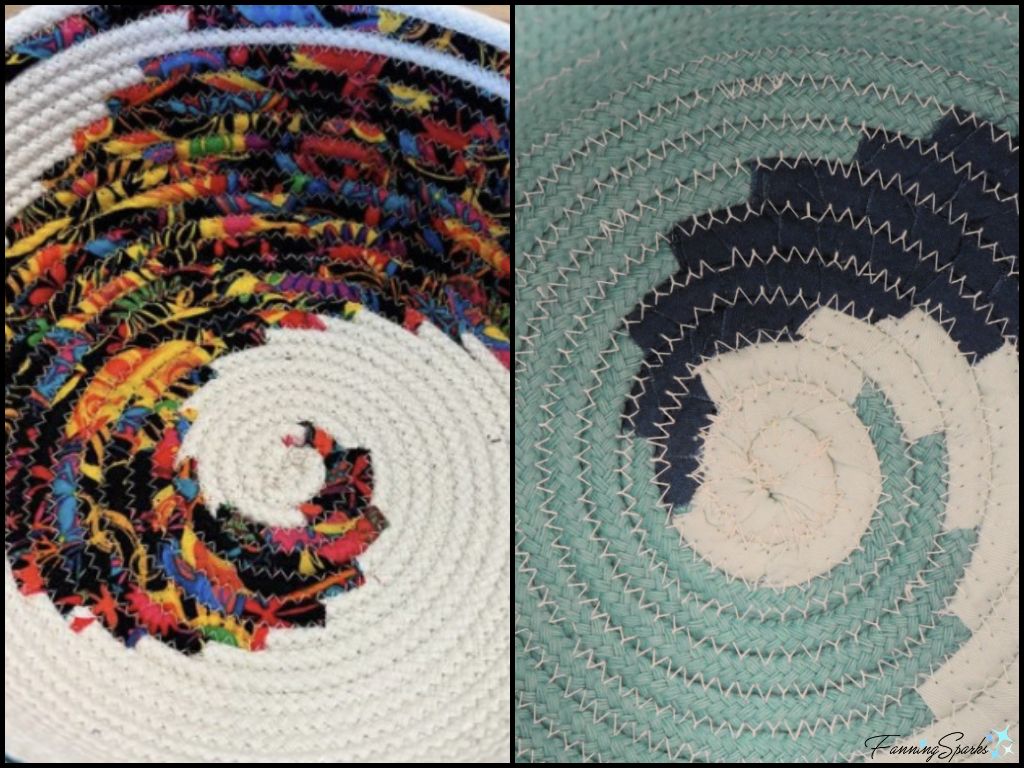
The more common approach is to add embellishments after the entire coiled object has been made. In this next example, by Living Water Quilter, abstract beige fabric appliques appear to be have been sewn on the basket’s surface after it was coiled.
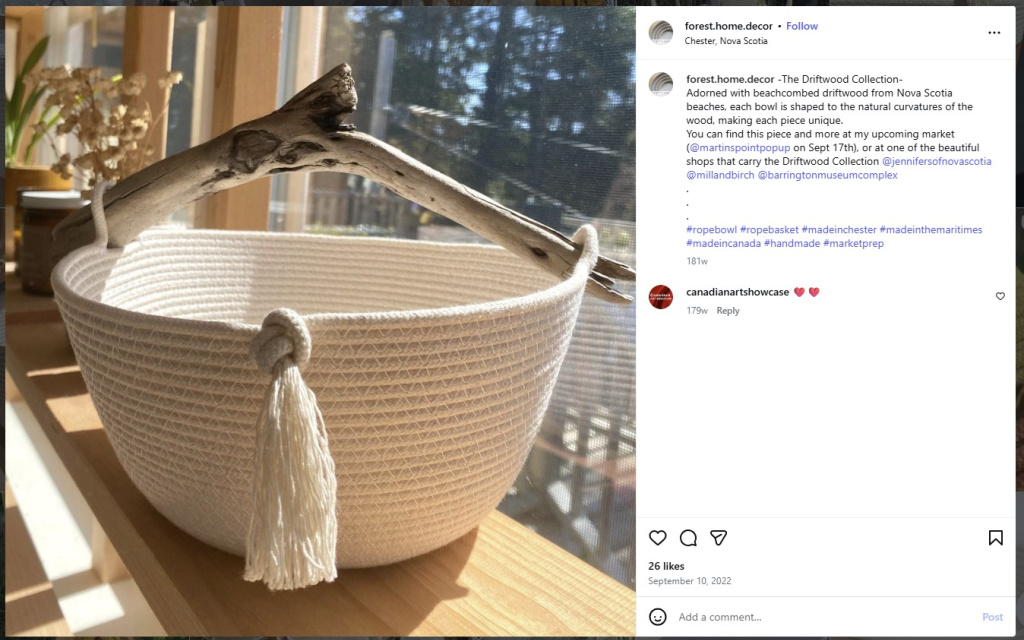
Some artists incorporate natural elements into their coiled rope baskets. Shown below is a basket by Forest Home Décor showcasing a unique piece of driftwood as a handle. I love the contrast between the smooth coiled rope surface and the organic weathered driftwood.
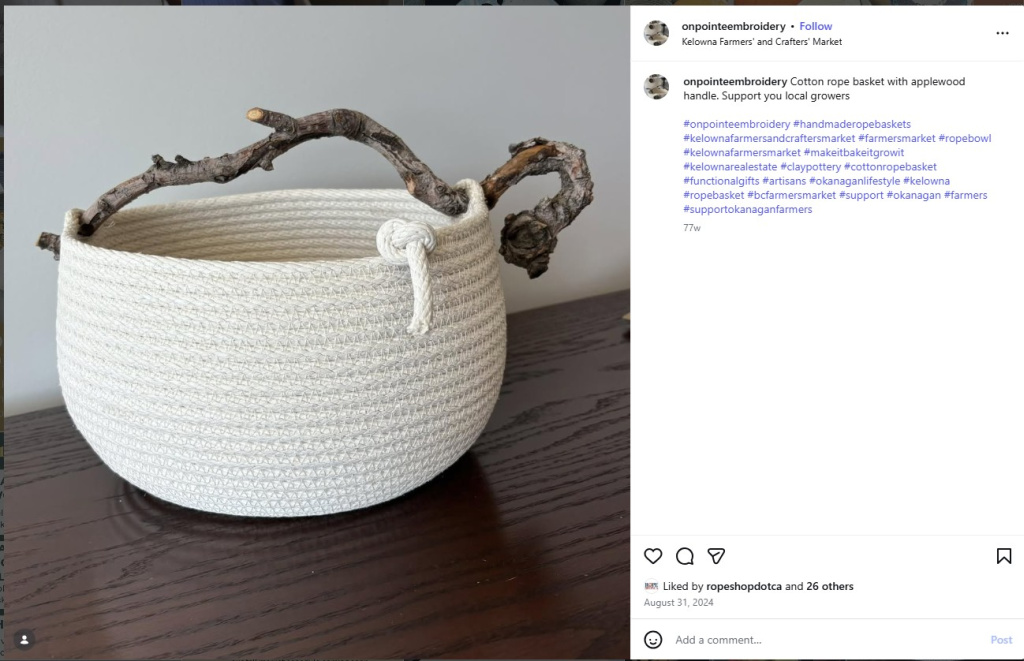
On Pointe Embroidery was another special discovery. They also add natural elements such as wood branches and pine needles to their coiled rope baskets. The coiled rope basket, shown below, provides the perfect stage for the beautiful, natural apple wood handle.
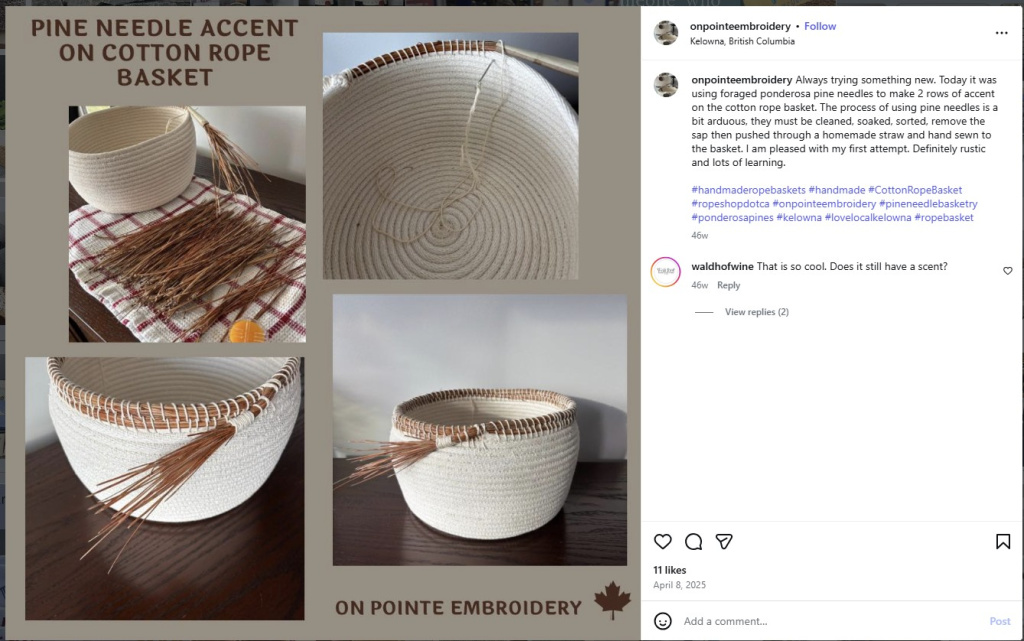
In this next example, also from On Pointe Embroidery, pine needles have been coiled around the top rim of the rope basket. Brilliant!
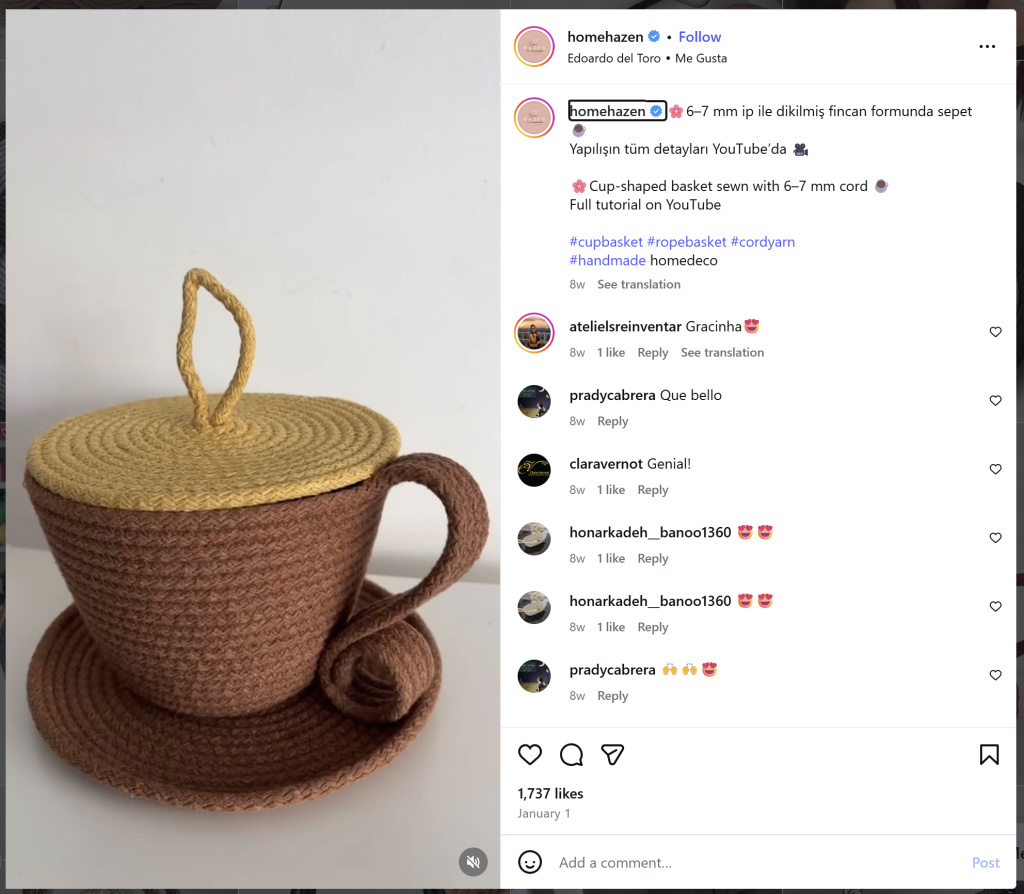
There are also some unusual, interesting shapes and forms being made. This cup-shaped basket by Hazen Home is a case in point. I really like the way the lid is incorporated into the design.
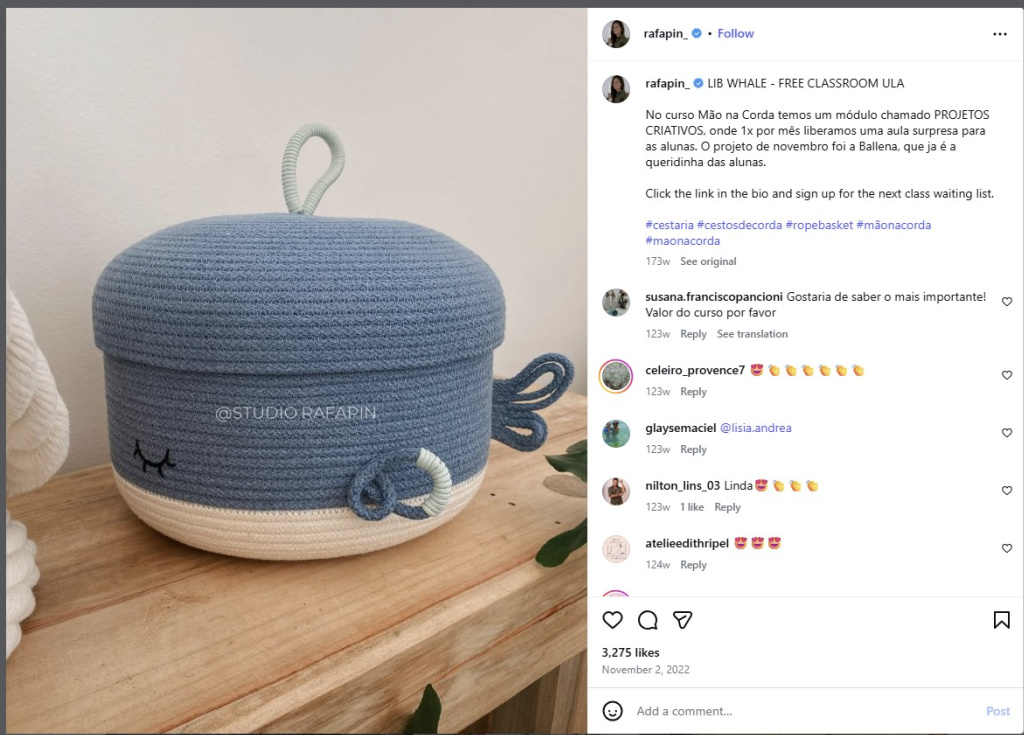
I found quite a few charming baskets decorated with ears and noses to look like teddy bears and rabbits, but the below whale basket really stood out. I love the creative way the artist used coiled rope to form the fins, tail and blow hole.
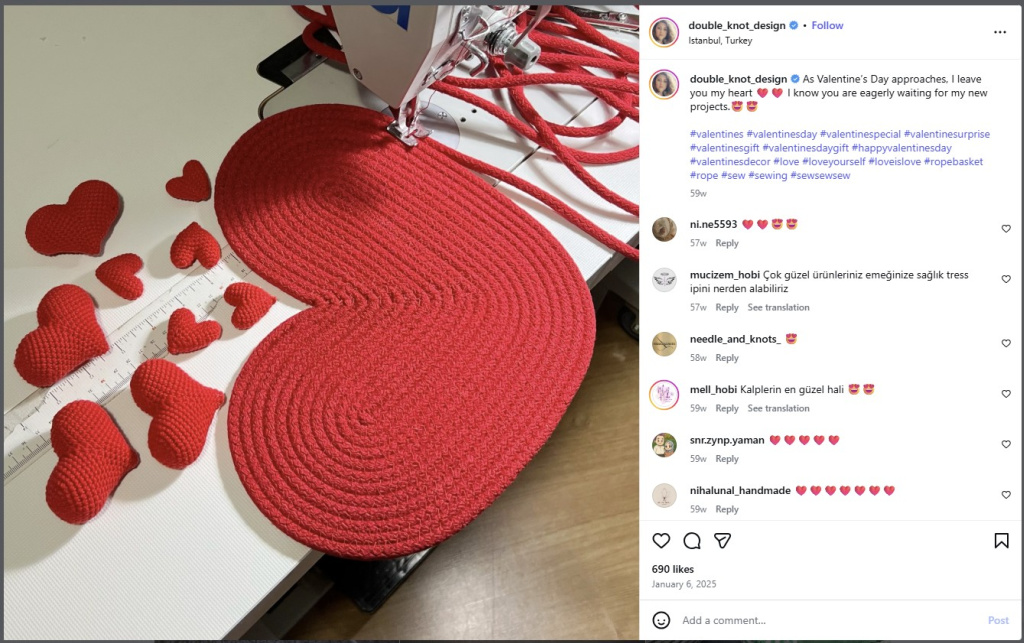
This bright red, heart-shaped, coiled rope piece, by Double Knot Designs, appears to be a work in progress.
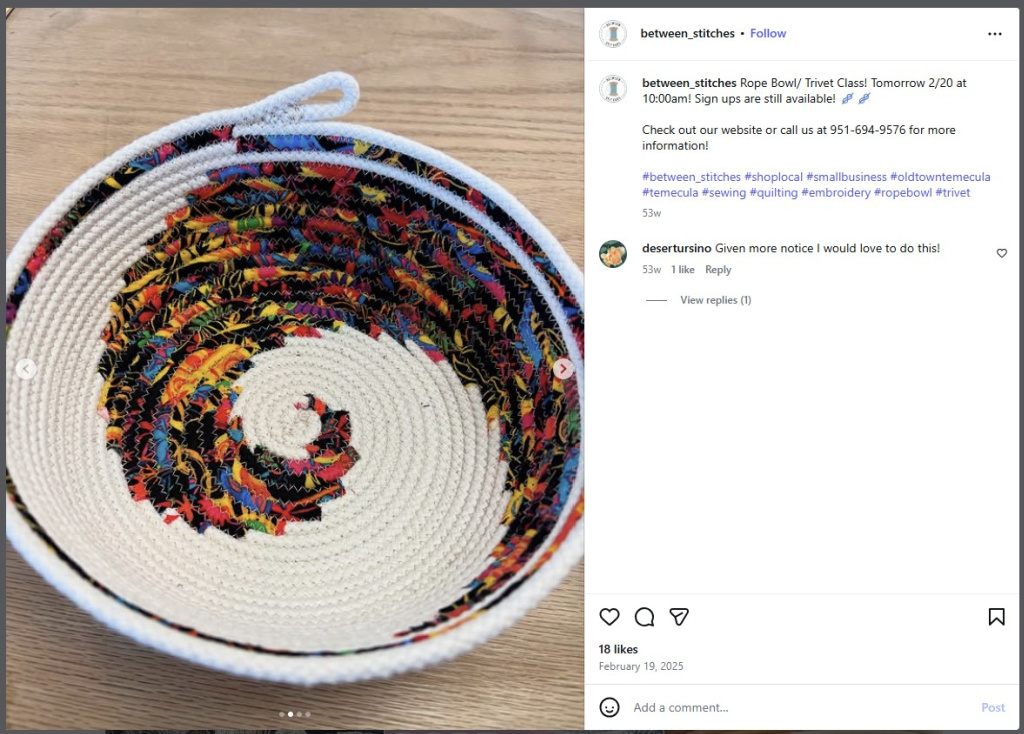
One design element which caught my attention is a spiraling swirl ― it’s very pleasing to the eye. The swirl bowl shown below was made by Between Stitches. This project combines a few interesting techniques including building up the swirl pattern and wrapping the rope with fabric strips.
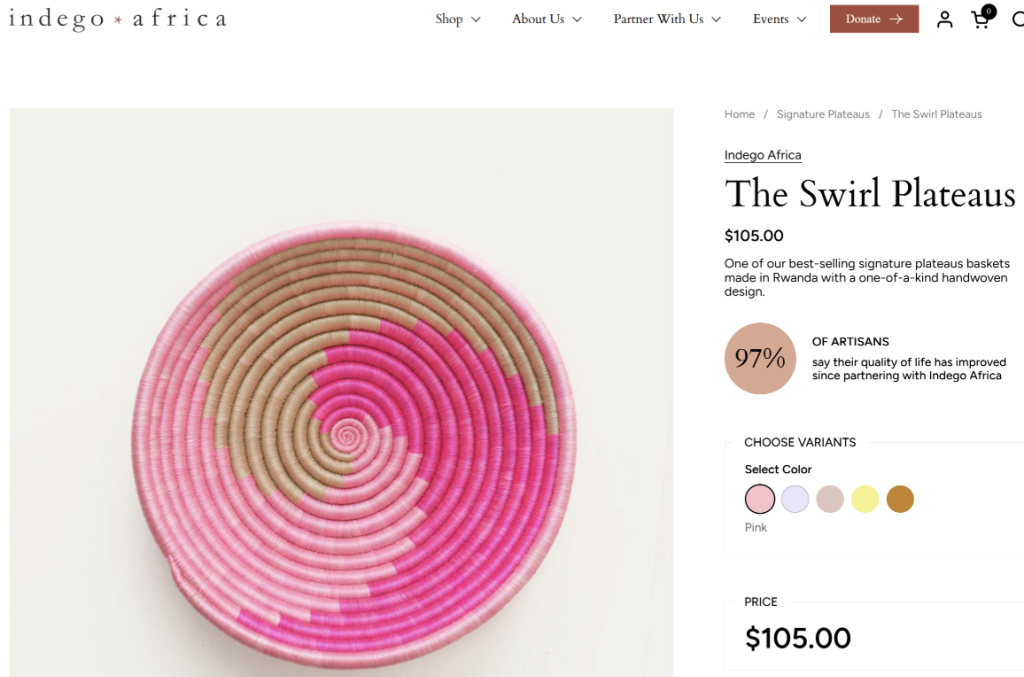
Somewhere in my online journey, I came across the below three-color version of a swirl design. This is a handmade, traditional Rwandan plateau basket made with “a time-honored weaving technique, [in which] artisans use a needle and thread to wrap hand-dyed strands of sisal around bunches of sweetgrass”. According to their website, these beautiful baskets are available through Indego Africa, a US-based non-profit organization which “partners with more than 20 independent, artisan-owned businesses in Rwanda, Ghana and Refugee Camps”.
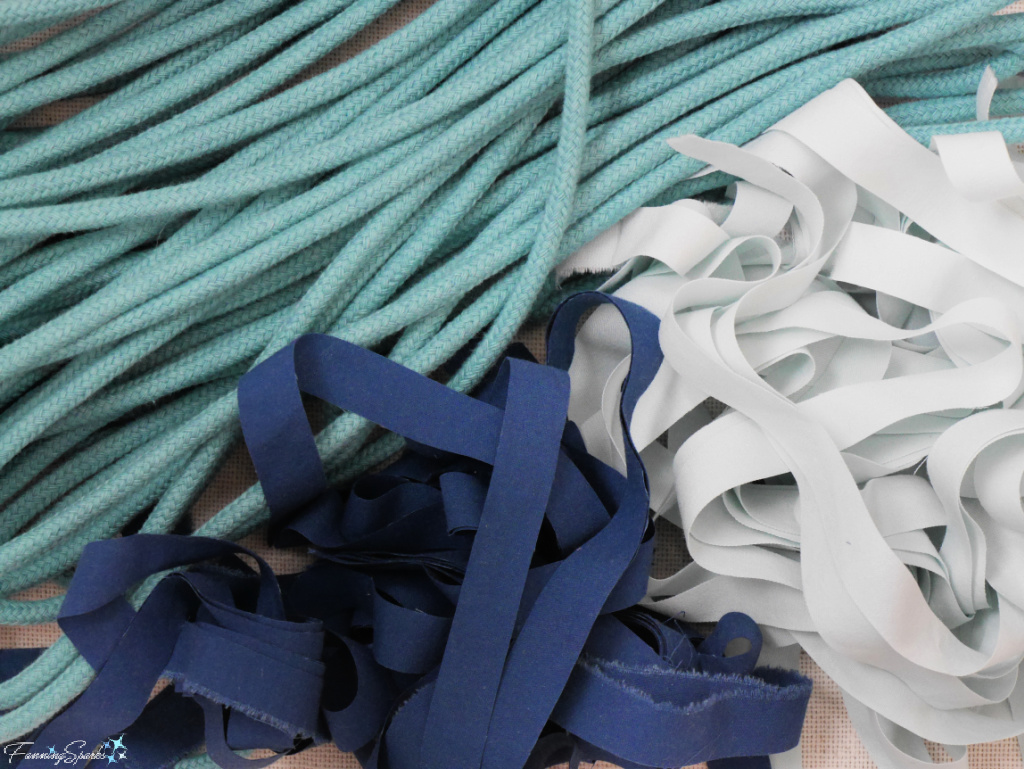
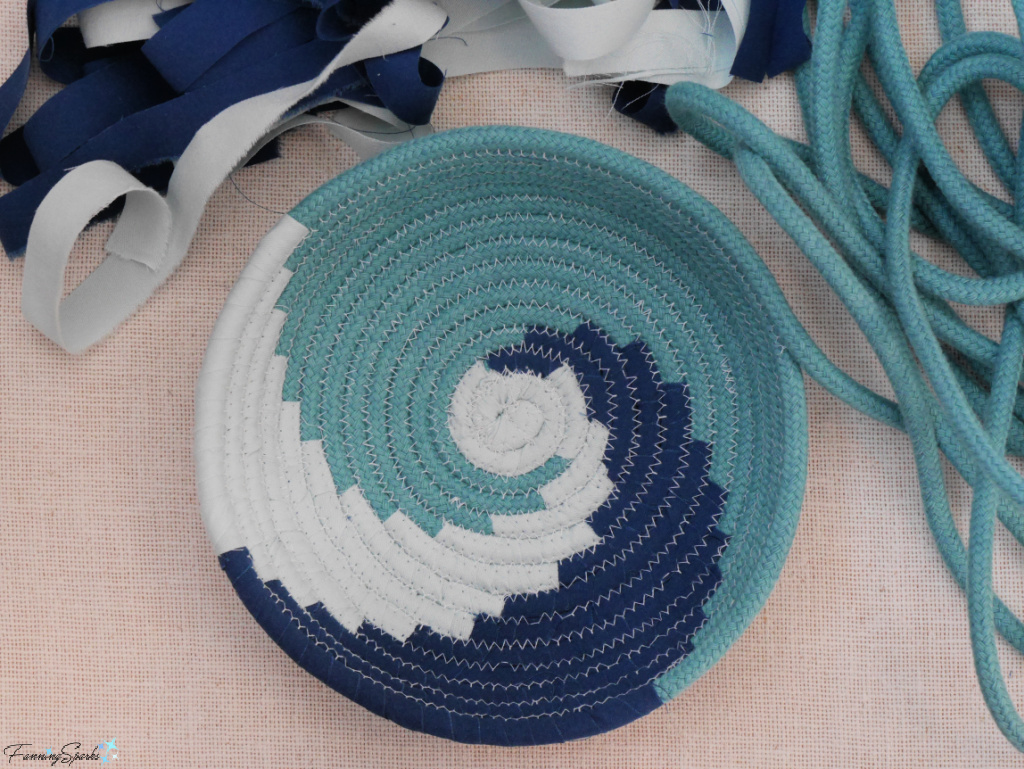
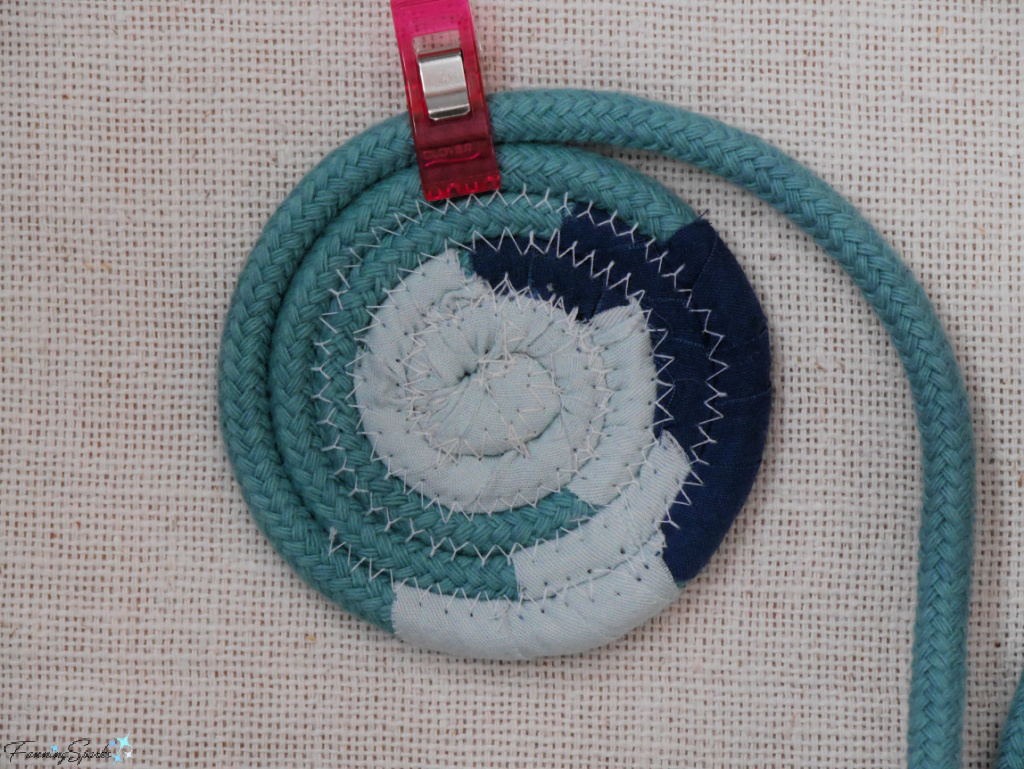
I decided to try making a similar three-color swirl but with fabric strips on a coiled rope basket. The idea was to use a teal-colored rope for the base and to add two more colors ― dark blue and pale green ― by wrapping the rope with fabric strips.
Online experts offer a variety of options for wrapping rope with fabric.
Some simply cut long rectangular strips with the grain of the fabric while others recommend cutting them on the bias. Experts say cutting on the bias will reduce the amount of fraying along the edges and will make the strips stretchier and easier to manipulate.
Recommended strip sizes also vary ― with widths from 1 to 3.2 cm (⅜ – 1 ¼”) and lengths from 15 to 50 cm (6 – 20”).
Some experts wrap the fabric strips around the rope as they sew the coils. Others recommend preparing the fabric and wrapping the rope in advance. Different techniques will result in different results. For instance, folding bias-cut strips lengthwise and wrapping the rope in advance with only the folded edges visible will create a neat, streamlined surface without any visible raw edges. On the other hand, simply wrapping strips, cut on the grain, around the rope as it’s being coiled will produce a more textural, organic surface.
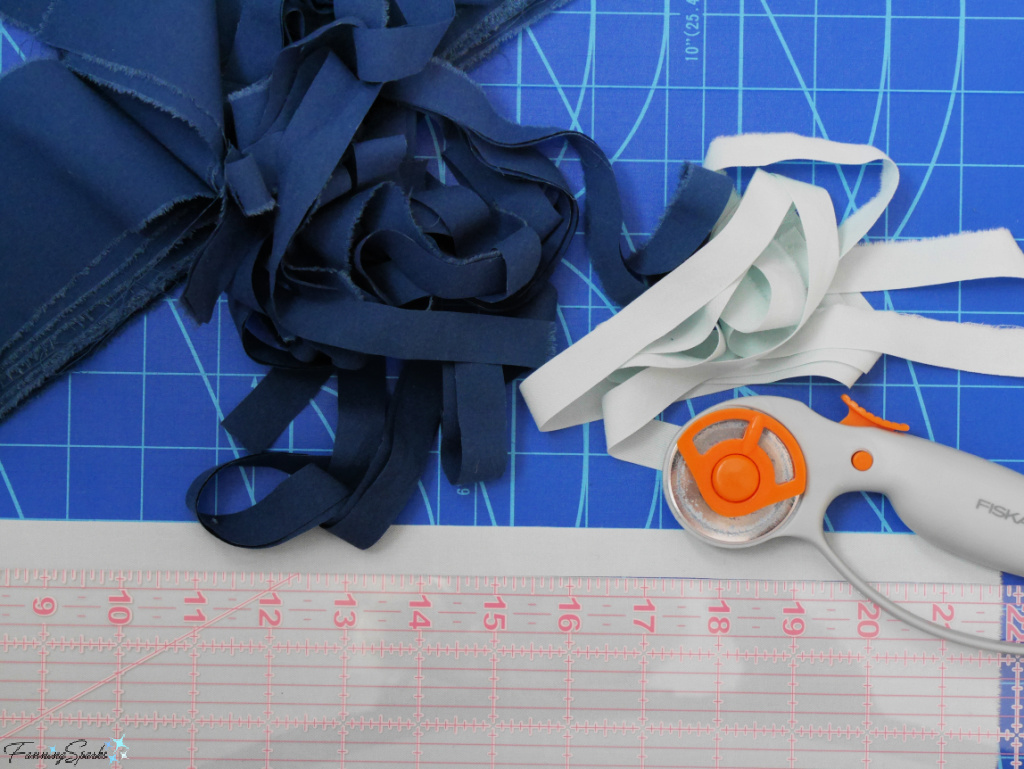
I chose to cut my fabric strips on the grain with a width of 1.5cm (about ½”). The swirl design calls for a variety of lengths with the longest strips being no more than 50cm long (20”). A rotary cutter, cutting mat and quilting ruler made cutting the strips quick and easy.
As it turns out, creating the three-color swirl design was much harder than I expected. A swirl pattern requires precision – every row must have the exact same offset. Specifically, I chose a 1cm (about ⅜”) offset for my project, meaning every decorative section had to start 1 centimeter after the decorative section in the previous row and it had to stop 1 centimeter after the previous row stopped. In hindsight, I think a slightly longer offset ― about 2cm (about ¾”) would be easier to manage.
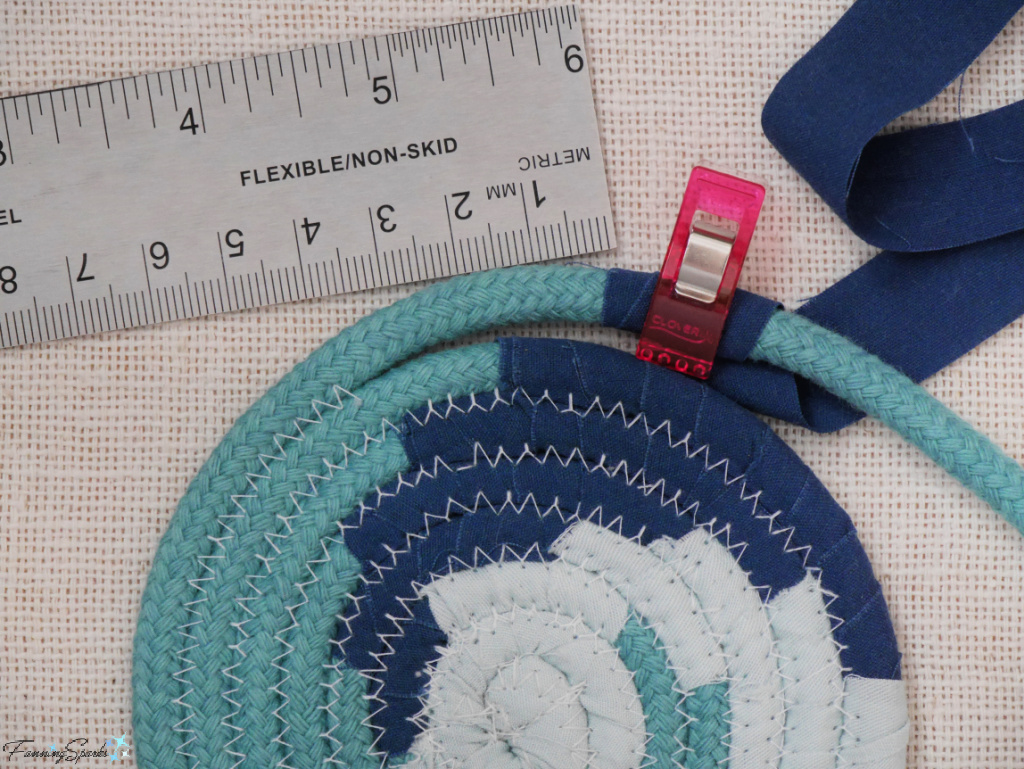
Every row in a coiled platter or bowl, like those shown in this blog post, is naturally longer than the previous row. It’s the combination of the two elements ― the naturally increasing row length and the precise offset of the decorative sections ― which leads to a beautifully balanced spiral swirl.
Here’s how my three-color spiral looked midway through the project. Not bad ― but oh so tedious!
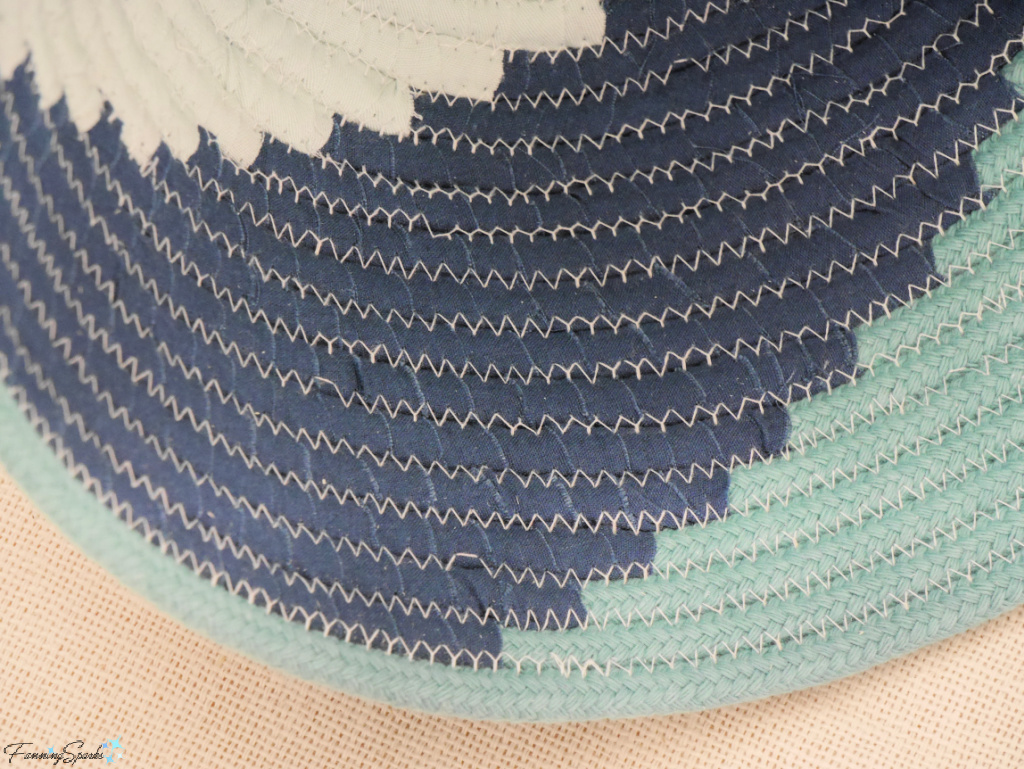
I learned that wrapping fabric strips around coiling rope isn’t difficult but wrapping them ― with precision ― is crazy fiddly! This is especially true when contrasting fabric strips must butt up against each other with neat right-angled ends.
Starting the rope coil was the most difficult part. I’ve found this to be true for all coiled rope projects but it was especially challenging with this bowl. Wrapping those short strips around the rope and keeping them in place while stitching those tight curves required a great deal of patience!
In hindsight, it would have been much easier to start the coil with unwrapped rope and then to add the fabric strips after the first couple of rows were sewn. A closer look, reveals that’s how the Between Stitches bowl was done.
When everything goes well, making a coiled rope bowl is like sewing one long, continuous seam. The rope is added gradually and slowly ― almost magically ― a bowl appears! It’s very satisfying!
But this fabric-wrapped swirl basket did not magically appear! It required a great deal of starting and stopping and, as a result, it was very difficult to achieve a smooth, uninterrupted zigzag stitching pattern. This is particularly noticeable when the sewing thread contrasts with the fabric or rope, as was the case with my basket where the beige thread is clearly visible on the dark blue fabric.
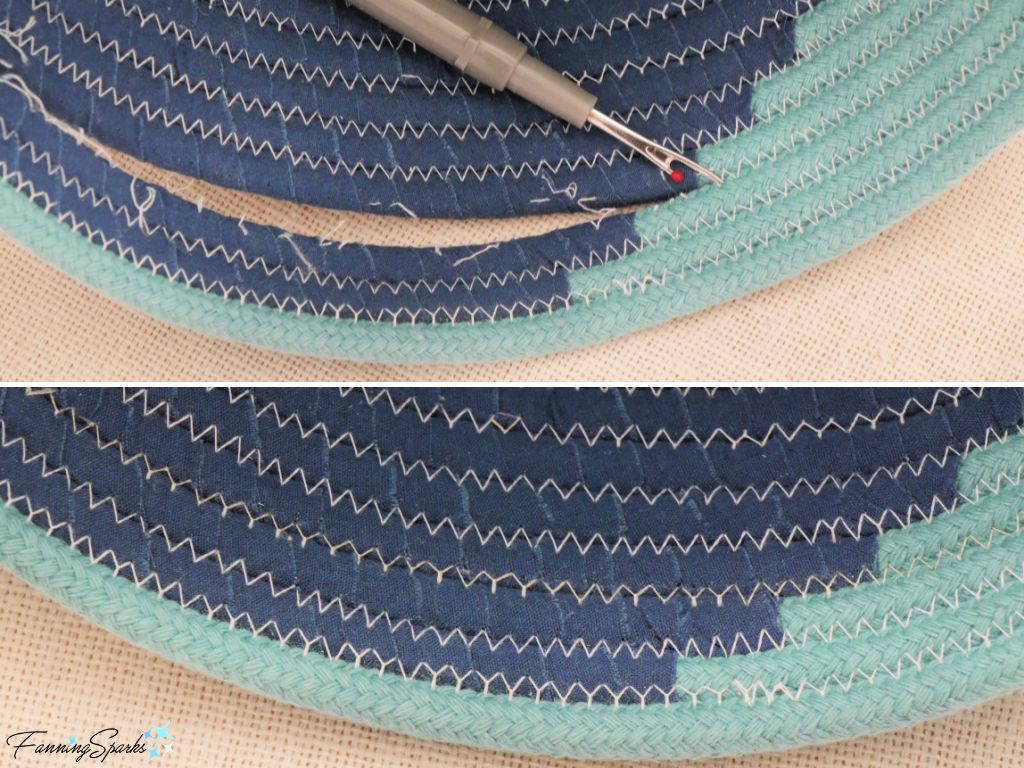
I’ve discovered it is possible to go back and correct these problem areas. After checking that my sewing machine needle could still reach the problematic area, I ripped out the entire section with the flawed zigzag stitches and sewed it again.
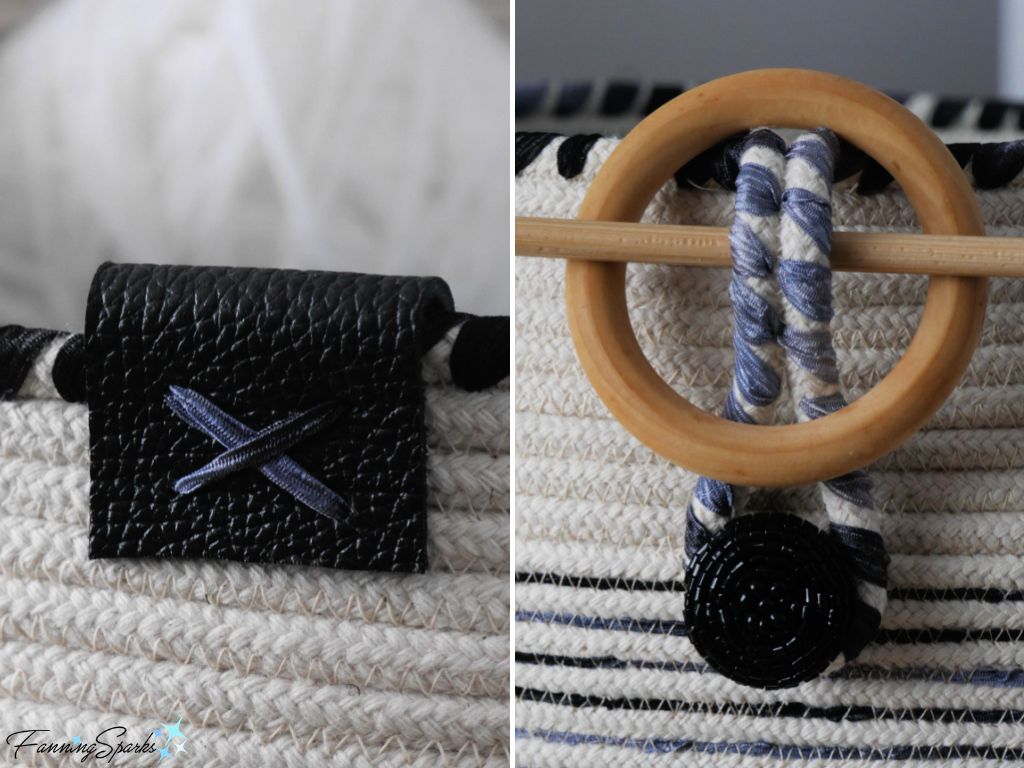
With coiled rope projects, there’s always a question of how to finish the end of the rope. Should it be downplayed and hidden? Or enhanced and featured? In my last project, the coiled rope barrel-shaped basket I shared in Learning the Ropes of Coiled Rope Baskets, I chose to hide the end of the rope under a piece of leather. And I added a showy decorative element on the opposite side of the rim to draw the eye.
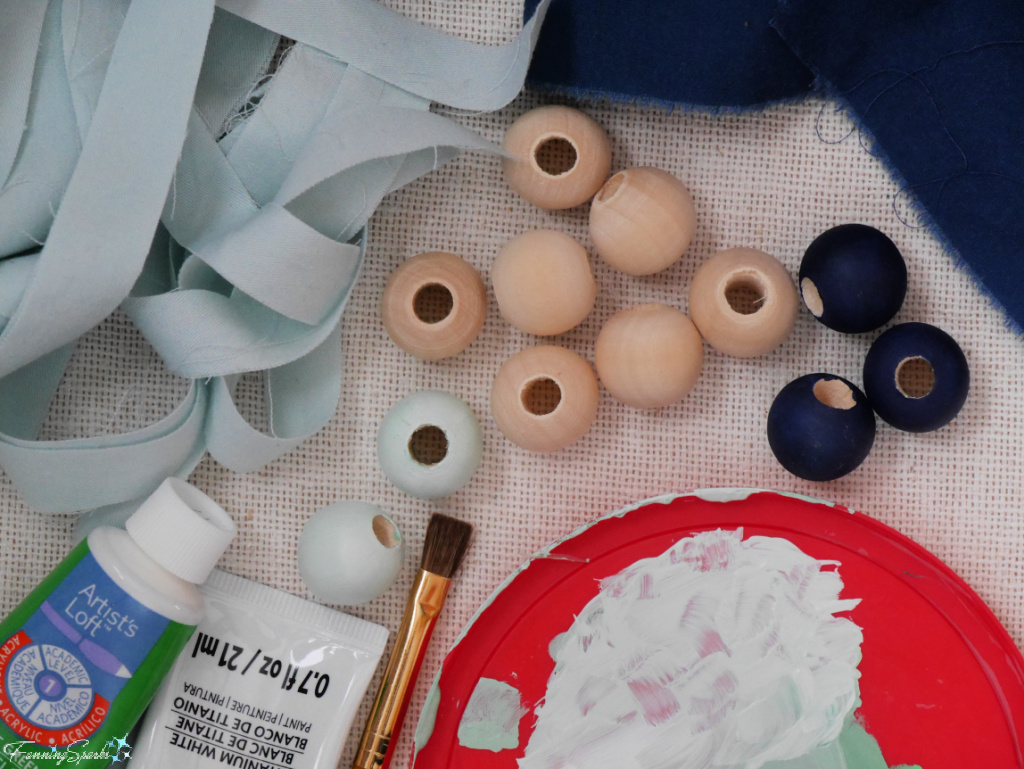
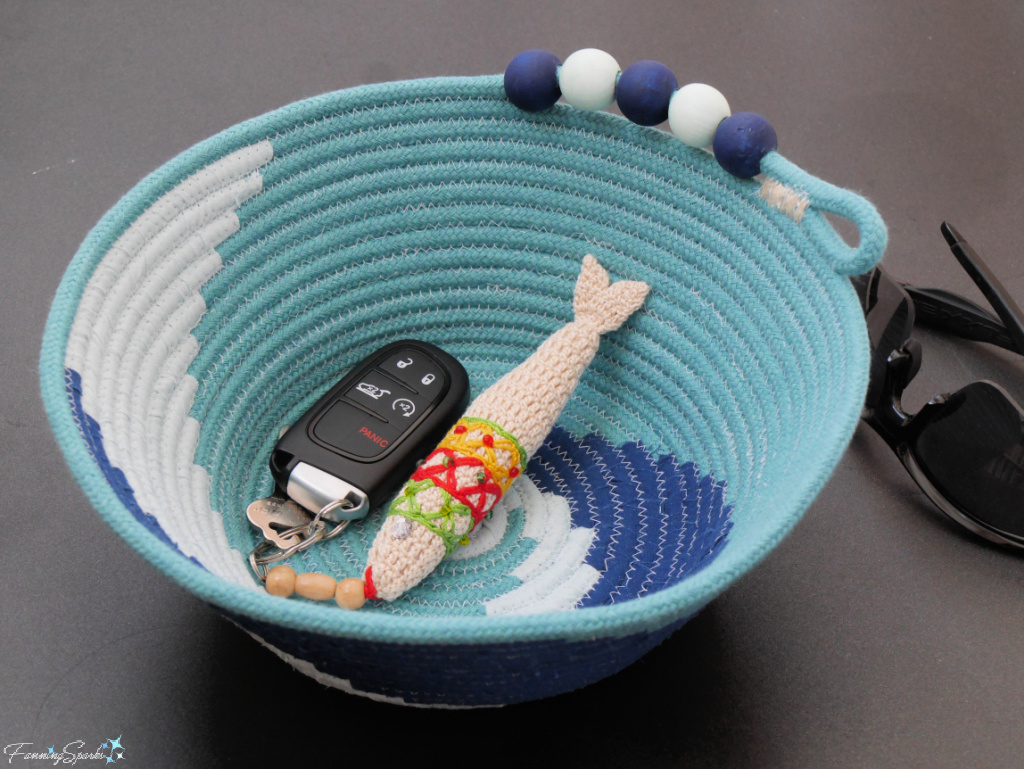
Initially, I thought it would be best to downplay the rope end on this project too because I didn’t want to distract from the spiral swirl. But then I considered how the bowl would be used. My plan is to place it on a table near the front door where it will catch keys, sunglasses, coins and other small items we tend to carry in and out of the house. This means the swirl pattern will often be interrupted by the bowl’s contents. It also means the bowl will be viewed from above which will call attention to the rim. So, I decided to add an accent on the rim to incorporate the end of the rope.
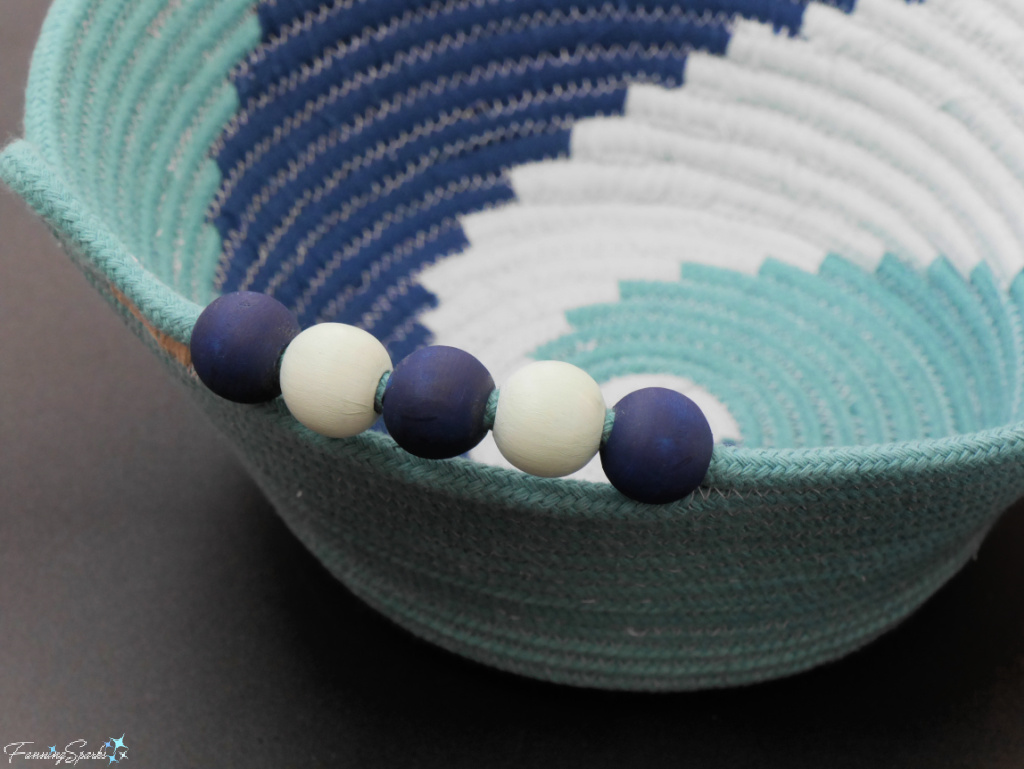
The accent consists of five wooden beads painted to match the colors of the bowl.
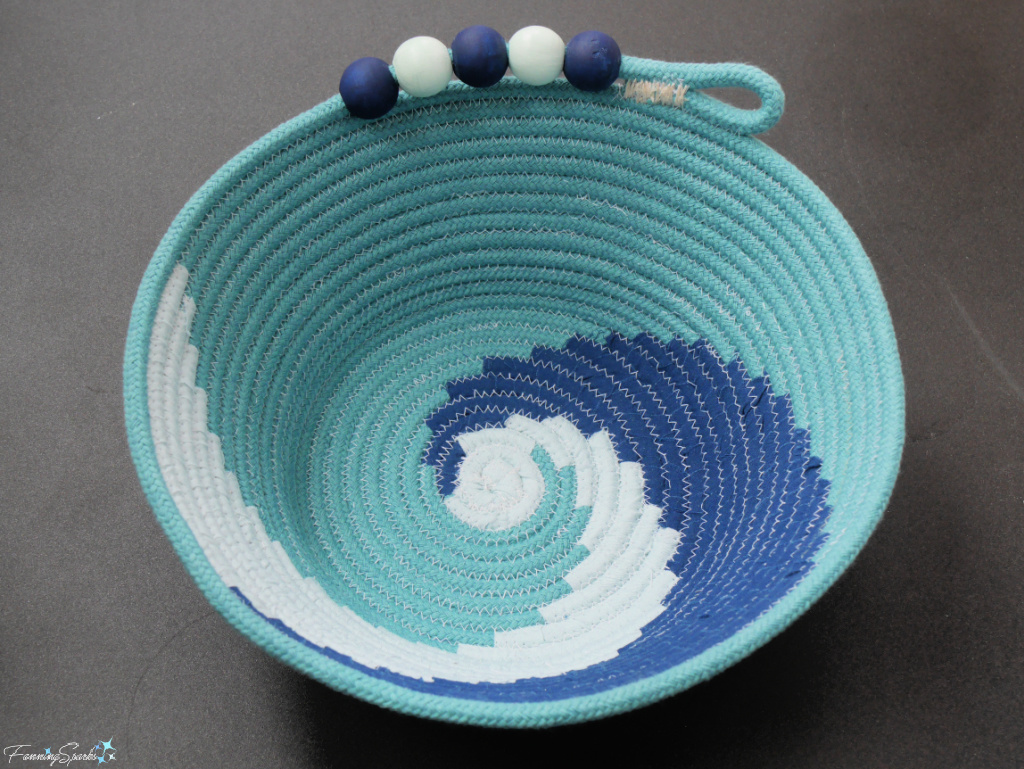
Here’s how the bead accent turned out.
In the final outcome, I’m really pleased with my new three-color swirl coiled rope bowl.
However, if I were ever to attempt such a project again, I would do several things differently including:
. Learn to make a spiral swirl with two colors before attempting three colors.
. Avoid high contrast between the colors of the coils (rope and fabric) and the color of the thread.
. Cut the fabric strips on the bias instead of with the grain.
. Start the coil with unwrapped rope; start wrapping fabric after two or three rows.
. Use an offset longer than 1cm (about ⅜”) ― 2cm (about ¾”) or so would be better.
. Don’t expect a spiral swirl project to be quick and easy!
I’ll wrap-up with one last photo showing my latest coiled rope project in action.
More Info
The following previous blog posts have also discussed coiled rope basketry:
. Learning the Ropes of Coiled Rope Baskets
. Getting Roped into Coiled Rope Basketry
. Coiled Rope Animal Coasters – DIY Tutorial.
The following resources were consulted in the writing of this blog post:
. Sewing A Scalloped Swirl Fabric Rope Basket with Clothesline Rope YouTube video by Sweet Country Living in Michigan
. Various YouTube videos by Crafty Patti ― see her on YouTube.
The following talented makers and artisans are mentioned in this blog post:
. Embroidery Library ― see more on Instagram or their website
. Living Water Quilter ― see more on Instagram or their website
. Forest Home Décor ― see more on Instagram or their website
. On Pointe Embroidery ― see more on Instagram
. Hazen Home ― see more on Instagram or their website
. Rafapin Studio ― see more on Instagram
. Double Knot Design ― see more on Instagram or their Etsy shop
. Between Stitches ― see more on Instagram
. Indego Africa ― see more on Instagram or their website.
You may also want to check out my Pinterest board, Coiled Rope Basketry – FanningSparks Favs, with over 230 examples of coiled rope basketry from bowls to baskets to laundry hampers to tote bags to coasters to lamps.
Today’s Takeaways
1. The wealth of maker expertise and inspiration available online is astonishing.
2. Much can be learned from attempting ambitious maker projects.
3. Remember to consider both form and function while creating. Will the finished object be purely ornamental or will it serve a purpose?


Comments are closed.