
Do you have a cherished teacup set languishing in the back of your china cabinet? The kind you picture at an old-timey tea party? There’s not much call for tea parties any more but that pretty little cup and saucer need not be forgotten. Perhaps it’s time to repurpose it and give it a new lease on life. How about turning that neglected china cup and saucer into a handy little pincushion? Here’s my favorite teacup set repurposed as a pincushion.
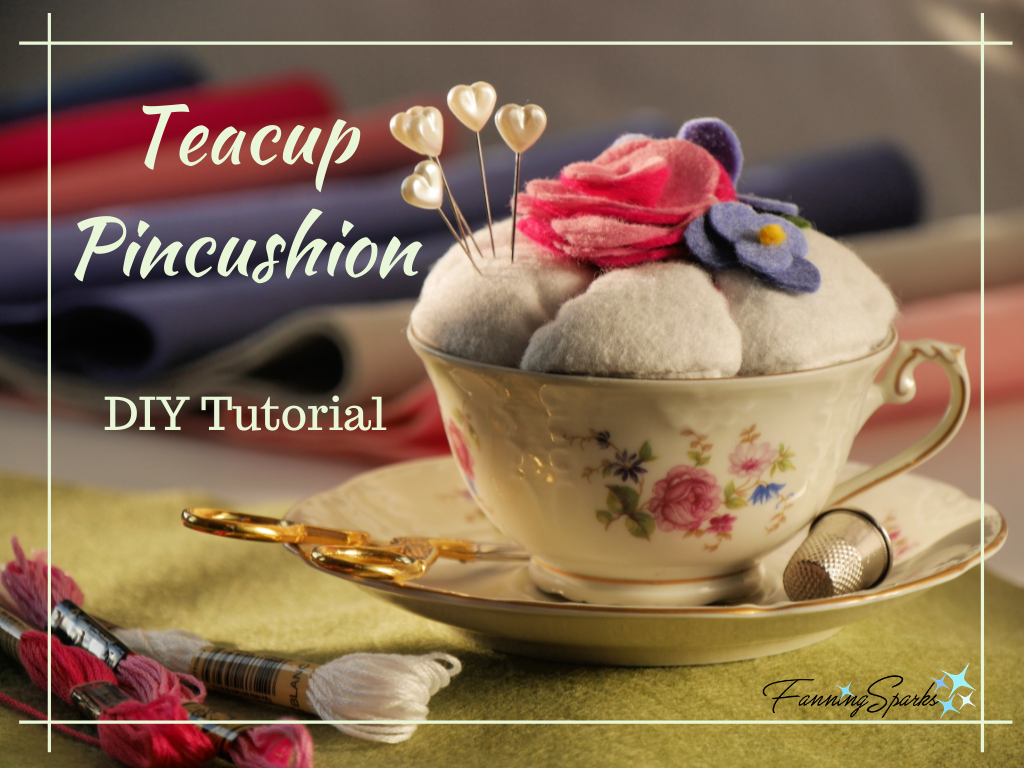
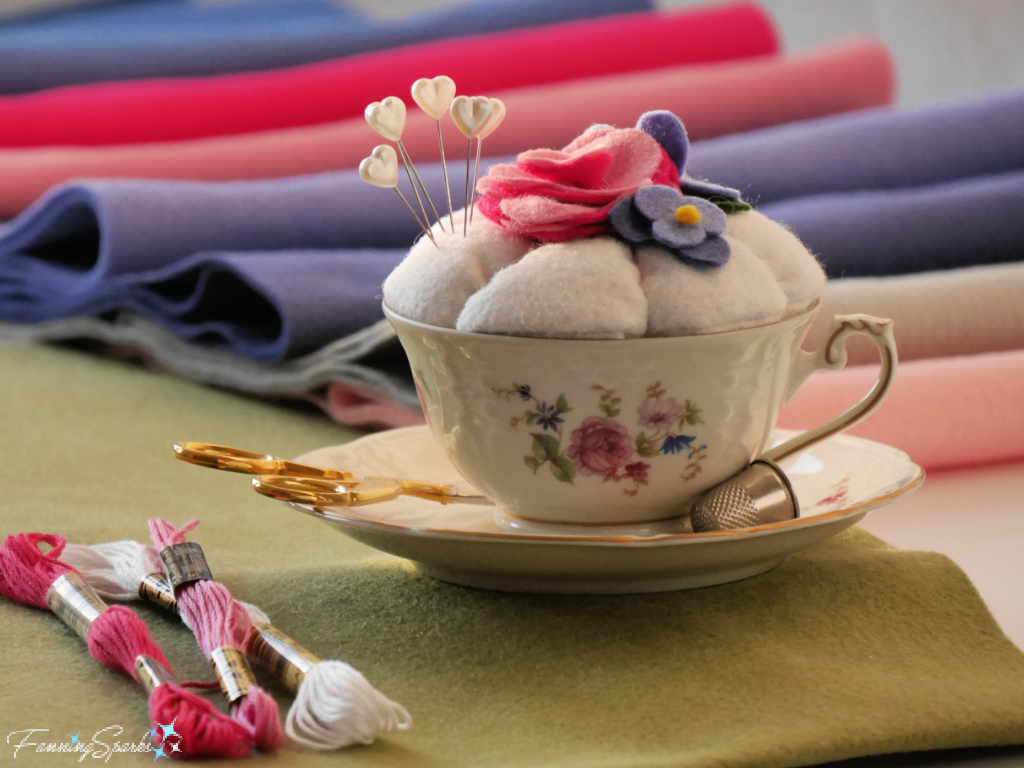 In today’s post, I share step-by-step instructions to make your own teacup pincushion. The approach and technique used are similar to those from my last DIY tutorial post, Vintage Bangle to Keepsake Box. Felt is used to make a stuffed pad for the pincushion which is lavishly embellished with felt flowers and leaves. The pincushion pad is adhered inside the rim of the teacup.
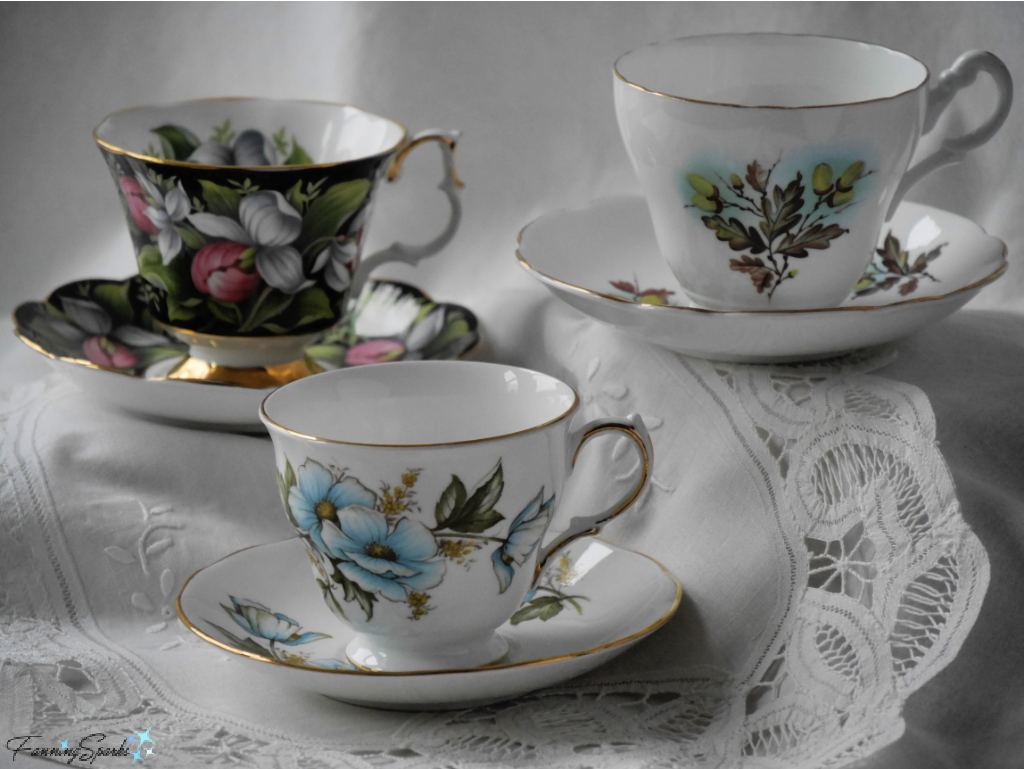
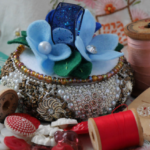
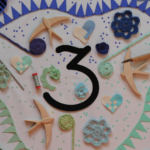
Start by examining the pattern on your teacup and saucer—many have beautiful flowers or stunning floral arrangements. Let this pattern be your inspiration. Which flowers are used? What are the forms and colors? Here are a few examples.
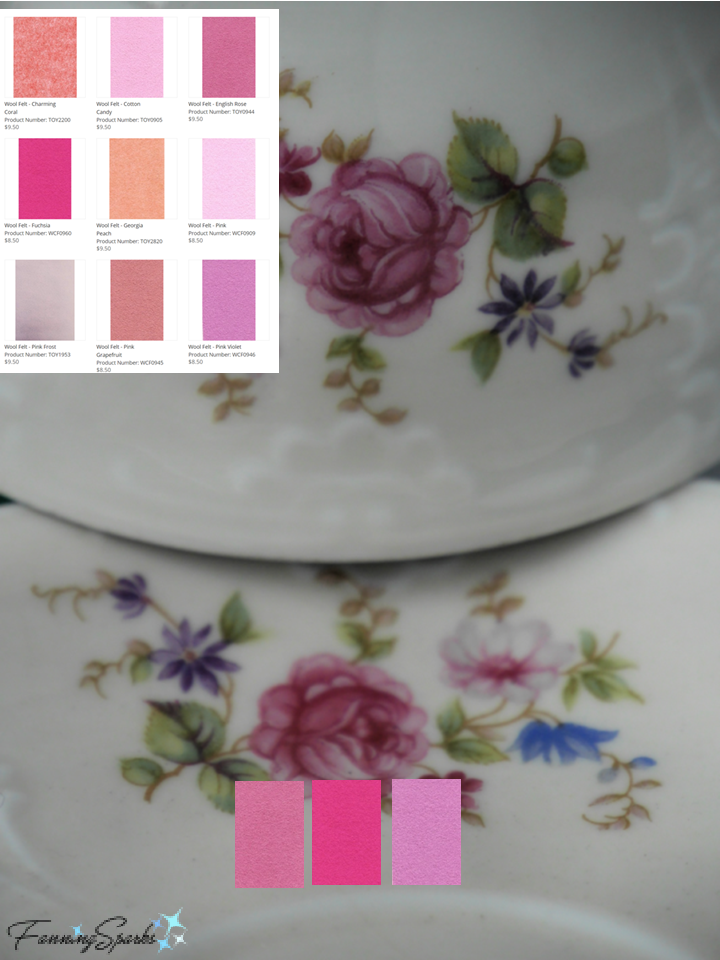
 Colorful felt flowers are the key to this project but buying felt in the desired colors can be a little tricky. The best way, of course, is to shop in person where you can hold the teacup up against the felt. But that’s not possible when shopping online. I’ve found using a photo of the item I’m trying to match is a good way to select colors online. Shoot the photo against a white background in bright, clear, natural light. Then view your photo beside the vendor’s colors. It’s helpful to take snippets of the color samples and drop them directly onto your photo. This method isn’t foolproof but the side-by-side comparison is a good indicator of which colors will work best. And it’s much better than holding a teacup up to your computer monitor! The below photo shows a few color samples from Prairie Point Junction’s wool blend felt (see More Info below).
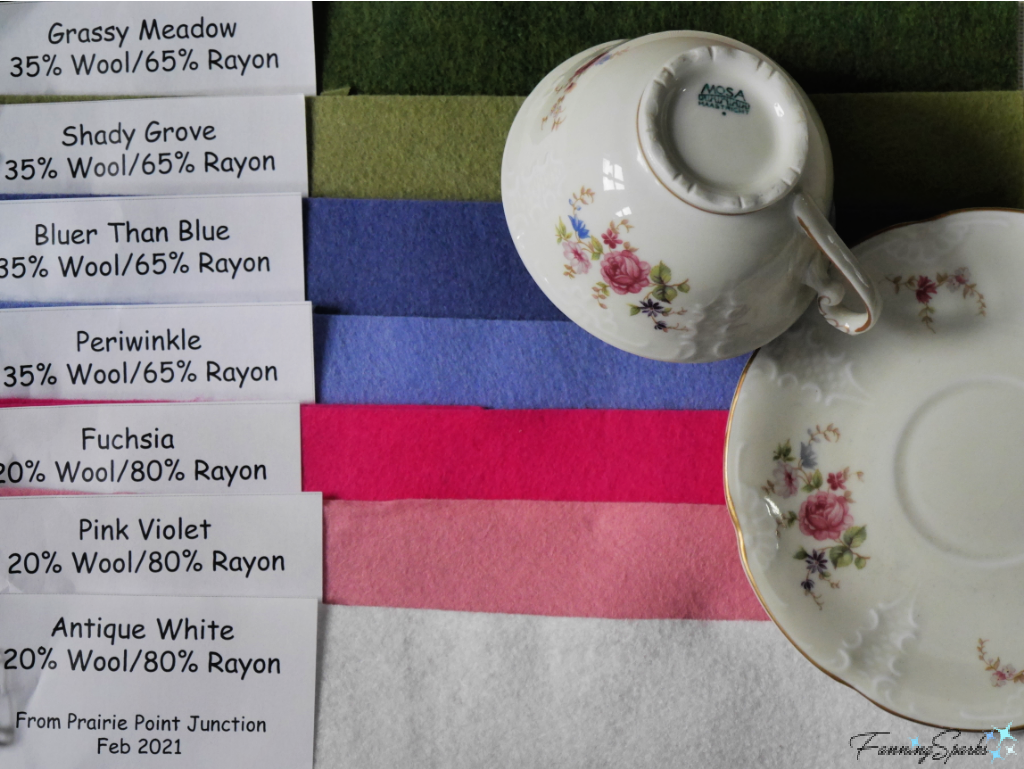
I selected a few options and ordered them in ⅓ yard cuts. The wool blend felt is available in 36” wide yardage so ⅓ yard yields a generous 12” x 36” piece. This project doesn’t require much felt so it’s possible to order a few different colors at a reasonable cost.
In the end, I selected 2 greens (Grassy Meadow and Shady Grove), 2 blues (Bluer Than Blue and Periwinkle), 2 pinks (Fuchsia and Pink Violet) and 1 white (Antique White) to make flowers in an open rose form, a daisy form and a hydrangea form. Alternatively, you may wish to make one of the flower forms (ie a closed rose form, an apple blossom form or a dogwood flower form) that I shared in my previous post Vintage Bangle to Keepsake Box – DIY Tutorial.
 Supplies Needed
. Teacup and Saucer
. Template – Download Felt Flowers for Teacup Pincushion – Complimentary Download to print the patterns for the felt flowers.
. Felt – Wool blend felt in the colors of your choice. I used approximately 12” x 6” in white for the pincushion pad; 4” x 8” in pinks for the open rose form; 3” x 1½” in blues for the hydrangea form; 4” x 1” in blue for the daisy form; 1” x 3” in greens for the leaves; ½” x 3” in yellow for the stamen.
. Freezer Paper
. Thread – To match the felt for your pincushion pad and flowers.
. Filling – Polyester fiberfill or other material to stuff the pincushion.
. Embroidery Floss – Pink (or your choice of color) to wrap the pincushion pad and green for the leaves.
. Hulled Millet (Dried Beans or Rice) – Approximately ½ cup to add weight to the teacup.
Equipment and Tools Needed
. Printer
. Iron
. Pencil
. Fabric Marker or Chalk
. Pins
. Scissors
. Scissors – Sharp, short-bladed scissors, such as embroidery or applique scissors, are ideal.
. Sewing Machine
. Needles – 1 needle for thread; 1 needle for embroidery floss; 1 extra-long embroidery needle; 1 large-eyed needle such as a darning needle.
. Stick – A small, round stick or dowel to hold the felt stamen.
. Hot Glue Gun
Step 1 Cut Pincushion Pad Parts Place the teacup upside down on a piece of freezer paper (shiny side down). Trace around the outside rim. Add ½“ to the circumference of this circle. Cut out the circle leaving a narrow border outside the cutting lines. Use the iron to press the freezer paper pattern (shiny side down) onto the felt you’ve selected for the pincushion pad. Cut out the felt circle with sharp, short-bladed scissors. Take care to cut precisely.
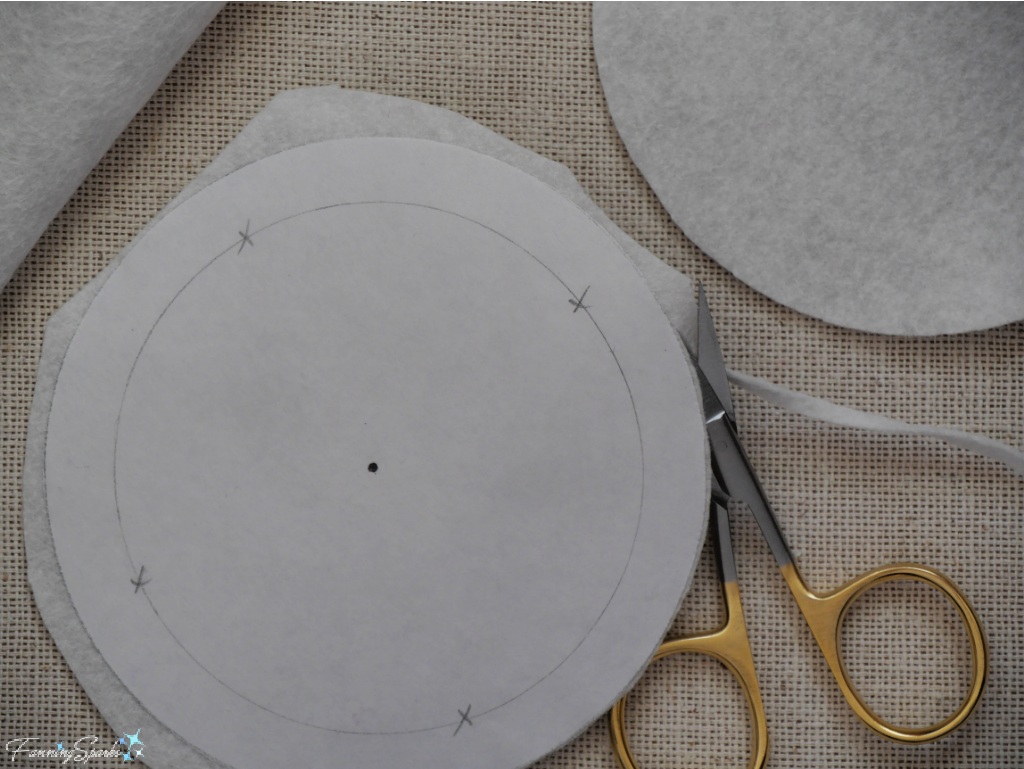
Remove the freezer paper pattern. Repeat for a second felt circle using the same color. After removing the freezer paper pattern, find the center of the circle. Transfer the center mark to the wrong sides of both of the felt circles. Select one of the circles to be the bottom. Draw a 2-3” line through the center mark. Cut on this line to create a slit in the bottom circle.
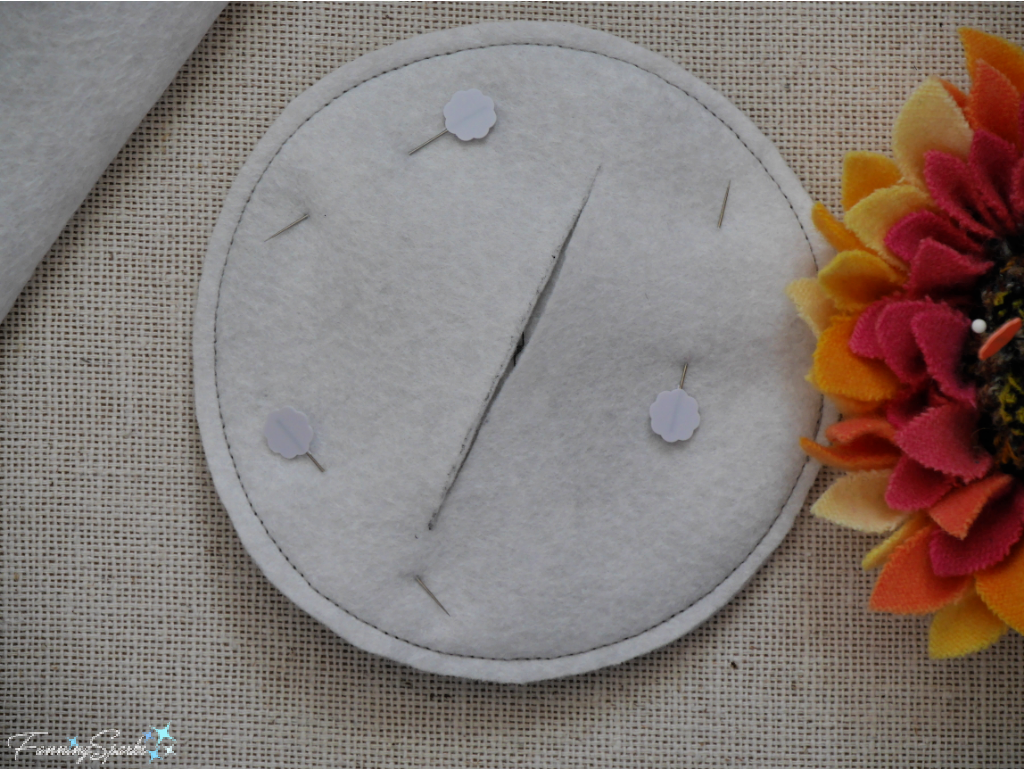
Step 2 Construct Pincushion Pad Lay the felt circles for the pincushion pad on top of each other with right sides facing. Align the edges and pin. Use the sewing machine to sew a ⅛“ seam around the entire circle.
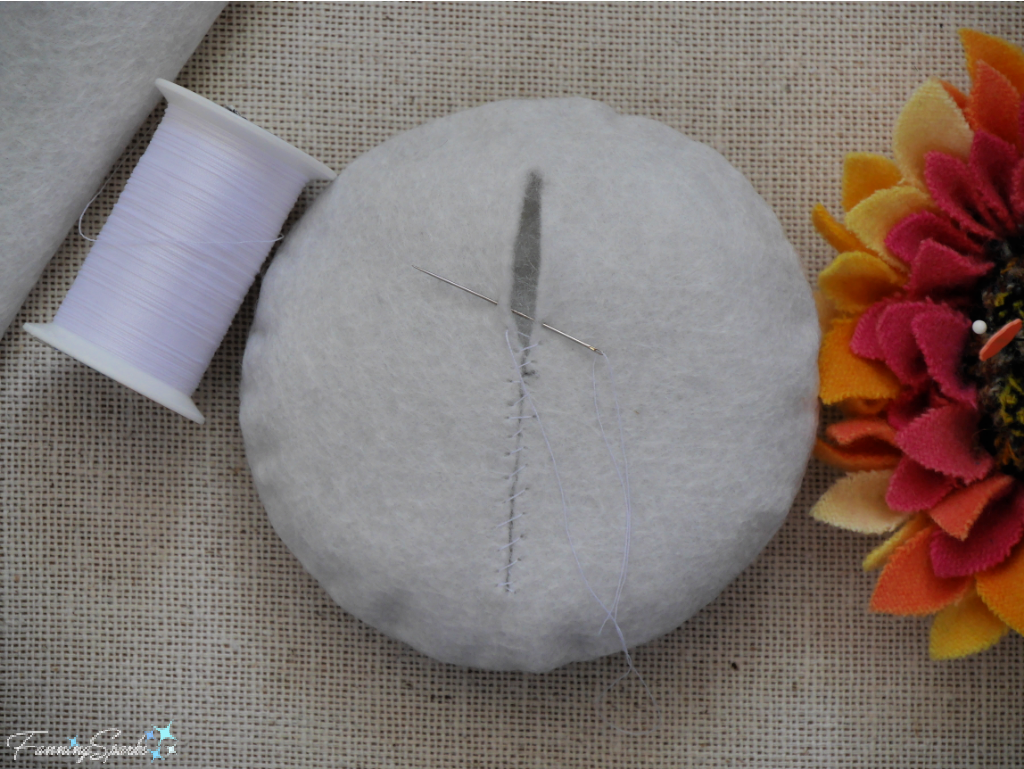
 Gently turn the felt circle inside out through the slit. Push out seam by running finger along the inside of the seam. Press. Stuff pincushion pad with polyester fiberfill or other material. Ensure outside edge is stuffed evenly. Take care not to overstuff—the seams should not be strained. Use matching thread and whipstitch (or stitch of your choice) to close the back slit.
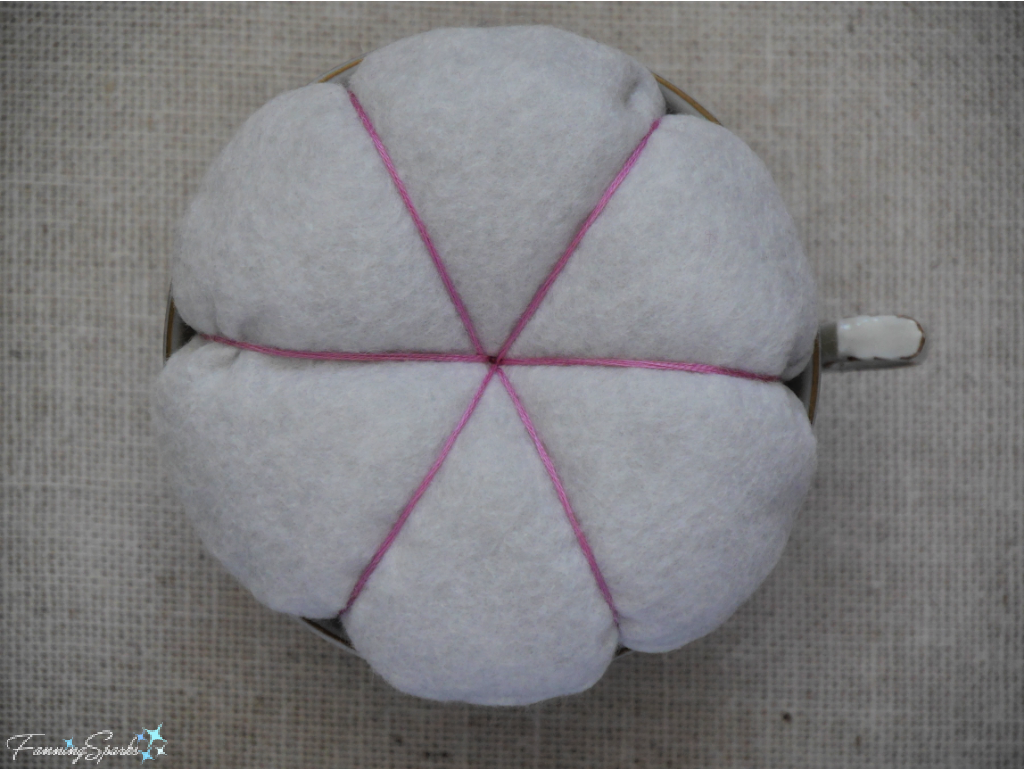
 Choose embroidery floss to divide the pincushion pad into petals—the color can match or contrast as you wish. Wrap the 6-strand floss around the pincushion pad 3 times to measure the length needed. Mine was 32” long. Cut and thread the floss onto a long embroidery needle. Insert a pin near the center point on the bottom and wrap the floss tail around this pin to anchor it. Insert the needle at the center point on the bottom of the pad, pull it up through the pad and exit at the center point on the top. Wrap the floss around the outside of the pad and return the needle to the center point on the bottom.
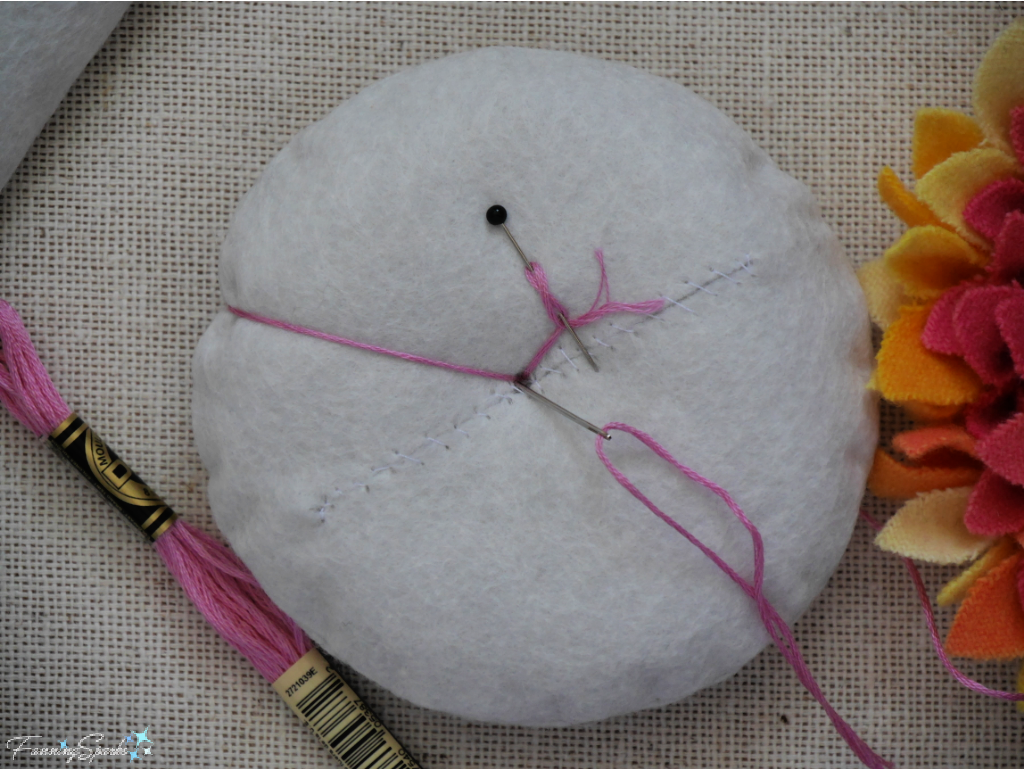
Pull the floss snug—this creates the indented points for the “petal” look. Pull needle through pad to top again. Repeat 5 times spacing out evenly around the circle into 6 petals. Check the fit of the pincushion pad in the teacup—it should sit snuggly in the rim. If needed, tighten or loosen the floss to adjust fit. Finish with a small stitch on the top and return the needle to the back. Knot the ends of the floss securely.
Step 3 Cut Flower Parts Download Felt Flowers for Teacup Pincushion – Complimentary Download to print the patterns for the felt flowers and leaves. Alternatively, you may wish to make one of the flower forms (ie a closed rose form, an apple blossom form and a dogwood flower form) that I shared in the Felt Flowers for Bangle Keepsake Box – Complimentary Download in my previous post Vintage Bangle to Keepsake Box – DIY Tutorial.
Cut a sheet of freezer paper to the size of a sheet of printer paper (ie 8 ½“ x 11“) and put it into the printer tray with the shiny side down. Print the template onto the freezer paper. Since not all printers work the same, please adjust this technique to the specifics of your own printer. Once you have your design printed on the freezer paper, cut out the individual patterns leaving a small border outside the cutting lines. Match up the pattern pieces with your felt colors.
Place a piece of felt on your ironing surface and lay the freezer paper pattern on top of it with the shiny side down. Use your iron to press the freezer paper pattern into place—a few seconds is all that’s needed. Take care to use the heat setting appropriate for your felt. Cut out the pattern piece (freezer paper and felt) using sharp, short-bladed scissors for precision. Then simply pull the freezer paper off the felt. Repeat with all felt pieces.
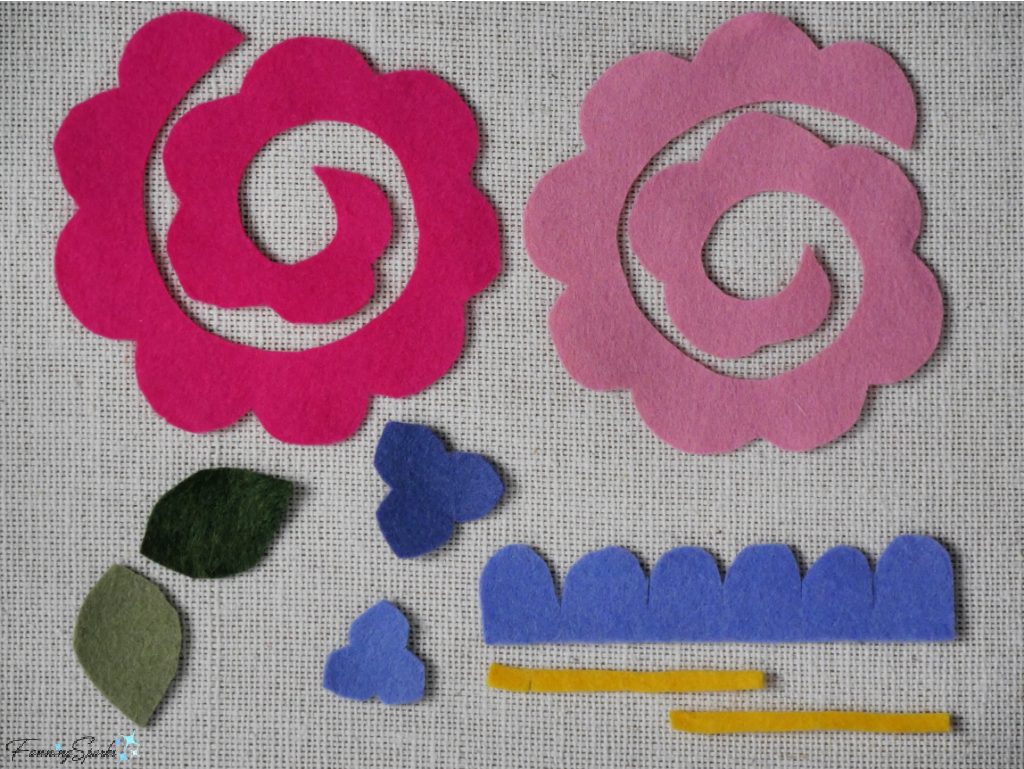
Cut the following:
. TWO #1 Open Rose Form Rolled Spiral Flower in pink. I cut one from Fuchsia and one from Pink Violet.
. ONE large #2 Hydrangea Form 3-Pointed Petals Flower in dark blue. I cut mine from Bluer Than Blue.
. ONE small #2 Hydrangea Form 3-Pointed Petals Flower in medium blue. I cut mine from Periwinkle.
. ONE stamen for #2 Hydrangea Form 3-Pointed Petals Flower in vibrant yellow. I cut mine from some scrap felt which I had on hand.
. ONE #3 Daisy Form Row of Petals Flower in medium blue. I cut mine from Periwinkle.
. ONE stamen for #3 Daisy Form Row of Petals Flower in vibrant yellow. I cut mine from some scrap felt which I had on hand.
. TWO #4 Leaves in green. I cut one from Grassy Meadow and one from Shady Grove.
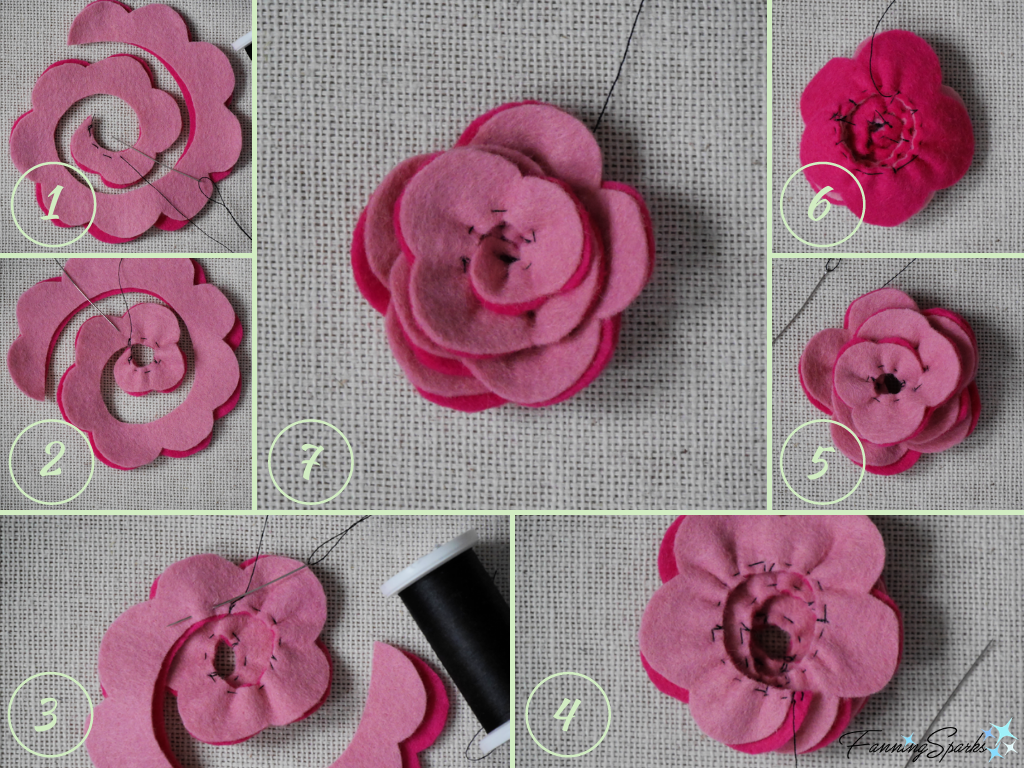
Step 4 Sew #1 Open Rose Form Rolled Spiral Flower Align the two open rose spirals with the lighter color on top. Thread sewing needle with matching thread. (Note: I’m using black thread for visibility in the photo below.) Start at the center of the spiral taking 2 small stitches to connect the two pieces of felt. Take 4 small running stitches along the inside edge of the spiral. Stop stitching to gather this section. Pull the end of thread bunching the felt together. Take 2 small stitches over the edge to lock in the gathers. Repeat this process, stopping every 5-7 stitches to gather and lock, until you reach the end of the spiral. Turn stitched spiral over with the light color on the top. Position the gathered spirals into a pleasing arrangement. Turn flower over and lock in the arrangement with a few stitches hidden on the bottom.
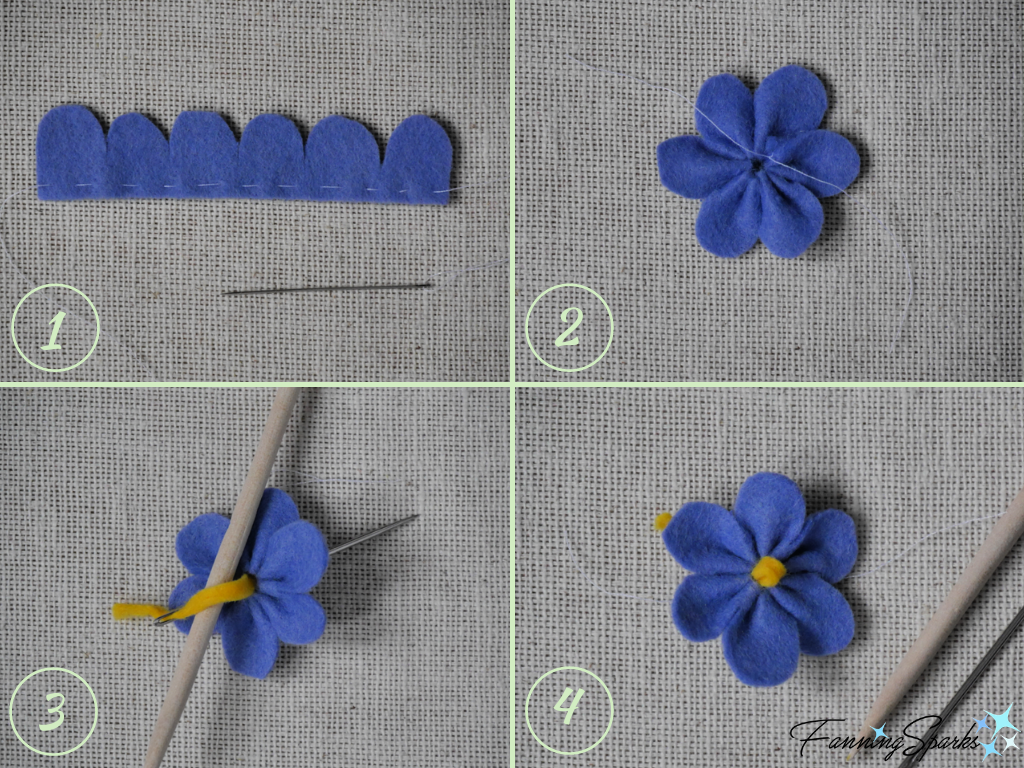
Step 5 Sew #2 Hydrangea Form 3-Pointed Petals Flower Lay the small hydrangea form on top of the large one staggering the points of the petals. Thread sewing needle with matching thread. (Note: I’m using white thread for visibility in the photo below.) Take 2 small stitches to connect the two pieces of felt. Pull stamen through a large-eyed needle such as a darning needle. Pull the needle and felt, from the back to the front, through the center of the flower. Pull gently but firmly. Loop felt stamen over a small stick to prevent it from pulling out. Pull the needle and felt, from the front to the back, through the same opening in the center of the flower. Turn flower over and trim the ends of the stamen to hide them. Lock the stamen in place with a few stitches hidden on the bottom.
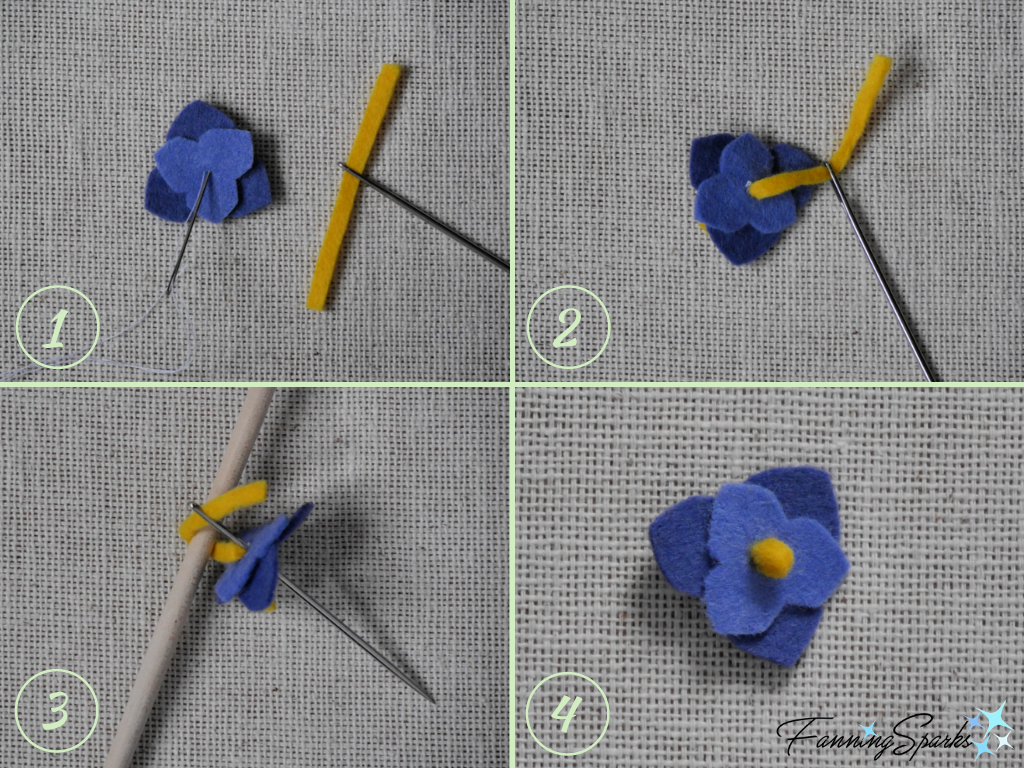
Step 6 Sew #3 Daisy Form Row of Petals Flower Thread sewing needle with matching thread. (Note: I’m using white thread for visibility in the photo below.) Leaving a long tail of thread, sew a row of small running stitches along the bottom straight edge of the flower. Leave a long tail of thread at the end. Grasp ends of thread and pull together to gather felt. Pull snuggly and knot securely. Pull stamen through a large-eyed needle such as a darning needle. Pull the needle and felt, from the back to the front, through the center of the flower. Pull gently but firmly. Loop felt stamen over a small stick to prevent it from pulling out. Pull the needle and felt, from the front to the back, through the same opening in the center of the flower. Turn flower over and trim the ends of the stamen to hide them. Lock the stamen in place with a few stitches hidden on the bottom.
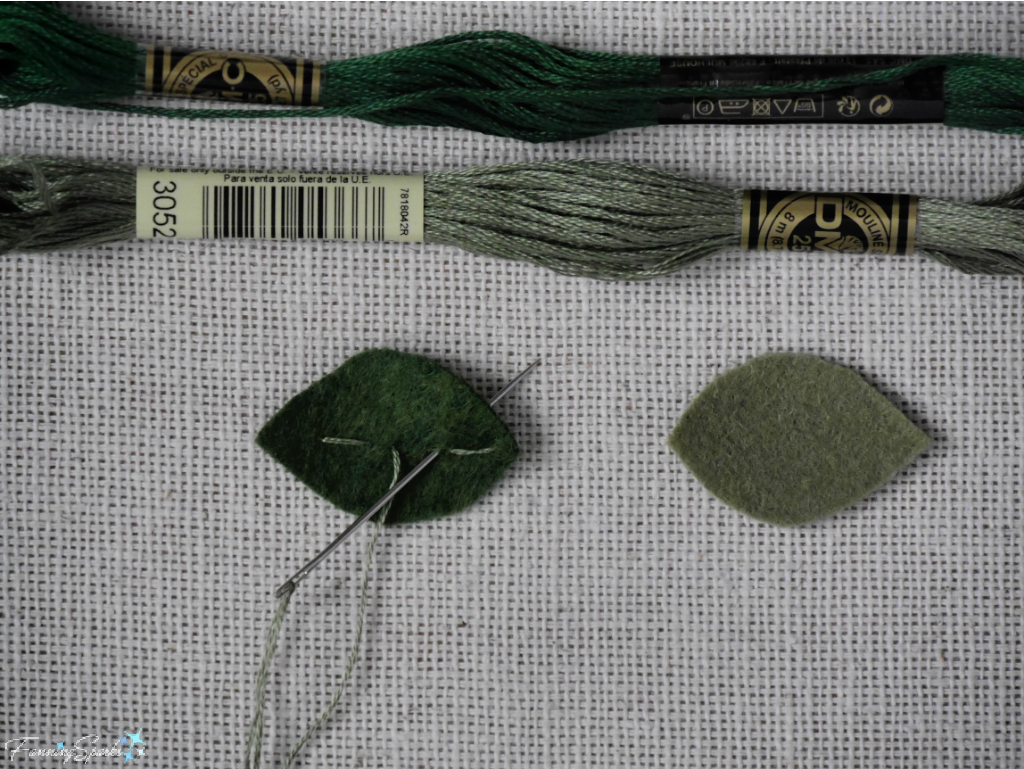
Step 7 Make the Leaves Use 2-strands of contrasting embroidery floss to stitch a decorative vein down the center of each leaf. Fold leaf in half. Take 2-3 small whipstitches along the base of the leaf near the folded center. This creates a slight tuck at the base of the leaf.
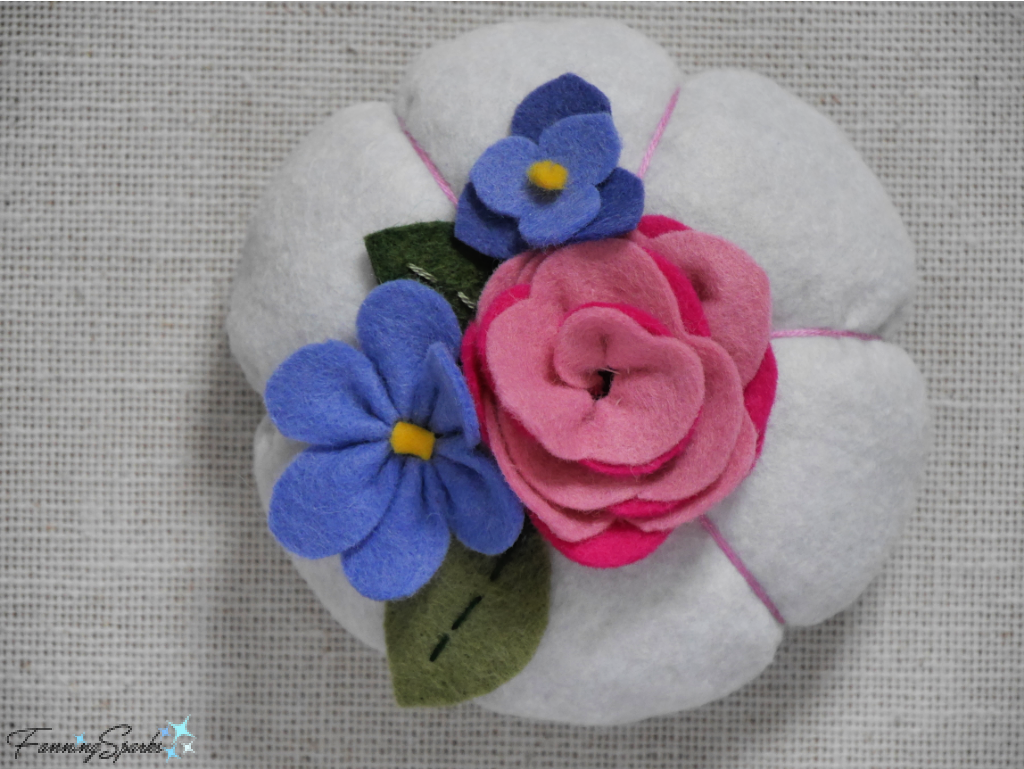
Step 8 Embellish the Pincushion Pad Position the flowers and leaves in a pleasing arrangement on the pincushion pad. Use needle with matching thread to attach each element. Work under the elements. Make small stitches taking care to keep them hidden. Alternatively, you may choose to glue the elements in place.
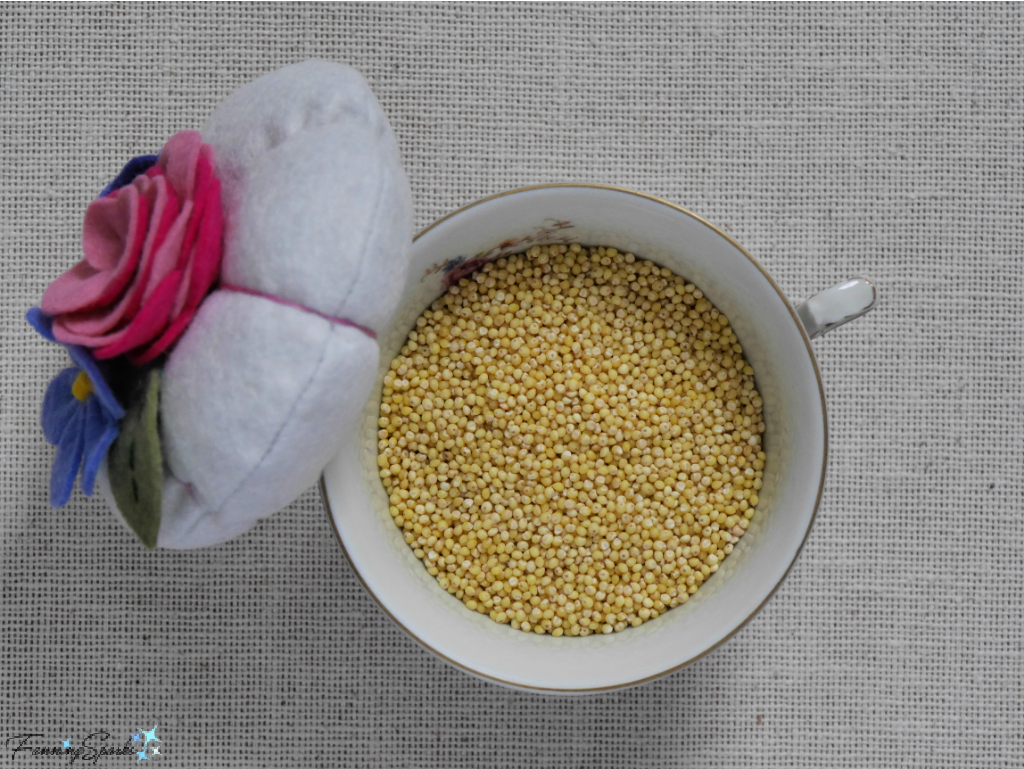
Step 9 Assemble Pincushion A teacup can be a little unstable when seated on a saucer. Since working with a wobbly pincushion would be less than ideal, I decided to try a couple of tweaks to stabilize it. First, I added weight to the bottom of the teacup by filling it with hulled millet. I used millet because I had some left over from another project. You could use dried beans or rice instead.
Then I used a hot glue gun to create a bead of glue around the cup just below the rim. I pressed the pincushion pad into the glue to secure the pincushion and seal the millet. The final step is to glue the bottom of the teacup to the saucer. I chose to do this for added stability but it’s optional.
And there you have it—your new teacup pincushion!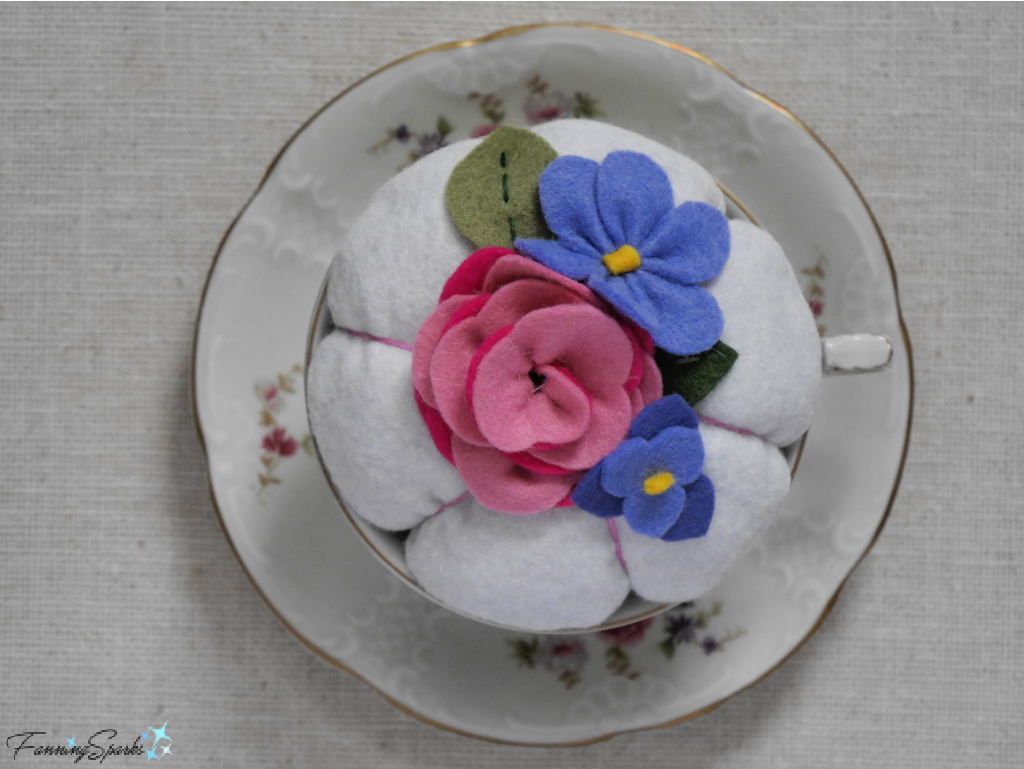
More Info
You can download the project template here: Felt Flowers for Teacup Pincushion – Complimentary Download.
Please pin this image to share or save for future reference.
I purchased my wool blend felt online from Prairie Point Junction which is the home of Wool Felt Central. They offer a wide selection of colors in a wool and rayon blend. I’m pleased with the quality of this felt; the colors are vibrant and the felt is easy to work with. My order was filled and shipped on the same day I placed it. The folks at Prairie Point Junction thoughtfully packed my felt in the same sequence as the order form so I could easily identify my colors. Prairie Point Junction is located in Nebraska, USA and their website shows shipping information for the USA. If you’re not located in the USA, you may want to check if they ship to your location. Alternatively, I suggest checking Etsy for wool blend felt. There are several well-established vendors showing thousands of positive reviews.
Today’s Takeaways
1. Consider incorporating cherished treasures into everyday use.
2. Wool blend felt, which is available in a rainbow of colors, can be made into an endless variety of forms.
3. Consider turning a neglected china cup and saucer into a handy little pincushion.

2 Comments
@Marian, It looks so nice sitting with my sewing things. I’m pleased to be able to share. Peg
Love It!
Excited to receive the pkg, and instructions