
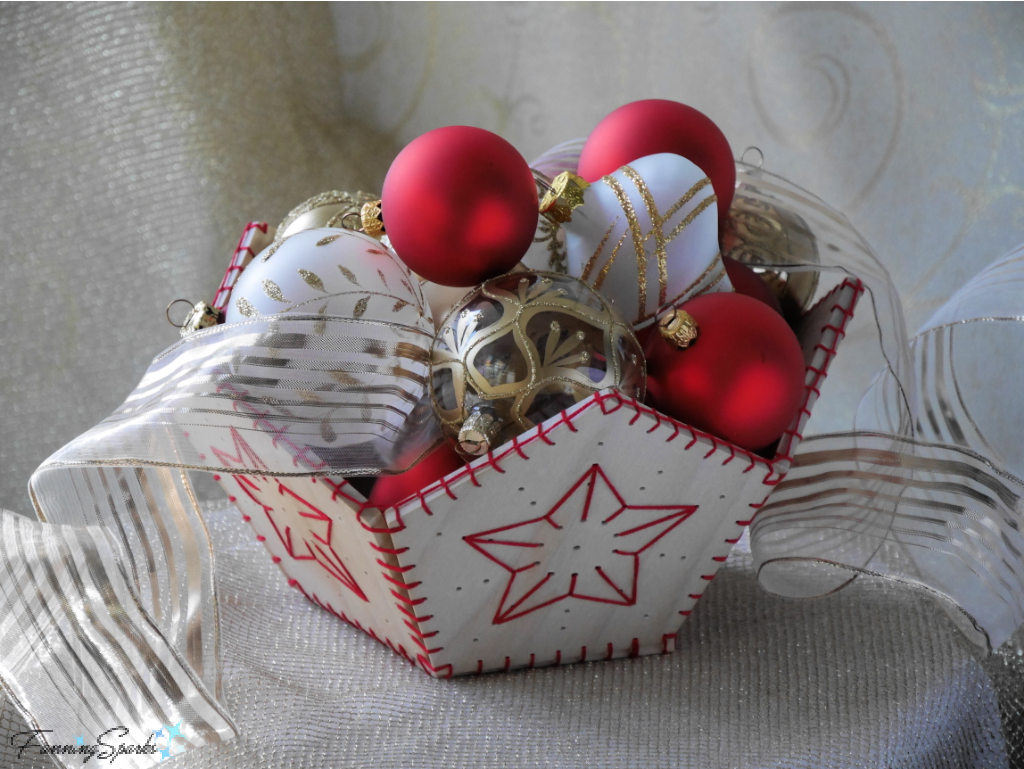
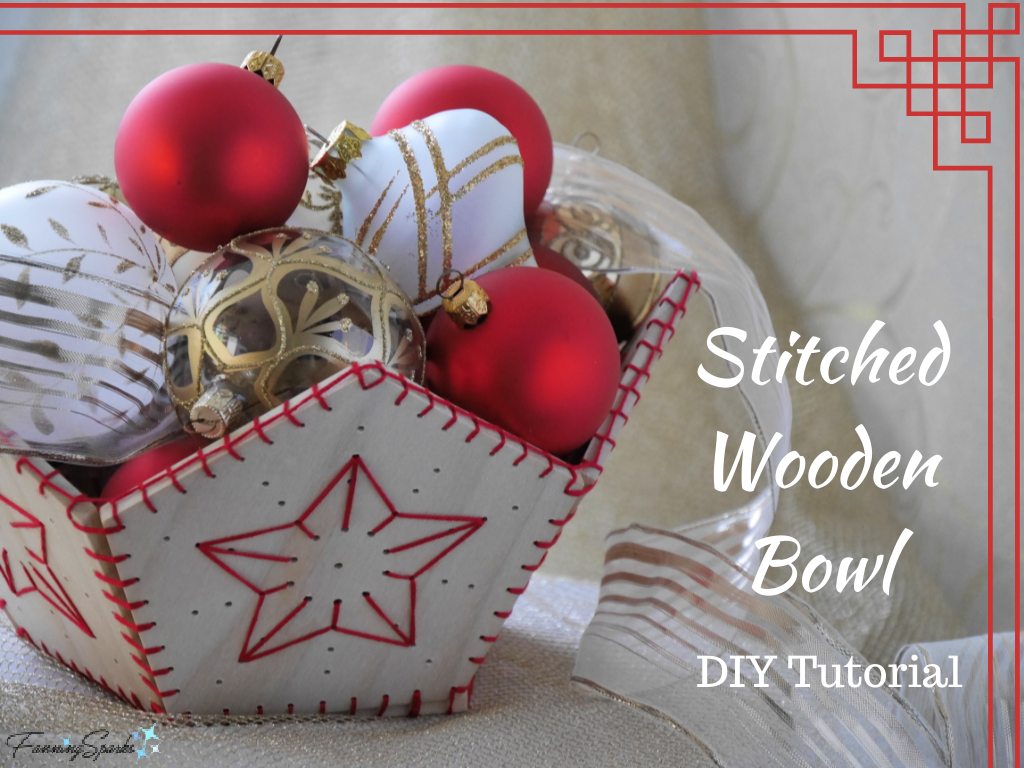
A pretty bowl filled with beautiful ornaments can add a nice decorative touch for the holidays. It’s a simple way to showcase favorite glass balls on a side table or as a centerpiece. Any pleasing bowl can be used but a stitched wooden bowl makes the display even more special. I’d like to share how I put together my ornament bowl in today’s post.
You may recognize this technique from the Starry Stitched Sphere I shared in my last post. The new stitched bowl is different enough that I’ve included step-by-step instructions. The finished bowl is 10½” in diameter and 5¼“ high. It is designed to be made from ¼” x 5½” wood. Basic woodworking and hand stitching is involved.
Supplies Needed
The following supplies are needed to make the Stitched Wooden Bowl.
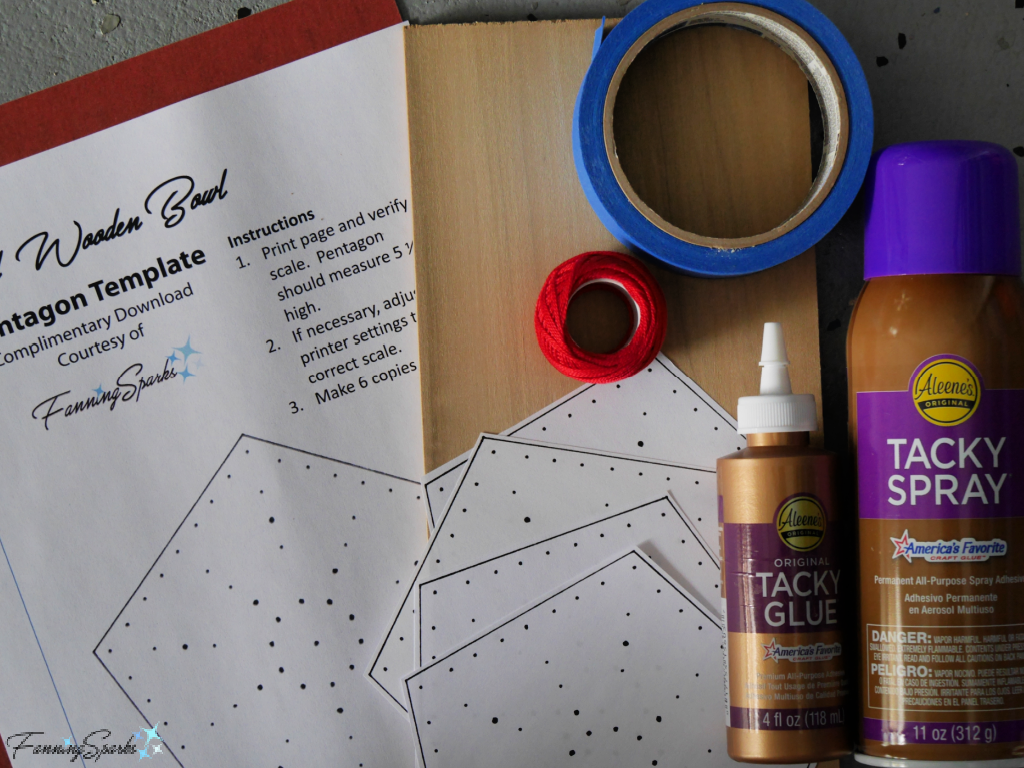
Template and Guides: Download Stitched Wooden Bowl – Complimentary Download to print the pentagon template and stitching guides.
. Paper: A few sheets of white paper for printing patterns and stitching guides.
. Wood Board: ¼“ x 5½” x 3 feet in light wood such as pine or poplar.
. Painter’s Tape
. Spray Adhesive: I used Aleene’s Tacky Spray.
. Sandpaper: In fine grit.
. Wood Finish: There are many options for finishing the wooden pentagons for this bowl. If you plan to use it for food, be sure to use a food-safe finish. Cutting Board Oil from Walrus Oil is made with coconut oil, beeswax, mineral oil and Vitamin E. It is FDA Compliant and safe for food-contact surfaces. If you do not plan to use the bowl for food, you could wax or stain the wood. Or you could leave the wood unfinished. I chose to wax the outside of the bowl and leave the inside unfinished.
. Thread: About 42 yards of Size 8 DMC Perle Cotton in your choice of color.
. Clear Glue: To finish thread ends. I used Aleene’s Tacky Glue.
Tools and Equipment Needed
. Printer: To print template.
. Scissors
. Tape Measure or Ruler
. Jigsaw
. Clamps
. Drill with 3 bits including 7/64”, 5/64” and 3/32”.
. Tapered Round File: To sand the drilled holes. I used a diamond- and titanium-coated steel file designed for jewelry-making.
. Needle: A dull-pointed tapestry needle is ideal.
Step-by-Step Instructions
Step 1. Print Patterns Download the Stitched Wooden Bowl – Complimentary Download and print the template for the pentagons. Take care to ensure the scale is accurate on your printed version. See specifics in the download document. Print 6 copies. Trim patterns with scissors.
Step 2. Adhere Patterns Cover wood board with painter’s tape. The tape makes it easier to remove the patterns from the wood later.
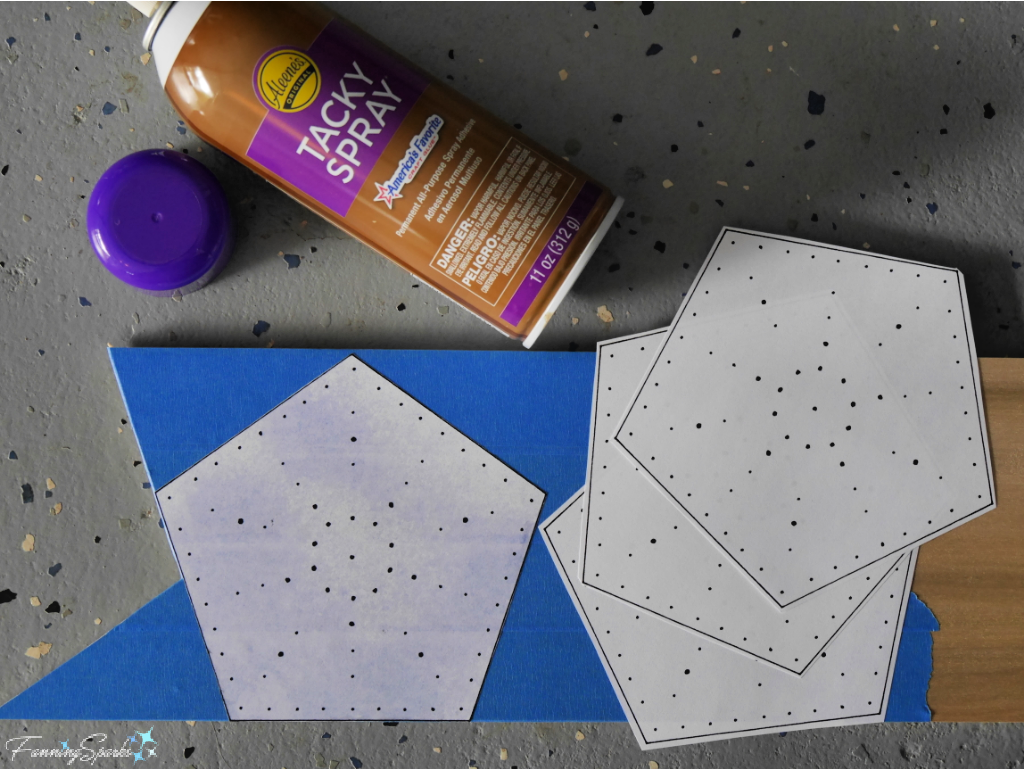
Spray the back of a paper pattern with adhesive. Position carefully on board, over the painter’s tape, aligning bottom of pentagon with bottom edge of board. Smooth and press down. Repeat for the second pentagon aligning its bottom with the top edge of the board. Repeat for the remaining 4 pentagons alternating placement to reduce the number of cuts and minimize the amount of scrap.
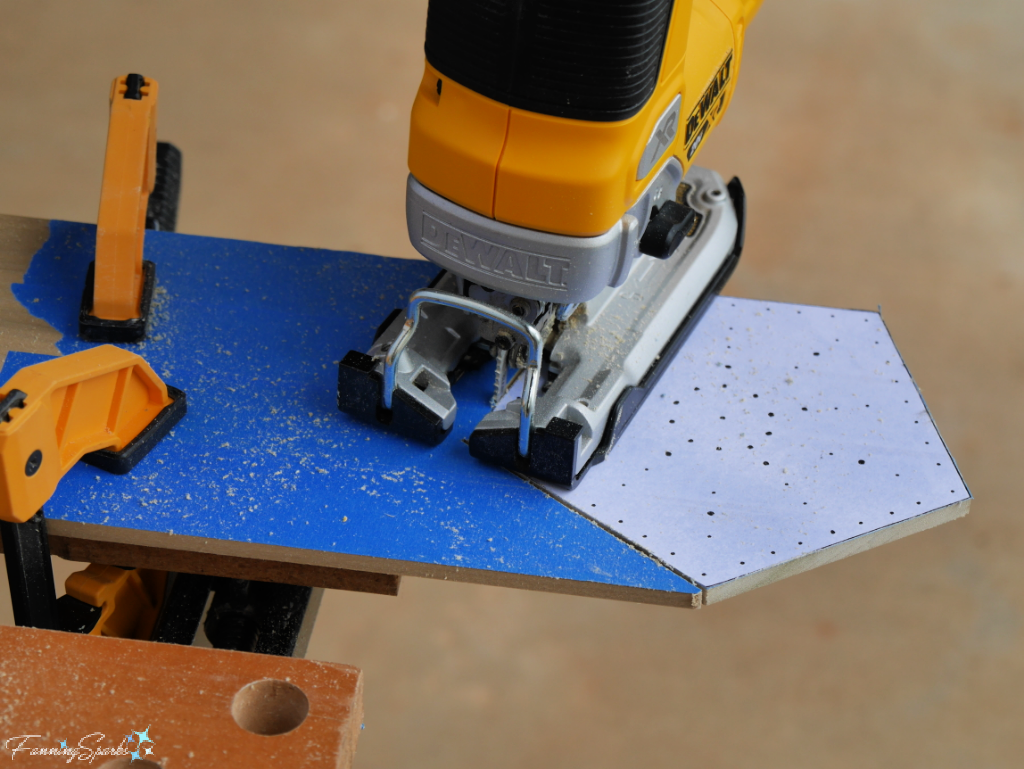
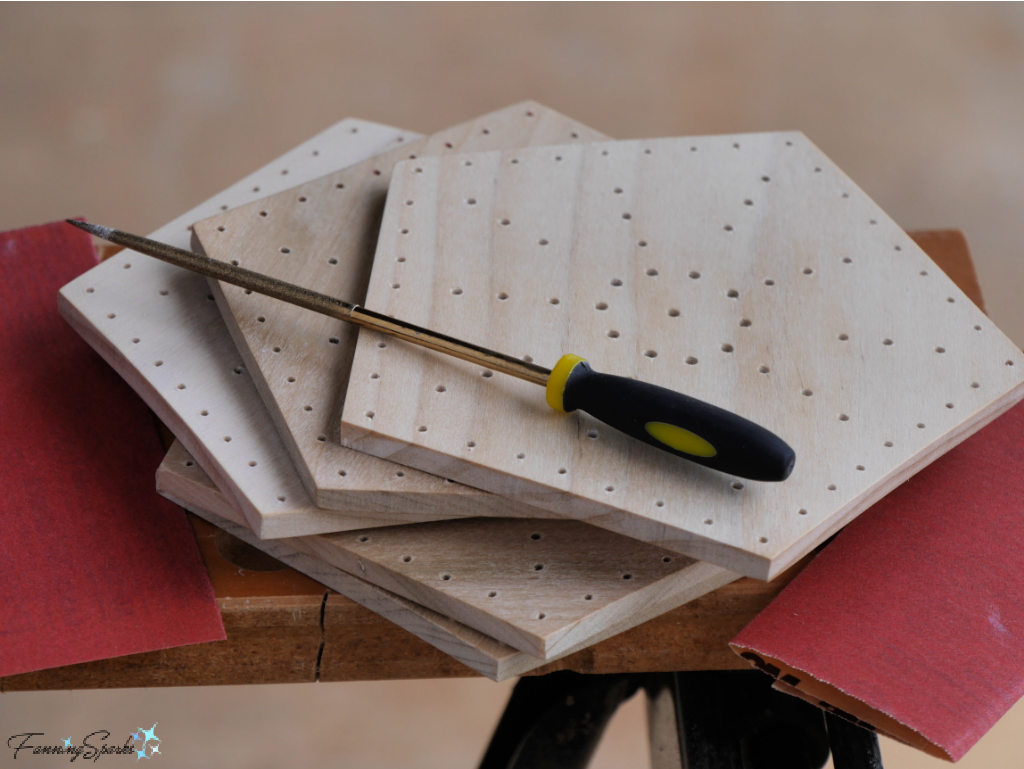
Step 3. Saw Wood Pentagons Clamp wood to sturdy surface. Use the jigsaw to cut out the 6 pentagon-shaped pieces. Cut as precisely as possible.
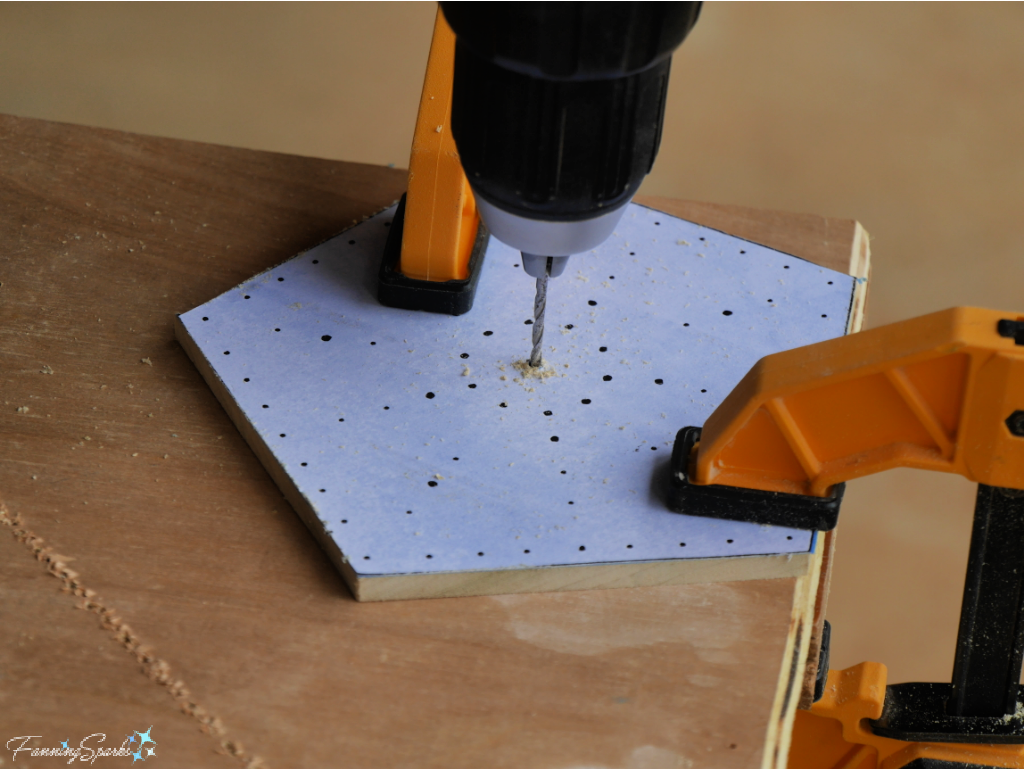
Step 4. Drill Wood Pentagons Clamp a pentagon on top of scrap wood to prevent tear out at the back. Drill all outer edge holes with a 5/64” drill bit. Drill center hole and all heavily-marked, large holes with a 7/64” drill bit. Drill all other holes with a 3/32” drill bit. Repeat for remaining 5 pentagons.
Step 5. Sand Wood Pentagons Sand edges and drilled holes. This is an important step because any roughness, especially along the edges of the holes, will snag the thread during stitching. A round tapered file is critical for this step.
Step 6. Finish Wood Pentagons As noted in the Supplies Needed section above, there are many options for finishing the wooden pentagons for this bowl. If you plan to use the bowl for food, be sure to use a food-safe finish such as Cutting Board Oil from Walrus Oil. Follow the manufacturer’s instructions for your chosen finish.
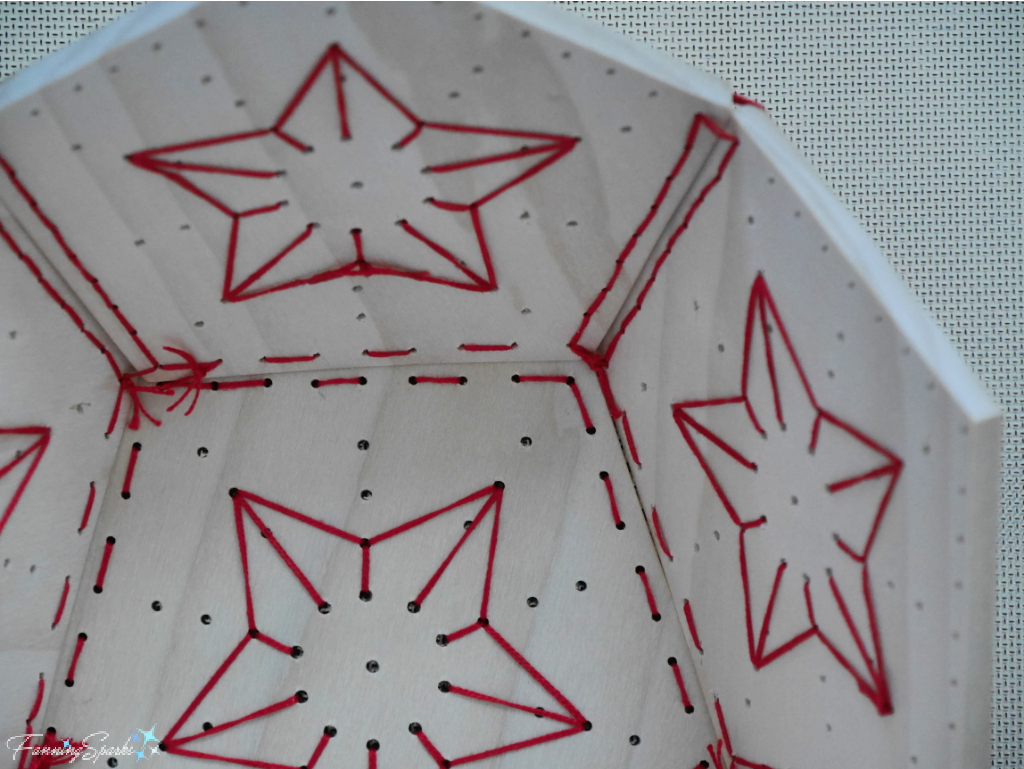
Step 7. Stitch Stars Download the Stitched Wooden Bowl – Complimentary Download and print the Stitching Guides. Be sure to print in color because it is color-coded. The stitched stars are designed to look the same on the inside and the outside of the bowl with no missing or double stitches. Pictured below are two finished pentagons; the pentagon at the top right shows the finished front and the one at the bottom right shows the finished back.
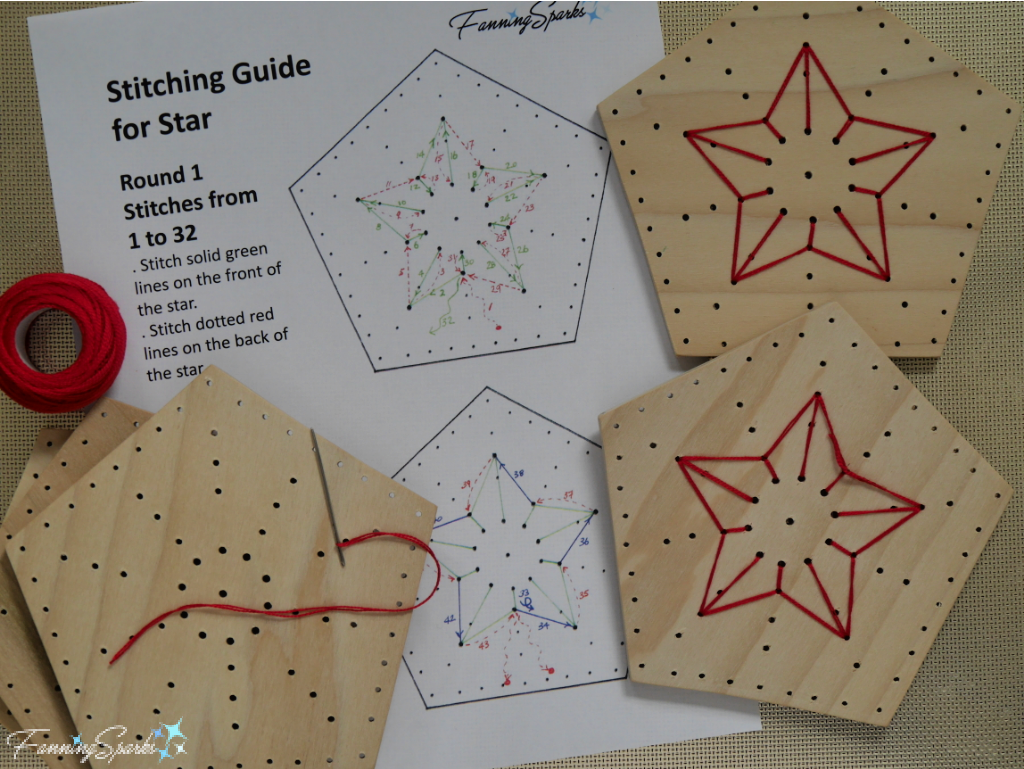
The Stitching Guide for Stars illustrates the stitch pattern. Stitch around the star twice; the first round is stitched clockwise and the second round is stitched counter-clockwise. The Stitching Guide for Stars is coded to indicate the placement of each stitch. In Round 1, solid green lines are to be stitched on the front of the star and dotted red lines are to be stitched on the back of the star. Follow the numbers, from 1 to 32, to stitch in the intended sequence. Reverse direction at Stitch 33 for Round 2. Work counter-clockwise from Stitch 34 to 43. In Round 2, solid purple lines are to be stitched on the front of the star and dotted orange lines are to be stitched on the back of the star.
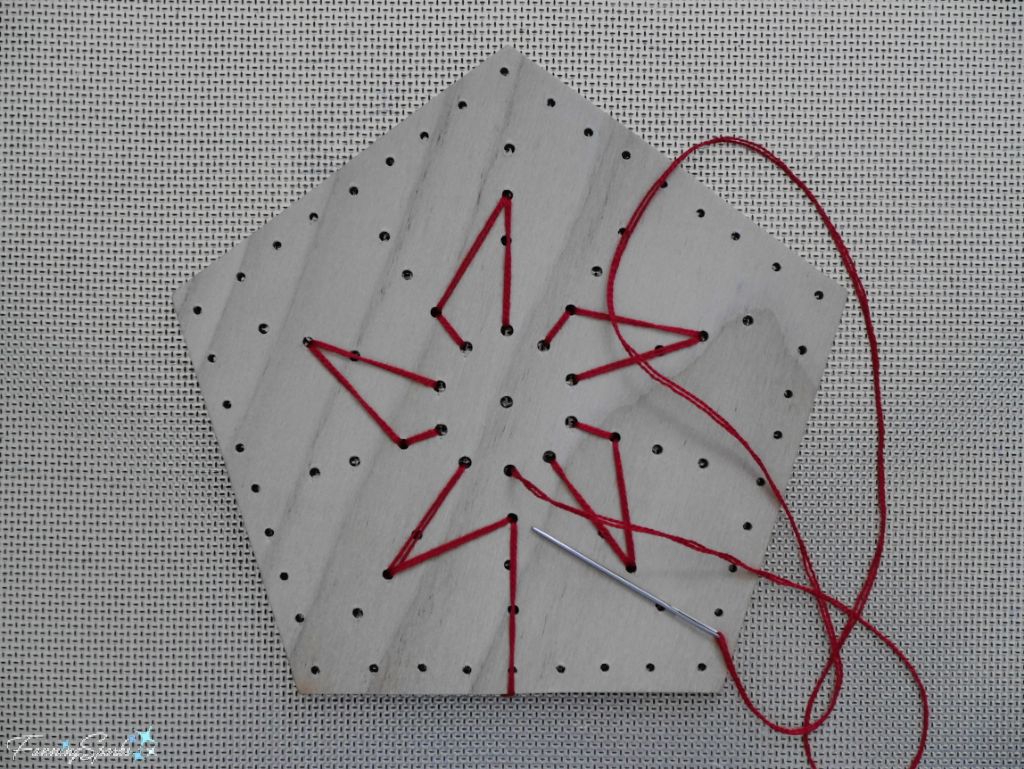
Each star requires about 9 feet of pearl cotton thread. The stars are stitched with a double thread so pull thread ends even and knot. Begin at Stitch Number 1 with a 3-4” tail at the back of the wooden pentagon. Pull tail up around edge to the front and tack down with painter’s tape. Pictured below is the star at the end of Round 1.
Finish at Stitch Number 43 with both thread ends at the back of the wooden pentagon. Pictured below is the star at the end of Round 2.
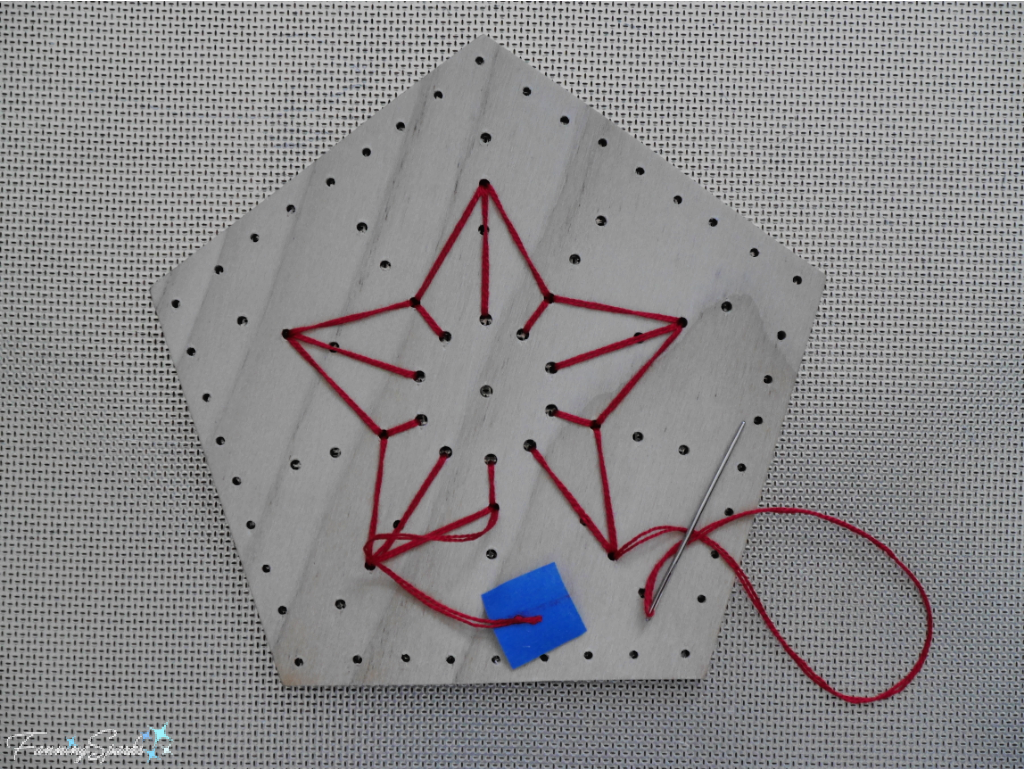
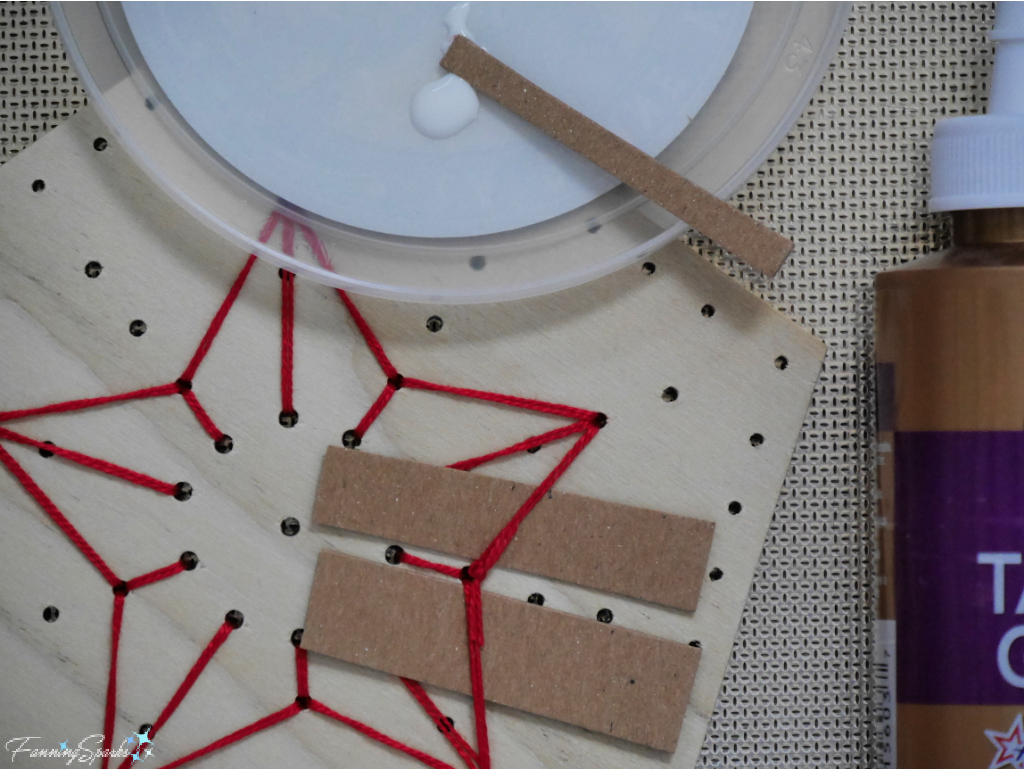
Knot the thread ends as close to a drilled hole as possible. Use a firm double knot. Trim thread with scissors leaving short ends. Use a dab of clear glue to hide the ends and prevent them from unravelling. Small strips of cardboard can be used to keep the glue off the wood but take care to remove them before the glue dries completely.
Repeat on the remaining 5 pentagons.
Step 8. Assemble Ring of Pentagons Start by connecting a row of 5 pentagons. The Stitching Guide for Connections illustrates the stitch pattern. The Stitching Guide is coded to indicate the placement of each stitch. Solid green lines are to be stitched on the front of the pentagons and dotted red lines are to be stitched on the back of the pentagons.
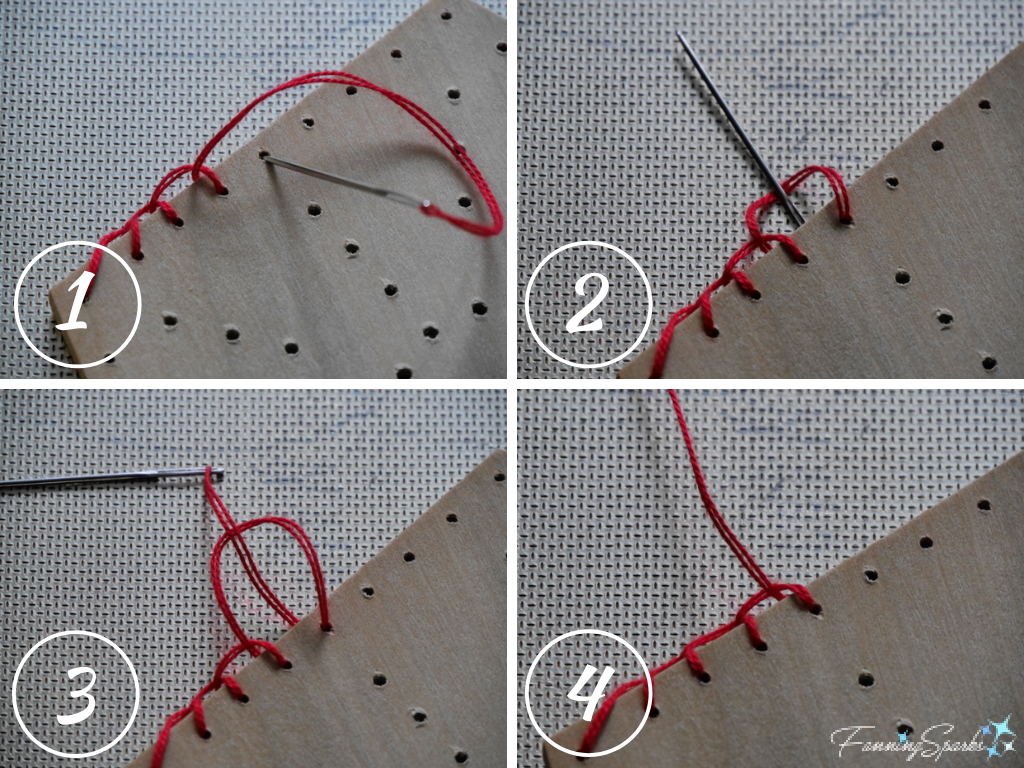
Each connection between pentagon sides requires about 5 ½ feet of pearl cotton thread. Double the thread and tie a knot. Select 2 pentagons and align 2 sides. Hold the pentagon sides together at an angle (as shown in the photo below). If the pentagons are held flat while stitching, the connection will likely be too tight and it won’t be possible to bend the pentagons into a ring. Begin at Stitch Number 1 with a 3-4” tail at the back of the wooden pentagon. Pull tail up around edge to the front and tack down with painter’s tape. Pictured below is the front view of the connection in progress.
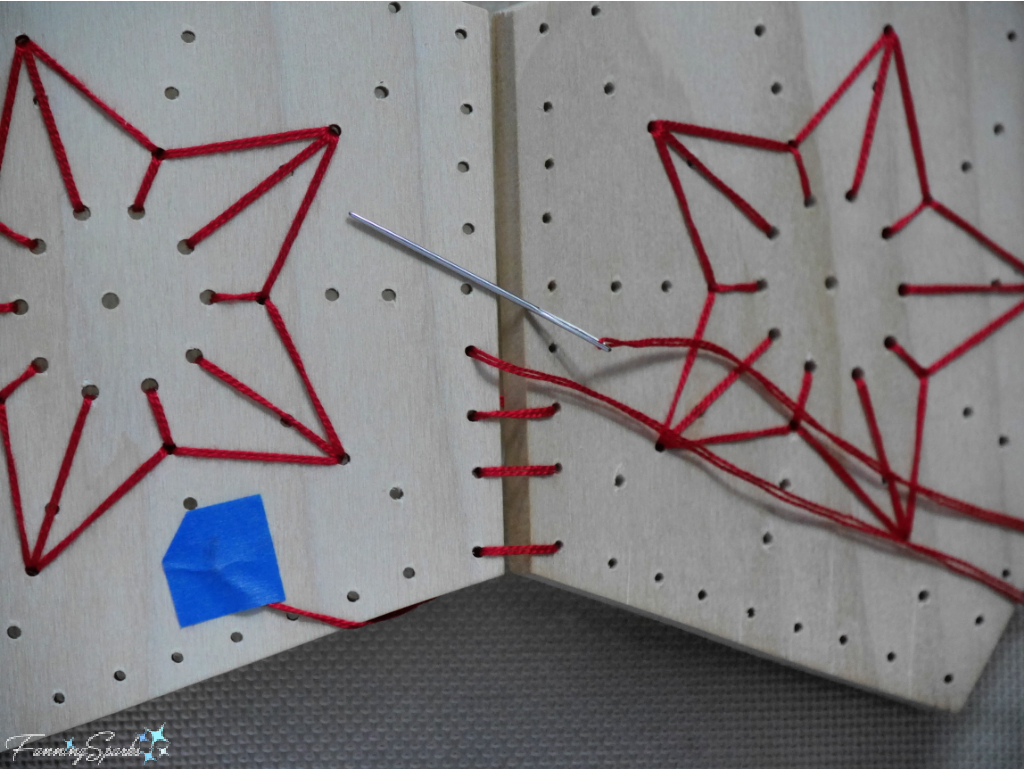
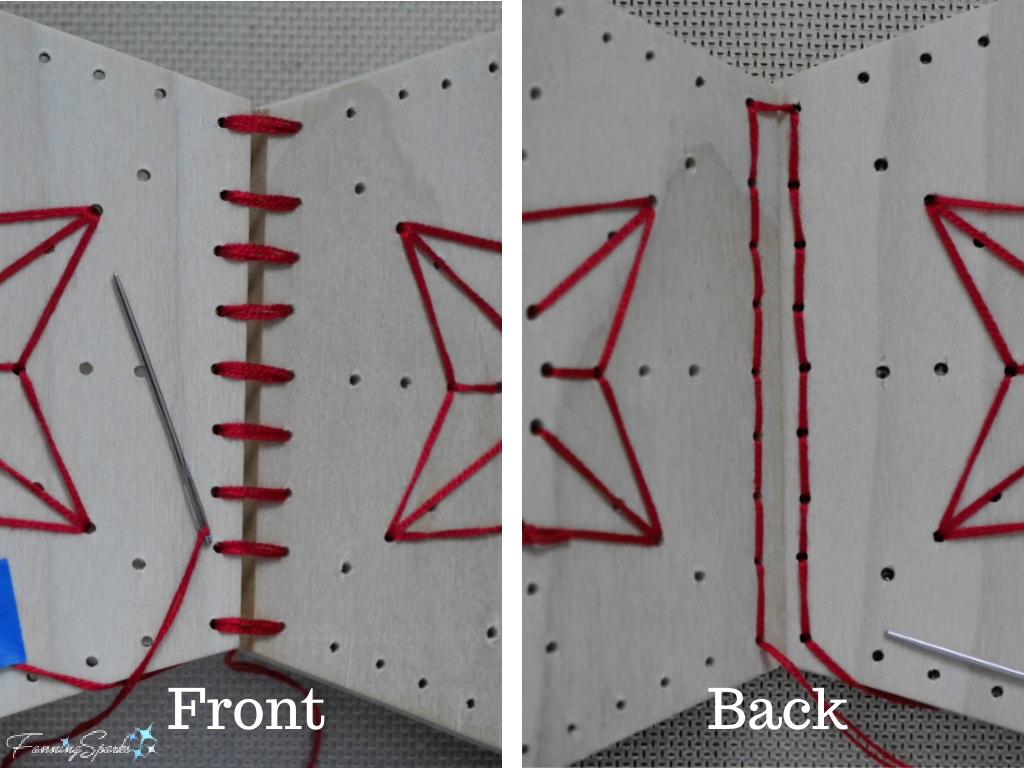
After working from the bottom up to the top, take the final stitch, Stitch Number 19, at the top and then repeat the entire sequence working back down to the bottom. This pass is done in the same way as Stitches 1-19. Make the stitches on the front of the pentagons in the exact same places. But make the stitches on the back of the pentagons on the opposite sides filling in the gaps. Pictured below are the front and back views of a connection.
Knot the thread ends as close to a drilled hole as possible. Use a firm double knot. Trim thread with scissors leaving short ends.
Continue to connect pentagons in this same way until a row of 5 is completed.
Pull the first and last pentagon of the row together to form a ring. If it’s too difficult to form a ring, one or more of the connections may need to be adjusted. Align the edges of the first and last pentagon. Use painter’s tape to hold ring in place.
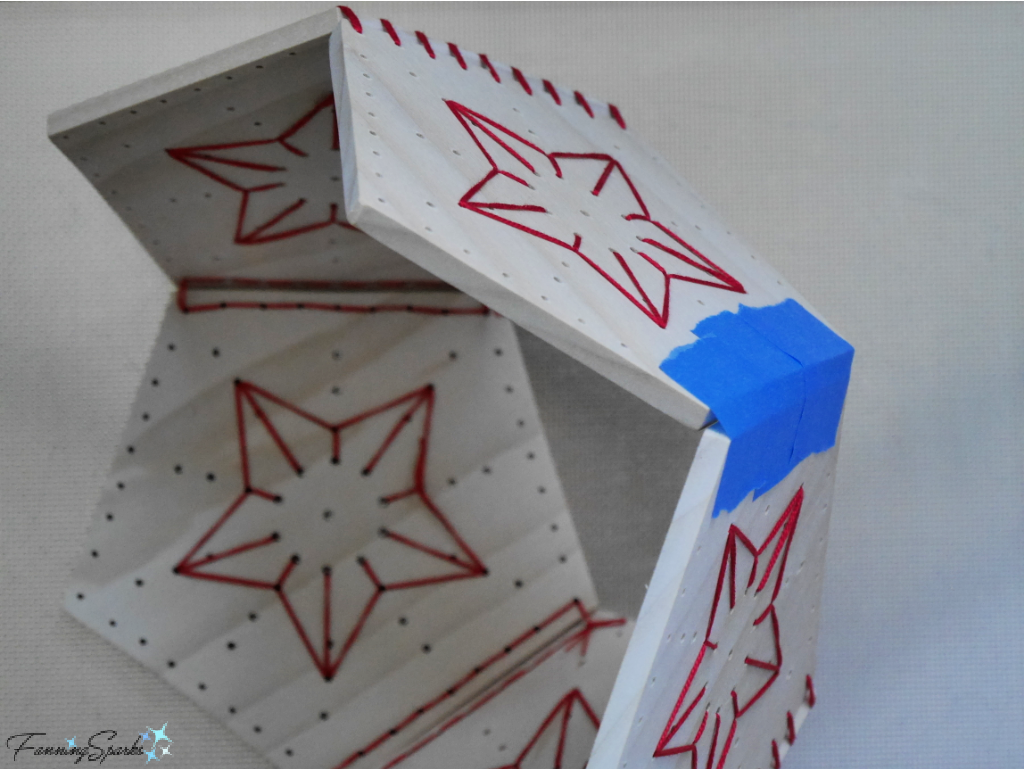
Stitch these 2 pentagons together in the same way as the other side connections.
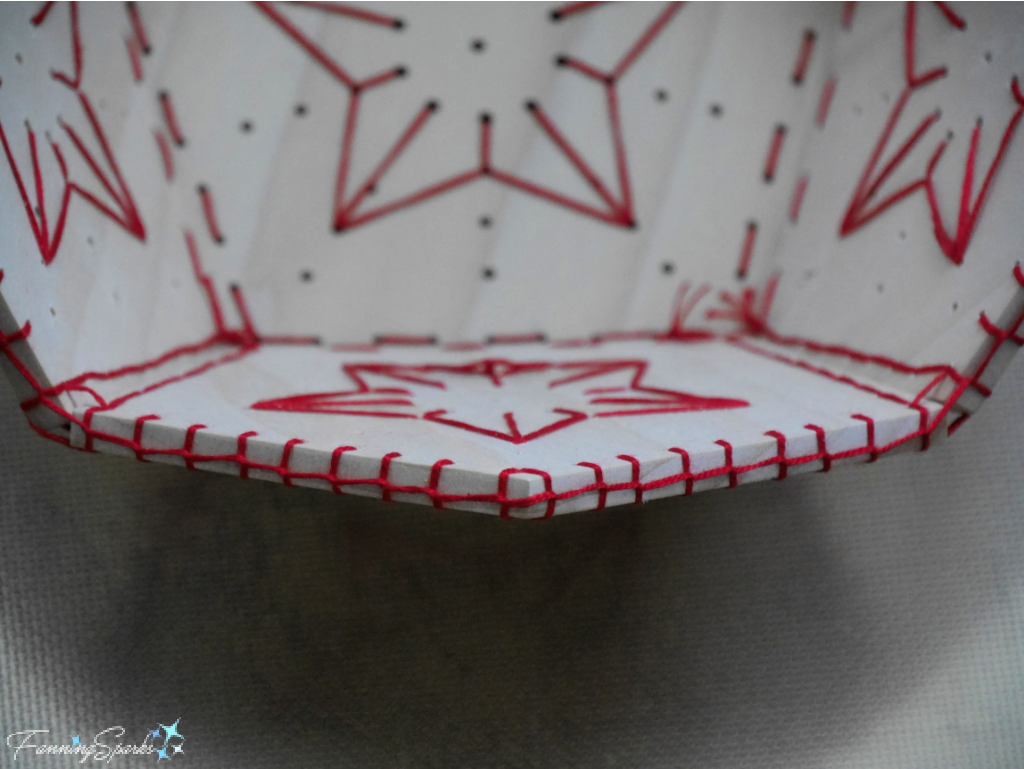
Step 9. Connect Bottom Place the final pentagon on the bottom of the ring aligning all edges. Thread the needle with about 14 feet of pearl cotton thread. Double the thread and tie a knot. Follow the stitch pattern illustrated in the Stitching Guide for Connections. Select a hole to the right of a connection as the starting point. Begin at the back leaving a 4-6” tail. Pull the thread tail up to the top edge and tack it down with painter’s tape. Pull out and smooth the full length of the thread as you stitch to prevent knotting. Stitch around all 5 sides of the bottom pentagon before tying off. Knot the thread ends as close to a drilled hole as possible. Use a firm double knot. Trim thread with scissors leaving short ends. Pictured below is the inside of the bowl showing the side and bottom connections.
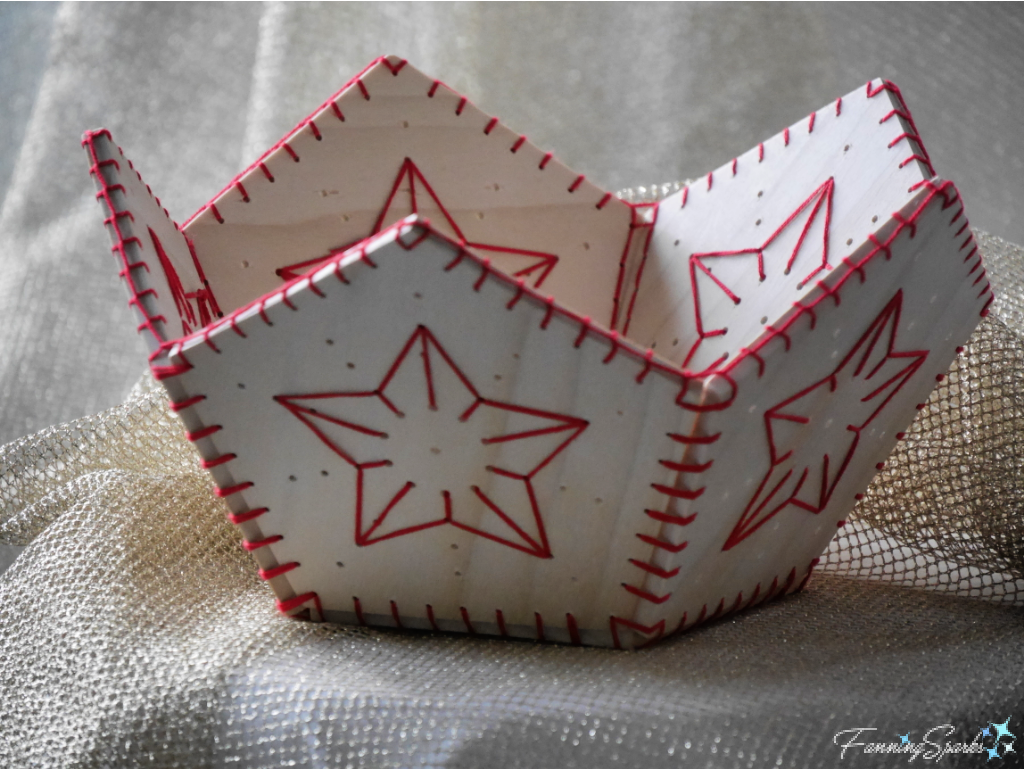
Step 10. Finish Top Edge The top edge is finished with a basic blanket stitch. Thread the needle with about 20 feet of pearl cotton thread. Double the thread and tie a knot. Select a hole to the right of a connection as the starting point. Begin at the back leaving a 3-4” tail. Pull the thread tail down towards the bottom and tack it down with painter’s tape. Follow the steps in the photo below. Push the needle from the front to the back while passing over the thread at the back to form a loop. Gently pull the loop to the center top of the wooden edge.
Pull out and smooth the full length of the thread as you stitch to prevent knotting. Take 2 stitches in the hole at the peak of each pentagon. Stitch around the entire top edge before tying off. Knot the thread ends as close to a drilled hole as possible. Use a firm double knot. Tuck ends into previous stitching and trim. Pictured below is the finished top edge.
Step 11. Display Your pretty Stitched Wooden Bowl is ready!
Have fun filling your bowl with pretty glass balls and ornaments. You may want to hide a small, upside-down dish or container inside the bowl to add height and reduce the number of ornaments needed. Consider curling a generous stretch of glittering ribbon through and around the bowl. Place the ornaments in a pleasing arrangement and you’re all set!
More Info
You can download the Stitched Wooden Bowl – Complimentary Download to print the pentagon template and the stitching guides.
Please share this image or pin for future reference.
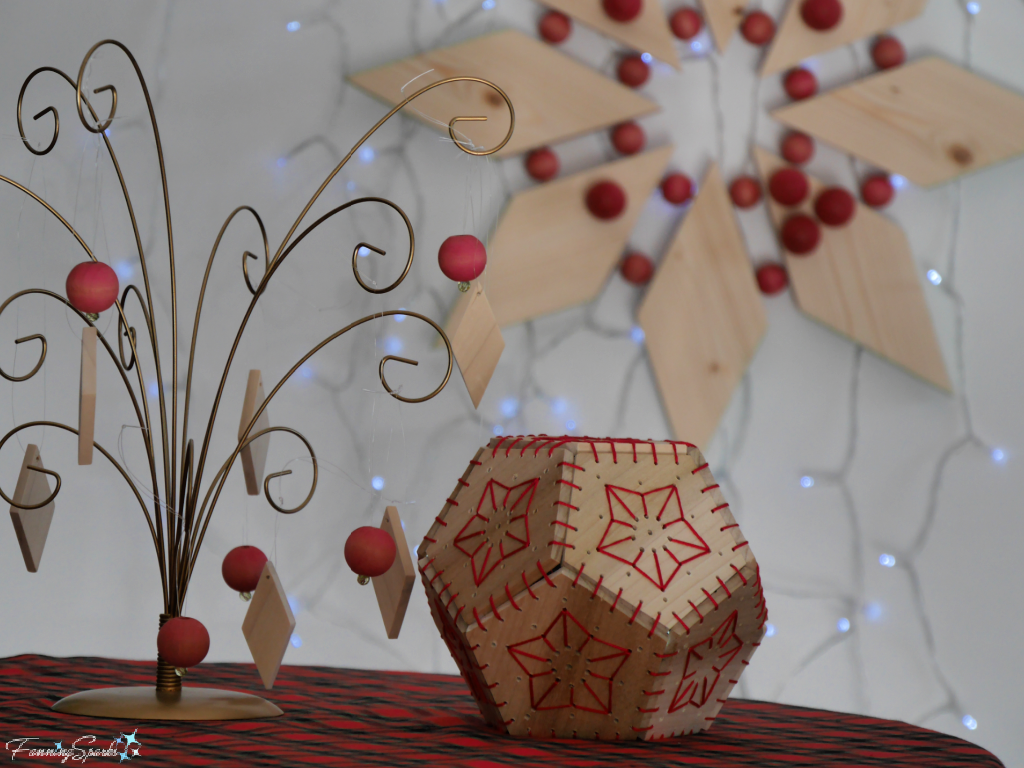
You may also like the Starry Stitched Sphere and the Diamonds and Beads Wooden Wreath shown in the below photo. Step-by-step instructions are provided for both projects.
Today’s Takeaways
1. A pretty bowl filled with beautiful ornaments can add a nice decorative touch for the holidays.
2. Consider stitching together wooden shapes for an unexpected accent.
3. Mix contrasting textures, from materials such as wood, fiber and glass, to create a striking arrangement.


Comments are closed.