
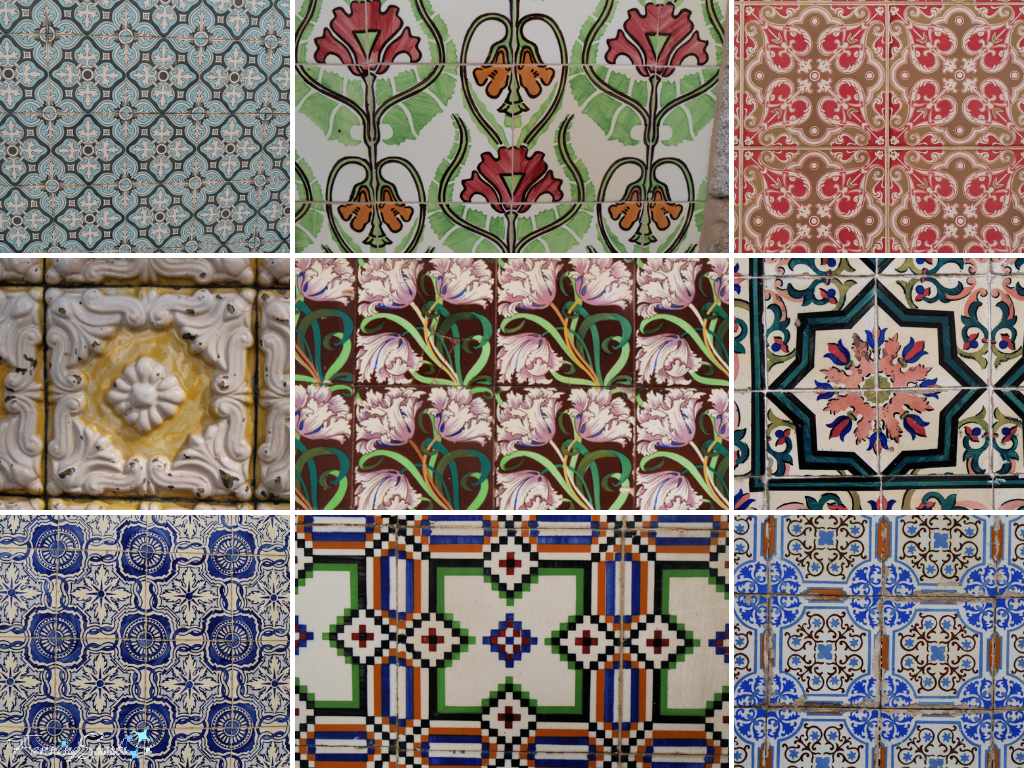
It’s hard to believe it’s been two and a half years since I became smitten with the tiles of Portugal. Azulejos (tiles in Portuguese) are found in a multitude of patterns, colors and designs throughout Portugal especially in historic cities like Ovar and Aveiro. I shared this amazing discovery in my previous blog post, Talk About Tiles!.
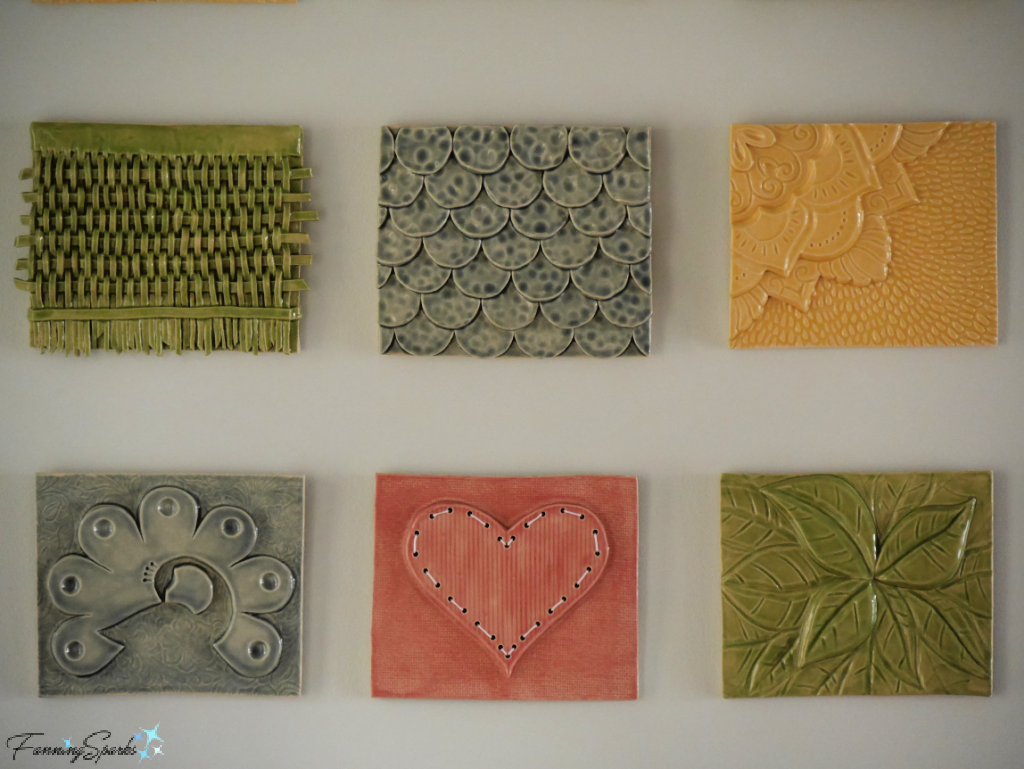
It’s equally hard to believe that I’ve been working on my own set of ceramic tiles for nearly as long. This week, after two years in the making, I was finally able to hang my collection of handmade ceramic tiles in our home.

In my own defense, I haven’t actually been working on the tiles non-stop—the project has progressed in fits and starts. First the School Street Pottery Studio, where I do my clay work during open studio hours, was closed for an extended period due to the pandemic. Then my project sat on hold while I travelled out of town. Despite the delays, the project is finished and I’m thrilled with the results.
This is my first major clay project after attending a Hand Building Clay class at OCAF (Oconee Cultural Arts Foundation) (see More Info below). In today’s post, I’d like to share this experience along with some tips and tricks I learned along the way. This will also serve as a reference for my clay projects going forward.
Inspired by the beautiful azulejos of Portugal, my original plan was to experiment with pattern and texture.
I arrived at the idea of making a set of ceramic tiles while exploring the possibilities of Decorating With Collections. This is a rough sketch of the original idea.
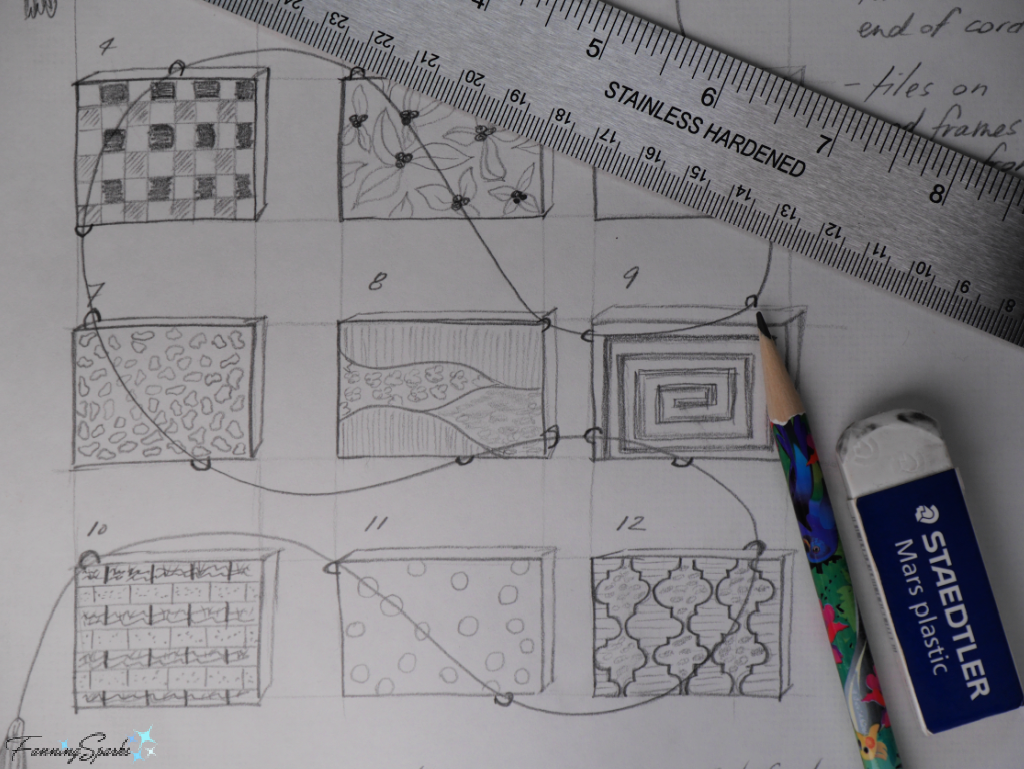
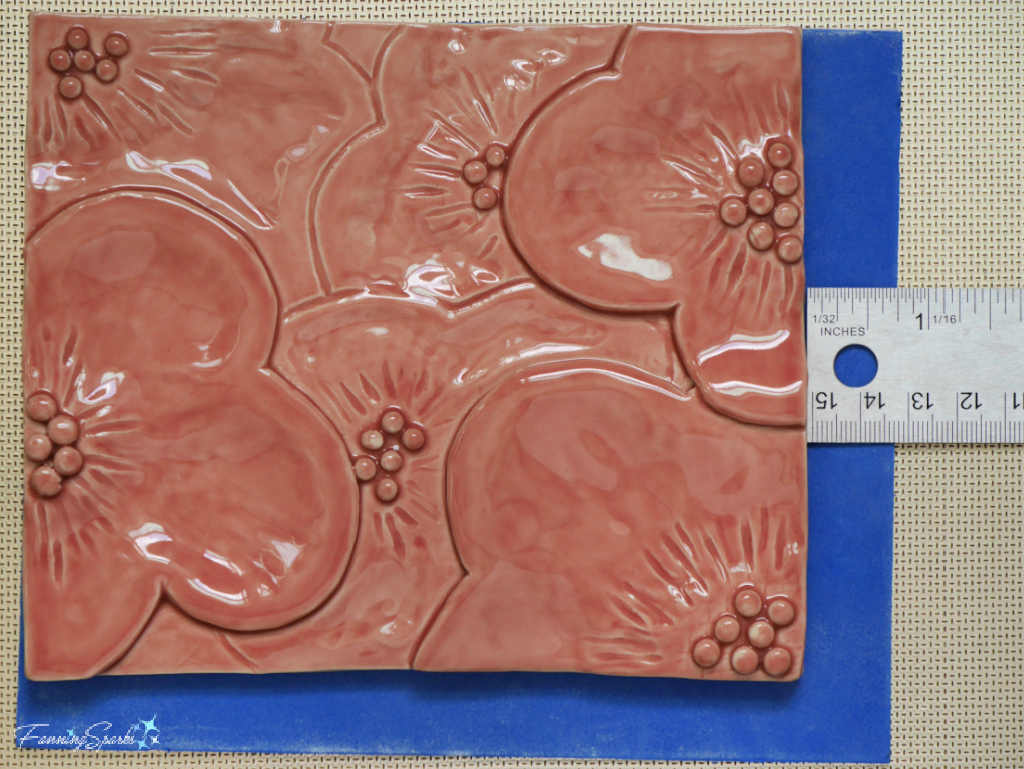
Starting with the wall space where I intended to display the tiles, I determined a collection of 12 tiles sized 7⅛” wide x 6” high would work. I used the slab roller at the Studio to roll out ⅜” thick slabs of B-Mix white clay. A template, made from a sheet of thin foam, helped me keep the tiles a consistent size. Shown below is the blue template with one of the finished ceramic tiles to illustrate the clay shrinkage that occurs when clay is dried and fired. Luckily, the smaller finished tiles work just as well in the intended space.
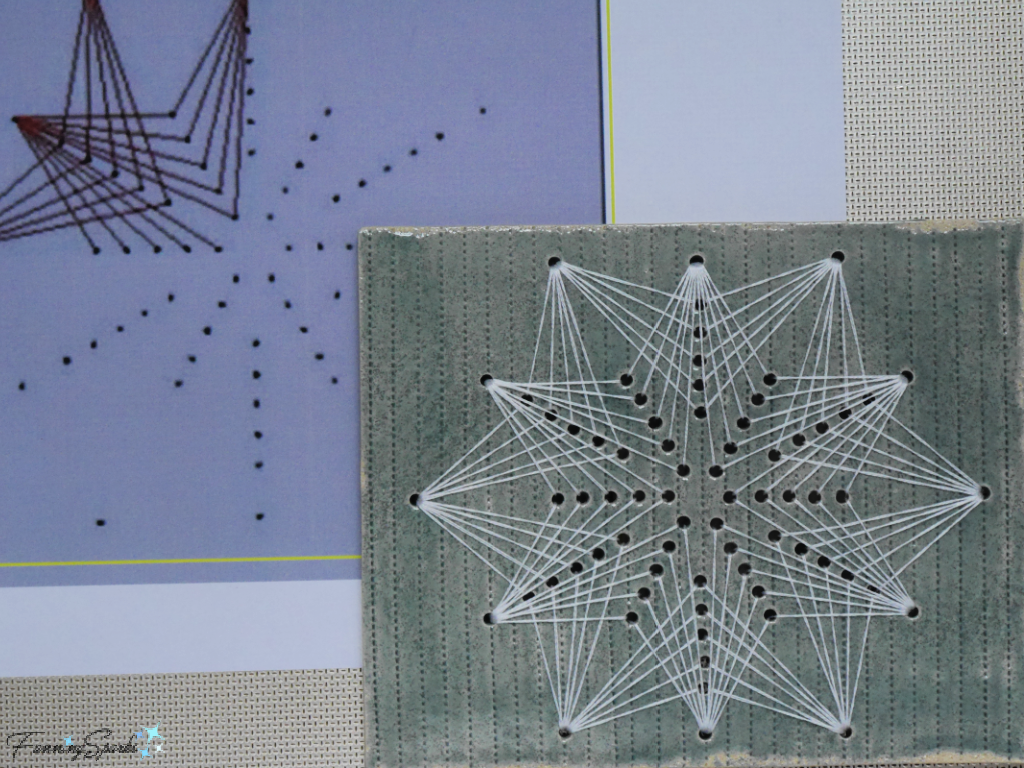
After rolling and cutting the rectangular tile base, it was time to add the design. I had gathered a nice selection of textures and patterns while writing the blog posts Patterns by Mother Nature and Texture by Mother Nature. Flowers, foliage, shells, stones and other natural elements were my jumping off point. I scouted out more inspiration from my photos and various online sources. Some of the design ideas were crossovers from other mediums. For instance, this starburst was originally designed for paper stitching.
 Design ideas started to spring up from the most unexpected places. For instance, this weaving project which I shared in the blog post DIY Woven Statement Necklace Tutorial…
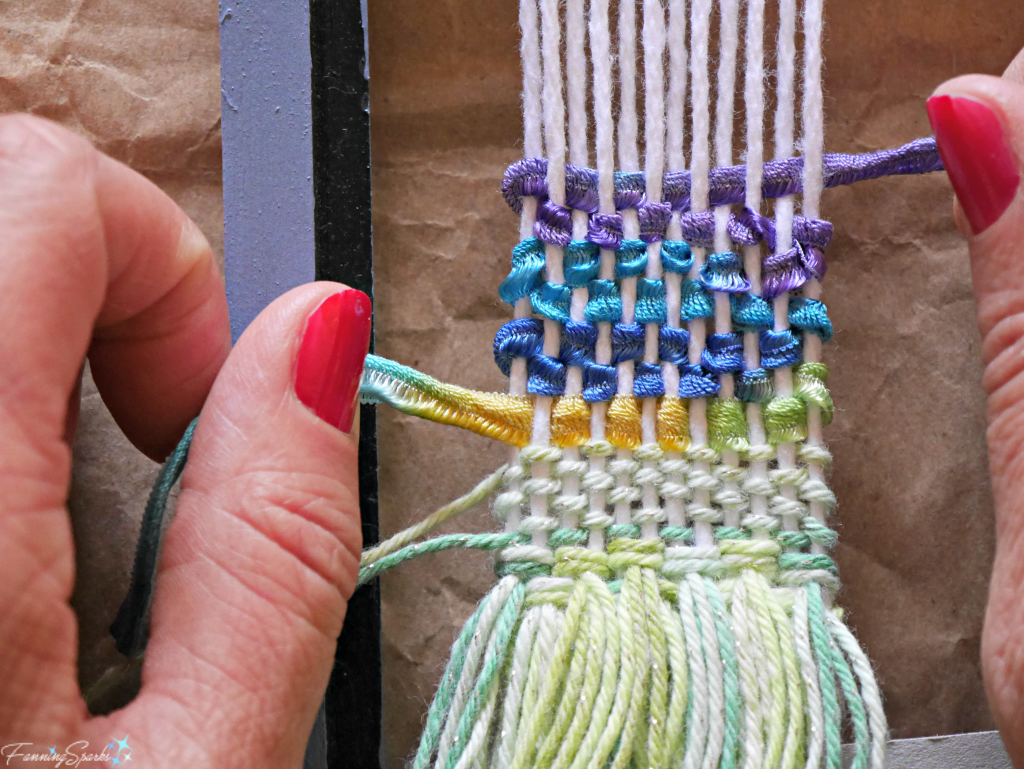 … inspired this intricate tile design.

While writing the blog post Inspired by Mother Nature’s Lace, I learned about the ancient art of net making which inspired this tricky piece.

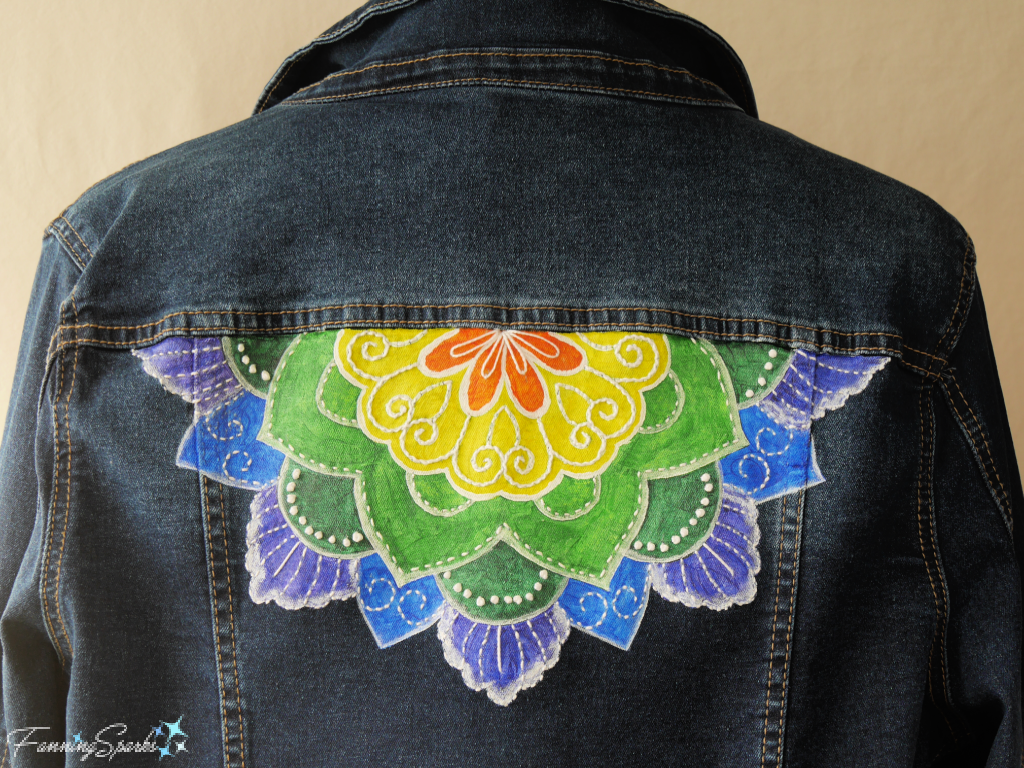
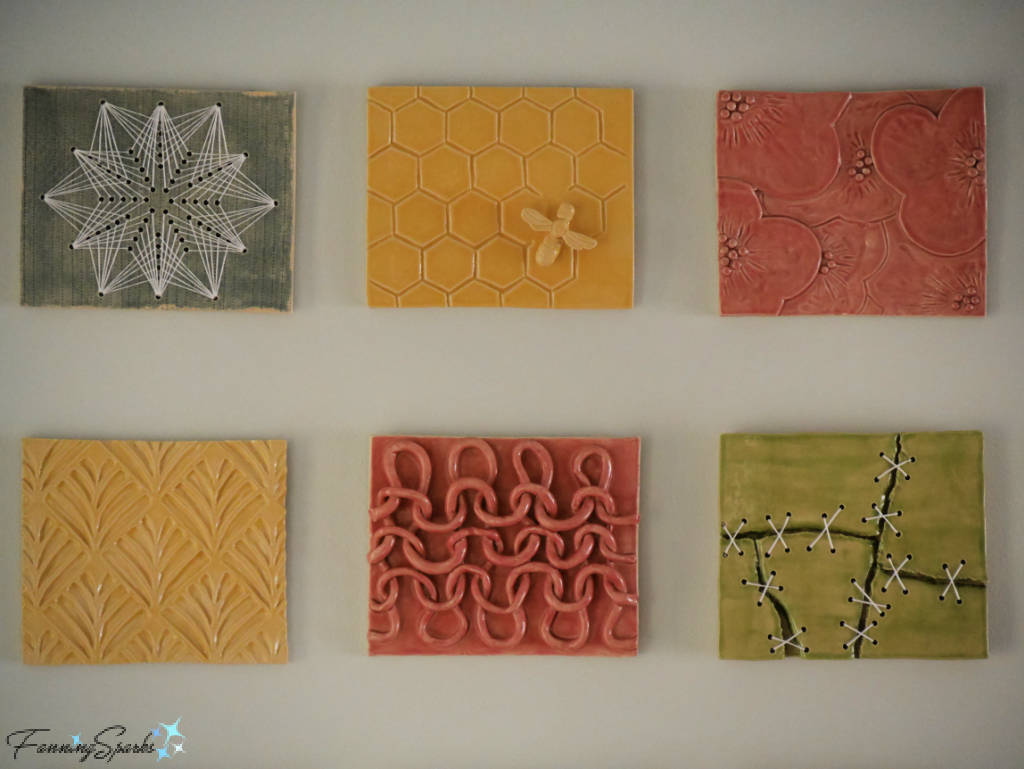
Some designs even popped up again on subsequent projects. I liked this mandala-inspired design so much…
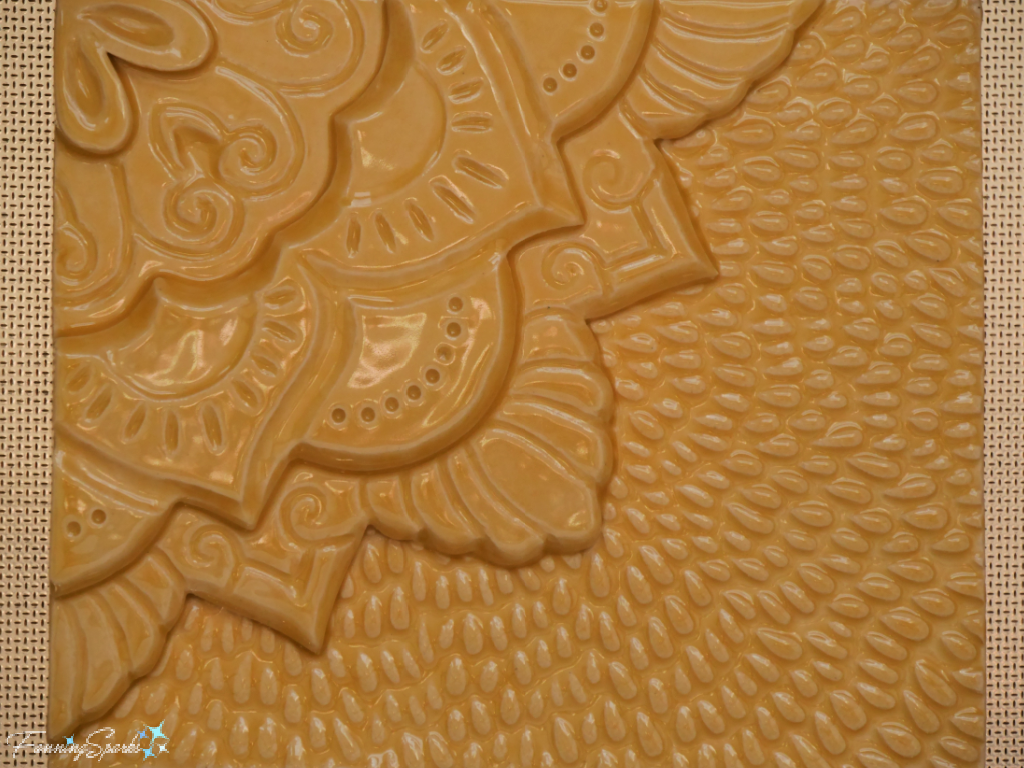
… I used it again to embellish this denim jacket which I featured in the blog post From Classic Jacket to Wearable Art.
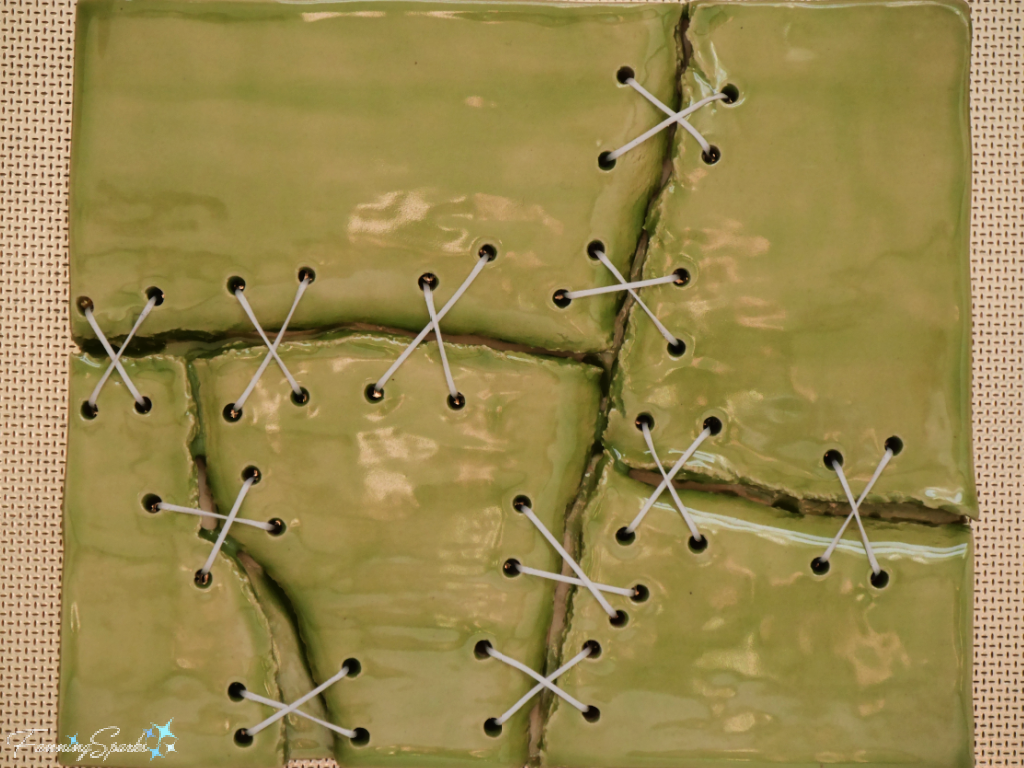
Most of the designs were prepared electronically for finetuning and sizing. A few of the designs, like this torn and mended tile, were figured out on the fly. The stitching, using Ritza 25 Tiger polyester thread from my leather crafting supplies (see More Info below), was done after the tile was fired.
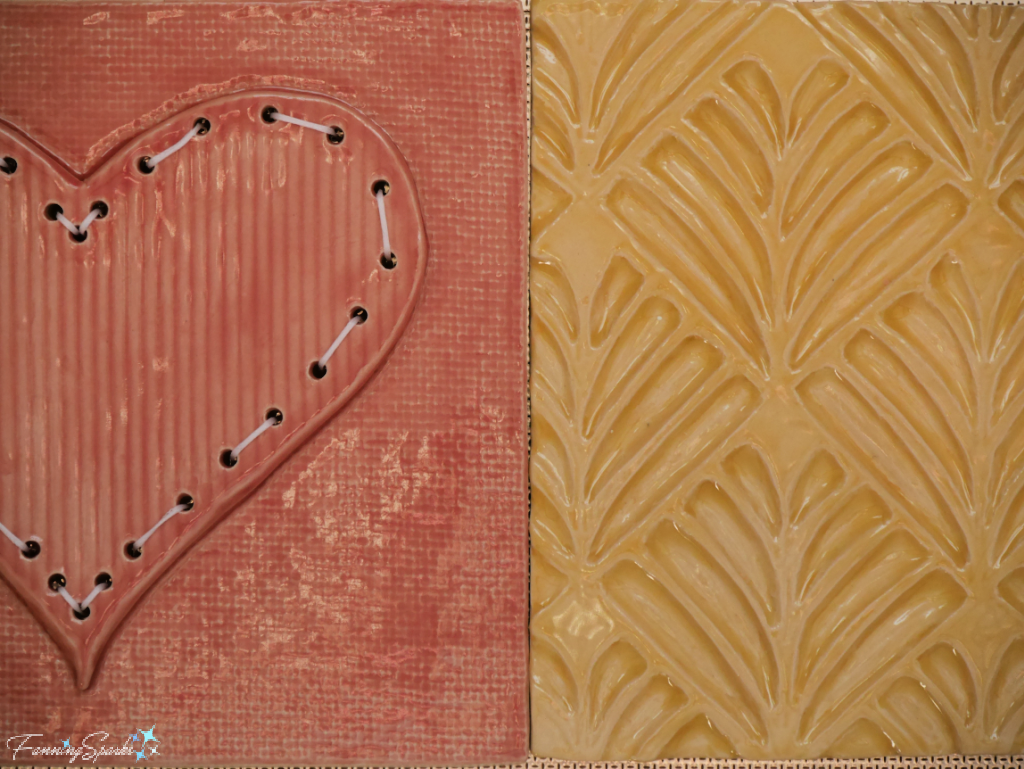
On my first tiles I added simple shapes onto the rectangular tile base. For this technique, I learned it’s best to use thinner clay for the added shapes—such as ⁵⁄₁₆” shapes on a ⅜” base. As I gained experience, I started to carve out designs using some of the techniques I learned from woodcarving (see More Info below). The below photo compares the two techniques—the stitched pink heart tile shows an additive process while the yellow art deco tile illustrates a subtractive technique.
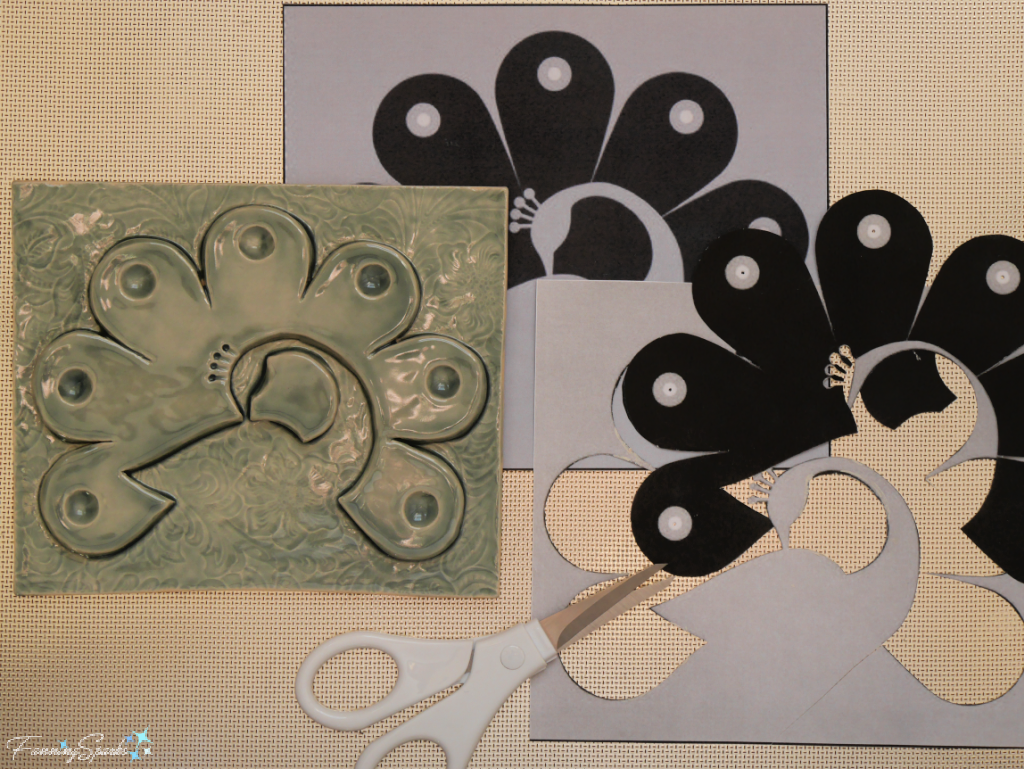
Most of the designs were transferred from a paper template to the clay tiles. I found it most effective to transfer the elements for a subtractive design by tracing over the paper pattern with a rounded tip to indent the clay. For additive designs, however, I found it best to avoid marking the clay tile base and to prepare the design elements using positive and negative paper templates.
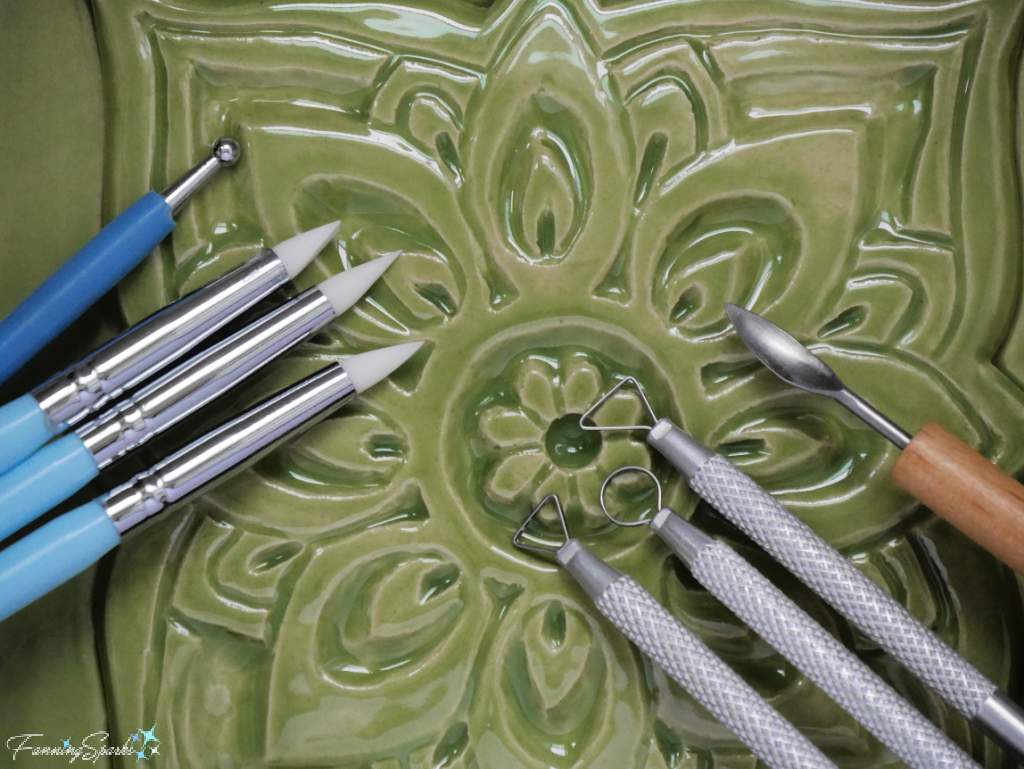
Here are my favorite tools for carving and sculpting clay.
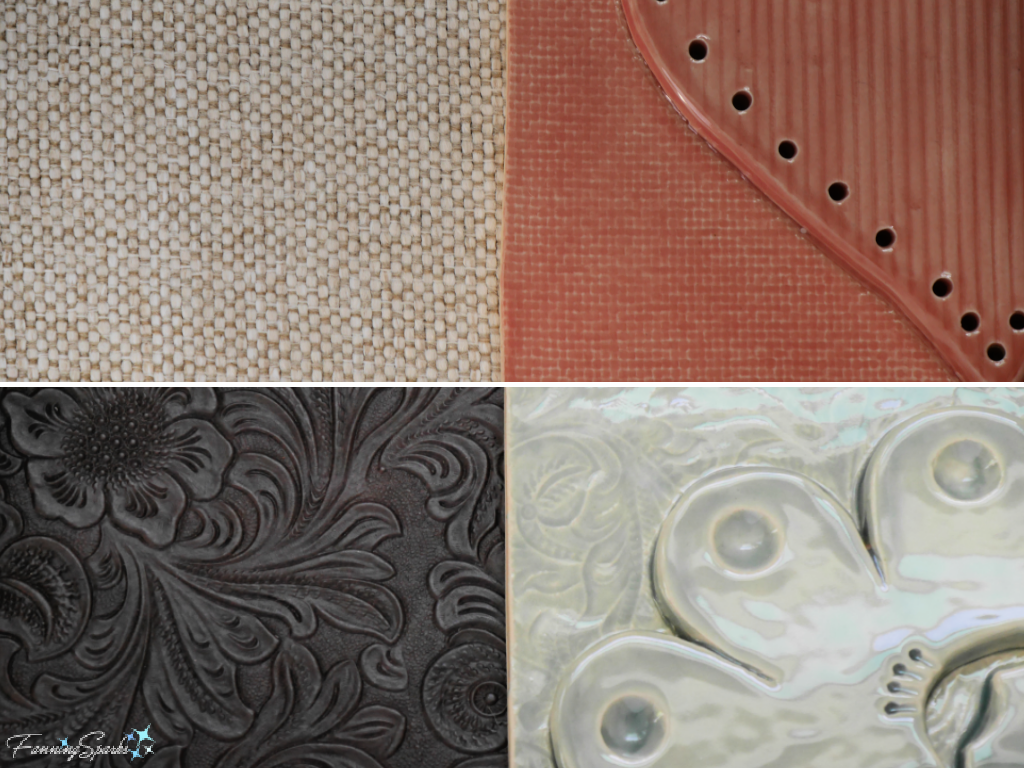
My plan was to incorporate a variety of surface textures into the tiles. I learned a variety of items can be used to produce an interesting textural design on clay. One option is to cover the clay surface with a piece of fabric (shown top left) or embossed vinyl (shown bottom left) while rolling it through the slab roller. A light dusting of cornstarch can be used to prevent the clay from sticking to the surface.
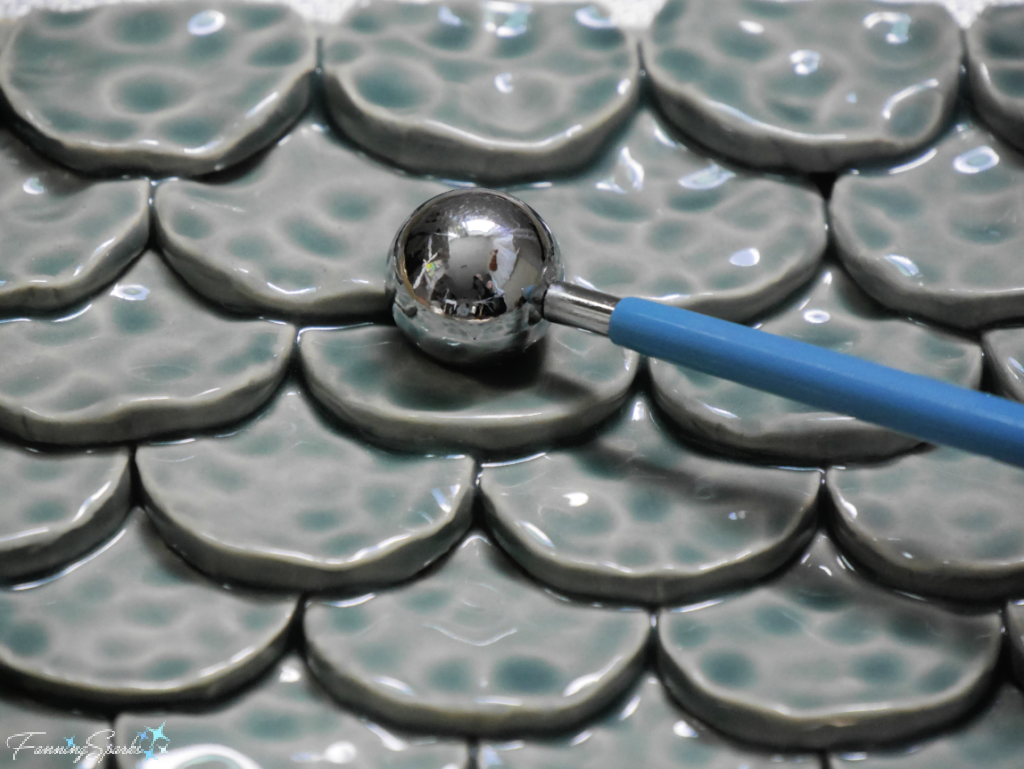
Another option is to manipulate the surface with a tool such as a ball stylus. The below rounded scales were indented while the clay was wet and before they were added to the base.
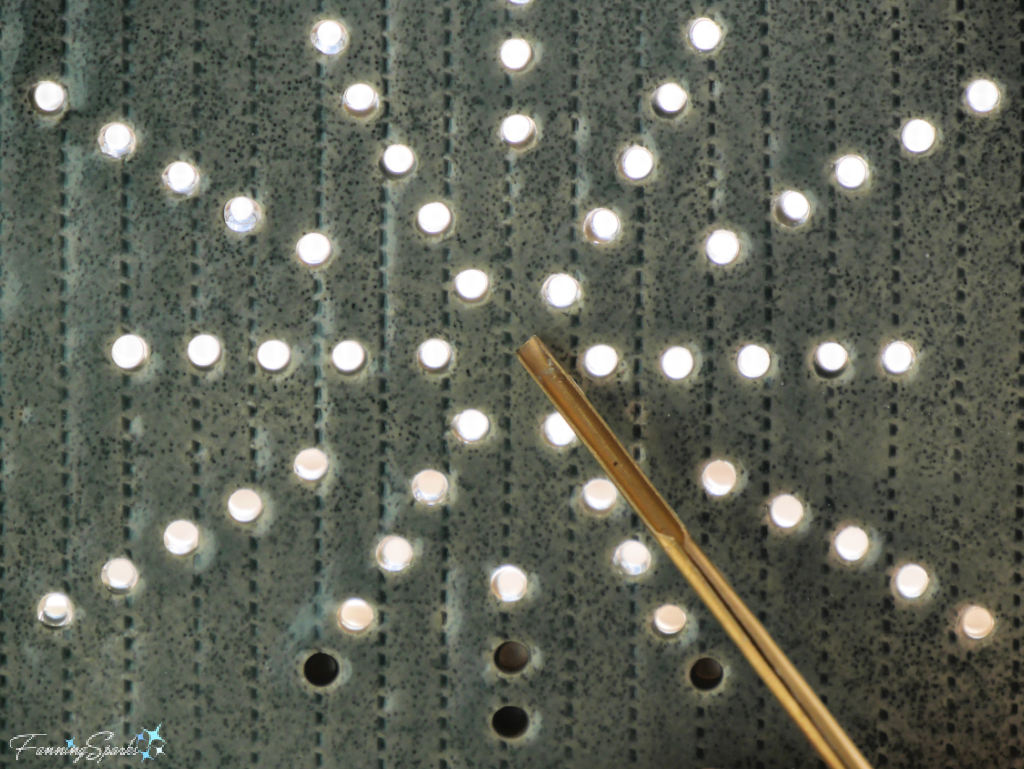
A few of my tile designs incorporated small holes. This brass round hole cutter, part of a 3-piece set from Chinese Clay Art, bores neat, clean holes. This was a great recommendation from a fellow Pottery Studio potter (Thank you Bill!).
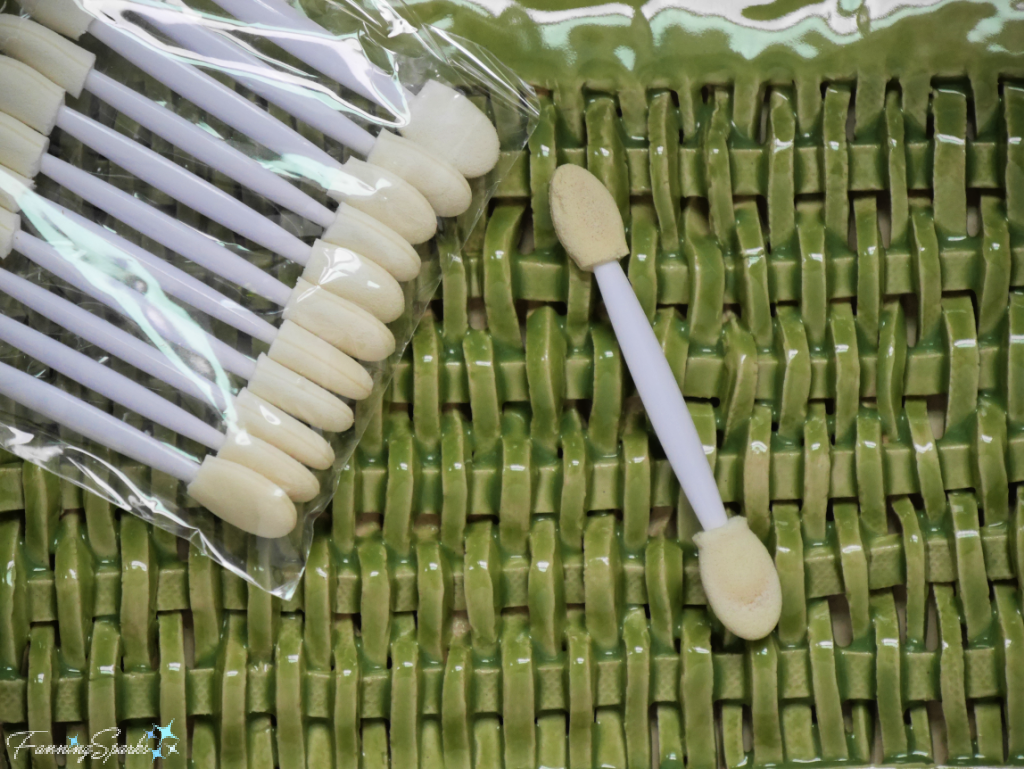
One more tip is to use sponge-tipped eye shadow applicators for smoothing edges and cleaning up elements in a clay piece. I used them extensively to prepare this woven tile.
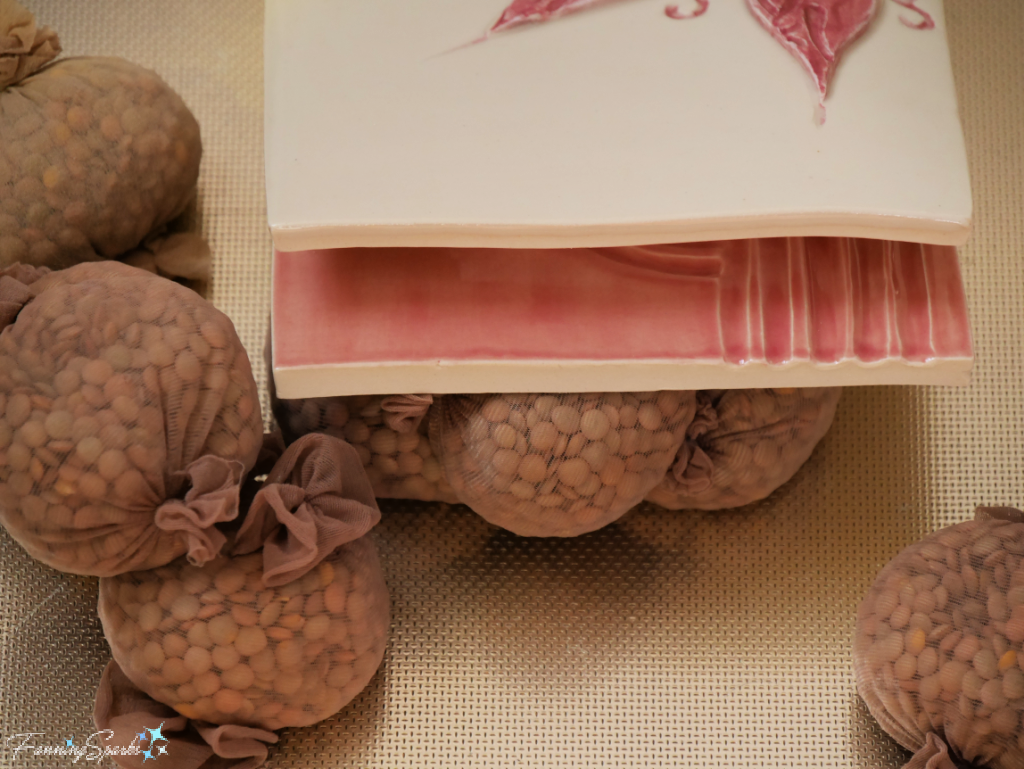
After the design has been applied to the clay tile, it must be dried for firing. I learned the hard way that flat pieces of clay have a tendency to warp during the drying process. To avoid this problem, it’s important to handle the clay as little as possible and always support it with a flat surface. It’s also important to let the clay dry slowly and consistently so all sections dry at the same rate. All of these steps helped but the best tip came from another Pottery Studio potter (Thank you Bertille!). Use small weights, made by filling a section of hose or tights with lentils, to keep the tiles flat as they dry. The below photo shows these weights along with a comparison of a flat tile which was dried with weights (bottom pink tile) and a warped tile that was dried without weights (top white tile).
There are an infinite number of options for decorating and glazing clay. As a result, deciding how to finish my tiles was one of the biggest challenges of this project. My plan was to use colors that would match the color palette in our kitchen/ family room. I tried several options in my quest to find the desired colors including Speedball Velvet Underglazes. But I couldn’t find the colors, saturation or finish I had in mind.
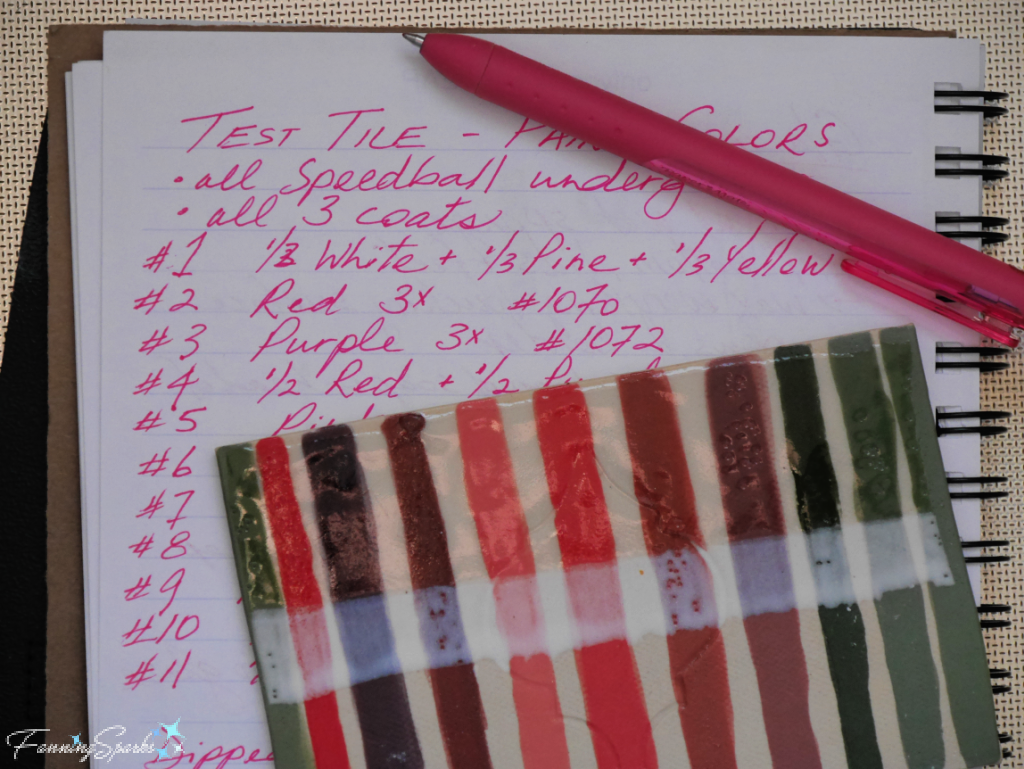
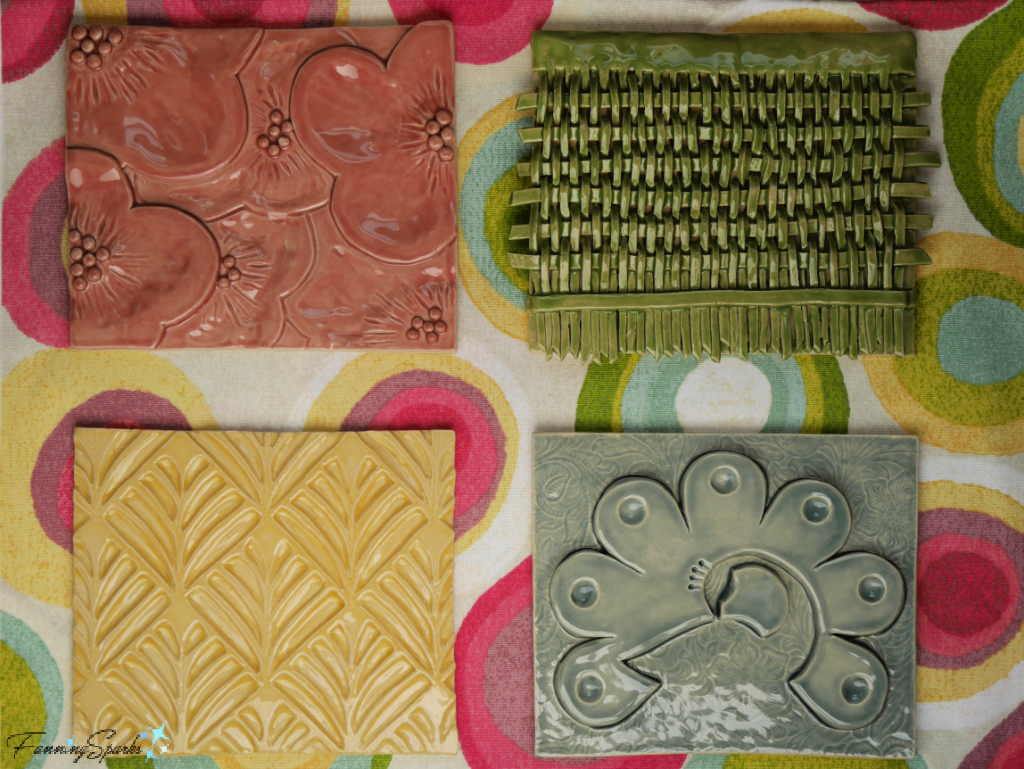
Once again, the Pottery Studio folks offered a great suggestion: AMACO Celadon glazes. The AMACO website describes the glaze this way “Like the beautiful ancient glazes they are modeled after, the AMACO Celadon glazes are glossy, transparent, and pool beautifully to add vivid accents to textured and carved surfaces.” I couldn’t agree more! The way the glaze color varies based on the surface texture—thinning on the mountains and pooling in the valleys—makes it the ideal choice for these tiles.
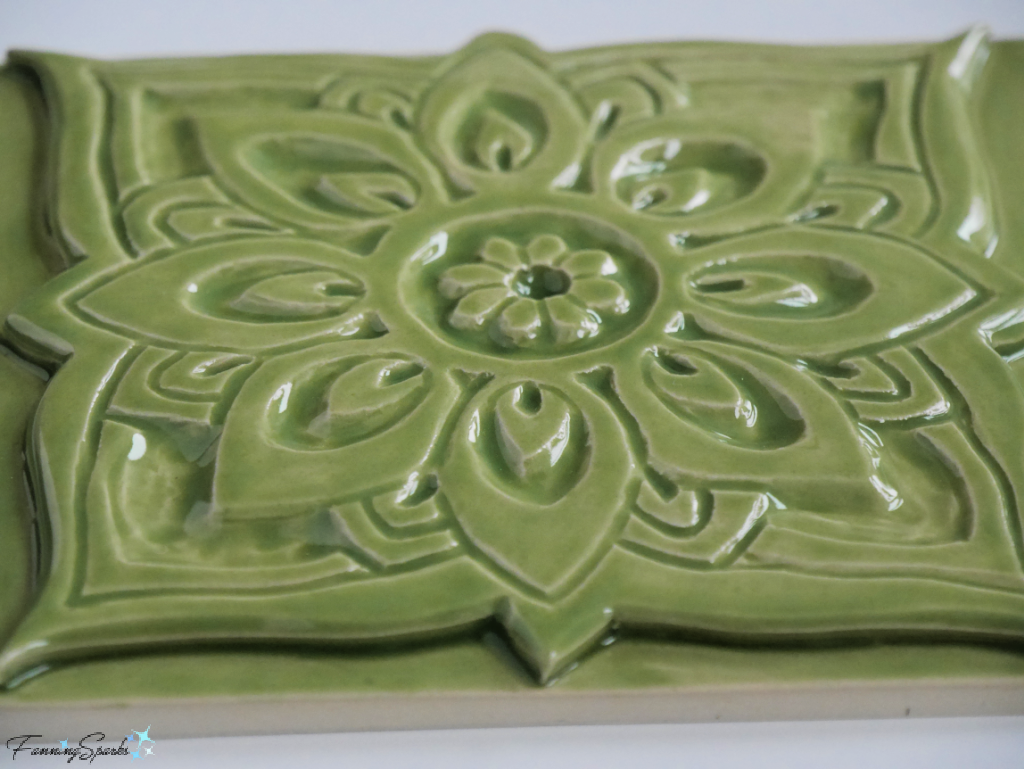
The colors are almost perfect, too. I selected Weeping Plum C-53 (pink top left), Wasabi C-43 (green top right), Marigold C-60 (yellow bottom left) and Fog C-22 (blue bottom right). To my eye, the green, yellow and blue are great matches. Only the pink color isn’t quite right—I should have custom-mixed this color for a better match. Luckily, the tiles aren’t displayed directly beside this fabric so the miss isn’t as obvious as it is in this photo.
One final note for future reference, don’t forget about functionality! In this case, the only functionality is a means to attach the tiles to a wall. I probably should have built a small hanger in the back of each tile. Instead, I used 3M Command Picture Hanging Strips. I tested them first to confirm they could hold the weight and could eventually be removed. They work perfectly.
Here’s a final look at my collection of handmade ceramic tiles.
More Info
Listed below are the previous FanningSparks’ blog posts mentioned in this post:
. Talk About Tiles! features the beautiful tiles of Portugal
. Pinch Pot Bunny shares my first experience hand building clay and introduces OCAF’s School Street Pottery Studio
. Decorating With Collections offers examples and suggestions
. Patterns by Mother Nature features patterns spotted in the natural world
. Texture by Mother Nature features texture spotted in the natural world
. DIY Woven Statement Necklace Tutorial provides step-by-step instructions for an easy weaving project
. Inspired by Mother Nature’s Lace explores how the spider and its web have inspired innovations in science and art
. From Classic Jacket to Wearable Art shares how to embellish a simple denim jacket with fabric paint and hand embroidery
. A Leather Flower Frame to Set the Stage shares an easy leather crafting project and introduces the polyester thread mentioned in this post
. Flat-Plane Carving with Harley and Carving in Brasstown share my experiences with wood carving.
More information about AMACO Celadon glazes can be found on the AMACO website.
You can learn more about the Oconee Cultural Arts Foundation (OCAF) on their website. Classes and workshops offered at the Watkinsville, Georgia, USA location are also listed. OCAF’s School Street Pottery Studio hosts open studio hours for those with clay experience. The Studio is run by a group of knowledgeable and generous volunteers. Many thanks to Louise, Bertille, Bill, Aurora and all the other kind and generous folks at the Studio!
Today’s Takeaways
1. Stretching out a project over time allows for more and varied ideas.
2. Borrowing designs and techniques from other mediums can be very inspiring.
3. Decorating your home with your own artwork can be very gratifying.

6 Comments
@Debora, Hello there! And thanks so much! Peg
@Leanne, Many thanks! I’m equally impressed by everything you create! Peg
@Marian, Thanks so much! I’m really pleased with how it all turned out! Peg
Brilliant! Absolutely love this!
Stunning! Beautifully displayed.
I love the stories behind each piece.
Absolutely amazing amount of talent, effort, and determination to complete this project.
WOW! These are GORGEOUS, although so is everything you create!