I love to make gifts with a thoughtful, personal connection.  Thinking about what the recipient likes to do in their spare time can lead to some good ideas.  What’s their passion?  Do they like biking?  Knitting?  Traveling?  Nature?  Music?  The possibilities are endless.  That’s why I think these Personalized Fabric-Covered Journals may just be the best make-and-give DIY project ever.

DIY Personalized Fabric-Covered Journals Tutorial by FanningSparks. @FanningSparks
See below image for designs and designers.

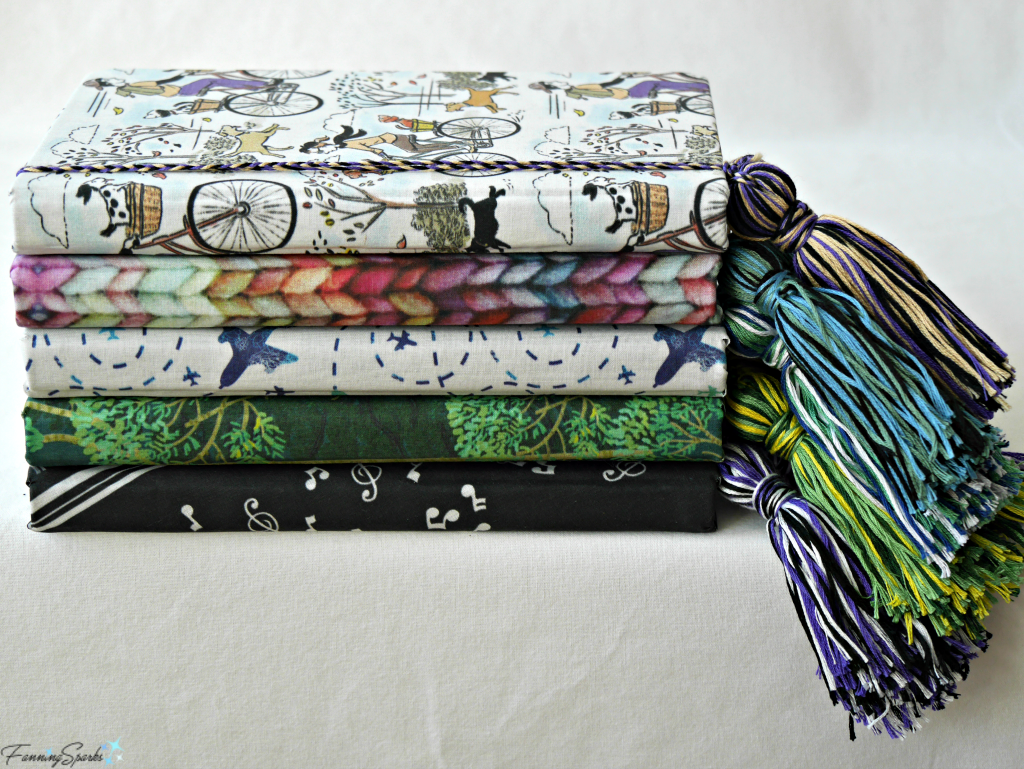
The journals make a lovely gift yet they are fast and easy to put together. Choose a fabric that reflects the recipient’s passion and simply cut-and-paste it to a notebook.  No sewing required.  Add a colorful tassel and braided cord bookmark and you’re all set.  There are two major steps which I’ll cover in two separate posts.  In this first post, we’ll discuss selecting the perfect fabric. In the second post, DIY Personalized Fabric-Covered Journal Tutorial Part 2, I provide step by step instructions for the cut-and-paste construction.

Choose a Fabric

The key to these personalized journals is the fabric. The fabric design makes it personal.  It’s the linchpin.  Therefore, it’s worth the effort to seek out a design that reflects something unique about the recipient.  It could be a favorite hobby, interest, or pastime.  I like to ask myself “What’s their passion?”
What's Their Passion? Selecting the Perfect Fabric for DIY Personalized Fabric-Covered Journals. @FanningSparks

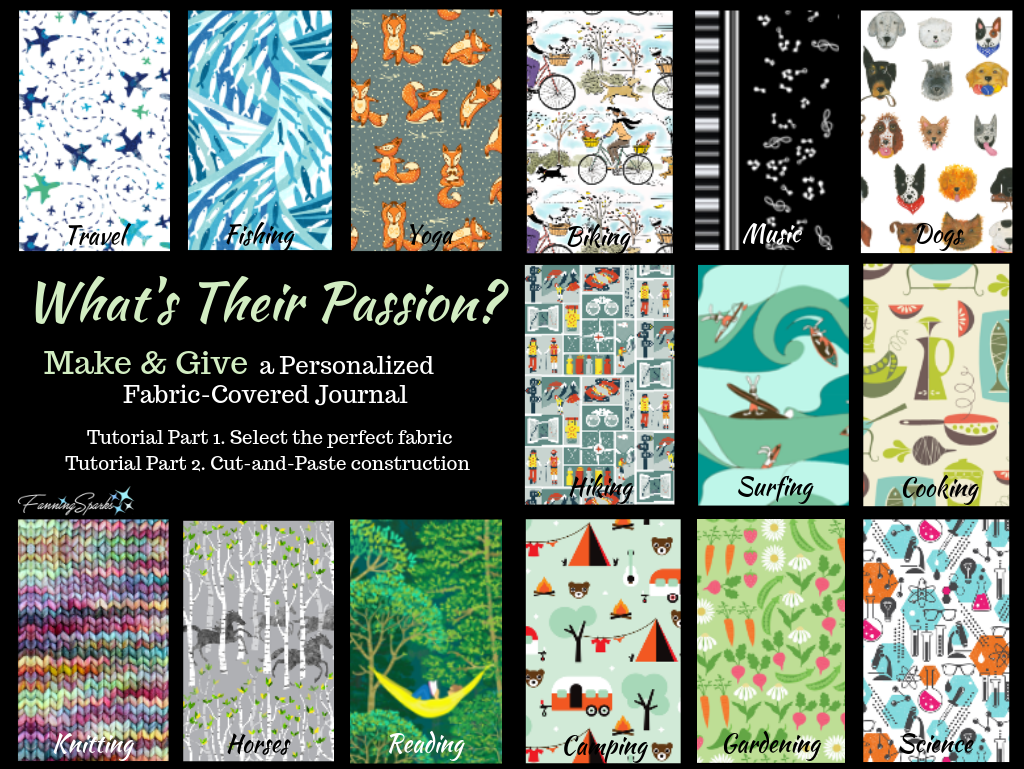
All of the fabrics shown in the above image were found on Spoonflower.  Many thanks to the following designers who agreed to have their designs included in this post:
Travel – Fun Airplanes on White Sky by Oksancia
Fishing – Ocean-Life by Gaia Marfurt
Yoga – Foxes Yoga by Penguin House
Biking – Retro Bikes and Dogs by Vinpauld
Music – Piano Music by Jade Gordon
Dogs – Dogs by Little Island Company
Hiking – I Love Hiking by EbyGomm
Surfing – Colored 2 by Belana
Cooking – In the Kitchen Cream by Studio Jenny
Knitting – Knit Fabric Smaller by Chicken Boots
Horses – Spring: All the Pretty Little Horses by VO aka VirginiaO
Reading – Lost in a Good Book in an Emerald Forest by Honolulu Design
Camping – Retro Camping Canada Woodland Kids by Little Smile Makers
Gardening – Home Grown Garden by Andie Hanna
Science – Chemistry Lab Modern Girl Small by Heather Dutton

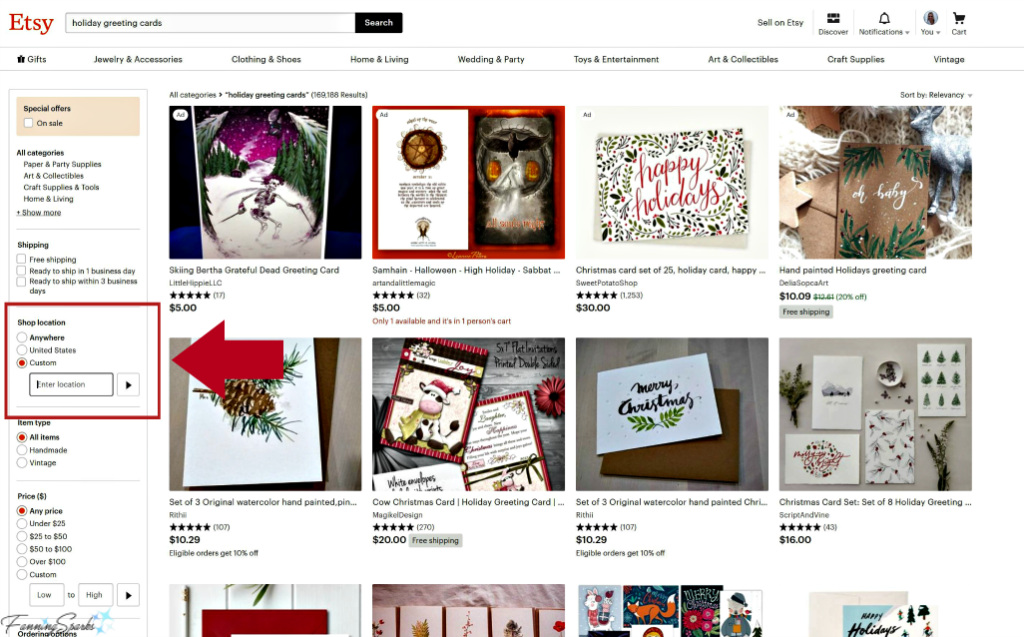
A simple 100% cotton fabric is ideal for this project.  Spoonflower is my favorite source, and the one I’d like to share with you today, but it is just one option.   You could select fabric at your local fabric store, online from an Etsy curated fabric shop, or an online fabric store.

With over 750,000 designs, the Spoonflower Marketplace is the largest collection of independent designers in the world.  This is not a sponsored post and I hope I don’t sound like a Spoonflower salesperson but that’s a lot of options!  There’s a very good chance they’ll have a design for your selected passion… the trick is to find it!

Spoonflower has multiple ways to search for designs.  If you’re new to Spoonflower, it’s worth taking a few minutes to get familiar with their website.

  1. You can simply explore. Check out the featured themes and trending designs from the home page.
  2. If you have a specific topic in mind, you can use the Search box at the top right. Enter a keyword and you’ll likely find dozens of options.
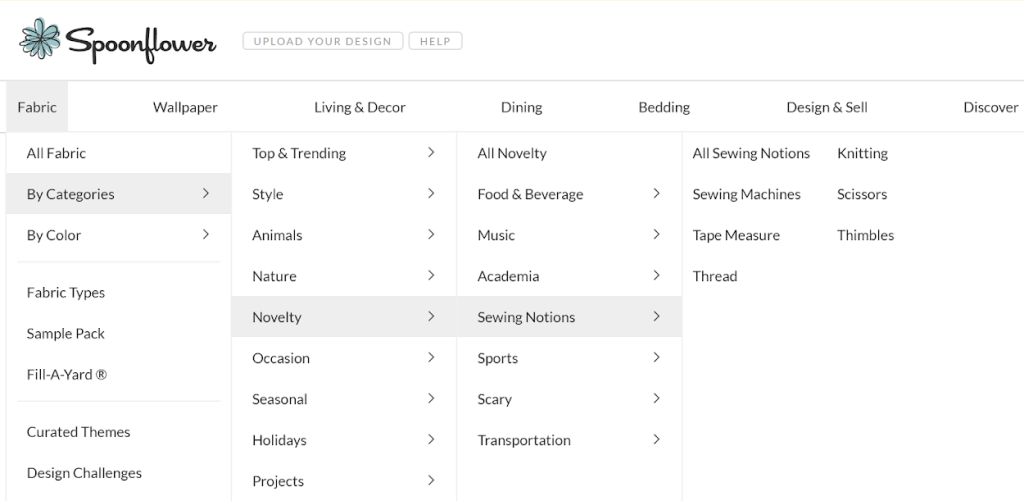
  3. Updated June 2, 2020:  Another approach is to navigate via the menu categories. Here’s an example clicking through Fabric > By Categories > Novelty > Sewing Notions.

Spoonflower Screenshot - Navigating by Category   @FanningSparks

  1. Yet another approach is to explore the Challenge Winners or Curated Themes sections under Fabric.

Design Challenges are one of the things that make Spoonflower unique.  Every week, Spoonflower selects a topic and challenges designers to enter their best designs.  Challenges cover a broad range of topics.  Some examples are Circles, Hedgehogs, Marrakesh, Cycling, and 1920s.  Designs are posted for public voting and the popular vote determines the top 50 winning designs.  Be sure to explore Challenge Winners for some exceptional designs.

I recommend you start by looking for 3-5 possible designs.  Be sure to mark your favorites, by clicking the little heart, as you go.  After you’ve found some good options, go to Favorites (little heart in the top right menu bar) to review your selections and narrow it down.

One important factor to consider in making your final selection is the scale of the design.  If the design is too large, the beauty of the design may be lost on the notebook cover.

Select and Measure the Notebook

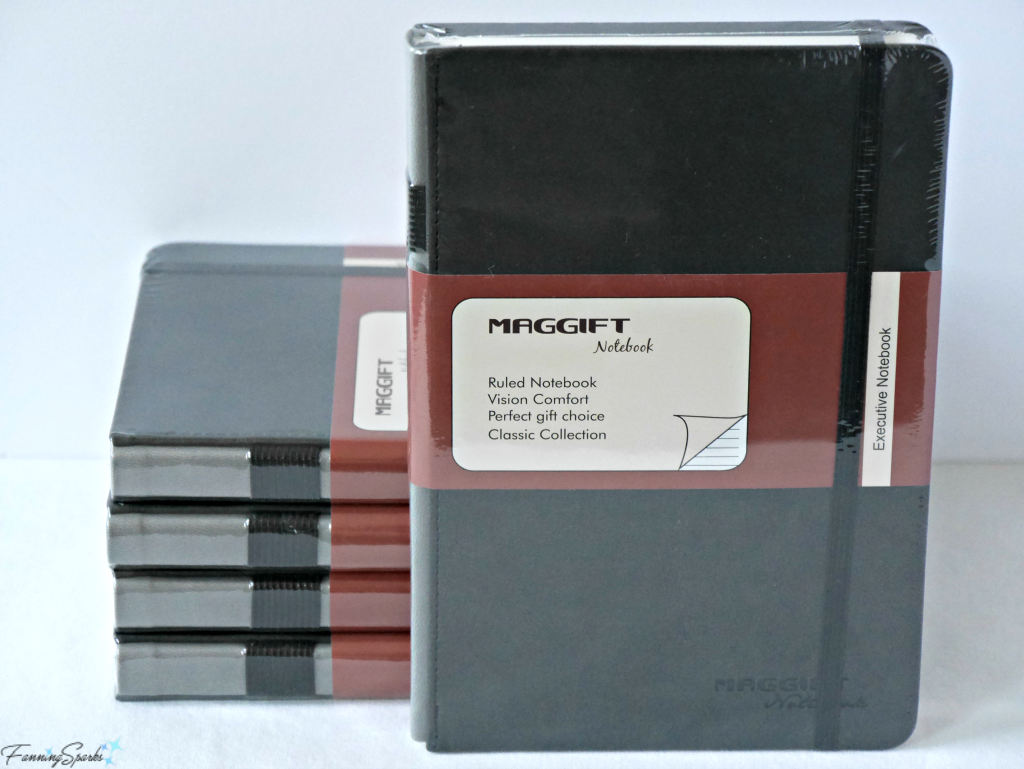
At this point, we need to switch gears and determine the size of your notebook.  Here is the notebook I purchased from Amazon (see More Details below for link).  I purchased 5 notebooks so I can make and give a few as gifts.
Maggift Notebooks are Perfect for this DIY Personalized Fabric-Covered Journals. @FanningSparks

If you use the same notebook, you can simply use my measurements.  Otherwise, measure your notebook carefully to determine 1) a suitable scale for the design and 2) the quantity of fabric needed.  Begin by measuring the following elements of the notebook:

  1. Cover Width = width of notebook from spine to right edge
  2. Cover Thickness = the thickness of the actual cover
  3. Cover Height = height of notebook from top edge to bottom edge
  4. Spine Thickness = the thickness of the notebook spine

We need to add ¾” of fabric to wrap around and glue to the inside of the cover.  Use these formulas to calculate the size of the fabric rectangle you’ll need:
. Width = ((Cover Width + ¾” + Cover Thickness) x 2) + Spine Thickness
. Height = Cover Height + ((¾” + Cover Thickness) x 2)

Let’s use the Maggift Notebook as an example.  Its precise measurements are:
. Cover Width = 5 ¹⁰⁄₁₆”
. Cover Thickness = ²⁄₁₆”
. Cover Height = 8 ⁷⁄₁₆”
. Spine Thickness = ¹²⁄₁₆”

Using the formula from above, we can determine the Width of the fabric rectangle should be:
Width = ((Cover Width + ¾” + Cover Thickness) x 2) + Spine Thickness
Width = ((5 ¹⁰⁄₁₆” + ¹²⁄₁₆” + ²⁄₁₆”) x 2 ) + ¹²⁄₁₆”
Width = 13 ¾

The Height of the fabric rectangle should be:
Height = Cover Height + ((¾” + Cover Thickness) x 2)
Height = 8 ⁷⁄₁₆” + ((¹²⁄₁₆” + ²⁄₁₆”) x 2
Height = 10 ³⁄₁₆”

Thus, a 13 ¾” x 10 ³⁄₁₆” rectangle of fabric is needed.

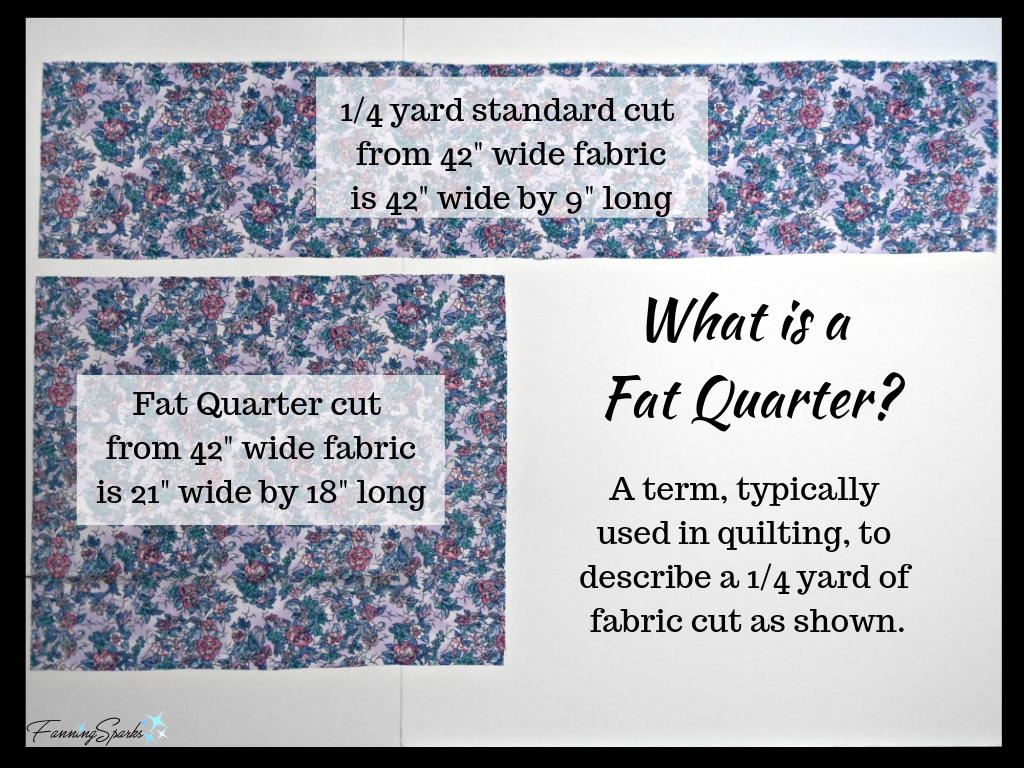
As a general rule of thumb, a fat quarter of fabric is sufficient to cover a typical notebook.  If you’re not familiar with this term, it is simply a piece of fabric that measures about 21” wide by 18” long.  The term, commonly used in the quilting world, comes from the way in which the fabric is cut as shown below.
What is a Fat Quarter? Explanation. @FanningSparks

Since the Maggift Notebook requires a 13 ¾” x 10 ³⁄₁₆” rectangle of fabric, a fat quarter at 21” x 18” is ideal.  You can order a fat quarter of any design on Spoonflower.  Many fabric stores offer pre-cut fat quarters.  When buying fabric off the bolt, however, you can typically only buy full width cuts meaning you would have to purchase a ½ yard of fabric.

Select the Final Design

Let’s return to our Spoonflower favorites.  As noted above, the scale of the design is an important consideration in making your final selection.  The ideal scale will showcase the beauty and detail of the design on the notebook cover.  Please note many designers will adjust the scale of their design for a custom order; just ask via the Contact option in the designer’s shop.

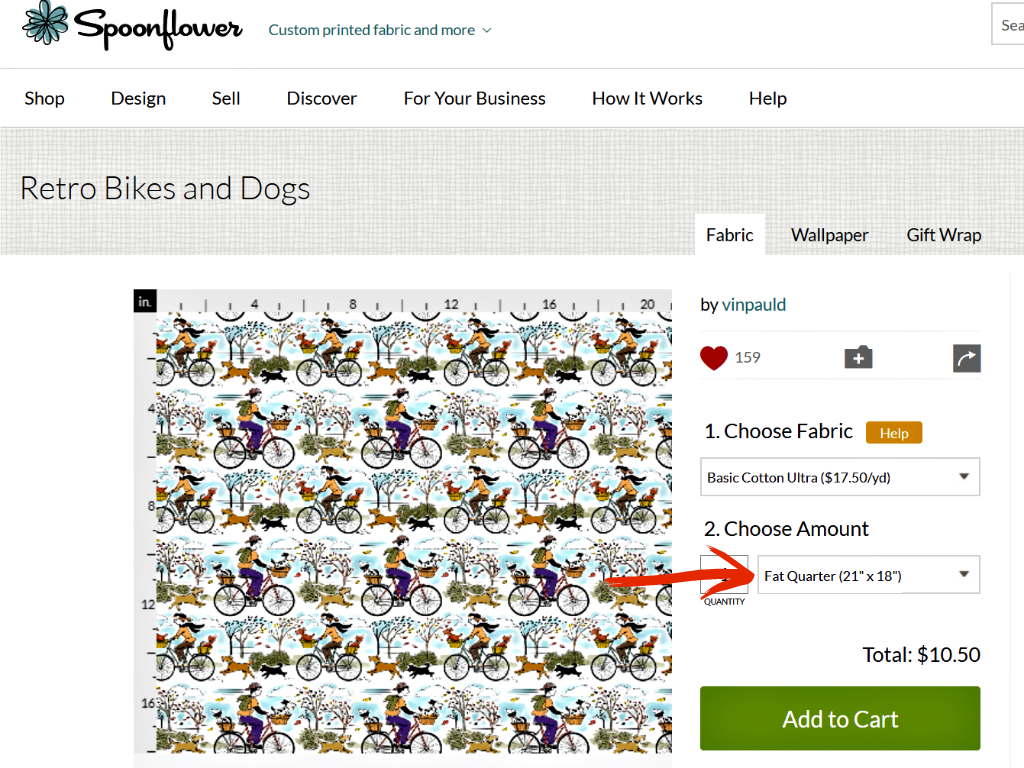
To gauge the scale of your design, we’ll use another one of Spoonflower’s cool features.  Select your fabric design.  Choose “Basic Cotton Ultra”.  Set the Choose Amount to “Fat Quarter” to see your chosen fabric displayed as a fat quarter.  The design and the rulers will adjust to 21” by 18”.  Genius!

Spoonflower Selecting Fabric and Amount Screenshot @FanningSparks
Fabric is Retro Bikes and Dogs by Vinpauld

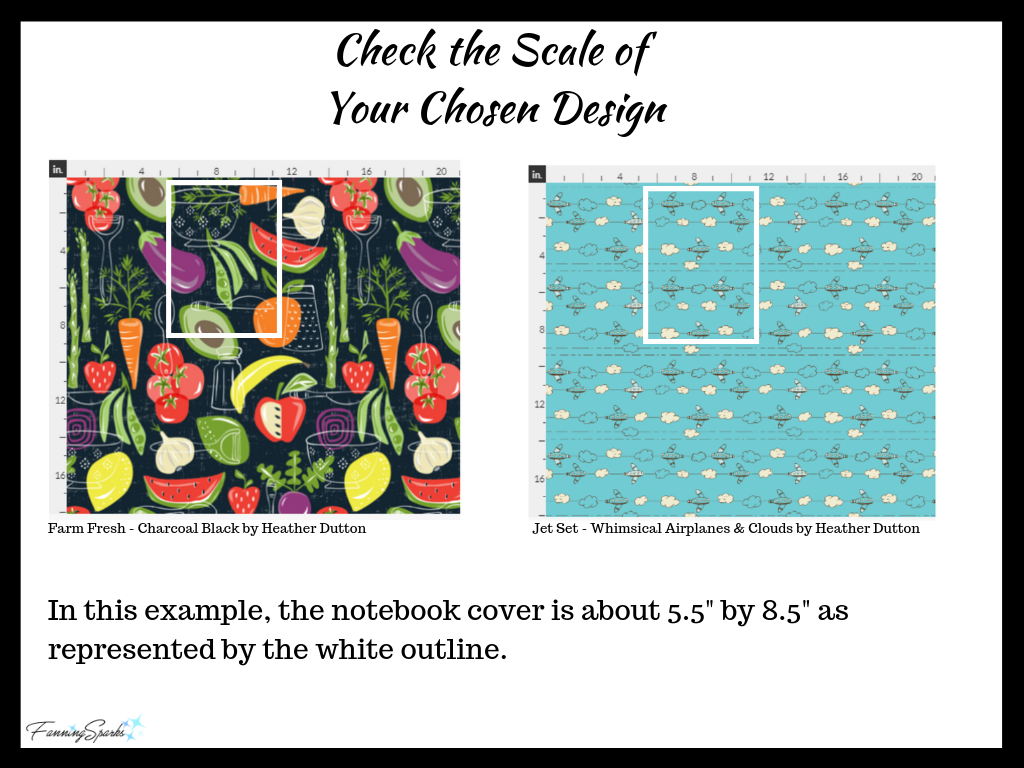
With your chosen fabric displayed to scale, you can easily check how it will appear on your notebook cover. Use the Cover Width and Cover Height measurements from above.  In our example, the Cover Width is 5 ¹⁰⁄₁₆” and the Cover Height is 8 ⁷⁄₁₆”.  You can use a tool, such as Snipping Tool, to carefully mark your cover design to size or you can simply eyeball it.

I created the below graphic to illustrate the point.  I think both designs are excellent but, based on the detail that would appear on the cover, I would more likely choose the airplanes than the vegetables for this particular project.

Check the Scale of Your Chosen Design. @FanningSparks
Fabric is Farm Fresh Charcoal Black and Jet Set Whimsical Airplanes & Clouds by Heather Dutton

Please note all of the designs shown in the What’s Their Passion? image at the top of this post have already been cropped to the size of a Maggift Notebook cover.

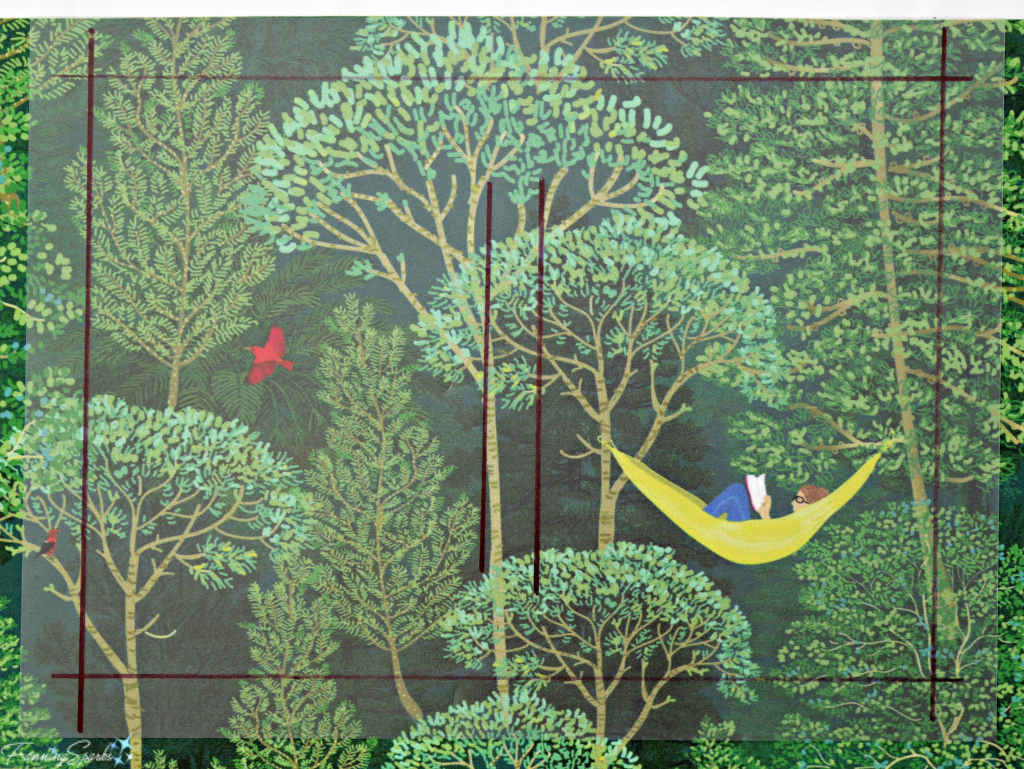
Placement is another factor to consider at this point.  If you have a design with an obvious focal point, you’ll want to ensure it can be positioned effectively on the notebook cover. We examine this topic in more detail in the next post, DIY Personalized Fabric-Covered Journal Tutorial Part 2, but in the meantime the below photo should help you visualize how placement may impact your design. Note: the front of the notebook will be covered with the fabric in the right section of the template.

Using Template to Determine Placement. @FanningSparks
Fabric is Lost in a Good Book in an Emerald Forest by Honolulu Design

Have fun selecting the perfect fabric for your journal!  If you’re ordering from Spoonflower take note of their holiday shipping deadlines since they’re approaching fast.

More Info

This is a two-part tutorial.  Be sure to read both posts:

  1. DIY Personalized Fabric-Covered Journal Tutorial Part 1 covers selecting the perfect fabric (this post).
  2. DIY Personalized Fabric-Covered Journal Tutorial Part 2 covers the cut-and-paste construction.

DIY Personalized Fabric-Covered Journals Tutorial by FanningSparks. @FanningSparks

Check out the Spoonflower website for more info.
This is the link to the Maggift Notebook I used.

Today’s Takeaways

  1. A fabric-covered notebook can make a lovely personalized gift.
  2. Fabric is available in a multitude of fabulous designs.
  3. Consider your gift recipient’s passions to select the perfect fabric for this DIY Personalized Fabric-Covered Journal.

Peg - FanningSparks Author

In my last post, Our Pony Wall and Banquette Combo, I shared the bespoke pillows I designed and created.  I chose to call these pillows “bespoke” because they are custom-made for the banquette in our kitchen.  Today I’d like to share a tutorial with step-by-step instructions for creating these two pillows.  Of course, while the same approach and techniques will apply, you’ll want to customize them for your own bespoke pillows.  Simply choose a fabric, in a design, color and pattern you love, as the foundation.  Then get creative with contrasting fabric, trim, piping, and buttons to embellish your look.  Here are my DIY bespoke pillows on the banquette in my kitchen.
Bespoke Pillows in Eat-in Kitchen Banquette. @FanningSparks

Let’s get started.  I’ll refer to the pillow at the back, with the circular pattern and the pompom trim, as the Pompom Pillow. I’ll refer to the pillow in the front, with the flowered pattern and the tailored button band, as the Button Pillow.
Bespoke Pillows on Banquette. @FanningSparks

The construction process is quite straightforward; we will be sewing together two squares of fabric to create a pocket for a pillow form.  Most ready-made decorative pillows use this same simple technique.  It’s the fabric selection and embellishment that set them apart.  The Button Pillow is embellished with a padded, contrasting band of fabric showcasing 5 sets of buttons.  The band and the outer edges of the pillow are trimmed with 2 rows of piping,  The Pompom Pillow has a row of custom-made piping (using the same fabric as the seat cushion) and a row of pompom trim around the outer edges.

Take your time to select fabric and trim you like.  We’ll get into the details below but to get you started, plan for less than 1 yard of fabric to make a standard square pillow (typically between 16” and 24” square).   Lay out your choices to help you visualize the finished product.  In the below photo, I’m trying to decide if I should insert striped or white piping under the pompom trim.  Definitely striped!
Selecting Fabric and Trim - Pompom Pillow. @FanningSparks

Please note some aspects of these pillows, for instance inserting a double row of piping around the outer edges, are rather difficult and may not be the best choice for a beginner.  If you’re just starting to sew, you may wish to use only one row of piping or skip the piping entirely.  You can still make a stunning bespoke pillow.

Supplies – Basics

Pillow Form:  It all starts with the pillow form (also called pillow insert or pillow fill).  This tutorial covers square pillows but you could easily adapt the instructions for a rectangular pillow.  Square pillows typically come in one inch increments from 16” to 24”.  The Button Pillow is 17” square.  The Pompom Pillow is 18.5” square.
Pillow Front:  Use home decorating fabric for the front of the pillow.  I used 17 ½” by 17 ½” (½ yd) flowered fabric for the Button Pillow and 19” by 19” (¾ yd) circular patterned fabric for the Pompom pillow.  Simply add ½” (¼” x 2 for the seam allowances) to the size of your pillow form to determine the amount of fabric you need.  Home décor fabric is typically 54” wide so a single cut will be plenty wide and you only need to determine the yardage to buy.
Backing Fabric: Choose matching fabric for the back of the pillow in the same size as the pillow front.  I used a matching cotton print.  Alternatively, you could simply use the same fabric as the pillow front.

Supplies – Embellishments

Piping for Button Pillow:  The Button Pillow has a row of thick black piping (Conso Elements 3/16” Cord with Lip) plus a thinner row of white piping (Wrights Bias Tape Maxi Piping).  You’ll need 2 yds of each.
Band Fabric for Button Pillow: The Button Pillow has a band made of contrasting fabric.  The band will be approximately 1/5 of the width of the pillow front.  I used a 21” by 4” piece of black cotton fabric.
Band Padding for Button Pillow:  21” by 3 ½” cotton batting (The Warm Company Warm & Natural Cotton Needled Batting)
Buttons for Button Pillow: The Button Pillow has 5 button embellishments evenly spaced on the band.  I used a combination of a large flat 1 ½” button in pink with a decorative ¾” shank button.  There are an amazing a variety of buttons available at stores like JOANN.

Bespoke Piping for Pompom Pillow:  The Pompom Pillow has a row of bespoke piping.  You’ll need  home decorating fabric cut into a long thin strip 80” long by 1” wide and cotton cording ½”diameter (aka size 5) by 90” long. You may need to sew together a few pieces of fabric to make it 80″ long.  Alternatively, you could choose to insert a row of purchased piping.  You’ll need 2 ¼ yds.
Pompom Trim for Pompom Pillow:  2 yds of 1 ¼” wide pompom trim.

Thread: You’ll need thread in a color matching your fabric.
Glue: You’ll need craft glue to attach the decorative buttons to the base buttons on the Button Pillow.  I used E-6000 Multi-purpose Craft Glue.

Have fun choosing the fabrics, piping and buttons to make your pillow truly unique.

Selecting Fabric and Embellishments - Button Pillow. @FanningSparks

Tools

Rotary Cutter, Ruler and Cutting Surface (alternatively use Fabric Scissors/ Shears)
Ruler/ Measuring Tape
Sewing Seam Gauge
Pins
Small Scissors / Thread Snips
Seam Ripper
Sewing Machine
Zipper Foot for Sewing Machine
Iron
Ironing Board
Light Cardboard (such as a manila file folder)
Cutting Pliers (if you use buttons with shanks)
Needle (for hand sewing)
Marker (pencil, chalk or disappearing ink)

Instructions for Button Pillow

Bespoke Pillow Embellished with Tailored Contrasting Band and Decorative Buttons. @FanningSparks

Cut Pieces

Cut the home decorating fabric into a 17 ½” square for the pillow front.
Cut the backing fabric into a 17 ½” square for the pillow back.
Cut the contrasting fabric for the button band to 21” x 4”.
Cut the cotton batting to 21” by 3 ½”.
Press the pieces.

Assembly

Step 1 Press Button Band.  Prepare the black button band by pressing under ¼” along both long edges.

TIP: I find it easiest to create a simple template from light cardboard for this step.  This one is cut from a manila file folder and is 11 ½” long by 1 ¼” wide.  I drew a line ¼” from the long edge.  Smooth out the fabric on the ironing board and place the template on top.  Fold the edge of the fabric over the edge of the template to the ¼” mark.  Press directly over the fabric and template.  Alternatively, you can use a sewing gauge or ruler to measure ¼” from the edge, fold and press.
Pressing Under Edge on Button Band. @FanningSparks

Step 2 Pad Button Band.  Insert the button band padding into the underside of the button band tucking the edges inside the ¼” folded edges.
Edges Pressed Under with Padding Inserted. @FanningSparks

Step 3 Attach Button Band.  With the right side up, carefully measure and mark 3 ½” from the right side edge of the pillow front.  Lay the right edge of the button band at the 3 ½” line.  Allow the top and bottom edges of the band to extend over the pillow front edges. Baste the button band to the pillow front stitching ½” in from the edges.  This ½” clearance will be needed to insert the piping.  Take care to ensure everything is smooth and even.  Press.
Button Band Basted to Pillow Front. @FanningSparks

Step 4 Add Piping to Button Band.  Insert two rows of piping along button band.  Alternatively, you could choose to insert only one row of piping.  Place thick black piping on bottom.  Place thin white piping on top.  Tuck snugly under the pressed edge of the button band.  I only pin the first section and then hand feed the rest of the piping as I sew.  Alternatively, you can pin the piping all the way along the edges.  Put the zipper foot on the sewing machine.  As you sew, press the zipper foot snugly against the cord in the piping.  Ideally, the original stitching on the piping will be hidden under the edge of the button band.
Inserting Double Row of Piping Under Button Band. @FanningSparks

Step 5 Finish Button Band.  Remove the basting from the button band.  Trim the top and bottom of the button band even with the pillow front.  Press.

Step 6 Attach Buttons.  I used 5 buttons and placed them at the center of the button band at 3”, 5 ¾”, 8 ½”, 11 ¼”, and 14”. Sew on large flat buttons by hand.
Sewing Base Buttons to Band on Pillow Front. @FanningSparks

Use cutting pliers to snip off the shanks from the decorative buttons.  Glue the decorative buttons on top of the large flat buttons.  Allow to dry.  Alternatively, you can glue on the decorative buttons after you finish all other sewing (as I did).
Removing Shanks from Decorative Buttons. @FanningSparks

Step 7 Prepare to Sew on Piping.  Prepare to sew two rows of piping around the pillow front.  Alternatively, you could choose to insert only one row of piping or simply skip the piping entirely.  Lay the pillow front on your work surface with the right side up.  Locate the center of the bottom edge and mark with a pin.  The piping will start and end at this center point so leave about 3” of piping free (as shown in below photo).  First, place thin white piping on top of pillow front.  Second, place thick black piping on top of thin white piping.  Ensure fabric edge, thin white piping lip edge, and thick black piping edge are all aligned.  I only pin the first few inches and then hand feed the rest of the piping as I sew.  Alternatively, you can pin the piping all the way around before sewing.  Prepare to leave about 3” of loose piping at the end.
Starting Point for Stitching Double Piping around Pillow Front. @FanningSparks

Step 8 Sew on Piping.  Put the zipper foot on the sewing machine.  As you sew, press the zipper foot snugly against the cord in the piping.  Ideally, your seam will be in actually the same place as the original stitching on the piping.

TIP: Sewing piping around the corners can be tricky.  The solution is to turn at the correct spot which is exactly ¼” from the end. Stop sewing as you near the corner and mark the ¼” point with a dot.  Resume sewing, moving forward slowing until your needle punctures your dot.  Don’t forget you can adjust the machine’s stitch length to help you land on the right spot. Leave the needle down, lift the presser foot and swivel the fabric by 90⁰.  You may need to fuss a little to get all the layers to lay flat.  Resume sewing.  It’s worth the effort to get this right because neatly finished corners will make the pillow look much more professional.  The below photo (taken with the Pompom Pillow) shows how to measure and mark the ¼” turning point.
Stop to Mark Turning Point to Ensure Crisp Corner. @FanningSparks

Step 9 Finish Piping Ends.  The 3” tails left at the start and end of the piping will be merged to create a clean connection.  Finish the two rows of piping separately.  Start with the thick black piping.  Carefully line up the two ends.  Trim the piping start tail at the center point cutting through the cord and wrapping.
Joining Ends of Piping. Trim Right Side at Center Point. @Fanning Sparks

Trim ONLY the cord in the piping end tail keeping it even with the piping start tail.  Fold under the wrapping of the piping end tail.
Joining Ends of Piping. Trim Only Cord of Left Side and Fold Under Wrapping. @Fanning Sparks

Tuck the piping start tail inside the piping end tail covering the cut ends with the wrapping.  Pin in place.  Repeat this process with the thin white piping.  Hold the overlapping connections, turn over and stitch to pillow front.
Joining Ends of Piping. Tuck Right Side End into Left Side Overlap. @Fanning Sparks

Step 10 Sew on Back.  Find and mark centers on all sides of pillow front and pillow back. Lay the pillow back on your work surface with the right side up.  Lay the pillow front on top of the back with the right side down.  At this point, all 4 outside edges should be aligned, the piping should be turned in and hidden, and only wrong sides of the fabric should be visible.  Align centers and pin out to the corners as shown in the below photo.
Start at Center to Stitch Pillow Front to Pillow Back. @FanningSparks

Start sewing each seam at the center and stitch out to the corner.  Check fit at corner; adjust seam if necessary.  Repeat for 2 more sides; you will sew 6 short seams.  On the bottom side (where the piping was connected), start the seams about 3” from the corner instead of at the center.  This leaves an opening for inserting the pillow form.

TIP: Although the pillow front and pillow back started out exactly the same size, the pillow front has likely shrunk a little because of the attached trim.  When I checked the fit at the corner shown below, I found the pillow back was now wider than the pillow front and I had to adjust the seam.  The pillow front still had the original ¼” seam allowance but the seam allowance on the pillow back had to be doubled to ½” at the corner.
Fine Tune Seam at Corner to Ensure Smooth Finish. @FanningSparks

Step 11 Finish Pillow.  Turn the pillow right side out.  Check seams to ensure piping was not caught in stitching, all seams are smooth, and all corners are neat and tidy.  Correct any flaws by ripping out the stitching and redoing.   Press the pillow case.  Insert the pillow form.  Hand stitch the opening.  Your Button Pillow is done!
Smoothly Finished Pillow Corner After Finetuning Seam. @FanningSparks

Instructions for Pompom Pillow

Bespoke Pillow Embellished with Custom Piping and Pompom Trim. @FanningSparks

Most of the steps for the Pompom Pillow are the same as those used for the Button Pillow.  To keep this post as short as possible, I will refer back to the relevant instructions instead of repeating them.

Cut Pieces

Cut the home decorating fabric into a 19” square for the pillow front.
Cut the backing fabric into a 19” square for the pillow back.
Cut the home decorating fabric for the bespoke piping into a long thin strip 80” long by 1” wide. You may need to sew several pieces together.
Cut an 90” length of cotton cording ½” diameter (aka size 5).
Press the pieces.

Assembly

Step A Make Piping.  Place the 80” by 1” fabric strip on your work surface with the wrong side up.  Place the cotton cording down the center of the strip.  Fold the fabric over the top of the cording aligning the raw edges.  Only the right side of the fabric will now be showing.  Pin the edges to keep them aligned.  Because my fabric was striped, I had to take extra care to keep the stripes aligned and pin perpendicular to the edge.  Put the zipper foot on the sewing machine.  As you sew, press the zipper foot snugly against the cording in the piping.  Trim the ends to even up the fabric and cording.
Custom Made Piping for Pillow. @FanningSparks

The next 3 steps are the same as the Button Pillow Step 7, Step 8 and Step 9.  Steps 1 to 6 were concerned with the button band which is not relevant to the Pompom Pillow.

Step 7 Prepare to Sew on Piping.  Note the Pompom Pillow has only one row of piping instead of two like the Button Pillow.  Follow the instructions for the thick black piping and skip references to the thin white piping.

Step 8 Sew on Piping
Attaching Custom Made Piping to Edge of Pillow Front. @FanningSparks

Step 9 Finish Piping Ends.

Step 9B Sew on Pompoms.  This next step is unique to the Pompom Pillow. Lay the pillow front right side up on your work surface.  The piping will be on top.  Starting and ending at the same place as the piping, place the pompom trim around the outside edges of the pillow front with the pompoms toward the center of the pillow.  Ensure edges are aligned and keep the pompom trim braid outside of the seam.  Pin in place and fold over to check alignment (it should look as shown below).  Simply cut, overlap and sew the ends of the pompom trim to connect the start and end at the bottom center.
Pompom Trim Shown With Edge Folded Over to Check Alignment. @FanningSparks

The objective is to have only pompoms, and no braid, visible on the finished pillow.
Finished Piping and Pompom Trim. @FanningSparks

Finish the Pompom Pillow in the same way as the Button Pillow Step 10 and Step 11.

Step 10 Sew on Back.

Step 11 Finish Pillow.

Enjoy your new bespoke pillows!
Bespoke Pillows Embellished with Trim, Contrasting Fabric, Buttons and Piping. @FanningSparks

More Info

Most of the fabric, trim and buttons used in this project were purchased at JOANN.  Unfortunately, both the circular and flowered fabric were purchased some time ago and do not appear to be available.  The striped fabric was custom printed via Spoonflower from my own design.  I’ll be sharing more on this amazing service in an upcoming post.

Today’s Takeaways

1 Pillows are a great way to pull color and pattern into a room.
2 Consider designing and creating bespoke pillows for your home.
3 Use bold colors and/or lively patterns to add energy and personality.

Peg - FanningSparks Author

In the previous post A Before Tour of Our New Casual Lake House, I shared photos of our new-to-us house and I mentioned our plans to upgrade some of the outdated areas.  One of those areas was the kitchen.  The kitchen has many positive attributes.  It has an efficient L-shaped layout, it is open to the living room, has lots of natural light, and is a generous size.  It also has a few challenges.   The biggest challenge, and the one I’d like to focus on in today’s post, is the front entry.

The house is a Cape Cod style with a covered porch across the front.  The front door, which is our primary entrance, is centered on this porch.  So far, so good!  The challenge appears as soon as you enter the front door; you step directly into the kitchen!  To make matters worse, it’s an eat-in kitchen and the dining table is directly beside the front door.  Anyone entering the house will immediately be standing at the dining table.  Awkward!
Before view of Front Door. @FanningSparks

To remedy this functional problem, we decided to simulate an entry by separating the space around the front door.  The plan was to construct a half wall, often called a pony wall, beside the front door.  Then leverage that same pony wall to support a built-in banquette for the dining area.  We engaged a contractor to build this structure.  This all worked out as planned but, the truth is, a completely different part of our renovations went a long way to alleviating our concerns.

Our new house has an outstanding view of Lake Oconee.  We are fortunate to overlook the lake and a small wooded island. Originally, we admired this view through a series of small windows in the living room.

Living room showing window wall. @FanningSparks

To make the most of our view, we decided to replace 3 of these windows with full size patio doors.  The doors lead to a covered porch.  Replacing these windows has completely changed our living space.  It’s more open and lighter.  The indoors space is more connected to the outdoors and it feels more spacious.  What we didn’t quite expect is how much these new windows opened up the kitchen.

Back to that awkward situation at the front door.  The fact is the lovely view takes over.  Walking in the front door, you immediately notice the view of the lake.  It’s the focal point.
View of Lake Oconee from front entry. @FanningSparks

The first impression is the view, not that you’re standing in the middle of the kitchen at the dining table.  Of course, while the view is a beautiful distraction, it doesn’t actually solve the functional problem.  That’s where the pony wall and banquette still play a role.  The pony wall is not large, only 42″ high x 50.5″ wide, but it effectively creates a separate area.  This space is furnished and decorated to look like an entry.  The area is still just a small corner of the kitchen but it creates the illusion of a separate area.
After view of front entry. @FanningSparks

Here’s a before and after comparison you may wish to pin for future reference.
Before and After of Front Entry Directly Into Kitchen. @FanningSparks

The other half of this build was an L-shaped bench or banquette.  The objective was to create a more definitive eating area while maximizing the kitchen space.  The pony wall forms the back of the short side of the banquette.  The long side of the banquette runs along the exterior wall under the window.  The banquette seat is 16″ high (plus 2″ cushion) by 19″ deep.

New Banquette and Pony Wall Combination. @FanningSparks

Here are a few photos of the pony wall and banquette under construction.  It is surprisingly straightforward.
Pony wall under construction. @FanningSparks
Banquette Under Construction. @FanningSparks
Pony Wall and Banquette With Trim Under Construction. @FanningSparks

The pony wall and banquette are painted white to match the kitchen cabinets.  The pony wall is topped with a piece of granite from our new kitchen counter tops.  This keeps a nice cohesive flow across the kitchen space.
New banquette constructed in kitchen. @FanningSparks

In the final outcome the banquette serves many purposes.  It provides built-in seating at the dining table.  In conjunction with the pony wall, it serves to visually separate the entry from the main kitchen area.  It provides extra storage with built-in drawers.  Plus it’s the perfect place to use some textiles and introduce color and pattern into the kitchen.
Eat-in kitchen with banquette and pony wall combo. @FanningSparks

We’re pleased with how the pony wall and banquette combined to solve the challenges in our kitchen.  Thankfully, the big functional changes are done and we’re now contemplating decor and finishing touches.  Should we switch to a pedestal table?  What about a pendant light over the table?  Should we replace the rug?  And so the fun continues!

Speaking of textiles in the kitchen, I had great fun designing the banquette cushion and pillows, choosing the fabrics and embellishments, and sewing it all together.  I look forward to sharing the details with you in my next post where I’ll provide a tutorial for these bespoke pillows.  See DIY Bespoke Pillows Tutorial.
Bespoke pillows for kitchen banquette. @FanningSparks

More Info

See the Pinterest board, Banquettes and Pony Walls – FanningSparks Favs, for more ideas and inspiration.
Special thanks to our contractor, Neil Griffin, for his work on this project.

Today’s Takeaways

1. Consider constructing a pony wall to separate space without blocking it off completely.
2. A banquette can help maximize seating space at the dining table.
3. Consider using the combination of a pony wall and a banquette to address functional challenges in your home.

Peg - FanningSparks Author

As the days get shorter, the temperatures drop and the leaves start to fall, thoughts turn to the upcoming holiday season.  One of the first things I like to do is select greeting cards to send to family and friends.  I realize it’s much faster and easier to send greetings online and that sending cards via snail mail is a little old fashioned. Despite the trends, I still appreciate every card, letter and greeting that appears in our mailbox.  Opening the envelope, admiring the card’s design, and reading the sender’s message are all part of the experience.

Christmas Cards by Local Artists Arrive in Mailbox. Card by ManvsGeorge Design. #FanningSparks

It’s become our tradition to select cards made by local artists. We choose cards with a personal connection that represent an aspect of our lives.  It’s a small way to support local artists plus we get to share a small work of art with our family and friends.  That’s a win-win in my books!

Another part of our tradition is to include a short letter with our greeting cards.  We typically include a short paragraph explaining the background on the card’s artist.   Our letter extends best wishes to our family and friends and shares the highlights of our year.

Today, I’d like to share some examples of the holiday cards we’ve sent to family and friends over the last few years.  Every card has a bit of history and represents part of our story.  See the More Info section below for artist contact details.

While living in Michigan, USA, I came across an award-winning children’s book called “Stranger in the Woods”.  This book, created by wildlife photographers Carl R Sams II and Jean Stoick, is presented as a photographic fantasy.  It’s packed with beautiful photos and tells the story of how the birds and animals react to a snowman in the middle of the woods.  The story is unique and entertaining but it’s the photography that sets it apart.  As it turned out, the author/photographers lived in a village very close to us.  Their Stranger in the Woods greeting cards were the perfect choice!

Holiday Greeting Card by Stranger in the Woods. #FanningSparks

We selected the below card when we were living in Singapore.  Holiday greeting cards like this are more of a Western tradition so the options were limited.  I was very pleased to find this one.  It was the perfect way to share the excitement of living in that beautiful part of the world.  The card was created by Kim Angelico.

Holiday Greeting card by Kim Angelico. #FanningSparks

There were many beautiful greeting cards to choose from when we lived in Germany.  The below card showcases the magnificent Kölner Dom (Cologne Cathedral) which is a famous landmark in the German city of Cologne where we lived.  The card is based on an original work by Arlette Furler.

Holiday Greeting Card by Arlette Furler. @FanningSparks

Spending the Christmas season in Germany was a memorable experience.  Cologne hosts several outstanding Christmas markets but the biggest and most impressive is located around the base of the Dom.

Christmas Market at Cologne Cathedral. @FanningSparks

Nearly all German cities and towns host a traditional, street-based Christmas fair or market.  They are typically open for several weeks in December.  The markets are packed with small booths selling arts and crafts.  They feature unique, handmade products, such as blown glass ornaments, wool and felt apparel, nutcrackers, Christmas pyramids (aka candle carousels) and other carved wood decorations.

Hand Crafted Nutcrackers at German Christmas Market. @FanningSparks

Christmas music plays and the largest markets often have live musicians.  Of course, there is lots of food and drink including grilled sausages, roasted chestnuts, gingerbread cookies and beer.   It’s usually quite cold at this time of the year so drinking glühwein, which is a hot and spiced mulled wine, is a Christmas Market tradition.
Food Stands at German Christmas Market. @FanningSparks

Returning back to the topic of holiday greeting cards.  The below card was created by graphic designer Ryan Fitzpatrick from Man vs. George Design.  Based near Milwaukee, Wisconsin, USA, they specialize in fun and modern greeting cards.  I found these cards on Etsy (link in More Info below).  Ryan was very accommodating and agreed to print the cards with a custom message inside and on the back.  He even provided a small matching graphic for our letter.
Holiday Greeting Card by Man vs George Design. @FanningSparks

The first year we lived in Georgia USA, I came across the work of a local artist Sally Storey Jones in a local boutique.  I was delighted to discover that Sally lived in our neighborhood… only a few streets away!  This card, featuring historical downtown Villa Rica, was an ideal choice that year.
Holiday Greeting Card by Sally Storey Jones. @FanningSparks

Last year we selected a beautiful letterpress card from Cherry Laurel Studio.  They are located in Decatur, Georgia.  The artist, Elizabeth Kotz, calls herself a Southern girl through and through.  We were tempted to use one of her other cards but reluctantly admitted they were not appropriate for the holidays.  Runners-up were: “Well that just dills my pickle” and “Grinnin’ like a possum eatin’ a sweet potater”.
Holiday Greeting Card by Cherry Laurel Studio. @FanningSparks

As you can see, our holiday greeting cards were found from a variety of sources.  I’m always on the lookout for local artists and make it a point to shop in local stores and boutiques.  Oftentimes, these shops carry work by local artists.  Their inventory is usually quite limited but once an artist is identified it’s easy to do a little online research to see if he/she offers holiday greeting cards.

Community craft fairs and markets are another great way to identify local artists.  Look for paper, letterpress, and stationary artists.  Artists who paint, draw, work with fiber, or take photographs often offer cards as well.

Another, perhaps obvious, source is Etsy.  It’s easy to search for “holiday greeting cards” and find thousands of hits.  The trick, though, is to narrow the search based on the seller/artist’s location.  Etsy’s faceted search includes a Shop Location option (shown in red box below) that filters the results by location.
Screenshot of Location Facet in Etsy Search. @FanningSparks

More Info

The Stranger in the Woods book has evolved into an award-winning series of children’s books and movies called “In the Woods”.  You can learn more and view their amazing wildlife photography on the Stranger in the Woods website.

Several years ago, Singapore artist Kim Angelico sold her greeting cards under the label Paw Marx Cards but I was unable to find any current contact information.  Nor could I find anything further about Arlette Furler who created the painting on the Kölner Dom card.

Man vs. George Design has lots of unique and fun cards in their Etsy shop.

Here is the link to Sally Storey Jones’ website which showcases her lovely work.

Here is the link to the beautiful Cherry Laurel Studio website.

Today’s Takeaways

1. Consider sending holiday greeting cards via traditional mail.
2. Explore the opportunity to share a part of your personal story via your holiday greeting cards.
3. There are many worthy causes that you can support through the purchase of your holiday greeting cards.  Consider purchasing from local artists to support their work.

Peg - FanningSparks Author

One of the many things I love about the Lake Oconee area of Georgia USA where we now live is the rural countryside.  There are farms and ranches, fields and crops, animals and livestock.  We hear a rooster crowing every morning.  Back in June when we moved here (see A Before Tour of our new Casual Lake House), I noticed several fields had recently been seeded.  Young green plants were starting to surface in neatly planted rows.  It was a picturesque rural sight.  But I did not recognize this crop.  What was it?
Recently Seeded Cotton Fields in Lake Oconee, Georgia. @FanningSparks

 Recently Seeded Cotton Fields in Lake Oconee, Georgia. @FanningSparks

I watched with interest as the plants grew.  At some point, the buds started to form, flowers started to bloom and the mystery was solved.  It was cotton!  When I went for a closer look, the flowers reminded me of the Rose of Sharon flowers I’ve grown in my own flower gardens.  Sure enough, it turns out cotton is in the mallow (Malvaceae) family along with other well-known plants like hibiscus, hollyhock and okra.  I’ve learned it takes about 3 months for the flower buds to form and the blossoms to open.  The petals change colors from creamy white to yellow to pink to red.
Cotton Bloom is White When it First Forms. @FanningSparks

Cotton Bloom Changes to Pink as it Matures. @FanningSparks

The flower petals wither and fall, after about 3 days, revealing greed pods called “cotton bolls”.
Cotton Bloom Withers and Pod Appears. @FanningSparks

Moist fibers grow inside the boll which ripens and turns brown.
Cotton Bolls Begin to Form. @FanningSparks

The heat of the sun causes the fibers to expand and the bolls open to reveal the cotton.
Moist Fibers Grow Inside the Cotton Boll. @FanningSparks

Cotton Boll Opens and Expands. @FanningSparks

The bolls burst wide open as the fibers continue to expand.
Cotton Plants with Bolls Opening. @FanningSparks

Open Cotton Boll Reveals Cotton. @FanningSparks

The foliage turns brown and the cotton bolls become more prominent.  The scene changes to a field of white.
Fields of White Cotton in Lake Oconee Georgia. @FanningSparks

Fields of Ripe Cotton in Lake Oconee Georgia. @FanningSparks

Just recently, the cotton I’ve been observing was harvested and packed into huge bales or “modules” as they’re called.  Large specialized equipment, including a cotton stripping harvester which looks a grain combine, was used.
Machinery Used to Harvest Cotton. @FanningSparks

Modules of Cotton During Harvest. @FanningSparks

Closeup of Recently Harvested Cotton in a Module. @FanningSparks

A little online research shows that the next step is for the modules to be transported to a gin.  The cotton gin will produce ginned fiber, called “lint”, into 500-lb bales.  These bales will be sold and shipped to spinning and textile mills where the lint is cleaned, carded and spun.  Depending on the final use, it may be woven or knit into fabric.  At this stage, the fabric is unfinished and called “gray goods”.  It is sent to a dyeing/finishing plant to be bleached, pre-shrunk, dyed and printed.  Then it’s sent to the manufacturer to produce the final consumer goods.

Back in the spring when I visited Alabama Chanin (see A School for Makers), I learned about Natalie Chanin’s endeavors to grow organic cotton locally (see More Info below).  Alabama Chanin is located in Florence Alabama, an area that has a long history of producing cotton.  In keeping with her focus on natural fabrics, Natalie’s objective was to grow cotton organically without all the chemicals that are typically used in commercial cotton growing.  How intriguing!

It’s not clear to me how the experiment to grow organic cotton locally turned out in the long run but earlier this year Alabama Chanin’s website reported that all their medium-weight organic cotton jersey comes from cotton grown in Lubbock, Texas, USA and all their lightweight organic cotton jersey or rib-knit is organically grown and spun overseas.  Here’s how they put it in a February 13, 2018 Journal blog post “Organic cotton is the foundation of our business. We carefully choose our materials and look for the highest quality. It’s not the easiest, fastest, or cheapest way—but it’s the right way. We have a commitment to quality and a commitment to organic to enrich others’ lives and leave this planet better than before us.”  Hats off to Natalie Chanin and her team for their remarkable commitment!

The below basket of cotton bolls, which was prominently displayed at the School of Making, is an effective reminder of the important role cotton plays in Alabama Chanin’s products.
Bowl of Cotton Bolls at Alabama Chanin School of Making @FanningSparks

I’ve noticed several examples of cotton bolls incorporated into home decor locally.  Wreaths and floral arrangements are a popular application.  I love the texture, form and interest that natural elements can bring into my home and surroundings.  Cotton fields, plants and bolls are also popular subjects for paintings and photos.

More Info

The National Cotton Council of America has some great reference material available here.

You can learn more about Alabama Chanin on their website.  Here is the February 2018 Journal post with the 2018 Organic Cotton Supply Chain Update.  Here is a link to the 2016 Selvedge Article titled “Cotton On”. 

Today’s Takeaways

1. Consider planting something from seed.  Watching the full natural growth cycle can be very gratifying.
2. Explore opportunities to support more natural, sustainable sources for the finished products you purchase.
3. Consider incorporating natural elements into your home and surroundings.

Peg - FanningSparks Author

I’ve had the incredible good fortune to have visited some of the world’s most beautiful gardens in my travels.  I’ve marveled at the iconic English gardens at Sissinghurst, Hidcote and Kew in Great Britain, the springtime glory of the Keukenhof in The Netherlands; the serenity of traditional Japanese gardens in Kyoto and Tokyo, Japan; the richness of tropical wonderlands in Singapore, Thailand and the Canary Islands, and the beauty of many more botanical and display gardens across North America, Europe and Asia.  The style and size of the gardens has varied from grandiose and painstakingly formal like the Gardens of Versailles to casual, abundant and intimate like Monet’s Garden.

Claude Monet’s Garden, located in the quaint village of Giverny, France, is about 70 kilometers west of Paris. These photos were taken on a long weekend trip to Giverny, back in 2010, when we lived and worked in Germany.

Road sign outside the town of Giverny France. @FanningSparks

Street sign shows Rue Claude Monet in Giverny France. @FanningSparks

Typical small stone house in Giverny France. @FanningSparks

Small Cafe in Giverny France. @FanningSparks

Roses Beside Embedded Horse Shoe in Giverny France. @FanningSparks

Monet’s garden is famous, of course, for having inspired some of his greatest masterpieces like this one called “Nympheas”. The theme of water and gardens feature heavily in his works for 40 years.

Nympheas by Claude Monet, France, circa 1897-1898. @FanningSparks
Nympheas by Claude Monet, France, circa 1897-1898 Photo via www.LACMA.org

Here are a few photos from Monet’s famous house and gardens in Giverny.

Claude Monet's House in Giverny France. @FanningSparks

Claude Monet's Garden in Giverny France. @FanningSparks

Waterlily Ponds in Claude Monet's Garden in Giverny France. @FanningSparks

Famous Bridge in Claude Monet's Garden in Giverny France. @FanningSparks

I was reminded of the extraordinary experience of visiting Monet’s Garden when I recently visited Gibbs Gardens for the annual Waterlily Festival.  Gibbs Gardens, located in Ballground, Georgia, USA, and Monet’s Garden in Giverny, France are worlds apart but the waterlily ponds at Gibbs Gardens were inspired by and pay homage to Monet’s gardens.

I arrived at Gibbs Gardens early to catch the morning light and to avoid the crowds.  Ironically, the waterlily ponds were already surrounded by a dozen or so people… all with cameras mounted on tripods!  Obviously I’m not the only person who likes to take photos early in the day.  Here are a few of my favorite shots.

Red Waterlilies on Turquoise Water at Gibbs Gardens in Georgia. @FanningSparks

Group of Purple Waterlilies at Gibbs Gardens in Georgia. @FanningSparks

Yellow Waterlily Catches Sunlight at Gibbs Gardens in Georgia. @FanningSparks

Frog on Lily Pad at Gibbs Gardens in Georgia. @FanningSparks

It’s little wonder waterlilies have such an allure.  The blooms are lovely and provide an unexpected shot of color.  But it’s the interplay of light and water that creates the magic.  This is, of course, something Monet discovered over 100 years ago when he devoted the last 25 years of his life to a series of tranquil and contemplative waterscapes.  He’s said to have attempted to capture every observation, impression, and reflection of the flowers and water.

More Info

Check out this Giverny website to learn more about visiting the French village and Claude Monet’s house and gardens.

You can learn more about Gibbs Gardens, which are located in Ballground Georgia USA, on their beautiful website.

To find gardens to visit anywhere in the world, check out the Garden Finder feature on www.gardenvisit.com.  It’s a great resource.  I especially like how the Garden Finder helps you find additional gardens nearby the one you’ve selected.

If you’re not already familiar with the Google Arts and Culture website, give yourself some time to explore it.  This link will take you directly to the Claude Monet section.  You can click one of his paintings and then select the little person icon to get a “streetview” (just like you do in Google Maps).  Next thing you know, you’ll be walking around a world famous museum admiring Claude Monet’s masterpiece.  You can view from multiple angles and zoom in or out.  It really is amazing!

Today’s Takeaways

1. Consider visiting botanical and display gardens locally or when travelling away from home.
2. Consider viewing garden-inspired artwork in museums and galleries. If you can’t visit in person, try Google Arts and Culture for the next best thing.
3. Look for opportunities to capture the interplay of light and water in your photos.

 Peg - FanningSparks Author