Decorative pillows, dressed in the cheerful colors and patterns of the season, are an easy way to add a holiday touch.  I like to sprinkle them throughout the house.  But buying an extra set of pillows and storing them for 11 months of the year seems incredibly wasteful.  So I devised a way to make a temporary pillow cover-up.  I made a set of these in cheerful red and green plaid years ago and we’ve enjoyed them every December since.  It takes only a moment to dress up my regular decorative pillows for the holidays.  Then after the holidays, the pillow cover-ups are stored in a fraction of the space needed for actual pillows.
Plaid and Striped Festive Pillow Cover-ups on Sofa   @FanningSparks
Making a Festive Pillow Cover-up isn’t difficult.  It requires basic sewing skills and few hours of time.  A popular-sized 18” square pillow requires about 1 yard of fabric— ½ yard of base fabric and ½ yard of accent fabric.  Online sources, such as Spoonflower, have an endless variety of fabric designs.  The base fabric is cut into a long rectangle which is sewn into an envelope—wrapping around the pillow and overlapping to form a pocket.  The accent fabric is cut into 2 isosceles triangles which are sewn into the side seams.  When it’s time to decorate, simply slip a decorative pillow into the cover-up and tie the triangles into a pretty knot.
Of course, pillow cover-ups aren’t limited to only Christmas—they could just as easily be made in fabric for other special occasions such as Valentine’s Day, Halloween or birthdays.  They could also be used to refresh decorative pillows and left in place.
Why not give it a try?  Here’s how it’s done.
Supplies Needed
NOTES: Be sure to consider the direction of the fabric’s design—see TIP below for explanation.  The required yardage amount is based on an 18” square pillow—see Step 1 below to calculate fabric requirements for different pillow sizes.
. Base Fabric: ½ yard of 42” (or wider) cotton or other home decorating fabric.  I chose a non-directional green print with pine cones and leaves.
. Accent Fabric: ½ yard of 42” (or wider) fabric.  I chose a crisp red and white striped print.
. Thread
. Bias Tape (Optional): About 3 yards for an 18” square pillow.  I chose single fold bias tape in red.
Supplies Needed for Festive Pillow Cover-up   @FanningSparks
TIP:  Consider the Direction of the Fabric’s Design   The orientation of the fabric’s print or pattern comes into play in this project.  It’s easiest to choose a non-directional design, such as the pine and evergreen print shown, because the fabric, and thus the resulting covered pillow, can be viewed from any direction.
Alternatively, to create a pillow cover-up with ties at the sides (as shown in this tutorial), choose the fabric designs carefully.  The base fabric will be cut into a tall, thin rectangle giving it a portrait orientation.  A regular design, which looks good with the fabric selvages positioned at the top and the bottom, will work best for the base fabric.
On the other hand, the accent fabric will be cut into a short, wide rectangle giving it a landscape orientation.  A “railroaded” design, which looks good with the fabric selvages positioned at the right and left sides, will work best for the accent fabric.
By the way, the term “railroaded” is used to describe fabrics with a directional design running from selvage to selvage.  Designs with letters, text, stripes, village scenes or landscapes are often railroaded.  Shown below are a few examples of railroaded designs from my fabric stash.  The elements in these designs (eg giraffes, palm trees, boats, houses and cyclists) have an obvious direction.
Examples of Railroaded Fabric Designs   @FanningSparks
Tools and Equipment Needed
. Tape Measure
. Scissors or Rotary Cutter with Mat and Cutting Edge
. Sewing Machine
. Iron
. Standard Sewing Notions such as Pins
Step-by-Step Instructions
Step 1. Calculate Fabric Yardage   If your pillow does not measure 18” square, start by determining the amount of fabric needed.
Measure your pillow to determine the height (h) and width (w).  Multiply the height of your pillow by 2.5 to determine the height of the base fabric rectangle.  The width of the base fabric rectangle will be the width of your pillow plus ½” for seam allowances.
The rectangle for the accent fabric has the opposite orientation.  The height will be equal to the height of your pillow.  Multiply the width of your pillow by 2.5 to determine the width of the accent fabric rectangle.
Please note the factor of 2.5 isn’t an exact science—the factor could vary from 2.3 to 2.6 —and a few inches more or less in the overlap will work fine.
Convert the size of the rectangles into yardage based on the width of your selected fabric.  Fabric for home decorating is typically 42”, 45” or 54” wide.
Step 2.  Prepare Ties   Cut an 18” (h) x 42” (w) rectangle from the accent fabric.  The ties are made from two isosceles triangles (ie a triangle with two equal sides and two equal angles).  Cut the accent fabric in half horizontally resulting in 2 – 18” x 21” rectangles.  Find the vertical center of the resulting rectangle and mark (ie at 9”). Cut from this midpoint to the top edge and the bottom edge of the opposite side (as shown below).  Repeat for the second triangle.
Cut Ties from Accent Fabric for Festive Pillow Cover-up   @FanningSparks
Finish the long angled edges of the triangles with bias tape.  I used single fold bias tape, in red, for added contrast.  Alternatively, you could finish these edges with an overcast or zigzag stitch.  Unfold the bias tape.  Align the edge of the tape with one of the long angled sides of the triangle.  Pin and stitch.
Finish Edge of Tie with Bias Tape for Festive Pillow Cover-up   @FanningSparks
Wrap the bias tape to the back tucking all raw edges inside the fold.  Pin and stitch.  I find it easiest to stitch this second pass on the front while occasionally checking the back to ensure all layers are being caught in the seam.  Repeat this process on the second long angled side of the triangle but leave the last 2-3”, at the tip of the triangle, unstitched.  Trim and fold under the end of the bias tape as neatly as possible.  Stitch the tip.  The ends should be hidden inside the seam resulting in a clean finish.  Repeat this process on the second tie.
Finished Tips on Ties for Festive Pillow Cover-up   @FanningSparks
Step 3. Prepare Base Fabric Rectangle   Cut a 42”(h) x 18½”(w) rectangle from the base fabric.  Overcast or zigzag one short edge of the base fabric rectangle.  Fold under a ¼“ seam and stitch the other short edge.  The long edges will be finished later.
Step 4. Assemble   The trick to assembling the cover-up is to layer the pieces in a specific sequence.  Start by laying the base fabric rectangle, with the right side facing up, on your working surface.  The short end with the finished seam should be at the bottom of the working surface.  Measure down 12“ from the top edge.  Mark with pins at the right and left edges.  Note if your pillow is not 18” square, determine this placement by centering the ties on the long edge of the base fabric rectangle.
Position a tie, right side facing down, over the base fabric rectangle.  Align the short, straight side edge of the tie with the left side of the base fabric rectangle at the 12“ mark as shown.  Pin in place.
Position Tie on Base Fabric Rectangle for Festive Pillow Cover-up   @FanningSparks
Repeat with the second tie along the right side of the base fabric rectangle.  Pin in place.
Position Both Ties on Base Fabric Rectangle for Festive Pillow Cover-up   @FanningSparks
Flip up the bottom edge of the base fabric rectangle folding up at the bottom edge of the ties.  Pin in place.  Flip down the top edge of the base fabric rectangle folding down at the top edge of the ties.  Pin all layers in place removing extra pins from previous layers.  Stitch the side edges with a ¼“ seam allowance.  Finish the side seams with an overcast or zigzag stitch.
Cover and Ties Sewn Together for Festive Pillow Cover-up   @FanningSparks
Step 5. Finish   Turn the cover-up right side out, pull ties free and push out corners.  The opening, which is on the front of the pillow cover-up, will be hidden by the ties.  Press.
Sewn Festive Pillow Cover-up   @FanningSparks

Insert the pillow into the cover-up smoothing out the layers of fabric.  Secure the ties in an attractive knot.  Presto!  Your Festive Pillow Cover-up is ready!
Tied Festive Pillow Cover-up   @FanningSparks

More Info

Please share this image or pin for later reference.
Festive Pillow Cover-up DIY Tutorial pin   @FanningSparks
The decorative pillow, shown above in its Festive Pillow Cover-up, is one of the fern photo pillows from the FanningSparks “Bring In the Outdoors – Fern Collection”.   Get the scoop on this collection in the post Bring in the Outdoors – Fern Collection.  This is the link to the FanningSparks shop on Spoonflower where you can order the cut-and-sew fern photo pillow covers.  The post Basic Pillow DIY Tutorial provides step-by-step instructions to make these amazingly simple cut-and-sew pillows.
The stitched wooden bowl and sphere, shown above, are projects I shared recently.  Full step-by-step instructions can be found in the posts Starry Stitched Sphere – DIY Tutorial and Stitched Wooden Bowl – DIY Tutorial.

Today’s Takeaways

1. Decorative pillows in holiday fabrics can add a festive touch to your home.
2. Dress up everyday pillows with a temporary cover-up for the holidays.
3. Festive pillow cover-ups are easy to make.
Peg - FanningSparks Author

Last year (when we could still travel without concern), my husband and I took a road trip to Savannah, Georgia.  We visited in December to catch the city in her holiday finery.  With her charming public squares, moody oak trees and beautiful historic district, Savannah is a delight to visit any time of the year.  But add in special holiday events and cheerful decorations, and the city is captivating!
Take her iconic fountain in Forsyth Park for instance.  In August 1858, The Daily Morning News reported “The fountain in the park was in operation on Saturday to the delight of large crowds.”  Here’s a photo taken around that time by photographer J.N. Wilson.
Historic Photo of Forsyth Park Fountain by J.N. Wilson   @FanningSparks
Over 150 years later, the fountain still operates to the delight of residents and visitors.  Here’s the elaborate Victorian fountain dressed up for the holidays…
Forsyth Park Fountain in Savannah Georgia   @FanningSparks
… captured in glorious sunshine.
Fountain Caught in the Early Morning Sunshine in Forsyth Park in Savannah Georgia. @FanningSparks
Strolling around Savannah’s Historic District is a great way to spend a day.  The district is arranged in a grid pattern making it easy to navigate.  There are 22 park-like squares waiting to be discovered.  Here’s another delightful fountain.  This one, in LaFayette Square, is more recent having been placed to commemorate the 250th anniversary of the founding of the colony of Georgia.
Fountain in LaFayette Square, Savannah   @FanningSparks
Stately live oaks (Quercus virginiana) picturesquely draped with Spanish moss are quintessentially Savannah.
Lamp Post Amongst Live Oak and Spanish Moss   @FanningSparks

Sunlit Spanish Moss on Live Oaks   @FanningSparks
Beautiful cast iron fences, lamp posts and benches are found throughout the district.  Ironwork was introduced in Savannah after a devastating city-wide fire in 1796 and gained popularity during the mid-nineteenth century.
Garland and Bows on Cast Iron Fence   @FanningSparks
Many of the cast iron grilles and railings on the historic homes are adorned for the holidays.  Here a trio of simple evergreen wreathes decorate a balcony railing.
Trio of Wreaths on Railing   @FanningSparks
A lush garland of magnolia leaves, accented with a cluster of brass bells, makes a more elaborate display.
Magnolia Garland with Brass Bells   @FanningSparks
Vibrant red poinsettia plants flank the front steps of historic homes.
Poinsettias Flank Front Steps   @FanningSparks
Nutcracker Soldiers and Poinsettia on Front Steps  @FanningSparks
Intriguing art galleries, boutiques and cafes are sprinkled throughout the district.
Red Chairs at Café in Savannah   @FanningSparks
Unexpected little details, such as the below carved angel, greet the sharp-eyed visitor.
Carved Angel in Window Frame   @FanningSparks
One might even come across a pair of penguins enjoying a sip of bourbon!
Penguins Sipping Bourbon   @FanningSparks
Museums and historic sites, such as the Massie Heritage Center, also get in the holiday spirit.  The Center is an excellent place to learn about the history of Savannah, its beautiful city plan and architecture, and its past citizens.  One of the Center’s exhibits is a Heritage Classroom—an authentic 1900s classroom complete with slate boards, reading charts, …
Teachers Desk at Massie Heritage Center Classroom   @FanningSparks
… a globe, a giant abacus, …
Globe and Abacus at Massie Heritage Center Classroom   @FanningSparks
… a Dunce cap, …
Dunce Cap at Massie Heritage Center Classroom   @FanningSparks
… and carefully-written lists of the Naughty and Nice!
Naughty and Nice Lists at Massie Heritage Center Classroom   @FanningSparks

More Info

You may also like the post, Charleston’s Glorious Window Boxes, which explores the charming southern city of Charleston, South Carolina.
You can learn more on the Visit Savannah and Massie Heritage Center websites.
The historic photo of Forsyth Park Fountain (shown above) is from the Miriam and Ira D. Wallach Division of Art, Prints and Photographs: Photography Collection, The New York Public Library. (1850 – 1930).  Park Fountain by photographer: Wilson, J. N. (Jerome Nelson) (1827-1897).  Retrieved from here in the Digital Collections of the New York Public Library.

Today’s Takeaways

1. Savannah, Georgia is a great place to visit during the holidays.
2. Get to know a destination by exploring on foot.
3. Take time to appreciate the details.
Peg - FanningSparks Author

A pretty bowl filled with beautiful ornaments can add a nice decorative touch for the holidays.  It’s a simple way to showcase favorite glass balls on a side table or as a centerpiece.  Any pleasing bowl can be used but a stitched wooden bowl makes the display even more special.  I’d like to share how I put together my ornament bowl in today’s post.
You may recognize this technique from the Starry Stitched Sphere I shared in my last post.  The new stitched bowl is different enough that I’ve included step-by-step instructions.  The finished bowl is 10½” in diameter and 5¼“ high.  It is designed to be made from ¼” x 5½” wood.  Basic woodworking and hand stitching is involved.
Supplies Needed
The following supplies are needed to make the Stitched Wooden Bowl.
Supplies Needed for Stitched Wooden Bowl   @FanningSparks
Template and Guides:  Download Stitched Wooden Bowl – Complimentary Download  to print the pentagon template and stitching guides.
. Paper:  A few sheets of white paper for printing patterns and stitching guides.
. Wood Board: ¼“ x 5½” x 3 feet in light wood such as pine or poplar.
. Painter’s Tape
. Spray Adhesive:  I used Aleene’s Tacky Spray.
. Sandpaper:  In fine grit.
. Wood Finish: There are many options for finishing the wooden pentagons for this bowl.  If you plan to use it for food, be sure to use a food-safe finish.  Cutting Board Oil from Walrus Oil is made with coconut oil, beeswax, mineral oil and Vitamin E.  It is FDA Compliant and safe for food-contact surfaces.  If you do not plan to use the bowl for food, you could wax or stain the wood.  Or you could leave the wood unfinished.  I chose to wax the outside of the bowl and leave the inside unfinished.
. Thread: About 42 yards of Size 8 DMC Perle Cotton in your choice of color.
. Clear Glue: To finish thread ends.  I used Aleene’s Tacky Glue.
Tools and Equipment Needed
. Printer: To print template.
. Scissors
. Tape Measure or Ruler
. Jigsaw
. Clamps
. Drill with 3 bits including 7/64”, 5/64” and 3/32”.
. Tapered Round File:  To sand the drilled holes.  I used a diamond- and titanium-coated steel file designed for jewelry-making.
. Needle: A dull-pointed tapestry needle is ideal.
Step-by-Step Instructions
Step 1. Print Patterns
  Download the Stitched Wooden Bowl – Complimentary Download and print the template for the pentagons. Take care to ensure the scale is accurate on your printed version.  See specifics in the download document.  Print 6 copies.  Trim patterns with scissors.
Step 2. Adhere Patterns  Cover wood board with painter’s tape.  The tape makes it easier to remove the patterns from the wood later.
Adhere Pattern to Wood for Stitched Wooden Bowl   @FanningSparks
Spray the back of a paper pattern with adhesive.  Position carefully on board, over the painter’s tape, aligning bottom of pentagon with bottom edge of board.  Smooth and press down.  Repeat for the second pentagon aligning its bottom with the top edge of the board.  Repeat for the remaining 4 pentagons alternating placement to reduce the number of cuts and minimize the amount of scrap.
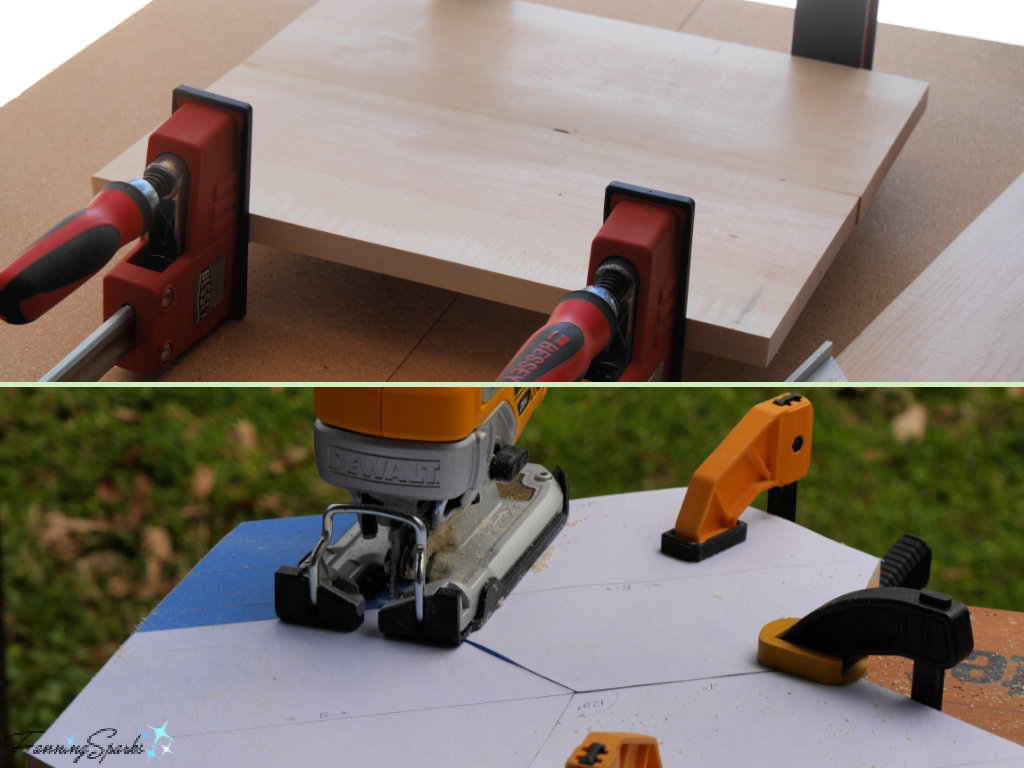
Step 3. Saw Wood Pentagons   Clamp wood to sturdy surface.  Use the jigsaw to cut out the 6 pentagon-shaped pieces.  Cut as precisely as possible.
Cut Wooden Pentagons for Stitched Wooden Bowl   @FanningSparks
Step 4. Drill Wood Pentagons  Clamp a pentagon on top of scrap wood to prevent tear out at the back.  Drill all outer edge holes with a 5/64” drill bit.  Drill center hole and all heavily-marked, large holes with a 7/64” drill bit.  Drill all other holes with a 3/32” drill bit.  Repeat for remaining 5 pentagons.
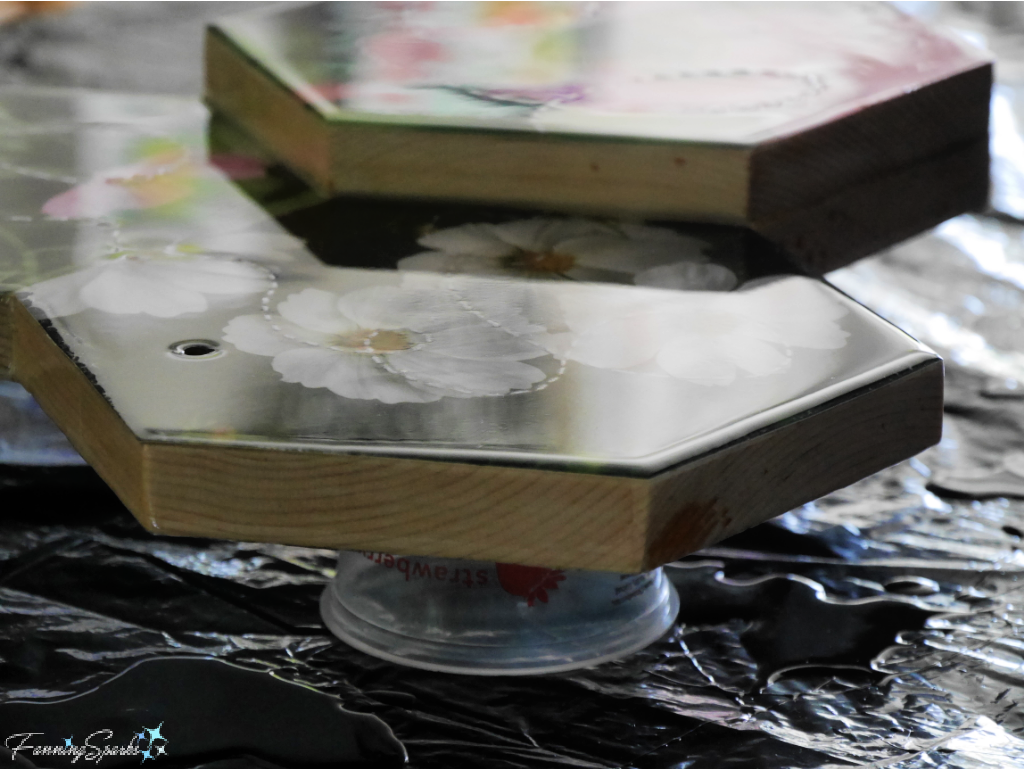
Drill Wooden Pentagons for Stitched Wooden Bowl   @FanningSparks
Step 5. Sand Wood Pentagons  Sand edges and drilled holes. This is an important step because any roughness, especially along the edges of the holes, will snag the thread during stitching.  A round tapered file is critical for this step.
Sand Wooden Pentagons for Stitched Wooden Bowl   @FanningSparks
Step 6. Finish Wood Pentagons  As noted in the Supplies Needed section above, there are many options for finishing the wooden pentagons for this bowl.  If you plan to use the bowl for food, be sure to use a food-safe finish such as Cutting Board Oil from Walrus Oil.  Follow the manufacturer’s instructions for your chosen finish.
Step 7. Stitch Stars   Download the Stitched Wooden Bowl – Complimentary Download and print the Stitching Guides.  Be sure to print in color because it is color-coded.  The stitched stars are designed to look the same on the inside and the outside of the bowl with no missing or double stitches.  Pictured below are two finished pentagons; the pentagon at the top right shows the finished front and the one at the bottom right shows the finished back.
Front and Back of Stitched Stars for Stitched Wooden Bowl   @FanningSparks
The Stitching Guide for Stars illustrates the stitch pattern.  Stitch around the star twice; the first round is stitched clockwise and the second round is stitched counter-clockwise.  The Stitching Guide for Stars is coded to indicate the placement of each stitch.  In Round 1, solid green lines are to be stitched on the front of the star and dotted red lines are to be stitched on the back of the star.  Follow the numbers, from 1 to 32, to stitch in the intended sequence.  Reverse direction at Stitch 33 for Round 2.  Work counter-clockwise from Stitch 34 to 43.  In Round 2, solid purple lines are to be stitched on the front of the star and dotted orange lines are to be stitched on the back of the star.
Each star requires about 9 feet of pearl cotton thread.  The stars are stitched with a double thread so pull thread ends even and knot.  Begin at Stitch Number 1 with a 3-4” tail at the back of the wooden pentagon.  Pull tail up around edge to the front and tack down with painter’s tape.  Pictured below is the star at the end of Round 1.
Star Stitching After Round 1 for Stitched Wooden Bowl   @FanningSparks
Finish at Stitch Number 43 with both thread ends at the back of the wooden pentagon.  Pictured below is the star at the end of Round 2.
Star Stitching After Round 2 for Stitched Wooden Bowl   @FanningSparks
Knot the thread ends as close to a drilled hole as possible.  Use a firm double knot. Trim thread with scissors leaving short ends.  Use a dab of clear glue to hide the ends and prevent them from unravelling.  Small strips of cardboard can be used to keep the glue off the wood but take care to remove them before the glue dries completely.
Glue Thread Ends for Stitched Wooden Bowl   @FanningSparks
Repeat on the remaining 5 pentagons.
Step 8. Assemble Ring of Pentagons   Start by connecting a row of 5 pentagons.  The Stitching Guide for Connections illustrates the stitch pattern.  The Stitching Guide is coded to indicate the placement of each stitch.  Solid green lines are to be stitched on the front of the pentagons and dotted red lines are to be stitched on the back of the pentagons.
Each connection between pentagon sides requires about 5 ½ feet of pearl cotton thread.  Double the thread and tie a knot.  Select 2 pentagons and align 2 sides.  Hold the pentagon sides together at an angle (as shown in the photo below).  If the pentagons are held flat while stitching, the connection will likely be too tight and it won’t be possible to bend the pentagons into a ring.  Begin at Stitch Number 1 with a 3-4” tail at the back of the wooden pentagon.  Pull tail up around edge to the front and tack down with painter’s tape.  Pictured below is the front view of the connection in progress.
Pentagon Connections Started for Stitched Wooden Bowl   @FanningSparks
After working from the bottom up to the top, take the final stitch, Stitch Number 19, at the top and then repeat the entire sequence working back down to the bottom.  This pass is done in the same way as Stitches 1-19.  Make the stitches on the front of the pentagons in the exact same places.  But make the stitches on the back of the pentagons on the opposite sides filling in the gaps.  Pictured below are the front and back views of a connection.
Pentagons Connected from Front and Back for Stitched Wooden Bowl   @FanningSparks
Knot the thread ends as close to a drilled hole as possible.  Use a firm double knot. Trim thread with scissors leaving short ends.
Continue to connect pentagons in this same way until a row of 5 is completed.
Pull the first and last pentagon of the row together to form a ring.  If it’s too difficult to form a ring, one or more of the connections may need to be adjusted.  Align the edges of the first and last pentagon.  Use painter’s tape to hold ring in place.
Tape Ring of Pentagons for Stitched Wooden Bowl   @FanningSparks
Stitch these 2 pentagons together in the same way as the other side connections.
Step 9. Connect Bottom  Place the final pentagon on the bottom of the ring aligning all edges.  Thread the needle with about 14 feet of pearl cotton thread.  Double the thread and tie a knot.  Follow the stitch pattern illustrated in the Stitching Guide for Connections.  Select a hole to the right of a connection as the starting point.  Begin at the back leaving a 4-6” tail.  Pull the thread tail up to the top edge and tack it down with painter’s tape.  Pull out and smooth the full length of the thread as you stitch to prevent knotting.  Stitch around all 5 sides of the bottom pentagon before tying off.   Knot the thread ends as close to a drilled hole as possible.  Use a firm double knot. Trim thread with scissors leaving short ends.  Pictured below is the inside of the bowl showing the side and bottom connections.
Side and Bottom Connections Finished for Stitched Wooden Bowl   @FanningSparks
Step 10. Finish Top Edge  The top edge is finished with a basic blanket stitch.  Thread the needle with about 20 feet of pearl cotton thread.  Double the thread and tie a knot.  Select a hole to the right of a connection as the starting point.  Begin at the back leaving a 3-4” tail.  Pull the thread tail down towards the bottom and tack it down with painter’s tape.  Follow the steps in the photo below.  Push the needle from the front to the back while passing over the thread at the back to form a loop.  Gently pull the loop to the center top of the wooden edge.
Blanket Stitch Edging Steps for Stitched Wooden Bowl   @FanningSparks
Pull out and smooth the full length of the thread as you stitch to prevent knotting.  Take 2 stitches in the hole at the peak of each pentagon.  Stitch around the entire top edge before tying off.  Knot the thread ends as close to a drilled hole as possible.  Use a firm double knot. Tuck ends into previous stitching and trim.  Pictured below is the finished top edge.
Blanket Stitch Edging Steps for Stitched Wooden Bowl   @FanningSparks
Step 11.  Display  Your pretty Stitched Wooden Bowl is ready!
Finished Stitched Wooden Bowl  @FanningSparks
Have fun filling your bowl with pretty glass balls and ornaments.  You may want to hide a small, upside-down dish or container inside the bowl to add height and reduce the number of ornaments needed.  Consider curling a generous stretch of glittering ribbon through and around the bowl.  Place the ornaments in a pleasing arrangement and you’re all set!
Stitched Wooden Bowl with Ornaments @FanningSparks

More Info

You can download the  Stitched Wooden Bowl – Complimentary Download to print the pentagon template and the stitching guides.
Please share this image or pin for future reference.
Stitched Wooden Bowl DIY Tutorial   @FanningSparks
You may also like the Starry Stitched Sphere and the Diamonds and Beads Wooden Wreath shown in the below photo.  Step-by-step instructions are provided for both projects.
Starry Stitched Sphere with Wood Wreath @FanningSparks

Today’s Takeaways

1. A pretty bowl filled with beautiful ornaments can add a nice decorative touch for the holidays.
2. Consider stitching together wooden shapes for an unexpected accent.
3. Mix contrasting textures, from materials such as wood, fiber and glass, to create a striking arrangement.
Peg - FanningSparks Author

Decorating for the holidays gives us a chance to bring cherished treasures out of storage and enjoy them in our homes.  It’s also a great opportunity to get creative and make something new.  Adding one or two new items into the mix keeps things interesting.  This year, I decided to try something a little unexpected—stitching wood!  I love the warm and cozy feeling of natural wood.  Highlighted with the red and green of the season, it’s perfect for the holidays.   I dusted off my geometry skills and designed a decorative dodecahedron.  The 12-sided sphere is made of wooden pentagons stitched together with pearl cotton thread.  Each pentagon shape is embellished with a bright and cheery red star.  Here’s how my Starry Stitched Sphere turned out!
Finished Starry Stitched Sphere   @FanningSparksIn today’s post, I’d like to share step-by-step instructions so you can make your own Starry Stitched Sphere.  This project requires only a few supplies—basically wood and thread.  The sphere is designed to be made from ¼” x 3½” wood and measures just over 6″ in diameter.  Basic woodworking and hand stitching is involved.
Supplies Needed
The pictured supplies, described below, are needed to make this project.
Supplies Needed for Starry Stitched Sphere @FanningSparks
.Template:  Download Starry Stitched Sphere Pentagon Template – Complimentary Download to print the template for the pentagons.
. Paper:  A few sheets of white paper for printing template.
. Wood Board: ¼“ x 3½” x 4 feet in light wood such as pine or poplar.
. Painter’s Tape
. Spray Adhesive:  I used Aleene’s Tacky Spray.
. Sandpaper:  In fine grit.
. Finishing Wax: I used WATCO Satin Wax for Finishing in Natural color.  Alternatively, you could choose to stain the wood or leave it unfinished.
. Thread for Assembly:  About 18 yards of DMC Perle Cotton.  I used red in size 8.
. Thread for Star Embellishments:  About 25 yards of DMC Perle Cotton.  I used the same thread for assembly and embellishment–red in size 8.
There are a number of options for the star embellishments.  They can be stitched in the same thread as that used to connect the pentagons.  Or the stars can be stitched with a decorative thread such as metallic embroidery floss.  The stars can be stitched as 5 straight spokes, fully filled in, or something in between.  Here are some options to consider.
Star Embellishment Options   @FanningSparks. LED Lights (optional): Battery-operated LED lights can easily be inserted into the Starry Stitched Sphere.  If you decide to add lights, you’ll want to maximize the amount of light that can shine through the drilled holes.  You may want to drill bigger holes and/or minimize the amount of stitching on the stars.
Tools and Equipment Needed
. Printer: To print template.
. Scissors
. Tape Measure or Ruler
. Jigsaw
. Clamps
. Drill with 3 bits including 7/64”, 5/64” and 3/32”.
. Tapered Round File:  To sand the drilled holes.  I used a diamond- and titanium-coated steel file designed for jewelry-making.
. Rags: Lint-free rags such as an old t-shirt.
. Gloves
. Needle: A dull-pointed tapestry needle is ideal.
Step-by-Step Instructions
Step 1. Print Patterns   Download the Starry Stitched Sphere Pentagon Template – Complimentary Download and print the template for the pentagons. Take care to ensure the scale is accurate on your printed version.  See specifics in the download document.  Print 11 copies.  Trim patterns with scissors.
Step 2. Adhere Patterns  Cover wood board with painter’s tape.  This tape makes it easier to remove the patterns from the wood.
Apply Painter’s Tape to Wood   @FanningSparks
Spray back of one paper pattern with adhesive.  Position carefully on board (on top of painters tape) aligning bottom of pentagon with bottom edge of board.  Smooth and press down.  Repeat for remaining 10 pentagons.  Arrange as shown to minimize cuts and reduce scrap.
Note: You may notice the pattern shown differs slightly from the version provided in the download.  The download is a more accurate version.
Glue Paper Patterns to Wood   @FanningSparksStep 3. Saw Wood Pentagons   Clamp wood to sturdy surface.  Use the jigsaw to cut out 11 pentagon-shaped pieces.
Cut 11 Pentagons from Wood   @FanningSparksStep 4. Drill Wood Pentagons  Clamp a pentagon on top of scrap wood to prevent tear out at back.  Drill all outer edge holes with a 5/64” drill bit.  Drill center hole and inside ring with 7/64” drill bit.  Drill all other holes with 3/32” drill bit.  Repeat for remaining 10 pentagons.
Drill Holes in Pentagons   @FanningSparksStep 5. Sand Wood Pentagons  Sand edges and drilled holes. This is an important step since any roughness, especially along the edges of the holes, will snag the thread during stitching.  A round tapered file is critical for this step.
Sand Pentagon Edges and Holes   @FanningSparksStep 6. Finish Pentagons  Follow the manufacturer’s instructions for applying the wax.  I used Watco Satin Wax for Finishing in Natural.  Apply a generous coating to the front and edges of the pentagons.  Let it soak in for about 15 minutes and reapply to any areas that dry out.  Then wipe off the excess with lint-free rags.  Buff and let dry.
Please note: this product has a very strong odor so be sure to use it in a well ventilated area and allow plenty of time for the wax to dry and the smell to dissipate.  I waited 4 days.
Finish Wooden Pentagons with Wax   @FanningSparksStep 7. Embroider Stars   As noted in the Supplies Needed section above, there are a number of options for the star embellishments.  You may wish to try stitching a few different configurations after your wooden pentagons are dried.
The design shown requires about 72” of pearl cotton thread for each star.  The stars are stitched with a double thread so pull thread ends even and knot.  Begin at the back of a wooden pentagon leaving a 1 ½ -2 ½ ” tail.  Simply lace needle in and out of holes to stitch around the star.  Knot tails at back to secure.  The back will not show so there’s no need to worry about how it looks.  Repeat on the remaining 10 pentagons.
Stitch Stars on Wooden Pentagons   @FanningSparksStep 8. Assemble Ring of Pentagons   Start by connecting a row of 5 pentagons.
Step 8a. Select 2 pentagons.  Choose 2 sides that are precisely the same width with the holes well aligned.
Align Sides of Two Pentagons   @FanningSparksStep 8b. Thread the needle with a 20” length of pearl cotton thread.  This step is sewn with a single thread.  Hold the 2 pentagons at an angle.  Bring the needle up from the back through the first hole in the first pentagon.  Pull the thread out through to the front leaving about a 1 ½-2 ½“ tail at the back.
Begin First Stitch to Connect Pentagons   @FanningSparksStep 8c. Push the needle down, from the front, through the matching first hole in the second pentagon.  Pull the thread out through to the back.  Pull the needle back through the first hole, from the back to the front, in the first pentagon.  Push the needle down, from the front to the back, in the first hole of the second pentagon.  This will result in 2 visible stitches on the front face (as shown below).  Holding the 2 pentagons at an angle, pull the thread snuggly.
First Stitch to Connect Pentagons   @FanningSparksStep 8d.  Follow the process described in Step 8c in the remaining 4 holes.  The front should look like this.
First Stitch to Connect Pentagons   @FanningSparksStep 8e.  At the end, pull the thread to the back and tie the thread ends in a double knot.  The back should look like this.
Knot Thread Tails to Secure   @FanningSparksStep 8f.  Continue to connect pentagons in this same way until a row of 5 is completed.
Row of 5 Connected Pentagons   @FanningSparksStep 8g. Pull the first and last pentagon of the row together to form a ring.  If it’s too difficult to form a ring, one or more of the connections may be too tight.  Adjust accordingly.  Align the edges of the first and last pentagon.  Connect in the same way as above in Steps 8b-8e.
Connect Ring of Pentagons   @FanningSparksStep 9. Finish Bottom Edge  The bottom edge is finished with a blanket stitch.  Thread the needle with a 60” length of pearl cotton.  This step is sewn with a single thread.  Select a hole to the right of a connection as the starting point.  Begin at back leaving a 3” tail.  Pull tail up to top edge and tack down with painter’s tape.
TIP: Sewing with 60” of thread can be tricky.  Work slowly and smooth out the thread as you go to prevent knotting.
Step 9a. To start the stitching, bring the needle through the hole from the back to the front.  Wrap the thread neatly around the bottom edge.  Bring the needle through the same hole from the back to the front again.  Wrap the second line of thread neatly around the bottom edge beside the first line.  Keeping the needle at the back, pass it under the tacked-down thread tail (stitching from left to right) and into the back of the next hole.
Begin Stitching Bottom Edge   @FanningSparksStep 9b. Continue around the entire bottom edge in the same way.  Bring the needle through the hole from the back to the front.  Wrap the thread neatly around the bottom edge.  Bring the needle through the same hole from the back to the front again.  Wrap the second line of thread neatly around the bottom edge beside the first line.  Keeping the needle at the back, pass it under the previous horizontal stitch (stitching from left to right) and into the back of the next hole.   Do not be concerned if the thread “cuts the corner” at the connections since this will not be visible.
Finished Bottom Edge   @FanningSparksStep 10. Assemble Sphere   Build up the sphere by connecting the remaining pentagons one at a time.  The top will be the most visible so you may want to set aside your best pentagon for this position.  The top will be added last.  Work around the sphere building a second ring.  Use the process described in Steps 8b-8e, to connect the pentagons.  Stitch all connecting sides of a pentagon before attaching another one.
Build Up Sphere One Pentagon at a Time   @FanningSparksStep 11. Connect Top  Place the final pentagon on the top of the sphere aligning all edges.  Thread the needle with an 84” length of pearl cotton thread.  This step is sewn with a single thread.  Select a hole to the right of a connection as the starting point.  Begin at the back leaving a 4-6” tail.  Pull the thread tail down to the bottom edge and tack it down with painter’s tape.  Stitch around all 5 sides of the pentagon before tying off.  Follow a process similar to that described in Steps 8b-8e.  It is a little tricky to sew this last section since you have to insert your hand inside the sphere.  Take your time.  Pull out and smooth the full length of the thread as you stitch to prevent knotting.  Don’t worry about tightening the knotted tails—a loose knot is fine.
Finished Top of Pentagon   @FanningSparksStep 12. Insert Lights (Optional)  If desired, slip a set of battery-operated LED lights inside the sphere.

There you have it—your new Starry Stitched Sphere is ready to display!
Starry Stitched Sphere - DIY Tutorial pin   @FanningSparks
This Starry Stitched Sphere is the perfect companion for the Diamonds and Beads Wooden Wreath I made last year.  See the DIY Tutorial here.  Starry Stitched Sphere with Wood Wreath   @FanningSparks

More Info

You can download the Starry Stitched Sphere Pentagon Template – Complimentary Download to print the template for the pentagons.
You may also like the Diamonds and Beads Wooden Wreath which has a similar style.  Check out the Diamonds and Beads Wooden Wreath – DIY Tutorial for step-by-step instructions.

Today’s Takeaways

1. Holiday decorating provides an opportunity to get creative and make something new.
2. Natural wood can add warmth and coziness.
3. Consider mixing materials and techniques in unexpected ways.
Peg - FanningSparks Author

An interesting exhibition, “Elements: Expressions in Wood, Metal and Stone”, was recently hosted by the Steffen Thomas Museum of Art. The art museum, a small, lesser-known venue in the town of Buckhead Georgia, is dedicated to preserving the works of Steffen Thomas (1906-1990).  The art museum’s website describes the artist this way: “Not happy unless he was making something, his vast output and ceaseless experimentation with every available medium are his work’s most characteristic aspects.”  The Elements exhibition aimed to “honor the legacy of Steffen’s three-dimensional work by displaying selections from our permanent collection alongside contemporary regional sculptors working in wood, metal and stone”.   The below Zodiac Chandelier (ca. 1965), made by Thomas from welded copper, is one of the many works on display.
Zodiac Chandelier by Steffen Thomas   @FanningSparks
The Zodiac Chandelier was originally a focal point in the Thomas family’s living room.   It hung above the huge dining table which can be seen in the Steffen Thomas Family Room Gallery at the museum.
Steffen Thomas Family Room Gallery   @FanningSparks
The table and the matching benches are covered in gorgeous Venetian glass mosaic artworks by Thomas.  Being a big fan of mosaics, I was thrilled to see a number of Thomas’ mosaic pieces at the museum.  Here’s a closer look at the Break Through into Outer Space mosaic artwork on the dining table.
Break Through Into Outer Space Details by Steffen Thomas   @FanningSparks
The variety and originality of Thomas’ work is striking.  It would take several hours to fully appreciate all the pieces on display but the work I’d come to see was part of the Elements exhibition.  Jeffrey Waller’s intarsia art was highlighted in a local newspaper article and I was eager to see it in person.  Shown below is Waller’s artwork called Southern Girl.
Southern Girl Intarsia by Jeffrey Waller   @FanningSparks
At first glance, Southern Girl appears to be a beautiful two-dimensional painting.  But as the charming subject draws in the viewer for a closer look, the surprise is revealed.  This artwork is made of wood!  I was vaguely familiar with intarsia and knew it was made with pieces of wood but I wasn’t expecting this!  Waller’s work takes intarsia to a whole new level.  Waller describes intarsia as “a picture mosaic in wood”.   Dozens of separate wooden pieces fit together perfectly to create the overall picture.  Here’s a closer look at Southern Girl.
Southern Girl Detail Intarsia by Jeffrey Waller   @FanningSparks
Intarsia pieces, I’ve learned, are typically cut from a variety of wood species with a scroll saw.  Variation in wood color and grain are typically used to “paint” the picture.  Sometimes, as appears to be the case in this work, color is added judiciously.  The pieces may be textured by carving and imprinting.  Pieces are typically contoured with careful sanding.  Each piece is finished and prepared for assembly.  Then the finished pieces are reassembled into the final work, like a jigsaw puzzle, and adhered to a backing.  This closeup from Waller’s work Tranquility illustrates the point.
Tranquility Detail Intarsia by Jeffrey Waller   @FanningSparks
It strikes me that this process is quite similar to making glass mosaics with a few notable exceptions.  Grout lines are a strong characteristic of glass mosaics—the lines are a fundamental element of the design with the grout filling the gaps between the tesserae.  There are no grout lines in intarsia—meaning the pieces have to be cut more precisely.  Anyone who has worked with wood can appreciate the challenge of getting those pieces to fit perfectly. This is the full view of Waller’s Tranquility.  Beautiful!
Tranquility Intarsia by Jeffrey Waller   @FanningSparks
Another major difference between glass mosaic and intarsia is dimension.  Glass mosaic is typically 2 dimensional—it’s not unheard of to incorporate a third dimension but it’s difficult to accomplish and rarely seen.  Intarsia, on the other hand, is 3 dimensional.  Wood is easier to layer and contour than glass.  The result is a work of art that comes alive with depth and dimension.  Take Waller’s stunning artwork “Journey Forward” for example.
Journey Forward Intarsia by Jeffrey Waller   @FanningSparks
His masterful use of wood tones and grain lines is more visible closeup.
Journey Forward Detail Intarsia by Jeffrey Waller   @FanningSparks
The magic of the third dimension becomes even more apparent when viewed at an angle.
Journey Forward Detail Intarsia by Jeffrey Waller   @FanningSparks
There is another wood working technique often discussed alongside intarsia.  In “marquetry”, the artist cuts the pieces of the design from differently-colored thin wood (ie veneer) then arranges and glues the pieces into intricate designs.  It is a 2-dimensional form.   Marquetry was popular during the Art Nouveau movement and often used in furniture making.  The below desk, labelled as a “Coffer-Writing Desk” is displayed at the Museum of Modernism in Barcelona. This jaw-dropping masterpiece is the work of Joan Busquets i Jané.
Coffer-Writing Desk by Joan Busquets i Jané   @FanningSparks
Several different woodworking techniques were used to create this astounding piece.  A couple of details are shown below.  The top section shows a beautiful marquetry panel made of several woods.  The clever cat, in the bottom section, appears to be a relief carving.  In relief carving, chisels are used to carve out wood from a flat surface creating depth and giving the carved objects dimension.
Coffer-Writing Desk Details by Joan Busquets i Jané   @FanningSparks
I’ve dabbled in woodworking for some time but I didn’t appreciate the creative possibilities until I tried woodcarving (see my posts Getting Started with Woodcarving and Flat-Plan Carving with Harley).  Intarsia, the art of making mosaics from wood, opens up a whole new creative outlet!

More Info

You can learn more about the Steffen Thomas Museum of Art, in Buckhead Georgia, on their website.  Note the museum is following strict COVID-19 safety measures and guests are asked to schedule an appointment to visit.  I had the pleasure of a private viewing during my recent visit.
Check out Jeffrey Waller’s website or Instagram account for more information about this talented artist.  The Augusta Chronicle article, “Wanting to separate his style, Eatonton artist uses centuries-old woodwork technique”, is an interesting read.
Intarsia has been practiced from before the 7th century CE.  The 1903 book, Handbooks for the Designer and Craftsman – Intarsia and Marquetry, by Jackson F. Hamilton provides a comprehensive history and overview.  The book is available in its entirety on the Internet Archive here.  The Internet Archive is a non-profit library of millions of free books, movies, software, music, websites, and more.
Despite its long history, I wasn’t able to find a great deal of information about intarsia online.  I did learn that Judy Gale Roberts, a Tennessee-based artist, is highly regarded as an intarsia expert.  She has been creating intarsia art for over 45 years, sells patterns for intarsia projects, has authored 14 books and teaches workshops.  Check out her website at Intarsia.com.
I learned about woodcarving at the John C Campbell Folk School.  Check out my posts Carving in BrasstownGetting Started with Woodcarving and Flat-Plan Carving with Harley.
It’s no secret I have a passion for mosaics.  Check out the posts Learning from the Ancient Masters and Gaudi’s Trencadis Mosaics to learn more about mosaics.  I’ve shared my mosaic projects in the posts Pair of Mosaic Mirrors Completed, My Mandala-Inspired Oval Design  and Serving Up My OOAK Mosaic Tray.  Plus I shared full step-by-step instructions for making your own mosaic project in the post DIY Turkish Mosaic Candle Holder Tutorial.

Today’s Takeaways

1. Small, lesser-known, local museums may provide safe and interesting excursions.
2. Intarsia is the art of making mosaics from wood.
3. Consider the creative possibilities of combining techniques and materials in innovative ways.
Peg - FanningSparks Author