Dear Family, Friends and Readers,
May you and your loved ones have a Happy Holiday Season!


Dear Family, Friends and Readers,
May you and your loved ones have a Happy Holiday Season!

“I heard the bells on Christmas Day
Their old, familiar carols play,
And wild and sweet
The words repeat
Of peace on earth, good-will to men!”
These famous words were written in 1863 by Henry Wadsworth Longfellow in his poem Christmas Bells. They became more widely known, nearly a hundred years later, when Bing Crosby recorded them as a Christmas carol.
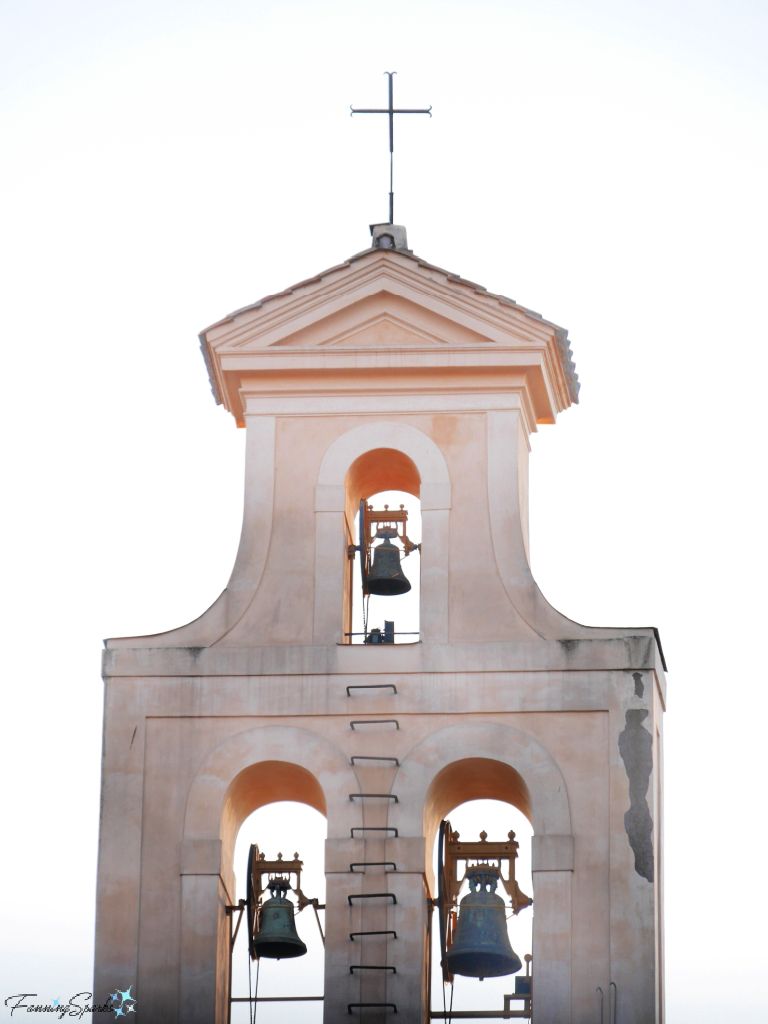
Church bells, such as this trio spotted in Rome Italy, are often associated with the holiday season. But, as I learned while researching today’s blog post, there’s a lot more to this subject than a catchy tune.
Ringing church bells to mark Christmas and New Year is a cherished custom in many parts of the world. Church bells also bring to mind church services and weddings. According to Wikipedia, “In AD 604, Pope Sabinian officially sanctioned the usage of bells to announce services and call worshippers. By the early Middle Ages, church bells became common in Europe.” Here’s another example—this single bell is from the island of Hydra in Greece.

It’s said that in Great Britain nearly everyone lives within hearing range of bells. The bells, according to the Bell Ringing Organization, “call us to wake, to pray, to work, to arms, to feast and, in times of crisis, to come together. Above all, bells are the sound of freedom and peace as in World War II they hung silently until the day they could ring in the peace.”
I discovered this classic church bell tower in Fão Esposende in Portugal.

In her book Bells, Bells, Bells, author Bernadine Bailey tells us “In olden times, people believed that bells had supernatural powers to drive out evil as well as to ward off danger. It was commonly thought that demons and ghosts could be scared away by the sound of metal, such as the beating of gongs or the ringing of bells. On Midsummer Eve, when witches were supposed to gather, church bells were rung all night long to drive them away.”
The moon is just barely visible in this photo of a bell tower in Caminha, Portugal.

Bailey goes on to explain “It was also believed that bells could have a great effect upon the weather, especially on thunder and lightning that were thought to be controlled by demons. The people felt that these spirits would be frightened by any sound connected with Christian worship, so they rang church bells when a storm was approaching to scare them away.”
I searched my archives for photos of bells and found a surprising variety from our travels in Europe. This early morning shot of the bridge in Avignon, France is one of my all-time favorites but I didn’t realize, until just now, that there are bells on the bridge!

Apparently, at one time there was an active chapel, the Saint Nicholas Chapel, on the bridge.

The soft light of early morning adds a magical glow to the bell towers of this twelfth-century church, Santa Maria a Casavecchia, near Spedaletto in Tuscany Italy.

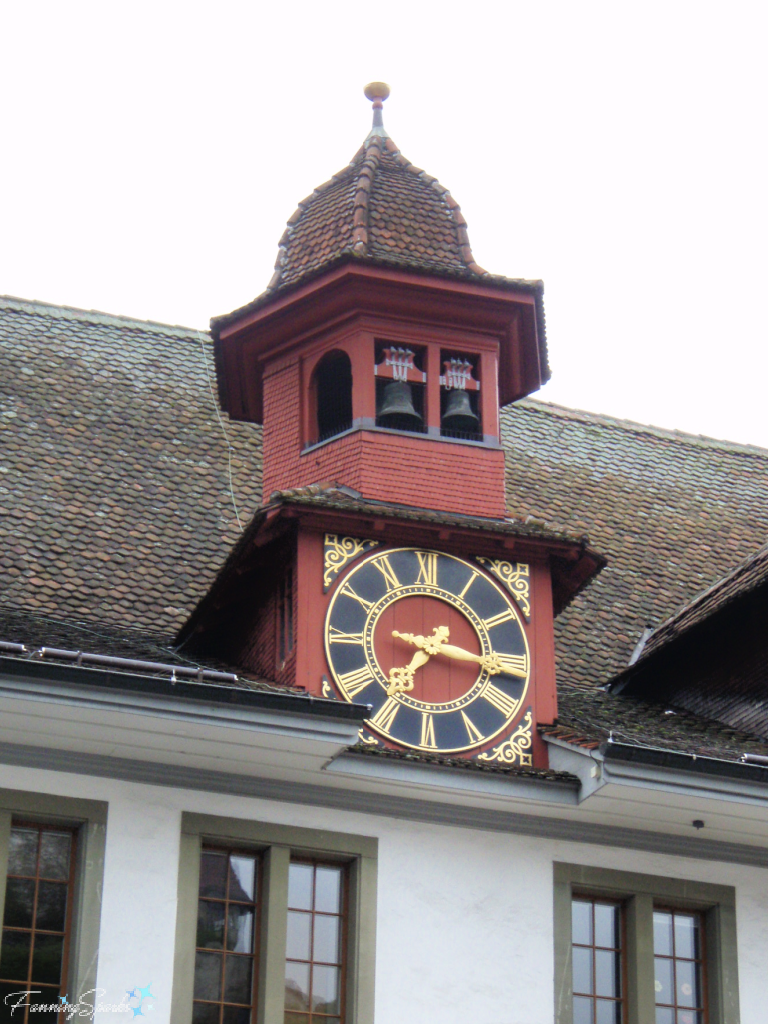
It’s fascinating to examine the various bell towers. Many of them, like this one in Oberhofen, Switzerland, hold clocks as well as bells.
This elaborate bell tower on the Old Castle Tower in Caminha, Portugal also displays a simple clock face.

I learned about the connection between bells and clocks when visiting the Ghent Belfry, a well-known landmark and UNESCO World Heritage Site in Belgium, earlier this year (see the blog post Expected and Unexpected Delights of Ghent for a peek into the many charms of this historic city).
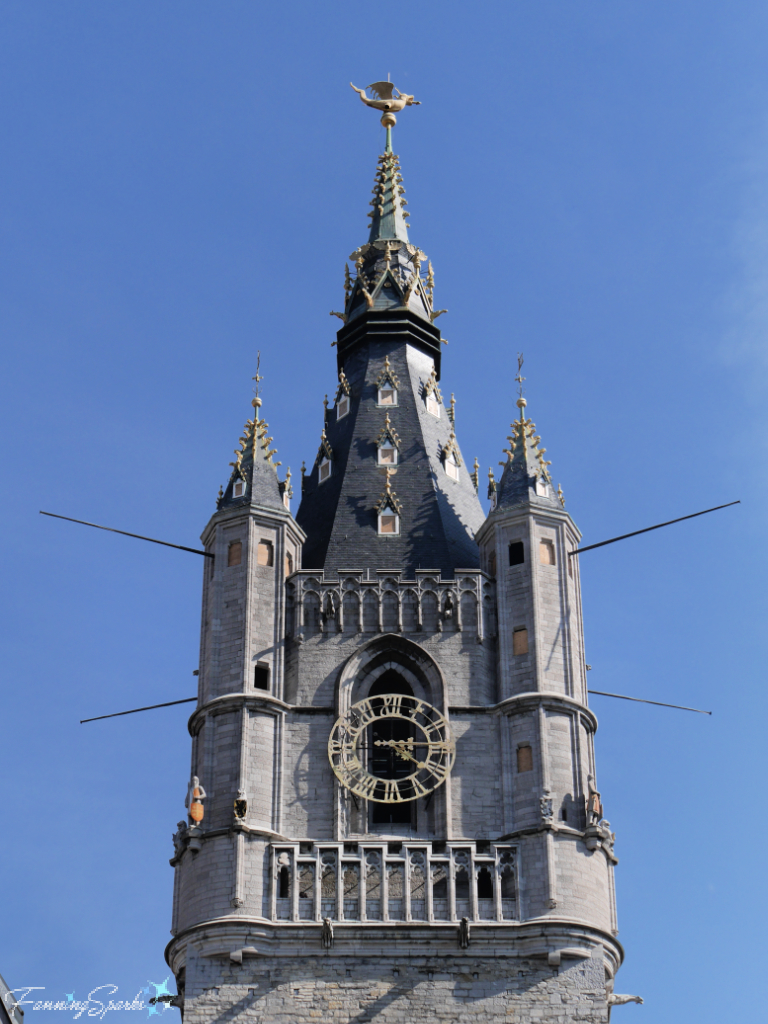
The Ghent Belfry, which dates back to 1313, housed communal bells managed by tower guards. In addition to standing guard to watch for fires, storms, attacks and other danger, the tower guards were bell-ringers. They rang the bells on the hour and for work setting the rhythm of life in the medieval city. Interestingly, because early clocks were wooden and did not track time accurately, the tower guards had to rely on sundials to correct the time several times a day. (For more information about sundials check out the FanningSparks blog post Count Only Sunny Hours.)
“Through the centuries, the belfry served not only as a bell tower to announce the time and various warnings, but also as a fortified watchtower and the place where the documents evidencing the municipal privileges were kept.” says Wikipedia. “The bells in the belfry originally only served a religious purpose. Gradually the bells got a secular role by regulating daily life in the growing medieval city. The hourly chime was preceded by warning signals on three smaller bells with various tones. This was the predecessor of the carillon.”
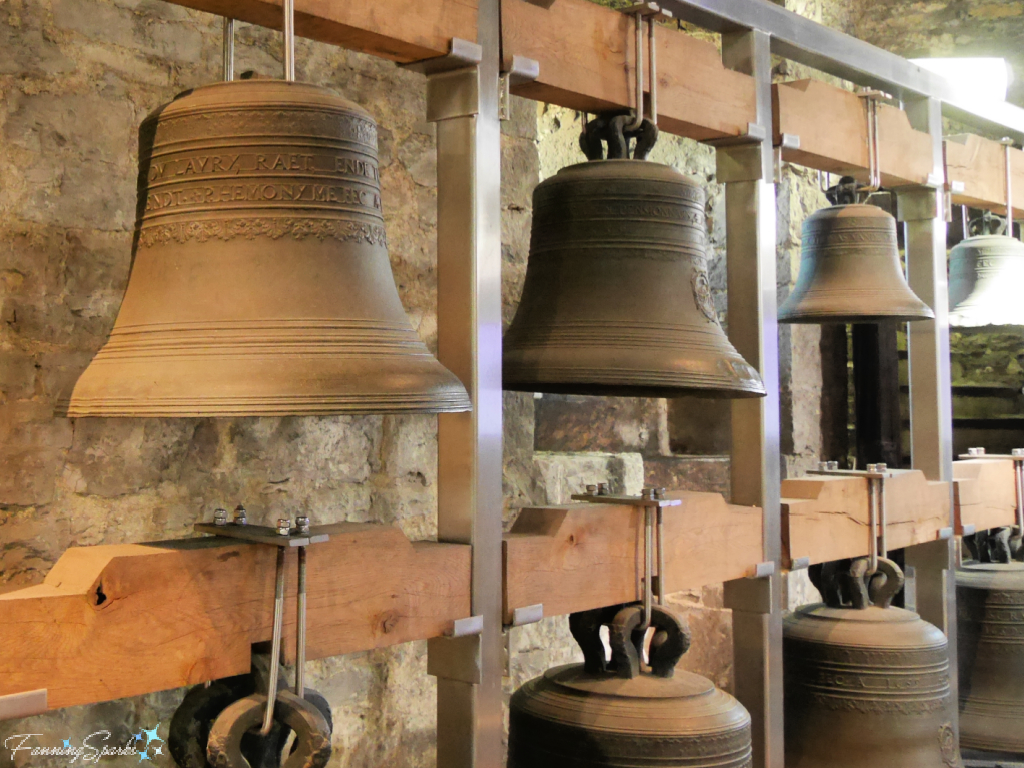
As explained by author Rev. Dan McDowell, “a carillon is a musical instrument that is typically housed in the bell tower (or belfry) of a church. The instrument consists of at least 23 cast bronze, cup-shaped bells, which are serially played to produce a melody, or sounded together to play a chord. A traditional manual carillon is played by striking a keyboard to activate levers and wires that connect to metal clappers that strike the inside of the bells, allowing the performer on the bells to vary the intensity of the note according to the force applied to the key. … Most modern carillons … are operated electronically.”
It’s possible to view the bells at the top of the Ghent Belfry.
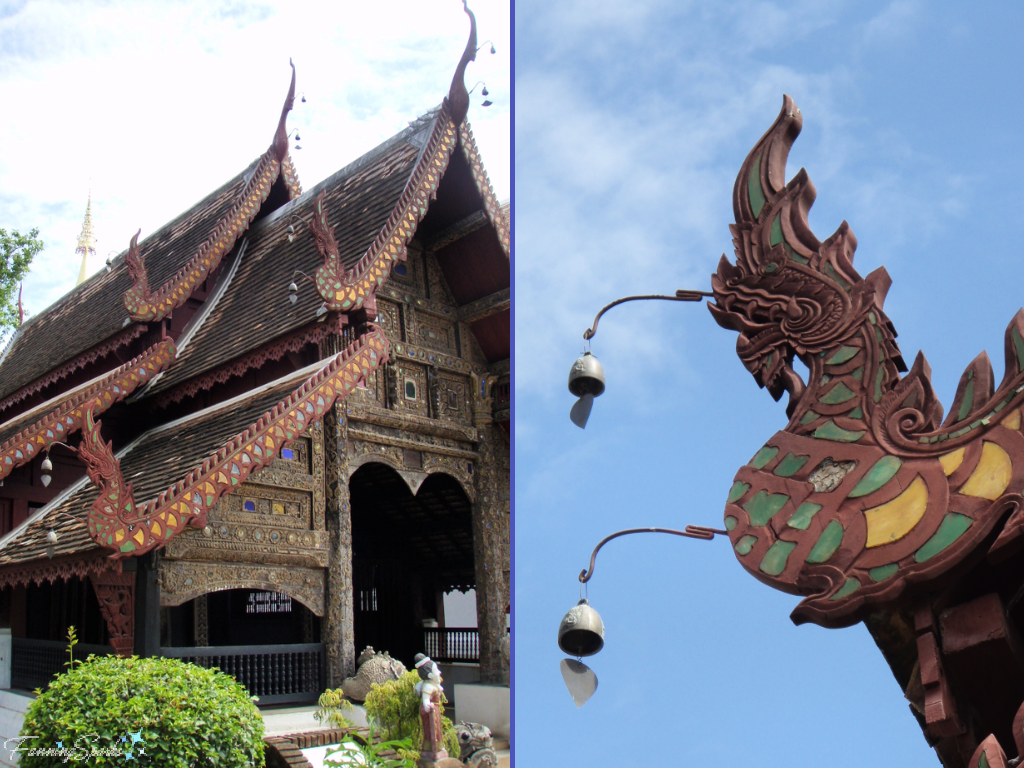
Bells are, of course, not limited to bell towers. In Asia, for instance, it’s common to see wind-bells attached to the eaves of temples and other special structures. “Buddhists especially made use of wind-bells, attaching them profusely by the hundreds or even thousands to the eaves of temples, shrines, and pagodas, causing during breezy moments an almost overwhelming volume of tintinnabulation.” states the Encyclopedia Britannica. “Tintinnabulation”, by the way, means the ringing or sounding of bells or a jingling or tinkling sound as if of bells.
Wind-bells are visible on the eaves of the Five-Storied Pagoda at the Sensoji Temple in Tokyo, Japan.

Interestingly, in 1996, Japan’s Ministry of Environment selected 100 Soundscapes of Japan as part of its efforts to combat noise pollution. The 100 best sounds include 13 different bells (such as temple bells, time bells and tower bells) in addition to waterfalls, streams, vegetation, waves, singing sand and festivals.
I also spotted wind-bells on the Five-Storied Pagoda at the Nikko Toshogu Shrine in Japan.

Here’s another wind-bell sighting. This splendid structure is Wat Lok Moli, a Buddhist temple, in Chiang Mai, Thailand.
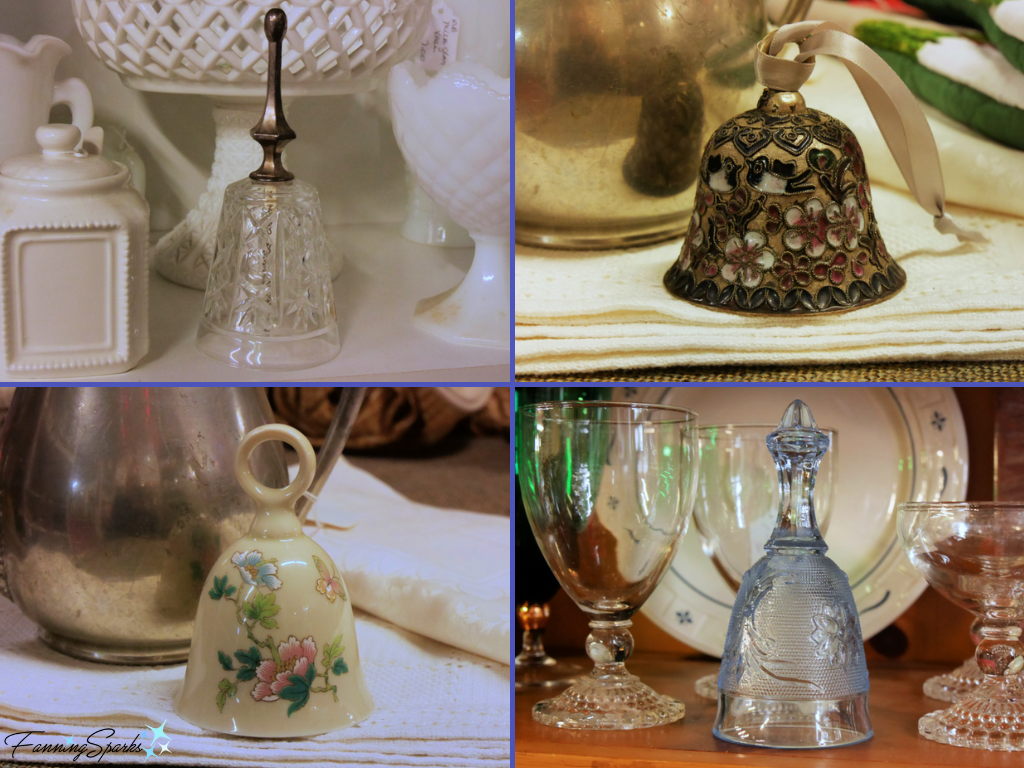
In addition to their roles in churches, watch towers and temples, bells serve a surprising number of functions in everyday life. Their shape and size may vary but their ability to attract attention is consistent. Shopkeeper’s bells, for instance, alert the shop owner of a customer’s entrance or exit.
At one time, hand bells or tea bells were used to summon service—much like the privileged Crawleys did in the Downton Abbey TV series! Handbells are still advertised as a great way to call guests to tea, get the family to the dinner table, or get attention from a sick bed.
Here’s an assortment of hand and tea bells from a local vintage shop.
Traditionally, bells are cast in bronze because, as author Elizabeth Starr Hill explains in her book Bells, “the clearest and sweetest bell voice is produced by bronze”. If I’d known that when I spotted this charming array of bronze hand bells at the El Rastro flea market in Madrid, Spain, I would surely have selected one or two to take home.
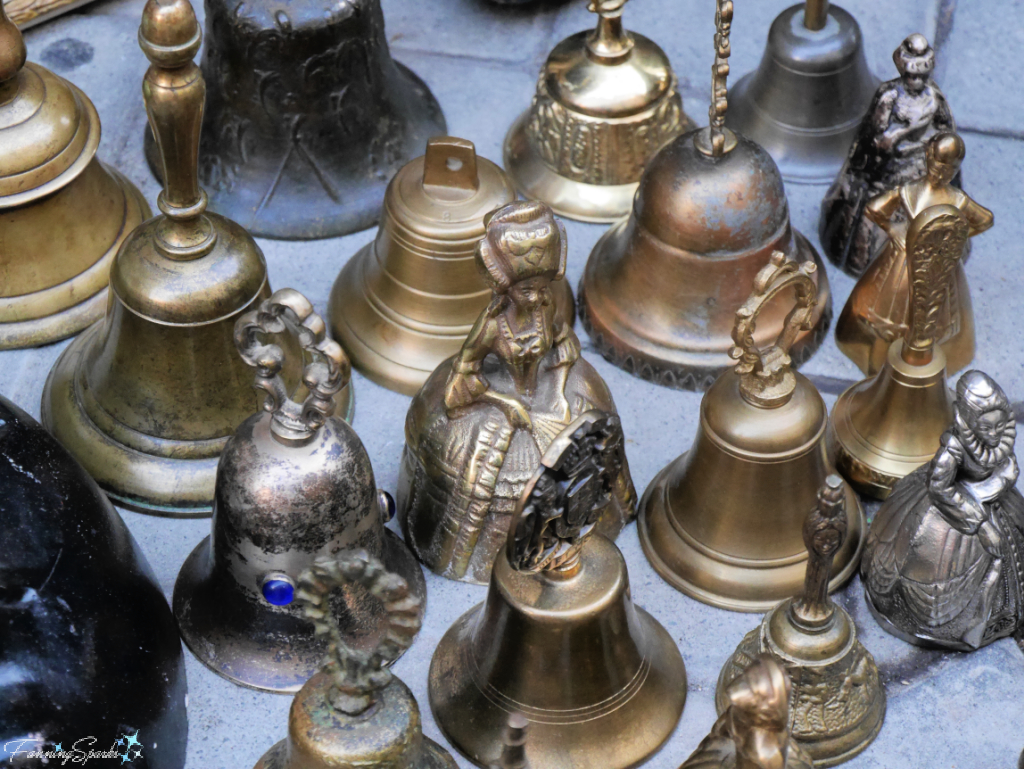
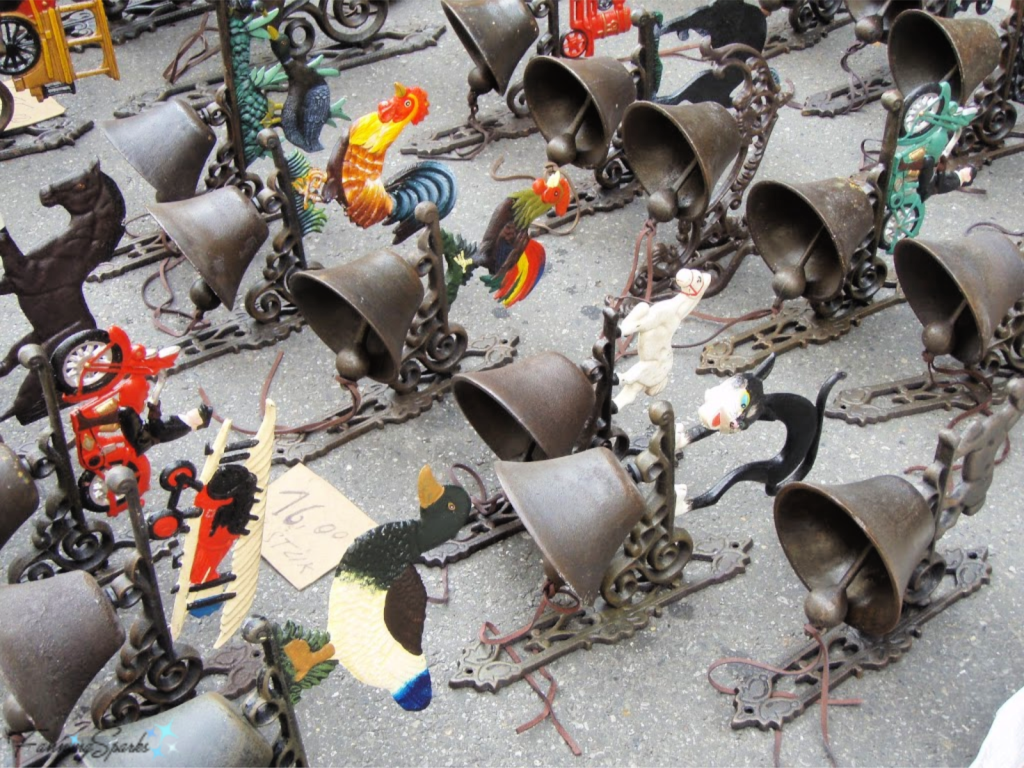
Bells were also on offer at a flea market I visited in Tongeren, Belgium. The variety of decorations on these wall-mounted bells, from roosters to horses to ducks to airplanes to motorcycles to cats, is amazing.
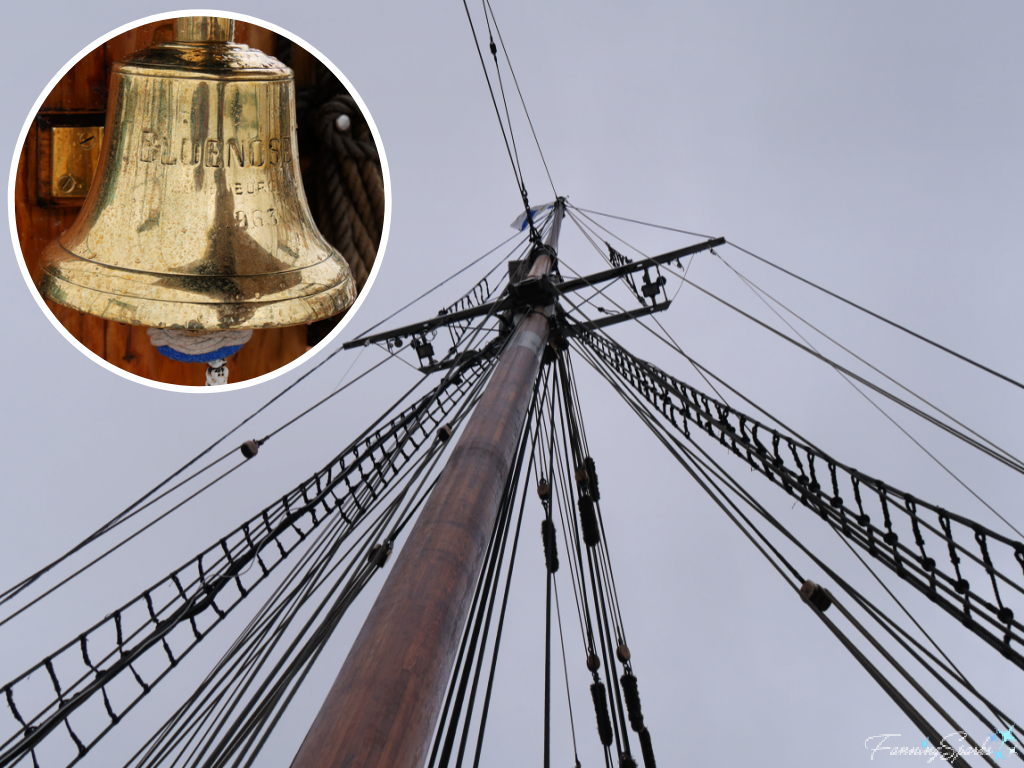
Another type of bell with a long history of important service is the ship’s bell. “Used for signaling, keeping time, and sounding alarms, bells are an important part of a ship’s routine and readiness. Before the advent of the chronometer, time at sea was measured by the trickle of sand through a half-hour glass. One of the ship’s boys had the duty of watching the glass and turning it when the sand had run out. When he turned the glass, he struck the bell as a signal that he had performed this vital function. This age-old practice of sounding the bell on the hour and half hour still holds a place in the modern Navy. The sounding of a ship’s bell can serve as a warning signal to other vessels in poor visibility and fog. In 1858, British naval regulations made this warning function mandatory. Today, maritime law requires all ships to carry an efficient bell.” reports the US Naval History and Heritage Command website.
This is the ship’s bell on the Bluenose II, Nova Scotia’s iconic racing schooner, which I had a chance to tour last fall.
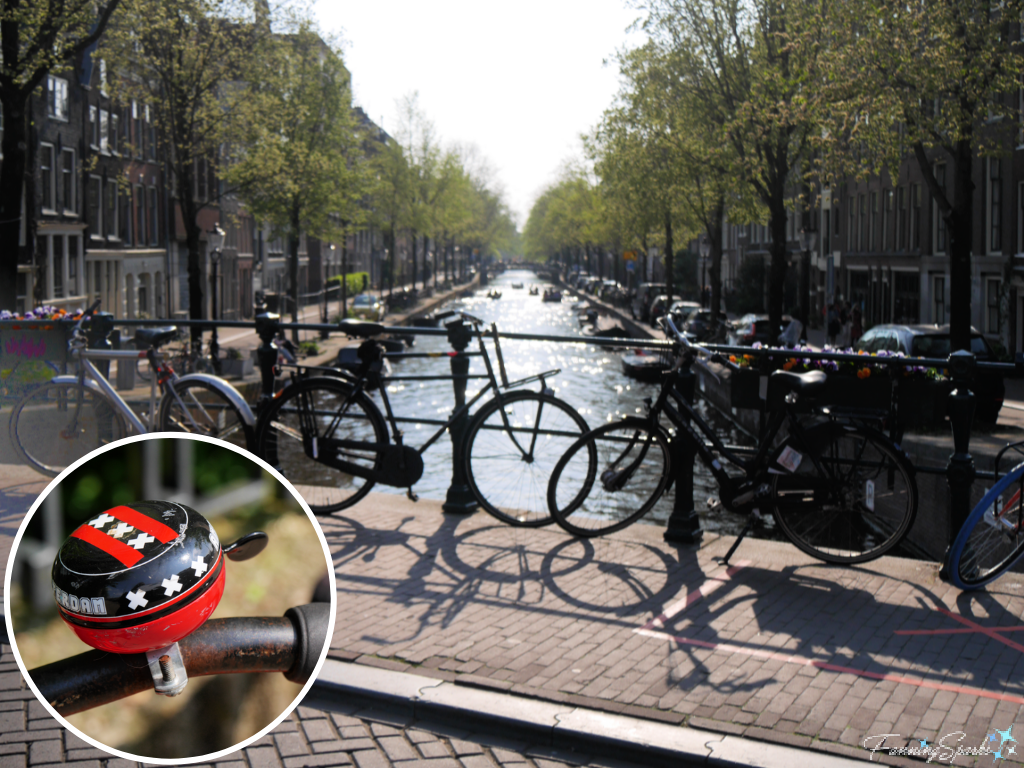
In the same way a ship’s bell can be used to warn other ships of her approach, bicycle bells are used to warn other cyclists and pedestrians. This striking bicycle bell was spotted in Amsterdam, Netherlands.
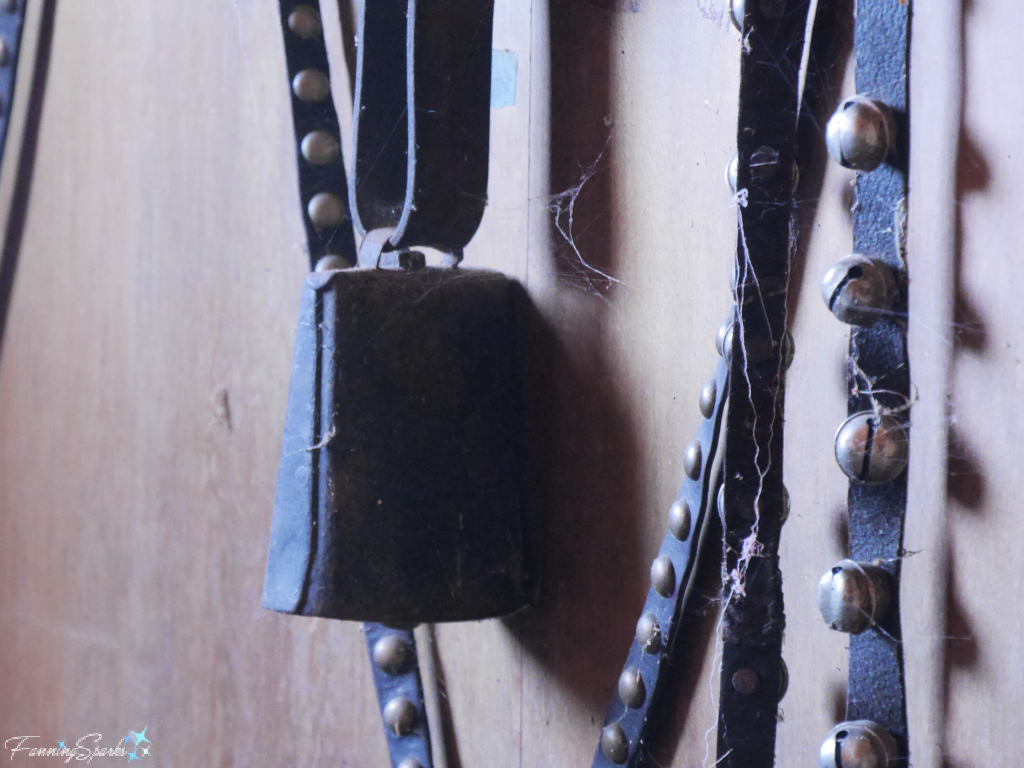
Sleigh bells originated for the same purpose. Wikipedia explains “In the winter in New England in pre-automobile days, it was common to adorn horses’ harnesses with straps bearing bells as a way to avoid collisions at blind intersections, since a horse-drawn sleigh in snow makes almost no noise.” Interestingly, the rhythm of the ever-popular Christmas song Jingle Bells, “mimics that of the trotting horse’s bells”.
This vintage cow bell and strap of sleigh bells, complete with dust and spider webs, was spotted in an old barn.
Bells have a long and interesting story to tell. Yet, they go mostly unnoticed until the holiday season. At this time of year, from the ringing of church bells to the jingle of sleigh bells, the sweet sound of bells provides a beautiful, audible reminder of the season’s joy.
Check out the following FanningSparks blog posts:
. Expected and Unexpected Delights of Ghent for lots of photos and a summary of my visit to Ghent Belgium
. Count Only Sunny Hours to learn about sun dials.
Several online resources were consulted for today’s blog post including:
. Wikipedia for various topics
. Bell Ringing Association website regarding the history of bell ringing
. Book: Bells, Bells, Bells by Bernadine Bailey which is available here on Archives.org
. The History and Significance of Church Bells by Rev. Dan McDowell, 2014 Olean Times Herald article
. Encyclopedia Britannica website regarding Wind-bells
. Book: Bells by Elizabeth Starr Hill which is available here on Archives.org
. US Naval History and Heritage Command website regarding Ships Bells.
1. Bells perform a wide variety of functions such as sounding alarms, keeping time, calling to worship, attracting attention, signaling and celebrating special events.
2. Ringing church bells to mark Christmas and New Year is a cherished custom in many parts of the world.
3. The sound of bells, from church bells to sleigh bells, is closely associated with the holiday season.

Everyone knows eliminating single-use items is better for the environment and paper gift wrap is no exception. There’s no shortage of online advice on how to wrap gifts in fabric instead of paper. One option is to wrap gifts in flat, squares of fabric knotting the corners in the style of Japanese furoshiki. Another option is to use gift bags made of fabric. It seems to me, most people would find fabric gift bags more convenient and easier to use so I decided to focus on this option.
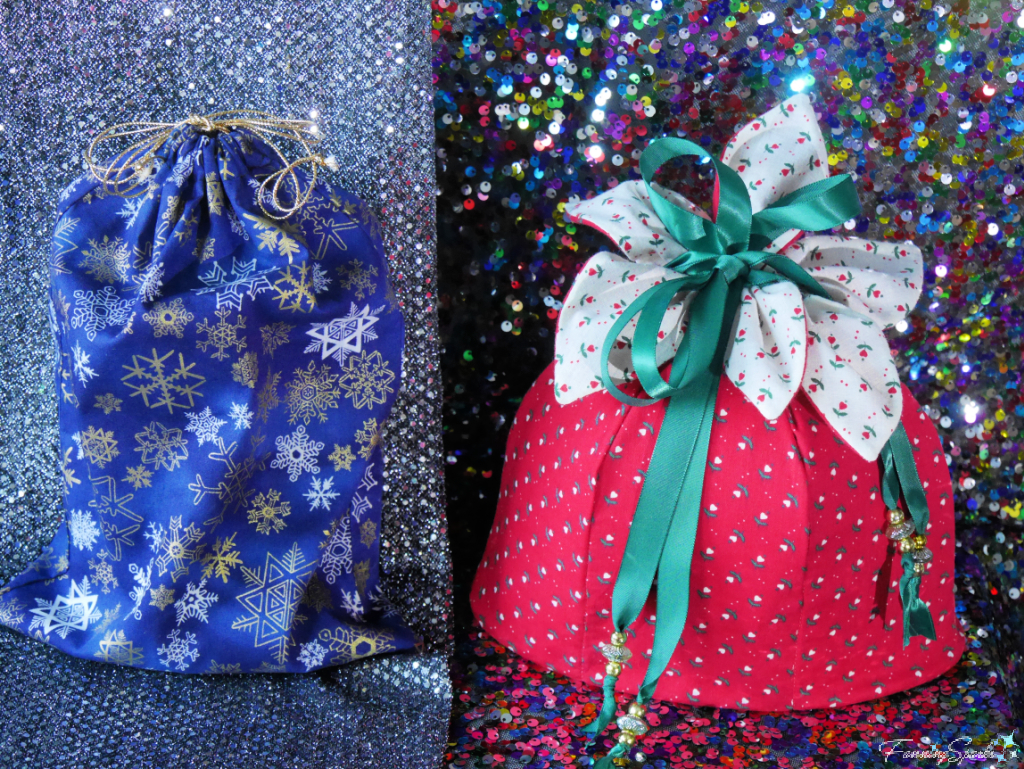
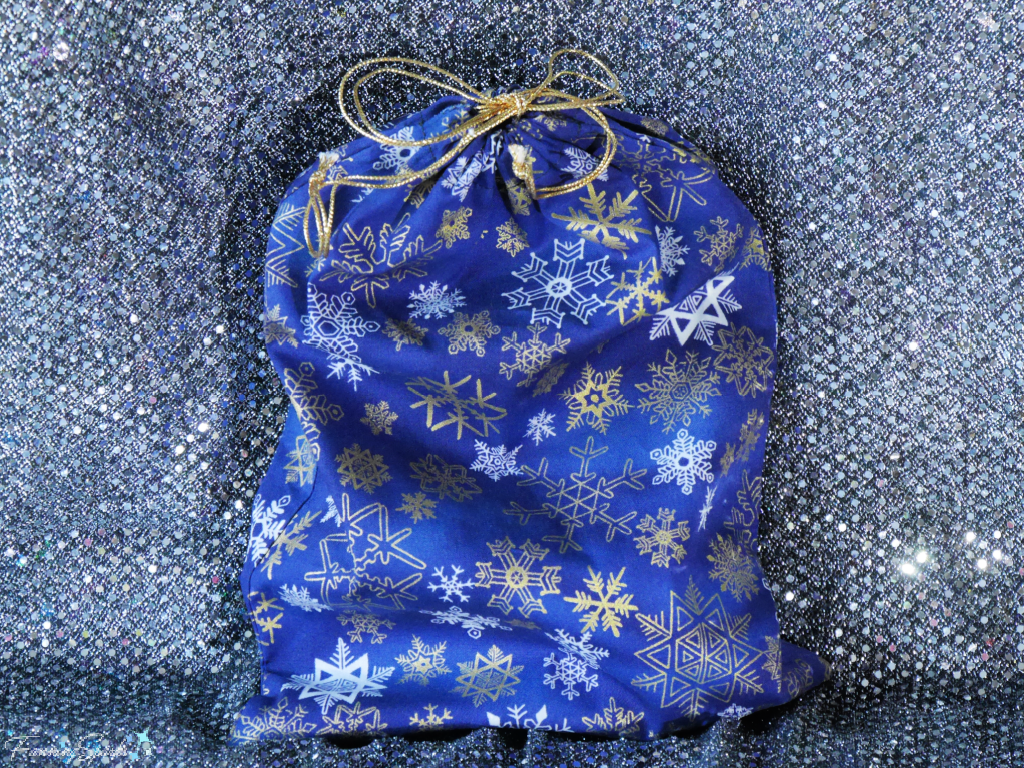
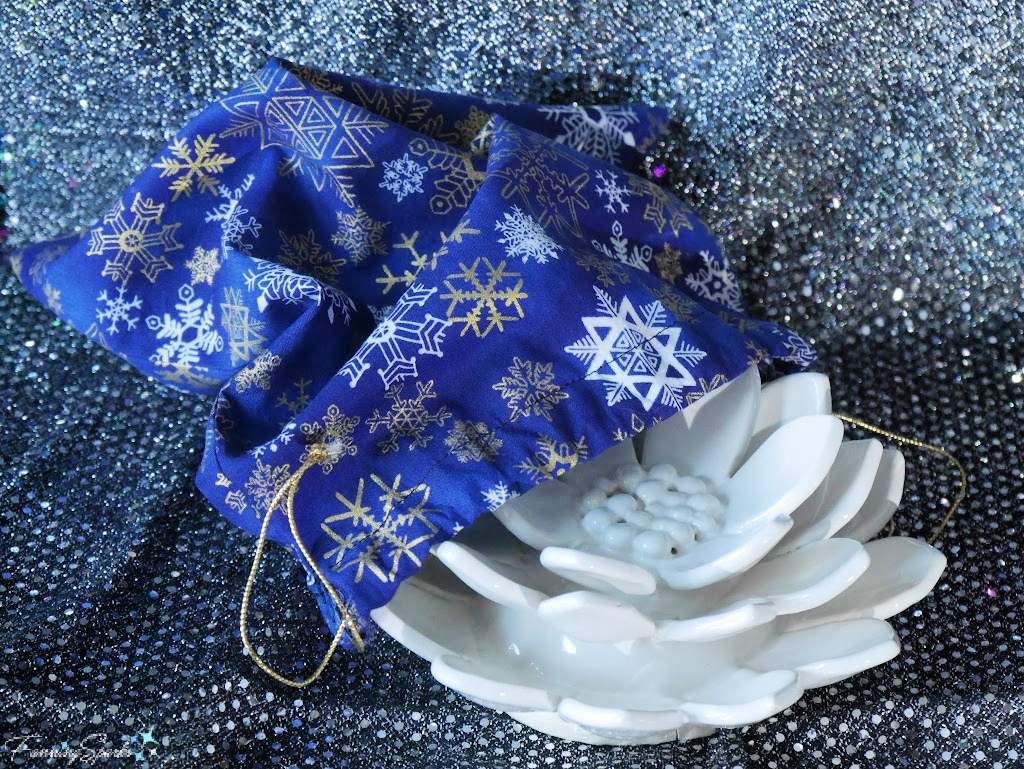
Ideally, a fabric gift bag would be fast and easy to make. The simplest design I could find was a basic, rectangular bag with a drawstring closing. To dress up the bag, I chose a festive fabric in a deep blue, snowflake pattern. It turns out, the drawstring gift bag was indeed easy to make and it looks quite nice. But, to my eye, it’s a little lackluster—it’s no match for those gorgeous paper-wrapped presents traditionally pictured under the Christmas tree!
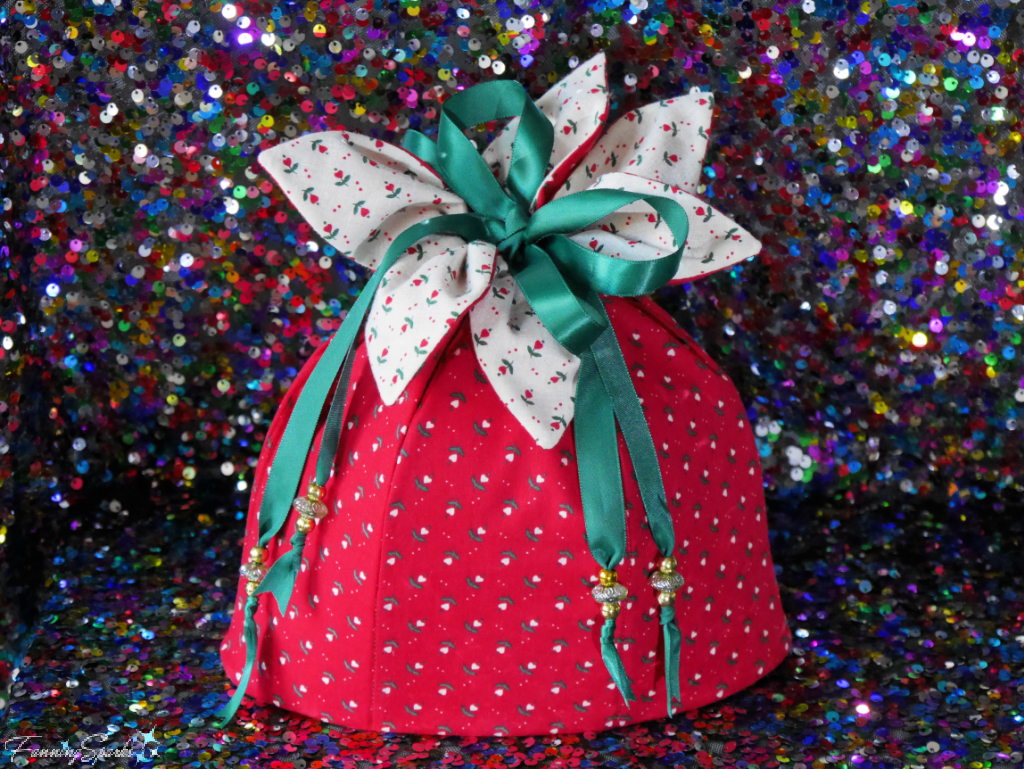
So, I went back to the internet rabbit hole in search of a gift bag that’s made of fabric, easy to make AND beautiful. I searched for hours and came up short. In the end, I decided to design my own—a six-sided, elliptical-shaped bag topped with fabric petals—which I made in a simple, red and white floral print. I’m quite pleased with the results!
I’ve included step-by-step instructions for both fabric gift bags in today’s blog post. First up, is the basic drawstring bag which I’ve dubbed a Fast Fabric Gift Bag. Second is the Fancy Fabric Gift Bag with my one-of-a-kind design.
How To Make a Fast Fabric Gift Bag
Supplies Needed
The following supplies are needed to make ONE drawstring bag measuring 12” x 8 ½”.
. Fabric: ONE fat quarter of cotton fabric. This fabric is typically 42-45” wide so a fat quarter measures 21-22½” wide x 18” long.
. Thread: In a color matching the fabric.
. Cord: TWO 32” pieces.
Tools and Equipment Needed
. Ruler or Measuring Tape
. Scissors
. Straight Pins
. Sewing Machine
. Iron
. Large Safety Pin or Bodkin
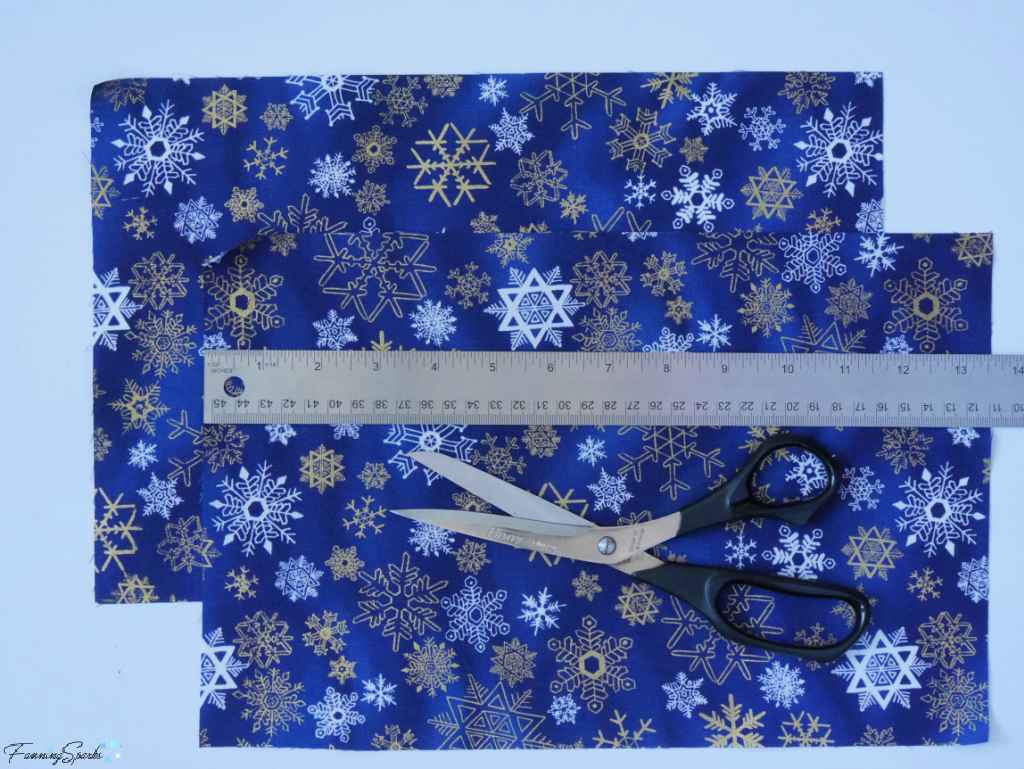
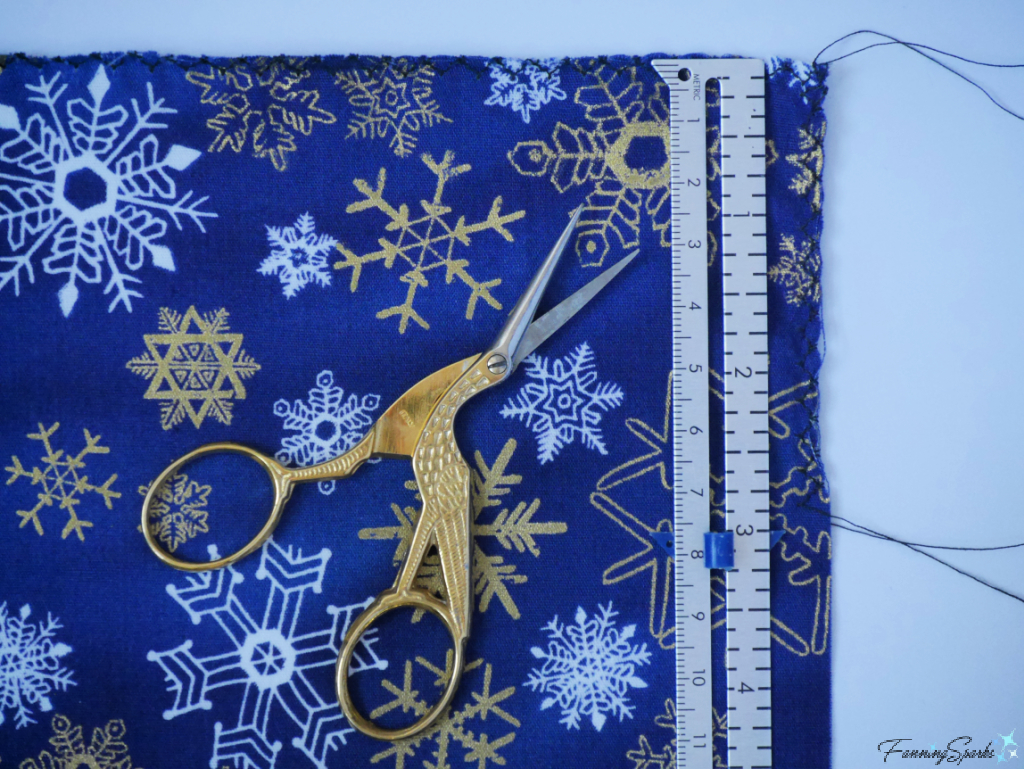
Step 1 Cut Fabric Cut TWO rectangles 13½” x 9” from the fabric.
Step 2 Finish Top Edges Select one of the 9-inch edges as the top for each rectangle. Select an overcast stitch on the sewing machine. Sew across the top edge and down each side for about 3”. Repeat on second rectangle.
Fold back 1” along the top edge and press. Repeat on second rectangle.
TIP: Use a straight strip of light cardboard, such as a manila file folder, with a line drawn 1” from the edge. My template is 11½” long by 1¼” wide and has lines at ¼”, ½”, ¾” and 1” from the top edge. Simply fold the top edge of the fabric over the template and down to the 1” line. Press fabric directly over the template.
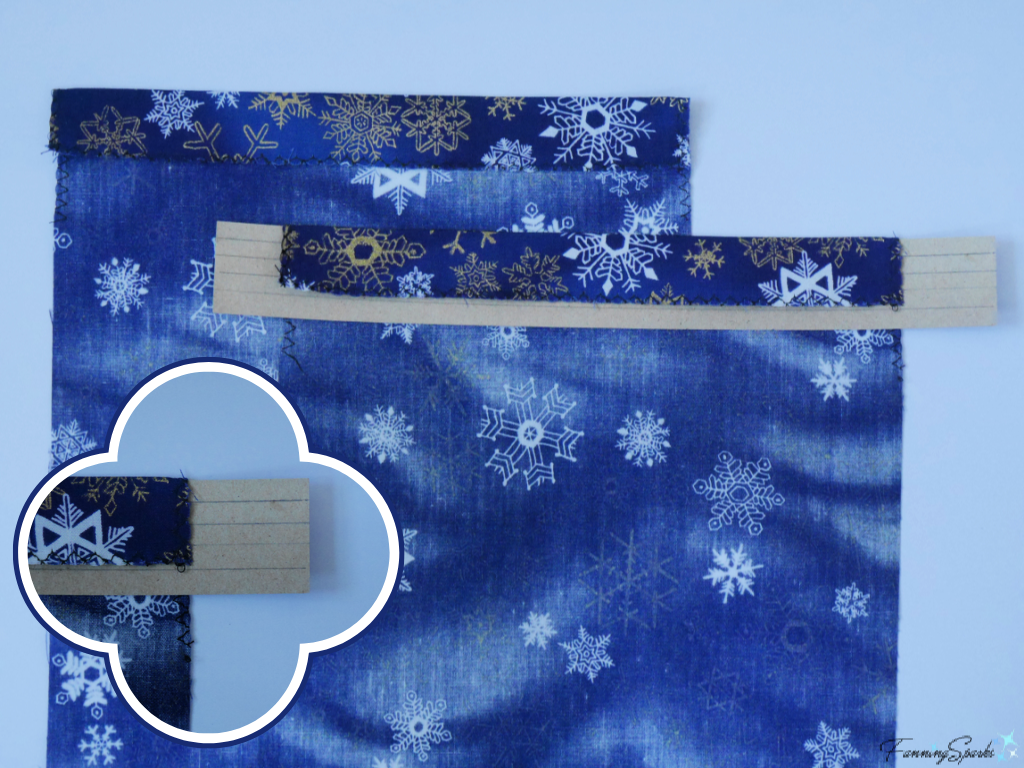
With top edge folded over, stitch close to the overcast edge to form a casing for the drawstring. Repeat on second rectangle.
Step 3 Sew Side Seams Lay one rectangle on work surface with right side facing up. Lay second rectangle on top, with right side facing down, aligning all edges. Pin. Stitch along both sides and bottom.
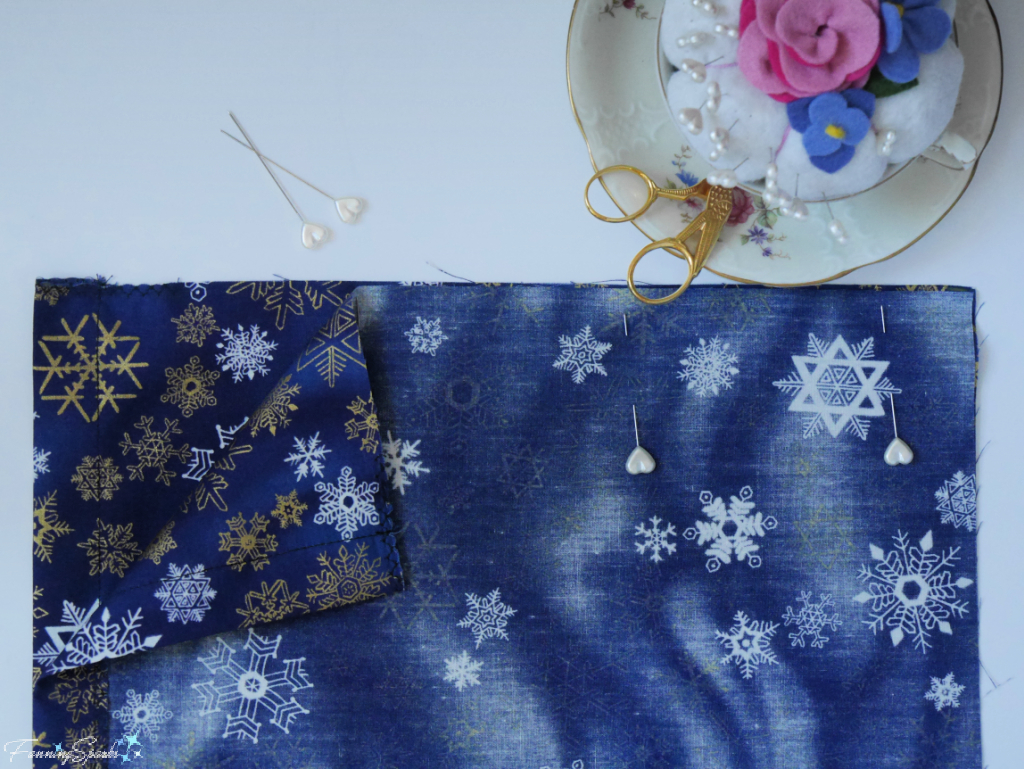
Turn right side out. Smooth the seam and push out the corners. Press.
Step 4 Insert Drawstring Use TWO pieces of cord about 32” long. Attach the large safety pin (or bodkin) to one end of one piece of cord. Insert the safety pin into the opening on the left side of the bag, gently pull all the way around the casing and pull out the same opening. Tie the ends of the cord together with a small knot. Repeat on the right side with the other piece of cord.
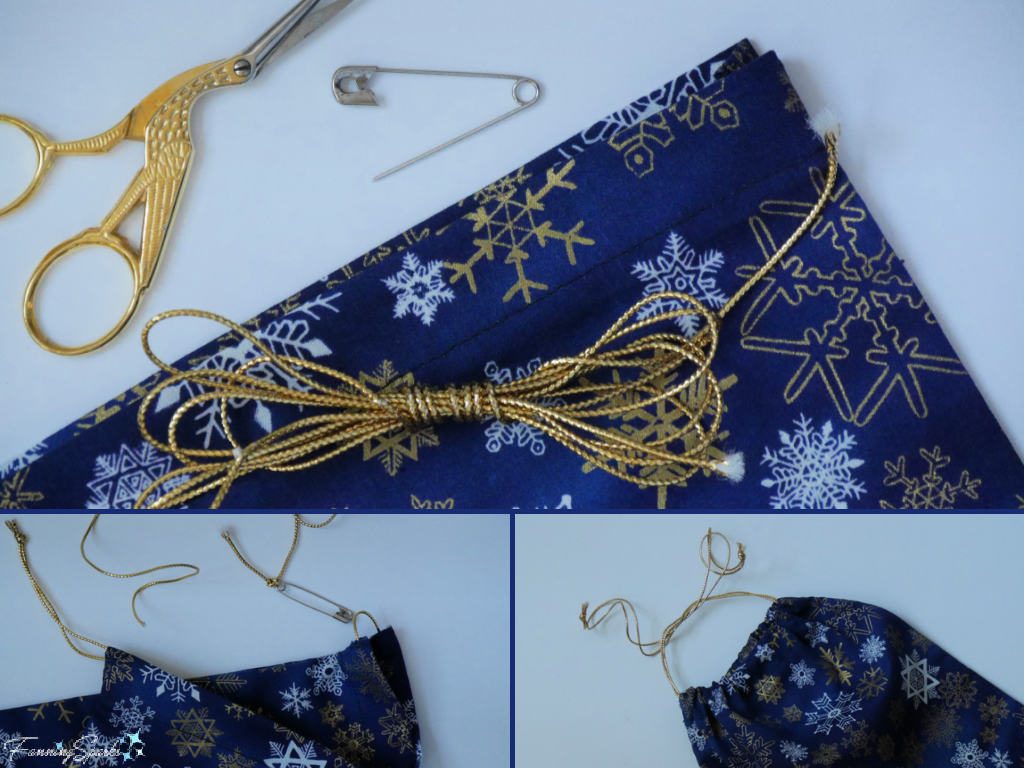
Step 5 Complete Your Fast Fabric Gift Bag is ready to use. Simply pull the two cords in opposite directions to tighten the drawstring.
How to Make a Fancy Fabric Gift Bag
Supplies Needed
The following supplies are needed to make ONE fancy drawstring bag measuring about 8½” high (to top of casing) x 9” wide x 5” deep.
. Template: Download Fancy Fabric Gift Bag – Complimentary Download to print the template.
. Paper: A few sheets of white paper for printing template.
. Fabric: Approximately TWO ½ yards of cotton fabric—ONE for main body and ONE for lining.
. Thin Cardboard: SIX 7¼” x 3½” pieces of thin cardboard such as manila file folders or cereal boxes.
. Foam Core Board: 9” x 5”
. Thread: In a color(s) matching the fabric.
. Fabric Glue
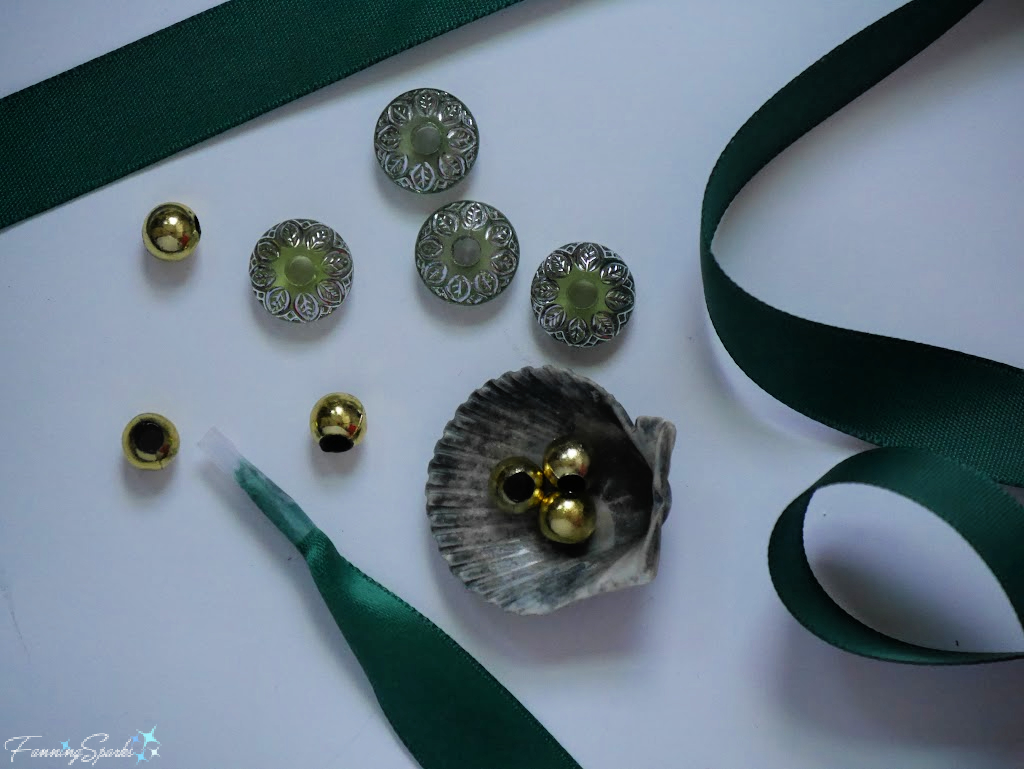
. Ribbon – 5/8” wide TWO pieces 54” long
. Adhesive Tape: Short pieces to temporarily reinforce ends of ribbon.
. Decorative Beads (Optional): Beads, with holes big enough to accommodate ribbon, to decorate ends of ribbon. I used inexpensive, small plastic beads—2 round beads and 1 disc-shaped bead—on each ribbon end.
Equipment and Tools Needed
. Computer and Printer: To print templates.
. Scissors: For paper and for fabric.
. Ruler
. Straight Pins
. Clips (Optional)
. Fabric Pen: I recommend the Pilot FriXion marker because markings can be removed with the heat of an iron.
. Sewing Machine
. Iron
. Large Safety Pin or Bodkin
Step 1 Prepare Templates Download the Fancy Fabric Gift Bag – Complimentary Download and print the templates. Take care to ensure the scale is accurate on your printed version. See specifics in the download document.
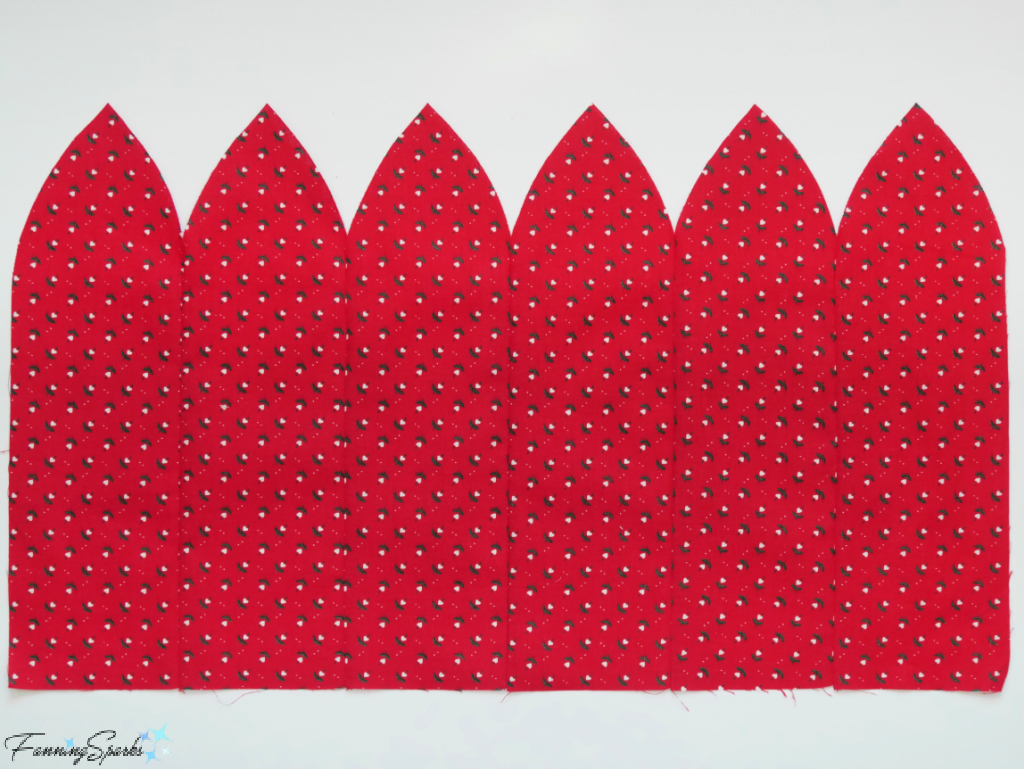
Step 2 Cut Fabric Use the Petal Section template to cut SIX petals from the decorative outside fabric and SIX petals from the lining fabric. Use the Ellipse template to cut ONE ellipse from the decorative fabric and ONE ellipse from the lining fabric. Cut TWO strips of fabric measuring 1½” x 13” from the lining fabric for the casing.
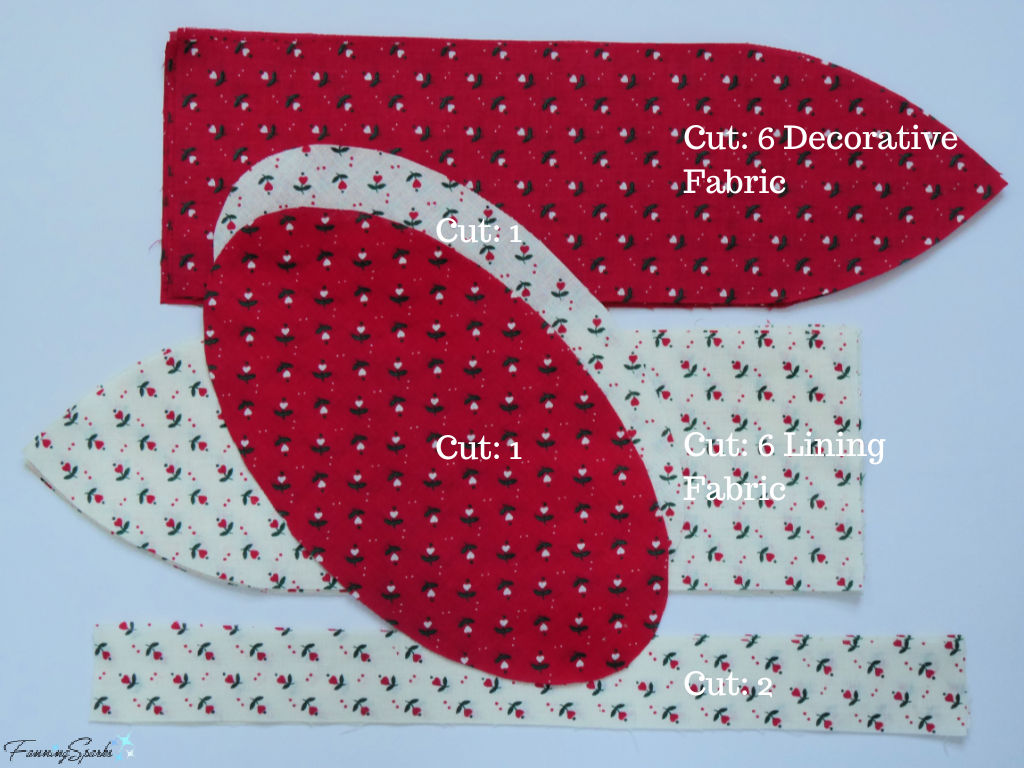
Step 3 Cut Supports Use the Petal Support template to cut SIX petal supports from thin cardboard. Use the Ellipse template to cut ONE ellipse from foam core board.
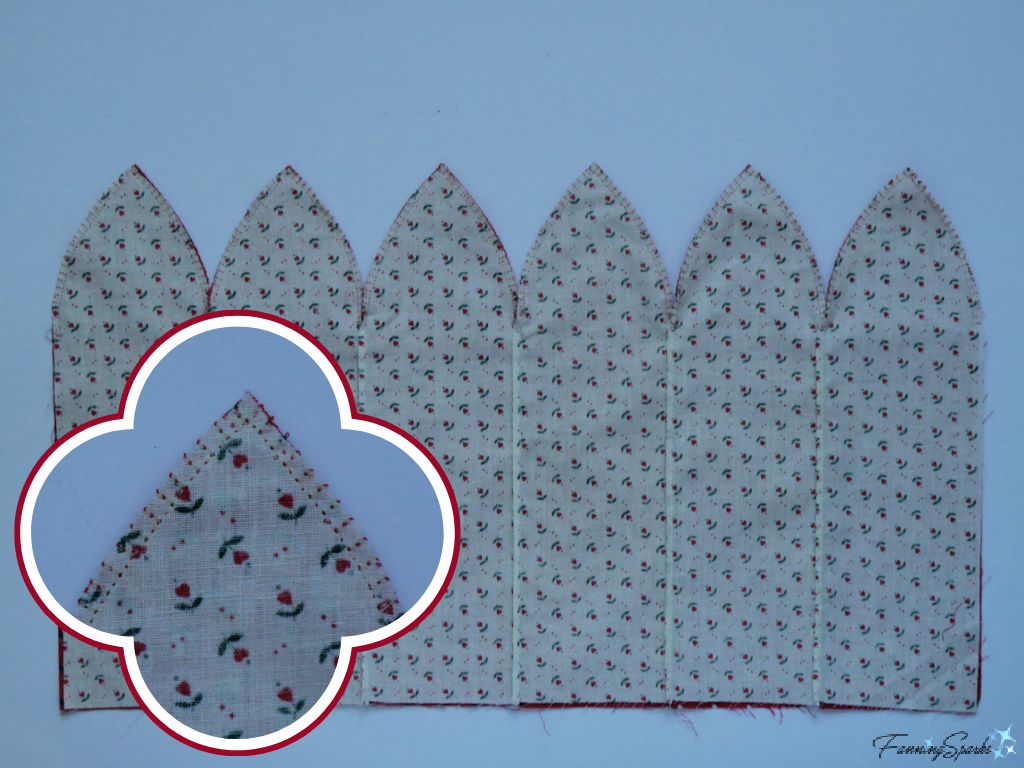
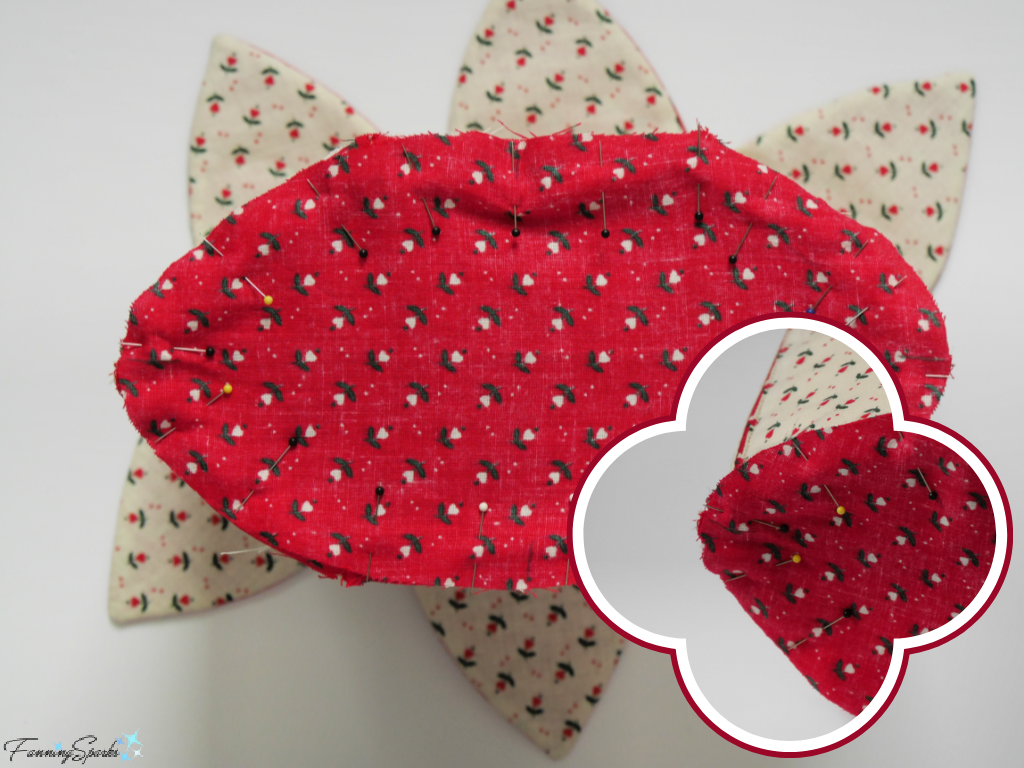
Step 4 Sew Outside Petals Together Prepare to sew the fabric petals into a long, flat row. Lay one of the decorative fabric petals on the work surface with right side up. Position a second one, with right side facing down, on top and align the edges. Clip or pin along one long side. Use the template and the fabric pen to mark the stop point (shown as x on the template). Select the setting to stitch and overcast woven fabric on the sewing machine. Stitch from the bottom edge up to the top edge taking care to stop precisely at the stop point and lock in the final stitch. Repeat with two more pairs of petals.
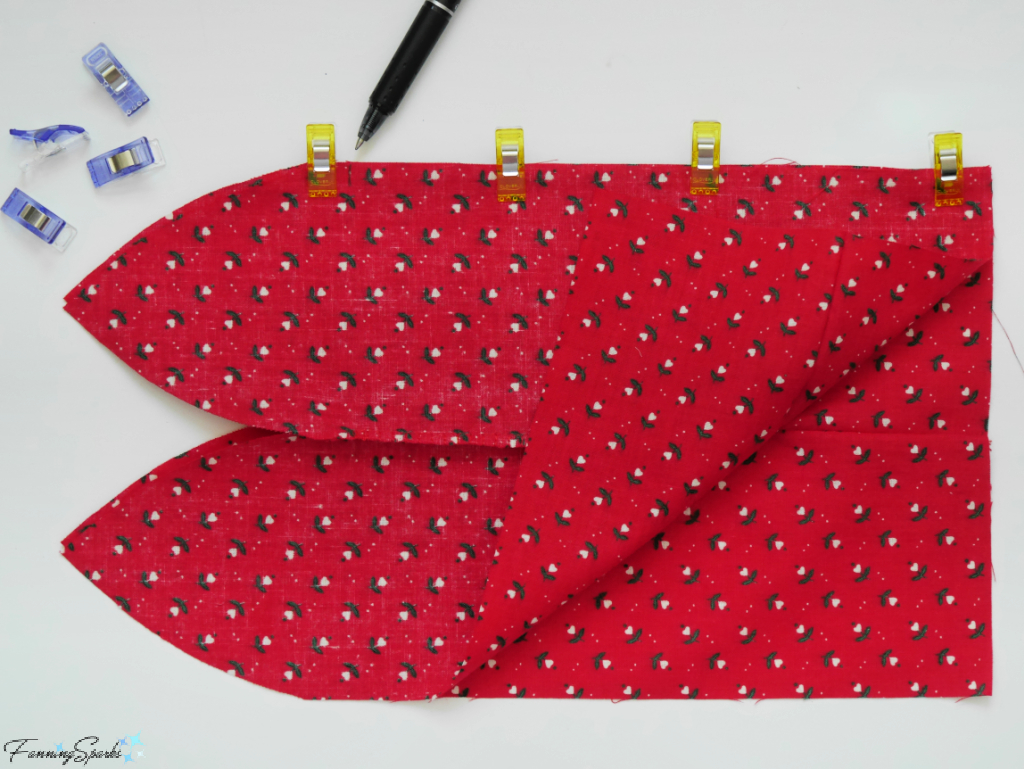
Lay one of the pairs of stitched petals on the work surface with right sides up. Position a second pair, with right side facing down, on top and align the edges. Sew the side seam in the same way as before. Repeat with the final pair of petals. This will result in a row of six petals stitched together. Press seams.
Step 5 Sew Lining Petals Together Follow the process described in Step 4 to sew the six lining fabric petals together.
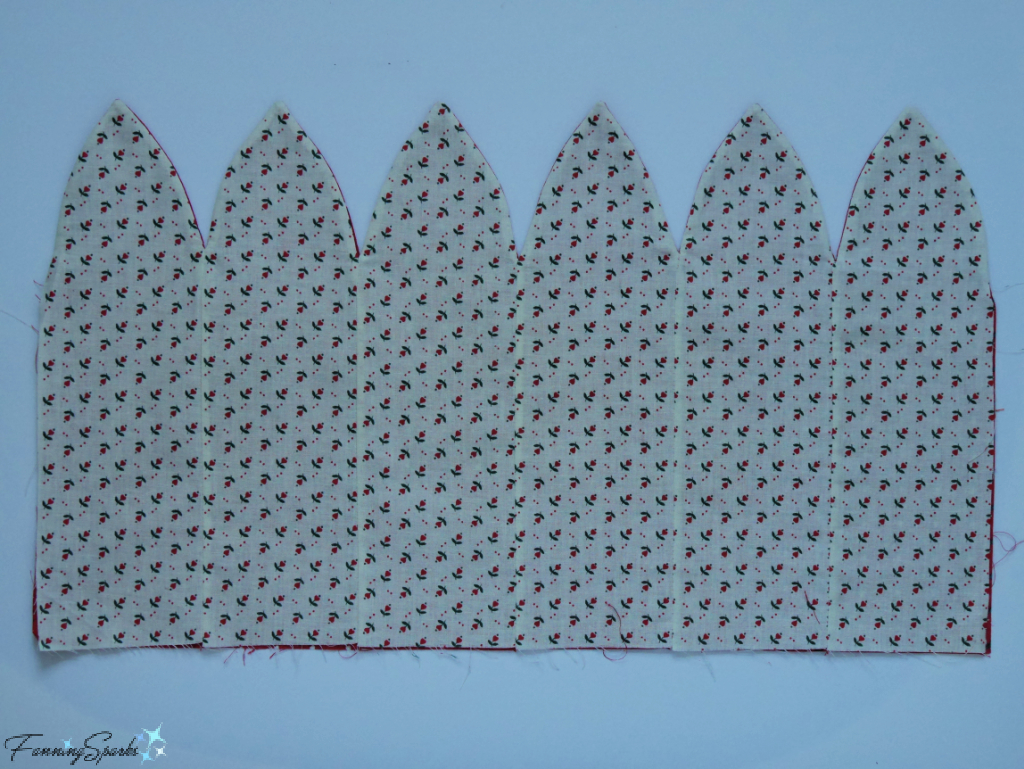
Step 6 Attach Lining Lay the decorative fabric petals on the work surface with right side facing up. Position the lining fabric petals on top, with right side facing down, and align the edges and seams. Clip or pin together along the top edges of the petals aka the peaks and valleys of the petals. Use template, aligned with the bottom edges, and fabric pen to re-mark the stop points (shown as x on the template).
Select straight stitch on sewing machine. The photos show an overcast straight stitch but, in hindsight, I recommend using a straight stitch instead. It’s easier to sew the tips of the peaks and the dips of the valleys accurately with a straight stitch. The trick is to sew from the tip of the peak down to the stop point in the valley. Stop precisely at the stop point, lock in the final stitch and cut off. Then repeat for all the peak-to-valley sections.
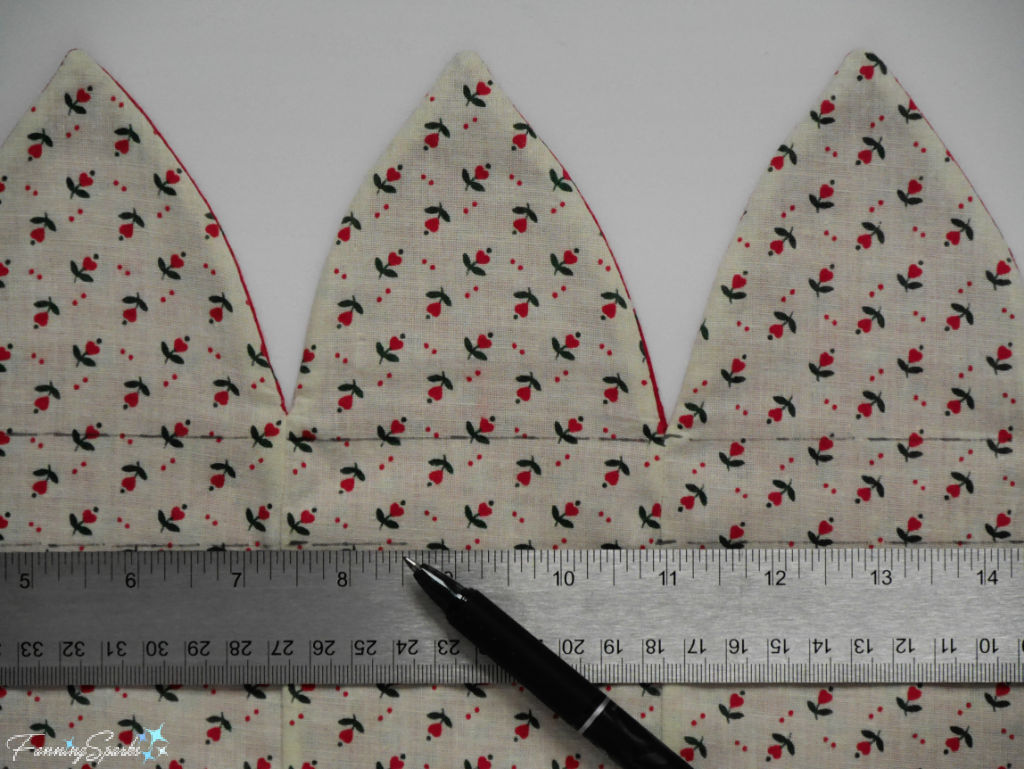
Turn the assembled piece right side out. Take care to open the seams, push out the peaks and smooth open the valleys. If the peaks or valleys pucker and don’t turn smoothly, it may be necessary to go back and adjust the stitching. Press. The assembled piece should look like this.
Step 7 Attach Casing Overcast all four edges of the two casing strips. Fold back and press under ¼” along all edges. Stitch casing edges in place with a straight stitch.
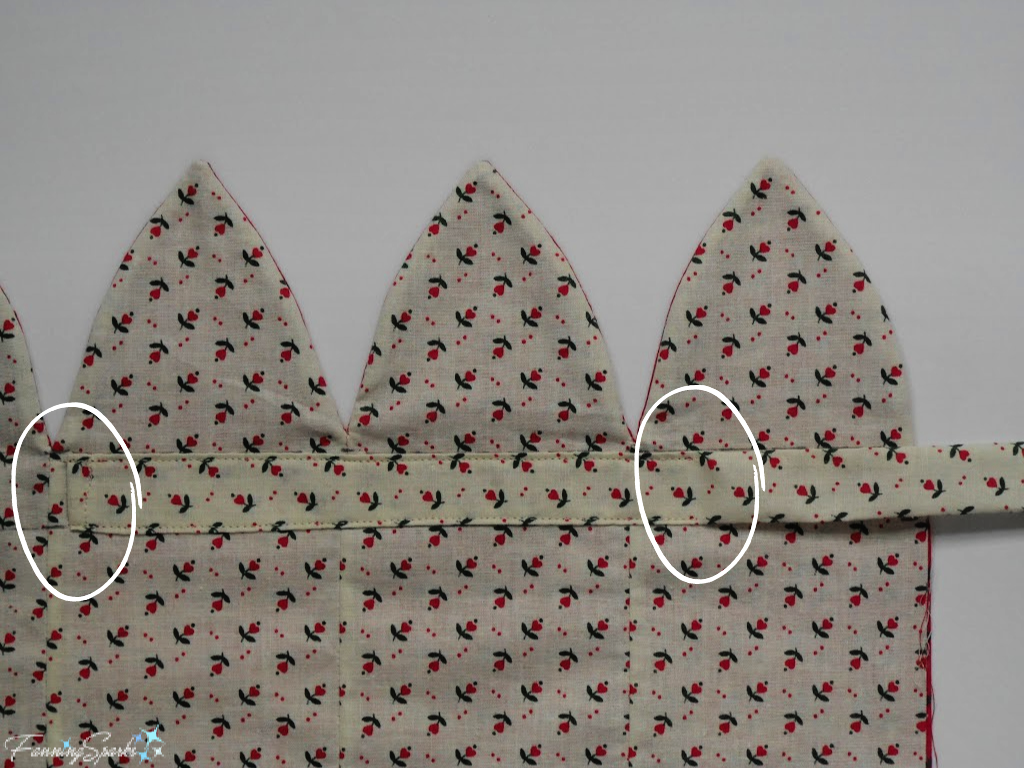
Lay the assembled piece, with lining facing up, flat on work surface. Use template, fabric pen and ruler to mark stitching lines across the petal sections.
Prepare sewing machine with matching thread—lining fabric will be on top and decorative fabric will be on bottom. There will be two openings left in the casing—one opening will be between the third and fourth stitched petals and the other opening will be at the side seam which remains unstitched at this time.
Place the casings on top of the assembled piece, aligning the long edges with the markings. Pin. Stitch close to edge from center to about 3” from the unfinished side edge. Leaving the end of the casing free at this point will make it easier to sew the side seam later. Attach the second casing in the same way.
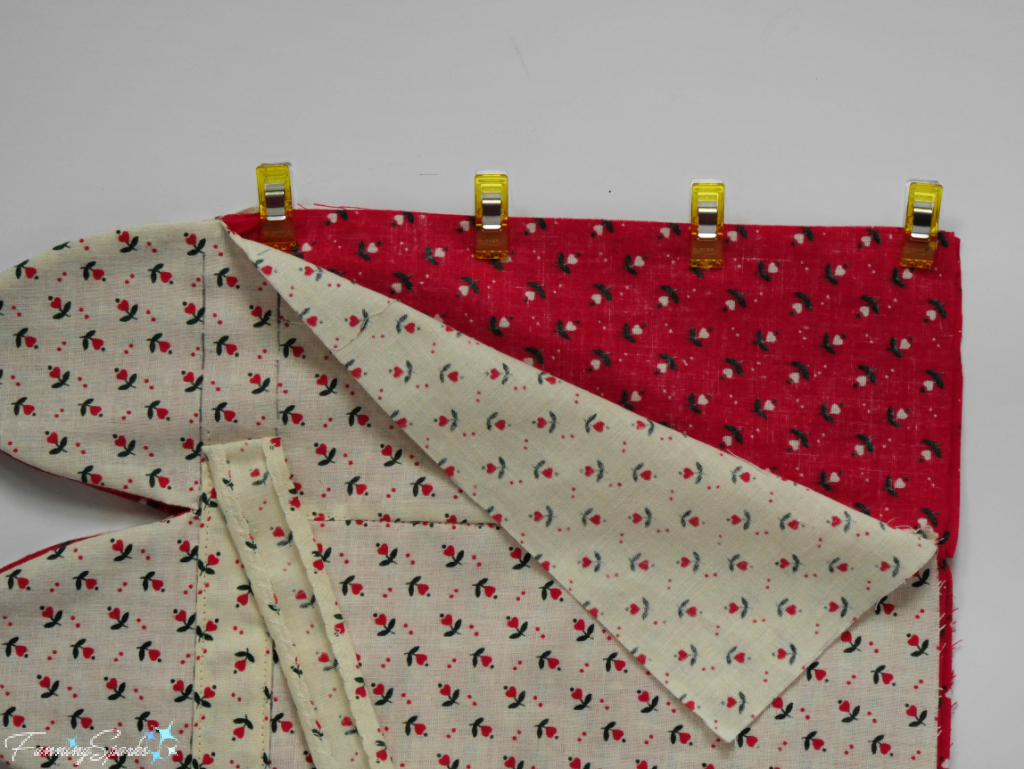
Step 8 Attach Lining at Vertical Seams Lay assembled piece on work surface with decorative fabric facing up. Carefully position each petal so the seam in the decorative fabric lines up with the matching seam in the lining. Pin. Prepare sewing machine with matching thread— decorative fabric will be on top and lining fabric will be on bottom.
Stitch with the decorative fabric facing up. Start sewing at the top just below the casing. Take care to sew along the same path as the previously sewn seam.
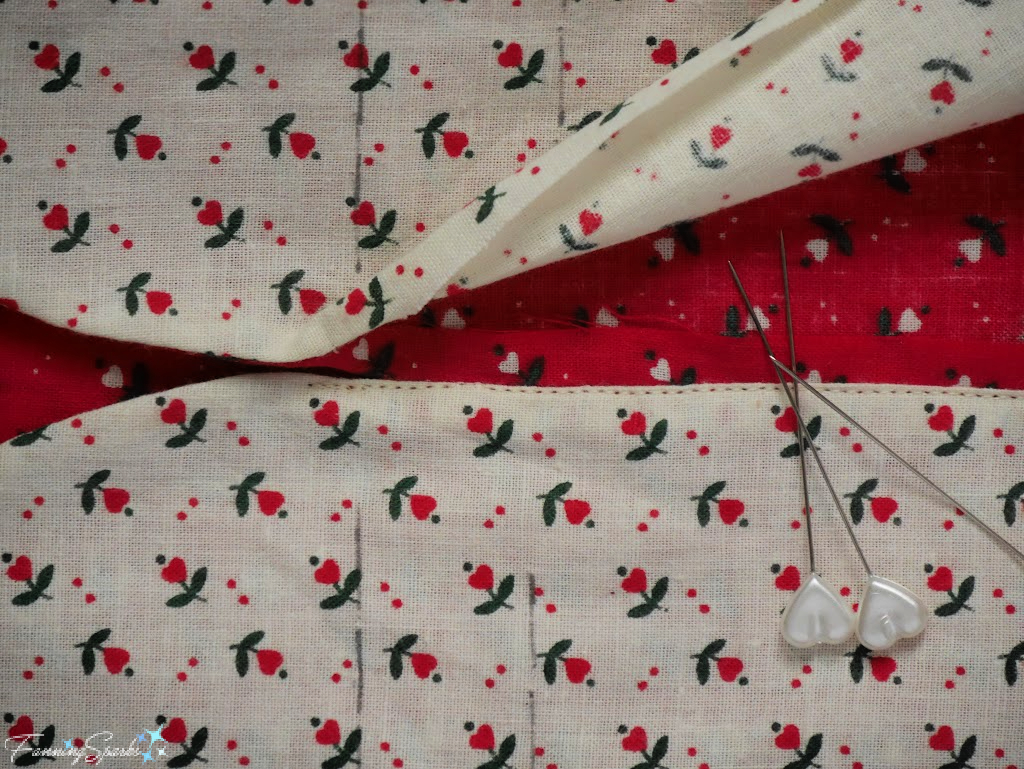
Step 9 Sew Final Side Seam Prepare to sew the assembled piece into a tube. Fold under and press ¼” along the side edges of the lining fabric. With right sides together, align the two side edges of the decorative fabric only. Take care to pull the lining fabric and casings out of the way. Pin. Use template, aligned with the bottom edges, and fabric pen to re-mark the stop points, if needed. Stitch side seam from stop point down to bottom edge. As noted above, accuracy is important—stop precisely at the stop point, lock in the final stitch and cut off.
Press seam open. Prepare to sew lining fabric in place. Carefully align the previously pressed edges of the lining side edges with the side seam in the decorative fabric. Pin. Prepare sewing machine with matching thread—lining fabric will be on top and decorative fabric will be on bottom. Take care to pull other fabric and casings out of the way. Stitch as close as possible to the folded edge of the lining fabric. Repeat with second lining edge.
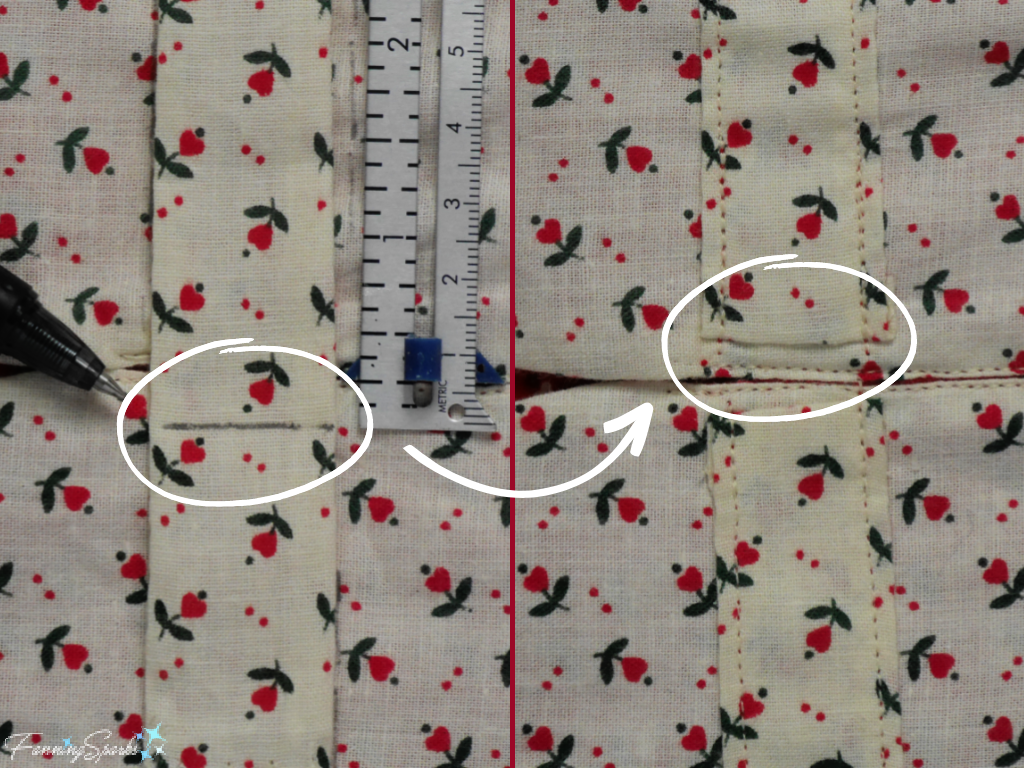
Step 10 Finish Casing Prepare to stitch the loose ends of the casings into place. Pull end of casing over the closed side seam and mark ¼” beyond the side seam. Cut at marking. Repeat on other casing. Fold under ⅜” and press. Pin casing into place. Sew final section of casings into place leaving the short, folded ends unsewn.
Step 11 Insert Supports Prepare to insert the thin cardboard petal supports. Slide a support into each petal. They should lay flat and fit snuggly. Trim the support, if needed. Push the petal supports as far to the top as possible to clear space for the next step.
Step 12 Attach Bottom Prepare to attach the elliptical piece to the bottom by marking center points. Use the template and the fabric pen to mark the four center points on the decorative fabric ellipse. Fold assembled piece at side seams to lay flat. Take care to ensure the ends of the casings are positioned at the folds. Mark the side seams at the bottom edge. Use a ruler to find and mark the center of the front and the back.
At this point, there should be 4 markings along the bottom edge of the assembled piece (2 at the side seams, 1 at center front and 1 at center back). These markings will align with the 4 markings on the fabric ellipse. The long, thin ends of the ellipse will be positioned at the side seams to align with the ends of the casings.
Turn assembled piece inside out so the lining is on the outside. Position on work surface with bottom edges standing up. Insert fabric ellipse on top of the opening with the right side facing down. Align a pair of markings at one side seam—aligning the side seam of the assembled piece with one of the long, thin ends of the fabric ellipse. Ensure the right sides of the fabrics are facing each other and the outside raw edges are even. Pin in place. Align and pin the remaining 3 center point markings. Work around the entire opening, aligning edges and pinning fabric into place.
Prepare to sew the bottom seam with a straight stitch. Working slowly around the entire opening, carefully feed fabric into the sewing machine while keeping the edges aligned and wrinkle-free. Check for any puckers along the stitched seam. Adjust, if necessary. Select an overcast setting on the sewing machine. Overcast edges to finish the seam.
Turn the assembled piece right side out taking care to gently bend, not fold or crease, the petal supports. Smooth and push out seam with fingers. Slide the petal supports as far down to the bottom edge as possible.
Insert the foam core board ellipse into the bottom of the assembled piece to test fit. Trim support, if needed. Use fabric glue to attach the lining fabric ellipse to the top of the foam core board ellipse. Allow to dry. Trim fabric edges, if needed. Slip finished bottom support into place. The bottom support can be removed later so the gift bag can be stored flat.

Step 13 Insert Ribbon Ties Prepare to insert ribbon ties into the casings. Use TWO pieces of ribbon about 54” long. Attach the large safety pin (or bodkin) to one end of one piece of ribbon. Insert the safety pin into the opening on the left side of the bag, gently pull all the way around the casing and pull out the same opening. Repeat on the right side with the other piece of ribbon. If decorating the ends of the ribbons with beads, wrap a small piece of adhesive tape around the end of the ribbon and roll tightly. This makes it easier to insert the end of the ribbon into the beads. Tie a small knot at the end of each ribbon.
Step 14 Complete Your Fancy Fabric Gift Bag is ready to use. Simply pull the two sets of ribbons in opposite directions to tighten and close.
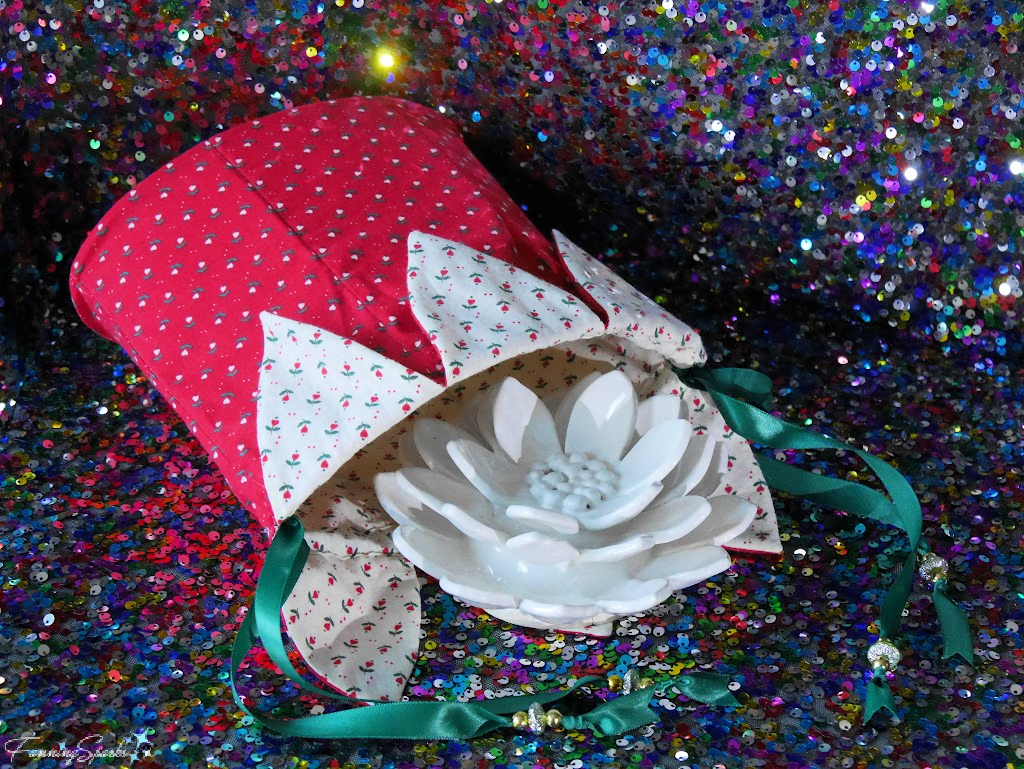
Tie ribbon into a pretty double bow.

You can download the project template here: Fancy Fabric Gift Bag – Complimentary Download.
Please pin this image to share or save for future reference.

1. Eliminating single-use items is better for the environment and paper gift wrap is no exception.
2. Fabric gift bags are convenient and easy to use.
3. Consider making your own fabric gift bags.

Making this super simple, Make & Give project was easier than deciding what to call it. Is it a buff, tube scarf, neck gaiter, neck warmer, turtleneck scarf, versa-wrap or multiclava? After a little research, I settled on a “Buff-Style Tube Scarf”. Buff is the name used most frequently but BUFF® is actually the trademarked product name from the Original Buff S.A. Spain company. It’s a very popular product and “Buff” has morphed into common usage much like Kleenex® has for facial tissues and Xerox has for photo copies.
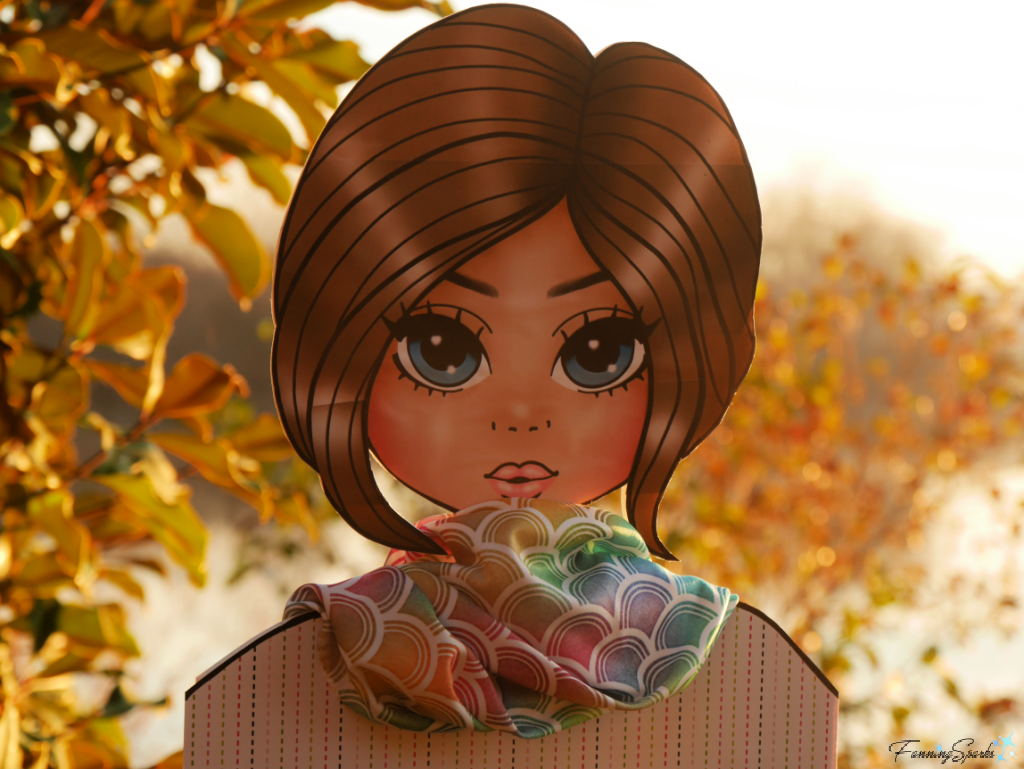
Regardless of its name, the project featured in today’s blog post is simply a tube of stretchy fabric typically worn to protect the neck from cold and wind. When sewn from a pretty fabric, the Buff-Style Tube Scarf can add a little style while keeping the wearer warm.
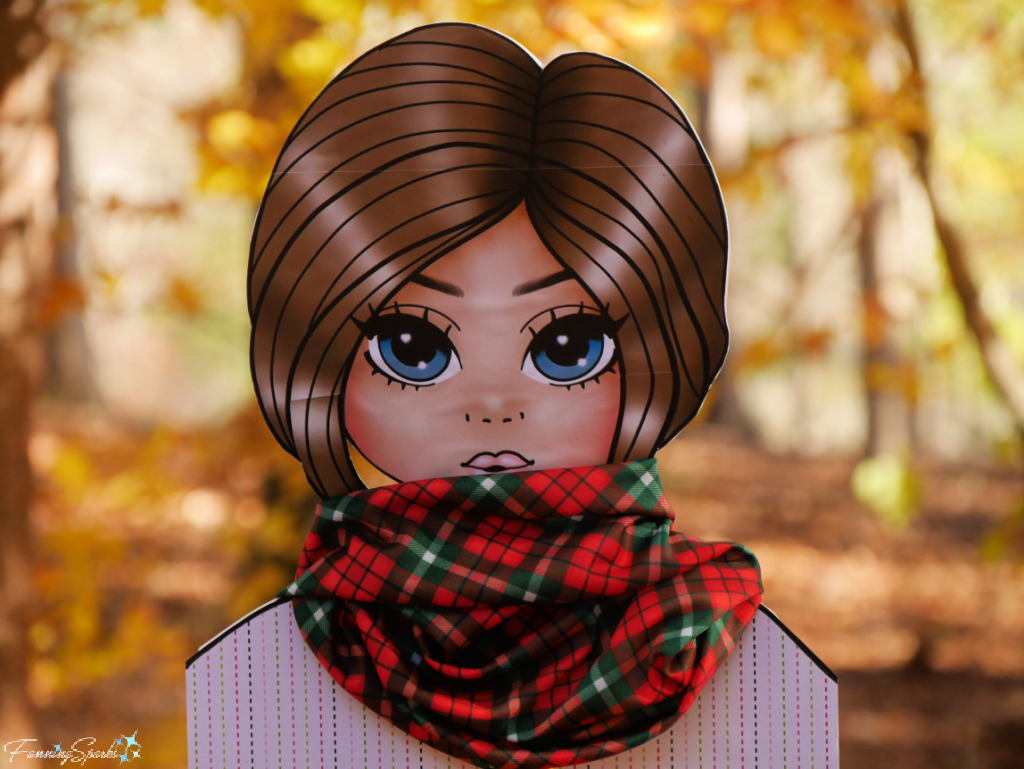
A quick note about my model: Willow was a digital stamp from Pink Gem Designs and, to my knowledge, this is her first modeling gig! See More Info below.
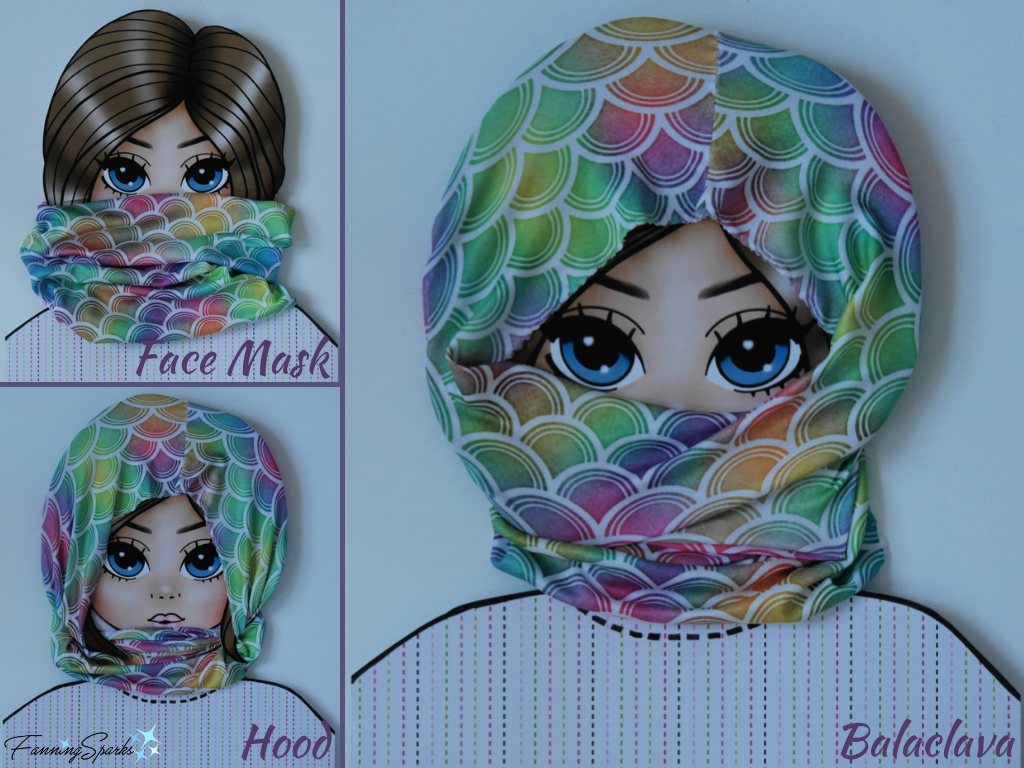
The fascinating thing about the Buff-Style Tube Scarf is the number of ways in which it can be worn and the myriad of purposes it can serve. The most obvious is as a neck gaiter or neck warmer to help keep the wearer warm in cold temperatures.

After pulling it around the neck, the ends of the Buff-Style Tube Scarf can be positioned in a variety of ways. A face mask is made by pulling one end up over the mouth and nose. A hood is formed by pulling one end up over the head. A balaclava can be fashioned by pulling both openings around the head—one end is pulled up over the head like a hood while the other end is pulled up over the mouth and nose like a face mask.
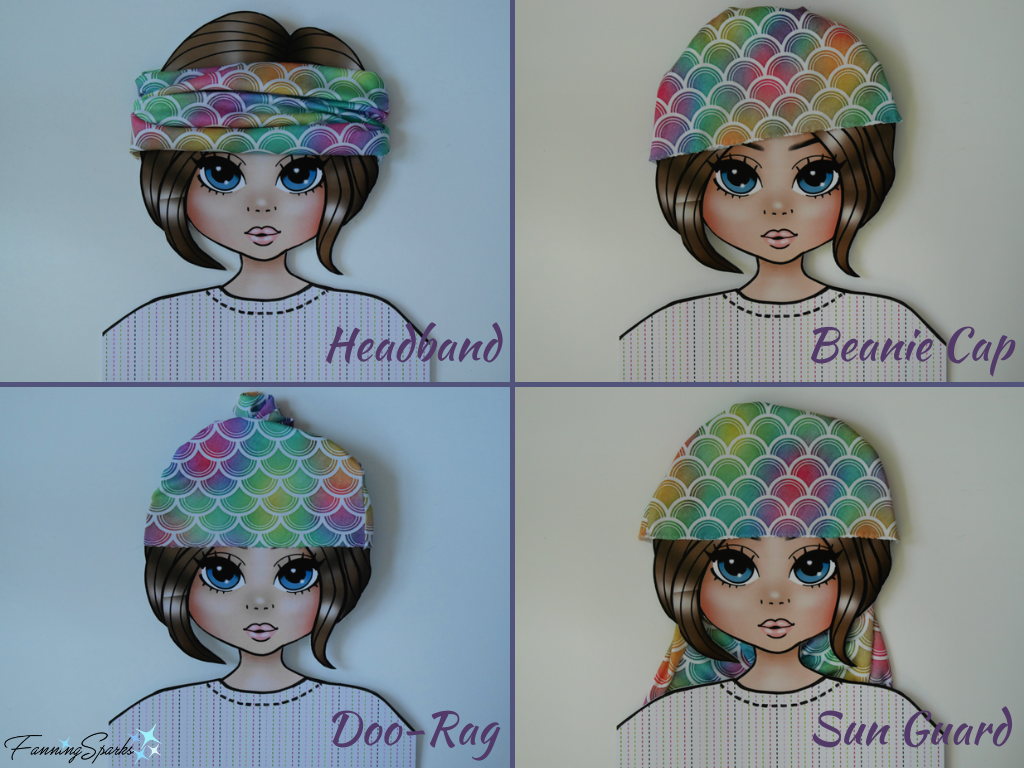
Alternatively, the Buff-Style Tube Scarf can be worn around the head instead of around the neck. It can be scrunched into a simple headband or sweat band, twisted into a beanie cap, knotted into a doo-rag, or fashioned into a sun guard with one end covering the back of the neck. These techniques can be combined with ball caps, hats, cycling helmets and protective headgear for even more options.
The Buff-Style Tube Scarf can also be used to manage hair as a hairband, hair tie or scrunchie. It can be twisted onto a wrist as a wrist sweat band or pulled over the head to cover the eyes as a sleep mask. It can be soaked in cold water to help keep the wearer cool in hot temperatures. In a pinch, it can even be used as a rag, towel or carrying pouch.
The Buff-Style Tube Scarf may just be handier than a pocket on a shirt! In fact, it may be the ideal gift for someone special this holiday season. It’s a fast, easy project requiring only basic sewing skills. Best of all, it can be personalized by selecting fabric in a style, pattern and color that matches the recipient’s interests and preferences.
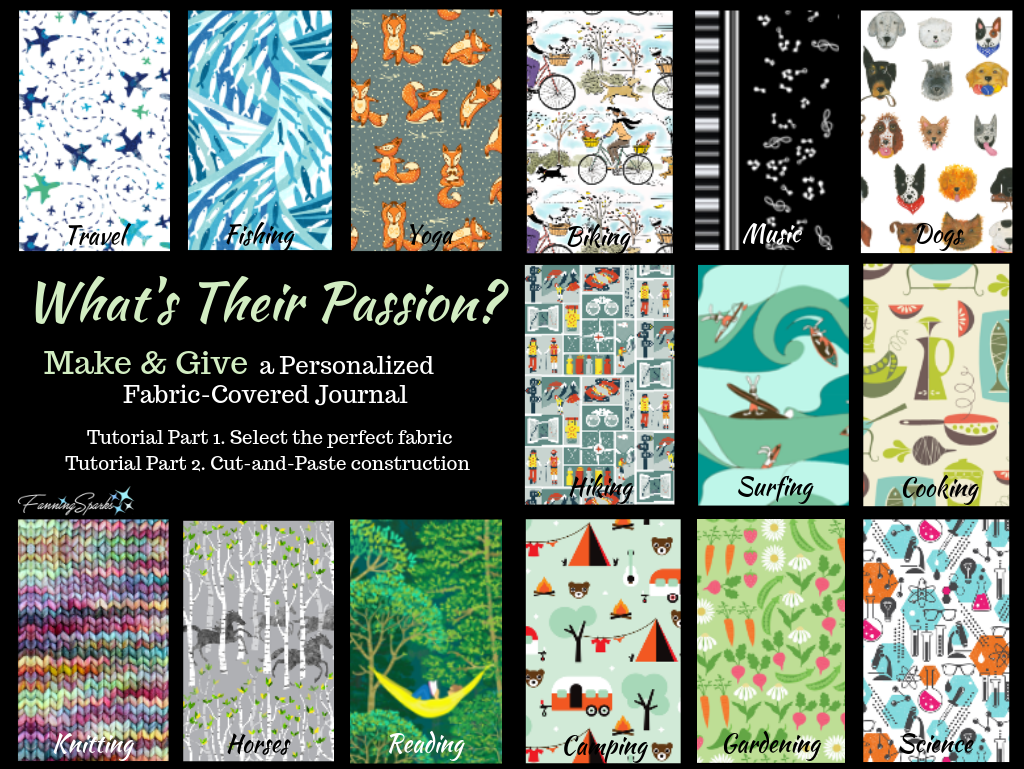
Fabric is available from a number of sources but my go-to source is Spoonflower. As noted on their website “The Spoonflower community has grown to over 3.3 million creatives who use the Marketplace of more than one million designs”. I love how Spoonflower enables independent designers and creatives to offer their designs to the world. Check out my previous blog post, DIY Personalized Fabric-Covered Journal Tutorial Part 1, for a closer look at Spoonflower along with tips for choosing the perfect fabric. The below image references a personalized fabric-covered journal but it’s equally relevant to this project.
After finding the ideal fabric, it’s time to begin. Here are the step-by-step instructions to make a personalized Buff-Style Tube Scarf.
Supplies Needed
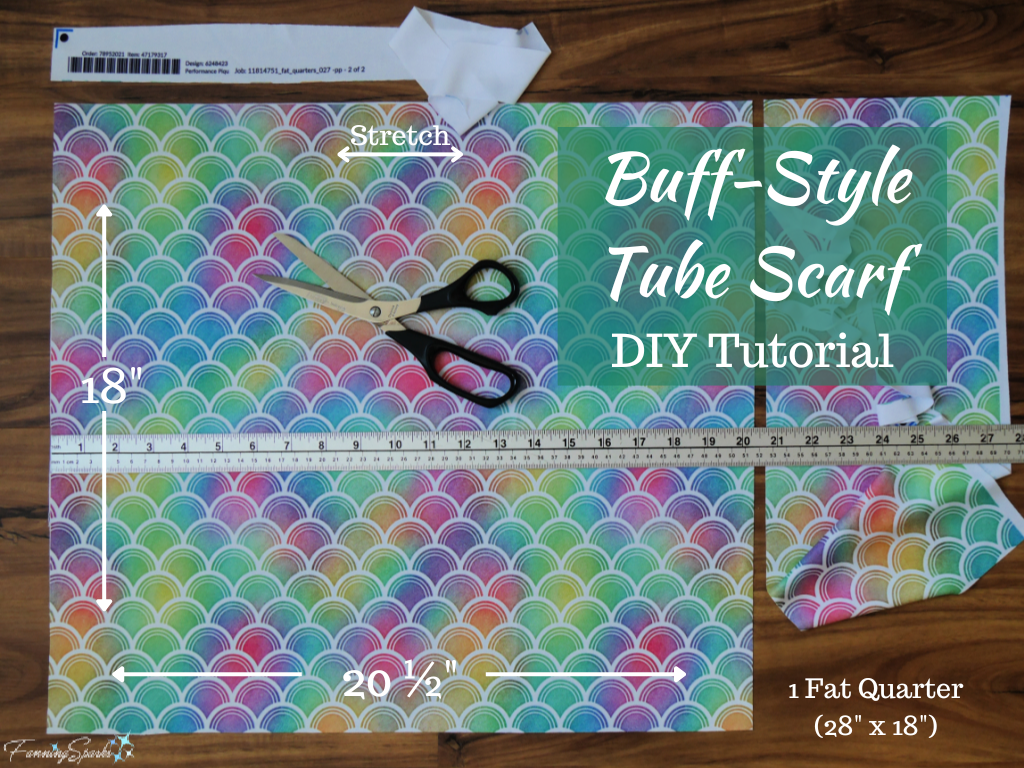
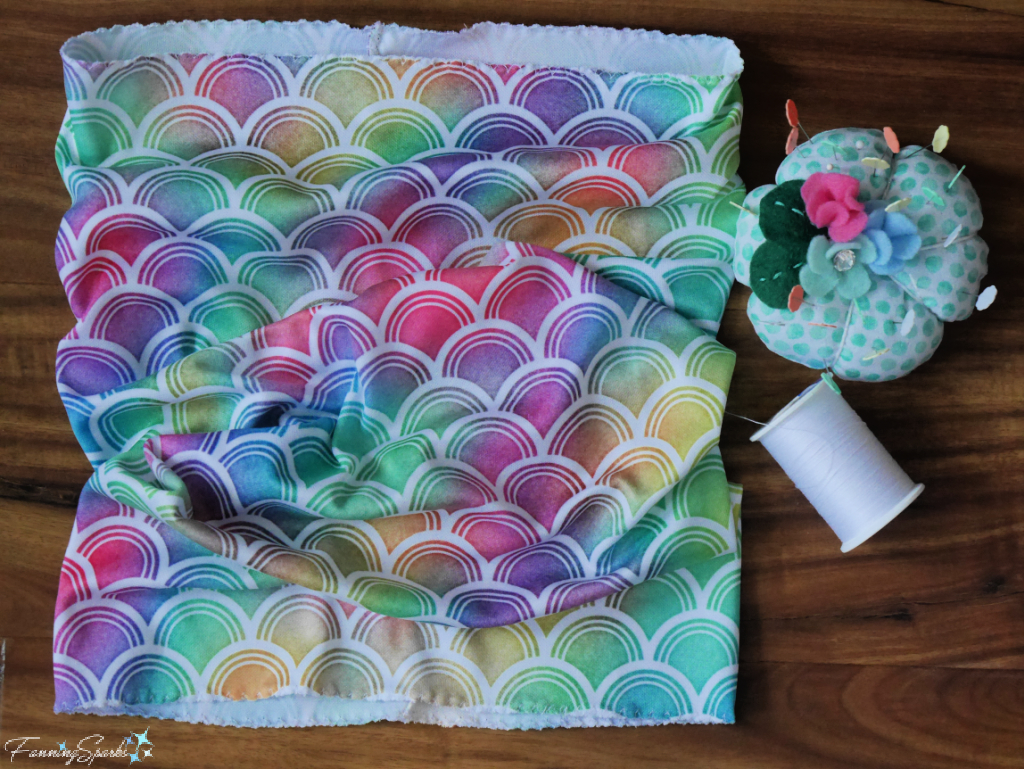
. Fabric: ONE fat quarter of lightweight knit fabric. I chose “Bright Rainbow Watercolor Scale Pattern 3” by Clarissa Hughes of Raccoon Girl in Performance Piqué from Spoonflower. This fabric has 1-way stretch with moisture wicking and wrinkle-resistance properties. The fabric is 56” wide so a fat quarter measures 28” wide x 18” long.
. Thread: In a color matching the fabric.
Tools Needed
. Ruler or Measuring Tape
. Scissors
. Pins
. Sewing Machine with Stretch Stitch
Instructions
Step 1 Cut Fabric Place fabric on flat surface with stretch running side-to-side. Trim off any selvages and un-printed sections. Measure 20 ½” from one side edge, across the stretch, and cut. Ensure length is 18”.
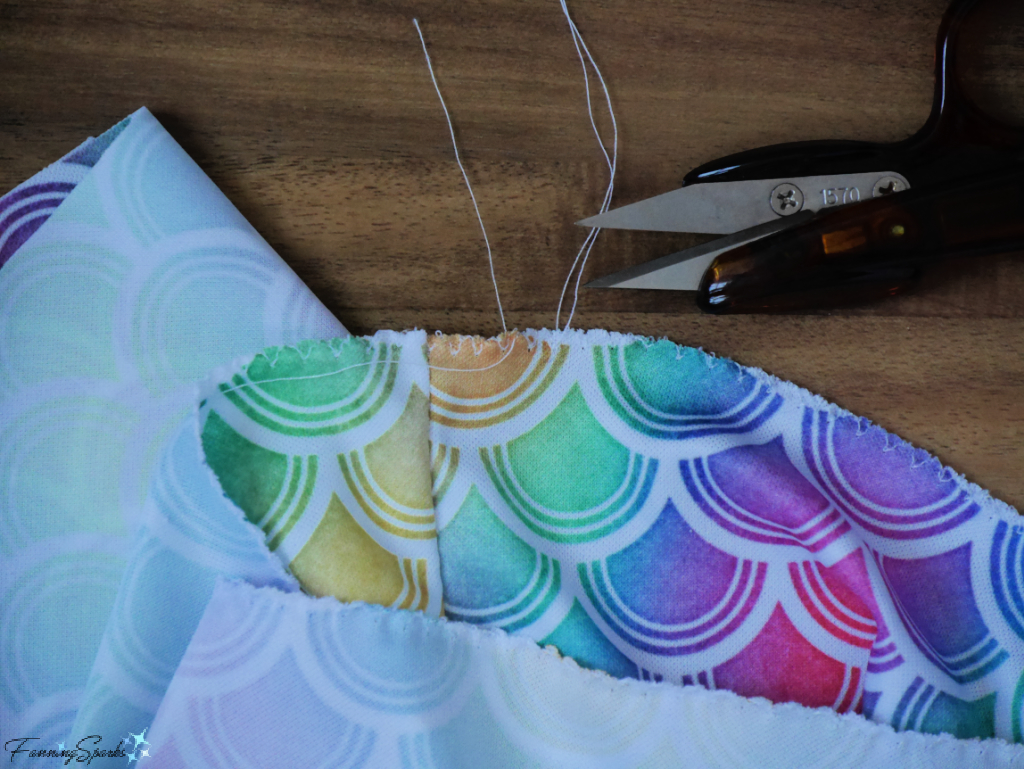
Step 2 Pin Fabric With right sides together, fold the fabric in half bringing the two 18” edges together. Align side edges and pin. The folded rectangle should measure 18” long x 10 ¼” wide.

Step 3 Sew Side Seam Select setting to stitch and overcast stretch fabric on the sewing machine. Sew the side edges together turning the rectangle into a tube.
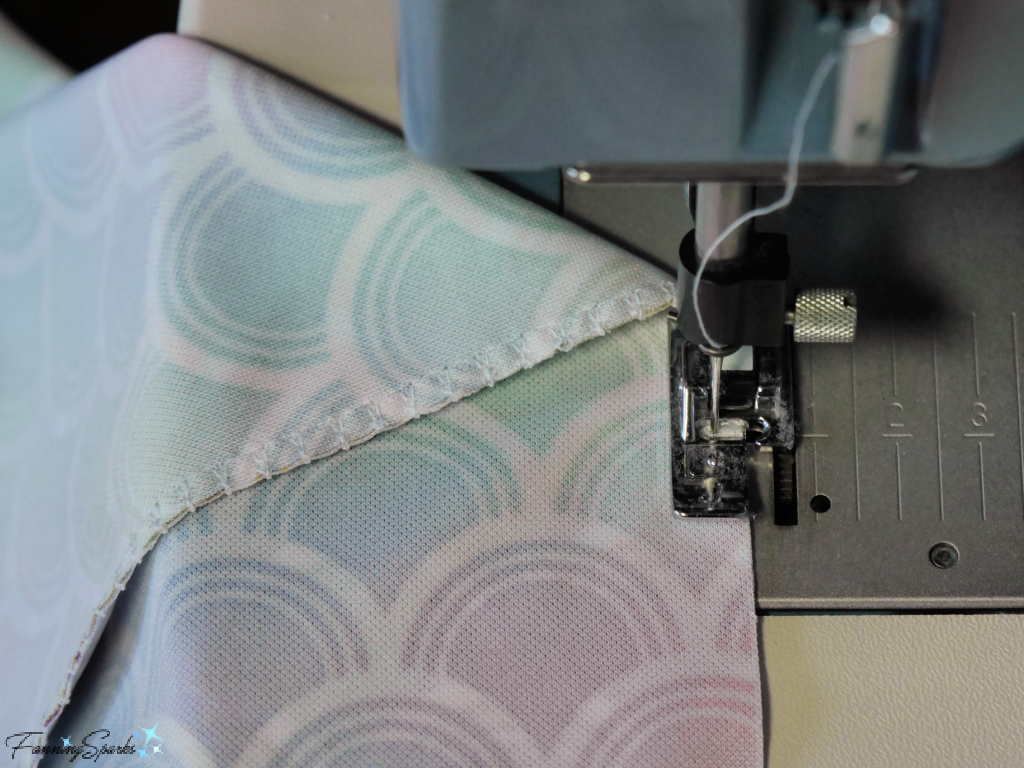
Step 4 Finish Edges Select setting to overcast stretch fabric on the sewing machine. Finish the top and bottom edges of the tube with an overcast stitch.
Step 5 Turn Right Side Out Simply turn the tube right side out to finish.
The Buff-Style Tube Scarf is so easy to make, I couldn’t resist making another one in red and green plaid for the upcoming holidays. I chose the same knit fabric from Spoonflower in a design called “Custom Christmas Red and Green Apple Plaid” by Hialeah Florida of Eclectic House.
Please pin this image to share or save for future reference.

The following unique products are featured in this post:
. Willow Digital Stamp by Janet Roberts of Pink Gem Designs on Etsy
. Bright Rainbow Watercolor Scale Pattern 3 fabric design by Clarissa Hughes of Raccoon Girl on Spoonflower
. Custom Christmas Red and Green Apple Plaid fabric design by Hialeah Florida of Eclectic House on Spoonflower.
Thank you all for your lovely work. And special thanks to Marian for inspiring this project and blog post.
Check out the Spoonflower website for more information about their print-on-demand fabrics. As noted, I’m a big fan—I even have a little FanningSparks shop on Spoonflower which offers a few cut-and-sew pillows. There are 6 designs with coordinating stripes—3 photos of flowers in the Floral World Tour Collection and 3 photos of ferns in the Bring in the Outdoors – Fern Collection.
You can learn more in the FanningSparks blog posts:
. Bring in the Outdoors – Fern Collection
. Basic Pillow DIY Tutorial
. Announcing the Floral World Tour Collection.
1. A Buff-Style Tube Scarf is a very versatile accessory.
2. Sometimes, the simplest things are the most useful.
3. Consider a Buff-Style Tube Scarf to make and give this holiday season.

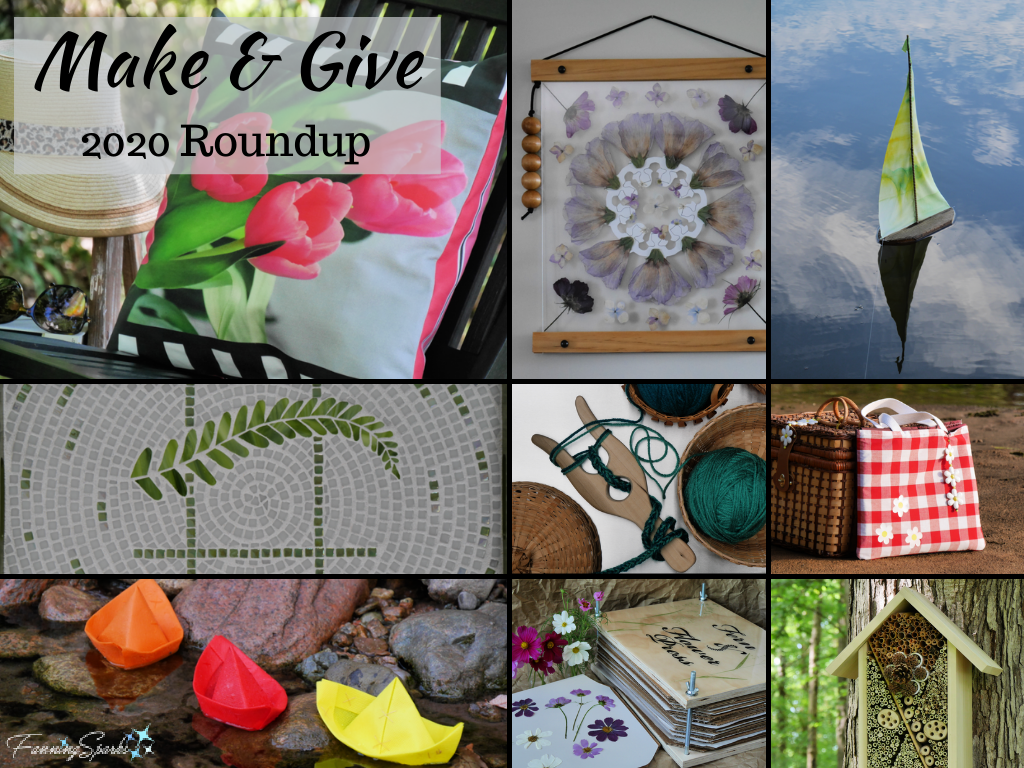
It’s time for the annual FanningSparks Make & Give Roundup. This blog post showcases 12 making projects—featuring a variety of materials and techniques—which I’ve shared on the blog this past year. Some of the posts provide detailed step-by-step instructions while others include an overview of the project. All of these items are one-of-a-kind—perhaps one or two would be ideal for someone special on your holiday gift list!
Scroll down for explanations, photos and relevant links for each numbered Make & Give suggestion.
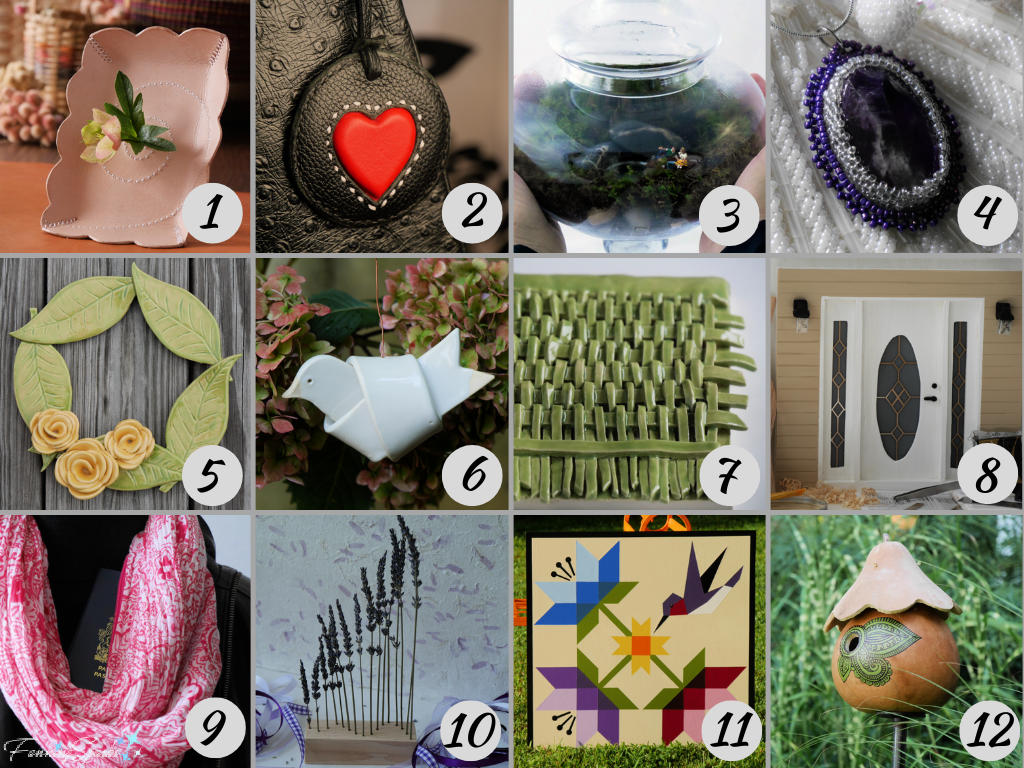
1. Leather Flower Frame
Anyone who appreciates the beauty of a flower bloom (and who doesn’t?) is likely to appreciate this unique way to showcase a single, cut flower. It’s a flower frame—the merger of a bud vase and a picture frame. Made of leather, this simple leatherworking project involves basic leatherworking skills including template building, accurate cutting, precise stitching and edge finishing. Minimal leather supplies and leatherworking tools are needed.

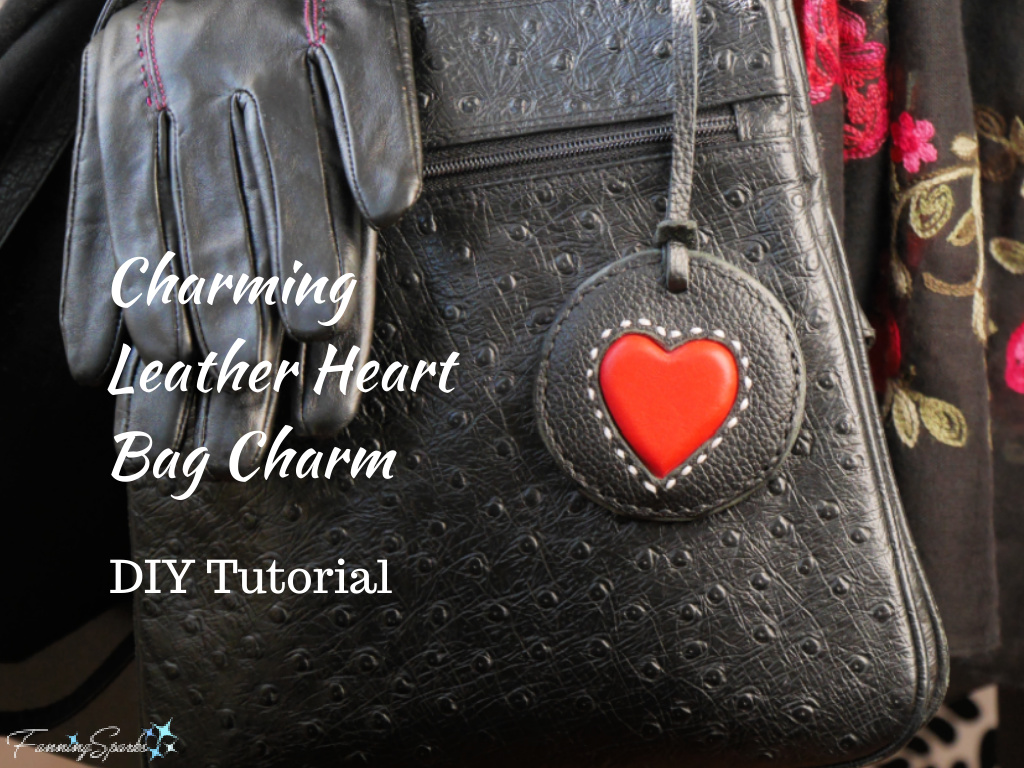
2. Charming Leather Heart Bag Charm – DIY Tutorial
Leather bag charms have been in vogue for a while. Two years ago, one online resource confidently claimed that bag charms were the new trend and it was no longer acceptable to have a bag without a charm. Well… acceptable or not, adding a charm to a bag can boost its personality—especially if the bag charm is a one-of-a-kind, handmade gift. When attached to the recipient’s favorite bag, this bag charm will serve as a daily reminder of your kind wishes.
This circular bag accessory, featuring a pretty red heart, is made of black leather. The step-by-step instructions provided in the DIY tutorial make this project achievable for a beginner leatherworker.
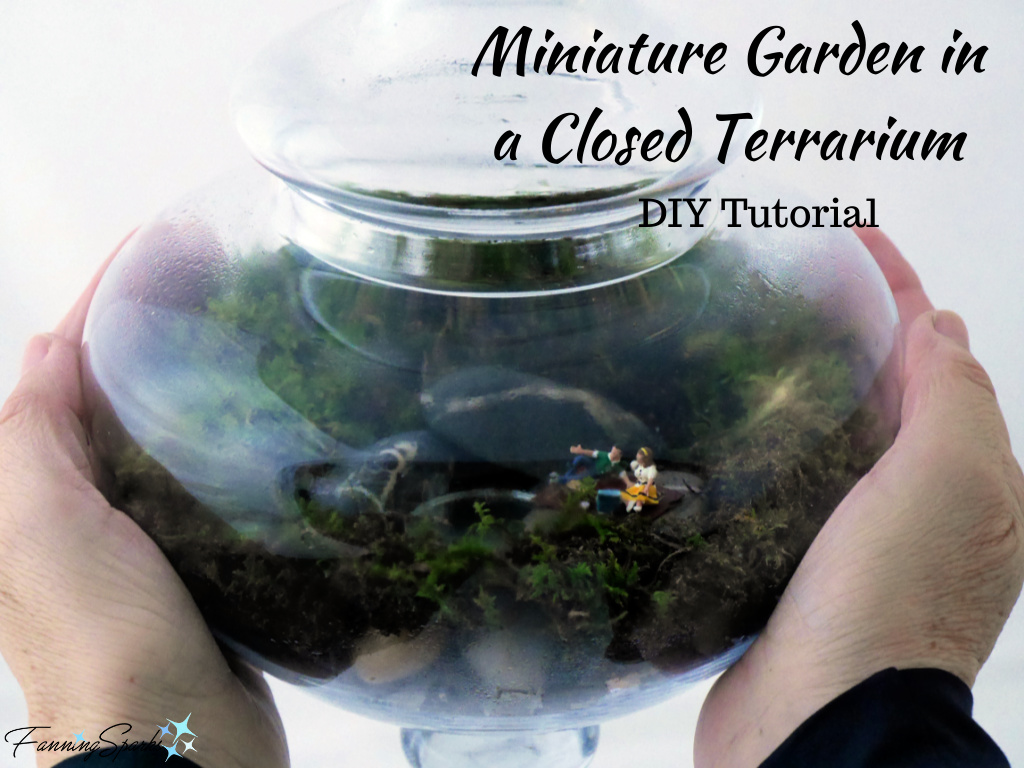
3. Miniature Garden in a Closed Terrarium – DIY Tutorial
This project, a miniature garden in a closed terrarium, would be ideal for someone who likes to garden or tend houseplants. All the best gardening activities are involved—planning the design, choosing the plants, preparing the soil, planting and tending the garden—just on a much smaller scale. It could be presented as a kit for the recipient to assemble or as a finished terrarium for the recipient to enjoy. Step-by-step instructions to make a closed terrarium are included in the blog post.
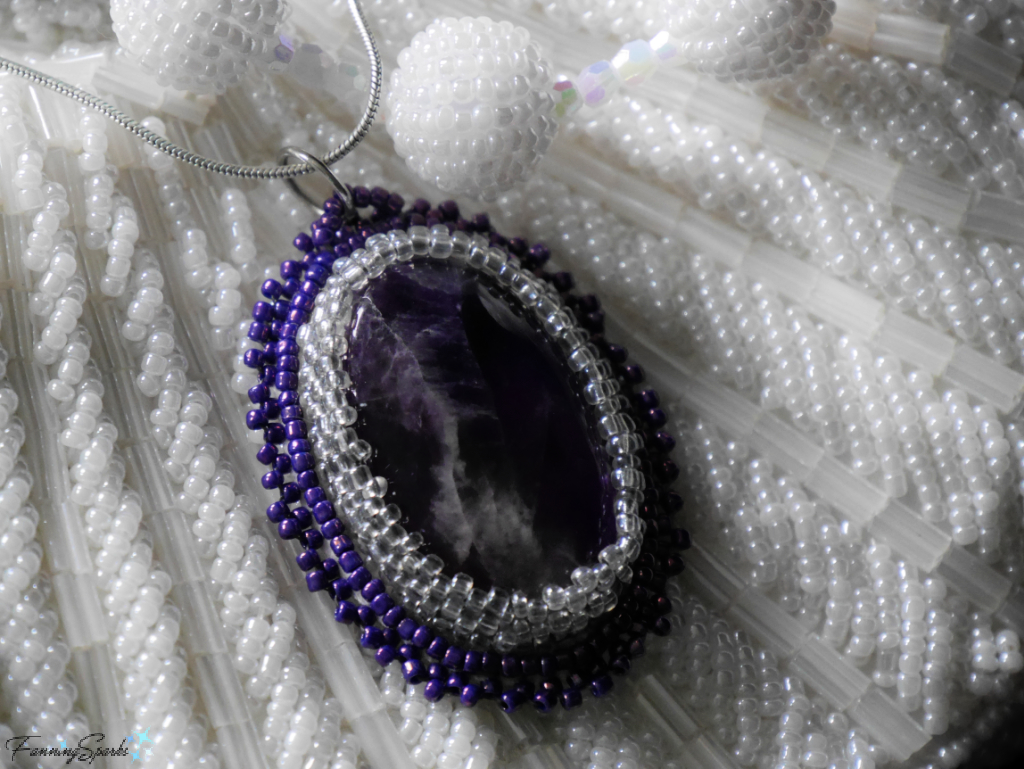
4. Beaded Amethyst Cabochon Pendant
A cabochon is a stone, gem or other object (such as glass) with a flat back and smooth dome surface. Surrounding a cabochon with an intricate pattern of tiny seed beads can transform it into an attractive, stylish pendant. A bead-embroidered semi-precious stone pendant may be the perfect gift for someone special.
Check out the blog post for an overview of materials and supplies needed. It doesn’t include step-by-step instructions but it does explain the process and suggests an excellent online resource. Basic sewing skills and some familiarity with beading will make this project easy to complete.
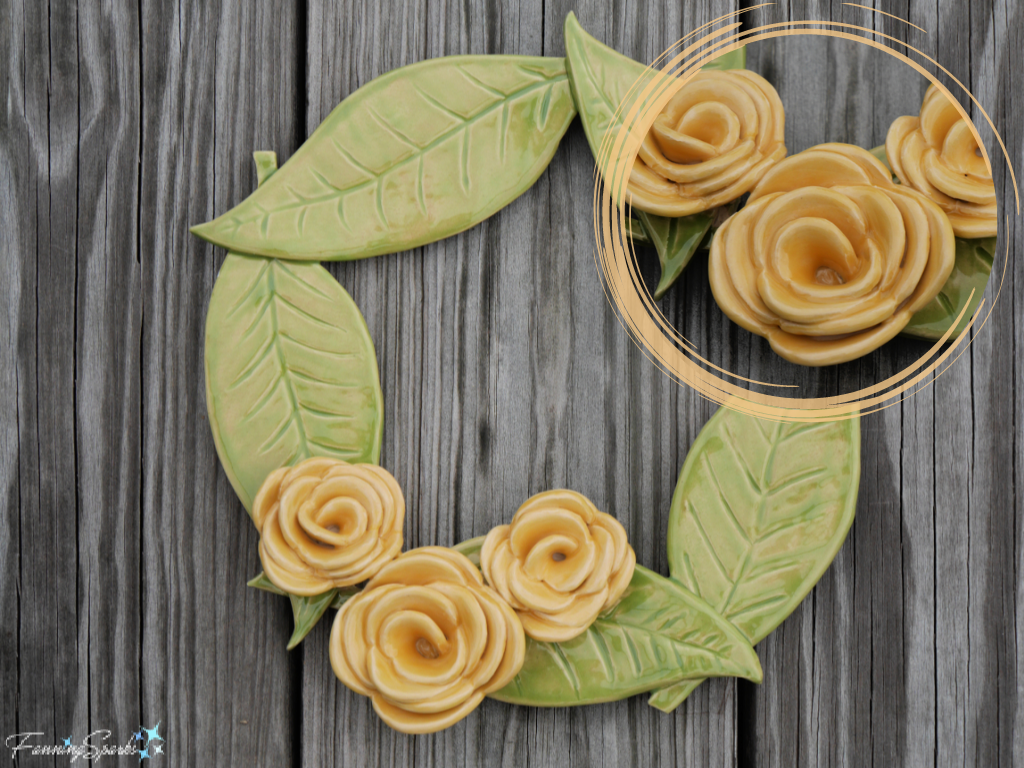
5. Ceramic Floral Wreath
The next three Make & Give suggestions hail from the pottery studio. Anyone who works with clay will know the gifting possibilities are endless—mugs, bowls, vases, plates, jugs, jars, trays and so on can be created with a little clay and some knowhow.
I’ve made quite a few decorative ceramic objects which can be tailored to suit a recipient’s preferences. The below ceramic floral wreath is a case in point. This wreath is based on 10-inch circle but it could be made in any shape or size. It showcases 3 rose-like blooms but there could be more or less flowers in any form. The green leaves and yellow flowers could be made in any color.
The blog post provides an overview of the creation process as well as a template for the roses. Basic hand-building with clay skills, as well as access to a kiln, are required for this project.
6. Ceramic Knotted Bird Ornaments
This next clay project is very simple. I made a small flock of these ornament-like, ceramic birds for my flower gardens but they could also be displayed on a Christmas tree. I shared a template along with an explanation of how the birds are made in the blog post.
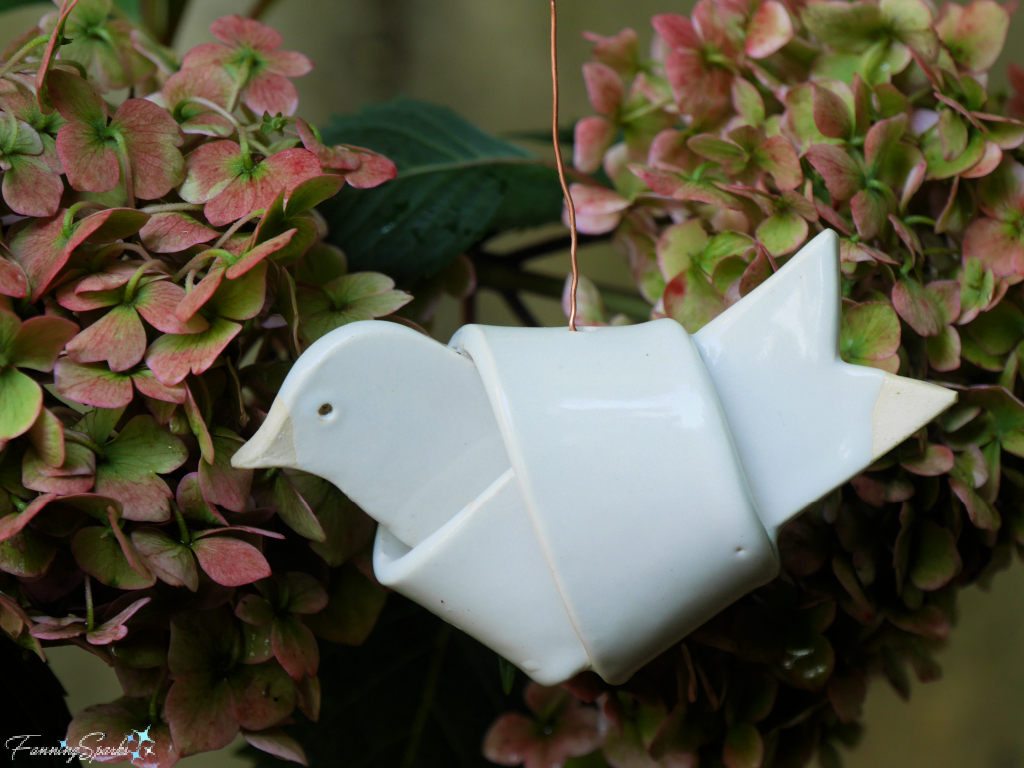
Just last week (see Handmade Ornaments for the Holidays), I used this same template to make a paper ornament. Here’s how the knotted birds look in pretty cardstock paper.

7. Ceramic Decorative Tiles
This next suggestion, a collection of 12 ceramic tiles, would be quite an ambitious undertaking for this holiday season. But tackling one or two tiles would be quite achievable. These tiles can easily be tailored in a style, pattern and color to suit the recipient. They can be made in a variety of sizes and shapes—mine are about 7” wide x 6” high. Check out the blog posts, Talk About Tiles! and Still Talking About Tiles! for lots of inspiration.
Basic hand-building with clay skills, as well as access to a kiln, are required for this project. An overview of the process along with some tips and tricks are included in the blog post.

8. Make Your Own Tiny Door – DIY Tutorial
This would be a great gift for a proud homeowner—a custom, tiny replica of the recipient’s front door! Detailed step-by-step instructions, in a two-part tutorial, explain how to take a photo of the recipient’s front door, create a 1:12 scale template, and then make the actual miniature door. It’s surprisingly easy—all you need are basic computer software skills, beginner woodworking skills and general crafting knowhow.

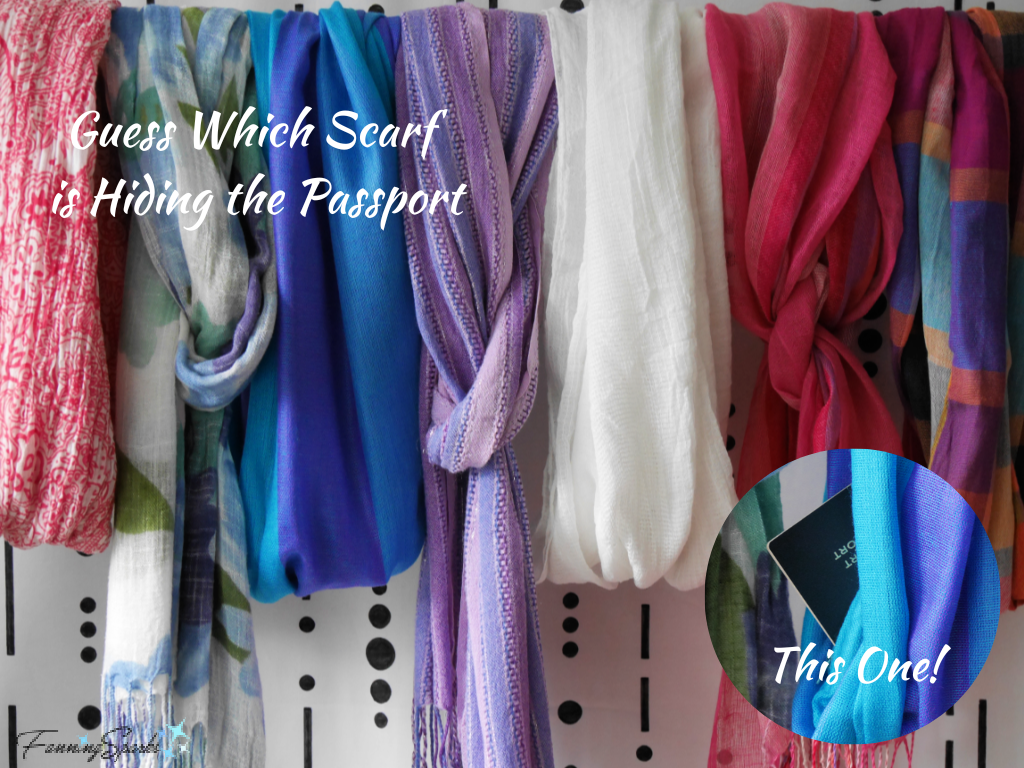
9. Traveler’s Infinity Scarf with Secret Zipped Pocket – DIY Tutorial
This ingenious fashion accessory is perfect for the traveler on your holiday gift list. It’s an infinity scarf with a secret zipped pocket—perfect for keeping travel documents close at hand while hiding them out of sight. But these nifty scarves aren’t limited to a passport and vaccination card, they can also stash a smart phone, lipstick, car key or cash! With the detailed step-by-step instructions in the blog post and beginner sewing skills, it’s easy to add a secret zipped pocket to a rectangular scarf and convert it into an infinity scarf.
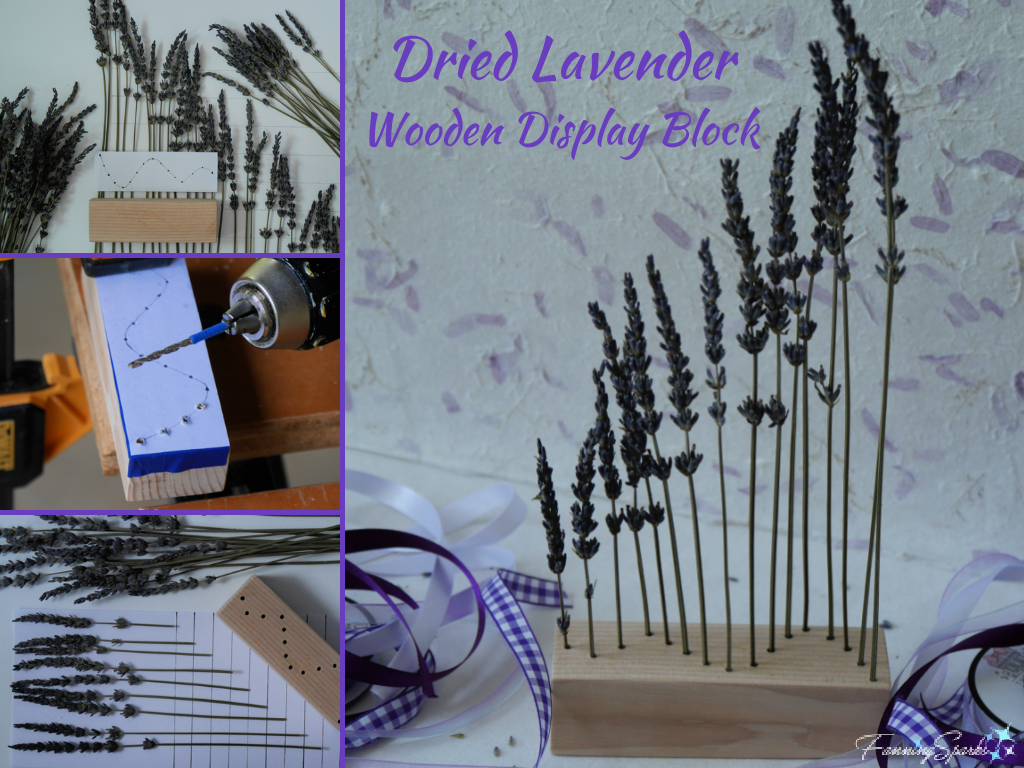
10. Dried Lavender Wooden Display Block
A scan through the latest home decorating trends confirms dried flowers and grasses made a comeback. The trend is attributed, in large part, to an increased focus on sustainability. Dried flowers also have the advantage of needing no water so they can be displayed in a variety of innovative ways. To that end, I made a small wooden display block to showcase some dried lavender blooms. It could be modified to hold any type of dried flowers or grasses. It may just be the simplest handmade gift I’ve ever shared.
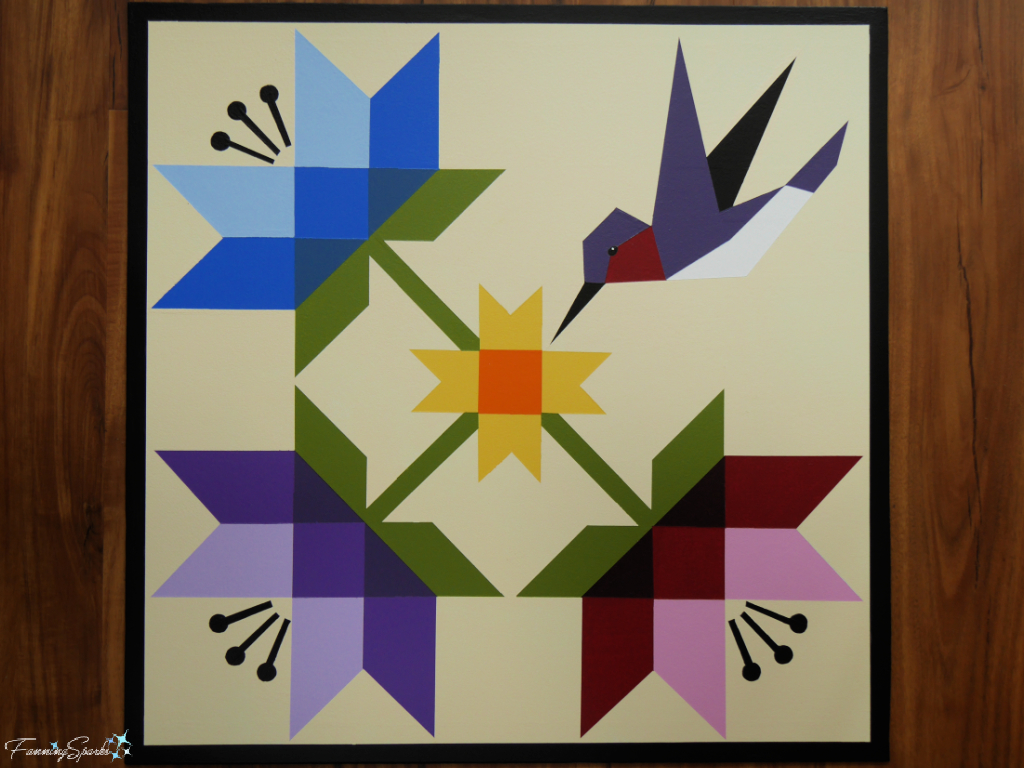
11. Barn Quilt Block
Barn quilts were all the rage about 20 years ago. While the format has evolved, interest in their beautiful patterns and joyful colors remains strong. Nowadays, barn quilts are more likely to be mounted on porches, garages, sheds and fences than barns. Barn quilts can be made in a wide variety of patterns and colors so they’re easy to tailor to the recipient’s interests and preferences.
The blog post provides an overview of the materials and supplies needed as well as the process involved. Basic crafting skills as well as a good dose of patience are needed for this project.
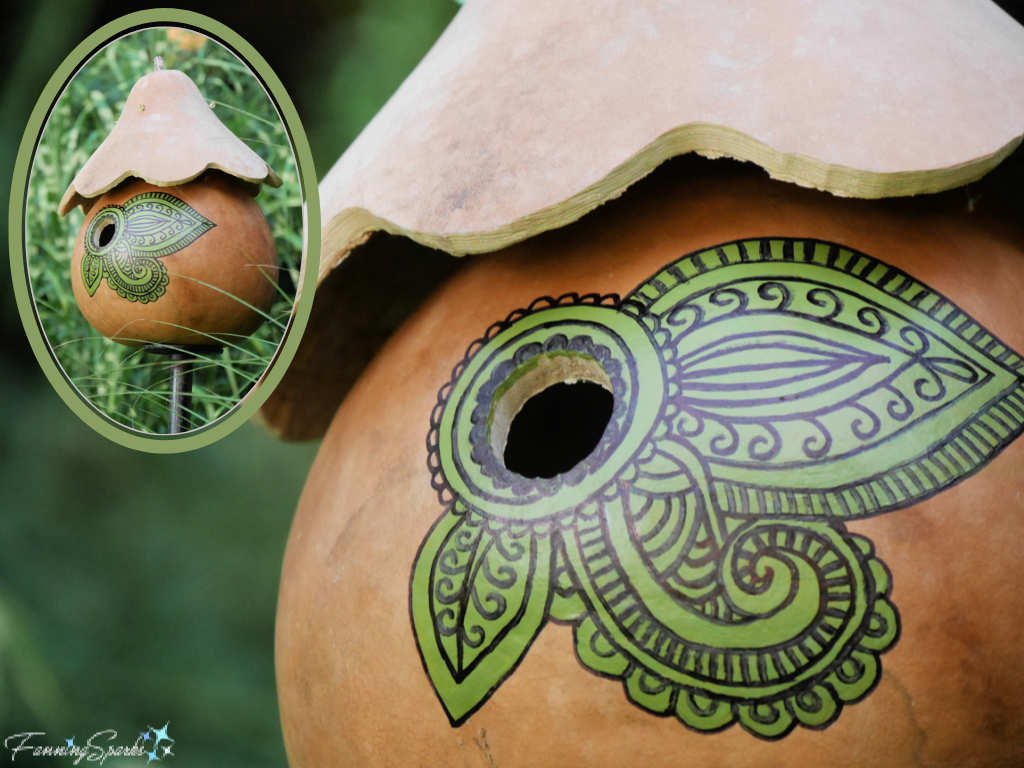
12. Chickadee Gourd Nest Box
Nest boxes are typically customized to meet the nesting needs of specific birds. This gourd nest box targets chickadees—those delightful, little black-capped songbirds.
The blog post provides an overview of the materials and supplies needed as well as the process involved. Two gourds yielding at least an 8-inch deep cavity are needed. Basic crafting skills make this project achievable.
This completes the Make & Give 2022 Roundup of FanningSparks’ projects. You may also want to consider some ideas from previous years. Check out the following blog posts for a variety of make-and-give ideas for holiday gift-giving.
. Make & Give 2021 Roundup
 . Make & Give 2020 Roundup
 . Make and Give 2019 DIY Tutorial Roundup

For your convenience, here’s a summary of the 2022 Make & Give suggestions mentioned in this blog post:
1. Leather Flower Frame
2. Charming Leather Heart Bag Charm – DIY Tutorial
3. Miniature Garden in a Closed Terrarium – DIY Tutorial
4. Beaded Amethyst Cabochon Pendant
5. Ceramic Floral Wreath
6. Ceramic Knotted Bird Ornaments
7. Ceramic Decorative Tiles
8. Make Your Own Tiny Door – DIY Tutorial
9. Traveler’s Infinity Scarf with Secret Zipped Pocket – DIY Tutorial
10. Dried Lavender Wooden Display Block
11. Barn Quilt Block
12. Chickadee Gourd Nest Box
Make & Give suggestions from previous years can be found here:
. Make & Give 2021 Roundup
. Make & Give 2020 Roundup
. Make and Give 2019 DIY Tutorial Roundup
1. There are many options for handmade gifts.
2. Making a one-of-a-kind gift for someone special signals care and affection.
3. Consider making and giving gifts this holiday season.

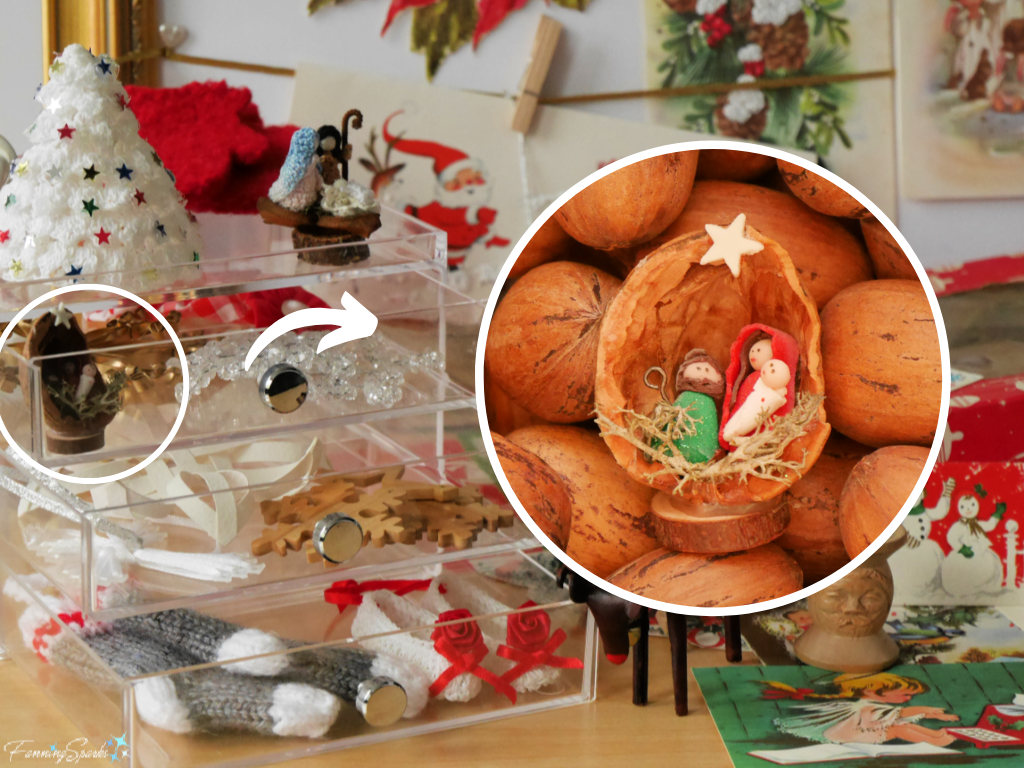
There’s a treasure trove of inspiration in my studio! Handmade creations are tucked away in every nook and cranny. Favorites are on display. Project materials and works in process cover every surface. It can get a little chaotic but I wouldn’t have it any other way! This week, with the holiday season just around the corner, I pulled out my favorite Christmas ornaments to spark some creative ideas.
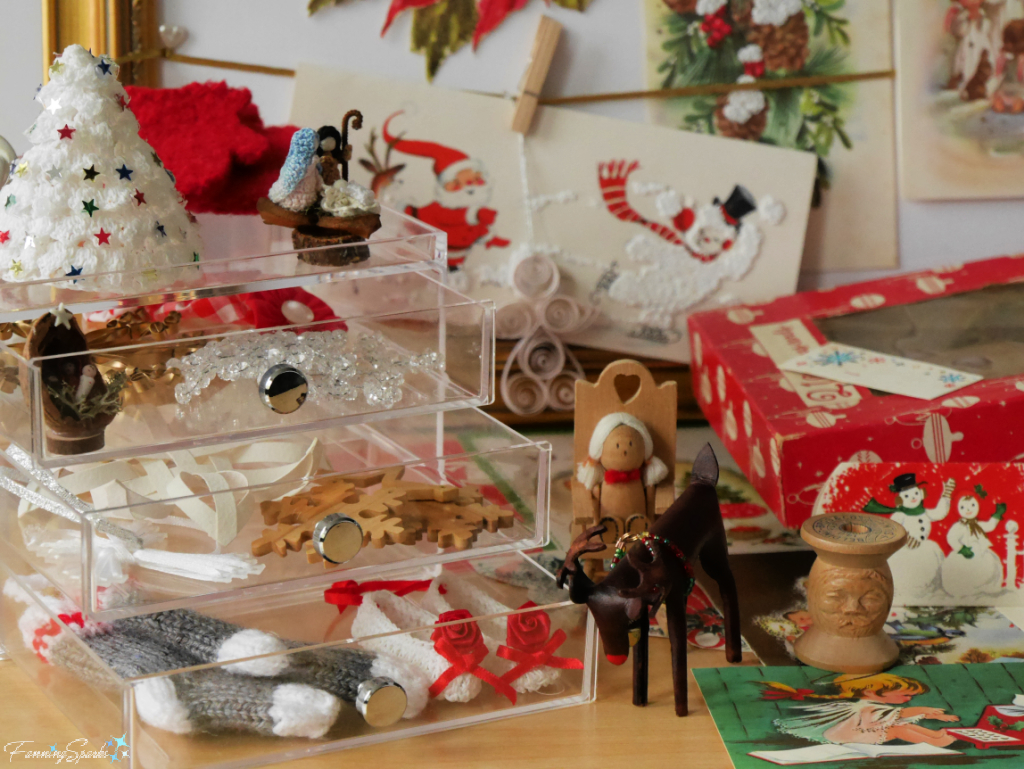
These ornaments are all handmade. They have been collected from a number of different sources including craft fairs, holiday markets and artist studios. Since they’re made by artisans, the materials and techniques vary greatly. For instance, there is a miniature nativity scene made with polymer clay figures built inside a nutshell. I found this delightful treasure at a street fair in Porto, Portugal.
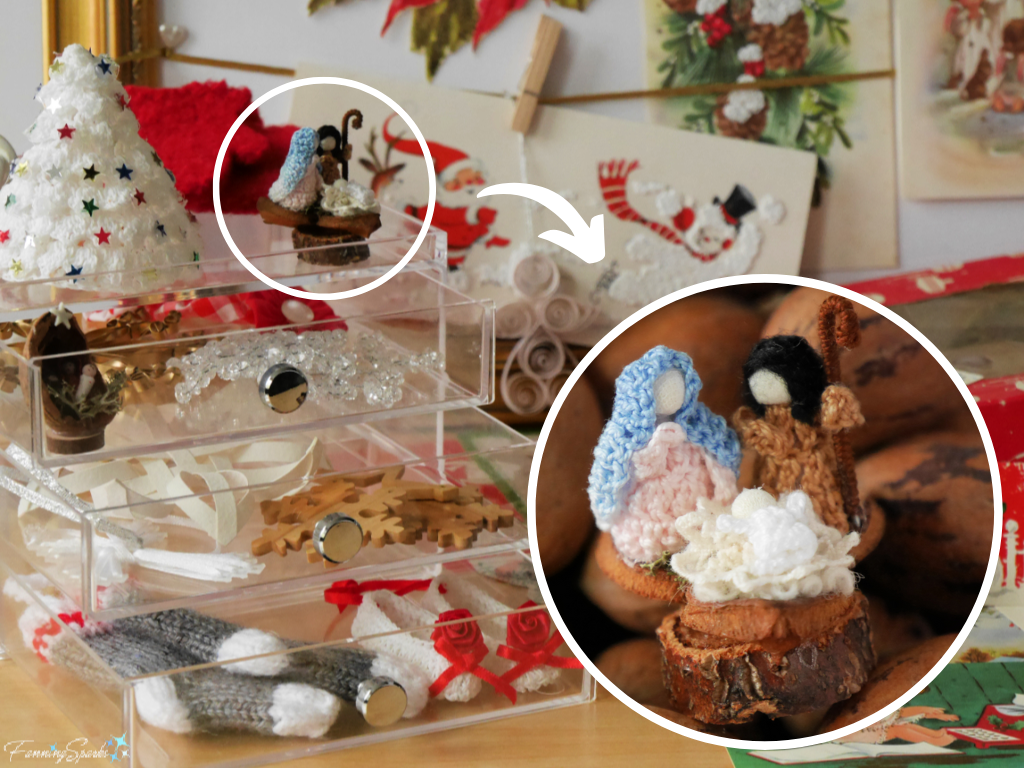
A second miniature nativity scene, this one with crocheted figures, was found at the same Portuguese street fair. This one has an artist signature—it’s a little difficult to read but it looks like “Açucena + Basery”. It’s very nicely done!
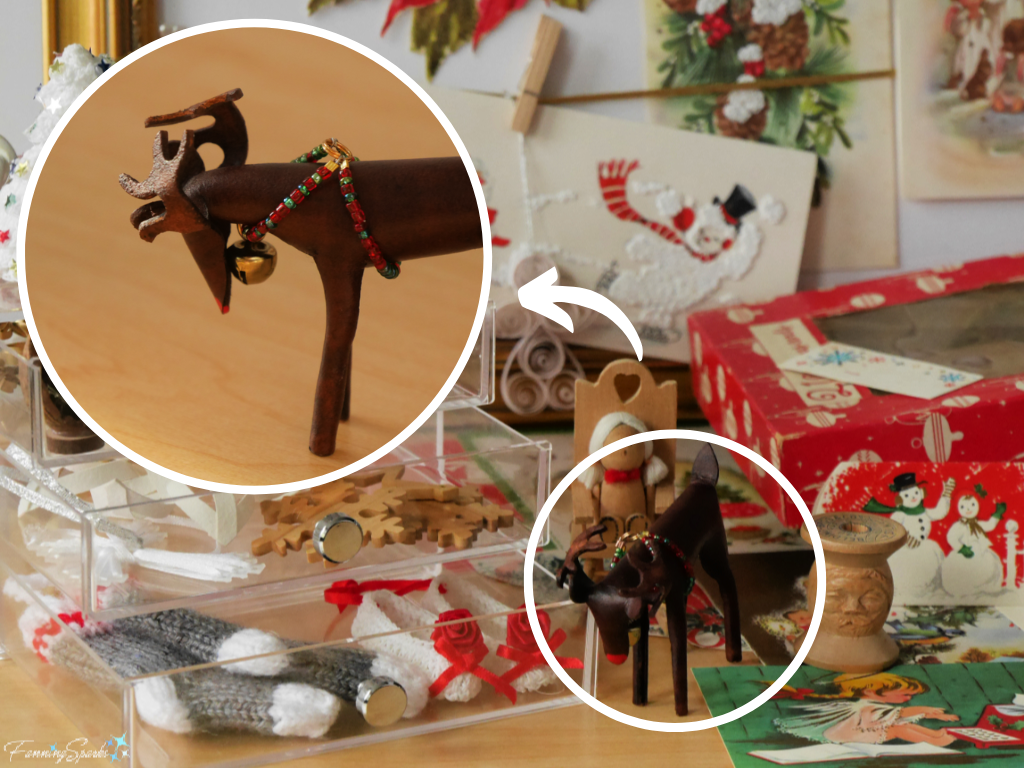
This festive reindeer, complete with beaded halter and shiny red, Rudolph-nose, is made of molded leather. It was found at a local Christmas market. Unfortunately, I don’t know the artist.
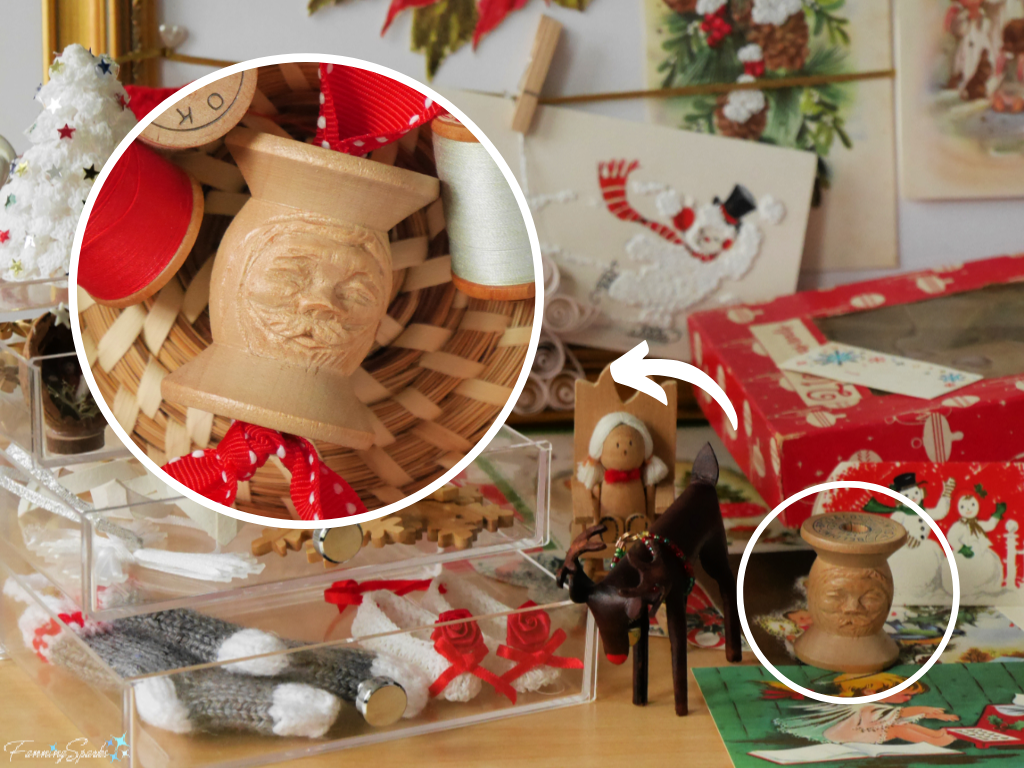
Accomplished woodcarver Carolyn Hall Anderson likes to carve charming Santa faces into vintage wooden spools. I had the pleasure of meeting Carolyn during the Thursday evening wood carving get-togethers (see previous blog post Carving in Brasstown) at the John C Campbell Folk School.
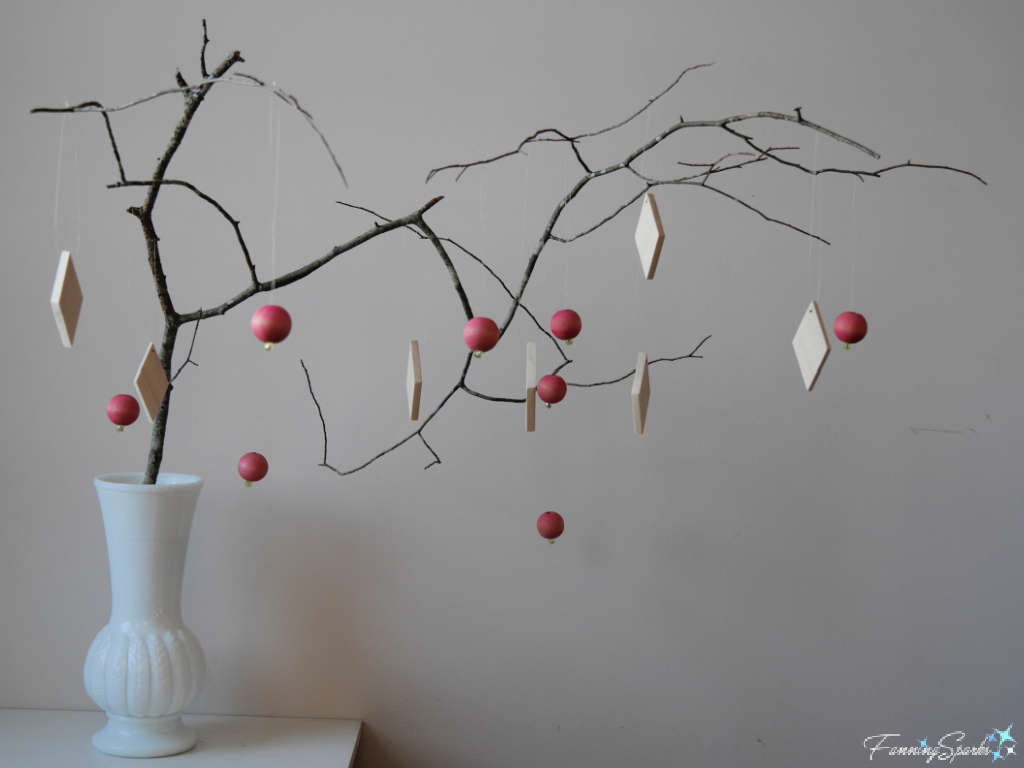
There are a few ornaments in the collection that I made myself. Regular readers might recognize a few of these ornaments from previous blog posts. For instance, the modest wooden ornaments, shown below, were included in the blog post Diamonds and Beads Wooden Wreath. It doesn’t get much simpler than wooden beads and diamond shapes!
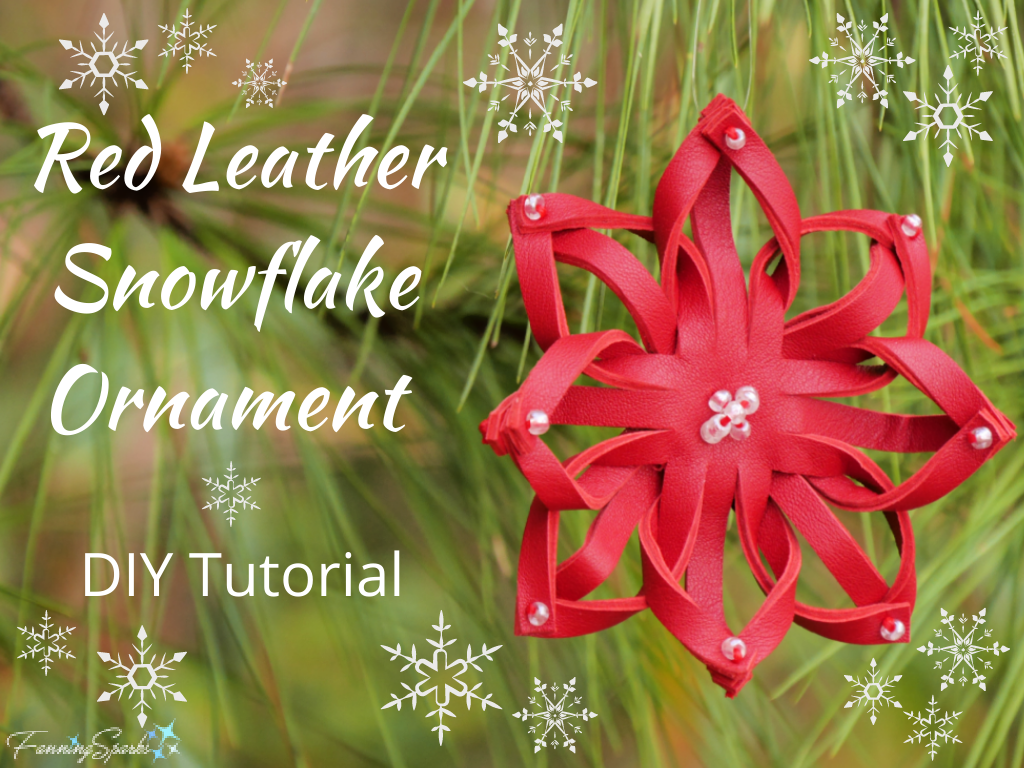
On the other hand, a series of complex twists and turns give the below snowflake its charm. It is made of repurposed leather—an unusual choice of material. Detailed step-by-step instructions, along with a complimentary download project template can be found in the blog post Red Leather Snowflake Ornament – DIY Tutorial.
Clay is a more common medium for figures and ornaments. Earlier this year, I made knotted ceramic birds to sprinkle around my flower gardens. I shared the steps to make this simple ornament in the blog post I Spy Something White. Here’s the complimentary download for the Knotted Ceramic Bird template. The knotted ceramic birds look great in my garden but they could just as easily be displayed on the Christmas tree.

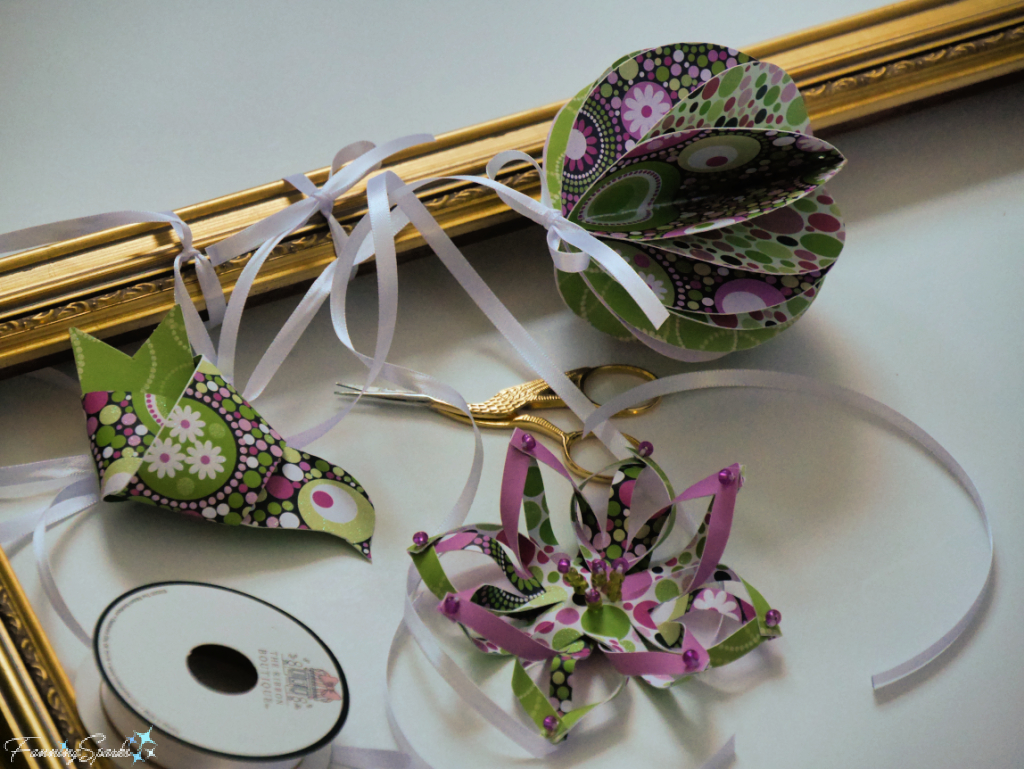
To jumpstart my creative play, I decided to make a few simple paper ornaments. I started by making a couple of knotted birds in pretty cardstock instead of clay. Here’s how they turned out.
And here’s the snowflake in the same pretty cardstock.
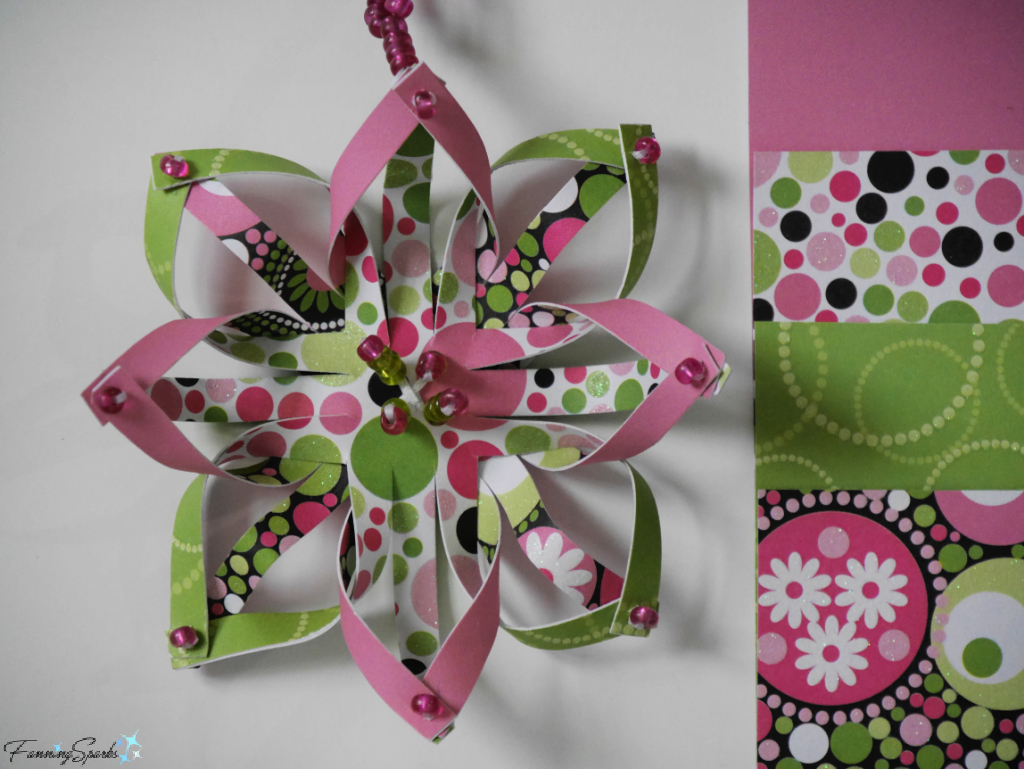
This led me to experiment with some new designs. I usually make a mockup from scrap paper to finetune the size, shape and assembly process for a new project. This design is an old classic—a half dozen circle shapes are glued together into a sphere with accordion folds.
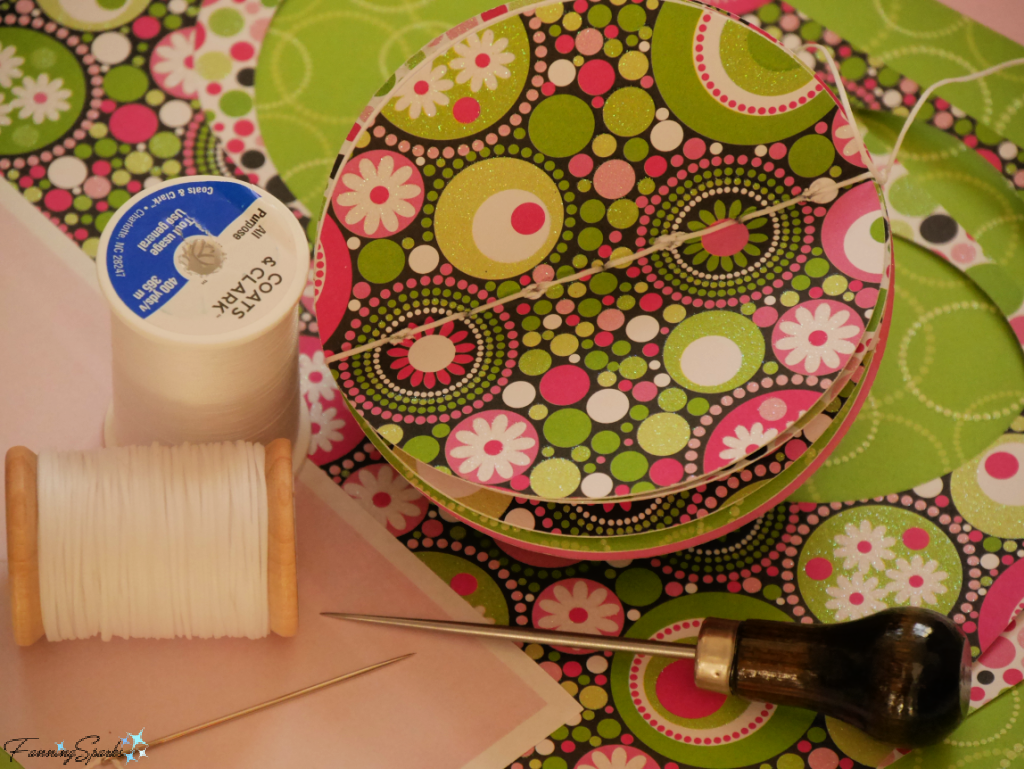
Choosing the ideal materials can require some trial and error. I chose to use the same pretty printed glitter cardstock as I’d used for the ornaments pictured above. I cut twelve 4” circles. The cardstock is only printed on one side so I glued the circles back-to-back. To begin the assembly, I stacked all six circles and stitched them together along the center. I found the Ritza Tiger thread I use for sewing leather worked best. This resulted in 12 half-circle flaps.
To form the sphere, the flaps are glued together along about one-third of the edge—alternating between the right and the left. The sequence is a) glue flap 1 right to flap 2 right b) glue flap 2 left to flap 3 left c) glue flap 3 right to flap 4 right and so on.
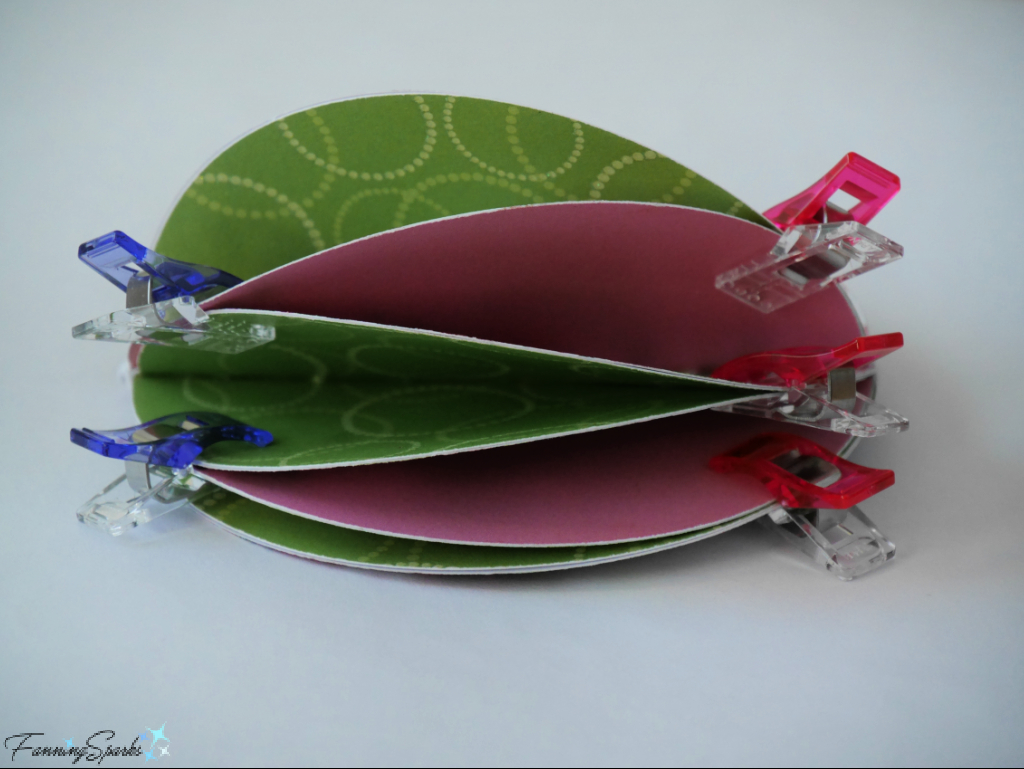
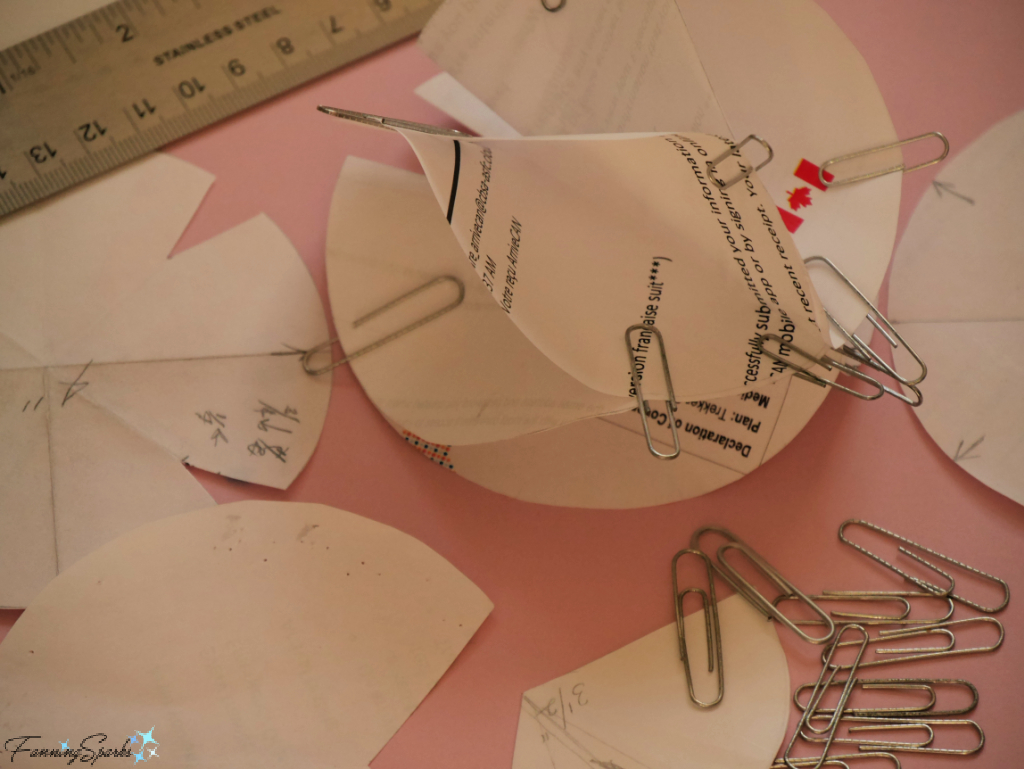
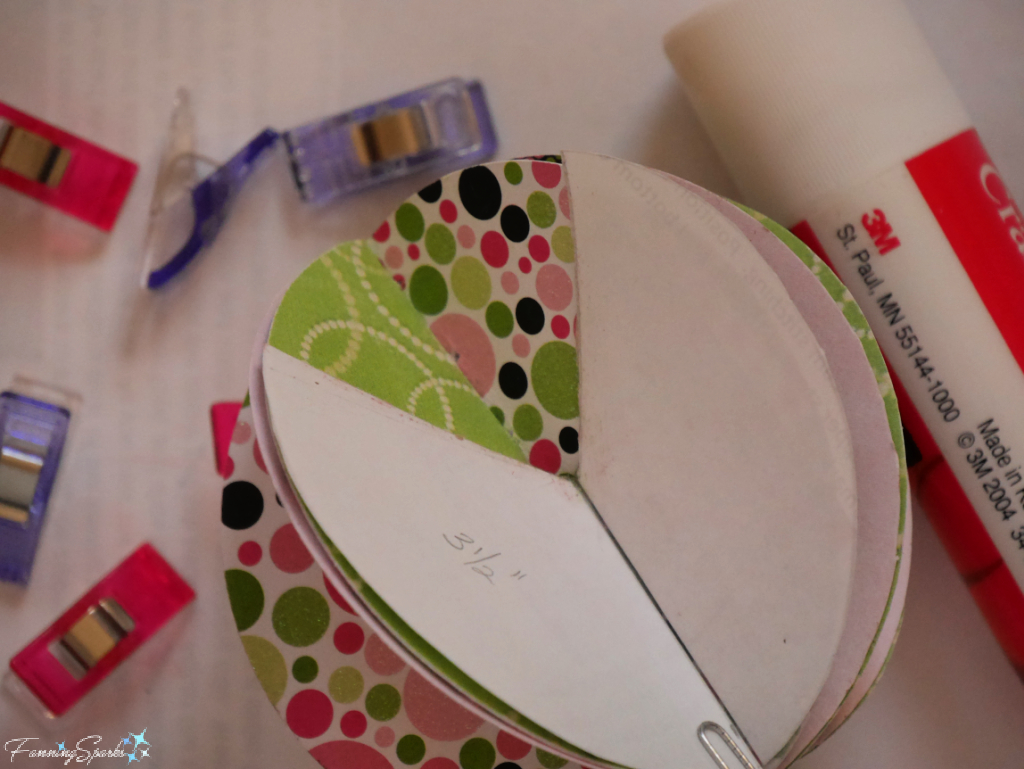
It quickly became apparent the double layered cardstock was too stiff—the flaps did not have enough flexibility to fan out into a full sphere. To fix this problem, I made a new set of circles. First, I copied two of the colored patterns onto regular printer paper. Then I cut four circles from cardstock and four circles from the printer paper. I glued the printer paper circles to the back of the cardstock circles. These circles were slightly smaller than the originals, 3.5” instead of 4″, and much more flexible. A small template from scrap paper made it easier to apply the glue accurately.
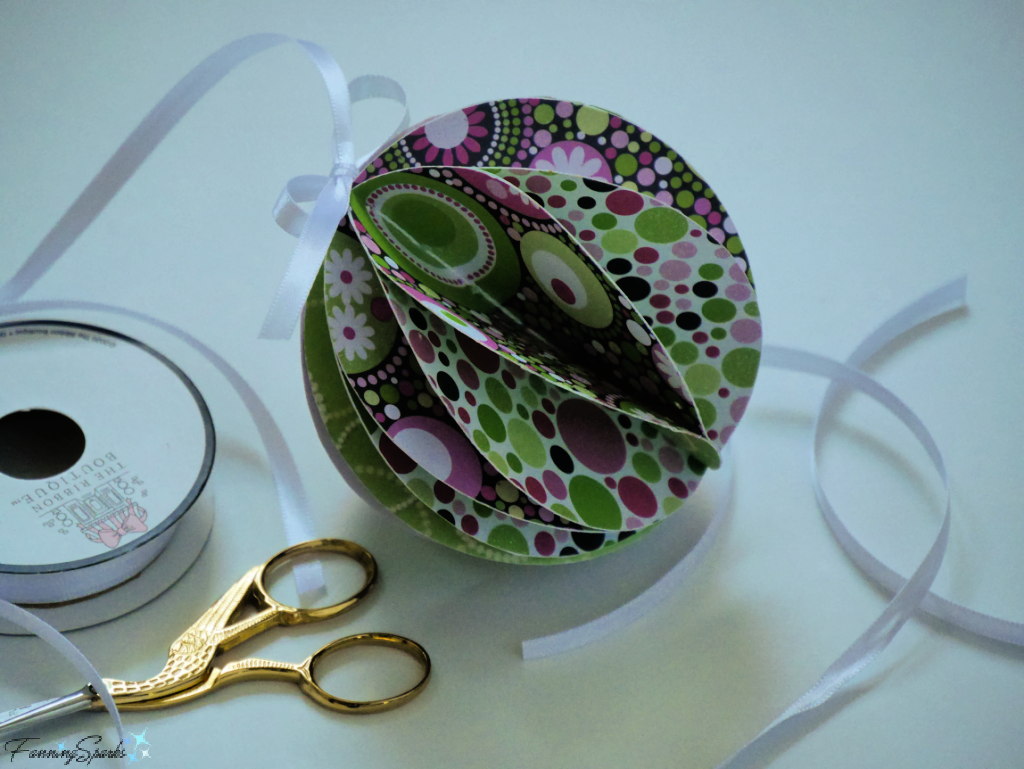
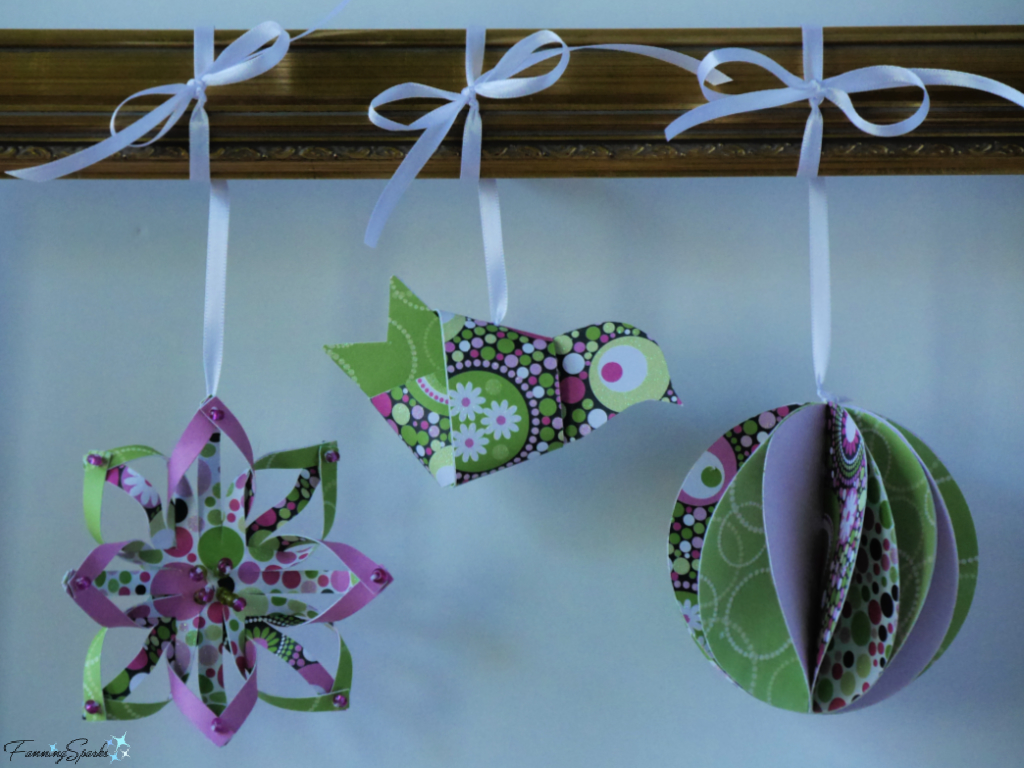
The second attempt was more successful. Here’s the finished accordion-folded paper sphere ornament.
To display my little trio of paper ornaments, I hung them from ribbons on an empty picture frame.
Here’s the final outcome—not bad for a few craft supplies and an afternoon of creative play!
The following FanningSparks blog posts are mentioned in this blog post:
. Carving in Brasstown
. Diamonds and Beads Wooden Wreath
. Red Leather Snowflake Ornament – DIY Tutorial which includes complimentary download project template
. I Spy Something White which includes a complimentary download for the Knotted Ceramic Bird template.
1. Be on the lookout for handmade ornaments when traveling away from home.
2. Consider supporting local artists and craftspeople.
3. Make time and space for creative play.