
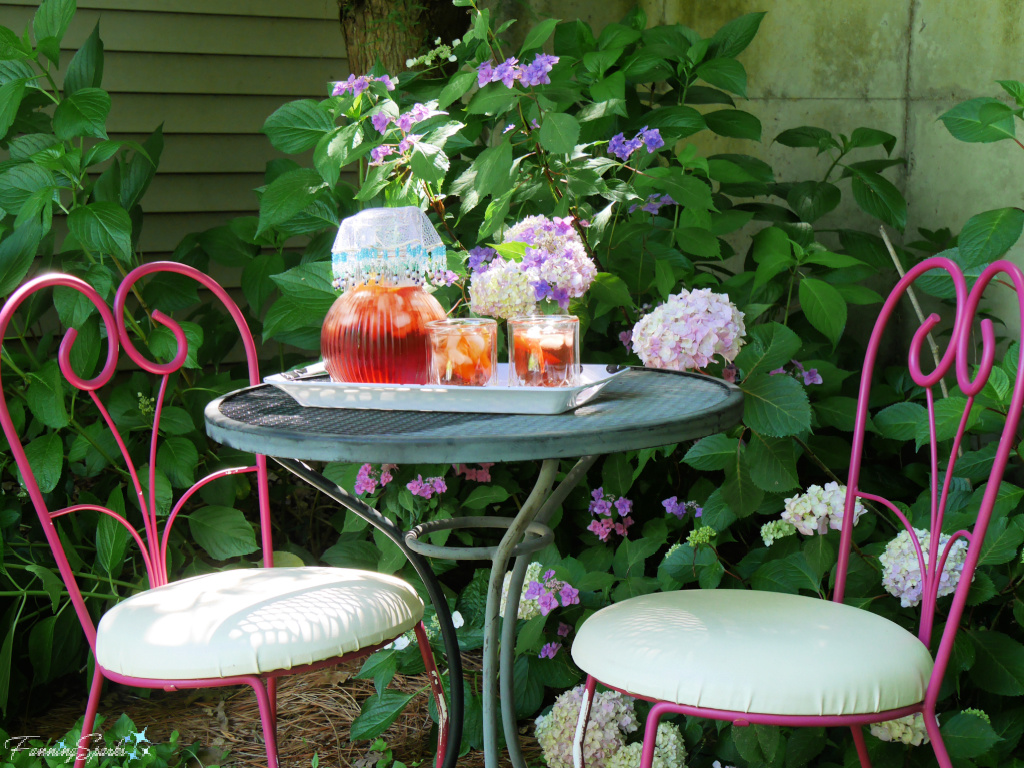
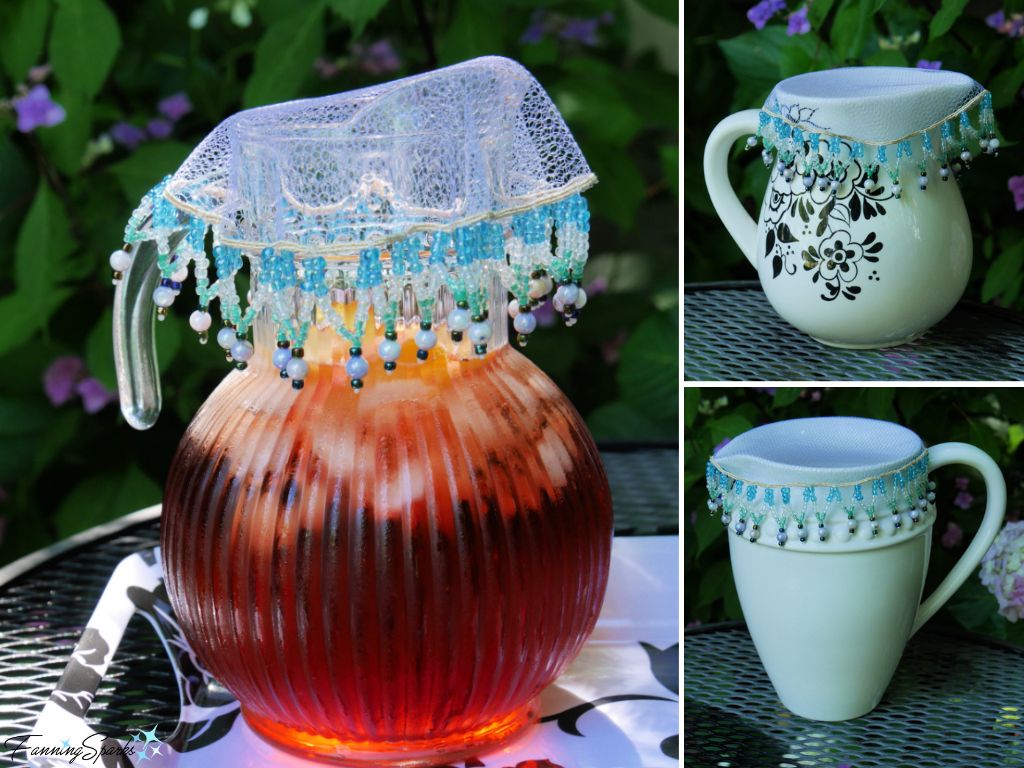
Next time you step outside with a refreshing, cold drink and a pitcher full of refills, you may want to consider protecting that pitcher with a simple, beaded net cover. These covers, traditionally called “jug covers”, serve to keep out insects and other unwanted elements.
 Jug covers were common in Victorian times when they were used to prevent bugs from getting into milk jugs. Dainty, decorative jug covers were used to protect small jugs of milk or cream on Victorian tea trays. Larger, more utilitarian jug covers were used on jugs, pitchers and bowls to protect food and drink in the kitchen and pantry. Most Victorian jug covers were hand-crocheted from cotton with beads around the perimeter. The beads serve to weigh down the edges keeping the cover taut and in place.
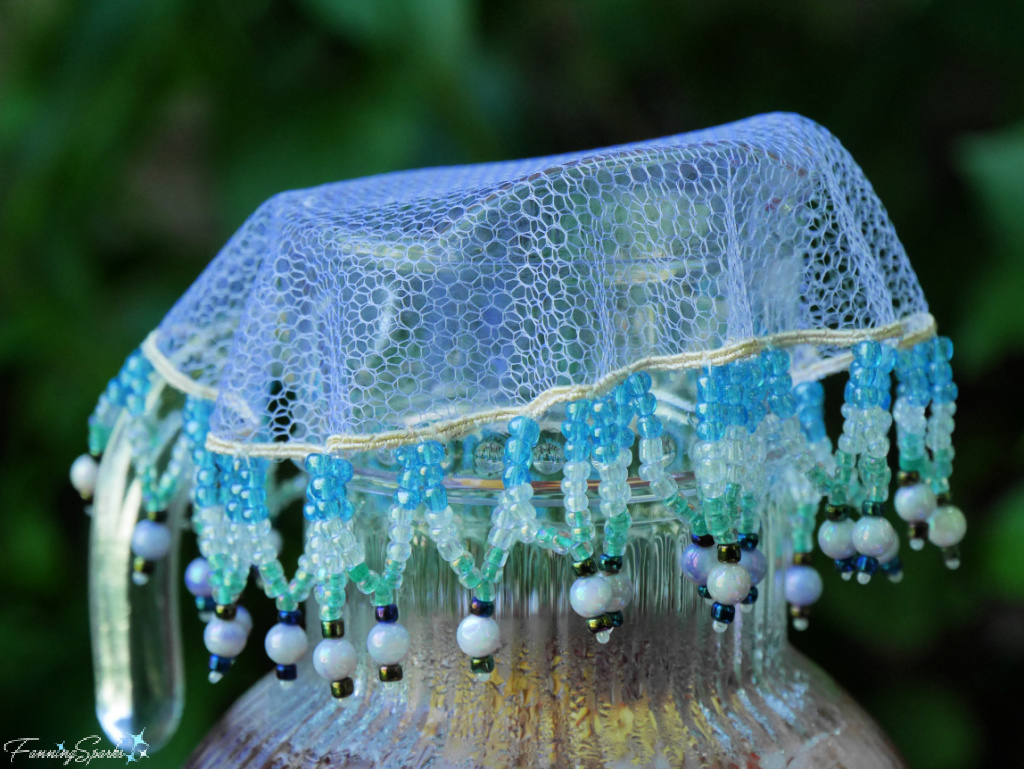
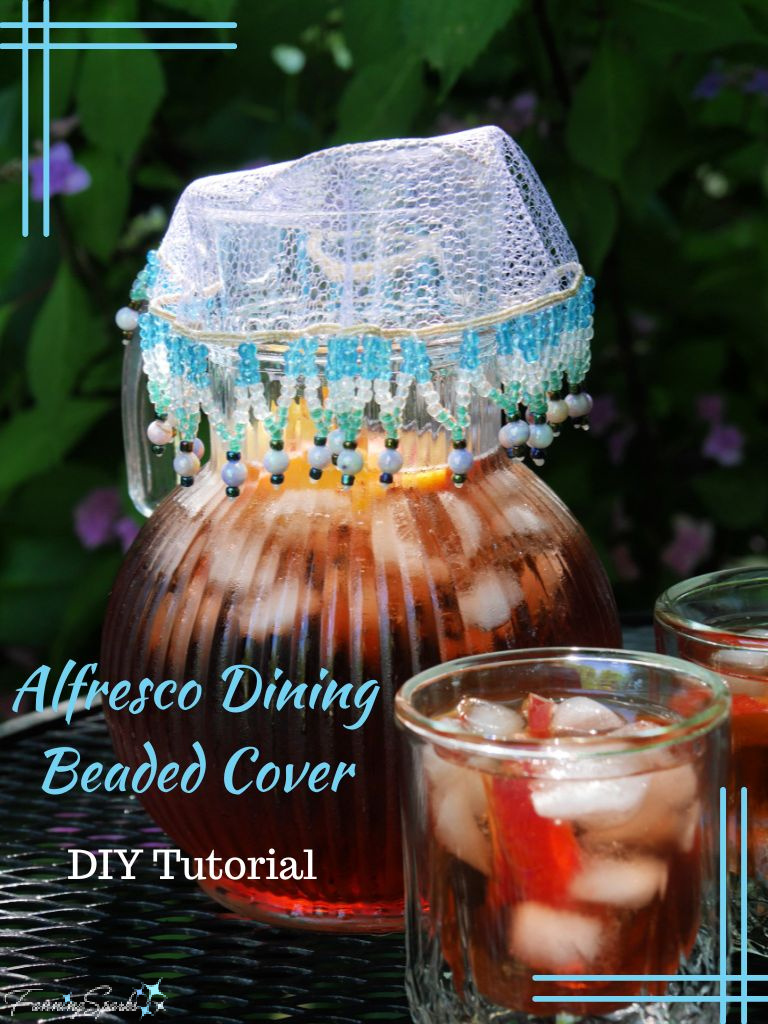
The jug cover, or “Alfresco Dining Beaded Cover” as I’ve dubbed it, featured in today’s blog post is similar to a traditional Victorian jug cover in that it serves the same purpose—it’s used to block insects and other debris from a container. It also has the same basic construction—circles of fabric netting are weighed down with decorative beading. It’s a modern twist on a traditional item.
 This is a fun, little project requiring only a few supplies and basic sewing and beading skills. Easy to follow, step-by-step instructions follow.
Supplies Needed
The following supplies are needed to make ONE Alfresco Dining Beaded Cover with a diameter of 7 inches.
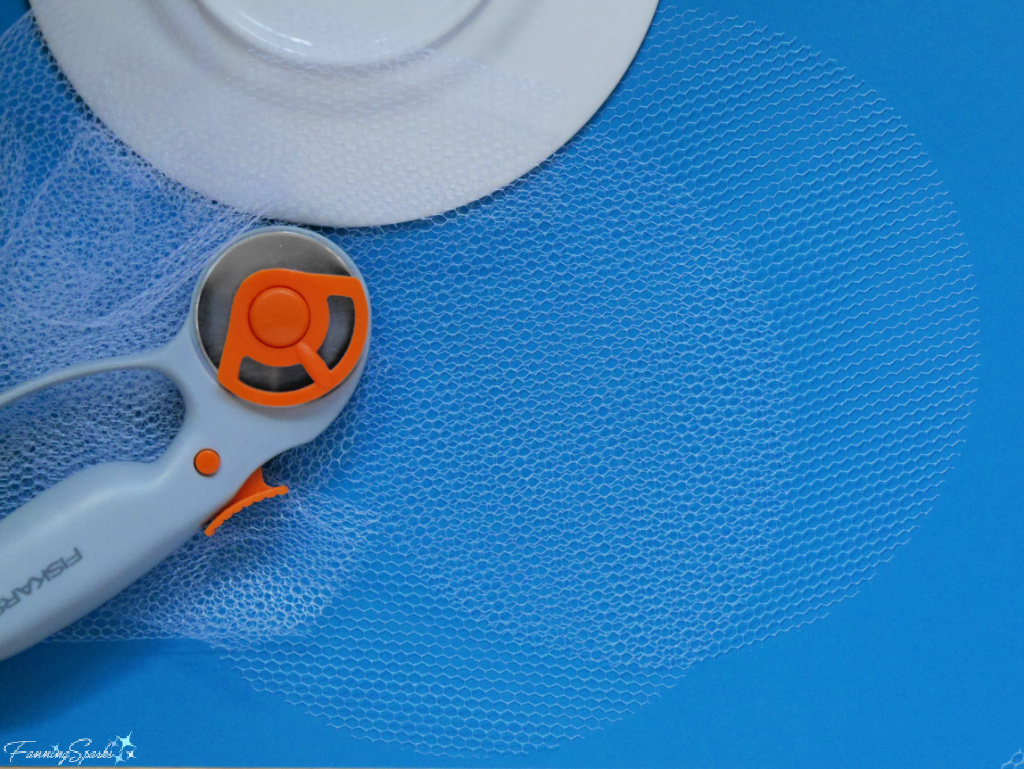
. Netting (or Tulle) Fabric: Approximately 8” x 15”. You’ll need enough netting to cut TWO 7” circles.
. Braid (or Cord): Approximately 22 inches of narrow, lightweight braid or cord. Choose a color and finish to make the braid blend in or stand out as you prefer. I sewed 22” of ⅛” wide braid around my 7” circular netting.
. Sewing Thread.
. Paper: To make a template.
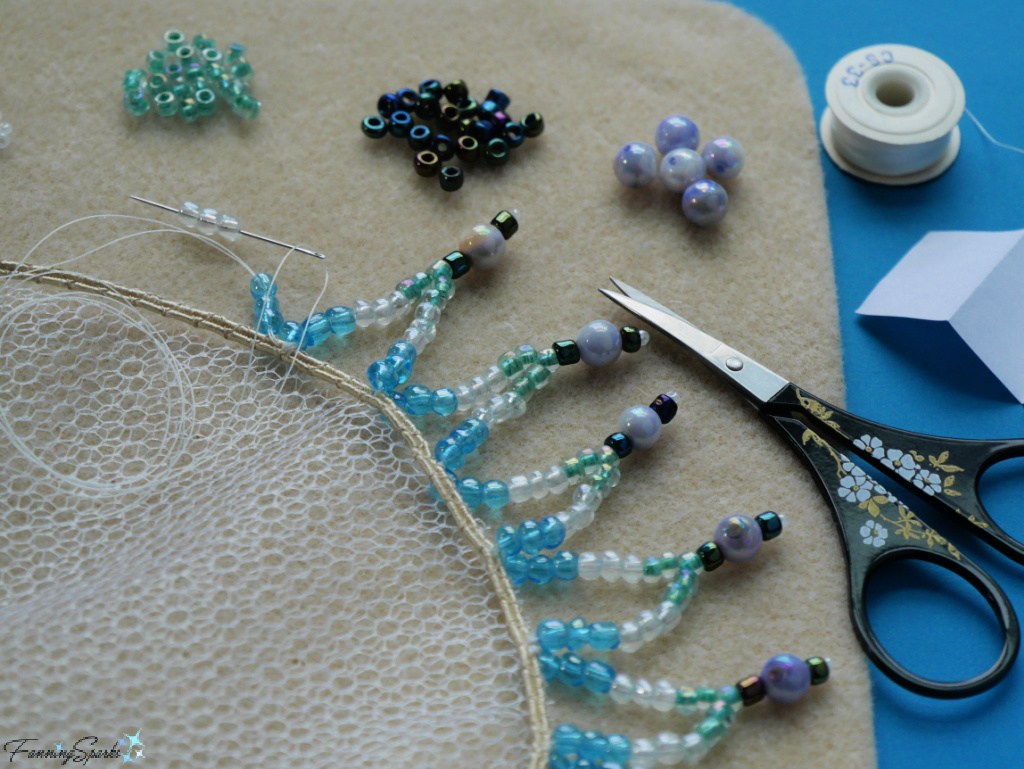
. Beads: A variety of beads in different colors and shapes. As a point of reference, the illustrated design required 630 beads including 570 6/0 glass seed beads, 30 6mm accent beads and 30 tiny seed bead anchors. See Step 5 Design Beading Trim (below) for suggestions and details.
. Beading Thread: Beading thread is usually stronger and smoother than regular sewing thread.
Equipment and Tools Needed
. Round Object: To trace around. Choose an item approximately 7” in diameter with a flat, outside edge such as a dessert plate.
. Iron: To press the netting.
. Rotary Cutter and Cutting Surface (alternatively use Fabric Scissors/ Shears)
. Straight Pins: Extra-long, flat-headed pins are best.
. Sewing Machine: With zigzag/overcast stitch and a specialty braiding or cording foot (ideal but not necessary).
. Small Scissors: For snipping threads.
. Pencil/Pen
. Beading Needle
. Beading Mat: A flat, textured surface that will prevent the beads from rolling around while also enabling you to sort beads into separate piles and load your needle without snagging. It can be as simple as a terry cloth hand towel or as fancy as a specialized beading mat from a bead shop.
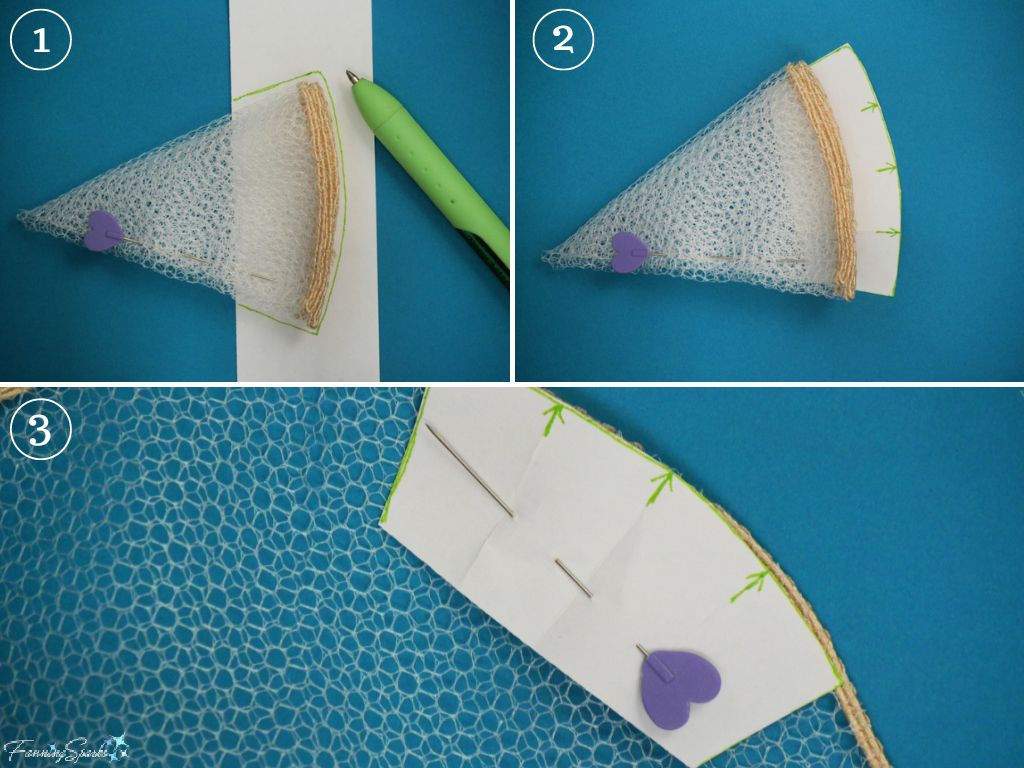
Step 1 Prepare Netting Press netting (or selected fabric) using low heat setting.
Step 2 Cut Netting Circles TWO identical circles of netting will be needed. A very easy way to cut these circles is to smooth the netting on a cutting surface. Then place a plate face down on the netting and hold it firmly in place with one hand. Use the other hand, to cut around the outside edge of the plate with a rotary cutter.
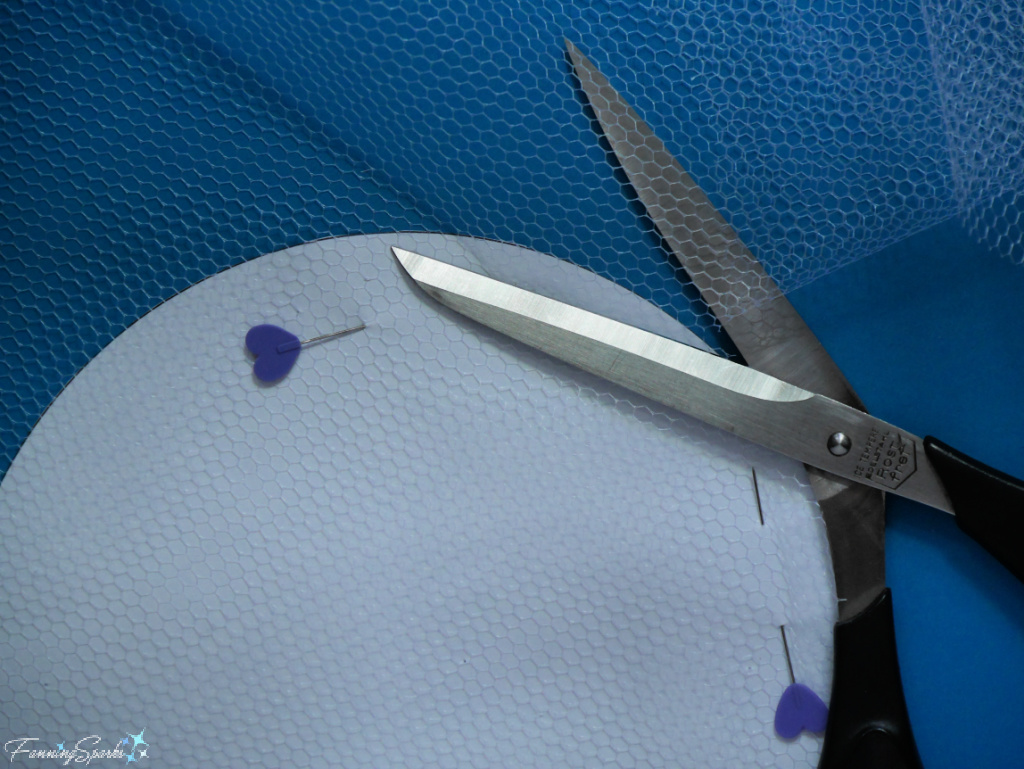
Alternatively, make a circular paper template and cut the netting with sharp scissors. I found it easier to cut accurately with the paper template pinned under the netting (rather than on top of the fabric in the standard way). Extra-long, flat-headed pins keep the netting in place.
 Step 3 Sew Netting Circles Together Lay one netting circle on top of the other rotating to ensure netting holes do NOT align. This increases the coverage of the finished beaded cover. Align edges of circles and pin with extra-long, large-headed pins.
A border of thin braid around the outside edge of the netting will add strength and stability. Set up your sewing machine for a zigzag stitch on light fabric. Position the thin braid over the edge of the netting aligned with the center of the zigzag stitch. Slowly zigzag around the outside edge of the netting circles.
A braiding or cording foot, if you have one for your sewing machine, is the ideal gadget for this step because the hole in the braiding foot is specifically designed to hold and feed the braid into exactly the right position.
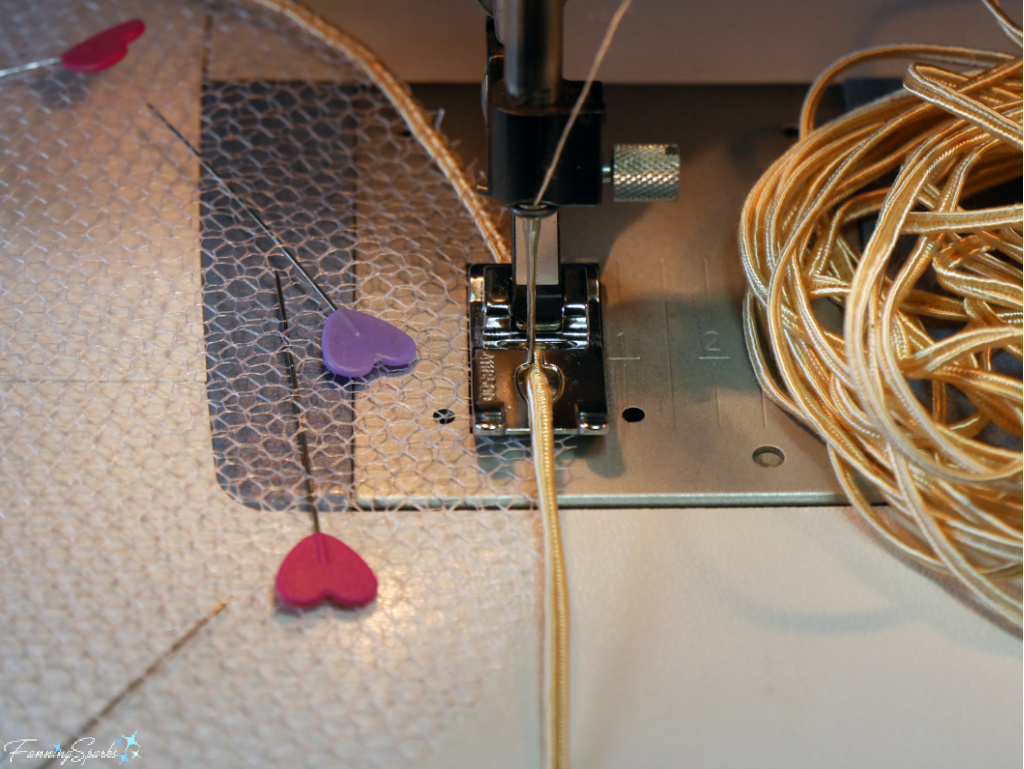 Use small, sharp scissors to trim any netting that shows beyond the edge of the braid.

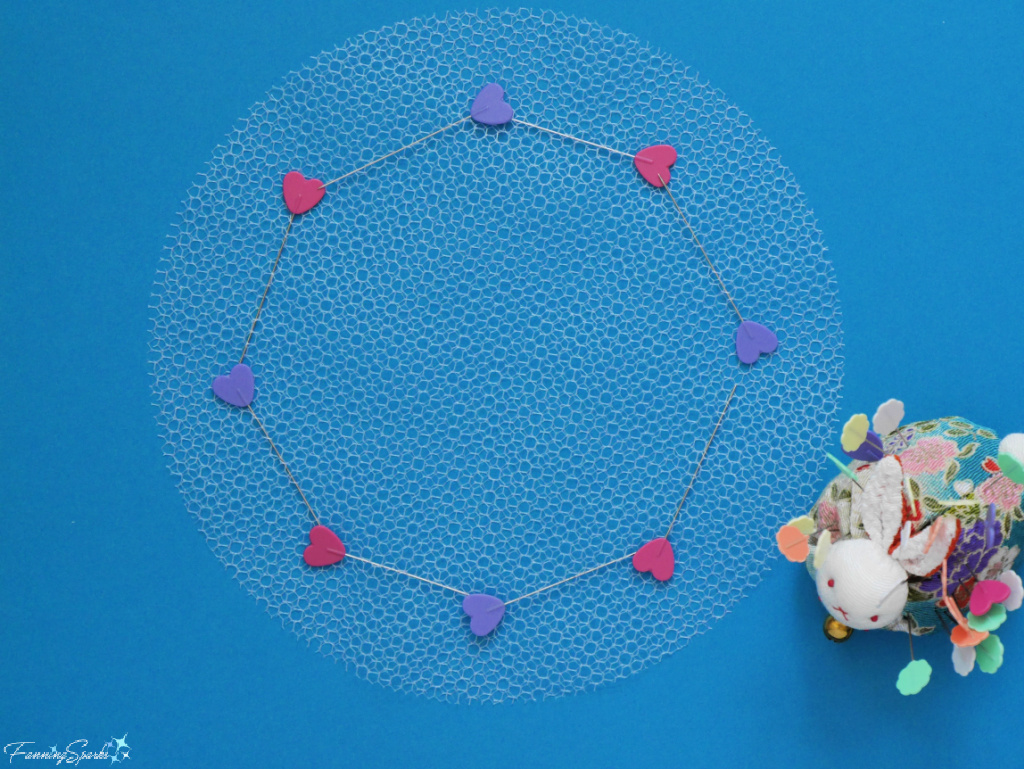
Step 4 Make Spacing Template Prepare to add bead trim to the netting by making a paper spacing template. Fold netting circle into equal halves, quarters and eighths. Trace the curved edge on a piece of scrap paper and cut out. Then fold paper into equal quarters to create 32 equal sections. This will result in 30 attachment points around the outside edge of the netting circle. Alternatively, you can adjust the spacing to create more or less attachment points.
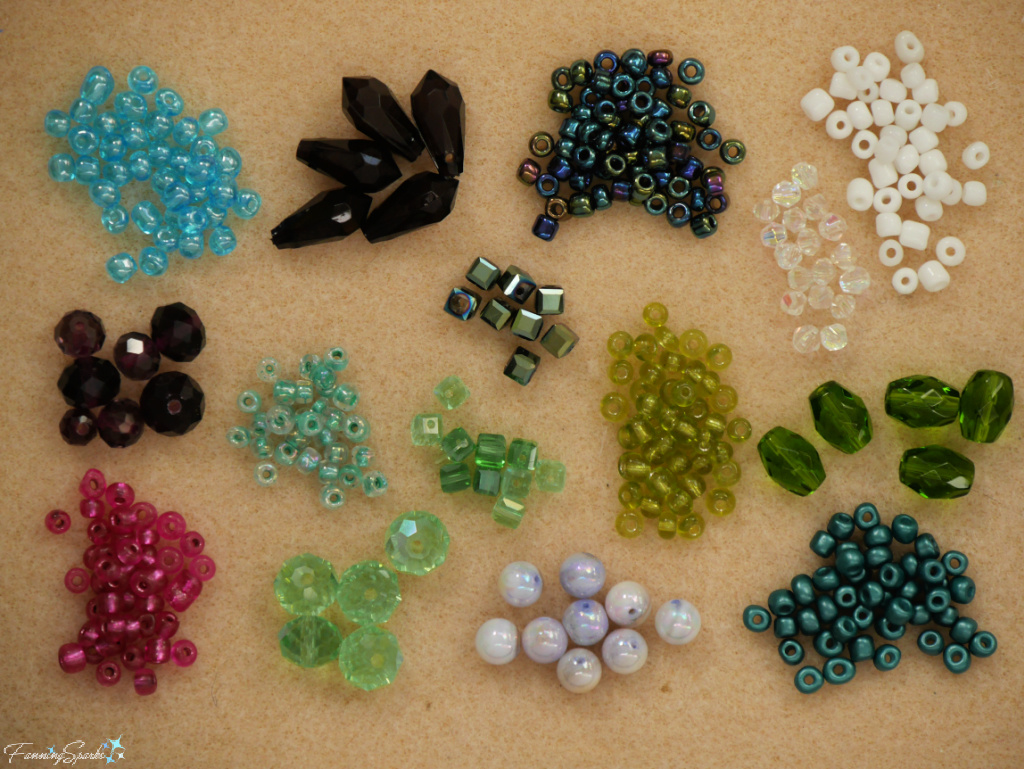
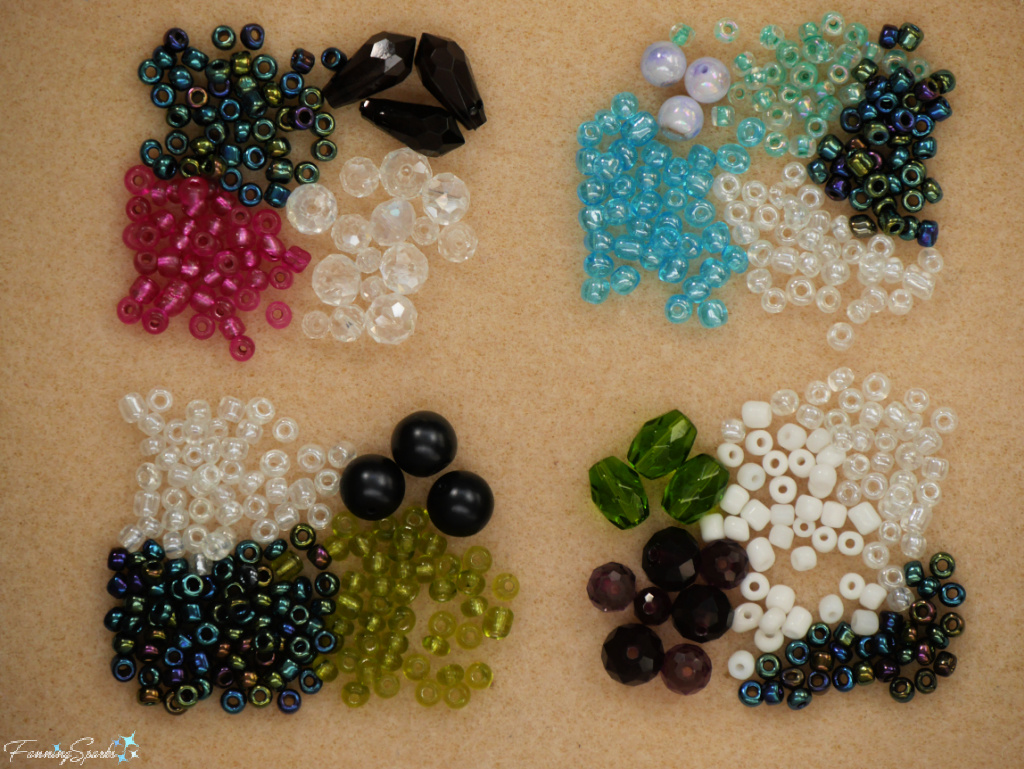
 Step 5 Design Beading Trim Beads are available in a vast variety of sizes, shapes, colors and materials. The number of beads you’ll need depends on your design. Unfortunately, it’s a bit of a chicken and egg situation—you won’t know how many beads to buy until you decide on a design but you can’t decide on a design until you buy beads.
Let’s use the demonstrated beading design as a point of reference. As described, each netting circle will have 30 attachment points. This design is based on a series of 30 V-shaped loops. There are 21 beads in every loop including SIX pale-blue 6/0 glass seed beads, SIX clear 6/0 glass seed beads, FIVE aqua 6/0 glass seed beads, TWO dark iridescent 6/0 glass seed beads, ONE pearlized 6mm accent bead and ONE tiny seed bead anchor. As a result, a total of 630 beads were used (180 pale-blue 6/0 glass seed beads, 180 clear 6/0 glass seed beads, 150 aqua 6/0 glass seed beads, 60 dark iridescent 6/0 glass seed beads, 30 pearlized 6mm accent beads and 30 tiny seed bead anchors).
Keep in mind, this is just an estimation. You’ll want to buy extras because beads vary in size and quality and some maybe flawed and unusable.
 To design your own beaded trim, start by laying out all your bead options so you can see what you have available. If you’re purchasing new beads for this project, you’ll essentially be doing the same thing with the options on offer.
 The next step is to consider combinations of beads. Which colors and shapes work well together? Which beads will be repeated? Which beads will serve as separators? Which beads will serve as accents? Consider colors, textures, sizes, shapes and combinations of factors. Here are a few possible combinations to get you started.
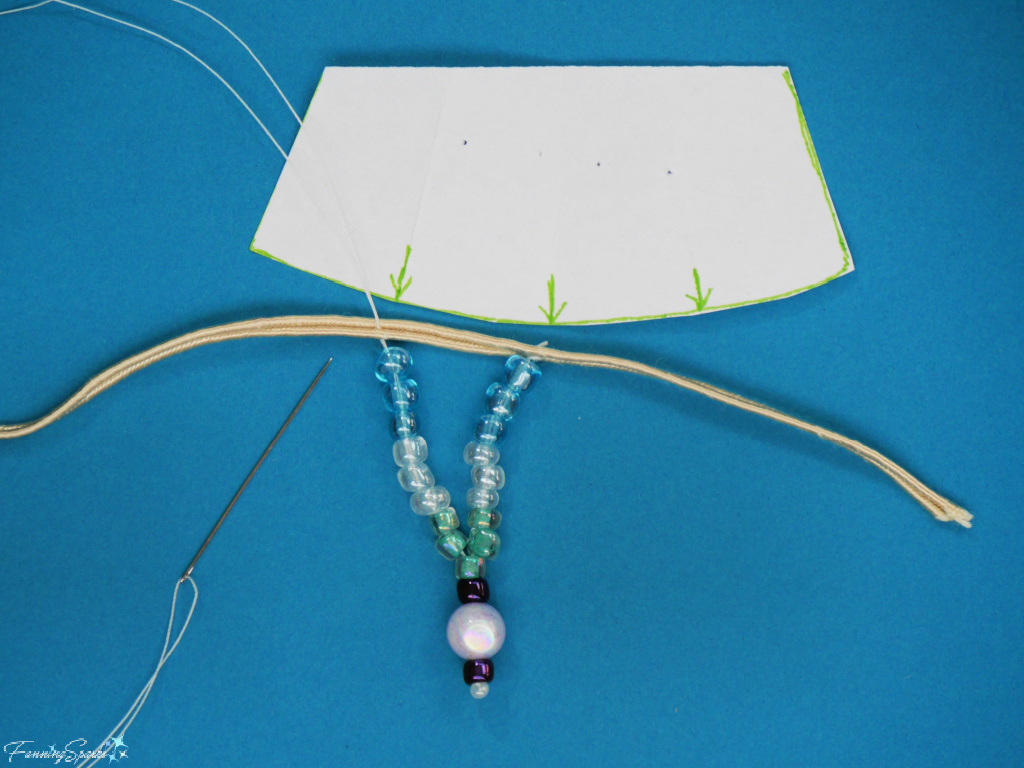
Step 6 Test Beading Design The next step is to design a motif with your selected bead combination. Your pattern will emerge when the motif is repeated in a defined order. Try a few different motifs. You can do this through hands-on experimentation or by drafting a pattern on paper. I tried both methods but found it most effective to just stitch up the options.
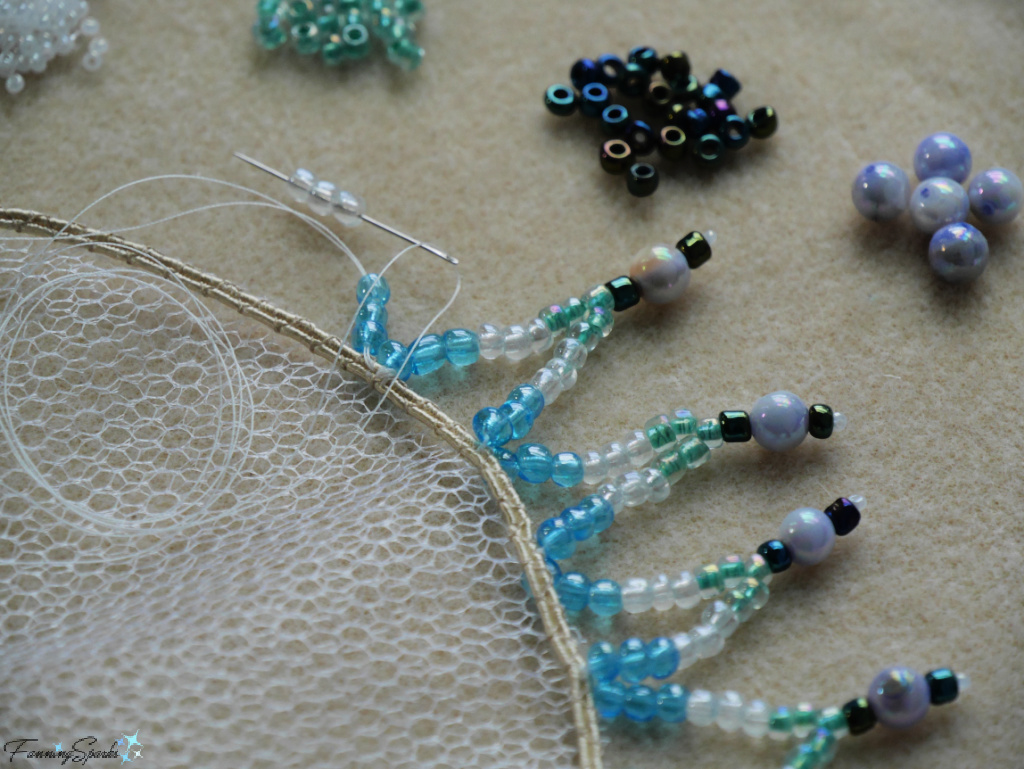
Use a short section of your braid to test your motif design. Cut about an arm’s length of beading thread and insert into a beading needle. Tie a small knot to prepare a double strand for stitching.
Take a small stitch in the braid to secure the end. Pick up the beads, in your defined order, onto the beading needle. Pull the needle through the beads pushing them snug against the braid. Then skipping the last bead so it anchors the strand, bring the needle back up through the other beads, picking up additional beads as needed, and return to the braid. Use the paper spacing template to determine the next attachment point (as shown below). Take a small stitch in the braid to attach and secure the thread.
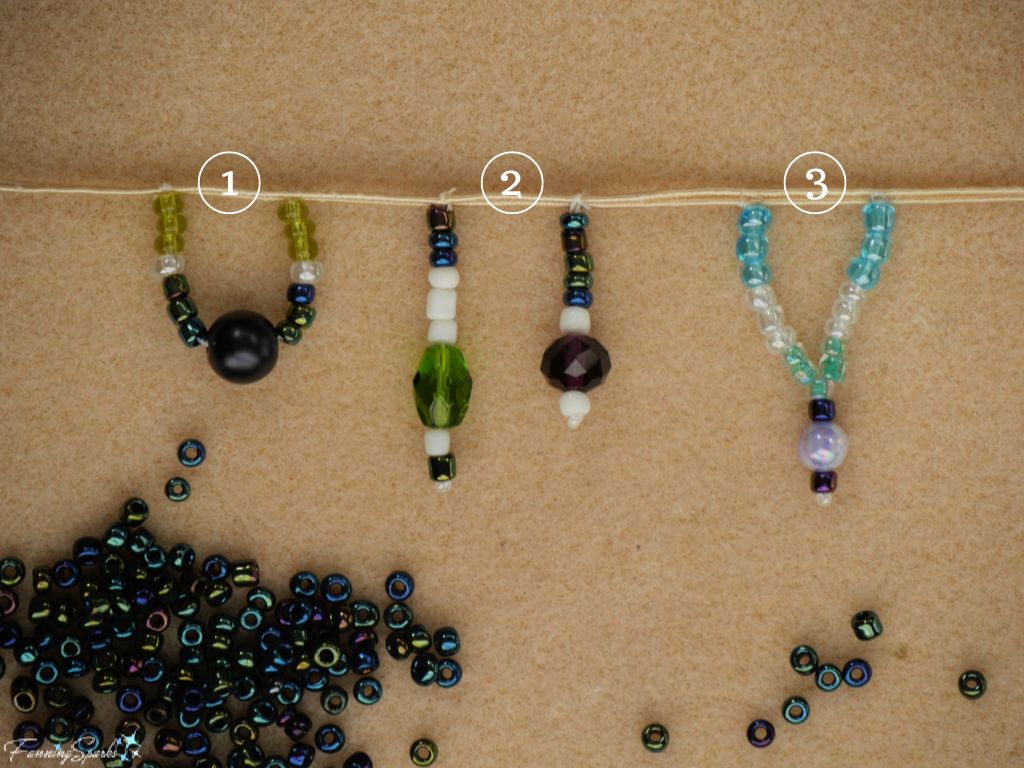
 Shown below are a few options for your consideration. The first example motif is a simple loop with a large, smooth black bead serving as the center accent. Example motif number 2 consists of a simple fringe with two alternating straight strands—one long and one short—made with repeating beads and complementary accents. Example motif number 3 is the one I selected. It is V-shaped loop with a large, smooth pearlized bead flanked by two dark beads as the center accent.
Hold up the braid to ensure the beaded trim hangs freely. Try to visualize your final pattern by imagining a series of motifs. Adjust as needed. Select your beading design.
Step 7 Stitch Beading Trim Following the same process described in Step 6 Test Beading Design, attach beads, in your selected design, all around the braid-trimmed edge of the netting circle. Use a double strand of beading thread. Secure the thread to the braid with small locking stitches. Pick up the selected beads on the beading needle. Pull the needle through and push the beads snuggly against the braid. Skipping the last bead so it will anchor the strand, bring the needle back up through the beads picking up additional beads as needed. Use the spacing template to determine the next attachment point, pull the needle through at this point, push the beads snuggly against the braid and take a small locking stitch. Repeat until all the beads have been stitched in place.
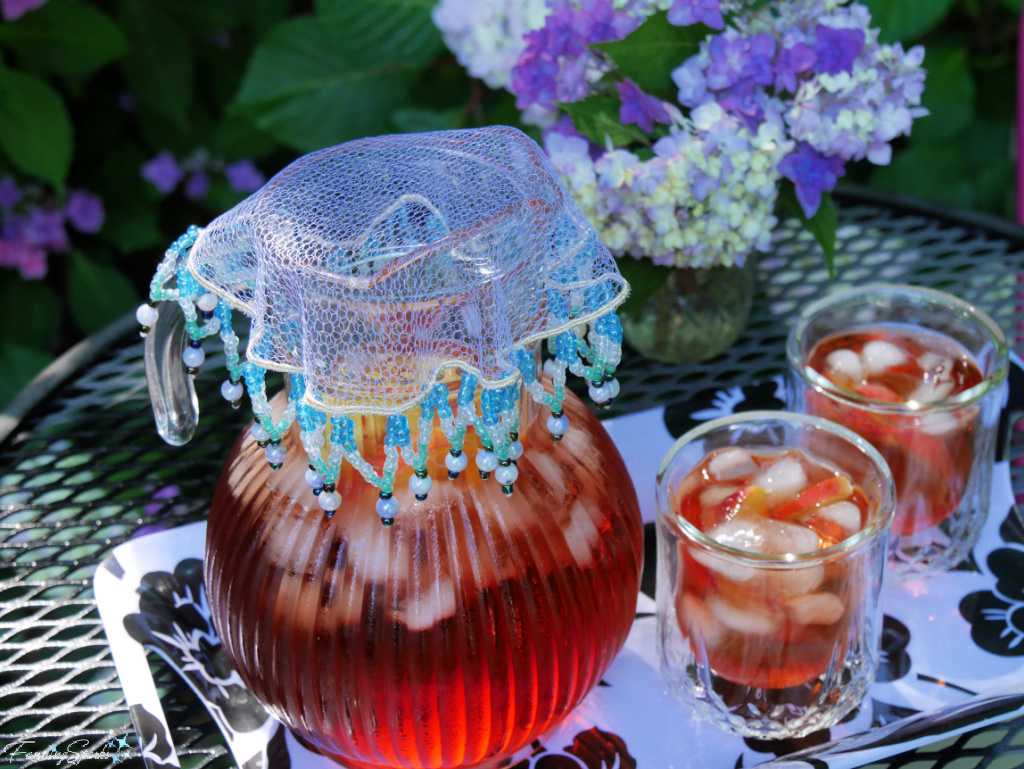
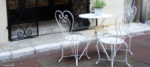
 Voilà! Your Alfresco Dining Beaded Cover is ready to use. Simply center the beaded circle over the top of your pitcher, jug or dish and let the beads fall down the sides to anchor it in place. As you can see, it easily adjusts to the size of the opening.
 Now, pour yourself a nice, cold ice tea and celebrate your accomplishment!
More Info
Please pin this image to share or save for future reference.
 The following were consulted in the writing of this blog post:
. The Complete Illustrated Guide to Beading & Making Jewelry book by Ann Kay.
. Decorative Beadwork book by Debbie Siniska which is available here on Internet Archives.
Today’s Takeaways
1. Jug covers were common in Victorian times when they were used to prevent bugs from getting into milk jugs.
2. The Alfresco Dining Beaded Cover is a modern twist on a traditional jug cover.
3. Consider following this tutorial to make your own Alfresco Dining Beaded Cover.


Comments are closed.